HILLTOPPER Discover Quick start guide

ASSEMBLY INSTRUCTIONS
Congratulations on the purchase of your new Hilltopper
Discover. This is a Class 2 electric bike with a variable
speed throttle and pedal assist. Both assist systems are
limited to 20 mph per class requirements.
This manual will help you finish assembling your bike.
Please feel free to take your bike to your local bike shop
if you are not comfortable aasembling it on your own.
SAFETY GUIDELINES
Wear a properly fitted bicycle helmet.
Make sure you understand how your bike works including shifting,
throttle power, and braking power.
Check your equipment. Before riding, inflate tires properly and check
that your brakes work.
Remain visible by wearing bright or reflective clothing, having proper
reflectors, and if possible, avoid riding at night.
Watch for and avoid road hazards.
RULES OF THE ROAD
Bicycles in many States are considered vehicles, and cyclists have the
same rights and the same responsibilities to follow the rules of the
road as motorists. When riding, always:
Go With the Traffic Flow. Ride on the right in the same direction as
other vehicles. Go with the flow – not against it.
Obey All Traffic Laws. A bicycle is a vehicle and you’re a driver. When
you ride in the street, obey all traffic signs, signals, and lane markings.
Yield to Traffic When Appropriate. Almost always, drivers on a smaller
road must yield (wait) for traffic on a major or larger road. If there is no
stop sign or traffic signal and you are coming from a smaller roadway
(out of a driveway, from a sidewalk, a bike path, etc.), you must slow
down and look to see if the way is clear before proceeding. This also
means yielding to pedestrians who have already entered a crosswalk.
Stay Alert at All Times. Use your eyes AND ears. Watch out for
potholes, cracks, wet leaves, storm grates, railroad tracks, or anything
that could make you lose control of your bike. You need your ears to
hear traffic and avoid dangerous situations; don’t wear a headset
when you ride.
For riders over 10 Years of Age. The safest place for bicycle riding is
on the street, where bicycles are expected to follow the same rules of
the road as motorists and ride in the same direction.
RMME ORD AEY ECUTOS
T TE IESADPDSRAS N
EJYDSOEIGNWAVNUES!
sales@hilltopperbikes.com
920 SOUTH HOLGATE STREET STE. 106 SEATTLE WASHINGTON 98134
CAGN H ATR
TO CHARGE THE BATTERY PRIOR TO FIRST USE:
Remove the battery from the frame using the
supplied keys.
Charging Instructions:
1. Plug the charger into a wall socket.
2. Wait for the charger light to turn GREEN
3. Plug the charger into the battery.
4. The light will turn RED and stay RED while charging.
5. When the light turns GREEN your battery is charged.
The battery button activates LEDs that indicate the
charge level.
Blue = Full
Green = Half full
Red = Empty
More accurate charge info is visible on the LCD screen.
ISALTEBTEY
ONCE THE BIKE IS ASSEMBLED
1. Place the battery into the downtube, aligning the
bottom end first.
2. The LEDs will be facing outward and positioned
towards the headtube near the lock.
3. Once everything is lined up you can snap it into place.
(Make sure it is secure.)
PWRADLDSRE
Press and hold the orange button on the top of the LCD
screen to turn on.
The bike has 5 levels of pedal assist, with 0 being
no assist.
The variable speed throttle can be used at any time,
the amount of power from the throttle is dependent on
the level chosen.
SITN
The right hand trigger/lever shifts between the 9 gears
on the rear wheel.
Pulling the lower trigger shifts to smaller/”higher”
/harder gears.
Pushing the upper lever shifts to larger/”lower”
/easier gears.
UBXN
1. Remove all contents including:
Bike, Front wheel, Rack, and Small Box that
contains your Pedals, Battery Charger, Quick
Release Skewer and all the Tools you will need
to complete the assembly
2. Remove all the plastic pieces covering the axles, they
are not part of the bike.
3. Locate and remove zip-ties holding wheel, without
letting it fall. Set the wheel to the side.
4. Remove other zip ties and packing materials, careful
not to let the cables twist too much.
5. Remove and charge battery.
FI OBC O
SATBK SEBY
LTSGT
SATD
INSTALL HANDLEBAR
1. Turn the stem 180º degrees so it points forward.
The forks will turn with the stem.
2. Use the 4mm wrench to remove the four bolts and
the front plate of the stem.
3. Set the handlebar in stem with the LCD screen and
throttle on the left side of the bike.
4. Align and center the handlebar and replace the
faceplate and four screws. Tighten to 6nm.
INSTALL THE SEATPOST
1. Insert the seat post into the seat tube.
2. Set to desired height and tighten using the included
5mm allen wrench. .
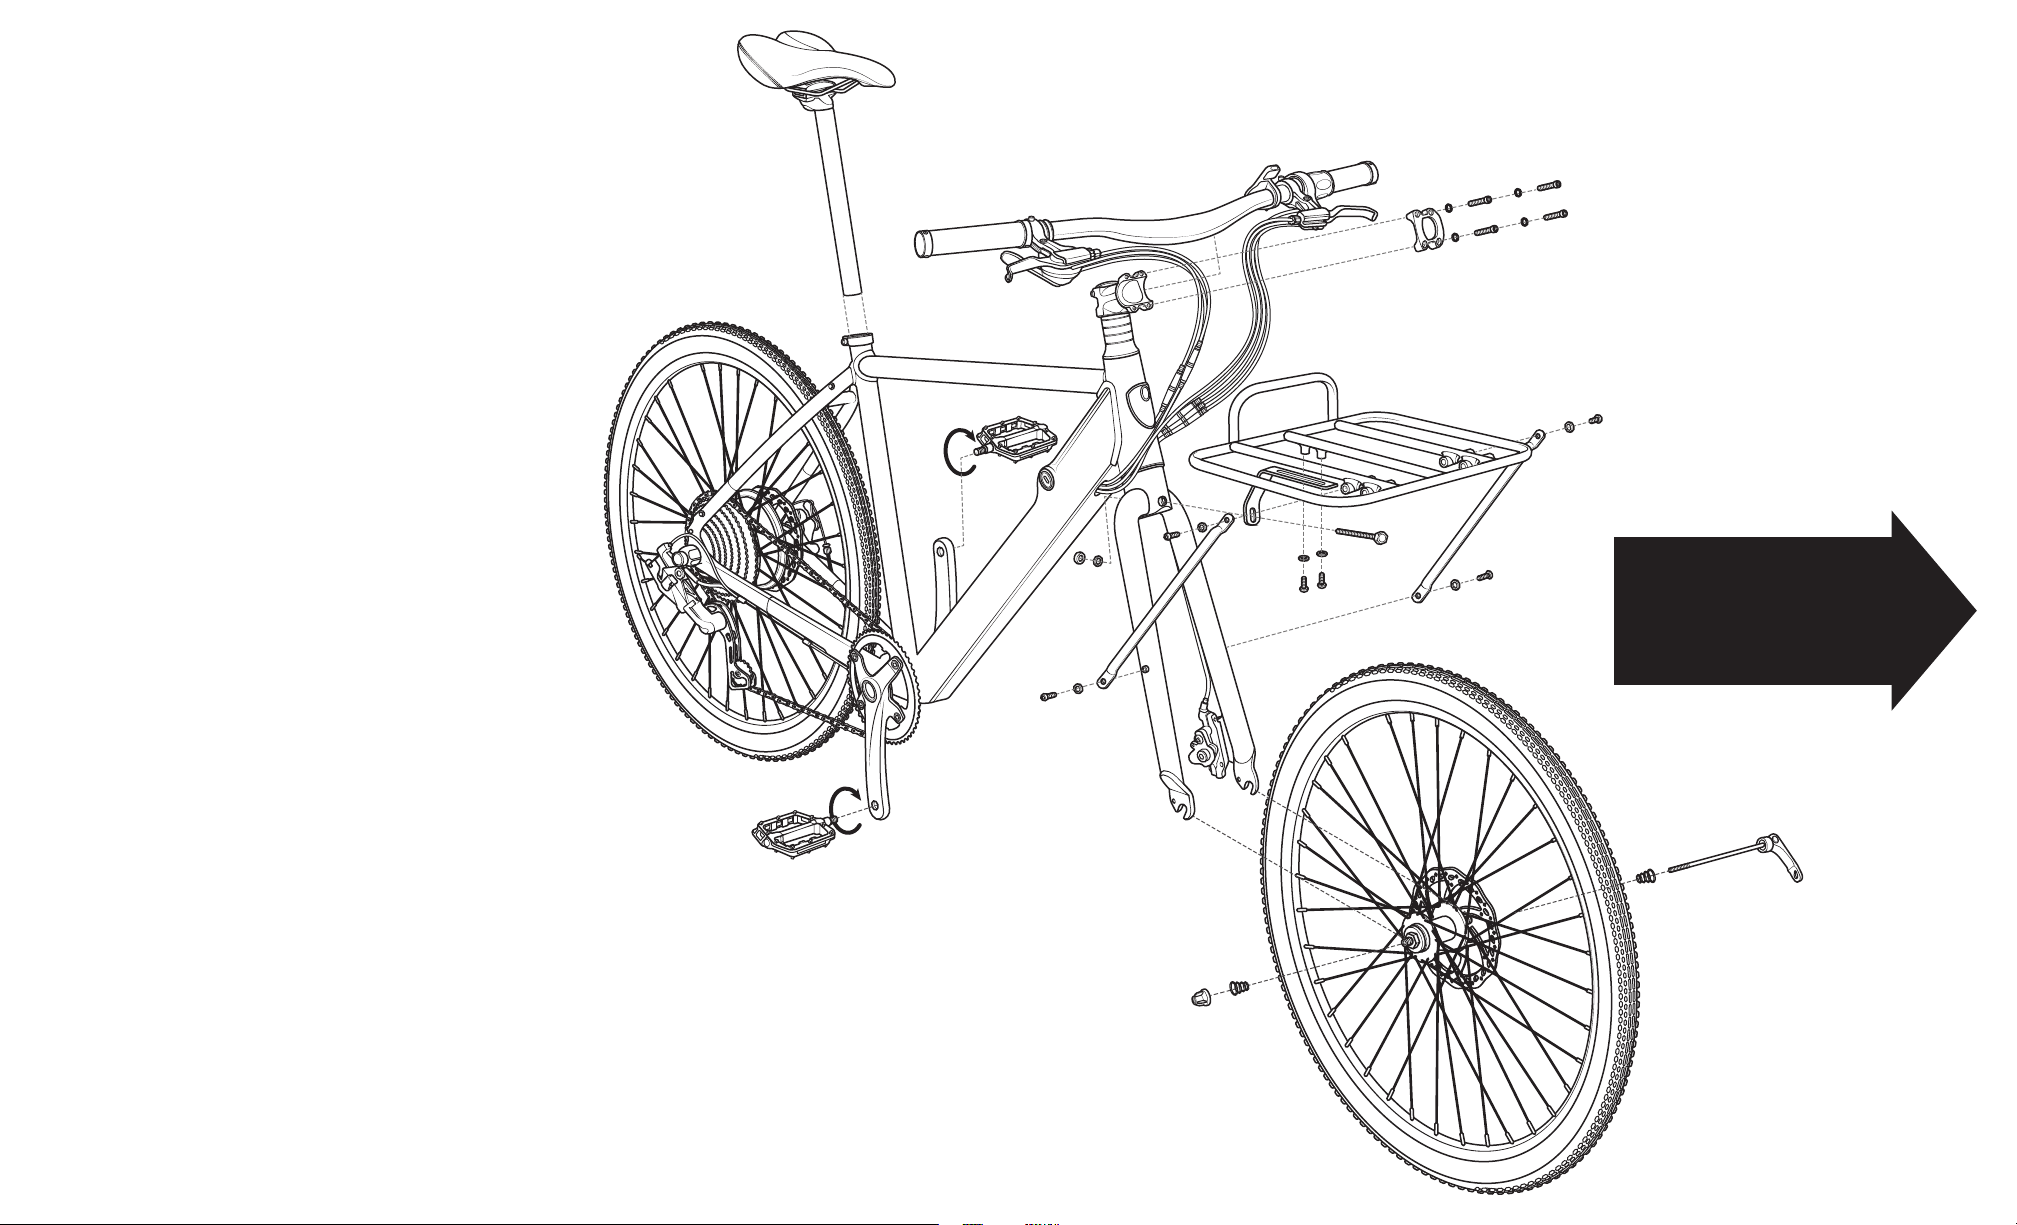
INSTALL THE FRONT WHEEL
1. Slide the front wheel into the fork dropouts with the
disc rotor on the left side of the bike.
2. Make sure the axle is aligned straight and use the
quick release skewer to secure it in place. The quick
release lever goes on the left side of the bike.
3. Inflate tires to recommended (or preferred) pressure.
POSITION LCD SCREEN
1. Using the 2.5mm allen wrench, loosen the bolt and
rotate the LCD screen to your desired position.
2. Make any personal adjustments to ensure you can
easily view the LCD before you ride.
INSTALL THE PEDALS
On the pedals there is a small “R” for right and a
small “L” for left, to let you know which side of the
bike the pedal belongs to. Use the provided 15mm
wrench to tighten the pedals.
1. The right pedal has regular threading.
(“righty tighty lefty loosey”)
2. The left side is reverse threaded so it’s the opposite.
Hint: Both pedals tighten by rotating them towards
the front of the bike.
INSTALL OPTIONAL RACK
Install the optional rack using the supplied hardware
to the pointing points on the bike as shown in the
assembly diagram
BK SEBY
WE IIHD
FI OFOTFR
BTEYISAL


