HiWeigh PH User manual

PHS


1
Warning
In electrical connection of controller, please cut off the power
supply in advance. Wait for 30 seconds between power-on of the
controller for 2 times.
Pay Attention to Static Electricity
The controller is a device sensitive to static electricity, thus please
take anti-static precautions in use and maintenance.
Warning
Ask professional personnel to debug, detect
and repair controller.
Warning
Please keep good grounding of controller.

2
Contents
ITECHNICAL INDICATORS.......................................................................................................3
II MAIN FUNCTION......................................................................................................................3
III BOUNDARY DIMENSION ......................................................................................................3
IV INTRODUCTION TO PANEL .................................................................................................4
VPARAMETER SETTING ...........................................................................................................5
SETTING ENTRY................................................................................................................................5
F1 Parameter Setting of Sca ............................................................................................ 5
F2 APPLICATION FUNCTION SETTING ....................................................................................7
F3 ENERGY-SAVING PARAMETER SETTING ...........................................................................8
F4 SERIAL-PORT SETTING...........................................................................................................8
F5 MAINTENANCE AND SERVICE .......................................................................................................9
VI FUNCTION DESCRIPTION ..................................................................................................10
VII Prompt Message of Instrument..............................................................................................11
APPENDIX 1. CONTINUOUS OUTPUT FORMAT SPECIFICATION ................................12
APPENDIX 2. PRINTING FORMAT SPECIFICATION .........................................................14

3
I Technical Indicators
●6-digit 1.2-inch LED display, 7 state indicator lamps. Long service life and shock
resistance
●7functionkeys.Operationissimple and convenient
●Protectionlevel:IP5x
●Excitationvoltage:+5VDC
●Loadcapacityofsensor:atmost4350Ωsimulation sensors
●Inputsignalrangeofnullpoint:0-5mV
●Inputsignalrangeoffullscale:1-10 mV
●Innerresolution:1million
●Weightupgradingrate:40timespersecond
●Powersupplymode
Battery: 6V4Ah
Adapter: voltage 100-240VAC Current 0.1A Frequency 50-60Hz.
●2RS232ports
●Operatingtemperature:-10-40, relative humidity is below 85 %
●Storagetemperature: -20-60, relative humidity is below 85 %
●Conformingtostandard:GB/T7724-1999
II Main Function
●Basicweighingfunction:resetting,removingthepeelandclearingthepeel
●Weightdetectionfunction,countingfunction,animal scale function
●Weightkeepingfunction,weightaccumulationfunction,percentagedisplay
●Setredundantbackupfunctionofparameters
●Automaticscreenprotectionandautomaticshutdownenergy-saving function
●Richprinting formats and communication protocol
III Boundary Dimension
Instrument size: detailed in the following figure (mm); instrument weight: 1.5kg

4
IV Introduction to Panel
●Introductiontoindicatorlamps
Identificati
on
Analysis
Remark
6
Dynamic and static indication
The lamp is on when scale is in dynamic state, otherwise, the
lamp is off
Zero center indication
The lamp is on when the absolute value of weight on the scale
is less than ±0.2d, otherwise the lamp is off
Net
Identification of gorses weight and
net weight
The lamp is on in net weight and off in gross weight
lb
Weight unit
For indicating current unit
kg
Hold
Weight maintenance
The lamp is on when the weight is locked, otherwise it is off
Ac
Voltage indication of battery and
power supply
The green lamp is on when the voltage of the adapter and
battery is normal, and the red lamp is on in undervoltage state
Introduction to operation keys
Operation without special specification refers to short press on keys.
Key symbol
Normal weighing state
Set stage
Weight maintenance key
Short press→F2.1 = 1, keep/cancel.
F2.1 = 2, switch between percentage and
weight.
F2.1 = 5, switch between quantity and
weight.
Long key→enter setting menu.
Return to the last menu.
Accumulation key
Short key →F2.1 = 4, include display weight in
accumulation value.
Long key →F2.1 = 3, select scale to sample target
weight.
F2.1 = 4, accumulate weight of scale
display.
F2.1 = 5, count sampling of scale.
No definition.
Unit conversion key
Short key →in weighing state, switch weight unit.
The corresponding unit indication lamp is
on.
Flicker bit is on the left.

5
Skin removal key
Short key →net weight turns to gross weight;
induction lamp of net weight “Net” is off.
Flicker bit is on the right.
Skin removal key
Short key →gross weight turns to net weight.
Indication lamp of net weight “Net” is on. Conduct
skin removal operation for multiple times.
Digit flicker position
reduces.
Zero clearing key
Gross weight state resets weight. When the scale is
in net weight, dynamic state, saving state and out of
resetting range, zero clearing operation is invalid.
In setting, digit of flicker
position increases. In
adjustment of display,
accumulation is cleared.
Printing key
Short key →start up or print.
Printing format refers to Appendix1.
Long key →shut down.
Confirm operation, to save
setting data.
V. P a r a m e t e r S e t t i n g
Setting entry:
Press the [Hold] button on the operating panel in the state of normal weighing.
If F1.14 = 0, you can set all the parameters within F1~F5.
If F1.14 = 1, you can only set all parameters within F2~F5.
If F1.14 = 1 and you need to set the parameters within F1 menu, you can press the
calibration switch button until the F1 menu is entered.
F1 Parameter Setting of Scale
F1.1 Measuring Range
Selectable parameters: 3~200000 (default value: 6)
F1.2 Decimal Places
Selectable parameters: 0 ---- no decimal point
0.0 ---- 1 decimal place
0.00 ---- 2 decimal places
0.000 ---- 3 decimal places (default value)
0.0000 ---- 4 decimal places
F1.3 Number of Divisions

6
Selectable parameters: 1 (default value), 2, 5, 10, 20, 50
F1.4 Calibration Unit
Selectable parameters: 0 ---- kg (default value)
1 ---- lb
F1.5 Gravitational Acceleration
Selectable parameters: 9.7000069.99999. Default value = 9.79455.
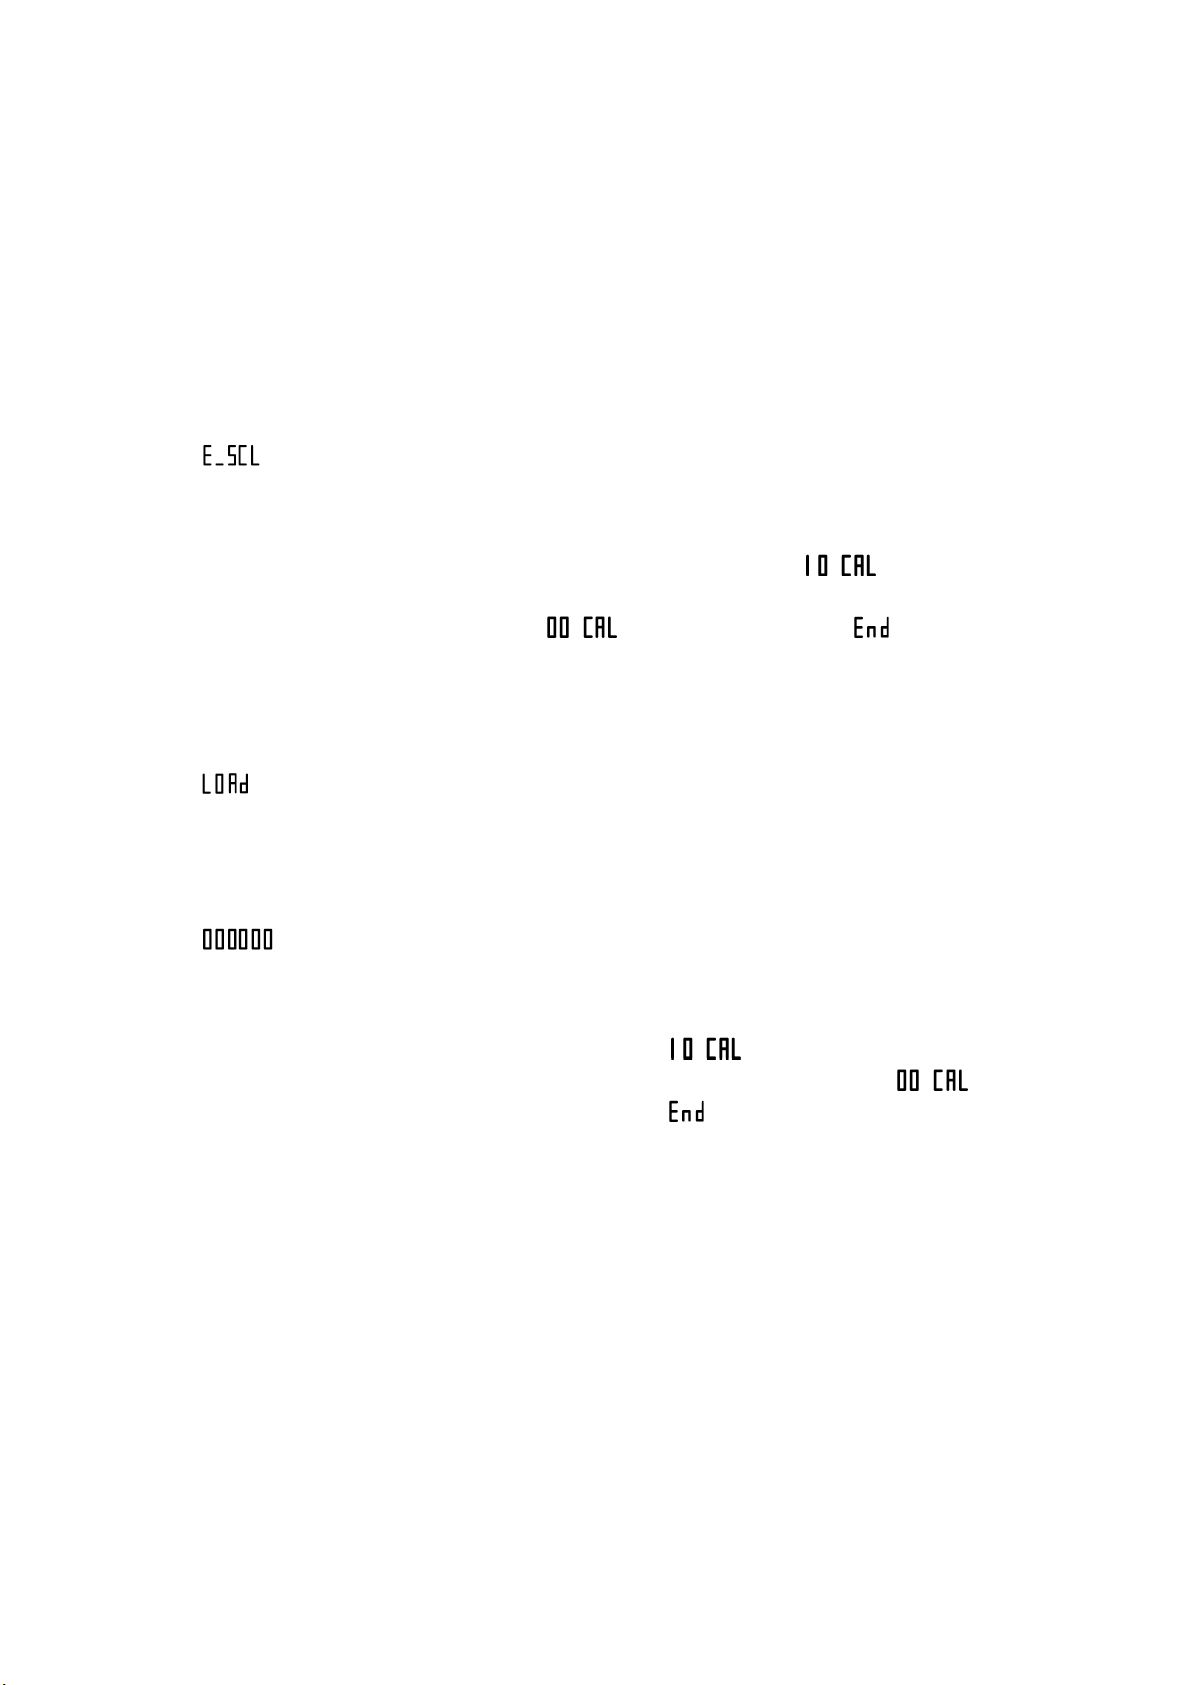
F1.6 Null-point Calibration
Keeping empty the scale
Remove the weights on the weighing platform to
guarantee the scale is in the empty state. Press the [Print]
key and the meter will display [ ]. The displayed
digits will reduce slowly until the meter displays
[]. In the end it will display [ ] for one
second, which indicates the end of null-point
calibration.
F1.7 Load-point Calibration
Loading weights
Load weights on the weighing platform to ensure that 10% of full-scale value ≤weight of weights
≤full-scale value, and then press the [Print] key to start the
next step.
Entering the same weight value as that of the loaded weights.
Entering the same weight value as that of the loaded weights,
please press the [Print] key after the scale becomes stable, and
the meter will display [ ]. After that, the displayed
digits will reduce slowly until the meter displays [ ]. In
the end it will display [ ] for one second, which
indicates the end of null-point calibration.
F1.8 Automatic Null Tracking
Selectable parameters: OFF, 1 d, 2 d, 3 d (default value)
F1.9 Automatic Reset Range at Startup
Selectable parameters: OFF, 2 %, 10 %, 20 % (default value)
F1.10 Button Reset Range
Selectable parameters: OFF, 2 %, 10 % (default value), 20 %
F1.11 Digital Filter
Selectable parameters: 0 ---- Mild Filtering

7
1 ---- Moderate Filtering (default value)
2 ---- Severe Filtering
F1.12 Steady Range
Selectable parameters: 1 d, 2 d, 3 d (default value)
F1.13 Overload Display Range
Selectable Parameters: 9d, 5% (default value), 10%, 20%
F1.14 F1 Menu Protection
Selectable Parameters: 0 ---- Enter F1 menu by keyboard operation
1 ---- Enter F1 menu by pressing the calibration
button
F1.15 Restoring Factory Default
Set the parameters within F1~F4 as the defaults, which can’t impact the parameters of
standard scale.
F2 Application Function Setting
F2.1 Function Selection
Selectable Parameters: 0 ---- Close the application functions (default value)
1 ---- Weight keeping function
2 ---- Percentage display function
3 ---- Weight checking and sorting function
4 ---- Accumulative scale function
5 ---- Counting scale function
6 ---- Animal scale function
F2.2 Empty-scale threshold value
Selectable Parameters: 0~ full range (default value: 0.001)
F2.3 Target Weight for Weight Checking and Sorting
Selectable Parameters: 0~ full range (default value: 2.000)
F2.4 Positive Error for Weight Checking and Sorting
Selectable Parameters: 0~ full range (default value: 0.100)
F2.5 Negative Error for Weight Checking and Sorting
Selectable Parameters: 0~ full range (default value: 0.100)
F2.6 Access to Target Weight for Weight Checking and Sorting, and Counting
Sample Weight

8
Selectable Parameters: 0 ---- Access to Platform Weighing (default value)
1 ---- Manual Input Access
F3 Energy-saving Parameter Setting
F3.1 Time-out Screensaver Time Setting
Selectable Parameters: 0~ 99 minutes, (default value: 30 minutes)
If set to be 0, this function shall not be allowed.
During the screen protection, the display will randomly show “ ”.
F3.2 Energy-saving Time Setting for Auto Power-off
Settable Parameters: 0~250 minutes. (default value: 150 minutes)
If set to be 0, this function shall not be allowed.
F3.3 Display Brightness Control
Selectable Parameters: 0---- low light level
1 ---- middle light level (default value)
2 ---- high light level
F4 Serial-port Setting
F4.1 Setting of UART0 Communication Interface Parameter
F4.1.1 Communication Mode
Selectable Parameters:
---- no output (default value)
---- continuous output protocol A
---- continuous output protocol B
---- continuous output MT
---- firm output protocol A
---- firm output protocol B
---- key dispatch protocol A
---- key dispatch protocol B
F4.1.2 Setting of Data and Check Pit
Selectable Parameters: 8_N_1 ---- 8-pit no parity check (default value)
7_E_1 ---- 7-pit odd parity check
7_O_1 ---- 7-pit even parity check
8_E_1 ---- 8-pit odd parity check

9
8_O_1 ---- 8-pit even parity check
F4.1.3 Baud Rate
Selectable Parameters: 1200, 2400, 4800, 9600 (default value)
F4.1.4 Continuous Output & Delivery Parity Check and Character (only for F4.1=3)
Selectable Parameters: 0 ---- no delivery (default value)
1 ---- delivery
F4.1.5 Bluetooth Node Setting (effective only when Bluetooth module option
is configured)
Selectable Parameters: xxxxi01~xxxx99 (default value: xxxx01)
F4.2 Parameter Setting of UART1 Printing Interface
F4.2.1 Whether to connect the printer
Selectable Parameters: 0 ---- not connected to the miniprinter (default)
1 ---- connected to the miniprinter
F4.2.2 Printing Carriage Return Character
Selectable Parameters: 0~9 carriage return characters (default value: 3)
F4.2.3 Printing Setting of Accumulative Scale
Selectable Parameters: 0 ---- total accumulative data for printing
(default value)
1 ---- printing detail + total accumulative data
F5 Maintenance and Service
F5.1 Key test
Instrument display , pressPrint, Zero, Tare,
Gross, lb/kgand Totalin order, and the instrument displays
, , , , and
, press Holdto quit key test.
F5.2 Display screen test
All strokes of meter display will have self-inspection, to observe
whether there is lacks of strokes.
Press Holdor Printto quit test of display screen.
F5.3 Display current internal code
The display will show internal code of current instrument after
smoothing. Press Holdor Printto quit the interface.

10
VI Function Description
●Weight maintenance function F2.1 = 1
Operation method
In normal weighing state, press Holdon the operation panel, the will
instrument lock display weight of the current scale, and “Hold” indication
lamp is on. Only when weight setting value≥F2.2 is displayed, weight
maintenance operation is effective. Otherwise, it will return to weighing state
after invalid operation information ] is shown for a second.
If weight is in locked state, pressHoldagain to cancel locking of weight and
return to normal weighing state, and “Hold” indication lamp is off.
If it is in weight locking state, refuse to remove skin, clear skin and zero setting
operation.
●Percentage display F2.1 = 2
Display specification
Display , representing 20.5 %.
Pr = current actual weight / range ×100%.
Press Holdto display switch in percentage and weight.
●Check weight and selection scale function F2.1 = 3
Function description
Set parameters such as F2.2 = A, F2.3 = B, F2.4 = C and F2.5 = D.
When display weight is X.
If X ≤A, do not conduct check weight and selection. 7
If X 4(B – D), it lacks of weight, and the display flickers.
If (B – D) ≤X ≤(B – C), it is qualified and the display has normal display
If X 5(B – C), it is overweight and the display flickers.
Acquisition of target value
Press Totallong until the display showsTARGET, and then pressPrint
to show current target value and flicker.
If F2.6 = 0, press Print, the instrument will take the weight on current scale as
the new target value and quit the setting interface.
If F2.6 = 1, the display shows , to request manual change of target value.
After change, press Printto save setting data and quit setting interface.
Function of accumulation scale F2.1 = 4
Operation method
In normal weighing state, when the scale is in zero, add weight to the scale and
pressTotalon operation panel, if the display shows progress
bar, it indicates that the current display weight is included accumulated value,
and then it returns to normal weighing state. If the display shows
for a second, and returns to the normal weighing state, it indicates operation is
invalid. Reason: 1. Between two accumulation operations, the scale must have
back-to-zero process, otherwise, accumulation is refused. 2. Accumulation
operation is effective only when display weight≥F2.2 is set. 3. The scale is in

11
dynamic state.
Adjustment, clearing and printing of accumulated value
In normal weighing state, press Totalon operation panel for more than 2
seconds, the display will show for a second, and then the display
shows current total accumulated value and flickers. To clear
accumulated value, press Zero, to make flicker weight be 0. Press Print
to print accumulated data. Press Holdto quit the interface.
Attention: set whether to be over detailed data or accumulated data in F4.6.
Function of counting scale F2.1 = 5
Instrument display
, showing current quantity.
Sampling method
1. Check whether the scale is in zero, if not, press Zerofor zero setting.
2. Place materials counted on the scale.
3. PressTotallong until the display shows , and then pressPrint.
If F2.6 = 0, the display shows . Input the quantity counted just now, and
press Printfor confirmation. The instrument saves sampling data and quits the
sampling interface. If F2.6 = 1, the display shows , input sample weight.
Press Print, the instrument saves setting data and quits sampling setting interface.
4. In this function, pressHoldto display switch between quantity and weight.
Function of animal scale F2.1 = 6
Operation method
In normal weighing state, place the animal on the weighing platform and its
weight must be ≥threshold value set in F2.2. Press Total, instrument will collect
data sampling. After sampling, the average value of sampling data will be locked,
showing A X.XXX. PressPrintto print; press Holdor Totalto quit the
interface.
VII Prompt Message of Instrument
The instrument has extremely high stability and reliability, thus is not easy to have error in
general situation. Once an error occurs, please make clear the error first and observe whether the
instrument still has error after power-on. Do not hurry to repair the scale body or instrument.
Repair the instrument according to error code of the instrument as possible.
No.
Symbol
Analysis
Treatment Method
1
Unable to reset after startup
1. Determine it is no-load state in
startup;
2. Make zero calibration again.
2
The weighed object is over full
range for 9 days
Reduce weight on weighing platform
3
The weighed object is below 0
for 5 days
Press Zeroto reset
4
Out of zero clearing range
Check whether the weighing platform
has weight.

12
Remove weight.
5
Invalid operation
6
EEPROM checksum and error
Press Printreprint factory value.
Start up again. If the information
occurs again, return to factory for
repair. Please calibrate the scale
again if the situation does not occur;
Attention: this place is provided with
all parameters of instruments of the
factory.
7
The calibration input weight is
too small
Input≥10 % weight of full range
8
The weight in calibration is too
light
Load≥10% weight of full range
9
The scale is dynamic in scale
Inspect the scale body
10
Setting error of date and time
Set according to specification of date
and time
11
Error of AD initialization
If the error occurs after restarting,
return it to the factory for repair
12
In loading scale, it indicates to
loading weight;
Load weight according to
requirements;
13
It has enters menu setting
Press Printto continue setting.
14
End of zero point and loading
point calibration
15
Including current display
weight in accumulated value
16
Accumulated weight overflows
Clear accumulated weight in time
17
Loading default value
18
Printing
Appendix 1. Continuous Output Format Specification
1. Continuous output MT format
Continuous output MT format has 18 digits.
Continuous output format
ST
X
A
B
C
X
X
X
X
X
X
X
X
X
X
X
X
C
R
CK
S
1
3
6
6
1
1
Where
1. <STX> ASCII02H0
2. Status word: A, B, C
3. Display weight, possibly gross weight or net weight, 6 digits without symbol or
decimal point.
4. Tare weight, 6 digits without symbol or decimal point

13
5. <CR> ASCII carriage return (ODH)
6<CKS> optional checksum and (no output in F4.2.3 = 0)
Status word: A, B, C.
Status word A
Bit 0
Bit 1
Bit 2
Position of decimal
point
0
1
0
1
0
1
1
0
0
1
0
0
1
1
1
XXXXXX
XXXXX.X
XXXX.XX
XXX.XXX
XX.XXXX
Bit 3
Constant 0
Bit 4
Constant 1
Bit 5
Constant 0
Bit 6
Constant 1
Bit 7
Constant 0/check bit
Status word B
Bits
Function
Bit 0
Gross weight = 0, net weight = 1
Bit 1
Symbol: positive = 0, negative = 1
Bit 2
Overload (upper and lower overload) = 1
Bit 3
Static = 0, dynamic = 1
Bit 4
Constant 1
Bit 5
Constant 1
Bit 6
Constant 0
Bit 7
Constant 0/check bit
Status word C
Bits
Function
Bit 0
Unit: kg = 0, lb = 1
Bit 1
Constant 0
Bit 2
Constant 0
Bit 3
Constant 0
Bit 4
Constant 1
Bit 5
Constant 1
Bit 6
Constant 0
Bit 7
Constant 0/check bit
2. Continuous output A format
The data transmitted by continuous output protocol A is present display weight.
Gross weight format: ww0000.000kg or ww0000.000lb
Net weight format: wn0000.000kg or wn0000.000lb
Example: gross weight of 15.000kg
w
w
0
0
0
1
5
.
0
0
0
k
g
0d
0a

14
Net weight of 15.000kg
w
n
0
0
0
1
5
.
0
0
0
k
g
0d
0a
Gross weight-15.000kg
w
w
-
0
0
1
5
.
0
0
0
k
g
0d
0a
Note: the above position of the decimal point is determined according to that in the
instrument.
3. Continuous output B format
Continuous output agreement B format:
1
2
3
4
5
6
7
8
9
10
11
12
13
14
15
16
17
18
HEAD1 , HEAD2 , DATA UNIT CR/LF
HEAD12OL Upper overload or lower overload, or no zero clearing in startup;
ST the scale is in stable state;
US the scale is in unstable state;
HEAD22GS gross weight3
NT net weight3
DATA2instrument display data3
UNIT2kg or lb3
CR/LF2new line.
Example 12in stale state, gross weight is 18.000kg. sp = space.
S
T
,
G
S
,
sp
sp
1
8
.
0
0
0
k
g
0d
0a
Example 22in unstable state, net weight is -0.200kg. sp = space.
U
S
,
N
T
,
-
sp
sp
0
.
2
0
0
k
g
0d
0a
Appendix 2. Printing Format Specification
F2.1 = 0, 1, 4, 61print current resetting, pressPrint.
F2.1 = 1 weight maintenance function:
Weight is not in maintenance state: Weight is in maintenance state:
or
REPORT
------------------------
Gross 0.200kg
Tare 0.000kg
Net 0.200kg
REPORT
----------------------
Gross 25.000kg
Status Hold
REPORT
------------------------
Gross 0.200kg
Tare 0.000kg
Net 0.200kg

15
F2.1 = 3 selection, check weight, press Print:
Underweight Qualified Overweight
F2.1 = 4 accumulation scale, print detailed statement or format of total weight:
Print details and total weight Only print total weight
F2.1 = 5 counting scale, pressPrint:
REPORT
-----------------------
Gross 1.980kg
State Less
REPORT
-----------------------
Gross 2.000kg
State OK
REPORT
-----------------------
Gross 2.020kg
State Over
REPORT
----------------------
Gross 0.547kg
Amount 55
REPORT
----------------------
Net 25.000kg
Status Hold
REPORT
-------------------------
1 0.200kg
2 0.175kg
3 0.347kg
4 0.375kg
-------------------------
Total 1.097kg
REPORT
-------------------------
Total 1.097kg

APPENDIX 3
GUIDE TO SAFE OPERATION
For safe operation of the truck, please read all warning signs and instructions here and on the truck before using this truck.
Do not operate the pallet truck unless you are familiar with it and have been trained or authorised to do so.
Do not operate the truck unless you have checked its condition. Give special attention to the wheels, the handle
assembly, the forks, lift and the lower control.
Do not use the truck on sloping ground.
Never place any part of your body in the lifting mechanism or under the forks or load. Do not carry passengers.
The operator should wear gloves and safety shoes for protection.
Do not handle unstable or loosely stacked loads.
Do not overload the truck.
Do not subject to unbalanced load, either side to side or along the length of the frame.
The capacity of the truck assumes an evenly distributed load with the centre of the load being at the halfway point
of the length of the forks.
Make sure that length of the forks matches the length of the pallet.
Lower the forks to lowest height when the truck is not being used.
At other specific conditions or places, the operator should operate the pallet truck carefully.
TROUBLE SHOOTING FOR PALLET TRUCK
NO
TROUBLE
CAUSE
ACTION
1
The forks do not lift
to maximum height.
-Not enough hydraulic oil.
-Add more oil.
2
The forks do not lift
up.
-Not enough hydraulic oil.
-The oil has impurities.
-Discharge valve is out of
adjustment.
-Air in the hydraulic oil.
-Pour in more filtered oil.
-Change the oil.
-Adjust the setting screw (B48).
-Expel the air.
3
The forks do not
descend.
-The rod (B101) and the pump
cover (B02) are deformed resulting
from a seriously unbalanced load.
-A part has been broken or been
deformed resulting from
unbalanced load.
-The setting screw (B48) is not in the
correct position.
-Replace the rod (B02) or pump
cover (B101).
-Repair or replace component.
-Adjust the setting screw (B48).
4
Leaks
-Seals worn out or damaged.
-Some parts may be cracked or
worn out.
-Replace seals with new ones.
-Check and replace with new ones.
5
The forks descend
without being
lowered.
-Impurities in the oil cause the
discharge valve (B106) to fail to
close.
-Air in the oil.
-Seals worn or damaged.
-Discharge valve (B106) is out of
adjustment.
-Replace with filtered oil.
-Expel the air.
-Replace with new ones.
-Adjust the setting screw (B48).

2
Figure 1

3
WIRING DIAGRAM OF JUNCTION BOX
L1~L4 Connect sensor connector
GND
silver
-S
white
+S
green
-E
black
+E
red
L0 -Connect meter connector
GND
silver
-S
white
+S
green
-E
black
+E
red
This manual suits for next models
1
Table of contents
Other HiWeigh Scale manuals