Thank-you for choosing Wild Boar Audio Liquid Cooled Lower Speaker Adaptors.
Since positive word of mouth is the best way to grow our business, we want your
new products to work as well as they were designed to. If you have any questions or
business hours (EST) at (705)-719-6361. If you still need help, please consider a
professional installation by your dealer.
Getting Started:
Step #1: Remove the seat, and both wires (+ and -) from the battery.
Step #2: Remove the outer fairing/headlamp assembly. Refer to a service manual if
you need help with this. Note: A towel on the front fender can help prevent
scratches or “dings” from dropped tools or fasteners etc. High volume expletives
will also be kept to a minimum.
Step #3: Starting on the brake side lower fairing, use a coin or something similar to
carefully pry off the front access cover. With the cover removed, look inside the
opening, and at the very back, you will see a 7/16” nut that is to be removed. This nut
allows the painted fairing lower “cap” on the front to come off. With the painted
cap off, you will see a “bar” that secures the top half of the lower to the crash bar.
Remove the 2 nuts and the bar and put aside for now. At the bottom of the lower is a
clamp that holds the bottom half of the lower to the crash bar. Remove the bolt that
secures the clamp.
Step #4: Gently push the top of the lower towards the back of the bike just enough
so you can remove the 3 torx screws (normally hidden by the painted cap) that hold
the lowers front panel in place. Gently pull on the front panel to release 2 clips which
will allow the front panel to come away, but not completely free from the bike yet.
There is a small arm for the vent mechanism still attached that is removed by
squeezing the top of the pivot pin and lifting up on the arm. You can now bring the
factory lower front panel to a work bench and remove the torx screw that holds the
vent adjuster and arm to the factory panel. Using the same screw, install the vent
adjuster and arm into your new speaker adaptor.
Step #6: Moving to the front side of the lower , in the area normally hidden by the
painted cap, you will see a hole where the bolt passes through that secures the
painted cap. Just above that hole and approximately 2” back from the bolt hole, you
will need to drill a 3/8” hole for the wires to pass. When this install is finished, the
painted cap will hide the wire nicely. It’s a good idea to start with a pilot hole and
then drill the final size. Use care to make sure your drill bit does not pierce the
radiators coolant tank inside the lower on the brake side!
Step #7: Locate the supplied wire harness. On the harness you will see a main 4 wire
harness with blue/black, and brown/black wires covered in a black sheath. You will
also see two-2 wire harnesses (wires are all black) that each need to be unplugged
from the main harness. If you are using a Wild Boar Audio or Hogtunes branded
amp, follow the instruction is that manual for wiring. If you are using another brand
of amplifier, you can cut the 4 pin plug off and wire your amp into our harness. The
blue/black pair is brake side and the black wire is the positive (+) . The brown/black
pair is the clutch side and the black wire is positive (+).
Step #8: Assuming the amplifier powering the lower speakers is inside the fairing,
the balance of the main wire harness will pass through on the brake side of the fair-
ing where the main factory wires pass. Have the opposite end of the main harness
go so it ends up on top of the crash bar as close to the center as you can. Locate the
2 wire harness marked “brake side” and plug it into the main harness connector
noting it will only go in one way. The other side of the same harness will go into the
lower. Pass the larger connector first. You can also tear off the sticker if that makes
it easier. Once the wires are in the lower, take up the slack along the crash bar keep-
ing the main harness as close to the center of the crash bar as possible.
Step #9: The kit comes with strips of black gummy material. Take one of the strips
and use it to seal the hole around the wire on the outside of the lower.
Step #10: Snap the arm for the vent back into place on the pivot pin. Re install the 3
factory torx head screws (by hand just until they are snug) to secure the panel to the
lower. The “bar” and 2 nuts removed earlier that secure the top of the lower to the
crash bar will now be reinstalled. The bolt removed earlier that secures the lower to
the bottom of the crash bar is also re installed.
Step #11: Using some of the supplied zip ties , secure the speaker wire to the crash
bar keeping the main harness as close to the center of the crash bar as you can. It’s a
good idea to trim the excess of the zip ties as close to flush as possible so there are
no sharp edges. When done, install and secure the painted fairing lower cap with
the 7/16” nut removed earlier.
Step #12: Using the supplied machine screws, secure your speaker to the adaptor.
Note: If the speaker grills you have don't fit, or fit the adaptors with your speakers,
Hogtunes “Rear RM Grills” (Drag Specialties Part # 4405-0415 ) will fit with most
speakers and look great.
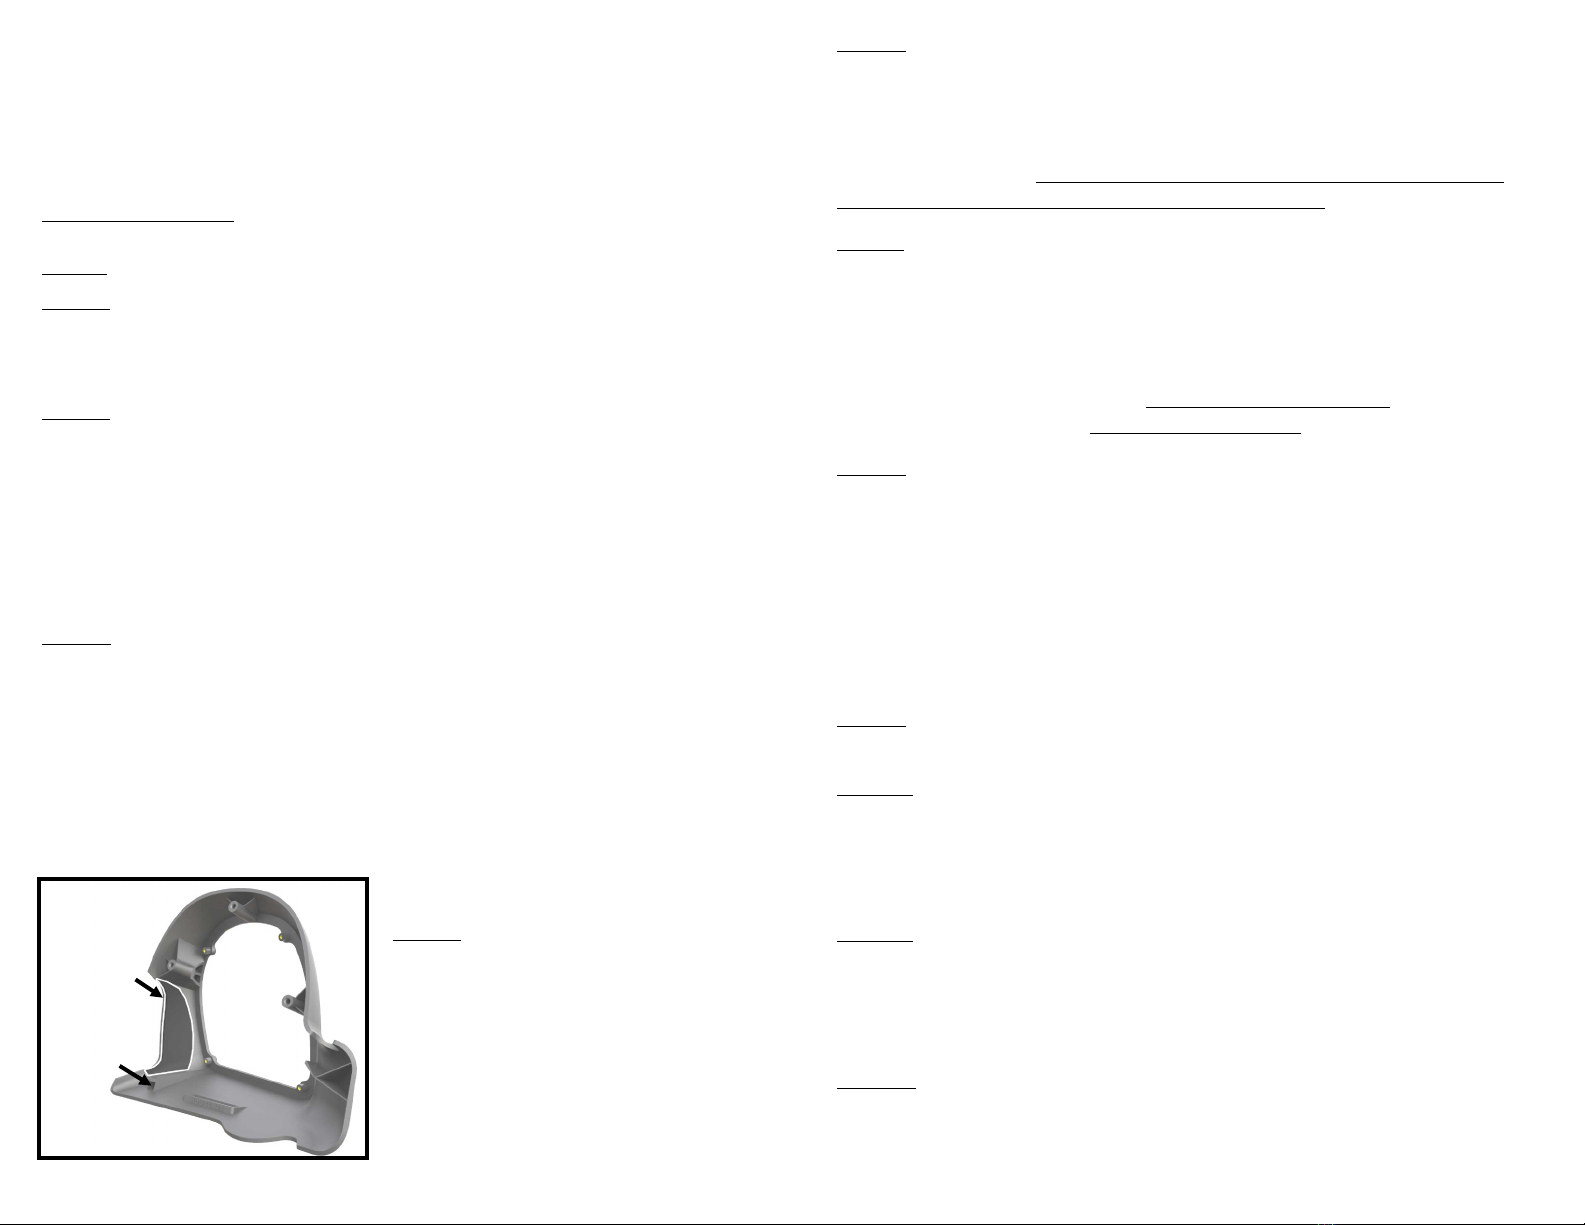
Step #5: The kit comes with die cut foam
panels. Find the one for the side of the bike
you are working on and apply as shown
noting you should clean the area with
isopropyl alcohol first. On your factory
front panel, you will see 2 white clips. One
of these clips will come off and be installed
onto the new speaker adaptor.
Foam Panel
Goes Here
Factory
White Clip
Goes Here


