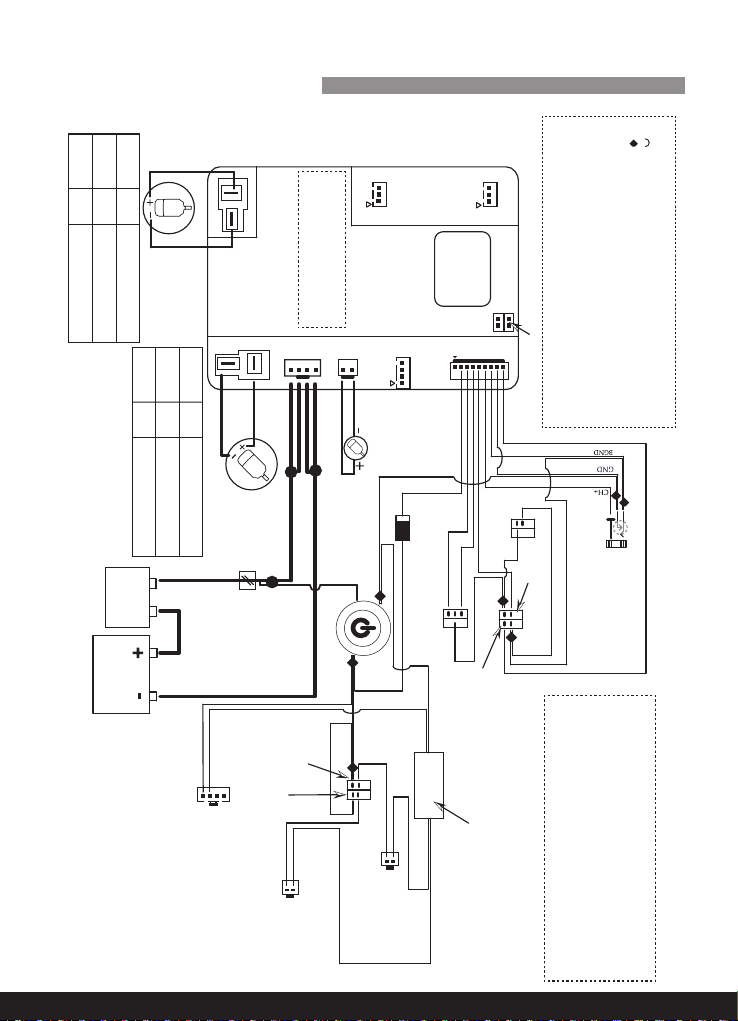
HOLLICY SX1928 User manual

Executive standard:
EN71-1
EN71-2
EN71-3
EN62115
Products should be assembled by an adult. Protective equipment
should be worn. Not to be used in traffic. Not suitable for children
under 3 years. Choking hazard- small parts. In unassembled
state, contains potentially hazardous small parts. Please keep
out of the reach of small children. Pay attention to the potential
hazards of using the toy in areas other than private grounds.
Please read the manual before using the product. The manual and
carton contain important information, please keep them properly
for later references. If failure to following the instruction in the
manual, it might be dangerous for your child.
In order to improve the product and quality, we may change the
parts of structure, appearance, packing method, assembly method
and function of the product without any notice. When there is any
difference between the manual and the product, please subject to
the actual product. We are sorry for any inconvenience.
Model:SX1928
The assembly manual of
battery operated car

PARTS LIST
F31
V
SD USB FLASHBLE
Front wheel
(with small hole)
Rear wheel
(with big hole)
Front motor
(with small hole)
Rear motor
(with big hole)
Handrail
Wheel cover
PARTS NAME PICTURE QTY PARTS NAME PICTURE QTY
1PC
1PC
1PC
2PCS
2PCS
2PCS
2PCS
2PCS
2PC 2PC
1PC
1PC
1PC
1PC
1PC
1PC
4PCS
1PC
1PC
1PC
1PC
1PC
Car body Seat
Remote control
Steering wheel
Charger
Support plate Pressing
batten
Manual
Hardware
package
(optional)
MP3 player
MP3 player
MP4 player
(optional)
(optional)
Winds hield
Front axle
Rear axle
Bumper beam

1
12V-10AH/12V-14AH
Small folding seat function
Small seat can be folded
twice and fix beside the
big seat. Unfold the
small seat again when
needed.
a.
b.
PP
60kg
146X98X76cm
WARNING:
This product is not the vehicle for transportation, it should be used
under adult guidance. Parents should ensure that children have
taken the safety measures before use.
The toy should be used with caution since skill is required to avoid
falls or collisions causing injury to the user or third parties.
PRODUCT SPECIFICATIONS
Battery
Main material
Suitable age
Weight limit
Product size
Speed
Runtime
Charger
Fuse
37-95 Months
3-7Km/h
Auto-reset fuse & Fast-blow fuse 6A (locate under the hood)
AC 110-120V or AC 220-240V
1 hour after charging for 8-12 hours, based on ride on conditions
Disclaimer:
The pictures in this instruction are for assembly reference only.
Please refer to the actual product.

2
Adjustable seat function
Assembly instruction
a.Front axle assembly
Turn over the car body, align the front wheel steel parts with the
car body, fix them with 4*16 self-tapping screws.
Two adjustable spanners are locate under the seat on both
sides, hold on them at same time, two hooks now can be
released, move the seat until the right position, then release the
spanners, hooks pop up and seat be fixed. The seat has a five
position adjustment function.
1
2
3
4
5
1
2
3
4
5
1.Steel parts assembly
Car assembling should be done by the adults.
Choking hazard, keep children away while assembling. Children
under 36 months are prohibited to use.
Please count all the parts carefully before assembling and
dispose the plastic bag properly.

3
①
③
B. Rear axle assembly
1. Loose the nuts at each end of the axle, pull out the rear axle
from rear axle tube.
2.Put the rear axle tube on the right position as shown in picture.
3.Aim the hole on steel part and rear axle tube, insert rear axle
to the steel part and tube, now the rear axle has been assemled.
( The tube should be in the middle of two steel axle parts.)
rear axle
rear axle
rear axle tube
rear axle tube
rear axle tube
assembled state
After assembling the
rear axle, attach the
motor to the rear axle
and car body. (Attention:
Two rear motors are
different, please divides
the right and the left. )
②

4
Front wheels assembly
Align the front motor with front axle, insert the head of motor into
the hole, assembly the sleeve (with small hole), washer, nut and
wheel cover in proper order.
(Attention: Front wheels are different with rear wheels. For the
motor, left and right, front and rear are all different, please divide
as we marked. )
3. Wheels assembly
sleeve
(with small hole)
washer
nut
wheel cover
2.Left and right support assembly
1)Align the support to the car body, connect the screw holes
and fix barb with barb groove.
2)Use 4*12 truss head screws to fix them.
screw
hole
screw
hole
barb
groove
barb
groove

5
4. Seat assembly
Align two plastic pressing battens on both sides of the seat
with corresponding openings on the car body, fit them with
screws (4x12)
Rear wheels assembly
a. First, check whether the rear axle is in the middle of the car,
make sure the axle length that extend out on both sides are same.
b. Align the rear motor with rear axle, put the head of motor into
the hole, assembly the sleeve (with big hole), washer, nut and
wheel cover in proper order.
C. Turn over the car body, make sure that the assembled wheel is
contacted with the ground, then assemble the other wheel.(If the
other wheel can’t assemble well, please pull out the rear axle until
it can’t move, try to assemble again.)
sleeve
(with big whole)
washer
nut
wheel cover

6
5.Steering wheel assembly
Connect steering wheel wire to the wires coming out of the
steering column and match connectors. Align the steering
wheel with steering axle, match the holes on steering wheel
and steering axle, fix them with a screw and a nut.
6.Windshield holder
assembly
Insert the windshield
holderto the corresponding
openings on the car body.
7. Handrail assembly
Insert the left and right
handrails to the
corresponding openings
on the car body.

7
A. Non-removable battery connection
B. Removable battery connection (optional)
8. Battery connection
Battery is located under the seat, loose the screws on the
battery cover, remove the battery cover from one side, insert the
protective device to the red plug which is fix on the car body.
Now battery has been connected.
FUSE
This car has the auto-reset fuse, if the car stops suddenly during driving,
it is mainly caused by instantaneous current exceeds ,which makes the
fuse to trip. Then just stop operating for about 8 seconds, and this fuse
can be reset. In order to avoid the fuse tripping and cutting off power
supply, please pay attention to the following matters.
This product can't be overloaded, the maximum load is 60kgs.
Attention: Charging
port is locate beside
the battery, take out
the battery so that
you can fine it.
protective
device
protective
device
battery lock
Don't drag anything behind products.
Don't let the water or other liquid into the batteries and other electrical
components.
Do not change the circuit system and the structure of the product.

8
CIRCUIT DIAGRAM
CN4 CN5
BGVBAT
CN3
CN10
CN1
+
V
LS
R
HS
CH
BG
G
SW
high / low speed
purple 0.2
forward / backward
M
CN8
CN9
M
M
CN2
+12V
GND
CN6
White
Steering Wheel
Steering Motor
Red
CN7
FUSE
6 X 30 F2A
Fuse replacement instructions:
forward / backward
rocking switch
(optional)
Short-circuit cap is located at RJ1
Remote control charged:
1. Short-circuit cap is located at RJ1,
RJ5 is available
1N5408
brown 0.2
brown 0.3
brown 0.2
brown 2.0
SM-2 needle/black
SM-2 needle/black
lights switch
fan switch
(optional)
RJ1
RJ5
XH-2 luck plug / white
MP3 power
+12V
GND
green 0.2
white 0.2
black 0.3
black 0.3
black 0.3
black 0.3
black 0.2
black 0.2
black 0.3
black 0.3
yellow 0.2
Brown1.5 x 2
Red1.5 x 2
-Negative pole
+Positive pole
Accelerator
Purple 0.3
Charging port
Blue1.5
Yellow1.5
Normally closed contact
steering motor
Yellow0.5
Blue0.5
One start button
Green1.5
Yellow1.5
Orange0.5
Orange0.5
Orange0.3
Orange0.3
Orange0.3
Red2.0
Red2.0
Red0.3
Red0.3
Black0.2 (optional)
Brown2.0
Red2.0
Yellow wire welding to red point (+)
blue wire welding to the gap (-)
right driving motor
Left driving motor
Method for side wire
welding of motor
Connector
Small
one
Big one
green wire welding to red point,
yellow wire welding to the gap
Yellow wire welding to red point,
green wire welding to the gap
Method for side wire
welding of motor
Driving motor
position
Driving motor
position
Right front
wheel
Left front
moto
Right rear
wheel
Left rear
motor
big one
Connector
small
one
yellow wire welding to red point,
blue wire welding to the gap
blue wire welding to red point,
yellow wire welding to the gap
Auto-rest
fuse 12V battery
1)
2)
Wire uncrossed
Wire crossed
Wire connection is as following:
3) No “optional” mark, means every car has this
function
4) Has “optional” mark, means this function is optional
5) Motor wire connection terminals: a) red point is
positive pole b) gap is a negative pole
6) Motor connect wire: use 2 squares wire
WARNING:
forward / backward rocking function is optional:
1) make sure to use this function at flat ground
2) If be used at slope, the car has a risk of
moving forward or backward.
1. Must use 2A fuse
2. Troubleshooting short circuit of
lamp before replacing fuse
Maximum current of LED
lights, MP3, MP4 power
supply can’t exceed 1A.
Maximum current of two
fans power supply can’t
exceed 1A.

9
SECURITY WARNING
1.The installation and charging of vehicle should be under adult
supervision at all times.
2.This product is limited to the children from 37 to 95 months, 60 kg
weight limit, please do not overload.
3.This product is ideal for driving on a hard flat surface.
4.It is strictly prohibited in the streets or the road, pot holes, and slopes.
5.Avoid driving in the sand or grass or uneven ground.
6.Children should be given full instructions on operation of the car.
Improper operation can cause damage or accidents.
7.While children are driving, it is parents' duty to supervise at all time to
avoid accidents.
8.Avoid driving in rains or flooded pathways. By doing so it can damage
the motor, circuit and other electrical equipments.
9.Battery charger should be regularly inspected by parents to insure that
the wires, plugs, crusts and other components are not damaged. Please
stop using if any damage is found, until it is completely restored.
10.In order to ensure product life and safety, avoid damage to the
charger, battery or electric circuit, the car must use the default
configuration of a dedicated charger and power supply.
11.Rechargeable batteries should be removed from the toy before
charging.
12.When no use of product, please cut off the product power, and keep
all the switch to "stop" or "off" position.
13.The charger provided is not a toy. It is to be kept away from children.
14.Strictly prohibit using the non-manufacturer provided parts.
15.This product is made of PP material mainly, and the safe using time
is two years.
USAGE DIRECTION
1. Before using it, make sure that all the following works are done.
●Step described in accordance with the instructions to the
installation of the car, the battery plug-in has been connected, the
power supply has been switched on.
●Make sure that all the positions which need the screws are fixed
tightly.
●Parents or guardian should ensure that children have taken the
safety measures before using.
To reduce the risk during using, pay attention the followings:
When driving the car ,child should sit on the car seat.
Adult or parents should take more care and guidance when child
driving and can't leave away.

10
Joke
LCD display
Next/volume
reduction Previous/volume
increase
MP3 socket
Play/pause
Model
Story Music Poetry English
USB socket
TF card
MP3 Optional
2. Operating(function reference diagram)
WARINING:
When changing the gears, the accelerator should be released
and the car has completely come to a stop. Prohibit to change
the gear while the car is still moving, because that can
damage the wire and other transmission parts.
fan (optional)
high / low speed MP3/MP4
player (optional)
charging
port
power
on / off
pedal
gear
switch
lights on / off
forward / backward
rocking function (optional)
Pay attention to the driving environment and driving on the hard
flat surface, not the unsafe environment.
For example:
a.The trenches, the riverside, slope or uneven ground;
b.Road or other places for driving and walking;
c.The obstruction which is easily hitting and causing injury;
d.Other unsafe zones.
To avoid accident, please use only in daytime or bright place,
avoid using under low visibility.

11
MP4 Optional
Back
File shortcut key
File on demand
shortcut key
Music/ story/
children’s song
Poetry/ cartoon /
photo
TF card
Touch function area
MP4 screen on/off
U dish (default first)
Previous
OK/ Pause
Next
Return to the
home page
Language selection
(Simplified Chinese,
Traditional Chinese,
English, French,
Farsi, Korean)
File management
(File selection in U
dish or TF card)
Battery capacity
U dish/TF card identification symbols
F31
V
SD USB FLASHBLE
MP3/ Mode/ Electric capacity display
Play/ Pause
U dish TF card
Bluetooth mode
TF card mark
U dish mark
Flash mode
Volume +
Volume –
Mode switch
Previous
Battery capacity
Bluetooth
Music
Story
Next
Bluetooth name
MP3 Optional
MP3 balance
waveform
microphone slot
microphone slot

12
Remote control instruction
1LED
2LED
3LED
Speed selection
Stop
Speed indicator
Remote indicator light
right
left
The code
(car-select key)
backward
Forward
2.Please select the proper speed during driving. Manual mode or
remote mode both can be selected.
(1)Remote mode: press and hold the speed select button to
chose the proper speed. (1 LED: slow speed; 2 LED: middle speed; 3
LED: fast speed.)
(2)Manual mode: use gear to select high or low speed.
3.The remote control uses slow start technology, it can reduce impact
force of the traditional controller and protect baby's spine.
4.The “stop” button on remote control can be used in any situation
(after connecting successfully), press and hold “stop” button, the car
will stop immediately and can’t be operated whether in manual mode or
remote mode. Parents have full control of the remote, so as to improve
the security.
5.Push the joystick front, the car will go forward. Push the joystick
back, the car will go backward. No operation, the car will not move.
6.Push the joystick left, the car will go left. Push the joystick right, the
car will go right.
1.Before first using, please code first, steps are as following:
(1)Press and hold car select button , until remote indicator light
starts to flash.
(2)Turn on the power, remote indicator light will be off, indicating the
successful connection with the car. Release the button, now the
remote control can be used.
(3)If remote indicator light is still flashing and turned on, try again
and repeat step 1-2.

13
1 . When operating the car, the distance between the car which kid
sit in and the remote control which operated by adults should not be
more than 10 meters.
2 .The remote is only for adults to use, keep far away from child.
3 .Before using the remote, you must read the instruction manual
carefully, and operate the empty car first , only when knowing the
way of operation, you can use the remote with kid in the car.
4.Please switch to the "P"of the gear before you get on the car.
5.This product should not be used on traffic road and the place with
water and obstacles.
6 . To Avoid damaging the circuit, please keep the remote control
from wet and in rains.
7 .Don’t mix old and new batteries and different brands of dry
batteries.
8 . In order to avoid damaging the remote control, please take out the
batteries if not use the remote control for a long time to avoid battery
leakage and circuit corrosion.
9.Avoid dropping the remote control during using.
10.Install batteries with right polarity to avoid battery short circuit.
11.Charging must be done by adults. Non rechargeable batteries
can't be charged.
12.Exhausted battery should be removed from the toy properly and
prevent children from playing.
13.Take out the battery if no use for long time, properly handle the
battery, and prevent children from playing.
14.If the remote distance is less than 3 meters, it means the battery
is down in the remote control, it is time to change the 2 pieces of AA
alkaline batteries.
WARNING:
AA 1.5V
AA 1.5V
How to insert batteries: Use screwdriver to
loosen the screw on the back of the
remote control, open the battery cover,
and install two AA 1.5V alkaline type
batteries according to the diagram
(Batteries are self-provided), then close
the battery cover,and fix with screw.

14
CHARGING WAY
●For Safety purpose ,the charging must be done by adults.
●When it is the first time use it, you should open the battery cover and insert
the protective device to the red plug which is fix on the car body, use it only
after charging 8-12 hours.
●Charging socket located inside the dashboard, follow the instructions to
charge the battery.
●If the car has slowed done, it needs to be charged by 8-12 hours, maximum
20 hours.
1.First insert the plug of the charger into the charging port.
2.Then insert the charger to the power socket. (The car cannot be started
during charging)
WARNING:
1 The toy is to be assembled by an adult. In unassembled state, it contains
potentially hazardous sharp points & small parts, so please keep out of
baby's reach.
2 CHOCING HAZARD – Small parts.
3 Not for children under 3 yrs.
4 Always wear shoes.
5 RISK OF FIRE. Do not bypass. Replace only with circuit protection device.
6 Protective equipment should be worn. Not to be used in traffic.
WARNING:
-Non-rechargeable batteries are not to be recharged;
-Batteries are to be inserted with the correct polarity;
-Exhausted batteries are to be removed from the toy;
-Rechargeable batteries are only to be charged under adult supervision;
-Rechargeable batteries are to be removed from the toy before being
charged.
How to remove batteries: Use screwdriver to loosen the screw on
the back of the remote control, open the battery cover and remove
batteries, then close the battery cover,and fix with screw.

15
The method of replacing a fuse
Attention:
·Can only use the charger and battery according to manufacturers
regulations.
·Do not mix old and new or different types of batteries.
·The battery terminal should not be short circuit.
·Do not open the battery or charger.
·Do not reverse the battery.
·Before charging, please check whether the charger, battery and plug are
ok, if you find any broken parts, you must stop using it immediately. And
do not use it until it is fully repaired.
·The battery will be little warm when being charged, it is normal. If not, it
may be caused from the short circuit of charger or circuit board.
·Must use the pressing plate to fix the battery.
·Run out of battery must be handled by adults, remove the battery which
has run out from toys to recycle properly and shall not be arbitrarily
discard.
·If the product is going to be stored unused long time , it must be fully
charged, and charge it every 3 months ,so as to make sure the battery
life.
·Charger and Battery are not toys. Keep them away from children.
When all the lights are turned off during using, it is necessary to check
whether the fuse in the fuse clip are burn out, please follow the steps
below to troubleshoot possible problems.
1.Please remove all the XH-2A plugs on transfer board;
2.Replace the new fuse in the fuse clip. (Replacement specification:
6A fuse, size 6x30. )
3.Insert XH-2A plugs to the transfer board one by one, when insert one
please check whether the fuse is burn out;
4.After the third step, you can find out which line has short circuit
problem, replace the led lights beads or lights belt on this line, then
replace the new fuse in the fuse clip. (Replacement specification: 6A
fuse, size 6x30. )

16
MAINTENANCE AND SERVICE
1, Before use, parents should check whether all parts like batteries,
charger, wires, plug, outer body and other parts are in good condition,
check whether the screws are loose and whether there are potential
safety hazards. Any damaged parts founded should be repaired before
using.
2, After using the product for a period of time, use a small amount of
lubricating oil to the moving parts to prevent wear and tear of rust.
3, Keep the car away from fire and direct sunlight. Place it stably, not
upside down. The car shall be stored indoors or outdoors under cover.
4, The car should be kept away from hot items, such as stoves or
heat-ers, or the plastic parts will melt. When charging, the car should be
kept away from inflammable materials to prevent it from catching fire.
5, Charge in time after use. Charging should be done by adults. If the
product is going to be unused for a long time, it must be fully charged.
Charge it every month so as to extend the battery lifespan.
6, A soft cloth must be used to clean the car. Do not use chemical
solvents to clean the plastic parts. Do not use soap or water to clean the
car. Driving in rainy or snowy weather, water can damage the motor,
battery and circuit system.
7, When stopping or storing the car, please cut off the power and make
sure all switches are in the ‘STOP’ or ‘OFF’ position.
8, Do not use fuses different from the specifications of this product.
9, Do not change the product structure and circuit system. Maintenance
and repair work must be done under the guidance of the professional or
technical personnel in place.
10, Do not use the product for other purposes. Put the battery in the
right polarity.
11, Battery negative short circuit is prohibited. Non-rechargeable
cannot be charged.
12, Rechargeable batteries can only be charged under the supervision
of the adult.
13, Do not mix old and new batteries or different types of batteries.
14, The battery running out of power should be removed from the car
properly and not allowed to be played by children.
15,Pull out the potective device when not in use and do not allow
children to play with them

17
TROUBLESHOOTING
If the battery is not fully charged. Need to be charged in time
If there is an issue with the wheels
If the wheels stuck and cannot move
If the pedal switch is not functioning properly
If “power” switch is in OFF position
If the fuse is not functioning properly
If the battery is not connected, check the red and black wires.
If the charger is plugged in, car will not power on. Unplug charger.
If rider weight exceeds specifications
If the charger is malfunctioning
If the battery lost its capacity
If the charger and battery connection are charged
Battery does
not charge
Car moves
slowly
Car does not
move or
power on

PINGHU SHUANGXI BABY CARRIER MANUFACTURE CO.,LTD.
PINGHU BABY CARRIER INDUSTRY CITY, ZHEJIANG, CHINA
Table of contents
Other HOLLICY Motorized Toy Car manuals
Popular Motorized Toy Car manuals by other brands

Peg-Perego
Peg-Perego QUAD Princess Use and care

Team Losi
Team Losi 8IGHT 2.0 Assembly and operation manual

Jamara
Jamara Power Drag Ride-On Traktor 12V instructions

Jamara
Jamara MB Arocs 2,4 GHz Instruction

Kyosho
Kyosho PureTen GP FASER instruction manual

Associated Electrics
Associated Electrics RC10B3 instruction manual