manuals.online logo
Brands
  1. Home
  2. •
  3. Brands
  4. •
  5. Honeywell
  6. •
  7. Fan
  8. •
  9. Honeywell 40011 User manual

Honeywell 40011 User manual

This manual suits for next models

1

Other Honeywell Fan manuals

Honeywell HT-112E User manual

Honeywell

Honeywell HT-112E User manual

Honeywell HY-023 Series User manual

Honeywell

Honeywell HY-023 Series User manual

Honeywell HS-160R Series User manual

Honeywell

Honeywell HS-160R Series User manual

Honeywell L6064A Operation manual

Honeywell

Honeywell L6064A Operation manual

Honeywell 51851 User manual

Honeywell

Honeywell 51851 User manual

Honeywell HT-800 Series User manual

Honeywell

Honeywell HT-800 Series User manual

Honeywell HSF600B User manual

Honeywell

Honeywell HSF600B User manual

Honeywell Lynton 51852 User manual

Honeywell

Honeywell Lynton 51852 User manual

Honeywell HT-900 Series TURBO FORCE User manual

Honeywell

Honeywell HT-900 Series TURBO FORCE User manual

Honeywell HY254E User manual

Honeywell

Honeywell HY254E User manual

Honeywell HYF1101E4 User manual

Honeywell

Honeywell HYF1101E4 User manual

Honeywell Kaliza User manual

Honeywell

Honeywell Kaliza User manual

Honeywell HS-2007 Series User manual

Honeywell

Honeywell HS-2007 Series User manual

Honeywell MEGA TURBO HF-810 User manual

Honeywell

Honeywell MEGA TURBO HF-810 User manual

Honeywell HT-906 Series User manual

Honeywell

Honeywell HT-906 Series User manual

Honeywell HTF210 Series User manual

Honeywell

Honeywell HTF210 Series User manual

Honeywell SUTTON User manual

Honeywell

Honeywell SUTTON User manual

Honeywell ELSTON User manual

Honeywell

Honeywell ELSTON User manual

Honeywell QUIETSET HS1655 Series User manual

Honeywell

Honeywell QUIETSET HS1655 Series User manual

Honeywell HT350 Series User manual

Honeywell

Honeywell HT350 Series User manual

Honeywell HFT-311B Series User manual

Honeywell

Honeywell HFT-311B Series User manual

Honeywell HY-026 Series User manual

Honeywell

Honeywell HY-026 Series User manual

Honeywell HR230 User manual

Honeywell

Honeywell HR230 User manual

Honeywell CARMEL 50196 User manual

Honeywell

Honeywell CARMEL 50196 User manual

Popular Fan manuals by other brands

Minka Group minkaAire Wave F843 instruction manual

Minka Group

Minka Group minkaAire Wave F843 instruction manual

Airflow Adroit DV50 instruction manual

Airflow

Airflow Adroit DV50 instruction manual

Vornado 270 Series owner's guide

Vornado

Vornado 270 Series owner's guide

comfort air TH-10D instruction manual

comfort air

comfort air TH-10D instruction manual

Livoo DOM386 instruction manual

Livoo

Livoo DOM386 instruction manual

Holmes BLIZZARD HAOF-90 owner's guide

Holmes

Holmes BLIZZARD HAOF-90 owner's guide

Taurus GRECO 16 ELEGANCE manual

Taurus

Taurus GRECO 16 ELEGANCE manual

Quorum PINNACLE installation instructions

Quorum

Quorum PINNACLE installation instructions

Monte Carlo Fan Company 3DIR58RBD-V1 Owner's guide and installation manual

Monte Carlo Fan Company

Monte Carlo Fan Company 3DIR58RBD-V1 Owner's guide and installation manual

Craftmade UH52 installation guide

Craftmade

Craftmade UH52 installation guide

Jocel JVA030658 instruction manual

Jocel

Jocel JVA030658 instruction manual

MIKA MFB1211/GR user manual

MIKA

MIKA MFB1211/GR user manual

Harbor Breeze RLG52NWZ5L manual

Harbor Breeze

Harbor Breeze RLG52NWZ5L manual

Allen + Roth L1405 instruction manual

Allen + Roth

Allen + Roth L1405 instruction manual

ViM KUBAIR F400 ECOWATT Technical manual

ViM

ViM KUBAIR F400 ECOWATT Technical manual

HIDRIA R10R-56LPS-ES50B-04C10 user guide

HIDRIA

HIDRIA R10R-56LPS-ES50B-04C10 user guide

BLAUBERG Ventilatoren CENTRO-M 100 L user manual

BLAUBERG Ventilatoren

BLAUBERG Ventilatoren CENTRO-M 100 L user manual

Triangle Engineering HEAT BUSTER SPL Series owner's manual

Triangle Engineering

Triangle Engineering HEAT BUSTER SPL Series owner's manual

manuals.online logo
manuals.online logoBrands
  • About & Mission
  • Contact us
  • Privacy Policy
  • Terms and Conditions

Copyright 2025 Manuals.Online. All Rights Reserved.

CEILING FAN & LIGHT REMOTE CONTROL
Item #0374118
Model #40011
User Guide
1. Read and keep this instruction sheet for future reference.
2. Switch off the power at the circuit breaker before working on receiver or ceiling fan.
3. If you are unfamiliar with installing electrical wiring contact a qualied electrician.
4. This unit is to be used for the control of a ceiling fan and its electrical source
must be AC 110/120V, 60Hz.
5. Do not install in damp location or immerse in water. For indoor use only.
6. Do not use this remote with fans that have pre-installed remote controls.
CAUTION: To reduce the risk of re or injury, do not use this product in
conjunction with any variable (rheostat) wall control.
This remote can work with a variety of hugger fan types, however, there
is typically very little space in the hanger bracket area to install a receiver.
Therefore, we do not recommend using this remote with hugger type or 5 speed
ceiling fans.
1. Turn power off at circuit breaker.
2. Remove ceiling fan canopy from the mounting bracket. Disconnect existing
wiring between ceiling fan and supply at electrical junction box.
3. Slide the receiver into the mounting bracket per FIG.1 being careful not to
pinch the antenna wire.
4. The receiver will be inserted between the downrod and the mounting bracket.
5. Make wiring connections per FIG. 2.
CAUTION: Incorrect wire connection can damage this receiver and could
cause injury or re.
6. Push all connected wires back into the junction box and reinstall the canopy
onto the mounting bracket.
7. Switch power back on at the circuit breaker.
8. Manually set fan speed to High and set light to On using the pull chains.
This remote is preprogrammed from the factory and should work right out of
the box once the battery is installed. Should, for any reason, reprogramming be
needed, please follow the learning process as follows:
1. After installation is complete, switch the power on. Within 30 seconds, remove
the battery cover on transmitter and insert 12V battery (included).
2. Use a small screwdriver or ballpoint pen to press and hold the “LEARN”
button, located in the battery compartment (see FIG. 3), for 3 seconds.
Fan will turn on at high speed and light (if installed) blinks 3 times. This
conrms that the SMART SYNC is active.
If user cannot nish the activation within 30 seconds, the main power must be
turned off and back on. This will reset the unit. Repeat steps 1 and 2 of the
ACTIVATING THE LEARNING PROCESS.
It is not necessary to redo the LEARNING process after replacing the battery.
NOTE: To control two receivers with one transmitter, turn power on to both receivers
simultaneously and follow the learning process.
Slide the D/O switch, located in the battery compartment (See FIG. 3), to match
the bulb type in your fan. “D” is for incandescent bulbs and “O” indicates compact
uorescent bulbs (CFL). Use a small screwdriver or ballpoint pen to slide rmly
left or right.
CAUTION: Incorrect bulb setting can damage the receiver.
INSERTING RECEIVER
INTO CANOPY ASSEMBLY
CANOPY
MOUNTING
BRACKET
FIG 1
LIGHT
(BLUE)
MOTOR
(BLACK)
MOTOR
(WHITE)
WIRING THE RECEIVER
TO THE FAN
ANTENNA
AC IN (NEUTRAL)
AC IN (LIVE)
FIG 2
D/O (DIMMER
SWITCH)
LEARN BUTTON
REAR VIEW OF TRANSMITTER
(shown with battery cover removed)
FIG 3
IMPORTANT SAFETY INSTRUCTIONS
ACTIVATING THE LEARNING PROCESS (SMART SYNC)
DIMMER ON/OFF SETTING (D/O SWITCH)
RECEIVER INSTALLATION INSTRUCTIONS
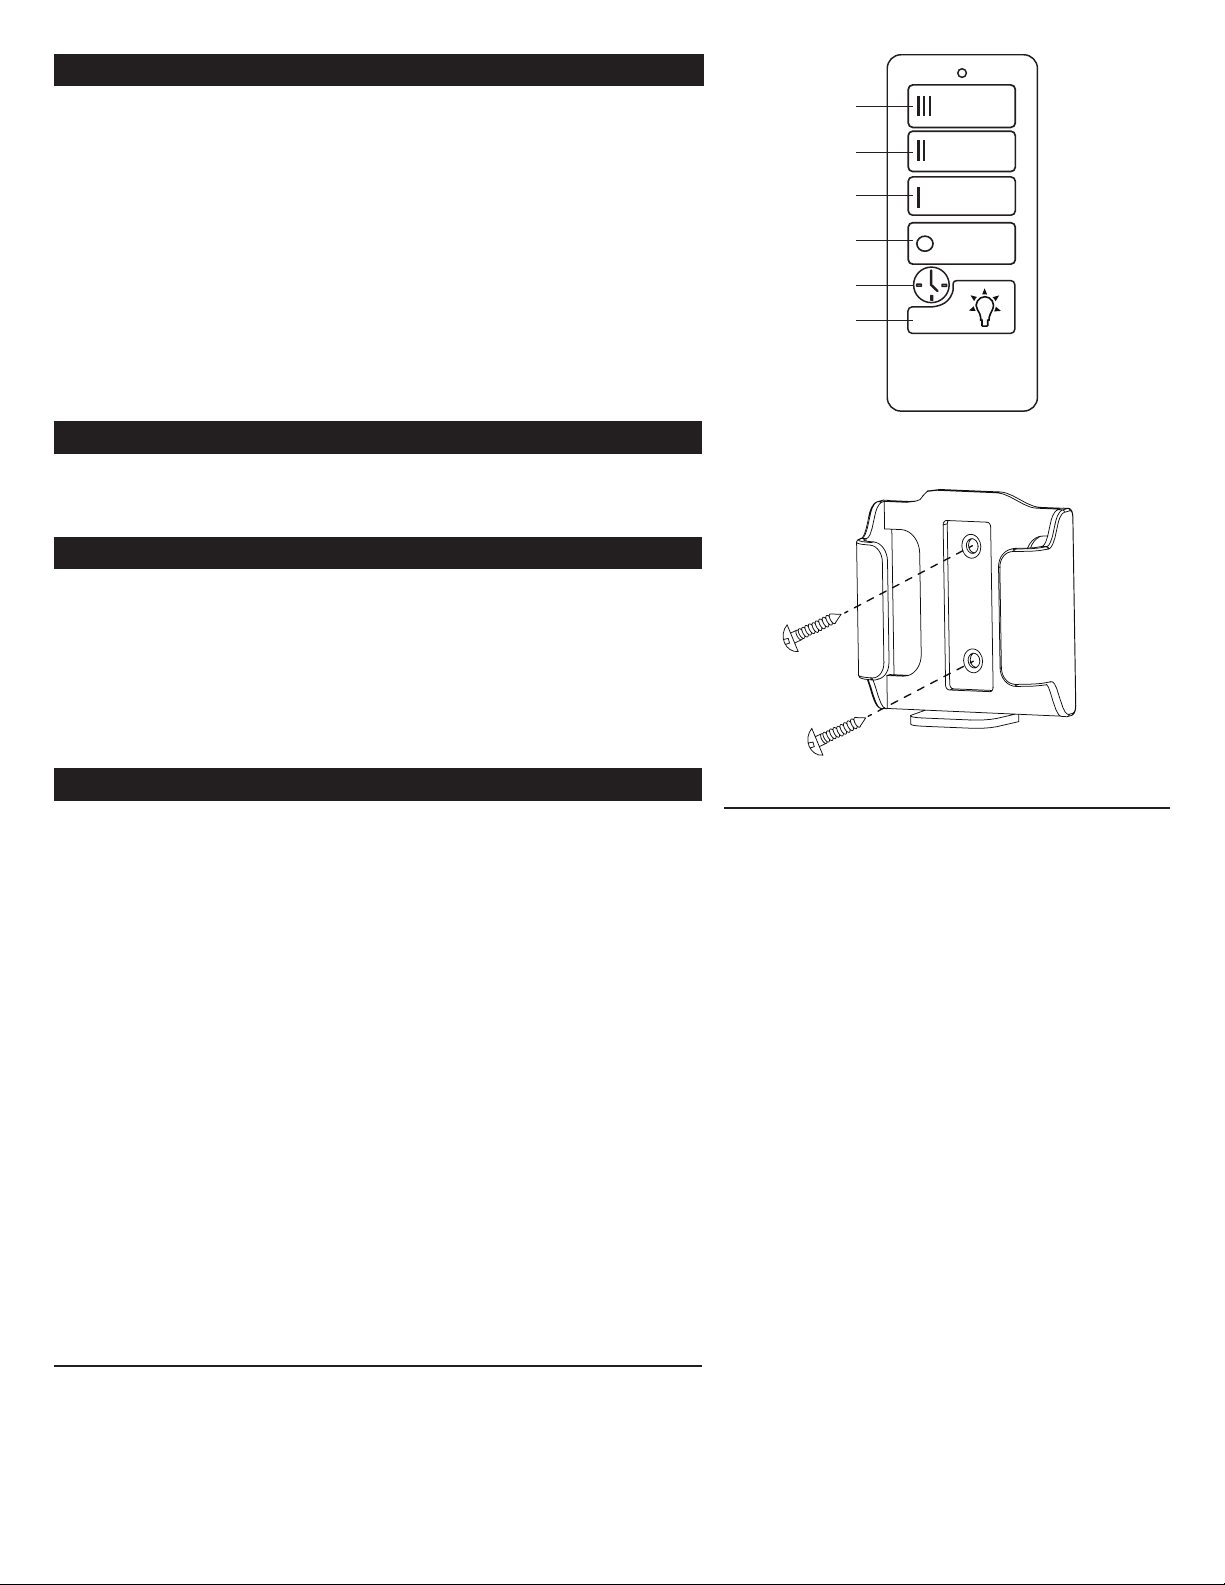
High / Medium / Low Speed – Tap lightly to turn the fan on at high, medium or
low speed respectively.
Fan Off – Tap lightly to turn the fan off.
Light –Tap lightly to turn light on or off. Hold down for 2 seconds to cycle through
dimmer setting. The light button has an auto resume feature so the light will
reactivate at the same brightness as the last time it was turned off.
NOTE: The dimmer function does not work with CFL bulbs.
Walk Away Light Delay – Tap once-the light and fan turn off after 1 minute. Light on
the fan blinks once to conrm function is active. Press any button to cancel function.
Home Shield – Press and hold the Light and Delay buttons for 3 seconds. Light on
the fan blinks two times to conrm function is active. Fan will be off and the light will
randomly turn on and off while you are away. To deactivate press any button once.
D/O – Set the switch to “D” for use with incandescent bulbs or “O” for CFL bulbs.
Factory default setting is “O” for use with CFL bulbs.
LEARN – Synchronizes transmitter and receiver signals.
TRANSMITTER OPERATION (FIG. 4)
HIGH SPEED
MEDIUM SPEED
LOW SPEED
FAN OFF
WALK AWAY
LIGHT DELAY
LIGHT
1. Locate wall mount in a convenient location.
2. Use two screws (included) and wall anchors to install wall mount bracket as
shown in FIG. 5.
• Is the wall switch turned on? Is power turned on at the circuit breaker?
• Is it wired correctly and receiving power? Are the wire connectors tight for
each wire connection?
• Is the fan pull chain set to High and light pull chain set to the On position?
• Is the transmitter battery new and fully charged?
• Learning process between fan and transmitter may not have been successful--
see ACTIVATING THE LEARNING PROCESS.
• Won’t operate at a distance – make sure antenna wire is not obstructed.
The Honeywell Trademark is used under license from Honeywell International
Inc. Honeywell International Inc. makes no representations or warranties with
respect to this product.
This product is manufactured for:
Hong Kong China Electric Appliance Mfg. Co., Ltd.
3059 Forest Hill Irene Rd, Ste 103
Germantown, TN 38138
1-877-580-4359
FCC INTERFERENCE STATEMENT
This equipment has been tested and found to comply with the
limits for a Class B digital device, pursuant to Part 15 of the
FCC Rules. These limits are designed to provide reasonable
protection against harmful interference in a residential installation.
This equipment generates, uses and can radiate radio
frequency energy and, if not installed and used in accordance
with the instructions, may cause harmful interference to radio
communications. However, there is no guarantee that interference
will not occur in a particular installation. If this equipment does
cause harmful interference to radio or television reception, which
can be determined by turning the equipment off and on, the user is
encouraged to try to correct the interference by one or more of the
following measures: Reorient or relocate the receiving antenna.
Increase the separation between the equipment and receiver.
Connect the equipment into an outlet on a circuit different from
that to which the receiver is connected. --Consult the dealer or an
experienced radio/TV technician for help.
Any changes or modications not expressly approved by the
grantee of this device could void the user’s authority to operate the
equipment.
This device complies Part 15 of the FCC rules. Operation is
subject to the following two conditions: (1) this device may
not cause interference, and (2) this device must accept any
interference, including interference that may cause undesired
operation of the device.
This equipment complies with IC radiation exposure limits set
forth for an uncontrolled environment. This equipment should be
installed and operated with minimum distance 20cm between the
radiator and your body.
If you have questions regarding this product, before returning
to your retailer, call our customer service department toll free at
1-877-580-4359.
Printed in China
9059 • rev 050514
This product is warranted to be free from defects in material and workmanship, under
normal use and maintenance, for a period of (1) year from the date of purchase. This
warranty shall not cover any removal or re-installation costs, and shall not apply to: (i)
cosmetic damage, such as scratches, nicks and dents; (ii) any alteration or improper
repair, maintenance, handling, or installation; (iii) the combination of the product with
other systems or components; (iv) consumable parts, such as batteries, including any
deterioration or damage to the product caused by the use of faulty batteries; (v) damage
caused by accident, abuse, misuse, water, ood, re, or other acts of nature or external
causes; (vi) damage caused by service performed by anyone who is not an authorized
service provider; or (vii) damage to a product that has been modied or altered. Your
sole and exclusive remedy for a breach of warranty shall be replacement of the product.
Alternatively, you may return your product to the retailer from which you made your
purchase in accordance with applicable return policies.
The warranties and remedies contained herein are exclusive and in lieu of all other
warranties whether express, implied, or statutory, including any liability arising under any
warranty of merchantability or tness for a particular purpose, statutory or otherwise. This
warranty gives you specic legal rights, which may vary from state to state. In no event
shall any party be liable for any incidental, special, indirect, or consequential damages,
whether resulting from the use, misuse, or inability to use this product or from defects in the
product. Some states do not allow the exclusion or limitation of incidental or consequential
damages, so the above limitations may not apply to you.
To obtain warranty service, please call the customer service number below. One of our
customer service representatives will assist you in determining whether you have a warranty
claim and, if so, how to return your product. If you return your product for a warranty claim,
please securely pack your product and include a copy of the original sales receipt, which
is required as the proof of purchase for all warranty claims. You shall be responsible for
shipment and assume all costs and risks associated with any product return.
INSTALLING THE WALL BRACKET
TROUBLESHOOTING
WARRANTY
FIG 4
TRANSMITTER OPERATION
FIG 5
INSTALLING THE WALL BRACKET
Distributed by:
LG Sourcing, Inc.
P.O. Box 1535
N. Wilkesboro, NC 28659
1-877-580-4359