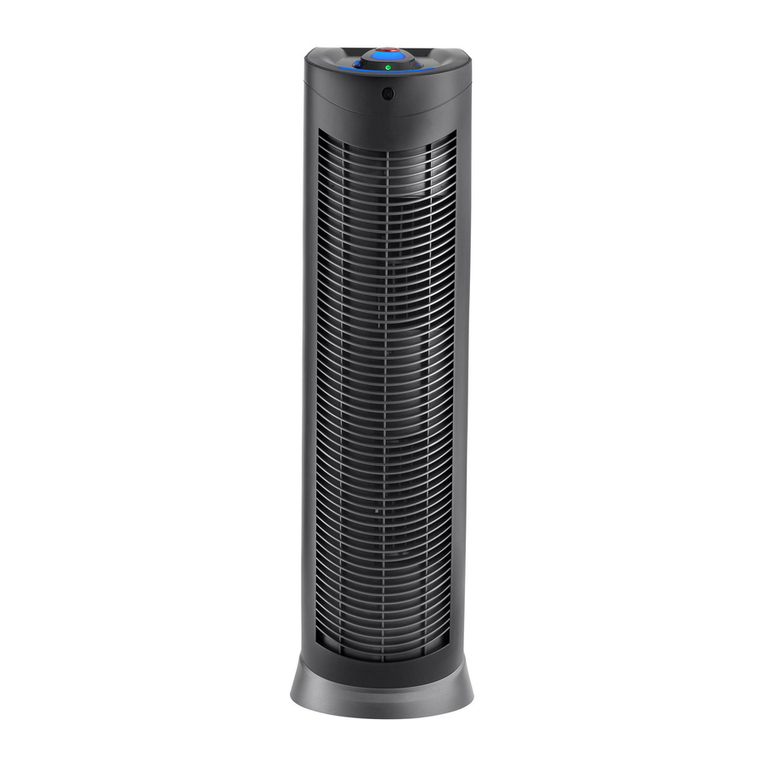
Hoover A101 User manual

©2014 Techtronic Floor Care Technology Limited. All Rights Reserved. Distributed by Royal Appliance Mfg. Co. Glenwillow, Oh 44139 #961152000 ID 110826-R0
AIR PURIFIERS
A301A201A101
IMPORTANT: READ CAREFULLY BEFORE ASSEMBLY AND USE.
User guide.

1
3
4
6
7
8
9
Your Guide:
Welcome to
Hoover ownership.
Now you can make it ofcal.
Visit www.hoover.com/lter-reminders to receive
free reminders sent straight to your inbox.
Get cleaning condence for up to 3 full years with
the Hoover® limited warranty.
Important Safety Instructions
Features
How To Use
Maintenance
Troubleshooting
Service
Warranty

IMPORTANT SAFETY INSTRUCTIONS
SAVE THESE INSTRUCTIONS
When using an electrical appliance, basic precautions should
always be followed, including the following:
READ ALL INSTRUCTIONS BEFORE USING THIS APPLIANCE.
THIS PRODUCT IS INTENDED FOR HOUSEHOLD USE ONLY.
IF USED COMMERCIALLY WARRANTY IS VOID.
WARNING: TO REDUCE THE RISK OF FIRE, ELECTRIC
SHOCK, DAMAGE OR INJURY:
• Fully assemble before operating.
•Operatecleaneronlyatvoltagespeciedondatalabelonback
of cleaner.
• Do not use outdoors or on wet surfaces. Keep the unit away
from water.
• Do not allow to be used as a toy. Not intended for use by
children age 12 and under. Close supervision is necessary when
usednearchildren.Toavoidinjuryordamage,keepchildren
awayfromproduct,anddonotallowchildrentoplacengersor
other objects into any openings.
• Use only as described in this manual. Use only manufacturer’s
recommended attachments and products.
• Do not use with damaged cord or plug. If appliance is not
workingasitshould,hasbeendropped,damaged,left
outdoors,ordroppedintowater,takeittoaservicecenterprior
to continuing use.
•Donotplacetheairpuriernearsourcesofheat,suchasstove
tops, ovens, radiators, or computers.
• Unplug from outlet when not in use and before cleaning
and servicing.
• Do not run cord under carpeting. Do not cover cord with throw
rugs, runners, or similar coverings. Arrange cord away from
trafcareaandwhereitwillnotbetrippedover.
• Do not pull or carry by cord, use cord as a handle, close a door
on cord, or pull cord around sharp edges or corners. Do not
place product on cord. Do not run appliance over cord. Keep
cord away from heated surfaces.
• Do not unplug by pulling on cord. To unplug, grasp the plug, not
the cord.
• Do not handle plug or appliance with wet hands.
• Do not put any object into openings. Do not use with any
openingblocked;keepfreeofdust,lint,hair,andanythingthat
mayreduceairow.
•Keephair,looseclothing,ngers,andallpartsofbodyaway
from openings and moving parts.
• Turn off all controls before unplugging.
•Donotusewithoutltersinplace.
•Donotusetheunitinanenclosedspacewhereammable,
combustible or explosive gases are present.
•Donotuseinanareawheretoxicvapors,ammabledustor
oxygentanksarepresent.Doingsomayresultinseriousinjury
ordeath.Checkthelocationandmakesuretheseelementsare
not present.
21
WARNING: Thisproductcontainschemicalsknown
to the State of California to cause cancer, birth defects or
reproductive harm. WASH HANDS AFTER HANDLING.
CAUTION: TO REDUCE THE RISK OF DAMAGE:
• Store appropriately indoors in a dry place. Do not expose
machine to freezing temperatures.
•Donotblockorpartiallyblocktheairintakeorairexhaust
grilles.Ensurethatthereisadequateairowaroundtheunit.
•Keeptheunitawayfromheaters/replacesandotherhot
objects/locations.
• Do not place any items on top of the unit, or sit on the unit.
• Never open the front cover while the unit is plugged into a wall
outlet.
• Keep personal and loose objects (such as jewelry, loose ties,
long hair etc.) away from unit.
• Keep children and pets away from unit.
•Neverusecompressedgasdusters,cannedair,ammableor
aerosol cleaners on this product. Some cleaning agents may
combust causing serious injury and/or property damage.
WARNING:
Toreducetheriskofelectricshock,thisappliancehasa
polarized plug (one blade is wider than the other). This plug will
tinapolarizedoutletonlyoneway.Iftheplugdoesnottfully
intheoutlet,reversetheplug.Ifitstilldoesnott,contacta
qualiedelectricantoinstalltheproperoutlet.Donotchangethe
plug in any way.

43
How To Use:Features: •IMPORTANT •
This unit is equipped with a smart panel that senses your
touch. Heavy pushing of buttons is not recommended.
CHECK theairpurier
forthelters.Besurethe
suppliedltersareproperly
in place and all plastic is
removed before turning the
unit on.
HORIZONTAL POSITION
PLACE theairpurierona
hard surface such as the
oor,atableordesk.Besure
thegrillesarenotblockedby
other objects, and there are
nocandlesoramesnear
theunit.Theairpuriercan
be placed in a horizontal or
vertical position.
12
3
4
5
6
7
1 Air Purifier Door: Easilyremovetogainaccesstothelter.
2 Main Filter: Filterparticlesfromtheairthatpassesthroughthelter.
3 Odor Filter: Reduceodorsfromtheairthatpassesthroughthelter.
4 Intake Grille: Where air enters the unit.
5 Check Main Filter Light: Indicatesthemainltermayneedtobe
replaced when lit.
6 Check Odor Filter Light: Indicatestheodorltermayneedtobe
replaced when lit.
7 Check Light Reset Button: Thisbuttonresetsboththemainlterand
odorlterlights.
8 Timer: Set the run time for two, four or eight hour, before automatically
turning OFF.
9 Fan Speed: The fan runs at three speeds. The lights indicate the current
fan speed.
L: Low for the Silence Technology®
M: Medium for typical use
H: High for maximum cleaning
10 Power: Turn the unit ON (I=ON) and OFF (0=OFF).
11 Exhaust Grille: Directtheowofairasitexitstheunit.
PLUG IN into nearest standard electrical outlet.
LIGHTLY TOUCH thepowerbuttontoturntheairpurieron.Touch
thepowerbuttonagaintoturntheairpurieroff.
SELECT THE FAN SPEED To select the speed, lightly touch and
release the fan speed button until the desired speed is reached.
L = low, Silence Technology®, M = medium or H = high.
ADJUST THE TIMER feature. The time can be selected from two, four
or eight hours. The unit will turn off once it runs for the selected hours.
Note: The unit will run continuously if all the timer lights are off.
THE CHECK FILTER LIGHTS willlightupwhentheltersneedto
be replaced. Touch and hold the button for several seconds until the
lterindicatorshutsoff.
FRONT
*Varies per model *Varies per model

5
Maintenance: replacing the filter
1
2
3
4
5
6
CAUTION
Toreducetheriskofinjuryfrom
moving parts - unplug before servicing.
!!
6
How To Use: control panel •IMPORTANT•
NOTE: THE FILTERS
ARENOTWASHABLE.
VERTICAL POSITION
•IMPORTANT •
This unit is equipped
with a smart panel that
senses your touch.
Heavy pushing is
not recommended.
2
3
UNDERNORMALOPERATINGCONDITIONSTHEMAINFILTERSHOULDBECHANGEDEVERYSIX
MONTHS.REPLACEODORFILTER*EVERYTHREEMONTHS.THEFILTERSMAYNEEDTOBECHANGED
MOREOFTENINHEAVYUSESUCHASSMOKYORDUSTYENVIRONMENTS.HAVESPAREFILTERS
AVAILABLEFORLATERREPLACEMENT.
Whenthelterlightisilluminated,turntheunitoffandunplugitfromthepoweroutlet.
Press buttons on sides of unit to release front cover. Rotate top down and remove.
Removetheusedlter.Note:theodorlterisattachedwithhookandloopclosuretothemainlter.The
odorlter*isanoptionalfeature.Theunitwillcontinuetocleantheairwithoutit.
Removethepackagingfromthenewlter(s).
Theodorlterisreversibleandattachestothehookandloopclosureappliedtothefrontofthemainlter.
Placethelter(s)intheunitaccordingtotheairowdirectionarrowasindicatedonthemainlter.Placenew
lter(s)intotheunit.
Replace the door by aligning and inserting the two door tabs, located at the bottom of the door, into the
holes provided on the unit frame. Rotate the top of the door toward the top of the unit and insure the door
snaps into place on both sides.
Pleaseseethelterinstalledinyourmachineforreorderinformation.
ANYOTHERSERVICINGSHOULDBEDONEBYANAUTHORIZEDSERVICEREPRESENTATIVE.
IFAPPLIANCEISNOTWORKINGASITSHOULD,HASBEENDROPPED,DAMAGED,LEFTOUTDOORS,OR
DROPPED INTO WATER, TAKE IT TO A SERVICE CENTER PRIOR TO CONTINUING USE.
*Varies per model *Varies per model

7 8
Troubleshooting: WARNING
Toreduceriskofpersonalinjury-Unplugbeforecleaningorservicing.
!
!Service:
Any other servicing should be done by an authorized service representative.
Ifapplianceisnotworkingasitshould,hasbeendropped,damaged,leftoutdoors,ordroppedintowater,takeittoaservicecenterpriortocontinuinguse.
PROBLEM POSSIBLE CAUSE POSSIBLE SOLUTION
Unit does not
turn ON
1. Power cord not firmly plugged
into outlet.
1. Plug unit in firmly.
2. No voltage in wall plug. 2. Checkfuseorbreakerinhome.
3. Blownfuseortrippedbreaker. 3. Replacefuse/resetbreakerin
home.
4. Timer may have finished. 4. Reset timer.
5. Front cover may be loose. 5. Secure front cover.
6. Filter may be loose. 6. Secure filter.
Unit has high
noise level
1.Checkforadirtyfilter. 1. Replace the filter.
Unit still does
not operate
1.Airgrillsmaybeblocked. 1. Clear air grill area.
2. Filter may be dirty. 2.Replacelter.
3. Fan speed is set to L=Low
(silence technology)
3. Indicator light will illuminate.
4.Checkallpointsabove. 4. Call 1-800-944-9200 for the
nearest authorized service
representative.
To obtain approved Hoover®service and genuine Hoover®parts,
locate the nearest Authorized Hoover®Warranty Service Dealer
(Depot) by:
•CheckingtheYellowPagesunder“AirPuriers”or“Household”.
• Visit our website at hoover.com (U.S. Customers) or hoover.ca
(Canadiancustomers).Followtheservicecenterlinktondthe
service outlet nearest you.
• For an automated referral of authorized service outlet locations
call 1-800-944-9200.
DonotsendyourAirPuriertoHoover®, Inc., Company in
Glenwillow for service. This will only result in delay.
If you need further assistance:
Tospeakwithacustomerservicerepresentativecall1-800-944-
9200;Mon-Fri8am-7pmEST.AlwaysidentifyyourAirPurier
by the complete model number when requesting information or
ordering parts. (The model number appears on the bottom of the
AirPurier.)
PLEASE DO NOT RETURN THIS PRODUCT TO THE STORE.
*Varies per model

9
ANY SERVICING SHOULD BE DONE BY AN AUTHORIZED SERVICE REPRE-
SENTATIVE Call (888) 679-2121 USA & Canada
In the event that further assistance is required, visit an authorized service
center. Find one nearest you by visiting our website at www.hoover.com. Costs
of any transportation to and from any place of repair are to be paid by the
owner. Always identify your product by the model number and manufacturing
code when requesting information or ordering replacement parts.(The model
number and manufacturing code for the vacuum appears on the bottom of
charger and side of battery.)
LIMITED ONE YEAR WARRANTY (DOMESTIC USE)
WHAT THIS WARRANTY COVERS
When used and maintained in normal household use and in accordance with
the Owner’s Manual, your HOOVER®product is warranted against original
defects in material and workmanship for a full one year from date of purchase
(the “Warranty Period”). During the Warranty Period, Hoover®will provide labor
and parts, at no cost to you, to correct any such defect in products purchased
in the United States, U.S. Military Exchanges and Canada.
HOW TO MAKE A WARRANTY CLAIM
If this product is not as warranted, take or send the product to either a Hoover®
Sales and Service Center or Hoover®Authorized Warranty Service Dealer
along with proof of purchase. For an automated referral to authorized service
outlets in the U.S.A., phone: 1-800-944-9200 OR visit Hoover®online at www.
hoover.com. For additional assistance or information concerning this Warranty
or the availability of warranty service outlets, phone the Hoover®Consumer
Response Center, Phone 1-800-944-9200, Mon-Fri 8am-7pm EST. In Canada,
contact Hoover®Canada, Carson Building, 100 Carson St., Etobicoke, Ontario
M8W 3R9, Phone: 1-800-944-9200, Mon-Fri 8am-7pm EST.
SERVICE & WARRANTY
SERVICE INFORMATION
WHAT THIS WARRANTY DOES NOT COVER
This Warranty does not cover: use of the product in a commercial operation
(such as maid, janitorial and equipment rental services), improper maintenance
of the product, damage due to misuse, acts of God, nature, vandalism or other
acts beyond the control of Hoover®, owner’s acts or omissions, use outside
the country in which the product was initially purchased and resales of the
product by the original owner. This warranty does not cover pick up, delivery,
transportation or house calls. However, if you mail your product to a Hoover®
Sales and Service Center for warranty service, cost of shipping will be paid
one way.
This warranty does not apply to products purchased outside the United States,
including its territories and possessions, outside a U.S. Military Exchange and
outside of Canada. This warranty does not cover products purchased from a
party that is not an authorized retailer, dealer, or distributor of
Hoover®products.
OTHER IMPORTANT TERMS
This Warranty is not transferable and may not be assigned. This Warranty shall
be governed and construed under the laws of the state of Ohio. The Warranty
Period will not be extended by any replacement or repair performed under
this Warranty.
THIS WARRANTY IS THE EXCLUSIVE WARRANTY AND REMEDY PROVIDED
BY HOOVER®. ALL OTHER WARRANTIES, EXPRESSED OR IMPLIED,
INCLUDING WARRANTIES OF MERCHANTABILITY OR FITNESS FOR
PARTICULAR PURPOSE, ARE DISCLAIMED. IN NO EVENT WILL HOOVER®
BE LIABLE FOR ANY SPECIAL, INDIRECT, INCIDENTAL OR CONSEQUENTIAL
DAMAGES OF ANY KIND OR NATURE TO OWNER OR ANY PARTY CLAIMING
THROUGH OWNER, WHETHER BASED IN CONTRACT, NEGLIGENCE,
TORT OR STRICT PRODUCTS LIABILITY OR ARISING FROM ANY CAUSE
WHATSOEVER. Some states do not allow the exclusion of consequential
damages, so the above exclusion may not apply to you. This warranty gives
you specific rights; you may also have others that vary from state to state.
Guía del usuario IMPORTANTE: Lea atentamente antes de ensamblar y usar.
ESPAÑOL
PURIFICADORES DE AIRE
Felicidades por hacerse propietario de un
producto Hoover.
¡Ya es ocial!
Visite www.hoover.com/lter-reminders para
recibir recordatorios gratis directamente en su
bandeja de entrada.
Para su tranquilidad, Hoover le ofrece una
garantía limitada de hasta 3 años.
11
13
14
15
16
17
18
Instrucciones importantes de seguridad
Características
Cómo utilizarlo
Mantenimiento
Resolución de problemas
Mantenimiento
Garantía

11 12
INSTRUCCIONES DE SEGURIDAD IMPORTANTES
GUARDE ESTAS INSTRUCCIONES
Cuando use un aparato eléctrico, siempre siga las precauciones
básicas, que incluyen las siguientes:
LEA TODAS LAS INSTRUCCIONES ANTES DE USAR ESTE
APARATO. ESTE PRODUCTO ESTÁ DISEÑADO SÓLO
PARA USO DOMÉSTICO. EL USO COMERCIAL DE ESTE
PRODUCTO ANULA LA GARANTÍA.
ADVERTENCIA: PARA REDUCIR EL RIESGO DE
INCENDIO, DESCARGA ELÉCTRICA, DAÑOS O LESIÓN:
• Ensamble completamente el producto antes de utilizarlo.
• Haga funcionar la limpiadora solamente con el voltaje
especicadoenlaplacadedatosubicadaenlaparteposterior
de la misma.
•Nouseesteaparatoenlugaresalairelibreniensupercies
húmedas. Mantenga la unidad lejos del agua.
• No permita que el producto se use como un juguete. No está
diseñado para que lo usen niños de 12 años o menos. Se
debe prestar especial atención cuando se use cerca de niños.
Para evitar daños y lesiones, mantenga a los niños alejados
del producto, y no permita que introduzcan sus dedos u otros
objetos en ninguna de las aberturas.
• Use el producto únicamente como se describe en este manual.
Use únicamente los productos y accesorios recomendados por
el fabricante.
• No lo use si el cable o enchufe están dañados. Si el aparato no
está funcionando adecuadamente, se dejó caer, se dañó, se
dejó a la intemperie o se dejó caer dentro del agua, llévelo a un
centro de servicio antes de volver a usarlo.
•Nocoloqueelpuricadordeairecercadefuentesdecalor,
como hornillas, hornos, radiadores o computadoras.
• Desenchúfelo de la toma de corriente cuando no lo esté usando
y antes de limpiarlo o darle mantenimiento.
• No coloque el cordón debajo de alfombras. No cubra el cordón
con tapetes, alfombras o cubiertas similares. Coloque el cordón
fueradeláreadetrácoydondenoprovoquetropiezos.
• No tire del cordón ni traslade el aparato jalando del cordón,
nitampocolousecomomanija;nocierrelapuertacuandoel
cordón está atravesado ni tire de este alrededor de esquinas o
bordeslosos.Nocoloqueelproductosobreelcordón.Nolo
haga funcionar encima del cordón. Mantenga el cordón lejos de
superciescalentadas.
• No lo desenchufe tirando del cable. Para desenchufarlo, sujete
el enchufe, no el cordón.
• Nunca manipule el enchufe ni el aparato con las manos
húmedas.
• No coloque ningún objeto en las aberturas. No use este
productosialgunaaberturaseencuentraobstruida;manténgalo
libre de suciedad, pelusa, cabello y cualquier objeto que pueda
reducirelujodeaire.
• Mantenga el cabello, la ropa holgada, los dedos y todas las
partes del cuerpo alejadas de las aberturas y otras piezas en
movimiento.
• Apague todos los controles antes de desenchufarlo.
•Noutiliceelaparatosinlosltrosensulugar.
• No use la unidad en un lugar cerrado donde se encuentren
gasesinamables,combustiblesoexplosivos.
ADVERTENCIA: Este producto contiene
sustancias químicas reconocidas por el estado de California
como causantes de cáncer, defectos congénitos o daños
reproductivos. LÁVESE LAS MANOS DESPUÉS DE USAR EL
PRODUCTO.
PRECAUCIÓN:
PARA REDUCIR EL RIESGO DE DAÑOS:
• Guarde el aparato de forma adecuada en la casa, en un lugar
seco. No exponga el aparato a temperaturas de congelamiento.
• No obstruya parcial o completamente la entrada o la salida de
airedelasrejillas.Asegúresedequeelujodeairealrededor
de la unidad sea el adecuado.
• Mantenga la unidad lejos de calentadores/chimeneas y otros
objetos/lugares calientes.
• No coloque ningún artículo sobre la unidad ni se siente en ella.
• Nunca abra la cubierta frontal mientras que la unidad esté
conectada al enchufe.
• Mantenga alejados objetos personales holgados de la unidad
(como joyas, corbatas holgadas, cabello largo, etc.)
• Mantenga a niños y mascotas alejados de la unidad.
• Nunca utilice gas comprimido para limpiar este producto,
aireenlatado,limpiadoresinamablesnienaerosol.Algunos
agentes de limpieza pueden incendiarse y causar lesiones o
daños a la propiedad.
ADVERTENCIA:
Para disminuir el riesgo de descarga eléctrica, este aparato tiene
un enchufe polarizado (una patilla es más ancha que la otra).
Este enchufe puede usarse en una toma de corriente polarizada,
de una sola manera. Si el enchufe no encaja completamente
en la toma de corriente, colóquelo al revés. Si aun así no
encaja,comuníqueseconunelectricistacalicadoparaque
instale la toma de corriente apropiada. No haga ningún tipo de
modicaciónalenchufe.
13 14
Características:
1 Puerta del purificador de aire:Sequitafácilmenteparateneraccesoalltro.
2 Filtro principal:Filtrapartículasdelairequepasaatravésdelltro.
3 Filtro de olor:Reduceoloresdelairequepasaatravésdelltro.
4 Rejilla de la entrada de aire: Lugar por donde entra el aire.
5 Revise la luz del filtro principal:Laluzindicaqueesposiblequenecesitecambiarelltroprincipal.
6 Revise la luz del filtro de olor:Laluzindicaqueesposiblequenecesitecambiarelltrodeolor.
7 Revise la luz del botón de reinicio:Estebotónreiniciatantolaluzdelltroprincipalcomoladelltrodeolor.
8 Temporizador: Puede seleccionar el temporizador ya sea por dos, cuatro u ocho horas para un apagado automático.
9 Velocidad del ventilador: El ventilador cuenta con 3 velocidades. Las luces indican la velocidad actual del ventilador.
L: Velocidad baja para Silence Technology®
M: Velocidad media para uso común
H: Velocidad alta para una limpieza máxima
10 Potencia: Encienda la unidad (I=encendido) y apagado (0=apagado).
11 Rejilla del escape:Dirigeelujodelairealmomentodesalirdelaparato.
*Varía según el modelo
Cómo utilizarlo:
•IMPORTANTE•
Esta unidad está equipada con un
panel inteligente sensible al tacto.
No se recomienda presionar con
fuerza los botones.
VERIFIQUElosltrosdelpuricadordeaire.Asegúresedequelosltrosincluidosesténcorrectamente
colocados y que se haya retirado todo el plástico protector antes de encender la unidad.
POSICIÓN HORIZONTAL
COLOQUE elpuricadordeaireenunasuperciecomoelpiso,unamesaounescritorio.Asegúresede
que las rejillas no estén bloqueadas por otros objetos y que no haya velas o llamas cerca del aparato. El
puricadordeairesepuedecolocartantohorizontalcomoverticalmente.
1
2
3
4
5
6
7
ENCHUFE el aparato al tomacorriente eléctrico estándar más cercano.
TOQUE EL BOTÓNdeencendidosuavementeparaencenderelpuricadordeaire.Toqueelbotónde
encendidoparaapagarelpuricadordeaire.
SELECCIONE la velocidad del ventilador. Para seleccionar la velocidad, presione rápida y suavemente el
botón de velocidad del ventilador hasta que alcance la velocidad deseada.
L = baja, Silence Technology, M= media o, H= alta.
CÓMO AJUSTAR la función del temporizador. Puede seleccionar el temporizador ya sea por dos, cuatro
u ocho horas. La unidad se apagará una vez transcurridas las horas seleccionadas.
NOTA: La unidad continuará funcionando inclusive si las luces del temporizador están apagadas.
LAS LUCESpararevisarelltroseencenderáncuandoseanecesariocambiarlosltros.Mantenga
presionadoelbotónduranteunoscuantossegundoshastaqueelindicadordelltroseapague.

15 16
Resolución de problemas: ADVERTENCIA
Para reducir el riesgo de lesiones físicas,
desenchufe la aspiradora antes de
limpiarla o de darle mantenimiento.
!!
Cualquier otra tarea de mantenimiento debe realizarse por un representante de
mantenimiento autorizado.
Si el aparato no está funcionando adecuadamente, se dejó caer, se dañó, se dejó a
la intemperie o se dejó caer dentro del agua, llévelo a un centro de servicio antes de
volver a usarlo.
PROBLEMA POSIBLE CAUSA SOLUCIONES POSIBLES
La unidad no
enciende
1. El cordón de alimentación no está bien
enchufado en la toma de corriente. 1. Enchufe bien la unidad.
2. No hay corriente en el enchufe de
pared. 2. Verifique el fusible o el disyuntor de la
casa.
3. Se quemó el fusible o se disparó el
disyuntor. 3. Cambie los fusibles o reinicie los
disyuntores de la casa.
4. El temporizador puede haber llegado
a su fin. 4. Reinicie el temporizador.
5. La cubierta del frente puede estar
suelta. 5. Cierre firmemente la cubierta del frente.
6. El filtro puede estar suelto. 6. Apriete bien el filtro.
La unidad hace
mucho ruido
1. Verifique que el filtro no esté sucio. 1. Cambie el filtro.
La unidad sigue
sin funcionar
1. Es posible que las rejillas de aire estén
bloqueadas. 1. Desbloquee el área de la rejilla de aire.
2.Elltropuedeestarsucio. 2.Cambieelltro.
3. La velocidad del ventilador es L=baja
(tecnología de funcionamiento
silencioso)
3. Luz indicadora se encenderá.
4.Veriquetodoslospuntos
mencionados previamente.
4. Llame al 1-800-944-9200 para encontrar
el concesionario autorizado más cercano. *Varía según el modelo
*Varía según el modelo
Cómo utilizar el panel de control:
POSICIÓN VERTICAL
•IMPORTANTE •
Esta unidad está equipada con un panel inteligente sensible al tacto. No se recomienda presionarlo con fuerza.
Mantenimiento: Cómo cambiar los filtros
1
2
3
4
5
6
PRECAUCIÓN
Para reducir el riesgo de lesiones
ocasionadas por piezas en movimiento,
desenchufe el producto antes de darle
mantenimiento.
!!
•IMPORTANTE•
NOTA: LOS FILTROS NO
SE PUEDEN LAVAR.
SISEUTILIZAELAPARATOENCONDICIONESNORMALES,ELFILTROPRINCIPALDEBECAMBIARSE
CADA6MESES.REEMPLACEELFILTRODEOLOR*CADATRESMESES.ESPOSIBLEQUELOS
FILTROSSEDEBANCAMBIARCONMAYORFRECUENCIAENCONDICIONESDEUSORUDOCOMO
LOSONAMBIENTESPOLVOSOSODONDEHAYHUMO.CONSERVEFILTROSDEREPUESTOPARA
REEMPLAZARLOSENUNFUTURO.
Cuandoseenciendalaluzdelltro,apaguelaunidadydesconécteladelatomadecorriente.
Presione los botones ubicados en los costados de la unidad para quitarlo de la cubierta. Gire la tapa hacia
abajo y retírela.
Retireelltrousado.Nota:elltrodeolorsecierraconuncierredevelcroalltroprincipal.Elltrodeolor*
es una función opcional. La unidad continuará limpiando el aire sin él.
Retiredelempaqueelnuevoltro(s).
Elltrodeoloresreversibleysecierraconuncierredevelcroalfrentedelltroprincipal.Coloqueelltro(s)
enlaunidaddeacuerdoaladireccióndelaechadelujodeairecomoseindicaenelltroprincipal.
Coloqueelnuevoltro(s)enlaunidad.
Para colocar la puerta nuevamente, alinee e inserte las dos lengüetas que se encuentran en la parte inferior
delapuerta,enlosoriciosproporcionadosenelmarcodelaunidad.Girelapartesuperiordelapuerta
hacia la parte superior de la unidad y asegúrese de que encaje en su lugar en ambos lados.
Elltroinstaladoensu
máquina contiene la
información necesaria para
ordenar nuevamente.
CUALQUIEROTRATAREADEMANTENIMIENTODEBEREALIZARSEPORUNREPRESENTANTEDE
MANTENIMIENTOAUTORIZADO.
SI EL PRODUCTO NO FUNCIONA ADECUADAMENTE, SE DEJÓ CAER, SE DAÑÓ, SE DEJÓ A LA
INTEMPERIE O SE DEJÓ CAER DENTRO DEL AGUA, LLÉVELO A UN CENTRO DE SERVICIO ANTES DE
VOLVER A USARLO.

17 18
CUALQUIER SERVICIO DE MANTENIMIENTO REALIZARSE POR UN REPRE-
SENTANTE DE MANTENIMIENTO AUTORIZADO Llame al (888) 679-2121 en
EE. UU. y Canadá
Si necesita más ayuda, visite un centro de servicio autorizado. Encuentre el
más cercano a usted en nuestro sitio web, www.hoover.com. El propietario
pagará el costo del transporte desde y hacia cualquier sitio de reparación.
Cuando solicite información o pida piezas de repuesto, siempre identifique
su producto por el número de modelo y código de fabricación. (El número
de modelo y el código de fabricación se encuentran en la parte inferior del
cargador y en un costado de la batería).
GARANTÍA LIMITADA DE UN AÑO (PARA USO DOMÉSTICO)
LO QUE ESTÁ CUBIERTO POR ESTA GARANTÍA
Siempre que su producto HOOVER® se use en el hogar en condiciones
normales y se le dé mantenimiento de acuerdo con el Manual del usuario,
tendrá garantía contra defectos de origen en los materiales y la fabricación
durante todo un año a partir de la fecha de compra (el “Período de Garantía”).
Durante el período de garantía, Hoover® le proporcionará gratuitamente mano
de obra y piezas para corregir cualquier defecto de este tipo en productos
comprados en los Estados Unidos, las tiendas situadas en una base militar de
los EE. UU., y Canadá.
CÓMO HACER UN RECLAMO SEGÚN LA GARANTÍA
Si este producto no se ajusta a las condiciones garantizadas, llévelo o envíelo
a un Centro de Ventas y Servicio de Hoover® o a un concesionario autorizado
de servicio de garantía de Hoover® junto con el comprobante de compra.
Si desea que le indiquen de manera automática la ubicación de los centros
autorizados de servicio en los EE. UU., llame al: 1-800-944-9200 O visite el
sitio web de Hoover® en www.hoover.com. Para obtener asistencia adicional
o información relacionada con esta Garantía o la disponibilidad de centros
de servicio de garantía, llame al Centro de Respuestas del Consumidor de
Hoover®, al teléfono 1-800-944-9200, de lunes a viernes, de 8:00 a. m. a 7:00
p. m., hora del Este. En Canadá, comuníquese con Hoover® Canadá, Carson
Building, 100 Carson St., Etobicoke, Ontario M8W 3R9, Teléfono: 1-800-944-
9200, de lunes a viernes, de 8:00 a. m. a 7:00 p. m., hora del Este.
MANTENIMIENTO Y GARANTÍA
INFORMACIÓN SOBRE EL MANTENIMIENTO
LO QUE ESTA GARANTÍA NO CUBRE
Esta garantía no cubre el uso del producto en una operación comercial (como
servicios de empleadas domésticas, mantenimiento de edificios y alquiler de
equipos), mantenimiento incorrecto del producto, daños por uso indebido,
causas de fuerza mayor, naturaleza, vandalismo u otras situaciones fuera del
control de Hoover®, acciones u omisiones del propietario, uso fuera del país
en el que se compró el producto inicialmente y reventas del producto por parte
del propietario original. Esta garantía no cubre recogidas, entregas, transporte
ni visitas a domicilio. Sin embargo, si usted envía su producto a un Centro de
ventas y servicio de Hoover® para un servicio de garantía, cada una de las
partes se hará responsable del envío correspondiente.
Esta garantía no se aplica a los productos comprados fuera de los Estados
Unidos, incluidos sus territorios y posesiones, fuera de una tienda situada en
una base militar de los EE. UU. ni fuera de Canadá. Esta garantía no cubre los
productos comprados a una parte que no sea un minorista, concesionario o
distribuidor autorizados de los productos de Hoover®.
OTROS TÉRMINOS IMPORTANTES
Esta garantía no es transferible y no puede ser asignada a ningún tercero.
Esta garantía será regida e interpretada de acuerdo con las leyes del estado
de Ohio. El período de garantía no podrá ser extendido por cualquier tipo de
reemplazo o reparación realizados bajo esta garantía.
ESTA GARANTÍA ES LA ÚNICA GARANTÍA Y EL ÚNICO RECURSO
PROVISTO POR HOOVER®. TODAS LAS DEMÁS GARANTÍAS, EXPRESAS
O IMPLÍCITAS, INCLUIDAS LAS GARANTÍAS DE COMERCIABILIDAD O
APTITUD PARA UN FIN PARTICULAR, QUEDAN EXCLUIDAS. HOOVER® NO
SERÁ RESPONSABLE EN NINGÚN CASO POR NINGÚN DAÑO ESPECIAL,
INDIRECTO, INCIDENTAL O MEDIATO DE NINGÚN TIPO O NATURALEZA
CON RESPECTO AL PROPIETARIO O A CUALQUIER PARTE QUE REALICE
UN RECLAMO A TRAVÉS DEL PROPIETARIO, YA SEA QUE SE BASE EN
RESPONSABILIDAD CONTRACTUAL, NEGLIGENCIA, RESPONSABILIDAD
EXTRACONTRACTUAL O RESPONSABILIDAD CIVIL OBJETIVA POR LOS
PRODUCTOS, O EMERGENTE DE CUALQUIER OTRA CAUSA. Algunos
estados no permiten la exclusión de los daños mediatos, por lo que es posible
que la exclusión anterior no se aplique a su caso en particular. Esta garantía
le otorga derechos legales específicos, y es posible que también tenga otros
derechos que varían de un estado a otro.
Mantenimiento:
Para obtener un servicio aprobado por Hoovery piezas
genuinas de Hoover, localice el Concesionario autorizado de
garantía de Hoover(Depot) mediante:
•Consultelaspáginasamarillasenlasección“Puricadoresde
aire”u“Hogar”.
• Visite nuestro sitio web en hoover.com. (clientes en Estados
Unidos) o hoover.ca (clientes en Canadá). Siga el enlace de los
centros de servicio para encontrar el más cercano.
• Llame al 1-800-944-9200 para que le indiquen, de manera
automática, la ubicación de los centros autorizados de servicio.
NoenvíesupuricadordeaireaHoover®,Inc.,Companyen
Glenwillow para su mantenimiento. Esto sólo causará demoras.
Si necesita más información:
Para hablar con un representante de servicio al cliente, llame al
1-800-944-9200;delunesaviernes,de8:00a.m.a7:00p.m.,
hora del Este. Cuando solicite información u ordene piezas de
repuesto,siempreidentiquesupuricadordeaireporelnúmero
completo de modelo. (El número de modelo se encuentra en la
parteinferiordelapuricadordeaire.)
POR FAVOR, NO DEVUELVA ESTE PRODUCTO A LA TIENDA.

Notes

Hoover.com
Find us on: youtube.com/hoover facebook.com/hoover twitter.com/hooverusa
#RethinkCleaning
This manual suits for next models
2
Table of contents
Languages:
Other Hoover Air Cleaner manuals

Hoover
Hoover HHP75CAH011 User manual

Hoover
Hoover H-PURIFIER Series User manual

Hoover
Hoover SILENTAIR 4000 User manual

Hoover
Hoover HHP55CA011 User manual

Hoover
Hoover HHP55CA011 User manual

Hoover
Hoover Air Cleaner User guide

Hoover
Hoover SilentAir 2000 User manual

Hoover
Hoover H-PURIFIER 700 User manual

Hoover
Hoover HHP30C011 User manual

Hoover
Hoover HHP50CA011 User manual