Horizon Fitness PF-P280 User manual

I
PAPER FOLDER
Important Information
- This manual is designed to help you to install, operate and maintain the Table Top
Folder PF-P280. Read, understand and keep this manual in a safe and convenient
place.
- Do not operate the PF-P280 until you read and understand the instructions in this
manual.
- Horizon International Inc. shall not be liable for incidental consequential damages
resulting from : improper or inadequate maintenance by customer; unauthorized modi-
fication or misuse; operation outside of the environmental specifications for the prod-
uct.
- No Horizon dealer and distributor is authorized to make any modification, expres-
sion, or addition to the warranties written in contract.
- Horizon International Inc. pursues a policy of continuing improvement in design and
performance of the product. Therefore, the product design and specifications are sub-
ject to change without prior notice and without our legal obligation.
- All rights are reserved. No part of the manual may be photocopied, reproduced or
translated to another language without the prior written consent of Horizon Interna-
tional Inc.
030123/PFP280/05E/NO/MM/ UM203002-05
PF-P280

II
Safety Precautions
- The signal word WARNING indicates a potentially hazardous situation which, if not
avoided, could result in death or serious injury.
- The signal word CAUTION indicates a potentially hazardous situation which, if not
avoided, may result in minor or moderate injury. It may also be used to alert against
unsafe practices.
- The signal word NOTE indicates a potentially hazardous situation which, if not
avoided, may result in damage on products.
- Read and understand all safety instructions with signal word such as WARNING,
CAUTION and NOTE. If safety instructions are ignored, personal injury will result.
- Observe the provisions of the federal, state, or local regulations, including OSHA.
- Horizon International Inc. cannot anticipate every possible situation that might in-
volve a potential hazard. The instruction in this manual and warning labels on the
machine are therefore not all inclusive.
- All equipment shall be locked out or tagged out to protect against accidental or inad-
vertent operation when such operation could cause injury to personnel. Do not attempt
to operate any switch, valve, or other energy isolating device where it is locked or
tagged out.
- Do not operate the machines with any covers being removed.
- Some of the drawings in this manual shows the machine uncovered for explaining the
detail or inside of machine.

III
Contents
1. Before You Begin ..................................................... 1
This section explains machine parts and their function.
1-1 Specifications ............................................................................2
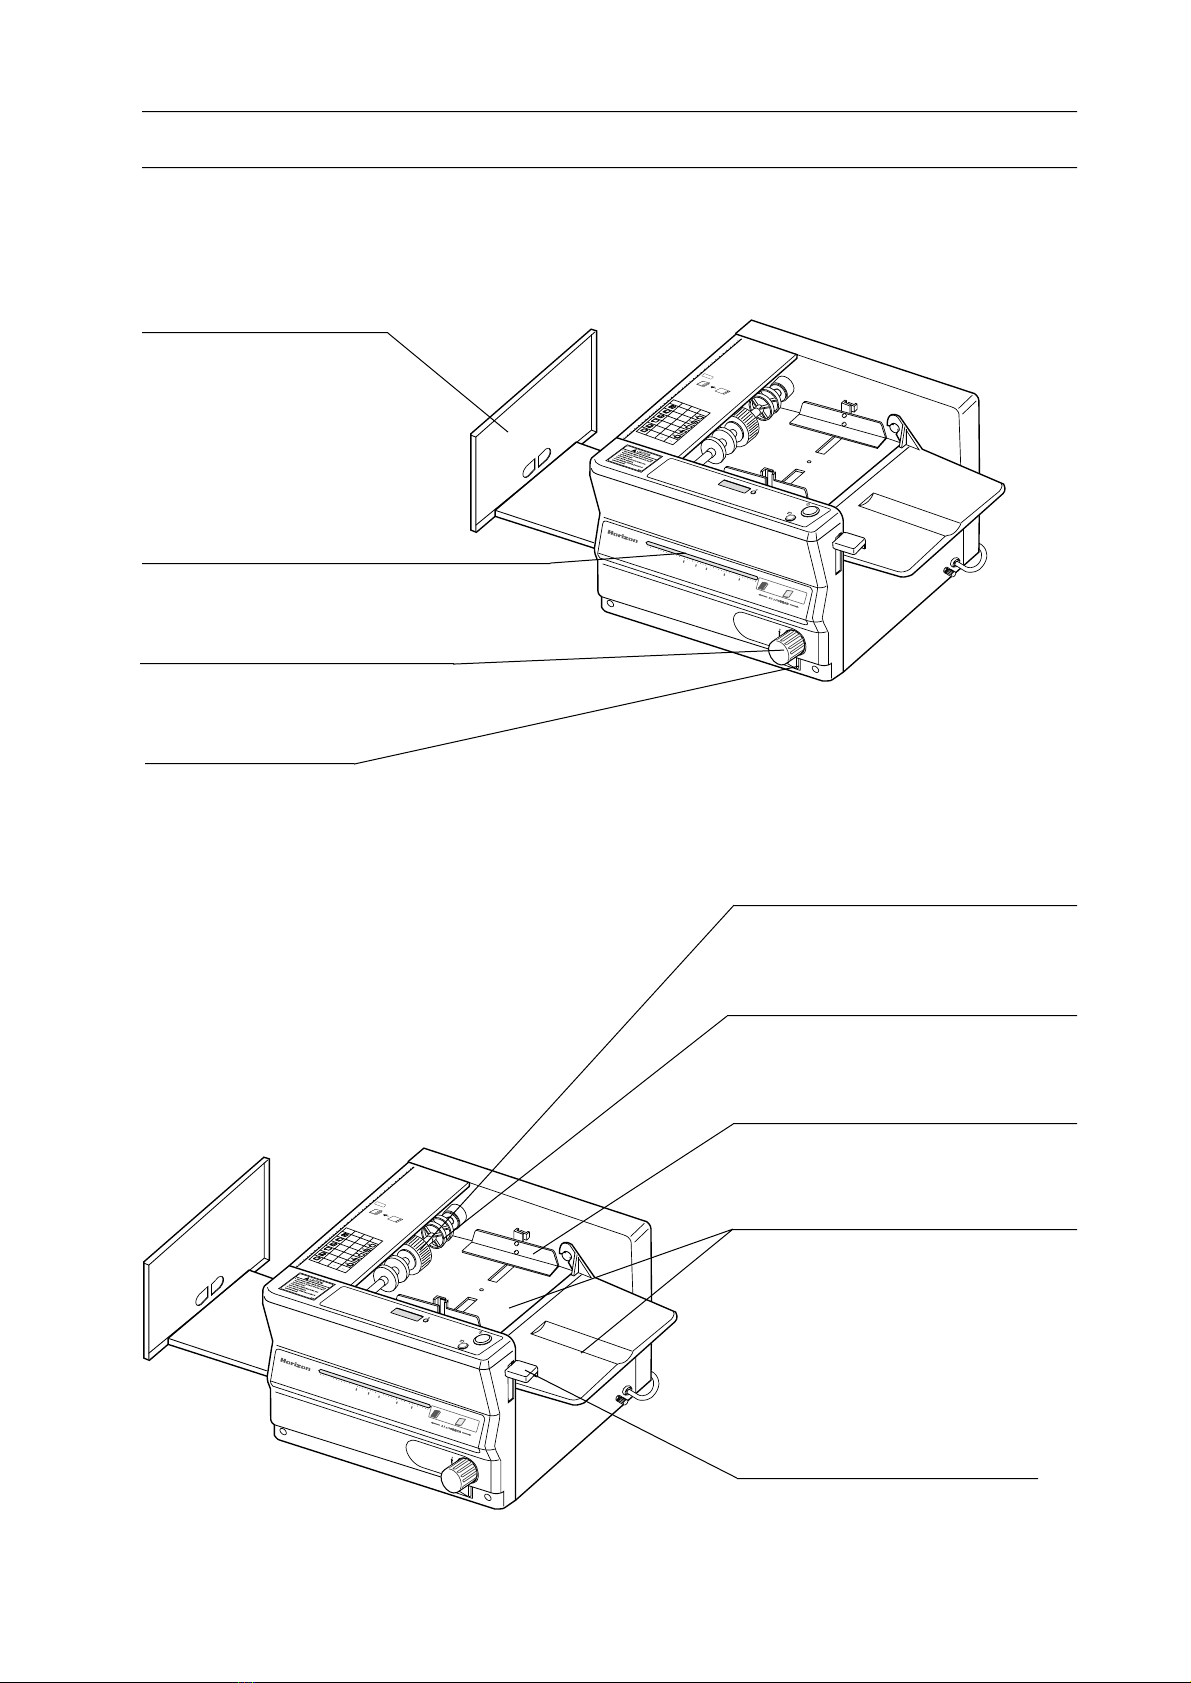
1-2 Machine Parts Descriptions ......................................................3
1-2-1 General View ...................................................................3
1-2-2 Operation Panel ...............................................................4
1-3 For Piling Sheets .......................................................................5
2. Operation Procedure ............................................... 7
This section explains setting up each parts and operation procedure.
2-1 Operation Procedure .................................................................8
2-2 Irregular Size Sheet Folding .....................................................12
2-3 Cross Fold .................................................................................14
2-4 When Folding Is Not Even or Square .......................................17
2-4-1 To correct uneven fold ....................................................17
2-4-2 To correct not square fold ...............................................18
3. Trouble Shooting ..................................................... 19
This section shows quick reference of trouble which can be resolved
or prevented by operator.
3-1 Trouble Shooting ......................................................................20
4. Maintenance ............................................................. 23
This section explains maintenance for PF-P280.
4-1 Feed Roller/Double Feed Stop Pad Replacement .....................24
4-2 Fold Roller Replacement .......................................................... 26
4-3 Removal of Jammed Sheet........................................................28
4-4 Cleaning the Count Sensor........................................................29
4-5 Maintenance Kit (Option) .........................................................30
4-6 Option .......................................................................................30

IV

1. Before You Begin
1
1. Before You Begin
This section explains machine parts and their function.
1-1 Specifications ......................................................................................... 2
1-2 Machine Parts Descriptions.................................................................. 3
1-3 For Piling Sheets .................................................................................... 5

1. Before You Begin
2
1-1 Specifications
Maximum Sheet Size : A3 (11" x 17")
Minimum Sheet Size : 65 mm x 44 mm (2.6" x 1.7")
Stock Weight : 50 to 105 gsm
Folding Speed : 140 sheets /min (A4, single fold)
Maximum Pile Height : 21 mm (0.85")
Power : 115 v 60 Hz 0.5 A
(Power Consumption) : 230 v 50 Hz 0.4 A
Dimension (W x D x H) : 711 mm x 485 mm x 316 mm (28" x 19.1" x 12.5")
Machine Weight : 25 kg (55.2 lb)
The machine design and specifications are subject to change without any notice.

1. Before You Begin
3
L
0
10
10
15
15
20
20
25
25
30
30
5
1/2
1/2
1/2
1/2
1/4
1/4
1/4
1/4
1/4
1/4
1/3
1/3
1/3
1/3
1/3
1/3
1/3
1/3
1/4
1/4
1/2
1/2
SL
10
10
15
15
20
20
5
A5/2
A5/2
B5/2
B5/2
A4/2
A4/2
B5/2
B5/2
A3/2
A3/2
PF-P280
PF-P280
PAPER FOLDER
PAPER FOLDER
L
0
10
10
15
15
20
20
25
25
30
30
5
1/2
1/2
1/2
1/2
1/4
1/4
1/4
1/4
1/4
1/4
1/3
1/3
1/3
1/3
1/3
1/3
1/3
1/3
1/4
1/4
1/2
1/2
SL
10
10
15
15
20
20
5
A5/2
A5/2
B5/2
B5/2
A4/2
A4/2
B5/2
B5/2
A3/2
A3/2
PF-P280
PF-P280
PAPER FOLDER
PAPER FOLDER
1-2 Machine Parts Descriptions
1-2-1 General View
Feed Guide
Guides sheet for straight feeding.
Feed Tray
Used to pile sheets to be folded.
Feed Tray Lever
Used to lower feed tray for piling,
to raise for folding.
Stopper Position Indicator
Used to indicate position of stopper.
Stopper Handle
Used to move stopper.
Power Switch
Used to turn ON/OFF main
power.
Feed Roller
Feeds piled sheet to buckle sec-
tion.
Hold Roller
Holds sheet for smooth feeding.
Delivery Tray
Folded sheet is delivered
to this tray.

1. Before You Begin
4
Clear Button
Used to clear display.
1-2 Machine Parts Description
1-2-2 Operation Panel
Test Feed Button
Used to feed one sheet for
testing.
Display
Indicates number of
folded sheets.
Start/Stop Button
Used to start/stop folding.

1. Before You Begin
5
1-3 For Piling Sheets
- Fan well the sheet before piling on the
feed tray. Otherwise, double sheet feed-
ing or miss feed occur.
- Make sure that printed ink is dry enough.
Otherwise, double sheet feed will occur.
The wet ink will not only be stain the
printed sheet but also make lower the
precision of folding of this machine.
- Jog well the sheet before piling on the
feed tray. Otherwise, jamming or miss
feed or fold on edge of sheet will occur.
- Straighten up the curled sheet or
folded sheet.

1. Before You Begin
6

2. Operation Procedure
7
2. Operation Procedure
This section explains setting up each parts and operation procedure.
2-1 Operation Procedure ............................................................................. 8
2-2 Irregular Size Sheet Folding .............................................................. 12
2-3 Cross Fold ............................................................................................ 14
2-4 When Folding Is Not Even or Square ............................................... 17

2. Operation Procedure
8
2-1 Operation Procedure
Delivery Tray Feed Tray
1.Plug power cord to outlet.
2.Open delivery tray and feed tray.
3. Turn on power switch.
4. Lower feed tray lever.
Feed Tray
Lever

2. Operation Procedure
9
Orange
Mark
Feed Tray
2-1 Operation Procedure
Feed Guides
Support Roller
Stopper
Handle
5. Pile sheets on feed tray.
- Face printed surface downward.
- Jog well and true up sheets toward
feed roller.
- Place sheets center of feed tray.
6. Slide both feed guides so that feed
guides slightly touch piled sheets.
- Place support rollers at 10 mm inside
of sheet edge.
7. Turn stopper handle so that orange mark
sets according to the sheet size.
CAUTION
Stop turning stopper handle when
orange mark comes to 10 mm (0.4") to
the both end. Do not turn any further.
NOTE
When irregular size sheets are folded,
refer to "2-2 Irregular Size Sheet
Folding" (Page 12 to 13).
8. Raise feed tray lever.

2. Operation Procedure
10
2-1 Operation Procedure
9. Press test button to fold one sheet in
order to check folding accuracy.
10.
Check folded sheet.
NOTE
- If sheet is folded uneven, correct it
with referring to "Adjustment Tips"
beside stopper position indicator. Or
refer to "2-4 When Folding is not
Even or Square" (page 17 to 18).
- Press test feed button and check
folded sheet after adjustment.
11.
Press start/stop button. PF-P280 starts
folding.
12.
When you want to stop folding, press
start/stop button or lower feed tray
lever.
Adjustment Tips

2. Operation Procedure
11
2-1 Operation Procedure
13.
Number of folded sheets are indicated
on display.
- To delete display, press clear button.
- Number indicated on display is de-
leted also when power switch is turned
off.
14.
When your folding job is finished, lower
feed tray lever and turn off main switch.
- Pull out power cord from outlet.
- Close delivery tray and feed tray.

2. Operation Procedure
12
ABC
Orange
Mark
2-2 Irregular Size Sheet Folding
1. Measure size of folding edge with ruler.
2. Complete step 1 to 6 in "2-1 Operation
Procedure" (Page 8 to 9).
- When sheet is piled so that printed
surface faces downward, printed
surface comes inside after folded.
3. Set stopper position for first folding.
- Start folding with referring to step 8
through 12 in "2-1 Operation Proce-
dure" (Page 10 to 11).
For Parallel Fold - 1/4 of sheet Width
For Single Fold - 1/2 of sheet Width
For Gate Folder - 1/4 of sheet Width
Stopper Position for First Folding
For Accordion Fold - 1/3 of sheet Width
For Letter Fold - 1/3 of sheet Width
For Short Fold - 1/4 of sheet Width
CAUTION
Stop turning stopper handle when
orange mark comes to 10 mm (0.4") to
the both end. Do not turn any further.

2. Operation Procedure
13
2-2 Irregular Size Sheet Folding
4. Press fold edge of sheet firmly.
NOTE
If fold edge of sheet is not pressed
sufficiently, sheet (signature) will not
be folded correctly.
5. Pile folded sheet on feed tray for second
folding.
- Refer to fold pattern table and pile
sheets properly.
6. Set stopper position for second folding.
When setting is completed, refer to step
9 and the following (page 9) and fold
sheet.
Pile Direction of Sheets For Second Folding
For Gate Folder
For Accordion Fold
For Parallel Fold
For Short Fold
For Letter Fold
Stopper Position for Second Folding
For Gate Folder - 1/2 of sheet Width
For Parallel Fold - 1/4 of sheet Width
For Short Fold - 1/4 of sheet Width
For Letter Fold - 1/3 of sheet Width
For Accordion Fold - 1/3 of sheet Width

2. Operation Procedure
14
Cross Fold
2-3 Cross Fold
NOTE
- In case of cross fold, sheet wider than
210 mm (8.5") may not be folded
completely.
- Please use cross folding guide (op-
tion).
ATTENTION
- Cross fold or 12-page letter fold can
be performed only by thin fine quality
paper which is 64 gsm or lighter.
(Meaning of Cross Fold)
Sheet is folded into half, and then this
single folded sheet (signature) is
folded once again in half.
When folded sheet is opened, each
crease of this signature become criss-
cross pattern.
The following steps are to fold A3 size sheet
without cross folding guide.
1. Fold A3 size sheet in single fold with
referring to "2-1 Operation Procedure"
(Page 8 to 11).
2. Press fold edge of sheet firmly.
NOTE
If fold edge of sheet is not pressed
sufficiently, sheet (signature) will not
be folded correctly.
3. Perform step 1 through 4 in "2-1 Opera-
tion Procedure" (Page 8) and pile sheets
on feed tray so that fold edge faces to
near side.
NOTE
Do not pile sheet more than half height
of feed guide. If folded sheet is piled
too much on feed tray at once, sheet is
not fed straightly.
Folded Line
Folded
Line

2. Operation Procedure
15
2-3 Cross Fold
4. Set feed guides.
4-1
When sheet width is less than 185 mm
(7.28").
- Slide feed guide 1 fully far side and
then set feed guide 2 .
4-2
When sheet width is more than 185 mm
(7.28").
- Slide feed guide 2 fully far side and
then set feed guide 1 .
5. Set support rollers.
- Place support roller on far side at 20
mm inside from edge of sheets.
- Place support roller on near side as
near as possible to fold edge.
6. Set stopper position.
- Set stopper for A4.
- When sheet to be folded is irregular
size sheet, refer to "2-2 Irregular Size
Sheet Folding" (Page 12 to 13).
20mm
1
2
1
2
Feed Guide
Feed Guide
Support Roller
Orange
Mark

2. Operation Procedure
16
2-3 Cross Fold
7. Raise feed tray lever and press start/stop
button.
- Hold folded edge slightly with finger
in order to feed sheet straightly.
NOTE
Cross folding guide is provided as an
optional equipment.
8. When your folding job is finished, lower
feed tray lever and turn off power
switch.
- Pull out power cord from outlet.
- Close delivery tray and feed tray.
For far side
Roller
Cross Folding Guide
For near side
Roller
Cross Folding Guide (option)
Cross folding guide is used to hold
folded edge when second folding is
performed.
Set cross folding guide along feed
guide on feed tray.
Table of contents
Other Horizon Fitness Folding Machine manuals

Horizon Fitness
Horizon Fitness SPF-10II User manual

Horizon Fitness
Horizon Fitness PF-P3100 User manual

Horizon Fitness
Horizon Fitness CRF-362 User manual

Horizon Fitness
Horizon Fitness SPF-10 User manual

Horizon Fitness
Horizon Fitness SPF-10 User manual

Horizon Fitness
Horizon Fitness AFC-566F User manual

Horizon Fitness
Horizon Fitness H-1000XP User manual

Horizon Fitness
Horizon Fitness PF-P330 User manual

Horizon Fitness
Horizon Fitness PF-P3100 User manual

Horizon Fitness
Horizon Fitness PF-P320 User manual