Horizon Fitness SPF-10II User manual

I
STITCHER & FOLDER
SPF-10II
Important Information
- This manual is designed to help you to install, operate and maintain Stitching and Folding
System SPF-10II. Read, understand and keep this manual in a safe and convenient place.
- Do not operate SPF-10II until you read and understand the instructions in this manual.
- Horizon International Inc. shall not be liable for incidental consequential damages resulting
from : improper or inadequate maintenance by customer; unauthorized modification or misuse;
operation outside of the environmental specifications for the product.
- Horizon International Inc. pursues a policy of continuing improvement in design and perfor-
mance of the product. Therefore, the product design and specifications are subject to change
without prior notice and without our legal obligation.
- All rights are reserved. No part of the manual may be photocopied, reproduced or translated to
another language without the prior written consent of Horizon International Inc.
000927/SPF10II/01E/DV UM201008-01

II
Safety Precautions
- The signal word WARNING indicates a potentially hazardous situation which, if not avoided,
could result in death or serious injury.
- The signal word CAUTION indicates a potentially hazardous situation which, if not avoided,
may result in damage on machines. It may also be used to alert against unsafe practices.
- Read and understand all safety instructions with signal word such as WARNING and CAU-
TION. If safety instructions are ignored, personal injury may result.
- Horizon International Inc. cannot anticipate every possible situation that might involve a
potential hazard. The instructions in this manual and warning labels on the machine are therefore
not all inclusive.
- All equipment shall be locked out or tagged out to protect against accidental or inadvertent
operation when such operation could cause injury to personnel. Do not attempt to operate any
switch, valve, or other energy isolating device where it is locked or tagged out.
- Do not operate the machines when any covers are removed.
- Some of the drawings in this manual show the machine uncovered for explaining the detail or
inside of machine.

III
CONTENTS
Important Information ............................................................................................I
Safety Precautions....................................................................................................II
1. Before You Begin
1-1 Specifications......................................................................................................2
1-2 Machine Descriptions ........................................................................................3
1-2-1 Machine Descriptions and Functions .............................................................3
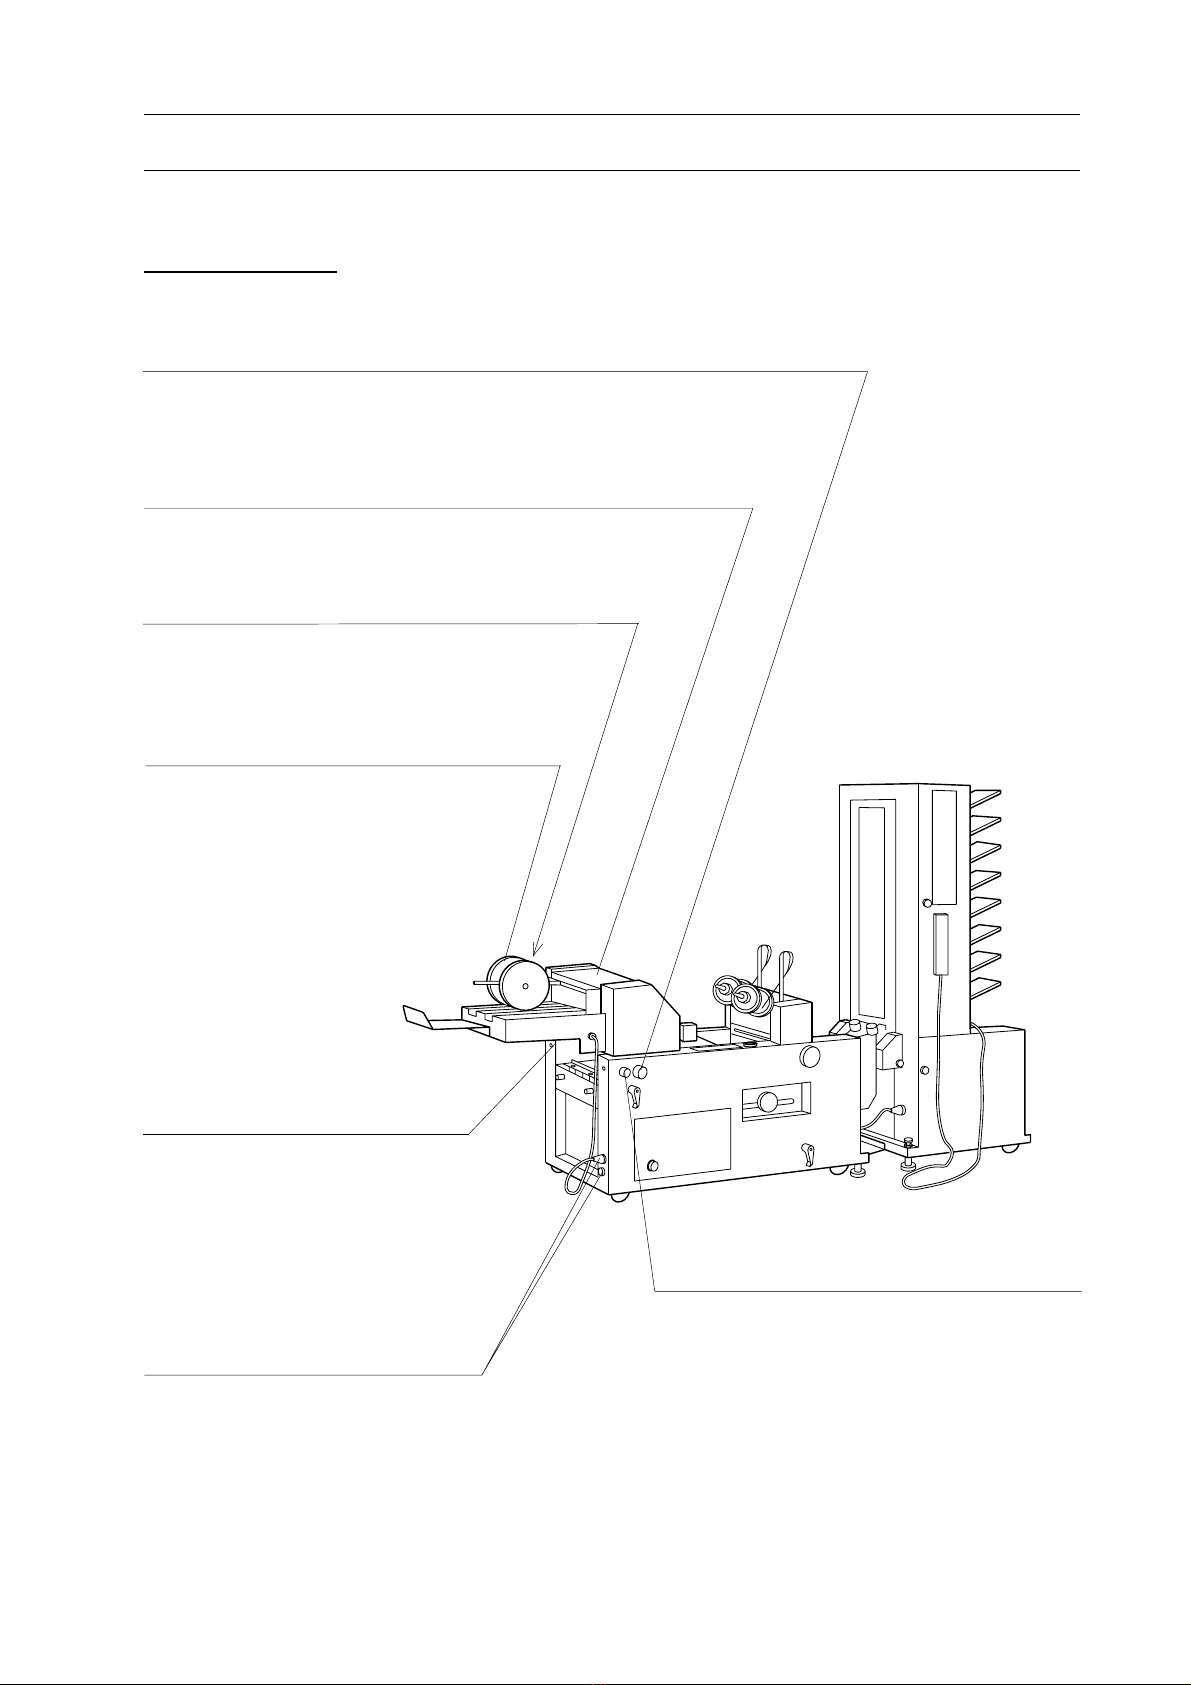
[1] General View 1................................................................................................3
[2] General View 2................................................................................................4
[3] Front and Side Joggers ....................................................................................5
[4] Stitcher ............................................................................................................6
[5] Wire Coil .........................................................................................................7
[6] Sheet Transport Section ..................................................................................8
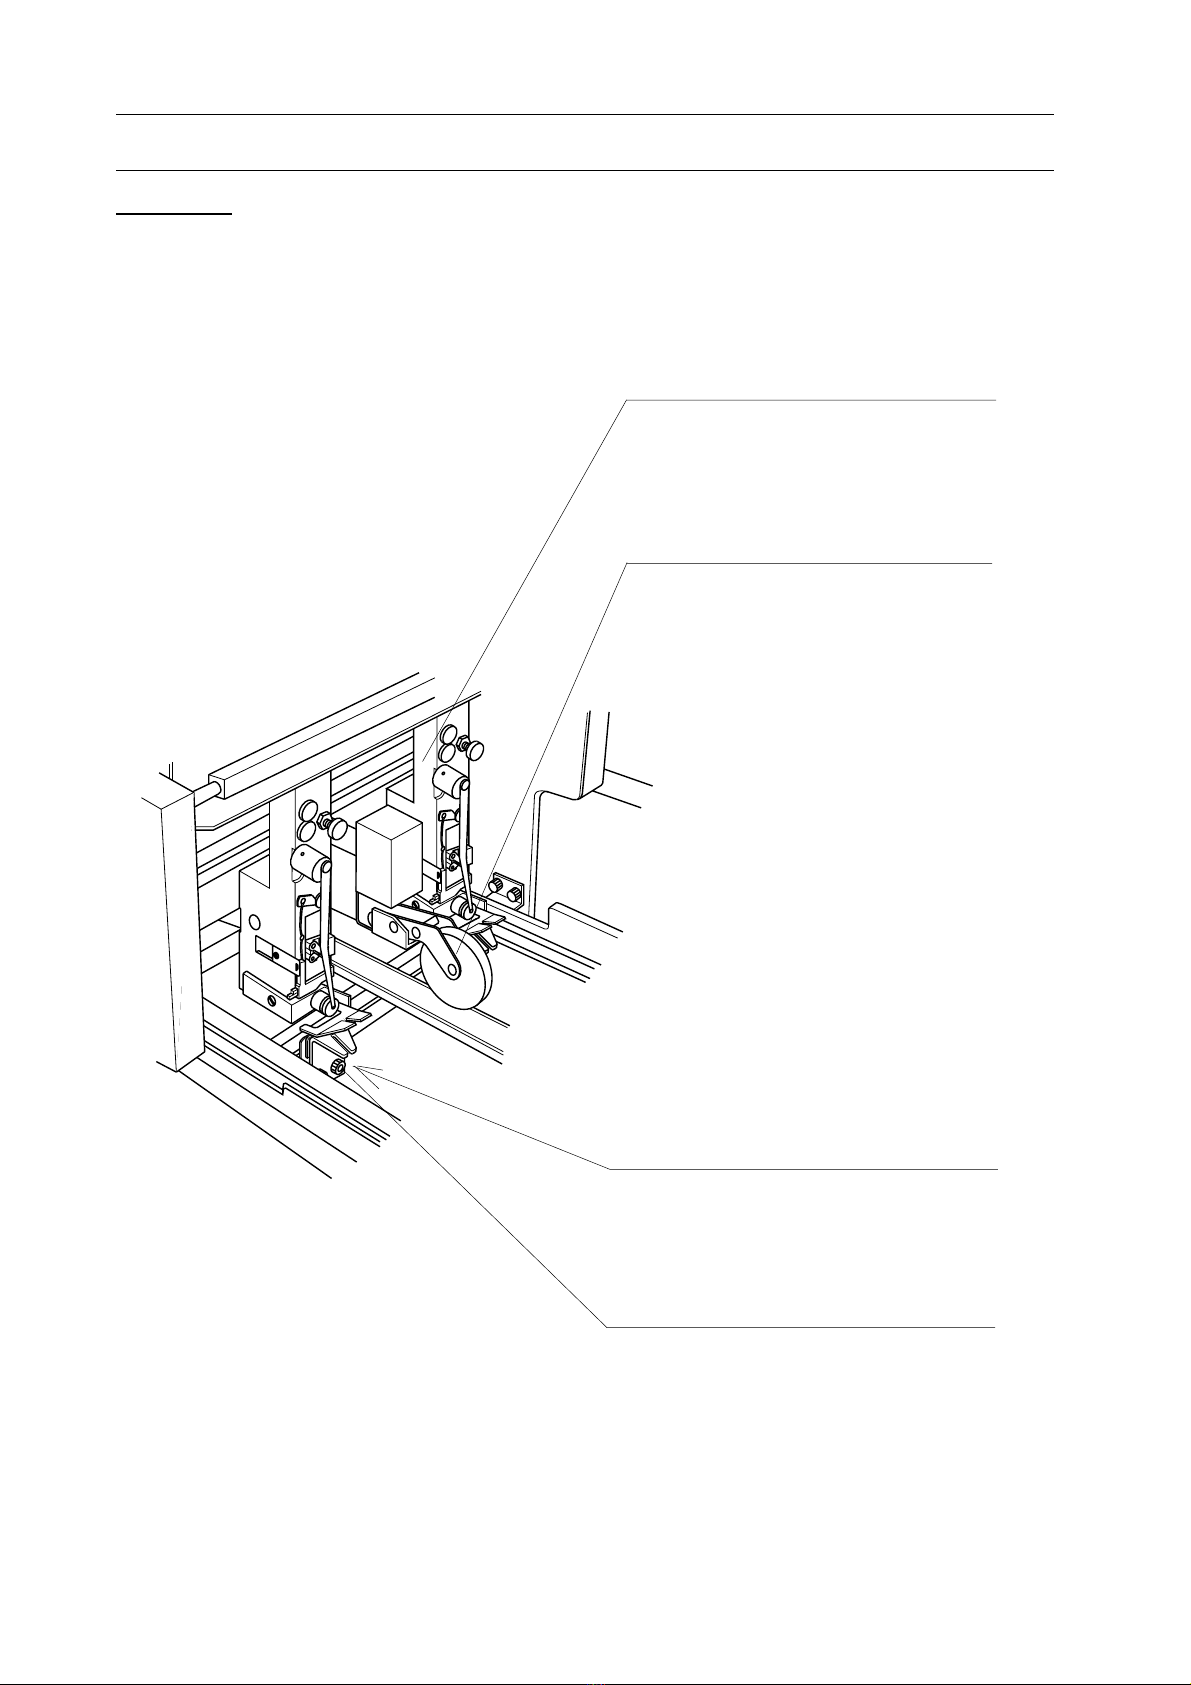
[7] Stitcher Head 1 ................................................................................................9
[8] Stitcher Head 2 ................................................................................................10
1-2-2 Operation Panel ..............................................................................................11
1-3 Accessories..........................................................................................................12
2. Operation Procedure
2-1 Stitching and Folding Operations ....................................................................16
2-1-1 Stitching Section.............................................................................................16
2-1-2 Folding Section...............................................................................................18
2-2 Top and Side Stitching Operations ..................................................................21
2-3 Folding Operations ............................................................................................22
2-4 Corner Stitching Operations ............................................................................23
2-5 Collating Operations .........................................................................................24
2-6 Operation Procedure .........................................................................................25
2-7 For Efficient Operations ...................................................................................26
2-7-1 Adjusting Parts ...............................................................................................26
[1] Adjusting Jogging Stroke of Side Jogger ........................................................26
[2] Adjusting Square of Folding End Stopper ......................................................26
[3] Adjusting Knife Height ...................................................................................26
[4] Adjusting Foding Roller Clearnce...................................................................26
[5] Adjusting Folding Roller Pressure ..................................................................27

IV
3. Preparing and Adjusting the Stitching Head
3-1 Threading Wire..................................................................................................30
3-2 Adjusting Stitch Length ....................................................................................32
3-3 Changing for Work Thickness .........................................................................32
4. Maintenance
4-1 Lubrication.........................................................................................................34
4-1-1 Daily ...............................................................................................................34
4-1-2 Weekly............................................................................................................34
4-2 Cleaning ..............................................................................................................34
4-2-1 Cleaning the Stitching Head (monthly) ..........................................................34
4-2-2 Cleaning the timing Belt and the ....................................................................34
4-3 Replacement .......................................................................................................35
4-3-1 Reversing or Replacing the Clincher Points on the Clincher .........................35
4-3-2 Reversing or Replacing the Driver of the Stitching Head ..............................35
5. Error Detectors and Automatic Stop Motion
5-1 Error Detectors and Automatic Stop Motion .................................................38
6. Installation Instruction
6-1 Installation Instructions ....................................................................................40
6-1-1 Installing Stitching Heads(two) ......................................................................40
6-1-2 Connection of SPF-10II with Collator ...........................................................41
6-1-3 Receiving Tray Installation ............................................................................44

1
1. Before You Begin
1. Before You Begin
1-1 Specifications ........................................................................................... 2
1-2 Machine Descriptions.............................................................................. 3
1-3 Accessories ............................................................................................... 13

2
1. Before You Begin
Model SPF-10II
Runnable Sheet Size 210 x 210 mm (8.3" x 8.3") to 330 x 70 mm (13" x 8.5")
Stitching & Folding
Top Stitching 1 8 x 210 mm (5.8" x 8.3") to 330 x 36 mm (13" x 1 .3")
Corner Stitching 1 8 x 210 mm (5.8" x 8.3") to 330 x 297 mm (13" x 11.7")
Stitcher Motion All stitching heads are cam-operated simultaneously.
Stitching Pitch Adjustable within the range from 80 to 280 mm (3.1" x 11")
Stitching wire Diameter 0.52 mm (Standard)
Stitching Thickness mm (0.25") Max
Production Speed 2,600 Booklets/Hour Max
Power Required 100 v 50/60 Hz, 115 V 60 Hz, 220/2 0 V 50 Hz
Power Consumption 500 W
machine Weight 280 kg (616 Ib)
1-1 Specifications
The machine design and specifications are subject to change without any notice.

3
1. Before You Begin
1-2 Machine Descriptions
1-2-1 Machine Descriptions and Functions
[1] General Vie 1
Hook
This hook is used to install con-
nectors such as CNC and CNS.
Folder
This section consists of folding roller,
knife stopper and folding knife.
Conveyor
This conveyor is used during stitching and fold-
ing operation. The conveyor operation time is
adjustable with conveyor time adjusting knob.
Knife Stopper Adjusting Knob
This knob must be turned to "L" position to increase distance between
leading edge of sheet and folding line, and to "S" position to decrease.
Smoother
Smoother must be set up at position
where booklets are delivered smoothly.
Stopper ON/OFF Knob
This knob is used to select operation mode
of folder.
ON : Folding... Booklets are folded and
delivered upward.
OFF : No folding... Booklets are delivered
without folding.
Receptacles : L1 (Upper)
L1 : For conveyor, CNC or CNS
L2 : For trimmer, FC-10 or receiving tray

1. Before You Begin
Po er S itch
1-2 Machine Descriptions
[2] General Vie 2
Stitcher Hand heel
This handwheel is used to
thread wire through stitcher
head.
Collator
Stitcher Adjusting Knob
This knob is used to adjust
stitcher position.
Operation Panel
Knife Height Adjusting Knob
This knob must be turned clockwise
to raise knife.
Knife Stopper Locking Lever
This lever has to be fastened after fold
stopper is adjusted.
Stitcher Locking Lever
This locking lever has to be fastened
after stitcher position is adjusted.
Stitcher Head
Referring to "Stitcher Head"
(page 9 and 10).

5
1. Before You Begin
Timing Belt
This belt is synchronized with timing
roller. This belt must be set at a
position suitable to size of sheets to be
run.
1-2 Machine Descriptions
[3] Front and Side Joggers
Roller Speed Control Knob
This knob is used to adjust delivery roller
speed.
Side Jogger and Locking Scre
This jogger is set at a position suitable to
size of sheets to be run with side jogger
located at its forward stroke end by press-
ing single jog button.
Front Jogger
The number of jogging motion is adjustable
by stitching interval knob.
Delivery Guide
This guide prevents sheets from curling
up. This guide adjusted to suit delivering
condition of sheets.
Delivery Sheet Bulging Nose
This nose functions to insure smooth and neat
delivery of sheets. This nose installed to handle
A3 or B sheets with light weight.
Jogging Stroke Adjusting Nut
This nut is used to adjust jogging stroke to
7 mm when a 80 gsm paper is run and to
less than 7 mm when thin paper is
handled.

6
1. Before You Begin
1-2 Machine Descriptions
[4] Stitcher
Stitcher Head
This head stitches sheets. Clincher is
located under stitching head.
Timing Roller
This roller delivers stitched sheets to
folding section. This roller is set on
timing belt.
Clincher Locking Scre
This screw is used to align clincher with
stitching head by loosing it.
Clincher
This clincher clinches legs of stitches
penetrated sheets . This must be
aligned with stitcher head.

7
1. Before You Begin
1-2 Machine Descriptions
[5] Wire Coil
Resistance Plate
This plate insures smooth wire feeding.
If this plate does not exert sufficient
pressure, coil turns too freely. This
causes wire to become tangled. If
pressure is excessive, uneven wire
feeding will result.
Stitcher Adjusting Scale
This scale indicates length from
front jogger to stitching position.
Stitcher Head Locking Lever
This lever is used to set stitching head
at position in conformity with stitch-
ing head positioning indicator on unit
base according to size of sheets to be
run. This lever must be replaced with
thumb nut when corner-stitching is
performed.
Coil
Wire must be fed to operating side from
bottom of coil. Buckle and crack of wire
may cause erroneous wire feeding.
Timing Roller Locking Nut
This nut is used to install timing
roller on timing belt. Timing roller
must be adjusted before this nut is
fastened.
Hex. Scre driver
This screwdriver is used to adjust
clincher timing belt and front
guide.
Delivery Smoother
This smoother prevent sheets from
curling up. This smoother is turned
upside down when top, side or
corner stitching is performed.
Wire Guide Spring
This spring draws wire into
stitcher head. Wire is threaded
through wire guides.

8
1. Before You Begin
1-2 Machine Descriptions
[6] Sheet Transport Section
End Stopper Micro-adjusting Knob
and Locking Knob
This knob is used to adjust stitch
position finely.
End Stopper Locking Knob
This knob must be set just on timing belt,
sliding end stopper.
End Stopper Adjusting and Locking Lever
This lever is used to adjust end stopper to sheet length with front
jogger located at forward stroke end by pressing single jog button.
Delivery Guide and Lock Screw
This screw is used to adjust this
guide.
Sheet Guides
These guides must be installed
at proper position according to
sheet delivering condition.
Folding Roller Clearance Adjusting Lever
This lever is used to adjusting folding roller
clearance according to number of sheets to be
run. Turning this lever clockwise increases
clearance.
Sheet Holding Guide
This guide must be
positioned for smooth
transportation of sheets.
Smooth Guide
This guide prevents sheets from
flapping up at the stopper.
Front Guide
This guide jog sheets more
efficiently.
Folding Roller
This roller holds up sheets against
transport belt and prevents sheets
from bounding back.

9
1. Before You Begin
1-2 Machine Descriptions
[7] Stitcher Head 1
Stitching Length Adjusting Scre
This screw is used to adjust length of
stitch legs. Turning this screw clockwise
shortens left leg of stitch, and turning it
counterclockwise lengthens left leg.
Guide
Cut of guide must be aligned with groove
of supporter crown when clincher is set up.
Upper Wire Straightener
This straightener is used to remove
curve of wire and to feed wire parallel
to face plate of stitching head.
Wire Guide Locking Scre
This screw must be fastened except the
case of adjusting stitching length.
Tension Pa l and Tension Roll
This pawl is lowered toward arrow
mark to open clearance between this
pawl and tension roll to thread wire.
Lo er Wire Straightener
Lower wire straightener adjusting knob
is set to 7 or 8 position of scale for
performing normal work.
Wire Gripper
This gripper grips and draw wire. This
gripper is opened turning stitching
handwheel when wire is threaded into
wire cutter lead-in hole.
Clincher Point
This clincher point clinches and flats
legs of stitches. It must be reversed
when it is worn out.
Perspective Vie of Clincher
Supporter Cro n
This crown supports stitch before it
penetrates sheets. This crown is pushed
out when stitching head is actuated.

10
1. Before You Begin
1-2 Machine Descriptions
[8] Stitcher Head 2
Wire Guide Spring
Clincher Driver Span and Groove
This span drives clincher slide up and
down.
Clincher Slide
This slide operates clincher point up and
down. This slide is set up by inserting bottom
of it in groove of clincher drive span.
Clincher Unit Base and Groove
This groove is used to remove clincher.
Wire Cutter
This cutter is reversible.
Stitcher Head Unit Base and Groove
Stitcher head is installed to stitching head unit
base using block and washers.
Stitcher Head Driver Span and Groove
This span drives stitching head up and down.
Driver Slide
This slide must be inserted correctly in groove
of driver span whenever stitching head is in-
stalled. Incorrect installation of stitching head
may cause stitching head to be damaged.
Block

11
1. Before You Begin
Operation Mode Select Switch
Stitch: Jog, stitch and delivery operation
Jog: Jog and delivery operation
Pass: Delivery belt is running
continuously. This mode is selected
when only collating operation is
performed.
1-2 Machine Descriptions
1-2-2 Operation Panel
Motor ON Button
This button is pressed to start
stitcher and folder motors. Trans-
port belts starts running by pressing
this button.
Stop Button
This button is pressed to stop machine,
and collator stops at the same time.
This button is turned clockwise to
resume operation.
Conveyor Operation Time Adjust-
ing Knob
This knob is used to adjust conveyor
operation time.
Power Lamp
Collating Stop Button
This button is pressed to stop collating.
When collating operation resumed, start
button of collator is pressed.
Single Jog Button
This button is pressed to actuate front
and side jogger.
End Stopper Control Knob
This knob is used to control end stopper open
time.
Single Fold Button
Whenever this button is pressed, folding
knife is actuated, and also conveyor belt
is set into action. This button is used to
test folding result.
Jam Lamp
This lamp comes on with collator,
stitcher and folder stopped if paper jam
is detected at transport section.
Motor OFF Button
This button is pressed to stop stitcher
and folder motors.
Single Stitch Button
This button is pressed to actuate
stitcher only once, and a set of sheets
stitched is delivered to transport sec-
tion. Stitching motion is synchronized
with folding knife motion.
Stitching Interval Knob
Single Jog Mode:
Front and side joggers are actuated
only once to jog sheets. After that,
stitcher is actuated.
Con:
Jogging time of front jogger is adjust-
able by stitching interval knob.

12
1. Before You Begin
1-3 Accessories
Delivery Roller B (A000-150) 2 pcs Transport Guide L (M002593-01) 1 set
Sheet Guide L (M002917-00) 2 pcs
Sheet Guide S (M002916-00) 2 pcs
Delivery Roller A (A000-142) 1 pc
Transport Guide S (M002589-00) 1 set
Leveling Bolt (HB12-00) 2 pcs
Ground Wire 1 pc
Stopper (M002781-02) 1 pc Point Screwdriver 1 pc

13
1. Before You Begin
1-3 Accessories
Tool Set (4-003344-00) 1 set
Coil (CO-25) 1 pc
Release Plate (P100-0001) 1 pc
Corner Stitch Guide 1 pc
Butterfly Nut (4-002387-00) 2 pcs
Cutting Pliers 1 pc

14
1. Before You Begin

15
2. Operation Procedure
2-1 Stitching and Folding Operations.......................................................... 20
2-2 Top and Side Stitching Operations........................................................ 25
2-3 Folding Operations.................................................................................. 26
2-4 Corner Stitching Operations .................................................................. 27
2-5 Collating Operations ............................................................................... 28
2-6 Operation Procedure............................................................................... 29
2-7 For Efficient Operations ......................................................................... 30

16
2. Operation Procedure
2-1 Stitching and Folding Operations
WARNING
Keep your hands and fingers off inside
of safety cover and any parts while
machine is in operation. Stitching Head
Locking Lever
2-1-1 Stitching Section
(1) Install stitching heads in position according
to size of sheets to be run as specified in
scale label.
(2) Set clinchers just under stitching heads by
loosening clincher locking screws and
aligning groove of paper guide for clincher
with slot of supporter crown of stitching
head. Set up clinchers before clincher
locking screws are fastened.
(Access supporter crowns to clinchers by
turning stitcher handwheel counterclock-
wise.)
(3) Set timing roller and timing belt at center
of two stitching heads by loosening timing
roller locking thumb nut and timing belt
locking screw. Set up timing roller and
belt before these nut and screw are fas-
tened.
Supporter Crown
Clincher
Timing BeltLocking Screw
Timing Roller
Table of contents
Other Horizon Fitness Folding Machine manuals

Horizon Fitness
Horizon Fitness PF-P330 User manual

Horizon Fitness
Horizon Fitness PF-P3100 User manual

Horizon Fitness
Horizon Fitness PF-P3100 User manual

Horizon Fitness
Horizon Fitness SPF-10 User manual

Horizon Fitness
Horizon Fitness PF-P280 User manual

Horizon Fitness
Horizon Fitness H-1000XP User manual

Horizon Fitness
Horizon Fitness PF-P320 User manual

Horizon Fitness
Horizon Fitness AFC-566F User manual

Horizon Fitness
Horizon Fitness SPF-10 User manual

Horizon Fitness
Horizon Fitness CRF-362 User manual