manuals.online logo
Brands
  1. Home
  2. •
  3. Brands
  4. •
  5. HTRC
  6. •
  7. Batteries Charger
  8. •
  9. HTRC P120 User manual

HTRC P120 User manual

7 - Stage Automatic Smart Battery Charger
For Lithium, Lead-Acid, LiFePO4...
( AGM, GEL, SLA , WET , DEEP CYCLE... BATTERIES)
12V10A& 24V/5A
IMPORTANT SAFETY INSTRUCTIONS
Please read this manual and follow the instructions carefully before using
.
WARNING:
The charger is designed for 12V and 24V Lithium, Lead-Acid, LiFePO4 batteries
with capacity from 6AH - 120AH(12V), 6AH - 60Ah(24V).
Check battery manufacturer specifications before using.
Explosive gases may emitting from battery during charging. Provide
ventilation to prevent flames and sparks.
Do not expose charger to the sun, or under high temperature environment.
Battery acid is corrosive. Rinse immediately with water if acid comes into contact with skin or eyes.
Do not charge a frozen or damaged battery.
Do not charge non-rechargeable batteries.
Do not place the charger on the battery while charging.
Be extra cautious to reduce risk of dropping a metal tool onto battery.
It might spark or short-circuit battery or other electrical part that may cause explosion.
When working with a lead-acid battery, remove personal metal items
such as rings, bracelets, necklaces, watch…
Do not smoke or allow a spark or flame while charging.
In order to reduce risk of electric shock, unplug charger from AC
outlet before doing any maintenance or cleaning.
Not for use by children or by anyone who is unable to follow instructions of this
manual, unless they are supervised by an adult to ensure the proper use of charger.
MAIN FEATURES:
High efficiency (>85%).
Lithium, Lead-Acid, LiFePO4 battery type can selectable
The 7-stage microprocessor controlled charging process
provides the best possible application and enables efficient battery charging.
Charging voltage adapts to temperature, that can prevent over- or under- charging of battery.
Capable of recharging severely discharged or heavily sulfated battery.
Reverse polarity protection, short circuit protection, over-charge protections, parks free contact.
LCD display: voltage, current, temperature etc.
Ease of use. Clear charging status display.
Full microprocessor controlled.
Do not over-charge your battery even it is kept connecting in any mode.
LCD DISPLAY:
Charger Inside Temperature Charge Voltage
Repair Mode Standby Battery Full
Charge Current
&
Test Mode
An automatic battery test is conducted
immediately after the absorption stage, it
monitors the voltage for 10 minutes to
determine if the battery is full or not
Low Voltage
Battery voltage is too low or
battery can’t savethe power
End of Repair Function
Winter Mode
When the temperature is below
+10’C, Raise the charge voltage
Only for Car mode
Summer Mode
When the temperature is above
+28’C,Reduce the charge voltage
Only for Car mode
Wrong polarity, please change the connection
of the clamps
Defect battery, please let the battery be
checked by a mechanic and if necessary
change the battery
Bad connection, please check the connection
between the charger and the battery
12V/24V Battery
Battery Capacity
12V 24V
V
V
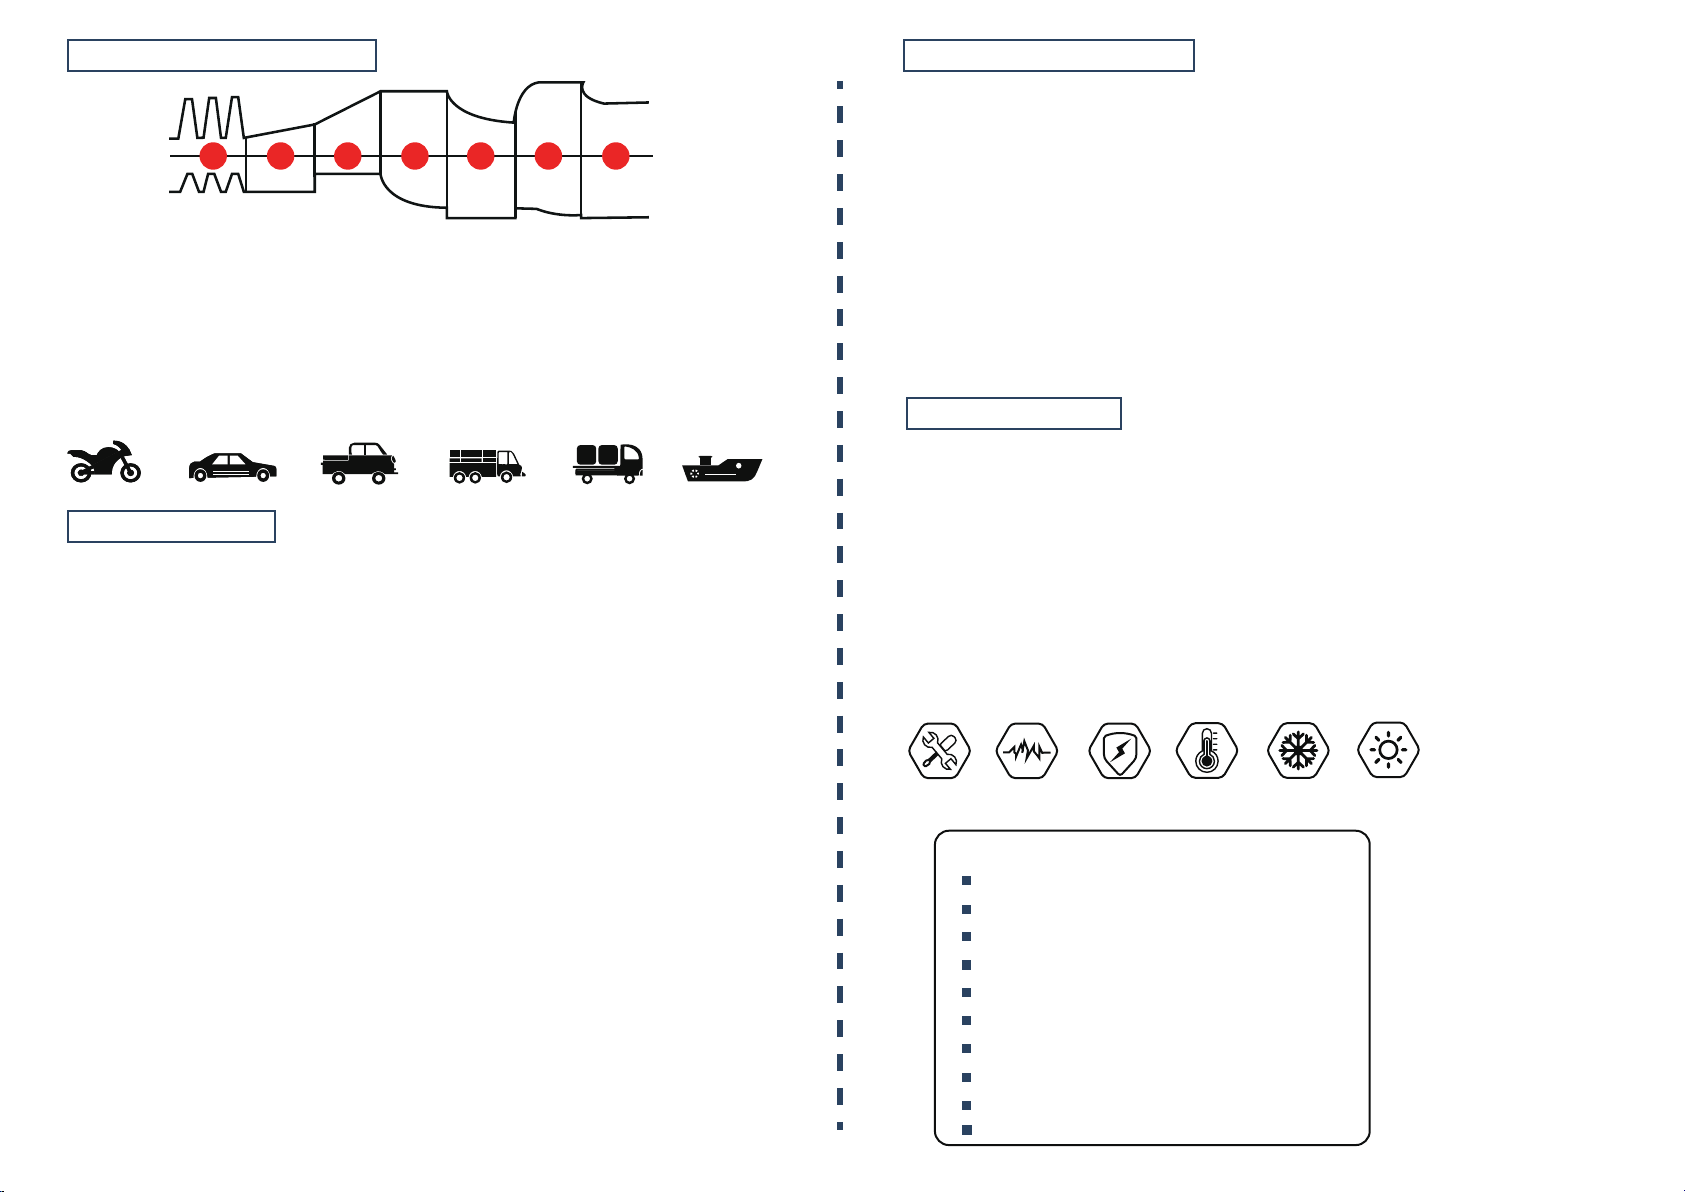
7-STAGE CHARGING PROCESS
1-stage: Battery desulphation >> this stage only for car mode
2-stage: Soft start charging
3-stage: Bulk charging
4-stage: Absorption charging
5-stage: Battery test
6-stage: Recondition charging
7-stage: Float & maintenance charging
CHARGER MODES:
The charger has seven (7) modes: Standby, 12V Lithium, 24V Lithium,12V Car, 24V Car,
12V Motorcycle(LiFePO4), 24V Motorcycle(LiFePO4), REPAIR.
It is important to understand the differences and purpose of each charge mode. Do not operate
the charger until you confirm the appropriatecharge mode for your battery.
Below is a brief description:
Lithium Batteries Mode
For charging 12.6V or 25.2V Lithium batteries. When selected, the Lithium blue LED will
illuminate. For use on batteries with Battery Management Systems (BMS) only.
Lead-Acid Batteries Mode
For AGM, GEL, SLA, WET, DEEP CYCLE, EFB, Calcium Batteries
Motorcycle and LiFePO4 Batteries Mode
For Motorcycle batteries and LiFePO4 batteries
Repair Mode (16 hours)
An advanced battery recovery mode for repairing and storing, old, idle,
damaged, stratified or sulfated.
Not all batteries can be recovered, only can use on Motorcycle and Car batteries
Charge mode select button
After charging for 30 seconds, the mode button will be locked. If you want to use it again, need
to remove the alligator clip from the battery
CONNECT TO THE BATTERY:
Do not connect the AC power plug until all other connections are made. Identify
the correct polarity of the battery terminals on the battery. Do not make any
connections to the carburetor, fuel lines, or thin, sheet metal parts. The below
instructions are for a negative ground system (most common). If your vehicle is a positive
ground system (very uncommon),
follow the below instructions in reverse order.
1.) Connect the positive (red) clamp to the positive (POS,P,+) battery terminal.
2.) Connect the negative (black) clamp to the negative (NEG,N,-) battery terminal.
3.) Connect the battery charger into a suitable electrical outlet. Do not face the battery
when making this connection.
4.) When disconnecting, disconnect in the reverse sequence, removing the negative first
(or positive first for positive ground systems).
BEGIN CHARGING:
1.) Verify the voltage and chemistry of the battery.
2.) Confirm that you have connected the battery clamps or eyelet
terminal connectors properly and the AC power plug is plugged into an electrical outlet.
3.) Press the mode button to toggle to the appropriate charge mode.
4.) The mode LED will illuminate the selected charge mode and the
Charge Icon will illuminate (depending on the health of the battery)
indicating the charging process has started.
5.) The charger can now be left connected to the battery at all times to
provide maintenance charging.
Auto-Memory: The charger has built in auto-memory and will return to
the last charge mode when connected.
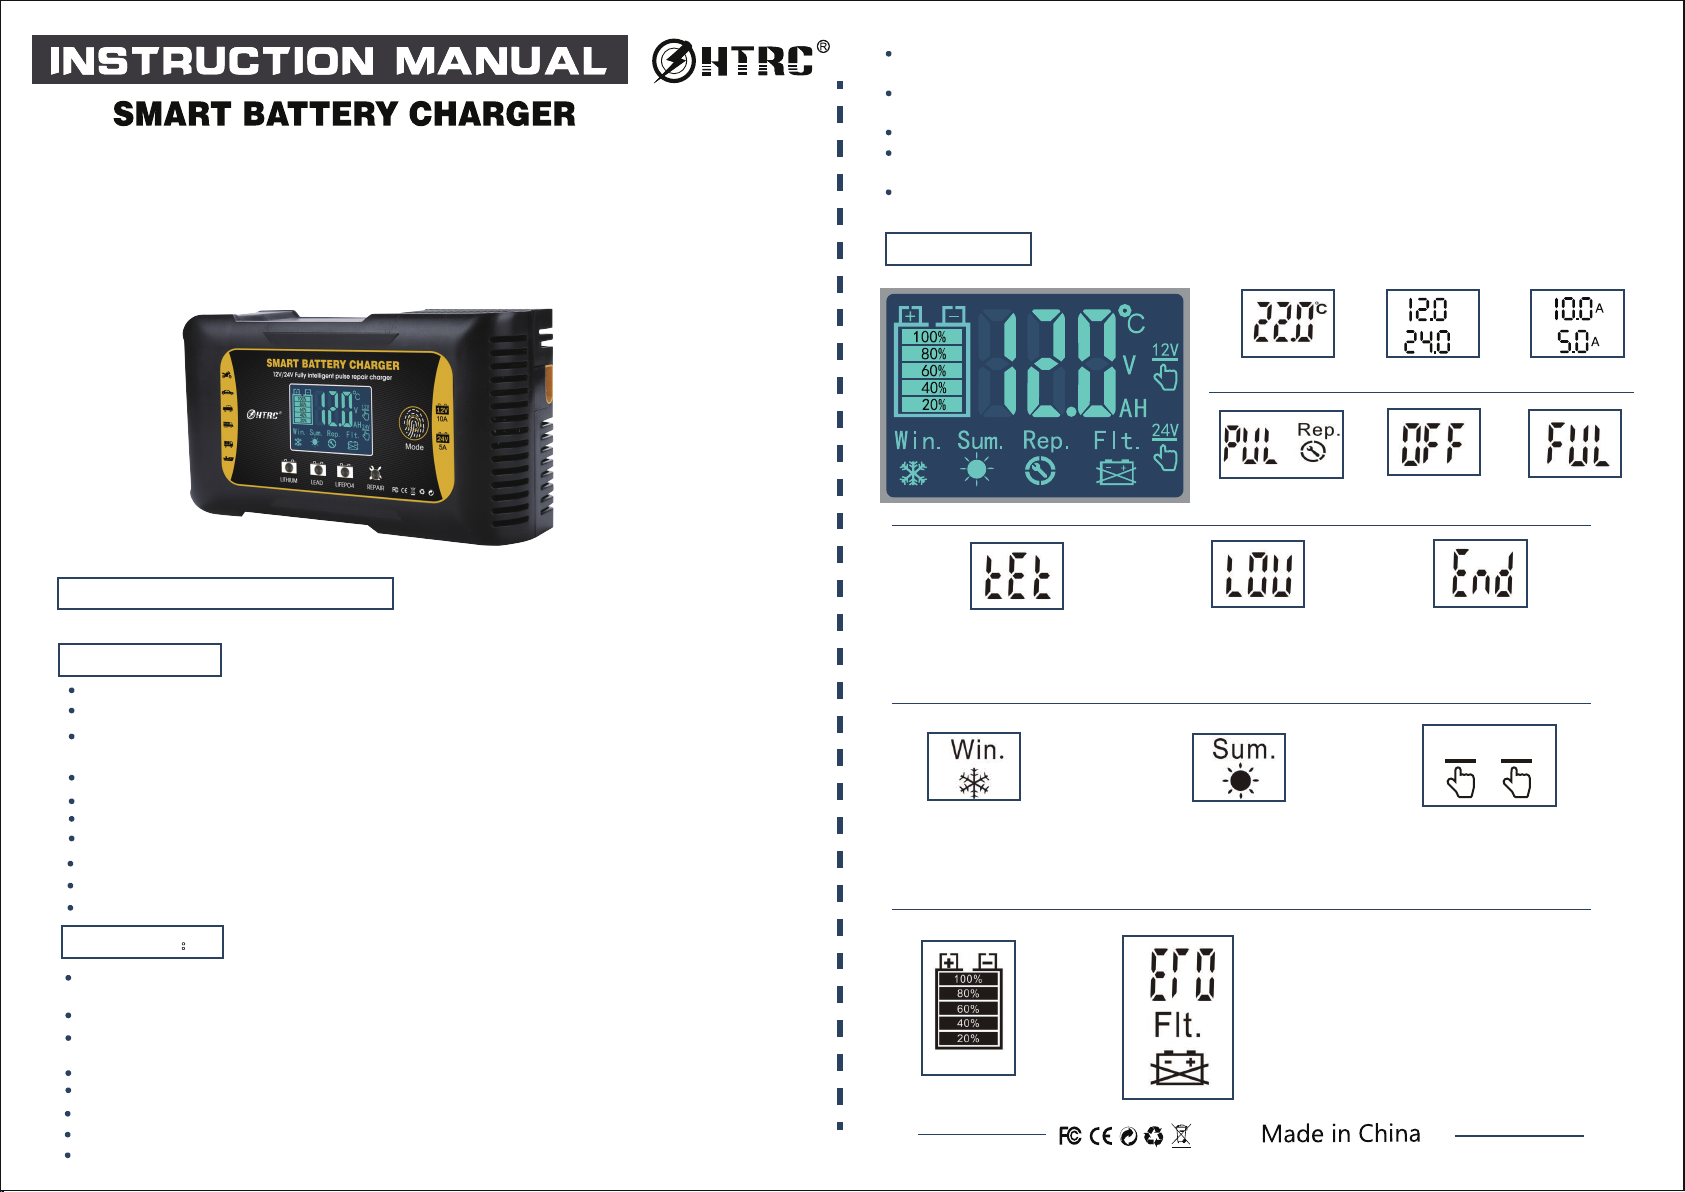
STAGE
V
A
1 2 3 4 5 6 7
Intelligent
Detection
SummerWinterTemp.
Detection
Pulse
Repair
Multi
Protection
SPECIFICATIONS:
Product Model:
AC Input Voltage:100-240V 50/60Hz
Output Voltage:12V/24V
Output Current:12V10A&24V5A
Output Volt under No Load:27.6V
Minimum Start Volt: >9.0V
Input Power with Load:MAX.120W
Dimension:158x90x50mm
Net weight:470g
Input Power under no Load:2.8W

Other HTRC Batteries Charger manuals

HTRC H825AC DUO User manual

HTRC

HTRC H825AC DUO User manual

HTRC C240 DUO User manual

HTRC

HTRC C240 DUO User manual

Popular Batteries Charger manuals by other brands

Moshi Symbus Q quick start guide

Moshi

Moshi Symbus Q quick start guide

Radio Shack 23-226 owner's manual

Radio Shack

Radio Shack 23-226 owner's manual

MOB MO6345 user manual

MOB

MOB MO6345 user manual

Horizon Hobby Smart Technology S120 instruction manual

Horizon Hobby

Horizon Hobby Smart Technology S120 instruction manual

ECO-WORTHY 5A user manual

ECO-WORTHY

ECO-WORTHY 5A user manual

Hama 87033 Operating	 instruction

Hama

Hama 87033 Operating instruction

Inateck UCC3001 instruction manual

Inateck

Inateck UCC3001 instruction manual

Sony BC-1WD Service manual

Sony

Sony BC-1WD Service manual

Hitachi Koki UC 36YRL Service manual

Hitachi Koki

Hitachi Koki UC 36YRL Service manual

TCE KRONOS Series Installation, use and maintenance manual

TCE

TCE KRONOS Series Installation, use and maintenance manual

Sepura DSK-STP9000 user guide

Sepura

Sepura DSK-STP9000 user guide

Sears 47004 owner's manual

Sears

Sears 47004 owner's manual

eyeROBO Adaptica 2WIN user manual

eyeROBO

eyeROBO Adaptica 2WIN user manual

Vetus BC120202 Operation manual and installation instructions

Vetus

Vetus BC120202 Operation manual and installation instructions

HYPERVOLT Home 3.0 Operation and installation manual

HYPERVOLT

HYPERVOLT Home 3.0 Operation and installation manual

Hama 87060 operating instructions

Hama

Hama 87060 operating instructions

Hilti C7 operating instructions

Hilti

Hilti C7 operating instructions

Schumacher SC1322 user manual

Schumacher

Schumacher SC1322 user manual

manuals.online logo
manuals.online logoBrands
  • About & Mission
  • Contact us
  • Privacy Policy
  • Terms and Conditions

Copyright 2025 Manuals.Online. All Rights Reserved.