Huawei Y6P User manual

User Guide

Contents
Essentials
Basic Gestures 1
System Navigation 1
Phone Clone 2
Lock and Unlock Your Screen 3
Get Familiar with the Home Screen 4
Notication and Status Icons 4
Shortcut Switches 6
Home Screen Widgets 6
Set Your Wallpaper 7
Screenshots&Screen Recording 7
View and Clear Notications 9
Adjust Sound Settings 9
Enter Text 10
Split-screen Mode and Floating Window 10
Power On and O or Restart Your Device 11
Charging 11
Camera and Gallery
Launch Camera 13
Take Photos 13
Take Panoramic Photos 14
Take HDR Photos 14
Adjust Camera Settings 15
Manage Gallery 15
Apps
Apps 18
Contacts 18
Phone 20
Messaging 25
Calendar 27
Clock 29
Notepad 30
Recorder 31
Email 31
Calculator 34
Quickly Access Frequently Used App Features 35
Optimizer 35
Phone Clone 37
Settings i

Essentials
Basic Gestures
Basic Gestures
More Gestures
Access Home screen editing mode
Pinch two ngers together on the home screen.
Display the shortcut panel on the lock screen
Swipe up from the bottom of the lock screen.
Display the search bar
Swipe down on the home screen.
Open the notication panel
Swipe down from the status bar.
System Navigation
Change the Navigation Mode
Go to Settings > System & updates > System navigation to select a navigation mode
according to your preferences.
1

Navigate with Gestures
Go to Settings > System & updates > System navigation and enable or disable
Gestures.
After enabling Gestures, you can:
•Go back to the previous screen: Swipe inward from the left or right edge.
•Return to the home screen: Swipe up from the bottom of the screen.
•Access the recent tasks screen: Swipe up from the bottom of the screen and hold.
•Close an app from the recent tasks screen: Swipe up on an app preview.
Three-Key Navigation
Go to Settings > System & updates > System navigation, and select Three-key
navigation.
Touch Settings to select the navigation key combination you prefer.
The icons on the navigation bar are as follows:
•: Back key to return to the previous screen, exit an app, or close the onscreen keyboard.
•: Home key to return to the home screen.
•: Recents key to display the recent tasks screen.
•: Notication key to open the notication panel.
Customise the Navigation Key Combination
Go to Three-key navigation > Settings. You can:
•Select a navigation key combination.
•Enable Hide navigation keys to allow you to hide the navigation bar when not in use.
Phone Clone
Phone Clone
Phone Clone lets you quickly and seamlessly move all the basic data (including contacts,
calendar, images, and videos) from your old device to your new device.
Clone Data from an Android Device
1On your new device, open Phone Clone . Alternatively, go to Settings > System &
updates > Phone Clone, touch This is the new phone, then touch Huawei or Other
Android.
Essentials
2

2Follow the onscreen instructions to download and install Phone Clone on your old device.
3On your old device, open Phone Clone and touch This is the old phone. Follow the
onscreen instructions to connect your old device with your new device by scanning a code
or connecting manually.
4On your old device, select the data you want to clone, then touch Transfer to start
cloning.
Phone Clone is only available on devices running Android 4.4 or later.
Clone Data from an iPhone or iPad
1On your new device, open Phone Clone. Alternatively, go to Settings > System &
updates > Phone Clone, touch This is the new phone, then touch iPhone/iPad.
2Follow the onscreen instructions to download and install Phone Clone on your old device.
3On your old device, open Phone Clone and touch This is the old phone. Follow the
onscreen instructions to connect your old device with your new device by scanning a code
or connecting manually.
4On your old device, select the data you want to clone, then follow the onscreen
instructions to complete the data cloning.
Phone Clone is only available on devices running iOS 8.0 or later.
Lock and Unlock Your Screen
Lock the Screen
If your device remains inactive for a period of time, it will automatically lock the screen and
enter sleep mode to save power.
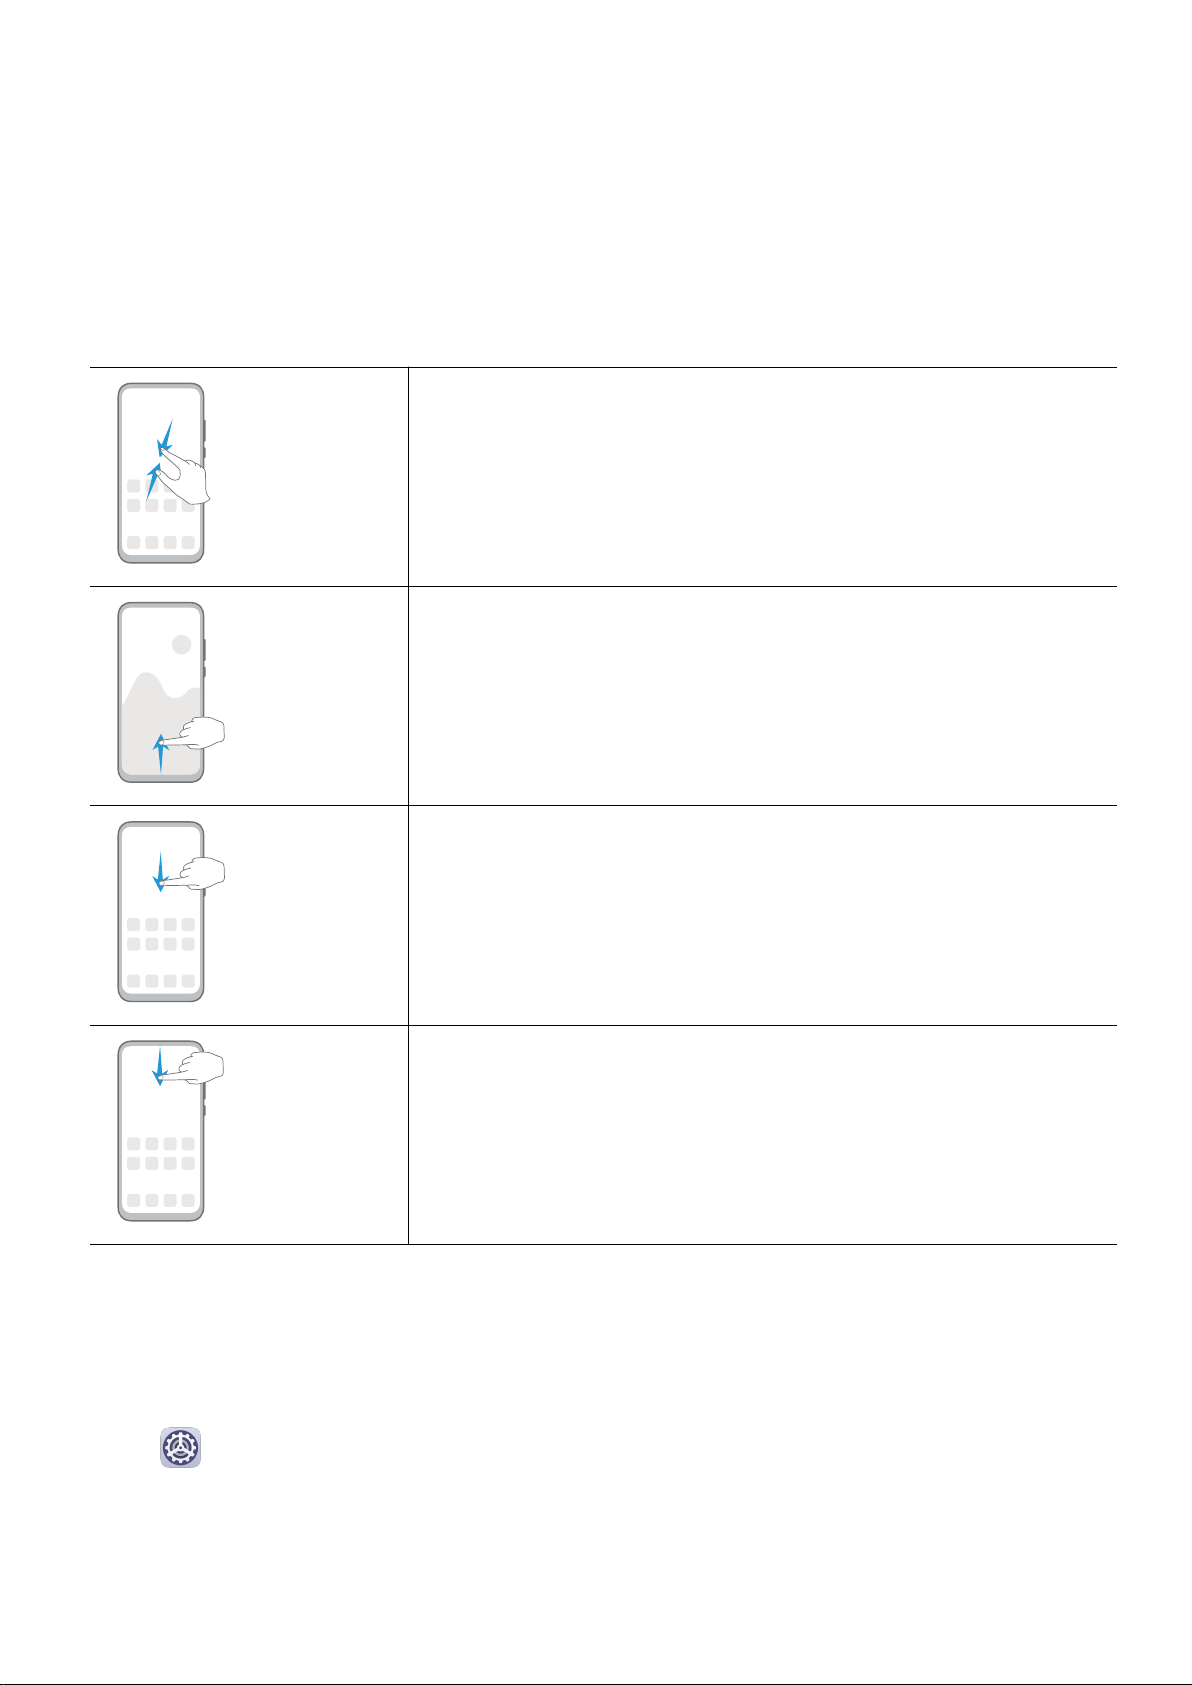
Alternative, you can manually lock the screen in either of the following ways:
•Press the Power button.
•On the home screen, pinch two ngers together to enter screen editing mode. Touch
Widgets, then drag the Screen Lock icon to the home screen. You can now touch the
Screen Lock icon to lock the screen.
Set the Screen Timeout Period
Go to Settings > Display & brightness > Sleep and select a screen timeout period.
Unlock the Screen with Password
Once the screen is turned on, swipe up from the middle of the screen to display the password
input panel. Then, enter your lock screen password.
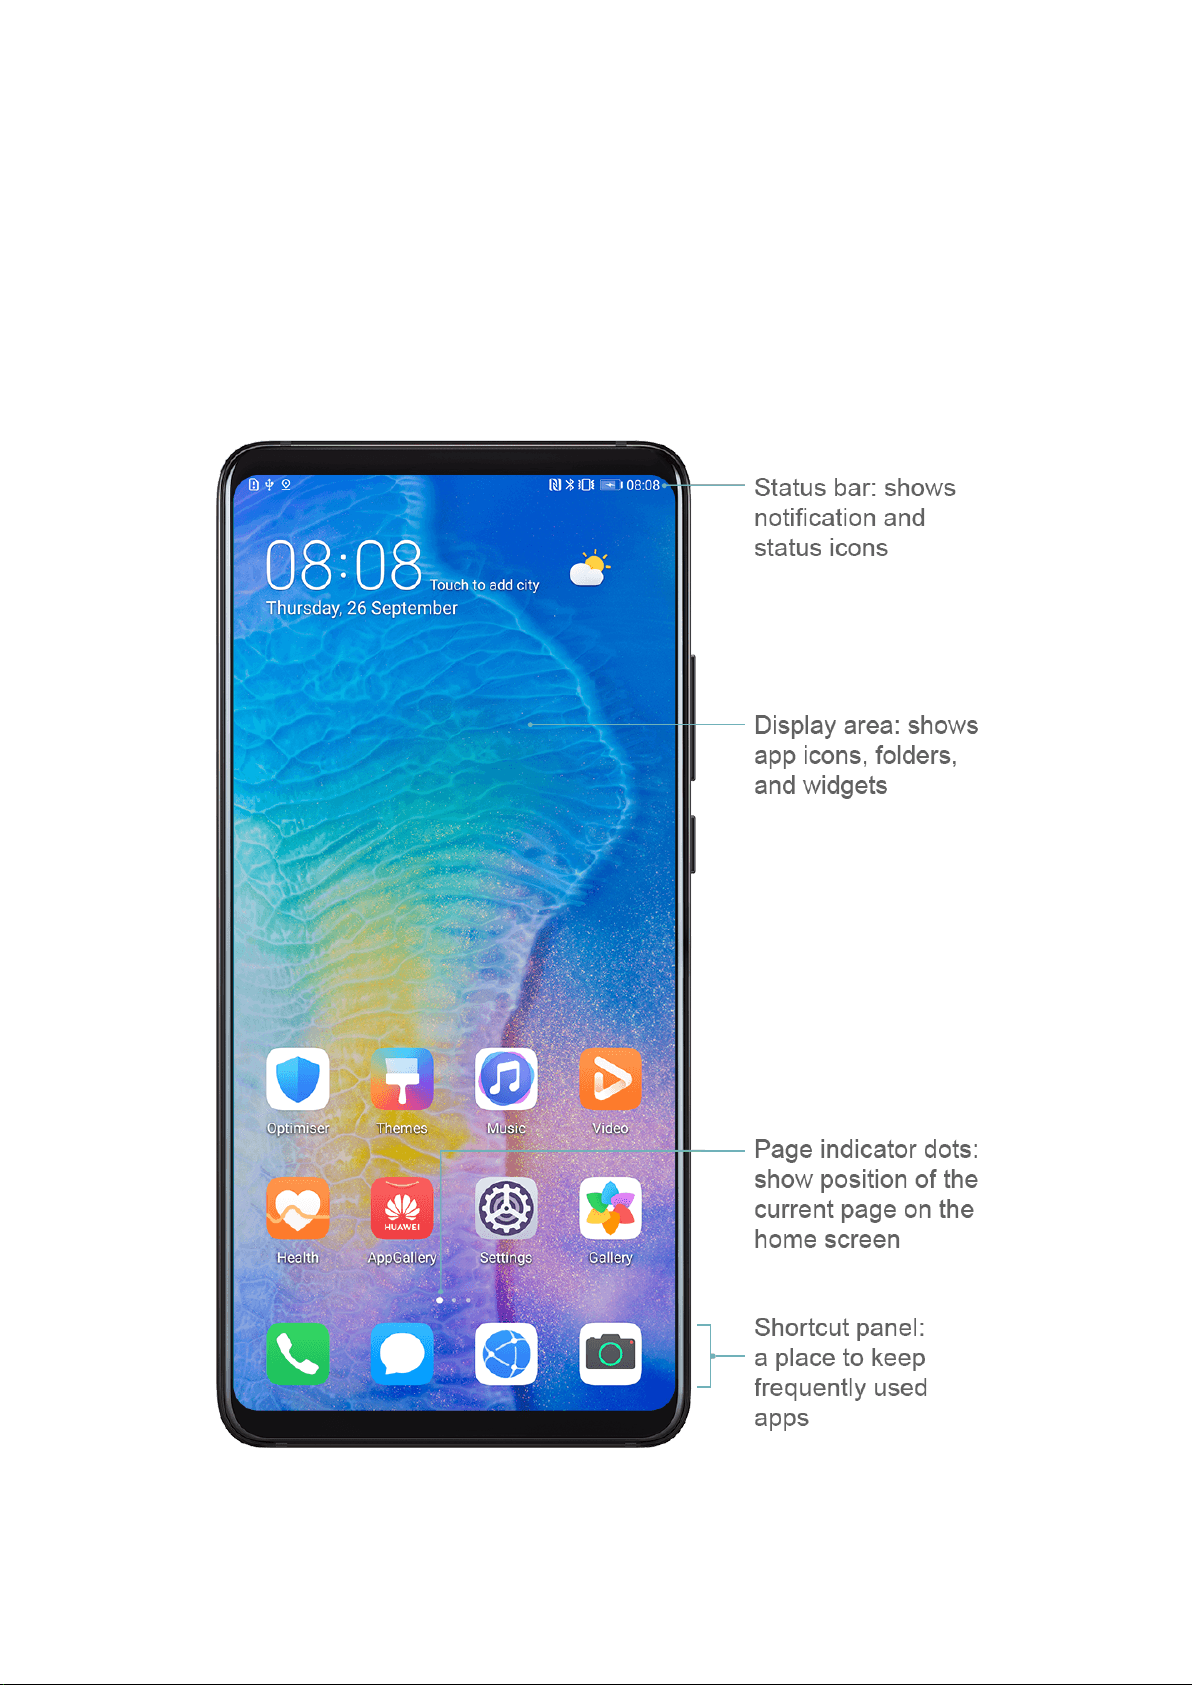
Essentials
3

Get Familiar with the Home Screen
From the home screen, you can:
•Check the status of your device and notications from the status bar at the top of the
screen.
•Swipe left or right to view apps and widgets displayed on the home screen.
Notication and Status Icons
Essentials
4

Notication and Status Icons
Network status icons may vary according to your region or network service provider.
Supported functions vary according to the device model. Some of the following icons may
not be applicable to your device.
5G network connected 4G network connected
3G network connected 2G network connected
Full signal strength Roaming
Data saver enabled SIM card not found
Hotspot enabled Hotspot connected
Calling VoLTE enabled
Wi-Fi network connected SkyTone in use
Hotspot disconnected Network being switched by Wi-Fi
+
Airplane mode enabled Alarms set
Battery empty Battery low
Charging Quick charging
Super charging Power saving mode enabled
Bluetooth enabled Bluetooth device battery
Bluetooth device connected VPN connected
Driving mode Projection device connected
Location service enabled Eye comfort mode enabled
Headset connected Headset with a microphone
connected
Missed call Unread SMS
Microphone disabled Muted
Essentials
5

More notications Vibrate only
NFC enabled Do Not Disturb mode enabled
Data syncing Data sync failed
Performance mode enabled New emails
Event reminders Digital balance enabled
Shortcut Switches
Shortcut Switches
Turn on a Shortcut Switch
Swipe down from the status bar to open the notication panel, then swipe down on it again
to show all shortcuts.
•Touch a shortcut switch to enable or disable the corresponding feature.
•Touch and hold a shortcut switch to enter the settings screen for that feature.
•Touch to open Settings.
Customise Shortcut Switches
Touch , touch and hold an icon, then drag it to the desired position.
Home Screen Widgets
Home Screen Widgets
You can add, move, or delete home screen widgets, such as Screen lock, Weather, Notepad,
Clock, Contacts, and Calendar, according to your personal requirements.
Add a Widget to the Home Screen
1Pinch two ngers on the home screen to access Home screen settings mode.
2Touch Widgets, then swipe left to view all widgets.
3Some widgets, like Weather, come in various formats. Touch the widget to view all
formats, then swipe right to return.
4Touch a widget to add it to the home screen. If there is no room on the current screen
page, touch and hold it, then drag it to a dierent screen page.
Essentials
6

Move or Delete a Widget
Touch and hold a widget on your home screen until your device vibrates, then drag it to the
desired position or touch Remove.
Set Your Wallpaper
Set Your Wallpaper
Use a Preset Wallpaper
1Go to Settings > Home screen & wallpaper > Wallpaper.
2Touch an image you want to set as the wallpaper.
3Set the following according to your preferences:
•Blur: applies a blur eect, which can be adjusted by dragging the slider.
•Scrollable: enables the wallpaper to be scrollable on the home screen.
4Touch , then determine whether you'd like to set the image as Lock screen, Home
screen, or both.
Set an Image from Gallery as Your Wallpaper
1Open Gallery, and open the image you want to set as your wallpaper.
2Go to > Set as > Wallpaper, then follow the onscreen instructions to complete the
setting.
Screenshots&Screen Recording
Take a Screenshot
Use a Key Combination to Take a Screenshot
Press and hold the Power and Volume down buttons simultaneously to take a screenshot.
Use a Shortcut to Take a Screenshot
Swipe down from the status bar to open the notication panel, then swipe down on it again
to show all shortcuts. Touch to take a screenshot.
Share and Edit a Screenshot, or Switch to Scrollshot
Essentials
7

After you take a screenshot, a thumbnail will display in the lower left corner of the screen.
Then you can:
•Swipe down on the thumbnail to take a scrolling screenshot.
•Swipe up on the thumbnail to select a sharing mode and share the screenshot with your
friends.
•Touch the thumbnail to edit or delete it.
Screenshots are saved to Gallery by default.
Record the Screen
Record your screen activities in sharable videos to compose a tutorial, show o your
awesome gaming skills, and a lot more.
Use a Key Combination to Start Screen Recording
Press and hold the Power and Volume up buttons simultaneously to start screen recording. To
stop recording, press and hold both buttons again.
Use a Shortcut to Start Screen Recording
1Swipe down from the status bar to open the notication panel, then swipe down on it
again to show all shortcuts.
2Touch Screen Recorder to start screen recording.
Essentials
8

3To stop the recording, touch the timer at the top of the screen.
4The recording will be saved to Gallery.
Record Your Voice During Screen Recording
You can enable the microphone to record your voice while recording the screen.
After starting a screen recording, touch the microphone icon and ensure that it is displayed as
. You can now record your voice.
If the microphone is disabled (if it is displayed as ), you will only be able to record
system sounds, such as music. If you don't want any system sounds in your screen
recording, mute your device and turn o any music or other media sounds before starting
the screen recording.
View and Clear Notications
View Notications
When there is a notication reminder, you can turn on the screen and swipe down from the
status bar to open the notication panel and view the notication.
Clear Notications
•Swipe right on a notication reminder to clear the notication.
•Touch at the bottom of the notication panel to clear all notications.
Block, Silence, or Delay Notications
Swipe left on a notication, then touch to block, silence, or delay notications from that
source.
Some system notications can't be blocked, cleared, or delayed.
Adjust Sound Settings
Press a Volume Button to Adjust the Volume
Press the Volume up or down button to adjust the volume.
Press the Power Button to Mute Your Device When It Rings
When your device rings for an incoming call or alarm, you can press the Power button to
mute it.
Essentials
9

Use a Shortcut to Switch Between Ring, Vibrating, or Mute Mode
1Swipe down from the status bar to open the notication panel, then swipe down on it
again to show all shortcuts.
2Touch the Sound, Silent, or Vibration icon to switch between dierent
modes.
Enter Text
Edit Text
You can select text displayed on your screen, copy or cut it to the clipboard, then paste it
somewhere else. You can also share it in multiple ways.
1Touch and hold the text until appears.
In some apps, what happens after you touch and hold the text may dier. For example, if
you touch and hold a sent or received message, an option menu will be displayed, and
will appear only after you touch Select text.
2Drag and to select the text you need, or touch Select all to select all text.
3Touch Copy or Cut as needed.
4Touch and hold the space where you want to paste the text until Paste appears, then
touch Paste.
Split-screen Mode and Floating Window
Split-screen Mode
You can split the screen of your device to use two apps simultaneously.
Enable Split-screen Mode
Certain apps do not support Split-screen mode.
1Open an app.
2Enable split-screen mode using any of the following methods:
•Swipe up from the middle of the screen with three ngers.
•When using gesture navigation, swipe up from the bottom of the screen and hold to
enter the Recent tasks screen. Then touch .
•When using three-key navigation, touch and hold the key.
3Open the other app to start multitasking.
Essentials
10

Adjust the Size of the Split-screen Panes
Drag in the middle of the split screen line to the desired position on the screen.
This feature can only be used when your device is in the portrait orientation.
Switch the Split-screen Panes
If the home screen is displayed in either of the split-screen panes, you won't be able to
switch the panes.
Touch in the middle of the split screen line, then touch .
Disable Split-screen Mode
Touch in the middle of the split screen line, then touch .
Power On and O or Restart Your Device
Power Your Device On and O
To power o your device, press and hold the Power button for a few seconds, touch Power
o and Touch to power o.
To power on your device, press and hold the Power button for a few seconds until your device
vibrates and displays the logo.
Restart Your Device
Restart your device on a regular basis to clear the cache and keep the device in an optimal
state. A restart can sometimes resolve the issue when your device encounters a problem.
Just press and hold the Power button for a few seconds, then touch Restart and Touch to
restart.
Force Restart Your Device
If your device isn't working or won't turn o normally, you can force restart it.
Just press and hold the Power button for 10 seconds or longer.
Charging
Charge Your Device
Your device will alert you when it is running out of power. Please make sure to charge your
device in time to prevent it from turning o automatically when the power runs out.
Essentials
11

Precautions for Charging
•Charge your device using the standard adapter and USB cable that came with your device.
Using other chargers or USB cables may cause repeated restarts, slow charging,
overheating, or other undesirable eects.
•Your device will automatically run a safety check when a charger or other device is
connected to the USB port. If moisture is detected in the USB port, your device will
automatically activate safety measures and stop charging. Disconnect your device from the
USB port and wait until the USB port is dry.
•The time required to fully charge the battery depends on the ambient temperature and age
of the battery.
•Batteries have a limited number of charge cycles. When the battery life becomes noticeably
shorter, go to an authorised Huawei Customer Service Centre to replace the battery.
•Do not cover your device or charger during charging.
•Your device may heat up when you have been using it for an extended period of time,
especially in high temperatures. In this case, stop charging, disable some features, and
move your device to a cool place.
•Please do not use your device while it is charging.
•If your device does not respond after you press and hold the Power button, the battery may
have run out. Charge for 10 minutes and then power it on.
Overview of Battery Icons
You can check the battery level from the battery icon on the device screen.
Battery Icon Battery Level
Less than 4% battery remaining
Charging, less than 10% battery remaining
Charging, 10% to 90% battery remaining
Charging, at least 90% battery remaining
If 100% is displayed next to the battery icon, or a charging complete
message is displayed on the lock screen, the battery is fully charged.
Essentials
12

Camera and Gallery
Launch Camera
Launch Camera
There are multiple ways to open the Camera app.
From the Home Screen
From the home screen, open Camera.
Take Photos
Take Photos
1Open Camera.
2You can then:
•Focus: Touch where you want to focus.
To adjust focus and metering separately, touch and hold the viewnder and drag the
individual ring or frame to the desired location.
•Adjust brightness: Touch the viewnder. When the symbol appears next to the
focus frame, drag it up or down.
•Zoom in or out: On the viewnder, pinch or spread two ngers, or drag the zoom
slider.
•Select a camera mode: Swipe left or right across the camera mode options.
•Turn the ash on or o: Touch and select (Auto), (On), (O), or
(Always on).
Some features are only available when using the rear camera.
3Touch to take a photo.
Take Timed Photos
The camera timer allows you to set a time delay so you can get into position after you have
touched the shutter button.
1Open Camera.
2Go to > Timer and select a delay option.
13

3Return to the viewnder and touch the shutter button. Your device will take a photo when
the countdown ends.
Use Audio Control to Take Photos
You can use your voice to take photos without having to touch the shutter button.
1Open Camera.
2Go to > Audio control, enable Audio control, and select an audio control option.
3Go back to the viewnder, then say your command to take a photo.
Take Panoramic Photos
Add breadth to your landscape or group photos with the Panorama feature. The camera
takes multiple photos of objects within your eld of view and stitches them together into a
single panoramic photo.
Use the Rear Camera to Take Panoramic Photos
1Go to Camera > More and select Panorama mode.
2Touch at the bottom of the viewnder to set the pan direction.
3Point the camera at your starting point, then touch to start shooting.
4Slowly move the camera in the direction of the arrow displayed on the screen. Keep your
device steady and the arrow on the centre line the entire time.
5Touch when you are nished.
Take HDR Photos
Take HDR Photos
When shooting photos with backlighting or a high light contrast, High Dynamic Range (HDR)
mode can help you improve light and shadow eects in your photos, giving your photos
sharper details.
Use HDR with the Rear Camera
1Go to Camera > More and select HDR.
2Steady your device, with the help of a tripod if necessary.
3Touch to take a photo.
Camera and Gallery
14

Adjust Camera Settings
You can adjust the camera settings to take photos and videos more quickly.
The following features may not be available in some camera modes.
Enable Location Tag
Enable Location tag to tag your location in photos and videos.
Swipe up on a photo or video in Gallery to view its shooting location.
Enable Mirror Reection
When using the front camera, touch to enable or disable Mirror reection.
Mute the Shutter Sound
Enable Mute as needed.
Manage Gallery
View Photos and Videos
You can view photos and videos by album on the Albums tab.
Some photos and videos are stored in default albums. For example, videos recorded with the
camera are saved in the Camera album. Screenshots and screen recordings are saved in the
Screenshots album.
Edit Photos and Videos
1Touch a photo, then go to Edit > > Stickers.
2Select a type of sticker, such as Time, Location, Weather, or Mood.
3Select a sticker and drag it to change its position. You can also edit the text of some types
of stickers.
4Touch to save your edits and touch to save the photo.
Pixelate Photos
1Touch a photo, then go to Edit > > Mosaic.
2Select a mosaic style and size to cover parts of the photo.
3To remove the mosaic, touch Eraser and wipe it o the photo.
4Touch to save your edits and touch to save the photo.
Camera and Gallery
15

Rename Photos
1In Gallery, touch the photo thumbnail you want to rename.
2Go to > Rename and enter a new name.
3Touch OK.
Share Photos and Videos
There are several ways to share photos and videos from Gallery.
1Open Gallery.
2Use either of the following methods:
•Share a single photo or video: Touch the photo or video, then touch .
•Share multiple photos or videos: In an album, touch and hold to select multiple photos
and videos, then touch .
Manage Gallery
Organise photos and videos into albums to easily sift through them.
Add Albums
1Open Gallery, then touch Albums.
2Touch Add album, then name the album.
3Touch OK.
4Select the photos or videos you want to add.
Delete Photos and Videos
Touch and hold to select the items you want to delete, then go to > Delete.
The All photos, Videos, and Camera albums cannot be deleted.
Deleted photos and videos will be temporarily moved to the Recently deleted album before
being permanently deleted after 10 days.
To permanently delete a photo or video manually, touch and hold its thumbnail in the
Recently deleted album, then go to > Delete.
Recover Deleted Photos and Videos
In the Recently deleted album, touch and hold to select the items you want to recover, then
touch to restore them to their original albums.
If the original album has been deleted, a new one will be created.
Camera and Gallery
16

Add Photos and Videos to Favorites
Open a photo or video, then touch .
The item will appear in both its original album and the My favourites album.
Camera and Gallery
17
Other manuals for Y6P
2
This manual suits for next models
2
Table of contents
Other Huawei Cell Phone manuals

Huawei
Huawei Y336-02 Installation guide

Huawei
Huawei AMN-LX1 User manual

Huawei
Huawei C2930 User manual

Huawei
Huawei Honor 2 User manual

Huawei
Huawei P8 lite Assembly instructions

Huawei
Huawei Sonic User manual

Huawei
Huawei P20 lite User manual

Huawei
Huawei U5707 User manual

Huawei
Huawei nova 9 User manual

Huawei
Huawei Y550-L01 Dimensions

Huawei
Huawei G7300 User manual

Huawei
Huawei Y5p User manual

Huawei
Huawei c3308 User manual

Huawei
Huawei P30 lite User manual

Huawei
Huawei MAO-LX9 User manual

Huawei
Huawei U2900 User manual

Huawei
Huawei ALE-L04 Dimensions

Huawei
Huawei C5600 User manual

Huawei
Huawei Ascend G700 User manual

Huawei
Huawei U1215 User manual