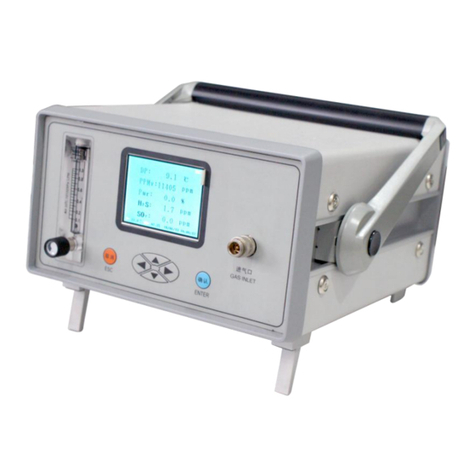
Huazheng HZSF-801 User manual

HZSF-801
SF6 Purity Analyzer
User Manual
Huazheng Electric Manufacturing (Baoding) Co., Ltd


Contents
I.Technical Characteristics and Parameters................................................................................ 1
II.Instrument Panel Description......................................................................................................2
III.Measurement Methods............................................................................................................... 3
IV.Menu Operation........................................................................................................................... 4
V.Matters Needing Attention........................................................................................................... 6
Note: Please warm up for 2 minutes before starting the test. When
testing, please slowly open the flow valve on the instrument to
control the flow between 0.1-0.3L / M!

1
I.Technical Characteristics and Parameters
1、Technical characteristics
Portable design: The instrument is lighter, easier to carry and use.
Fast measurement: There is no need to wait after the instrument is turned on, and the
measurement is performed immediately to obtain the purity value quickly.
Fast gas saving: The gas consumption is only about 0.5L (101.2kPa) during
measurement.
Self-locking joint: The self-locking joint imported from Germany is safe, reliable and
free of air leakage.
Data storage: Large-capacity design can store up to 100 sets of test data.
Clear display: The LCD screen directly displays the purity value, time and date,
battery power and other content.
RS232 interface: It can be connected to a serial printer for data printing.
Built-in power supply: Built-in large-capacity rechargeable lithium battery, which can
work continuously for 10 hours at a time.
2、Technical parameters
Purity
Measuring range
0%~100%
Measuring accuracy
±0.5%
Measuring time
<2 minutes
Ambient
temperature
-40℃~+60℃
environment
humidity
0~100%RH
power supply
AC 220V
Built-in rechargeable battery
Battery
performance
Charging time is more than 20 hours and can be used for 10
hours
Weight
3 kg
Dimension
250×100×300mm3
Operating
temperature
-30℃~+50℃

2
II.Instrument Panel Description
1、Front panel
Note: Press the bracket adjustment buttons on both sides at the same time to adjust the
angle of the bracket.
2、Rear panel
3、LCD screen
Flowmeter
LCD
keyboard
Air inlet
Flow valve
Charging
Switch
RS232
Air outlet
AC220V
Purity
Date
Battery
power
Time
Stand
mediation
button
Stan

3
III.Measurement Methods
1. Connect SF6 equipment
Connect the threaded end of the measuring pipe to the switch connector, tighten with
a wrench, and close the needle valve on the other end of the measuring pipe;
Then insert one end of the quick connector on the test pipe into the sampling port on
the purity meter;
Connect the exhaust pipe to the air outlet.
Finally, connect the switch connector to the measurement interface of the SF6
electrical equipment and tighten it with a wrench;
2.Check the power
This instrument is recommended to use AC power first.
When using DC power, please check the battery level displayed in the upper right
corner. If the power level is lower than about 20%, please turn off the battery and continue
to use it.
3.Start measuring
First fully open the needle valve on the measuring pipe of the instrument, then adjust
the flow with the flow valve on the panel, adjust the flow to about 0.2L / M, and start
measuring the purity of SF6.
Measure for 1 ~ 2 minutes, you can read or save after the data is stable.
4.Storing data
After the equipment measurement is completed, you can save the data in the
instrument and press the "OK" key to call up the operation menu. For details, see the next
section.
5.Measure other equipment
After a device measures, close the needle valve on the measuring pipe and the
regulating valve on the purity meter. Remove the adapter from the SF6 electrical
equipment. If you need to continue measuring other devices, follow the steps above to
continue measuring the next device.
6. End of measurement

4
After all equipment measurements are completed, turn off the power of the purity
tester.
IV.Menu Operation
After starting up, it will automatically enter the measurement page (as shown in the figure),
and press the enter key to enter each function menu.
1 Keep records
2 View records
3 Delete records
4 Modification time
5 Reset
Calibration (up key + cancel key)
1. Keep records
The test is completed. If you need to search the test data in the future, please save
the record first. After entering this menu, you can number the device and save the record.
2. Check the records
You can view and print previously saved records.
3. Delete records
You can delete previously saved records.
4. Change the time
Modify the system time, date and year.
5, Reset
After the completion of a test, it is better to flush the internal pipeline with N2 (the
flushing method is consistent with the measurement method, and pay attention to control
the flow rate within 0.5PLM). When flushing, the value on the main interface will rapidly
decrease to 0.0%. If you want to re-calibrate the instrument, please perform the zeroing
operation first.
6. Calibration (This is a hidden function. When “1 Save Record” is selected, press

5
the Up and Cancel keys simultaneously to bring up this interface)
Do this if the instrument has been in use for a year or if recalibration is necessary,
otherwise do not perform this operation. Before calibration, please prepare N2 and SF6
gas with standard purity (such as 95.8% purity SF6 gas, hereinafter referred to as
standard gas). Connect one end of the test pipe to the standard gas cylinder through the
pressure reducing valve, and insert the other end into the instrument inlet. Check whether
the flow valve, the needle valve on the pipeline, and the pressure reducing valve are all
closed. If they are not closed, please close them first; when the instrument is turned on,
the preheating is completed and the measurement interface is automatically entered,
press the "OK" key to enter the menu, and then Select the “Calibration” key down to enter
the calibration screen (as shown below),
Purity calibration
Vad:X.XXX
Val:00.0%
Open the pressure reducing valve, set the output flow of the cylinder to within
0.2MPA, and then open the needle valve in an appropriate amount, and then adjust the
flow valve to 0.2LPM. At this time, the value behind Vad will increase continuously. When
it is unchanged, press the "OK" key twice to enter the calibration procedure. At this time,
the first zero after P will flash. Use the up and down keys to increase or decrease the
number. Use the left and right keys to select the number of digits. At this time, you should
change 00.0 to 95.8 and press the "OK" key once, the calibration is completed, and then
press the "Cancel" button, you can see that the purity value appearing on the main
measurement interface is basically close to the nominal value. Access can be recalibrated.
After calibration, please flush it with N2. The method is the same as the measurement
method.
7、Start testing
In the main menu state, press the "Up" and "Down" keys to select "Start Test" and
press "OK" to enter the measurement data page. The instrument will start to measure the
purity of SF6 in real time and display it.

6
Users can click "OK" to enter "Save Page" on this page. The user can enter the
device number (five digits): use the "up" and "down" keys to increase the value, and the
"left" and "right" keys to adjust the number of data digits.
After entering the number, press "OK" to save the data. Press the "Back" key to
return to the previous page without saving data.
8. Historical data
In the main menu state, press the "Up" and "Down" keys to select "History Data",
press "OK" to enter the historical data page, and press the "Up" and "Down" keys to select
to view the first record and the last record, respectively. , Press the "up" and "down" keys
to view the data.
9.Set time
In the main menu state, press the "Up" and "Down" keys to select "Set Time" and
press "OK" to enter the Set Time page.
The time value can be decreased or increased by the "Up" and "Down" keys, and the
"Left" and "Right" keys can go to the next or previous modification field. Press the "OK"
key to complete the setting, and press the "Cancel" key to This setting is invalid.
10.Delete records
In the main menu state, press the "Up" and "Down" keys to select "Delete Record",
and press "OK" to enter the Delete Record page.
On this page, the user can press "OK" to delete all data, and press "Cancel" to
return.
V.Matters Needing Attention
The instrument should be placed in a safe place to prevent it from being broken and
avoid severe vibration;
Do not measure corrosive gases;
When adjusting the gas flow, the flow valve should be opened slowly so that the flow
indication is about 0.2 liters / minute;
Before using the instrument, it should be charged in time. When charging, you only

7
need to connect the power cord to the 220V socket. There is no need to turn on the
power switch. The instrument will automatically charge. The charging time generally
takes more than 20 hours.
Table of contents
Other Huazheng Measuring Instrument manuals

Huazheng
Huazheng HZSM-701 User manual

Huazheng
Huazheng HZCT-100B User manual

Huazheng
Huazheng HZX52AA User manual

Huazheng
Huazheng EDEKA TC-200 User manual

Huazheng
Huazheng HPC500 User manual

Huazheng
Huazheng HZ1434 User manual

Huazheng
Huazheng HZSF-641 User manual

Huazheng
Huazheng HZDZ-S3 User manual

Huazheng
Huazheng HZ2831 User manual

Huazheng
Huazheng HZ-8700 User manual