Hudora Vario Basic Module Mounting instructions

Art. Nr. 64024, 64025, 64026
Stand 07/20
1/20
Hersteller: HUDORA I Jägerwald 13 I 42897 Remscheid I Germany
www.hudora.de
DE
IT
FR
EN
ES
NL
AUFBAU- UND GEBRAUCHSANLEITUNG
INSTRUCTIONS ON ASSEMBLY AND USE
ISTRUZIONI PER IL MONTAGGIO E PER L´USO
INSTRUCCIONES DE MONTAJE Y DE USO
INSTRUCTIONS DE MONTAGE ET MODE D’EMPLOI
MONTAGE- EN GEBRUIKSHANDLEIDING

2/20
AUFBAUANLEITUNG
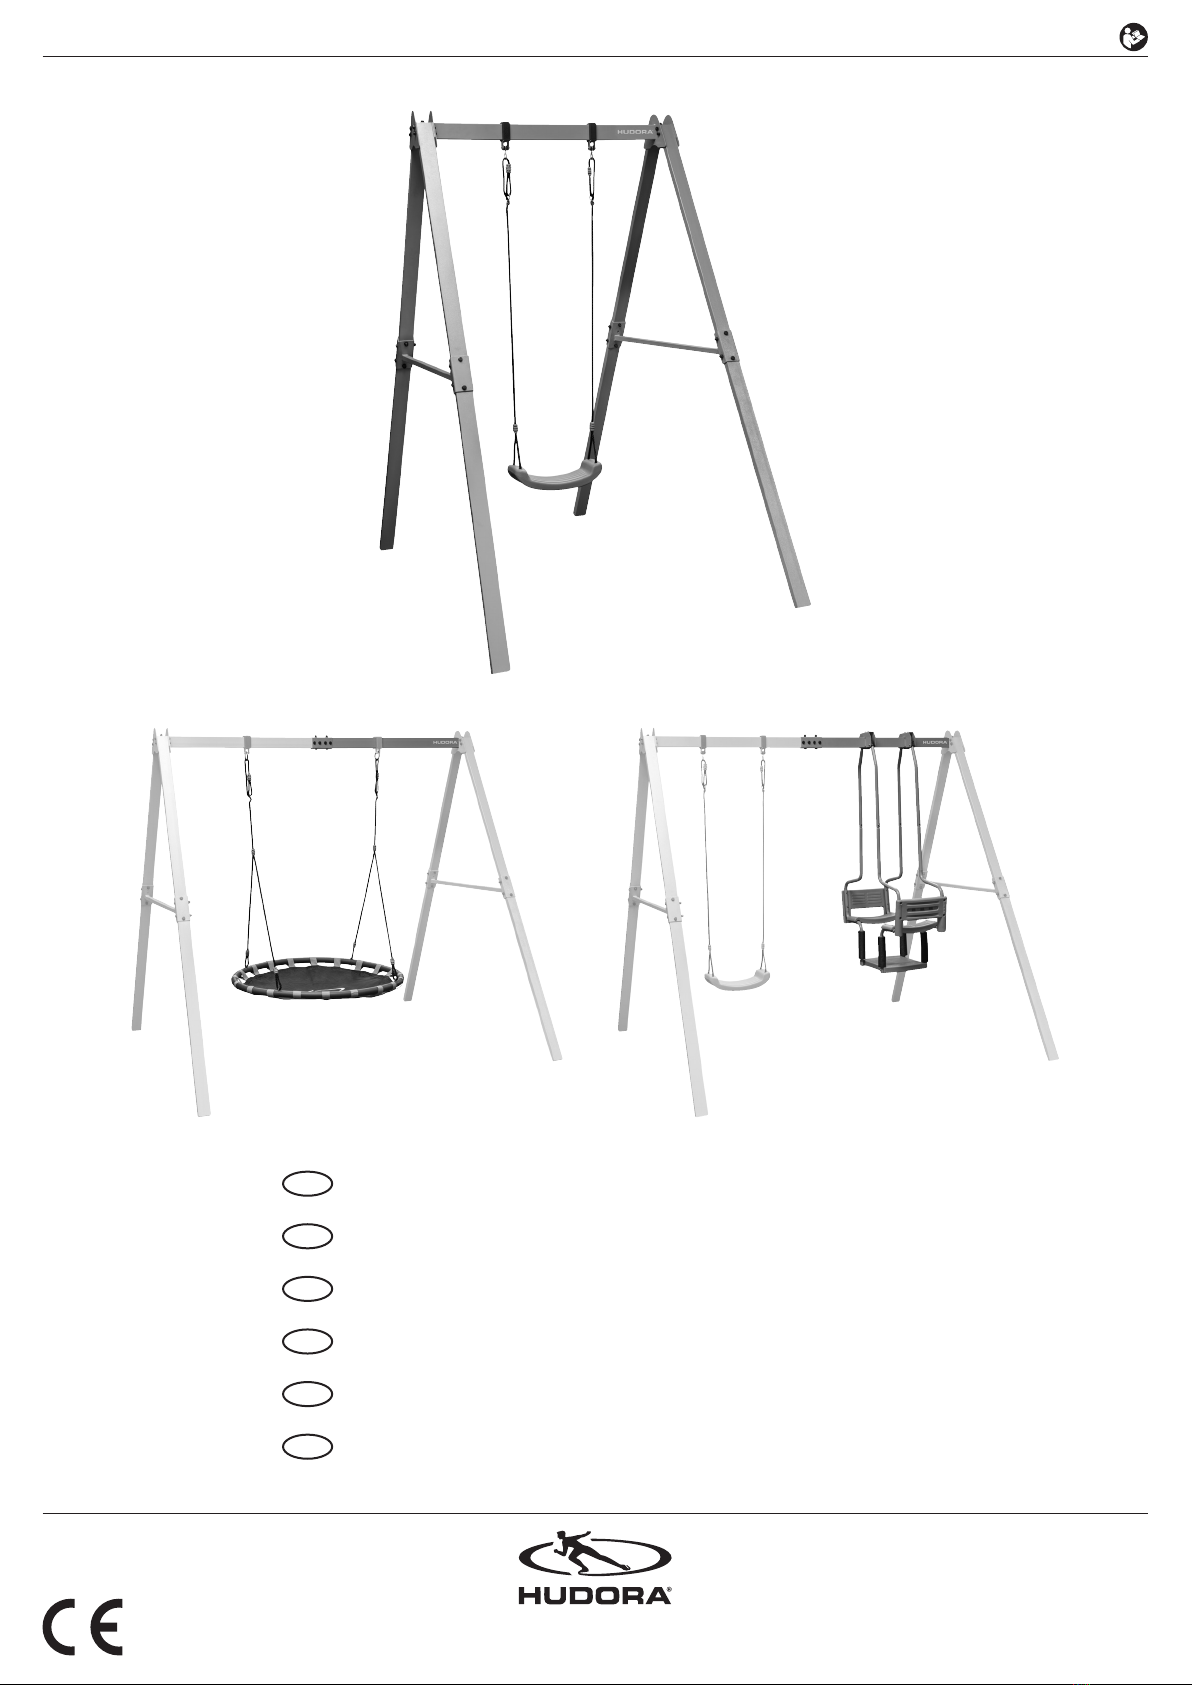
Bei der Schaukel Vario handelt es sich um ein modulares System, welches individuell mit
verschiedenen Ergänzungsmodulen erweiterbar ist. Das Vario Basismodul (64024) bildet
dabei die Grundlage. Das Vario Basismodul (64024) kann eigenständig verwendet wer-
den, während die Ergänzungsmodule nur in Kombination mit diesem Basismodul aufge-
baut werden können.
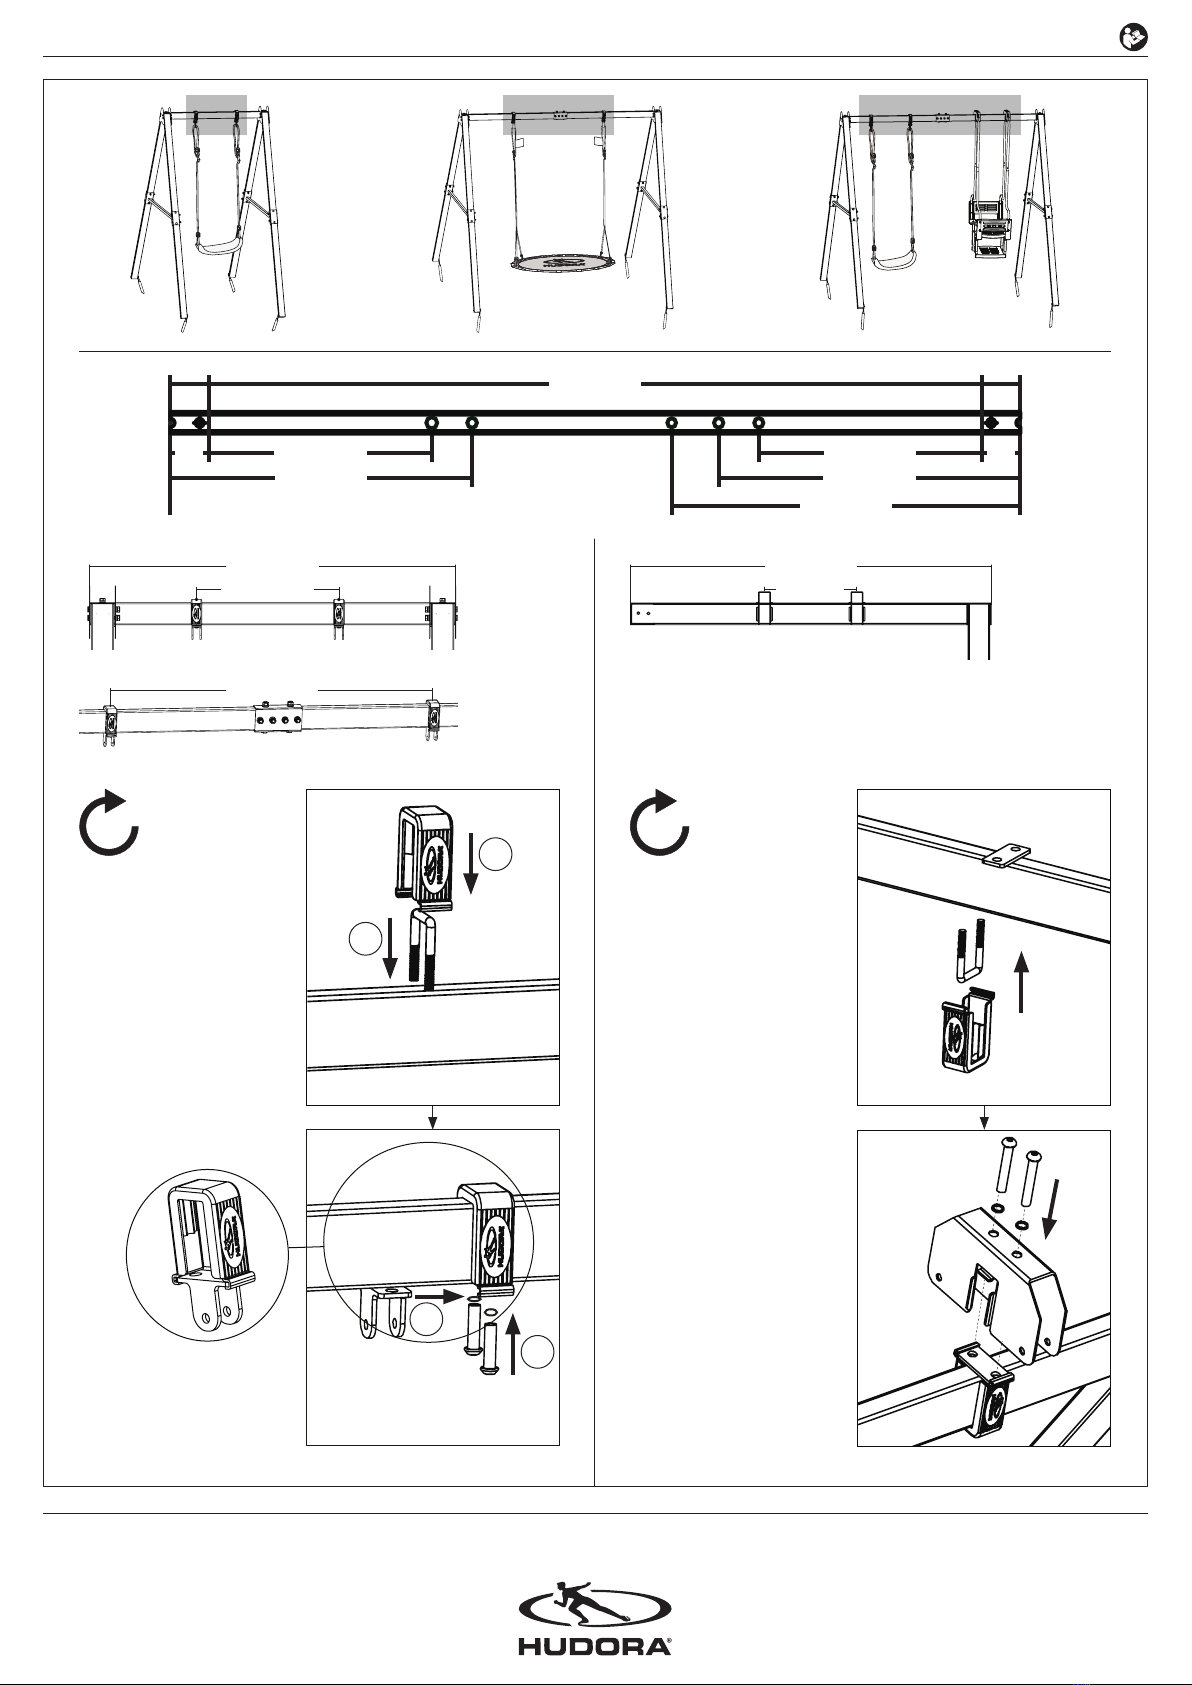
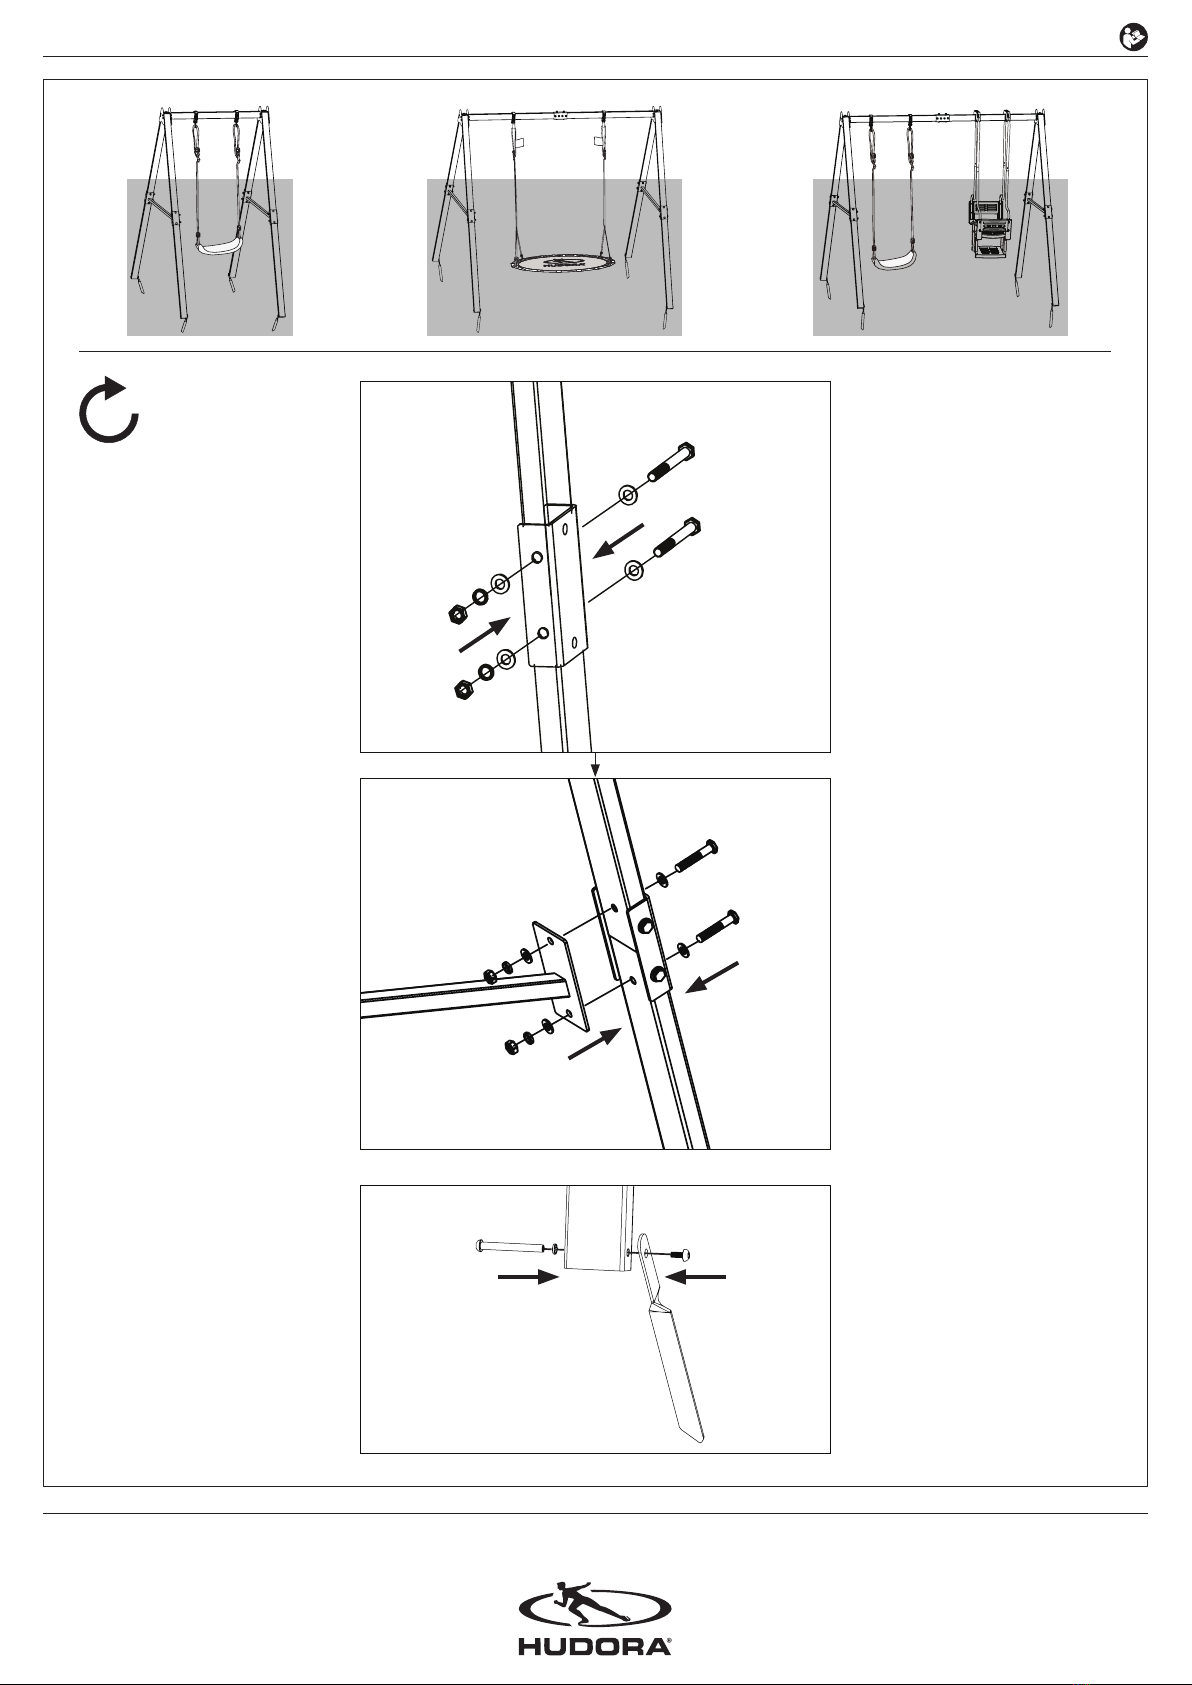
Das Erzeugnis soll zuerst nur fingerfest verschraubt werden, um sicher zu stellen, dass es
sich nicht verzieht und um den Zusammenbau zu erleichtern. Erst nachdem alle Teile
zusammengebaut sind, sollten sie fest angezogen und überprüft werden. Bitte achten Sie
auf scharfkantige Bohrungen und Späne, die unter Umständen in der Herstellung dieses
Spielgerätes anfallen können und entfernen Sie diese gegebenenfalls. Für einen mög-
lichst einfachen und schnellen Aufbau, insbesondere der Rahmenverkleidung, halten Sie
bitte unbedingt die im Folgenden bebilderte Reihenfolge der Aufbauschritte ein.
INSTRUCTIONS ON ASSEMBLY
The swing Vario is a modular system, that can be individually extended to different swing
sets. The swing set Vario Basic (64024) is the base set which is integral part of all availa-
ble extension sets. All extension sets can only be assembled in combination with Vario
Basic set (64024), while the basic set itself can be used independently.
The product should initially only be screwed finger-tight to ensure that it does not warp
and to facilitate the assembly. Only when all parts are assembled, should they be firmly
tightened and checked. Please take note of sharp-edged holes and chips that under cir-
cumstances may occur by the manufacture of this game device and if necessary have
these removed. It is imperative to pay attention to the order of the assembly as shown in
the pictures, in order to ensure a smooth assembly, in particular of the frame encasing.
ISTRUZIONI PER IL MONTAGGIO
L‘altalena Vario è un sistema modulare che può essere ampliato e personalizzato con di-
versi moduli aggiuntivi. Il modulo base Vario (64024) è la struttura principale. Il modulo
base Vario (64024) può essere utilizzato da solo, mentre i moduli aggiuntivi devono ne-
cessariamente essere montati sul modulo base.
Il prodotto deve essere prima avvitato solo con le dita per garantire che non si storca e per
facilitare l‘assemblaggio. Una volta assemblati tutti i pezzi è necessario stringerli e con-
trollarli. Si prega di fare attenzione ai fori con spigoli vivi e alle schegge che possono
presentarsi in determinate circostanze nella produzione di questo dispositivo di gioco e
rimuoverle se necessario. Per un assemblaggio il più semplice e rapido possibile, in modo
particolare del rivestimento del telaio, attenersi scrupolosamente alla sequenza di mon-
taggio illustrata qui di seguito.
INSTRUCCIONES DE MONTAJE
El columpio Vario es un sistema modular ampliable de manera personalizada con distintos
módulos complementarios. El módulo básico Vario (64024) es el sistema base. El módu-
lo básico Vario (64024) puede utilizarse de forma independiente, mientras los módulos
complementarios solo pueden montarse en combinación con este módulo básico.
El producto debe atornillarse en primer lugar sólo a mano, para garantizar que no se de-
forme y facilitar el montaje. Recién después de que se haya ensamblado todas las piezas,
se las debe ajustar fijas y verificar el producto. Por favor tenga en cuenta orificios de
canto vivo y virutas que bajo circunstancias pueden originarse en la fabricación del ju-
guete y elimínelos en su caso. Con el objetivo de realizar un montaje lo más simple y
rápido posible, en particular del recubrimiento del marco, será imprescindible que cump-
la con el orden de pasos que se especifica a continuación.
INSTRUCTIONS DE MONTAGE
La balançoire Vario est un système modulaire, qui peut être étendu individuellement avec
différents modules supplémentaires. Le module de base Vario (64024) en constitue la
base. Le module de base Vario (64024) peut être utilisé indépendamment, tandis que les
modules supplémentaires ne peuvent être configurés qu’en combinaison avec ce module
de base.
Le produit doit d’abord être vissé à la force des doigts, afin de s’assurer qu’il ne se dé-
forme pas et afin d’en faciliter le montage. Uniquement une fois que toutes les pièces ont
été assemblées, elles doivent être vissées avec force et contrôlées. Veuillez faire attenti-
on à des forages et des copeaux à bords tranchants, qui peuvent éventuellement apparaî-
tre lors de la production de ce produit destiné au jeu et enlevez-les éventuellement. Pour
une configuration la plus simple et la plus rapide, en particulier pour le revêtement de
cadre, veillez à suivre la séquence des étapes de montage illustrées ci-dessous.
MONTAGEHANDLEIDING
De Vario schommel is een modulair systeem dat kan worden uitgebreid met verschillende
aanvullende modules. De Vario basismodule (64024) vormt de basis hiervoor. De Vario-
basismodule (64024) kan onafhankelijk worden gebruikt, terwijl de aanvullende modules
alleen in combinatie met deze basismodule kan worden opgesteld.
Het product mag eerst alleen handvast worden geschroefd om ervoor te zorgen dat het
niet krom trekt en om de montage te vergemakkelijken. Pas als alle onderdelen zijn ge-
monteerd moeten deze worden vastgezet en gecontroleerd. Let altijd op scherpe randen
aan boorgaten en splinters die bij de fabricage van dit speelapparaat kunnen ontstaan en
verwijder dit indien nodig. Voor de eenvoudigste en snelst mogelijke installatie, met name
met de framebekleding, moet u de reeks montagestappen volgen die hieronder worden
geïlustreerd.

3/20
64024 64025 64026
1 4 x
2 4 x
3 1 x 1 x 1 x
4 2 x
5 4 x
6 2 x
7 2 x
8 2 x
9 2 x 2 x
10 2 x
11 4 x
12 2 x 2 x
TEILELISTE | PARTLIST | LISTA DEI PEZZI | LISTA DE PIEZAS | LISTE DES PIECES DETACHEES | ONDERDELENLIJST

64024 64025 64026
13 4 x
14 4 x
15 2 x
16 4 x
17 8 x 4 x 4 x
18 2 x
19 16 x 2 x 2 x
20 4 x
21 26 x 6 x 6 x
22 26 x 6 x 6 x
23 2 x 2 x 2 x
24 2 x
4/20
M 8x73 mm
M 8x32 mm
M 10x35 mm
M 10x55 mm
M 10x95 mm
M 10x90 mm
M 10x30 mm

64024 64025 64026
25 1 x
26 1 x
27 1 x 1 x
28 1 x 1 x
29 1 x 1 x
30 4 x
31 1 x
32 2 x
33 2 x
34 4 x
35 4 x
36 2 x
5/20
B
BB
B
1x
1x
M10*65mm
4x 2x
2x
2x
M10*95mm M10*55mm
4x 1x
1x 1x
4x
4x
4x 4x 16x
4x
4x
1x 2x
2x 8x
2x
86 97
6x 6x
2x
+

64024 64025 64026
37 4 x
38 4 x
39 4 x
40 2 x
41 2 x
42 1 x
43 2 x
44 2 x
45 8 x
46 4 x
47 4 x
48 16 x
6/20
M 10x65 mm
B
BB
B
1x
1x
M10*65mm
4x 2x
2x
2x
M10*95mm M10*55mm
4x 1x
1x 1x
4x
4x
4x 4x 16x
4x
4x
1x 2x
2x 8x
2x
86 97
6x 6x
2x
B
BB
B
1x
1x
M10*65mm
4x 2x
2x
2x
M10*95mm M10*55mm
4x 1x
1x 1x
4x
4x
4x 4x 16x
4x
4x
1x 2x
2x 8x
2x
86 97
6x 6x
2x
B
BB
B
1x
1x
M10*65mm
4x 2x
2x
2x
M10*95mm M10*55mm
4x 1x
1x 1x
4x
4x
4x 4x 16x
4x
4x
1x 2x
2x 8x
2x
86 97
6x 6x
2x
B
BB
B
1x
1x
M10*65mm
4x 2x
2x
2x
M10*95mm M10*55mm
4x 1x
1x 1x
4x
4x
4x 4x 16x
4x
4x
1x 2x
2x 8x
2x
86 97
6x 6x
2x
B
BB
B
1x
1x
M10*65mm
4x 2x
2x
2x
M10*95mm M10*55mm
4x 1x
1x 1x
4x
4x
4x 4x 16x
4x
4x
1x 2x
2x 8x
2x
86 97
6x 6x
2x
B
BB
B
1x
1x
M10*65mm
4x 2x
2x
2x
M10*95mm M10*55mm
4x 1x
1x 1x
4x
4x
4x 4x 16x
4x
4x
1x 2x
2x 8x
2x
86 97
6x 6x
2x
B
BB
B
1x
1x
M10*65mm
4x 2x
2x
2x
M10*95mm M10*55mm
4x 1x
1x 1x
4x
4x
4x 4x 16x
4x
4x
1x 2x
2x 8x
2x
86 97
6x 6x
2x
M 8x38 mm
M 8x24 mm
M 8x24 mm
B
BB
B
1x
1x
M10*65mm
4x 2x
2x
2x
M10*95mm M10*55mm
4x 1x
1x 1x
4x
4x
4x 4x 16x
4x
4x
1x 2x
2x 8x
2x
86 97
6x 6x
2x
B
BB
B
1x
1x
M10*65mm
4x 2x
2x
2x
M10*95mm M10*55mm
4x 1x
1x 1x
4x
4x
4x 4x 16x
4x
4x
1x 2x
2x 8x
2x
86 97
6x 6x
2x
M 8x24 mm

M8*38mm
M8*38mm
x4
Ensure the stakes are
positioned into the
setting Post-Mix concrete.
Warning: Never
set the legs of the
playset in concrete.
Dig holes:
300mm x
300mm x
300mm deep.
Mark leg/hole position.
Not
Supplied.
Fill holes with Post-Mix concrete.Fix stakes to legs.
Drill 3mm
Pilot holes
1
2 3
5 6
4
x4
TP814
300mm
300mm
300mm
B
BB
B
M8*38mm
B
BB
*11
7/20
2 x
64024
64025
64026
1 x 64025
64026
64024 64025 64026
M 10x95 mm
M 10x55 mm
M 10x55 mm
12
3
7
78
37
8
18
M 10x90 mm
16 M 10x35mm
329
29
27
28
17
3
28
3 3
33
17
33
19

M8*38mm
M8*38mm
x4
Ensure the stakes are
positioned into the
setting Post-Mix concrete.
Warning: Never
set the legs of the
playset in concrete.
Dig holes:
300mm x
300mm x
300mm deep.
Mark leg/hole position.
Not
Supplied.
Fill holes with Post-Mix concrete.Fix stakes to legs.
Drill 3mm
Pilot holes
1
2 3
5 6
4
x4
TP814
300mm
300mm
300mm
B
BB
B
M8*38mm
B
BB
*11
8/20
64024
4 x
64024
64025
64026
M 10x95 mm
19
6
2
3
64025 64026
2
2
2
3

M8*38mm
M8*38mm
x4
Ensure the stakes are
positioned into the
setting Post-Mix concrete.
Warning: Never
set the legs of the
playset in concrete.
Dig holes:
300mm x
300mm x
300mm deep.
Mark leg/hole position.
Not
Supplied.
Fill holes with Post-Mix concrete.Fix stakes to legs.
Drill 3mm
Pilot holes
1
2 3
5 6
4
x4
TP814
300mm
300mm
300mm
B
BB
B
M8*38mm
B
BB
*11
9/20
64024
1170 mm
1 2 3 13
300 mm
415 mm
500 mm
415 mm
300 mm
9
12
1
2
M 10x30 mm
10
13
2
1
1 1
1170 mm
430 mm
2 x 64024
64025
64026
64024
10
9
64025
22 1000 mm
2 x 64026
M 10x65 mm
64026
340 mm
1170 mm
3 3
64025 64026
4
3
3
40
12
9
3
9
39
41
70 mm 70 mm
64024
64025
64026

M8*38mm
M8*38mm
x4
Ensure the stakes are
positioned into the
setting Post-Mix concrete.
Warning: Never
set the legs of the
playset in concrete.
Dig holes:
300mm x
300mm x
300mm deep.
Mark leg/hole position.
Not
Supplied.
Fill holes with Post-Mix concrete.Fix stakes to legs.
Drill 3mm
Pilot holes
1
2 3
5 6
4
x4
TP814
300mm
300mm
300mm
B
BB
B
M8*38mm
B
BB
*11
10/20
64024
219
5
1
M 10x95 mm
4
2
1
17 M 10x55 mm
4 x
64024
64025
64026
M 8x73 mm
14
20
64025 64026
5
5

M8*38mm
M8*38mm
x4
Ensure the stakes are
positioned into the
setting Post-Mix concrete.
Warning: Never
set the legs of the
playset in concrete.
Dig holes:
300mm x
300mm x
300mm deep.
Mark leg/hole position.
Not
Supplied.
Fill holes with Post-Mix concrete.Fix stakes to legs.
Drill 3mm
Pilot holes
1
2 3
5 6
4
x4
TP814
300mm
300mm
300mm
B
BB
B
M8*38mm
B
BB
*11
11/20
64024
M 8x24 mm
4 x
64025 64026
6
42
42
37
38
37
38
M 8x24 mm
34 34 34 34
42
44
44
44
43
43
31 30
30
31
30
30
32
32
48
36
34
M 8x24 mm
48
M 8x24 mm
48 16 x M 8x24 mm
48
M 8x24 mm
47
35 35 35 35

M8*38mm
M8*38mm
x4
Ensure the stakes are
positioned into the
setting Post-Mix concrete.
Warning: Never
set the legs of the
playset in concrete.
Dig holes:
300mm x
300mm x
300mm deep.
Mark leg/hole position.
Not
Supplied.
Fill holes with Post-Mix concrete.Fix stakes to legs.
Drill 3mm
Pilot holes
1
2 3
5 6
4
x4
TP814
300mm
300mm
300mm
B
BB
B
M8*38mm
B
BB
*11
12/20
64024
M 8x32 mm
2 x 64024
64026 2 x 64025 2 x 64026
M 8x32 mm
2
1
M 8x38 mm 2
1
64025 64026
39
10
1111
39
15
39
15
11
11 33
3
46
45
45
7

M8*38mm
M8*38mm
x4
Ensure the stakes are
positioned into the
setting Post-Mix concrete.
Warning: Never
set the legs of the
playset in concrete.
Dig holes:
300mm x
300mm x
300mm deep.
Mark leg/hole position.
Not
Supplied.
Fill holes with Post-Mix concrete.Fix stakes to legs.
Drill 3mm
Pilot holes
1
2 3
5 6
4
x4
TP814
300mm
300mm
300mm
B
BB
B
M8*38mm
B
BB
*11
13/20
45°
45°
45°
45°
64024
4 x
64024
64025
64026
45°
300 mm
300 mm
300 mm
64025 64026
25
21 22
1 1 1
1 1 1
20
2020
8
26 x
64024
6 x
64025
64026

14/20
DE AUFBAU- UND GEBRAUCHSANLEITUNG
HERZLICHEN GLÜCKWUNSCH
ZUM ERWERB DIESES PRODUKTES!
Bitte lesen Sie diese Bedienungsanleitung sorgfältig durch. Die Bedienungsanleitung ist
fester Bestandteil des Produktes. Bewahren Sie sie deshalb genauso wie die Verpackung
für spätere Fragen sorgfältig auf. Wenn Sie das Produkt an Dritte weitergeben, geben Sie
bitte immer diese Bedienungsanleitung mit. Dieses Produkt muss von einem Erwachse-
nen aufgebaut werden. Dieses Produkt ist ausschließlich für den privaten Gebrauch kon-
struiert. Dieses Produkt ist nicht für den gewerblichen Gebrauch konstruiert. Die Benut-
zung des Produktes erfordert bestimmte Fähigkeiten und Kenntnisse. Setzen Sie es nur
altersgerecht ein, und benutzen Sie das Produkt ausschließlich für seinen vorgesehenen
Zweck.
TECHNISCHE SPEZIFIKATIONEN
Artikel: Schaukel Vario Basismodul |
Schaukel Vario Ergänzungsmodul Nest |
Schaukel Vario Ergänzungsmodul Gondel
Art. Nr.: 64024 | 64025 | 64026
Aufbaumaße: 64024: 210 x 117 x 206 cm |
64025, 64026: 210 x 234 x 206 cm
Maximales Nutzergwicht: 50 kg | 120 kg | 150 kg (50 kg je Sitz)
Mindestalter für Benutzung: 3 Jahre
Maximale Benutzeranzahl: 1 | 1 | 3
Zweck: Schaukelgestell für den Garten zur Nutzung in Kombination
mit HUDORA Schaukelvorrichtungen.
Wenn Sie Probleme beim Aufbau haben oder weitere Produktinformationen wünschen
finden Sie alles Wissenswerte unter http://www.hudora.de/.
INHALT
1 x Schaukel (s. Teilelisten auf den Seiten 3-6)
1 x Diese Anleitung
Weitere Teile, die unter Umständen in der Lieferung enthalten sind, werden nicht benötigt.
SICHERHEITSHINWEISE
• ACHTUNG! Nur für den Hausgebrauch. Nur für den Außenbereich geeignet.
• ACHTUNG! Nur unter direkter Aufsicht von Erwachsenen benutzen!
• ACHTUNG! Nicht für Kinder unter 36 Monaten geeignet. Absturzgefahr!
• ACHTUNG! Nicht für Kinder unter 36 Monaten geeignet. Lange Schnur. Strangulations-
gefahr.
• Die Eigentümer der Schaukel sowie die zuständigen Aufsichtspersonen sind verant-
wortlich dafür, dass alle Benutzer den Anweisungen in der Bedienungsanleitung fol-
gen.
• Nehmen Sie keine technischen Modifikationen vor.
• Änderungen am Originalprodukt dürfen nur nach Herstellervorgaben ausgeführt wer-
den.
• Während der Benutzung darf niemand in den Schaukelbereich laufen.
• Niemals auf der Schaukel stehen oder knien.
• Halten Sie sich immer mit beiden Händen fest.
• Es dürfen sich keine Gegenstände in der Schaukelzone befinden (Bäume, Mauern,
Zäune, Wäscheleinen).
• Sorgen Sie für einen Sicherheitsabstand zu anderen Aufbauten oder Hindernissen von
mindestens 2 m (vorne und hinten) und für einen ebenen, stoßdämpfenden Untergrund
(z. B. Gras) frei von scharfkantigen oder spitzen Gegenständen, Hindernissen (z. B.
Wäscheleinen o.ä.), Gefällstrecken, Absätzen, Treppen oder harten Oberflächen (z. B.
Beton o.ä.).
• Der seitliche Abstand zu stationären Teilen wie etwa einem Schaukelgerüst muss min-
destens 30 cm betragen.
• Die Schaukel muss im Ruhezustand einen Mindestabstand von 35 cm zum Boden ein-
halten. Die Länge des Schaukelseiles wird durch das Nachschieben des Seiles, durch
die Verstellösen hindurch, nach oben verkürzt und nach unten verlängert.
• Sie sollten die Schaukel nicht so befestigen, dass der Benutzer durch Sonneneinstrah-
lung geblendet werden kann.
• Weiterhin verwenden Sie die mitgelieferten Bodenanker zur dauerhaften Befestigung
und zum Schutz vor Umkippen, wie in der Aufbauanleitung gezeigt. Die Bodenanker
müssen wie gezeigt einbetoniert werden. (Siehe Abb. 8)
• Die selbsthemmende Wirkung von selbstsichernden Muttern bzw. Lack kann nach
mehrmaligem Lösen und Anziehen der Verbindungselemente nachlassen.
• Bei dauernder Einstrahlung durch UV-Licht altert das Material erheblich schneller. Zur
Vermeidung von frühzeitiger Alterung und somit zur Verlängerung der Lebensdauer
sollten Sie die abnehmbare(n) Schaukelvorrichtung(en) bei Nicht-Verwendung, immer
trocken und dunkel lagern. Setzen Sie die abnehmbare(n) Schaukelvorrichtung(en)
nicht dauerhaft Wind, Feuchtigkeit, extremen Temperaturen oder Sonnenbestrahlung
aus. Die einbetonierten Teile des Produkts sollten Sie bei Nichtverwendung, speziell im
Winter, mit einer Plane abdecken um sie somit vor Wettereinflüssen zu schützen.
WARTUNG UND LAGERUNG
Reinigen Sie das Produkt nur mit einem Tuch oder feuchten Lappen und nicht mit spezi-
ellen Reinigungsmitteln! Überprüfen Sie das Produkt vor und nach Gebrauch auf Schäden
und Verschleißspuren. Nehmen Sie keine baulichen Veränderungen vor! Verwenden Sie zu
Ihrer eigenen Sicherheit nur Original-Ersatzteile. Diese können Sie bei HUDORA beziehen.
Sollten Teile beschädigt sein oder scharfe Ecken und Kanten entstanden sein, darf das
Produkt nicht mehr verwendet werden! Nehmen Sie im Zweifel mit unserem Service Kon-
takt auf (http://www.hudora.de/service/). Lagern Sie das Produkt an einem sicheren,
witterungsgeschützten Ort, so dass es nicht beschädigt werden kann oder Personen ver-
letzen kann.
Überprüfen Sie das Produkt vor und nach Gebrauch auf Schäden und Verschleißspuren.
Weiterhin empfehlen wir vor jeder Nutzung:
• Festsitz von Muttern und Schrauben prüfen, gegebenenfalls nachziehen
• bewegliche Teile einfetten um den Verschleiß zu minimieren
• alle Abdeckungen von Schrauben und scharfen Kanten prüfen und bei Bedarf austau-
schen
• defekte Teile entsprechend den Anweisungen des Herstellers auszutauschen
• Schaukelsitze, Ketten, Seile und anderes Zubehör auf Anzeichen von Verschleiß zu
prüfen
Außerdem sollten Sie alle Kunststoffteile nach spätestens 5 Jahren austauschen um
einem möglichen Versagen dieser Teile vorzubeugen. Das Produkt ist hochwertig pulver-
beschichtet.
ENTSORGUNGSHINWEIS
Bitte führen Sie das Produkt am Ende seiner Lebensdauer den zur Verfügung stehenden
Rückgabe- und Sammelsystemen zu. Fragen beantworten die Entsorgungsunternehmen
vor Ort.
SERVICE
Wir sind bemüht einwandfreie Produkte auszuliefern. Sollten trotzdem Fehler auftreten,
sind wir genauso bemüht, diese zu beheben. Sie finden zahlreiche Informationen zum
Produkt, zu Ersatzteilen, Problemlösungen und verloren gegangene Aufbauanleitungen
unter http://www.hudora.de/service/.
Alle Abbildungen sind Designbeispiele.

15/20
EN INSTRUCTIONS ON ASSEMBLY AND USE
CONGRATULATIONS ON PURCHASING THIS PRODUCT!
Please read these instructions carefully. The instructions are an integral component of the
product. Therefore, please store them and the packaging carefully in case questions arise
in the future. Please always include these instructions when handing on the product to a
third party. This product must be assembled by an adult. This product is designed for
private/domestic use only. This product is not designed for commercial/industrial use.
The use of the product requires certain capabilities and skills. Always adjust according to
the age of the user and use for the purpose it has been designed for.
TECHNICAL SPECIFICATIONS
Item: Swing Vario Basic Module |
Swing Vario Extension Set Nest |
Swing Vario Extension Set Gondola
Item No.: 64024 | 64025 | 64026
Dimensions when assembled: 64024: 210 x 117 x 206 cm |
64025, 64026: 210 x 234 x 206 cm
Maximum user weight: 50 kg | 120 kg | 150 kg (50 kg per seat)
Minimum age for use: 3 years
Maximum number of users: 1 | 1 | 3
Purpose: Swing frame for the garden for use in combination with
HUDORA swings.
If you have assembly problems or would like further information on the product, we have
all you need and more at http://www.hudora.de/.
CONTENTS
1 x Swing set (cf. partlist on pages 3-6)
1 x These instructions
Other parts which may be included with the delivery in some circumstances are not re-
quired.
SAFETY INSTRUCTIONS
• WARNING! Only for domestic use. Suitable for outdoor use only.
• WARNING! Only use under direct supervision of an adult!
• WARNING! Not suitable for children under 36 months. Danger of falling!
• WARNING! Not suitable for children under 36 months. Long cord. Strangulation ha-
zard.
• The owners of the swing as well as the competent supervisory personnel are respon-
sible for ensuring that all users follow the instructions in the operation manual.
• Do not make any technical modifications.
• Changes to the original product must only be carried out according to manufacturer
specifications.
• No one is permitted to gain access to the swing area during use.
• Never stand or kneel on the swing.
• Always hold yourself firmly with both hands.
• No objects of any kind must be in the vicinity of the swing zone (trees, walls, fences,
clotheslines).
• Ensure a safe distance from other structures or obstructions of at least 2 meters (front
and rear) and for a level, shock-absorbing underground (e.g. grass) free from sharp
or pointed objects, obstacles (e.g. clotheslines etc.), gradients, steps, stairs or hard
surfaces (e.g. concrete etc.).
• The lateral distance to stationary parts such as a swing scaffold must at least amount
to 30 cm.
• The swing must at rest have a minimum distance of 35 cm from the ground. The swing
rope can be lengthened or shortened by pushing or pulling it through the adjustment
loops.
• You should not attach the swing in a manner that makes it possible for the user to be
blinded by the sunlight.
• Furthermore, using the included ground anchors for permanent attachment and pro-
tection against tipping over, as shown in the assembly instructions. The ground anchor
must be set in concrete as shown. (See picture 8)
• The self-locking effect of the self-locking nuts or else lacquer can subside after repea-
ted loosening and tightening of the connection elements.
• When permanently irradiated with UV light, the material ages significantly faster. To
avoid premature ageing and thereby extend the service life, you should always store
the removable hanging mechanism(s) in a dry and dark place when not in use. Do not
permanently expose the removable hanging mechanism(s) to wind, moisture, extreme
temperatures or sunlight. The parts of the product that are set in concrete should be
covered with a tarpaulin when not in use, particularly in winter, to protect them from
the effects of weather.
MAINTENANCE AND STORAGE
Use a dry or damp cloth only to clean the product; do not use special cleaning agents!
Check the product for damage or traces of wear and tear before and after each use. Do
not make any structural changes. For your own safety, please use original spare parts
only. These can be sourced from HUDORA. If parts become damaged or if sharp edges or
corners should develop, the product may not be used any more. If in any doubt, please
contact our service team (http://www.hudora.de/service/).Store the product in a safe
place where it is protected from the elements, cannot be damaged, and cannot injure
anyone.
Check the product for damage or traces of wear and tear before and after each use. We
also recommend before each use:
• to check for the firm sitting of nuts and bolts, tighten if necessary
• to lubricate moving parts in order to minimize wear
• to check all covers of screws and sharp edges and replace if necessary
• to replace defective parts according to the manufacturer‘s instructions
• to check swing seats, chains, ropes and other means of attachments for evidence of
deterioration
You should also replace all the plastic parts after a maximum of 5 years to prevent a
possible failure of these parts. The product is fitted with a high-quality powder-coating.
DISPOSAL ADVICE
At the end of the product’s life, please dispose of it at an appropriate collection point
provided in your area. Local waste management companies will be able to answer your
questions on this.
SERVICE
We make every effort to deliver faultless products. If faults do arise however, we put just
as much effort into rectifying them. You can find numerous information on the product,
replacement parts, solutions to problems and lost assembly manuals at http://www.
hudora.de/service/.
All images are examples of the design.

16/20
IT ISTRUZIONI PER IL MONTAGGIO E PER L´USO
CONGRATULAZIONI PER AVER ACQUISTATO QUESTO PRODOTTO!
La preghiamo di leggere molto attentamente questo manuale. Il manuale fa parte del
prodotto. Quindi va conservato come tutto l’imballaggio per eventuali domande in futuro.
Dando il prodotto a terzi per cortesia allegare sempre il manuale. Il prodotto deve essere
montato da un adulto. Questo prodotto è destinato esclusivamente all’uso domestico e
privato. Questo prodotto non è adatto all’uso pubblico o commerciale. L‘utilizzo del pro-
dotto richiede determinate abilità e conoscenze. Usare solo in maniera adeguata all‘età, e
utilizzare il prodotto esclusivamente per gli scopi previsti.
SPECIFICHE TECNICHE
Articolo: Modulo base altalena Vario |
Modulo aggiuntivo seggiolino a nido altalena Vario |
Modulo aggiuntivo seggiolino a gondola altalena Vario
Articolo numero: 64024 | 64025 | 64026
Misure per il montaggio: 64024: 210 x 117 x 206 cm |
64025, 64026: 210 x 234 x 206 cm
Massima capacità portante: 50 kg | 120 kg | 150 kg (50 chili per seggiolino)
Età minima per l‘uso: 3 anni
Numero massimo utenti: 1 | 1 | 3
Scopo previsto: Telaio altalena per il giardino da utilizzare con attrezzature
per altalena HUDORA.
Se avete problemi con l‘assemblea o richiedete più informazioni, visiti prego il nostro
website http://www.hudora.de/.
CONTENUTO
1 x Altalena (vedere l‘elenco dei componenti alle pagine 3-6)
1 x Queste istruzioni
Gli altri pezzi compresi nella fornitura non sono rilevanti per il montaggio e per l’uso.
NORME DI SICUREZZA
• AVVERTENZA! Solo per uso domestico. Adatto solo per esterni.
• AVVERTENZA! Utilizzare solo sotto diretta supervisione di un adulto!
• AVVERTENZA! Non adatto a bambini di età inferiore a 36 mesi. Pericolo di caduta!
• AVVERTENZA! Non adatto a bambini di età inferiore a 36 mesi. Corde lunghe. Rischio
di strangolamento.
• I proprietari dell‘altalena e le persone preposte alla sorveglianza sono tenute a garan-
tire che tutti gli utenti seguano le istruzioni riportate nel manuale.
• Non apportate modifiche tecniche.
• Modifiche al prodotto originale possono essere effettuate solo in base alle specifiche
del produttore.
• Durante l‘uso nessuno può camminare nell‘area dell‘altalena.
• Non stare mai in piedi o in ginocchio sull‘altalena.
• Tenersi sempre saldamente con entrambe le mani.
• Nessun oggetto deve trovarsi in prossimità della zona dell’altalena (alberi, muri, recin-
zioni e fili stendibiancheria).
• Assicurare una distanza di sicurezza da altre strutture o ostacoli di almeno 2 metri
(davanti e dietro) e un terreno uniforme, ammortizzante (per es. erba) libero da oggetti
aguzzi o appuntiti, ostacoli (per es. corde per il bucato, ecc), dislivelli, gradini, scale o
superfici dure (per es. calcestruzzo, ecc).
• La distanza laterale rispetto a parti fisse, come la struttura dell‘altalena, deve essere
di almeno 30 cm.
• L‘altalena a riposo deve stare a una distanza minima di 35 cm da terra. La lunghezza
della corda dell‘altalena verrà accorciata esercitando pressione sulla corda verso l‘alto,
attraverso gli occhielli regolabili, e allungata verso il basso.
• Non fissare l‘altalena in modo che l‘utente possa essere accecato dalla luce del sole.
• Utilizzare inoltre gli ancoraggi a terra in dotazione per il fissaggio permanente e la pro-
tezione contro il ribaltamento, come indicato nelle istruzioni di montaggio. L‘ancoraggio
al terreno deve essere impostato in calcestruzzo, come mostrato. (Vedi Fig. 8)
• L’effetto autofrenante dei dadi autobloccanti e della vernice può diminuire dopo ripetuti
allentamenti e avvitamenti degli elementi di collegamento.
• L‘esposizione continua del materiale ai raggi UV ne provoca un invecchiamento note-
volmente più rapido. In caso di non utilizzo, riporre sempre il componente amovibile/i
componenti amovibili in un luogo asciutto e al riparo dalla luce per prevenirne il preco-
ce invecchiamento (oltre a scolorimento e corrosione prematura) e, di conseguenza,
prolungarne la durata. Non esporre il componente amovibile/i componenti amovibili
costantemente a vento, umidità, temperature estreme o ai raggi solari. In caso di non
utilizzo, soprattutto in inverno, le parti cementate al suolo dovrebbero essere coperte
con un telo a protezione dagli agenti atmosferici.
MANUTENZIONE E CONSERVAZIONE
Pulire il prodotto solo con un panno oppure con un panno inumidito senza usare speciali
detergenti. Verificate che il prodotto non abbia subito danno e non presenti tracce di usura
prima e dopo l’uso. Non apportate alcuna modifica al prodotto. Utilizzate per la vostra sicu-
rezza solo ricambi originali. Essi si possono acquistare presso la ditta HUDORA. Se le parti
dovessero essere danneggiate oppure dovessero evidenziare angoli e spigoli, il prodotto
non potrà essere più utilizzato. Nel dubbio contattate il nostro centro di assistenza tecnica
(http://www.hudora.de/service/). Stoccate il prodotto in un luogo sicuro, protetto dalle in-
temperie, in modo che non possa essere danneggiato o ferire delle persone.
Verificate che il prodotto non abbia subito danno e non presenti tracce di usura prima e
dopo l’uso. Consigliamo inoltre prima di ogni utilizzo:
• controllare il serraggio di dadi e bulloni, stringere se necessario
• di lubrificare le parti mobili per ridurre al minimo l‘usura
• controllare tutte le coperture di viti e spigoli vivi e sostituire se necessario
• sostituire parti difettose secondo le istruzioni del produttore
• verificare che i seggiolini dell’altalena, le catene, le funi ed altri accessori non presen-
tino segni di usura
Inoltre si dovrebbero sostituire tutte le parti in plastica dopo un massimo di 5 anni per
evitare possibili malfunzionamenti. l prodotto è rivestito con polvere di alta qualità.
ISTRUZIONI PER LO SMALTIMENTO
Siete pregati di portare l’apparecchio, al termine della propria durata utile, presso un
apposito punto di raccolta e di restituzione disponibile. L’impresa di smaltimento locale
sarà a vostra disposizione per rispondere ad eventuali domande.
ASSISTENZA TECNICA
Ci sforziamo a fornire dei prodotti perfettamente funzionali. Se comunque doveste
riconoscere eventuali difetti, ci impegneremo subito a rimuoverli. Riceverete tante
informazioni sul prodotto, sui pezzi di ricambio, sulle soluzioni ai problemi e sulle istruzioni
per il montaggio andate perse sul sito web all’indirizzo http://www.hudora.de/service/.
Tutte le illustrazioni sono esempi di progetti.

17/20
ES INSTRUCCIONES DE MONTAJE Y DE USO
¡LE FELICITAMOS POR LA COMPRA DE ESTE PRODUCTO!
Lea atentamente estas instrucciones. Estas instrucciones forman parte integrante del pro-
ducto. Consérvelas por ello cuidadosamente, al igual que el embalaje, para posteriores
consultas y preguntas. Entregue asimismo el manual de instrucciones cuando preste o
regale el producto a terceros. Este producto debería ser montado por un adulto. Este pro-
ducto está diseñado exclusivamente para el uso privado/doméstico. Este producto no está
diseñado para el uso comercial. El uso del producto requiere de ciertas capacidades y co-
nocimientos. Utilícelo sólo conforme a la edad y exclusivamente con el objetivo previsto.
TECHNISCHE SPEZIFIKATIONEN
Artículo: Módulo básico del columpio Vario |
Módulo complementario para nido de columpio Vario |
Módulo complementario para góndola de columpio Vario
Número de artículo: 64024 | 64025 | 64026
Dimensiones de montaje: 64024: 210 x 117 x 206 cm |
64025, 64026: 210 x 234 x 206 cm
Peso máximo del usuario: 50 kg | 120 kg | 150 kg (50 kg por asiento)
Edad mínima para el uso: 3 años
Máxima cantidad de usuarios: 1 | 1 | 3
Propósito: Soporte de columpio para el jardín para utilizar en combi-
nación con sistemas de columpios de HUDORA.
Si usted tiene problemas con la asamblea o requiere más información, visite por favor
nuestro website http://www.hudora.de/.
CONTENIDO
1 x Columpio (véanse las listas de piezas en las páginas 3 a 6)
1 x Estas instrucciones
Las otras piezas contenidas en el envío no son relevantes para el montaje y el uso.
INDICACIONES DE SEGURIDAD
• ¡ADVERTENCIA! Solo para uso doméstico. Sólo apto para el uso en ambientes externos.
• ¡ADVERTENCIA! ¡Utilizar sólo bajo vigilancia de un adulto!
• ¡ADVERTENCIA! No conviene para niños menores de 36 meses. ¡Peligro de caídas!
• ¡ADVERTENCIA! No conviene para niños menores de 36 meses. Cuerda larga. Peligro
de estrangulamiento.
• Los propietarios del columpio así como las personas de vigilancia competentes son
responsables de que todos los usuarios cumplan las indicaciones de las instrucciones
de uso.
• No realice modificaciones técnicas.
• Las modificaciones en el producto original sólo pueden ser llevadas a cabo según las
prescripciones del fabricante.
• Durante el uso nadie puede permanecer en la zona del columpio.
• Nunca pararse sobre el columpio o ponerse de rodillas.
• Sosténgase siempre con ambas manos.
• No debe haber objetos en la zona del columpio (árboles, muros, cercas, cuerdas para
tender la ropa).
• Procure que haya una distancia de seguridad hacia otras construcciones u otros obstá-
culos de cómo mínimo 2 m (hacia delante y atrás) y que haya una superficie plana
amortiguante (por ej. césped) libre de objetos de canto vivo o puntiagudos, obstáculos
(por ej. cuerdas para tender la ropa, o similares), pendientes, escalones, escaleras o
superficies duras (por ej. hormigón, o similares).
• La distancia lateral hacia piezas estacionarias como por ej. el armazón del columpio,
debe ser de cómo mínimo 30 cm.
• El columpio debe tener una distancia mínima de 35 cm hacia el suelo estando quieto.
La longitud de la cuerda del columpio se acorta hacia arriba o alarga hacia abajo des-
plazando la cuerda por las orejillas de ajuste.
• No debería sujetar el columpio de modo tal que el usuario pueda quedar encandilado
por la radiación solar.
• Asimismo utilice los pernos de anclaje suministrados para una sujeción duradera y
para evitar que se vuelque, como se indica en las instrucciones de montaje. El ancla
de tierra se debe establecer en concreto, como se muestra. (Véase fig. 8)
• El efecto de retención automática de tuercas autofijadoras o barniz puede ceder
después de soltar y ajustar varias veces los elementos de conexión.
• Si el material está constantemente expuesto a la luz ultravioleta, se deteriora mucho
más rápido. Para evitar el deterioro prematuro y así alargar la vida útil del producto,
debe almacenar las partes desmontables de la hamaca en un lugar seco y con poca
luz siempre que no esté utilizándolas. No exponga las partes de la hamaca perma-
nentemente al viento, la humedad o a los rayos solares. Las partes hormigonadas del
producto debería protegerlas con una lona en caso de que no se utilicen, en especial
durante el invierno, para protegerlas de las influencias térmicas.
MANTENIMIENTO Y ALMACENAMIENTO
Limpie el producto sólo con un paño o un trapo húmedo y no con agentes de limpieza
especiales. Revise el producto antes y después del uso en cuanto a daños y rastros de
desgaste. No efectúe modificaciones estructurales. Por su propia seguridad, utilice sólo
repuestos originales. Podrá adquirirlos en HUDORA. Si hay partes dañadas o se han ge-
nerado ángulos y bordes filosos, el producto no deberá seguir siendo utilizado. En caso de
duda, contáctese con nuestro servicio técnico a http://www.hudora.de/service/. Guarde
el producto en un lugar seguro, protegido de las inclemencias del tiempo, de modo que no
pueda ser dañado ni pueda lastimar a personas.
Revise el producto antes y después del uso en cuanto a daños y rastros de desgaste.
Asimismo, antes de cada uso recomendamos:
• Verificar el asiento correcto de tuercas y tornillos, dado el caso, reajustarlos
• lubricar las partes móviles para minimizar el desgaste
• Verificar todas las coberturas de tornillos y cantos vivos y, dado el caso, sustituirlos
• Sustituir las piezas defectuosas correspondientemente a las indicaciones del fabri-
cante
• Revisar los asientos de columpio, cadenas, cuerdas y otros accesorios por rastros de
desgaste
Asimismo debería sustituir todas las piezas de plástico a más tardar cada 5 años para
prevenir una posible falla de esas piezas. El producto está recubierto de polvo de alta
calidad.
INSTRUCCIONES DE DESECHACIÓN
Utilice los sistemas de devolución o recogida disponibles para desechar el producto
cuando éste llegue al final de su vida útil. Consulte en su caso a los servicios de
desechación locales.
SERVICIO
Procuramos vender siempre productos perfectos. Si éstos presentan, no obstante,
defectos, procuramos eliminarlos inmediatamente. Proporcionamos numerosas
informaciones sobre el producto y los recambios, soluciones a problemas e instrucciones
de montaje perdidas en http://www.hudora.de/service/.
Todas las ilustraciones son ejemplos de diseño.

18/20
FR INSTRUCTIONS DE MONTAGE ET MODE D’EMPLOI
FÉLICITATIONS POUR L’ACHAT DE CE PRODUIT!
Veuillez lire attentivement le présent mode d’emploi. Le mode d’emploi fait partie inté-
grante du produit. Veuillez en conséquence le conserver soigneusement ainsi que
l’emballage à des fins de questions ultérieures. Si vous cédez le produit à un tiers, veuillez
également lui donner le présent mode d’emploi. Ce produit doit être monté par un adulte.
Ce produit est conçu pour usage privé / familial seulement. Ce produit n’est pas conçu
pour usage commercial. L’utilisation du produit nécessite certaines facultés et connais-
sances. Ne l’utilisez que conforme à l’âge d’utilisation et utilisez le produit uniquement
dans son but prévu.
SPÉCIFICATIONS TECHNIQUES
Article : Module de base balançoire Vario |
Module supplémentaire avec une balançoire à panier
Vario | Module supplémentaire avec une gondole Vario
Référence de l’article : 64024 | 64025 | 64026
Dimensions après montage : 64024: 210 x 117 x 206 cm |
64025, 64026: 210 x 234 x 206 cm
Poids maximum de l’utilisateur : 50 kg | 120 kg | 150 kg (50 kg / assise)
Âge minimum pour l’utilisation : 3 ans
Nombre maximum d’utilisateurs : 1 | 1 | 3
But prévu : Cadre de balançoire pour le jardin pour une utilisation
en combinaison avec la balançoire HUDORA.
Si vous rencontrez certaines difficultés lors de l‘installation ou si vous souhaitez plus
d‘informations sur le produit, rendez-vous sur http://www.hudora.de/.
CONTENU
1 x Balançoire (voir liste de pièces sur les pages 3-6)
1 x Ce mode d’emploi
Les autres pièces incluses dans la livraison ne sont pas importantes pour le montage et
l‘utilisation.
INDICATIONS DE SECURITE
• ATTENTION ! Réservé à un usage familial. Conçu uniquement pour l’extérieur.
• ATTENTION ! Seulement utiliser sous la surveillance d’adultes !
• ATTENTION ! Ne convient pas aux enfants de moins de 36 mois. Risques de chutes !
• ATTENTION ! Ne convient pas aux enfants de moins de 36 mois. Longue corde. Danger
de strangulation.
• Les propriétaires de la balançoire ainsi que les surveillants sont responsables, que
tous les utilisateurs respectent les indications et consignes du mode d‘emploi.
• N’effectuez pas de modifications techniques.
• Des changements au produit d’origine doivent uniquement être exécutés selon les in-
structions du fabricant.
• Personne n’a le droit de pénétrer le rayon de balancement de la balançoire pendant
l‘utilisation.
• Ne jamais se mettre debout ou s’agenouiller sur la balançoire.
• Tenez-vous toujours bien avec les deux mains.
• Aucun objet (arbres, murs, clôtures, cordes à linge) ne doit se trouver dans la zone
d’installation de la balançoire.
• Veillez à un écart de sécurité d’au moins 2 mètres par rapport à d’autres constructions
ou d’obstacles (à l’avant et à l’arrière) et à une surface plane et amortissante (par
exemple de la pelouse) sous la balançoire, surface exempte d’objets tranchants ou
pointus, d’obstacles(per exemple cordes à linge ou similaire), de pentes, de paliers,
d’escaliers ou de surfaces dures (par exemple du béton ou similaire).
• L’écart latéral par rapport à des pièces stationnaires comme par exemple un échafau-
dage de balançoire, doit d’être d’au moins 30 cm.
• La balançoire doit, au repos, avoir un écart de 35 cm par rapport au sol. La longueur de
la corde de balançoire est raccourcie vers le haut ou rallongée vers le bas en poussant
la corde à travers les œillets de réglage.
• Vous ne devriez pas fixer la balançoire de façon à ce que l’utilisateur soit ébloui par le
rayonnement solaire.
• En outre, utilisez les ancrages au sol livrés pour la fixation durable et pour la protection
contre le renversement, comme montré dans le mode d’emploi. L‘ancrage au sol doit
être fixé dans le béton. (Voir ill. 8)
• L’effet autobloquant des écrous autobloquants, respectivement de la peinture peut
s’atténuer après plusieurs desserrages et serrages.
• En cas d’irradiation permanente par la lumière UV, le matériau se dilate beaucoup plus
vite. Pour éviter le vieillissement et ainsi prolonger la durée de vie, il suffit toujours de
conserver le(s) dispositif(s) amovible(s) de la balançoire, en cas de non utilisation
dans le sec et l’obscurité. Ne mettez pas les dispositifs amovibles de la balançoire dans
du vent durable, à l’humidité, des températures extrêmes ou à l’exposition à la lumière
de soleil. Couvrir les parties bétonnées avec une bâche lorsqu’il n’est pas utilisé, en
particulier en hiver, pour le protéger contre les influences météorologiques.
ENTRETIEN ET STOCKAGE
Nettoyez le produit uniquement avec un tissu ou chiffon humide et non avec un produit de
nettoyage spécial! Avant et après utilisation, vérifiez le produit afin de détecter tout signe
d’endommagement ou d’usure. N’apportez aucune modification conceptuelle. Pour votre
propre sécurité, n’utilisez que des pièces de rechange d’origine. Vous pouvez les acquérir
auprès de HUDORA. Le produit ne doit plus être utilisé en cas d’endommagement de
certaines parties ou d’apparition de coins saillants ou d’arêtes vives. En cas de doute,
prenez contact avec notre service après-vente (http://www.hudora.de/service/). Stockez
le produit dans un endroit sûr et à l’abri des intempéries de manière à ce qu’il ne puisse
pas être endommagé et qu’il ne puisse blesser personne.
Avant et après utilisation, vérifiez le produit afin de détecter tout signe d’endommagement
ou d’usure. Avant chaque utilisation, nous recommandons en outre :
• De contrôler la bonne assise des écrous et des vis et, le cas échéant, de les resserrer
• De graisser toutes parties amovibles pour minimiser l‘usure
• De contrôler les couvercles de vis et de bords tranchants et de les remplacer en cas de
besoin
• D’échanger les pièces défectueuses selon les directives du fabricant
• De vérifier les sièges de balançoire, les chaînes, les câbles et autres accessoires pour
des signes d’usure
En plus, vous devriez remplacer toutes les pièces en plastique au plus tard après 5 ans,
afin de prévenir la défaillance éventuelle de ces pièces. Le produit est équipé d‘une
couche de poudre de haute qualité.
CONSIGNES D’ÉLIMINATION
A la fin de la durée de vie de l’appareil, veuillez l’amener dans un centre de reprise et de
collecte mis à disposition. Le personnel des déchetteries répondra à toutes vos questions
sur place.
SERVICE APRÈS-VENTE
Nous nous efforçons de livrer des produits irréprochables. Cependant, en cas de
défaillances, nous déployons également tous les efforts requis afin de les éliminer. Vous
pouvez obtenir de nombreuses informations sur le produit, les pièces de rechange, la
résolution des problèmes et les instructions de montage égarées sur http://www.hudora.
de/service/.
Tous les schémas sont indicatifs.

19/20
NL MONTAGE- EN GEBRUIKSHANDLEIDING
HARTELIJK GEFELICITEERD MET DE KOOP VAN DIT PRODUCT!
Lees de gebruiksaanwijzing zorgvuldig door. De gebruiksaanwijzing is een vast bestand-
deel van het product. Bewaar de gebruiksaanwijzing en verpakking dus zorgvuldig voor
eventuele vragen op een later tijdstip. Wanneer u het product aan derden overdraagt, moet
u de gebruiksaanwijzing ook meegeven. Dit product moet door een volwassene gemon-
teerd worden. Dit product is enkel ontworpen voor privaat/huishoudelijk gebruik. Dit pro-
duct is niet geconstrueerd en niet toegelaten voor commercieel gebruik. Het gebruik van dit
product vereist bepaalde vaardigheden en kennis. Gebruik het uitsluitend in overeenstem-
ming met de leeftijd en gebruik het product uitsluitend voor het beoogde doel.
TECHNISCHE SPECIFICATIES
Artikel: Basismodule Vario schommel |
Aanvullende module Nest Vario schommel |
Aanvullende module Gondel Vario schommel
Art. Nr.: 64024 | 64025 | 64026
Opbouwafmetingen: 64024: 210 x 117 x 206 cm |
64025, 64026: 210 x 234 x 206 cm
Maximaal gewicht gebruiker: 50 kg | 120 kg | 150 kg (50 kg per zit)
Minimum leeftijd voor gebruik: 3 jaar
Maximaal aantal gebruikers: 1 | 1 | 3
Doel: Schommelframe voor de tuin voor gebruik in combinatie
met de HUDORA schommels.
Wanneer u problemen heeft met de montage of verdere informatie over het product
wenst, vindt u onder http://www.hudora.de/.
INHOUD
1 x Schommel (zie onderdelenlijst op de pagina’s 3-6)
1 x Deze gebruiksaanwijzing
Verdere meegeleverde onderdelen en items zijn niet relevant voor de montage of het ge-
bruik.
VEILIGHEIDSINFORMATIE
• WAARSCHUWING! Uitsluitend voor huishoudelijk gebruik. Alleen geschikt voor gebruik
buitenshuis.
• WAARSCHUWING! Gebruik uitsluitend onder toezicht van volwassenen!
• WAARSCHUWING! Niet geschikt voor kinderen jonger dan 36 maanden. Gevaar voor
ongevallen!
• WAARSCHUWING! Niet geschikt voor kinderen jonger dan 36 maanden. Lang koord.
Verwurgingsgevaar.
• De eigenaar van de schommel en bevoegd toezichthoudende personen zijn verant-
woordelijk ervoor, dat alle gebruikers de instructies in de handleiding volgen.
• Voer geen technische wijzigingen door.
• Wijzigingen aan het oorspronkelijke product moeten volgens de specificaties van de
fabrikant worden uitgevoerd.
• Tijdens het gebruik mag zich niemand binnen het schommelbereik (swing zone)
ophouden.
• Nooit op de schommel gaan staan of knieën.
• Houdt u zich steeds met beide handen vast.
• Er mogen zich geen obstakels in de schommelomgeving bevinden (bomen, muren,
hekken, waslijnen).
• Houd een veilige afstand van tenminste 2 meter t.o.v. andere attributen of obstructies
(voor en achter) en zorg voor een gladde, schokabsorberende ondergrond (bijvoor-
beeld gras), vrij van scherpe of puntige voorwerpen, obstakels (bv. Waslijnen enz.),
hellingen, trappen, trappen of harde oppervlakken (bv. beton enz.).
• De zijdelingse afstand tot vaste onderdelen zoals het schommelgestel moet tenminste
30 cm bedragen.
• De schommel moet in rusttoestand een minimale afstand van 35 cm vanaf de grond
hebben. De lengte van het schommeltouw wordt naar boven verkort of naar beneden
verlengd door het aanduwen van het touw, via de verstelbare lussen.
• De schommel moet zodanig worden bevestigd, dat de gebruiker niet door zonlicht kan
worden verblind.
• Gebruik bovendien ter permanente bevestiging en bescherming tegen kantelen de
meegeleverde grondankers, zoals in de montage-instructies getoond.
Het grondanker moet worden ingesteld in beton. (Zie afb. 8)
• De zelfborgende werking van de zelfbeveiligende moeren of lak kan na meerdere ma-
len los- en vastdraaien van de bevestigingsmiddelen minder worden.
• Bij permanente bestraling door Uv-licht veroudert het materiaal aanzienlijk sneller. Om
vroegtijdige veroudering te vermijden en hierdoor de levensduur te verlengen moet u
de afneembare schommelonderdelen altijd droog en donker bewaren. Plaats de af-
neembare schommelonderdelen niet in voortdurende wind, vochtigheid, extreme tem-
peraturen of zonlicht. De gebetonneerde delen van het product moeten bij niet gebruik,
vooral in de winter, worden afgedekt met een zeildoek en hierdoor beschermd zijn
tegen weersinvloeden.
ONDERHOUD EN OPSLAG
Reinig het product slechts met een doek of een vochtige lap en niet met speciale reini-
gingsmiddelen. Controleer het product vóór en na gebruik op schades en tekenen van
slijtage. Verander niets aan de constructie van het product. Gebruik voor uw eigen veilig-
heid alleen originele onderdelen. Deze zijn verkrijgbaar bij HUDORA. Mochten onderdelen
beschadigd zijn of scherpe hoeken en randen ontstaan zijn, dan mag het product niet
meer worden gebruikt. Neem in geval van twijfel contact op met onze Serviceafdeling
(http://www.hudora.de/service/). Berg het product op een veilige plek op waar het be-
schermd is tegen weersinvloeden, zodat het niet beschadigt raakt of mensen verwondin-
gen toebrengt.
Controleer het product vóór en na gebruik op schades en tekenen van slijtage.
Verder raden we u ook voor elk gebruik aan:
• controleer het vastzitten van bouten en moeren, draai deze indien nodig verder aan
• vet beweegbare delen in om slijtage te beperken
• controleer alle afdekkingen van schroeven en scherpe kanten en vervang deze indien
nodig
• vervang defecte onderdelen conform de instructies van de fabrikant
• de schommelzitjes, de kettingen, de kabels en andere accessoires te controleren op
slijtage
Bovendien moet u na uiterlijk 5 jaar alle plastic onderdelen vervangen om een mogelijk
falen van de onderdelen te voorkomen. Het product is van hoogwaardige poedercoating-
kwaliteit.
AANWIJZING VOOR DE AFVOER AAN HET EINDE
VAN DE LEVENSDUUR
Laat het toestel aan het einde van de levensduur afvoeren via de ter beschikking staande
teruggave- en inzamelsystemen. Met eventuele vragen kunt u terecht bij afvalverwerkers
bij u in de buurt.
SERVICE
Wij doen ons best om producten te leveren die helemaal in orde zijn. Mochten toch fouten
voorkomen, dan zullen wij ons best doen om deze op te lossen. U vindt zeer veel informatie
over product, onderdelen, probleemoplossingen en kwijtgeraakte opbouwinstructies
onder http://www.hudora.de/service/.
Alle afbeeldingen zijn ontwerp-voorbeelden.

Other manuals for Vario Basic Module
1
This manual suits for next models
5
Table of contents
Languages:
Other Hudora Baby Swing manuals

Hudora
Hudora 72101 Mounting instructions

Hudora
Hudora Nest Swing Square 110 Mounting instructions

Hudora
Hudora Comfort Mounting instructions

Hudora
Hudora HD 200 Mounting instructions

Hudora
Hudora 72175/00 Mounting instructions

Hudora
Hudora 72111 Mounting instructions

Hudora
Hudora 72126/01 Mounting instructions

Hudora
Hudora 72111 Mounting instructions

Hudora
Hudora Nest Swing Octagon 70 Mounting instructions

Hudora
Hudora Hollywood 72165 Mounting instructions