Huffy Folding Trike User manual

HF-L&S Trike EN 101613 m0063
Copyright Huffy Corporation 2013
Owner’s Manual
Folding Trike
PLEASE READ AND FULLY UNDERSTAND THIS MANUAL
BEFORE OPERATION.
SAVE THIS MANUAL FOR FUTURE REFERENCE.
THIS MANUAL CONTAINS IMPORTANT SAFETY, ASSEMBLY,
OPERATION AND MAINTENANCE INFORMATION.

Safety Information
Trikes, like all wheeled vehicles, will provide safe, enjoyable transportation and rec-
reation when used and maintained properly. Like bicycling, skateboarding, and in-line
skating, riding a Trike can be dangerous even under the best of circumstances. We
do not want you to get hurt. Please follow these safety rules.
This symbol is important. It is the WARNING symbol. The warning symbol pre-
cedes safety instructions. Make sure the child understands these instructions. Failure
to follow these instructions may result in injury to the rider or to others, or damage to
the product.
WARNING TO AVOID SERIOUS INJURY:
• An adult must assemble this product.
• Keep small loose parts and plastic bags out of the reach of children.
• An adult must unfold and fold this product.
• Adult supervision is required.
• This product should only be used by persons 3 years and up.
• Never ride with more than one person.
• Maximum rider weight for this product is 27kg. (60 lbs).
• Do not allow a child to ride in the rear plastic bin.
• Maximum weight for the rear plastic bin is 2.3kg. (5 lbs).
• Excessive weight in the rear bin may cause a hazardous or unstable condition.
• Do not allow a child to ride without a CPSC approved helmet, with the chinstrap
securely fastened.
• Do not allow a child to ride without shoes.
• Do not allow a child to ride the product at dusk, at night or at times of limited vis-
ibility.
• Do not allow a child to ride on roadways or alleys.
Manual Index
ENGLISH
• Safety Information ................................................................................2/3
• Maintenance..........................................................................................3
• Trike Assembly .....................................................................................4/5
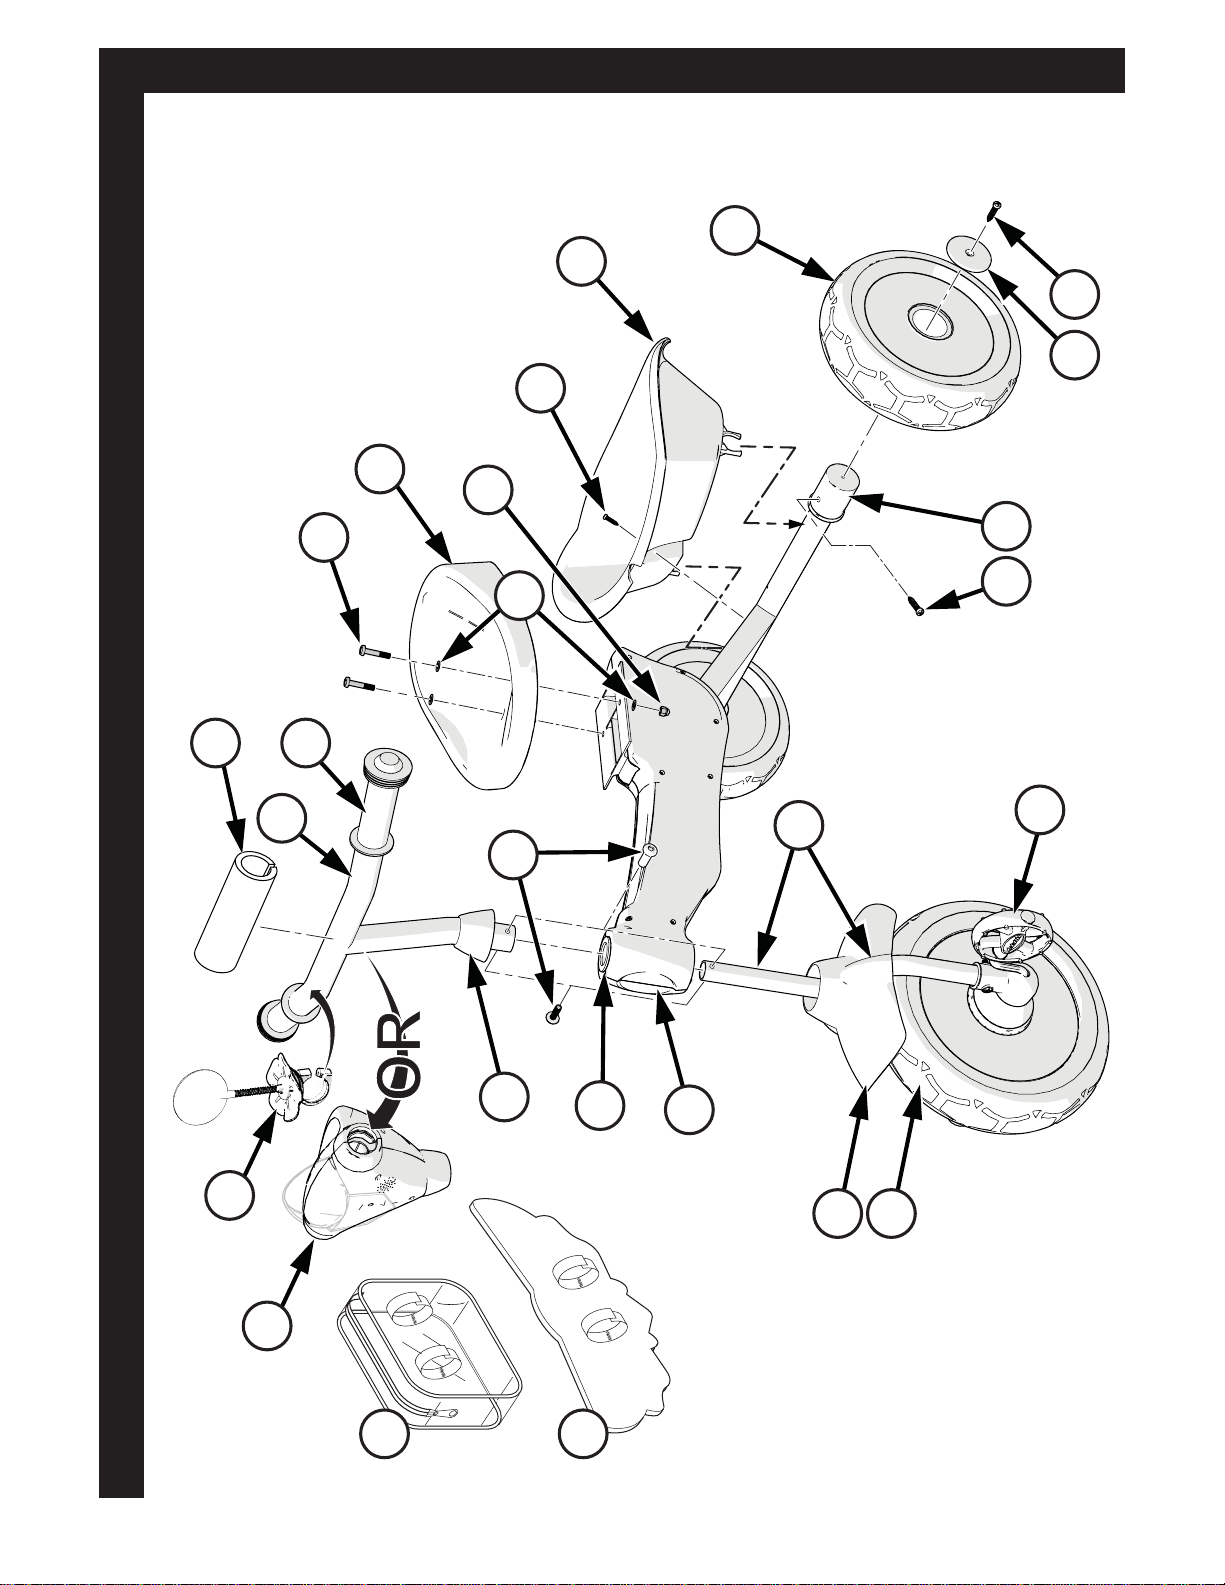
• Parts View.............................................................................................6/7
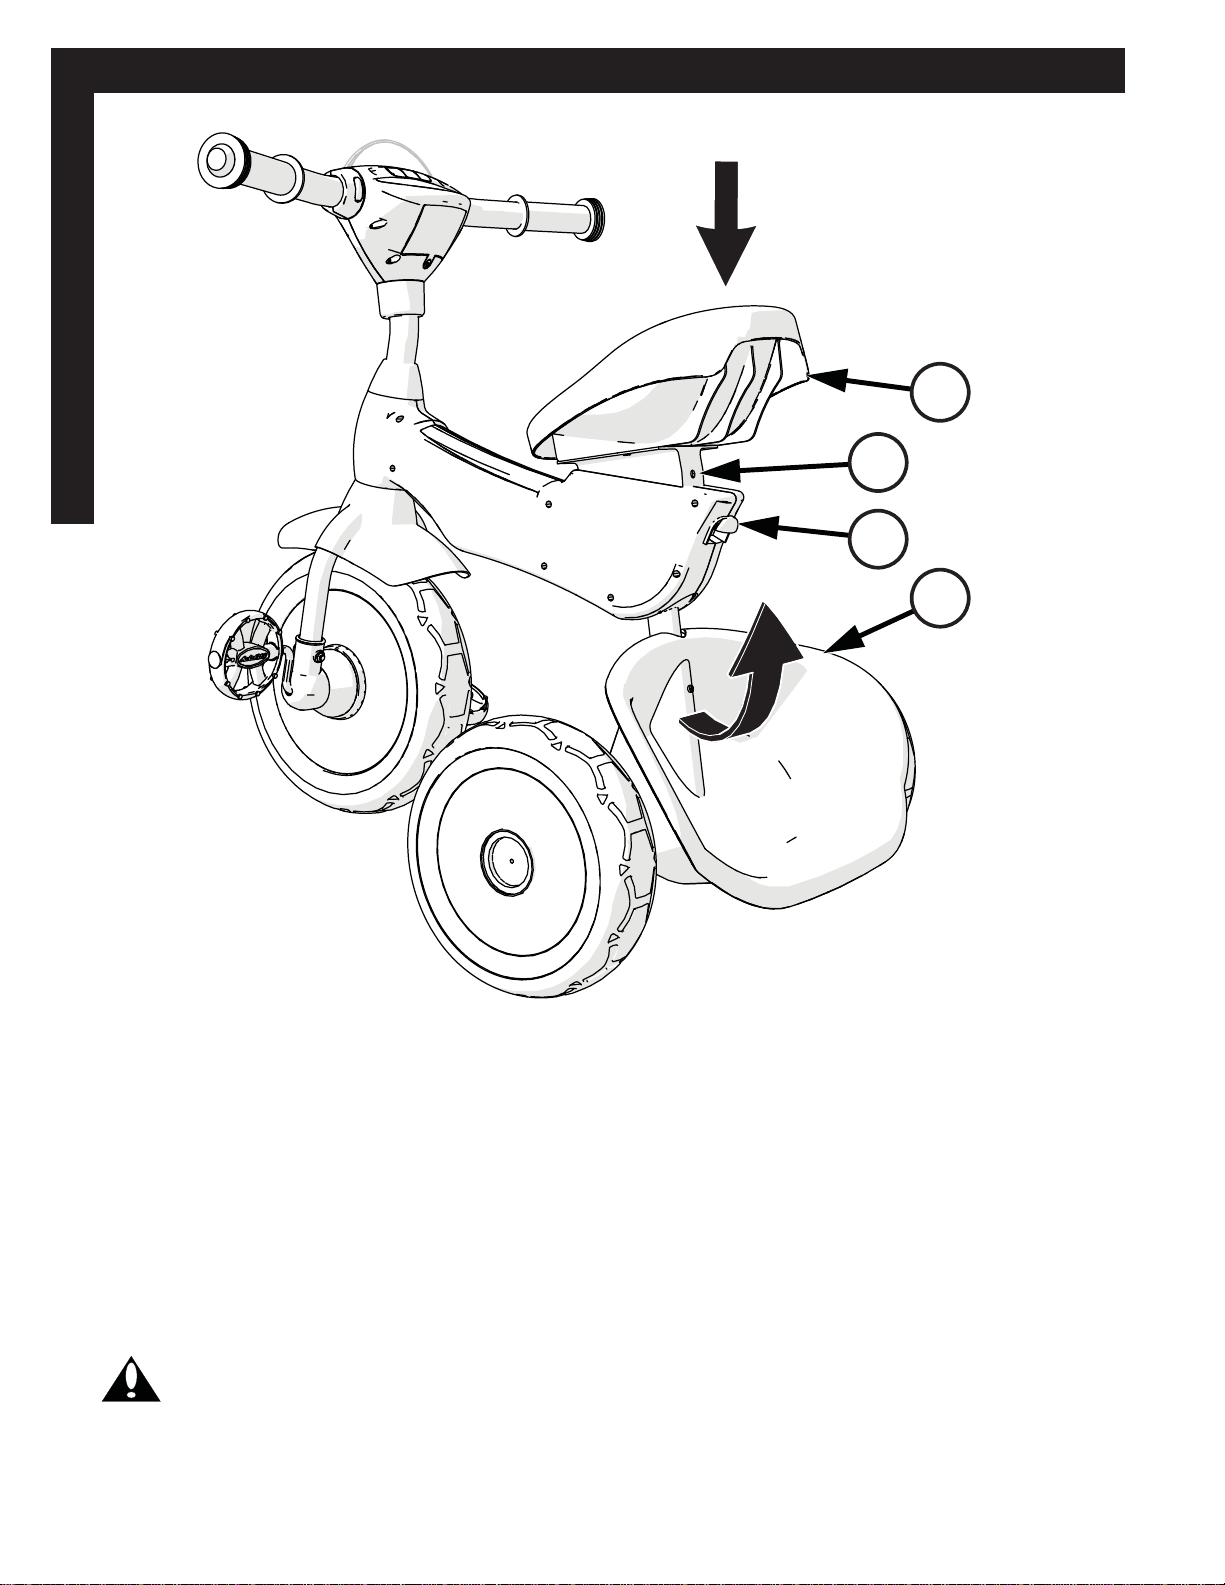
• Folding / Unfolding Trike........................................................................8
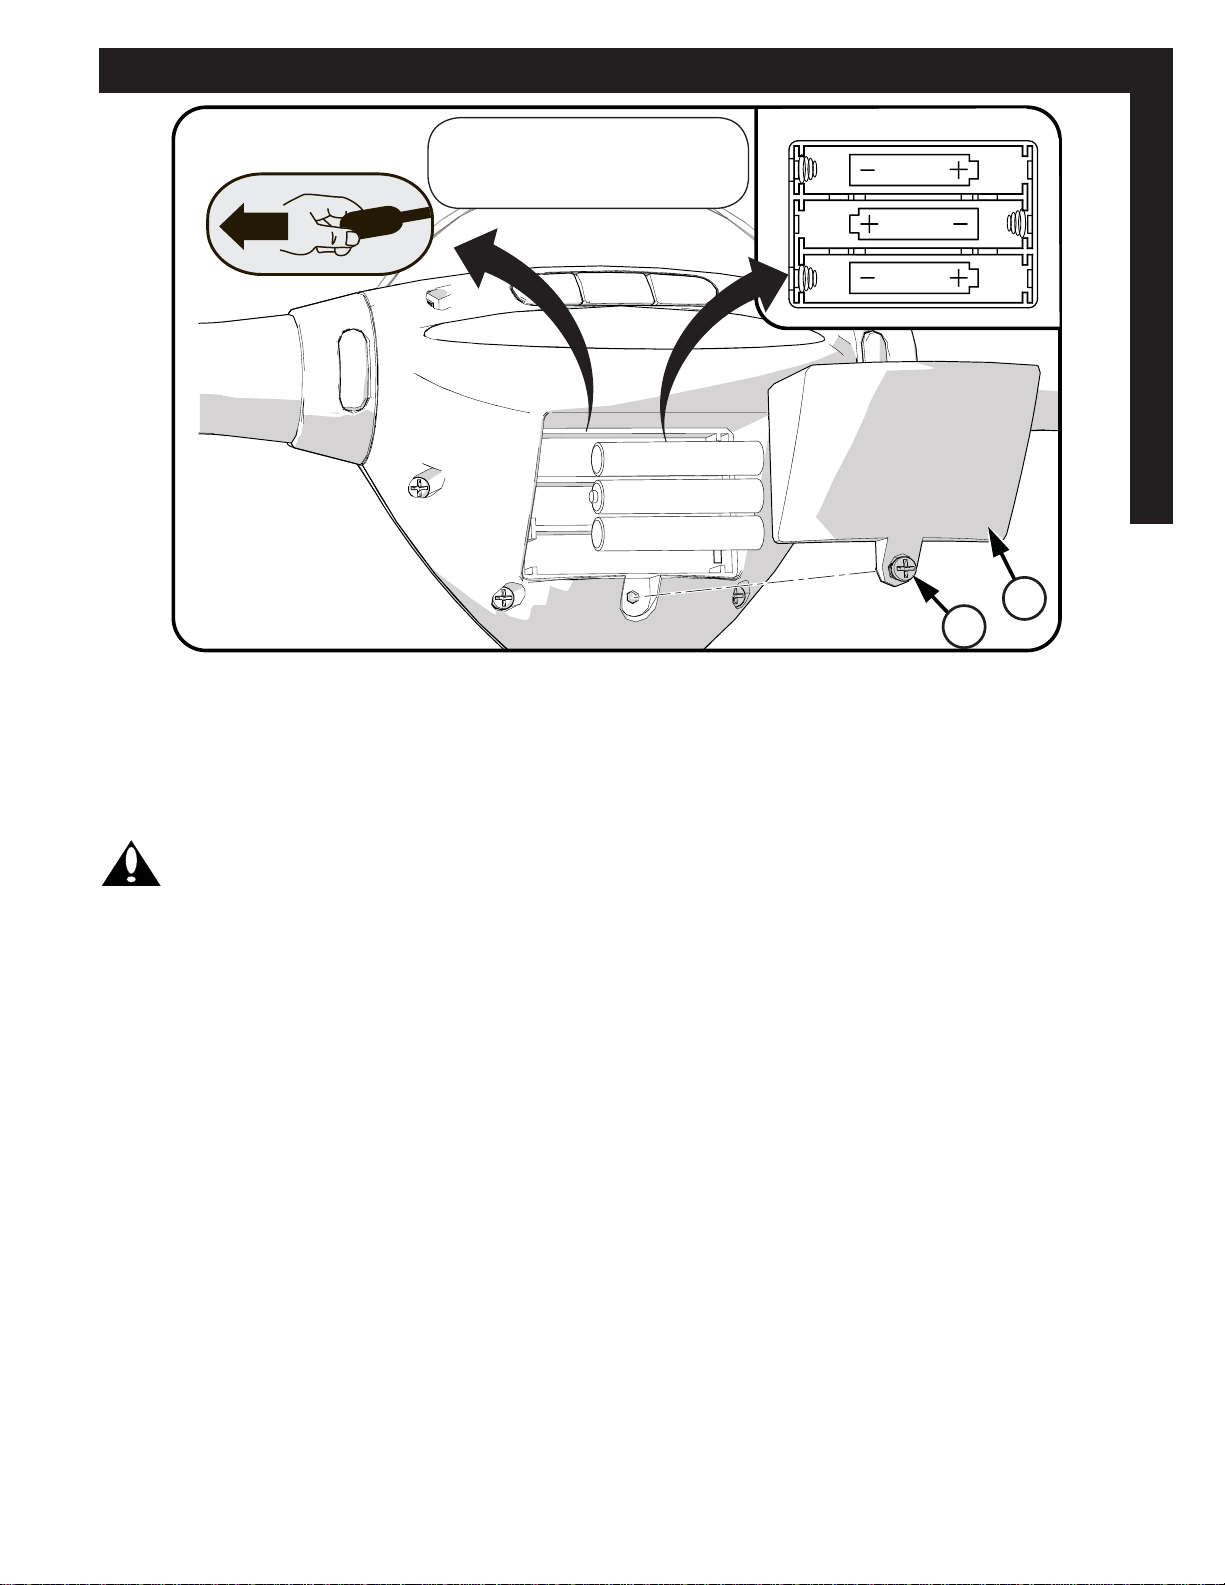
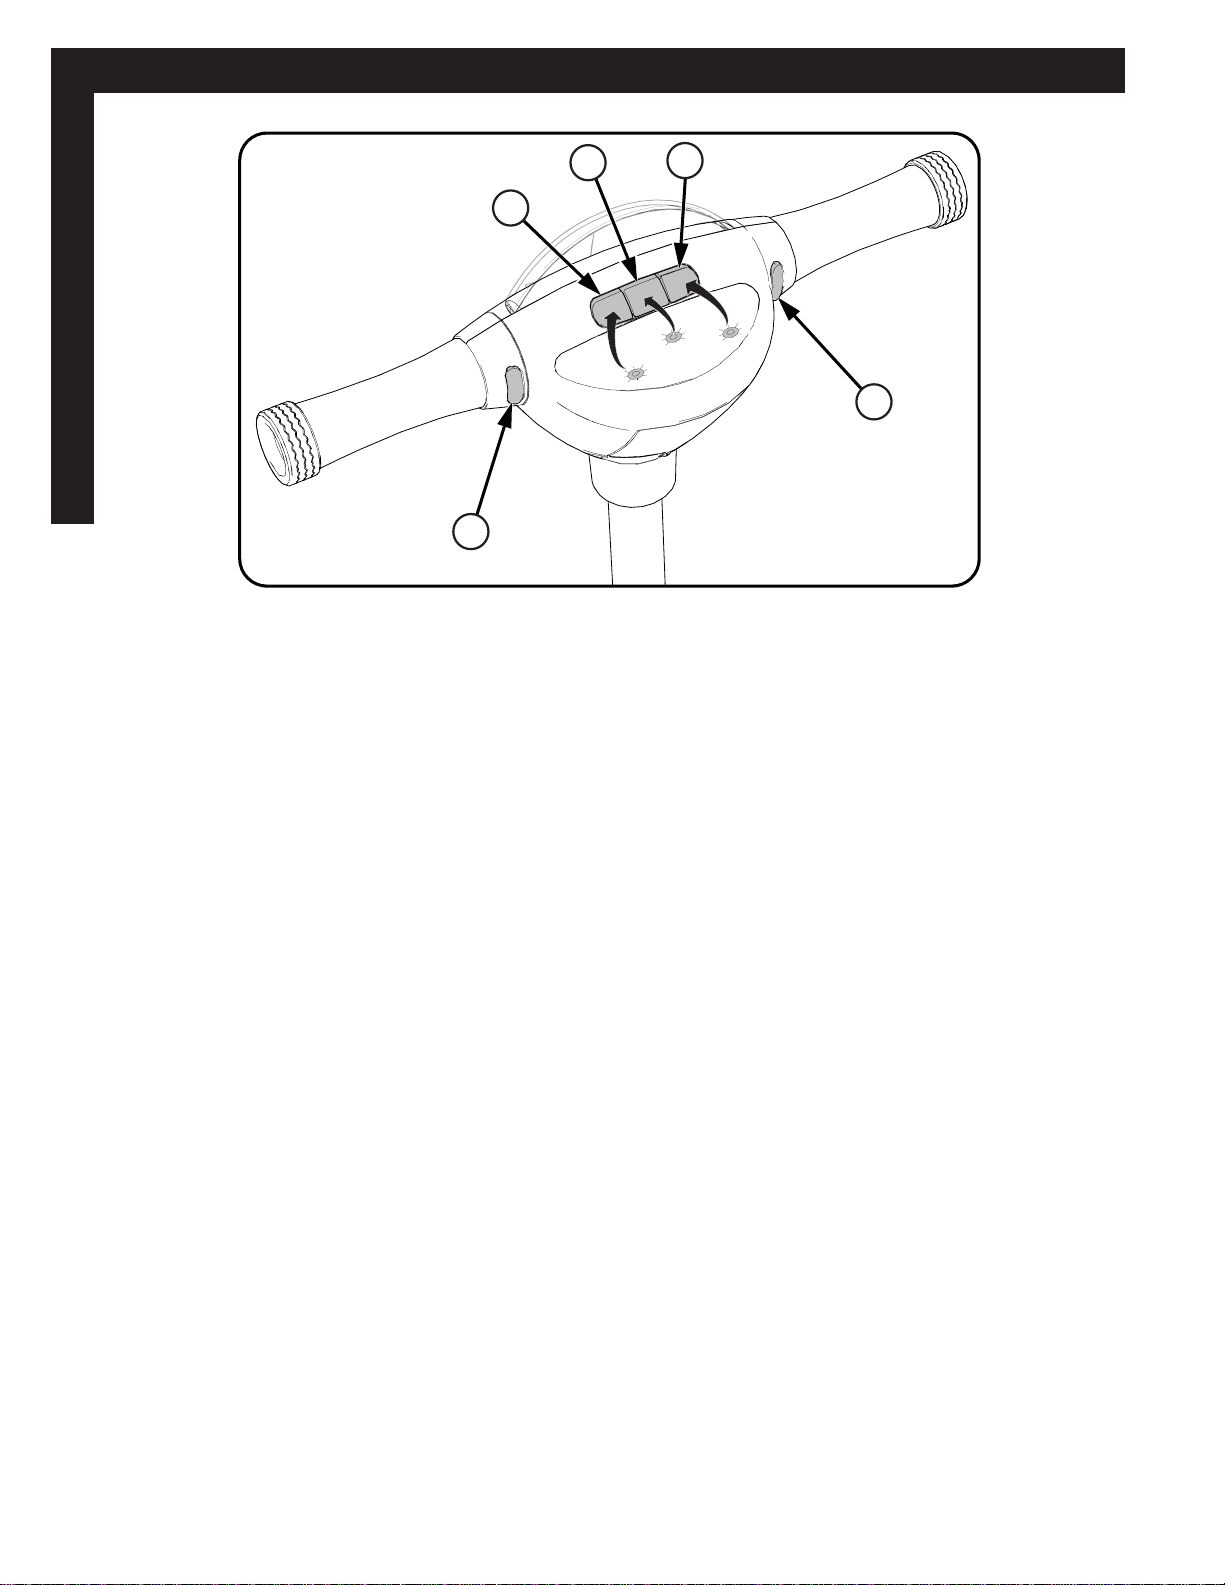
• Lights and Sounds Operation (if equipped).........................................9/10
• Warranty............................................................................................... 11

3
• Do not allow a child to ride off road, on grass or wet surfaces.
• Do not allow a child to ride on sloped driveways or hills.
• Do not allow a child to ride near steps.
• Do not allow a child to ride near swimming pool areas, or other bodies of water.
• Always comply with local laws and regulations.
• For use on smooth paved surfaces only.
• Understand all operating procedures before use.
• Do not tow or pull any objects with the product.
• Do not push or pull a child riding on the product.
• Replace worn or broken parts immediately.
• Not suitable for children under 3 years as foam pieces may break off and pose a
choking hazard.
• If anything does not operate properly, discontinue use.
If you have any quesƟons regarding the operaƟon of this product, please refer to this owners
manual or call Customer Service - see Consumer Service contact info.
Safety Information - continued
Maintenance
The trike does not require maintenance. However, the trike should be checked
periodically for any loose, broken, or worn parts. Tighten any parts that are loose,
and replace any worn or broken parts immediately. Periodic cleaning will prolong the
useful life of this trike.
Do not store outside or expose Lights and Sounds unit (if equipped) to water.
Safety and Maintenance

4
Trike Assembly
The Trike comes either fully or partially assembled. Follow the instructions below
for TrikeAssembly. If equipped, the Lights and Sound unit will be installed on the
Handlebars.
Fork, Handlebars and Lights and
Sounds unit (if equipped):
1.Place the Fender (16) over the fork
(13) as shown.
2.Slide the Fork assembly into the
Frame (12).
3.Place Cap (3) onto Handlebar (1).
4.Make sure Spacer (6) is in place
over Fork Tube (13).
5.Install Handlebar (1) into Fork (13)
so that screw holes are aligned.
6.Install Screw Set (5) through
Handlebar and Fork holes. Tighten
securely.
7.Slide Cap (3) down until the tabs
snap in place.
1
16
6
12
3
13
5
CAUTION:
• Ensure Handlebars and Fork turn smoothly in both directions and are not loose.
• Ensure front Wheel and Pedals rotate smoothly.
Assembly

5
Trike Assembly - continued
Rear Wheels:
1.Install Rear Wheels (10) over Axle Cups (9).
2.Install Axle Cap (11) with screw (7). Ensure Axle Cap is seated all the way in.
3.Repeat for opposite side.
4.Tighten Screws (7) securely but Do Not overtighten.
WARNING:
• Ensure Wheels turn smoothly.
• The Wheels can come off if the Screws are not tight or if the screw threads are
stripped.
Plastic Bin and Seat:
1.Install Seat (17) using 2 Screws (18) , 2 Nuts (19) and 4 Washers (20) as shown.
Do Not overtighten.
2.Snap the two Bin clips (A) over Frame Legs (B).
3.Install Plastic Bin (8) using Screw (22) into Frame Tube as shown. Do Not over-
tighten.
22 8
10
17
20 19
18
B
9
11
7
A
Assembly

6
Components
Parts View
22
8
10
17
19
18
20
12
26
921
16
15
6
12
3
4
25
24
23
711
14
5
13

7
Components
Item # Description Item # Description
1 Handlebar 14 Pedal (x2)
2 Grips (x2) 15 Front Wheel
3 Collar 16 Fender
4 Lights & Sounds Unit (if equipped) 17 Seat
5 Captive Screw Set 18 Screw (x2)
6 Steering Collar 19 Nut (x2)
7 Screw (x2) 20 Washer (x4)
8 Plastic Bin 21 Self Tapping Screw (m4 x 2)
9 Axle Cup (x2) 22 Self Tapping Screw
10 Rear Wheel (x2) 23 Plaque (various models)
11 Axle Cap (x2) 24 Bag (various models)
12 Frame Assembly 25 Handlebar Accessory (various models)
13 ForkAssembly 26 Handlebar Pad (various models)
Parts List

8
Folding / Unfolding the Trike
To Unfold the Product:
• Gently push down on Seat (A) and pull back on Rear Assembly (B) until the unit
locks into place.
• Make sure Locking Button (C) snaps into Seat Pivot Hole (D) - an audible CLICK
will be heard.
To Fold the Product:
• Pull out Locking Button (C) to release Seat Pivot Hole (D).
• Gently fold Rear Assembly (B) IN towards Front Wheel.
WARNING: An adult must fold and unfold this product each time.
A
C
D
B
Assembly

9
Lights and Sounds Unit Setup (if equipped)
A
B
$$$9
$$$9
$$$9
WARNINGS:
• Battery replacement is to be conducted by an adult.
• Dispose of batteries properly. Do not dispose of batteries in fire, batteries may
explode or leak. Check local regulations for proper battery disposal.
• Non-rechargeable batteries are not to be recharged.
• Different types of batteries or new and used batteries are not to be mixed.
• Only batteries of the same or equivalent type as recommended are to be used.
• Batteries are to be inserted with the correct polarity.
• Keep the unit from getting wet.
• The battery supply terminals are not to be short-circuited.
• Rechargeable batteries are to be removed from the unit before being charged.
• Rechargeable batteries are only to be charged under adult supervision.
This unit produces flashing lights and light patterns. Although rare, it is possible for
children to be susceptible to photosensitive seizures when exposed to certain flashing
lights or light patterns. It is important that parents monitor their children while playing
with this unit. To reduce exposure to such potential, play in a well-lit area and keep an
appropriate distance from the flashing lights.
Parents must assess whether their child’s capabilities, development and coordination
is appropriate for use of this unit.
Battery Replacement (For initial operation remove Pull Tab):
Batteries: DC 1.5V,AAA (included). The unit requires 3 batteries.
1. Loosen the battery compartment cover Screw (A) to remove the Cover (B).
2. Insert batteries in the orientation shown inside the compartment.
3. Re-install the compartment cover and tighten the screw.
For initial operation
remove Pull Tab
Lights and Sounds

10
A
L
R
BC
The various Lights and sounds are activated by pressing and releasing Buttons A,
B, C, Land R. Specific button combinations will activate special Lights and Sounds
sequences.
• Game Mode #1 Sing-A-Long: Push and Hold Button (C) for 1 second:
• To keep the song playing, press the corresponding button when a light
flashes.
• Game Mode #2 - Simon Says: Push and Hold Button (B) for 1 second:
• After the Light Sequence shows, repeat using the corresponding buttons.
• Game Mode #3 - Follow The Leader: Push and Hold Button (A) for 1 second:
• When a light shows, press the corresponding button.
Reset Unit: If ANY Button is pushed continuously for more than 10 seconds, a BEEP
will play for 1.0 second and the unit will reset.
If there are problems with operation – ensure the batteries are not low and they
are properly installed.
To clear all operations: Remove the batteries and re-install.
Lights and Sounds Unit Operation (if equipped)
Lights and Sounds

11
Huffy Corporation Limited Warranty
Part or model specifications are subject to change without notice.
This Limited Warranty is the only warranty for this product. There are no express
warranties. The only uses for this product are described in this manual. Warranty reg-
istration is not required. This limited warranty extends only to the original consumer
and is not transferable.
What does this Limited Warranty cover?
This Limited Warranty covers all parts of the product.
What must you do to keep the Limited Warranty in effect?
This Limited Warranty is effective only if:
• the product is completely and correctly assembled;
• the product is used under normal conditions for its intended purpose (see “Warn-
ings” for excluded activities);
• the product receives all necessary maintenance and adjustments.
What is not covered by this Limited Warranty?
This product is designed for recreational use only. This Limited Warranty does not
cover normal wear and tear, normal maintenance items, or any damage, failure, or
loss that is caused by improper assembly, maintenance, adjustment, storage, or use.
This Limited Warranty is void if the product is ever:
• used for stunt riding, jumping, acrobatics, or similar activity;
• ridden by more than one person at a time, or the weight limit is exceeded;
• used in a manner contrary to the instructions in this manual.
How long does this Limited Warranty Last?
All components are warranted for 6 months from the date of purchase.
What will the manufacturer do?
The manufacturer will replace, without charge to you, any component found to be de-
fective. The original owner must pay all labor and transportation charges associated
with the repair or warranty work.
How do you get service?
Contact Huffy Consumer Service.
See included list for Customer Contact information.
What rights do you have?
This Limited Warranty gives you specific legal rights. You may also have other rights
which vary from state to state.
Warranty

H Helmet EN 100212 i0027
• Helmet should sit level on your head and low on your forehead
• Adjust the strap sliders below the ear on both sides.
• Buckle the chin strap. Adjust strap until it is snug.
• No more than two fingers should fit between the strap and your chin.
• A proper fitting helmet should be comfortable and not rock forward/back-
ward or side to side.
• Always read the user manual that comes with your helmet to make sure it
is fitted and attached properly to the wearer’s head according to the fitting
instructions described in the user manual.
CORRECT INCORRECT
Check www.Huffy.com for the current contact information
WARNING:
ALWAYS WEAR YOUR
HELMET WHEN RIDING
THIS PRODUCT!
Table of contents
Other Huffy Bicycle manuals

Huffy
Huffy Kids Ride-On User manual

Huffy
Huffy coaster User manual

Huffy
Huffy Multi-Speed Comfort Bicycles User manual

Huffy
Huffy Green Machine User manual

Huffy
Huffy cruiser User manual

Huffy
Huffy coaster User manual

Huffy
Huffy Slider User manual

Huffy
Huffy 1C4880-A01 User manual

Huffy
Huffy M0782 User manual

Huffy
Huffy freewheel User manual

Huffy
Huffy BMX User manual

Huffy
Huffy 700c User manual

Huffy
Huffy CLASSIC TRIKE User manual

Huffy
Huffy Green Machine User manual

Huffy
Huffy m0743 User manual

Huffy
Huffy Minnie Lights & Sound User manual

Huffy
Huffy Mountain Bikes User manual

Huffy
Huffy Green Machine User manual

Huffy
Huffy Coaster Brake Bicycles User manual

Huffy
Huffy KD58C-LCD User manual