Husky HDUFL50 User manual

Sidentrodelaoapartirdelafechadecompra,estaherramientaneumáticaHusky
presentaradosfalladebidoaundefectoenlosmaterialesoenlamanodeobra,llamede
inmediatoalCentrodeServiciodeProductosal188-669-5672(8a.m.a5p.m.hora
estándardelEste,delunesaviernes,exceptodíasferiados).Nodevuelvalaherramienta
neumáticaalatienda.Estépreparadoparaenviarelproducto,franqueoprepagado,junto
conunacopiadelrecibodecompraconlafechaenlaqueseadquirióelproductoyel
modelodelaherramientaa:PRIMEGLOBALPRODUCTS,INC.Dirección:201Ropemill
Parkway,suite#1,Woodstock,GA.30188.Unproductodefectuososeráreemplazadocon
unonuevodeigualomayorvalor.Estagarantíaexcluyeda osaccidentalesoresultantesy
fallasdebidoamaluso,abusoodesgastedebidoalusonormal.Estagarantíaleotorga
derechosespecíficos,peropodríatenertambiénotrosderechosquevaríansegúnel
estado.Llamealparamásinformación.1-888-669-5672
GARANT AS
GARANT ASLIMITADADE2AÑOS
WARNING:
FailuretofollowwarningscouldresultinDEATHORSERIOUSINJURY.
KEEPYOURDATEDPROOFOFPURCHASEFORWARRANTYPURPOSES
IMH300400AV-E/S04/11
SAVETHISMANUALFORFUTUREREFERENCE
DistributedBy:
HomeDepotU.S.A.,Inc.
2455PacesFerryRd,N.W.Atlanta,GA30339
MODEL:HDUFL50
26-Sp

03
Thewarningsandprecautionsdiscussedinthemanualcannotcoverallpossibleconditionsand
situationsthatmayoccur.Itmustbeunderstoodbytheuserthatcommonsenseandcautionare
factorswhichcannotbebuiltintothisproduct,butmustbesuppliedbytheuser.
WARNING:
SAVETHISMANUAL
Keepthismanualforthesafetywarnings,
precautions,operations,inspectionsand
maintenance.Keepthismanualandthe
receiptinasafeanddryplaceforfuture
reference.
Inthismanual,onthelabels,packagesandallotherinformationprovidedwiththistool.Thefollowing
signalwordsandmeaningsareintendedtoexplainthelevelsofriskassociatedwiththistool.
Toavoidseriouspersonalinjury,donot
attempttousethisproductuntilyouread
thoroughlyandunderstandit
completely.Savethismanualandreview
frequentlyforcontinuingsafeoperation
andinstructingotherswhomayusethis
themanual
WARNING:
!
SYMBOLS SIGNAL MEANING
!
!
WARNING:
CAUTION:
CAUTION:
Indicatesapotentiallyhazardoussituation,which,ifnotavoided,
couldresultindeathorseriousinjury.
Indicatesapotentiallyhazardoussituation,which,ifnotavoided,
mayresultinminorormoderateinjury.
(Withoutsymbol)Indicatesasituationthatmayresultin
propertydamage.
GENERALSAFETYRULES
WORKAREA
Keeptheworkareacleanandwelllighted.
Keepbystanders,children,andothersaway
whileoperatingthetool.
Clutteredbenchesanddarkareasincreasethe
risksofaccidents.
Distractionscould
resultinimproperuseandcauseinjury.
Donotoperatethetoolinexplosive
atmospheres,suchasinthepresenceof
flammableliquids,gases,ordust. Thetool
createsasparkwhichmayigniteflammable
liquids,gasesordust.
Usesafetyequipment. Adustmask,non-skid
safetyshoesandahardhatmustbeusedforthe
applicableconditions.Wearafullfaceshieldif
youareproducingmetalfilingsorwoodchips.
CALIFORNIAPROPOSITION65
WARNING:
!
Whenusingtools,basicprecautions
shouldalwaysbefollowed,includingthe
following:
WARNING:
!
Thisproductoritspowercordmay
containchemicalsknowntotheState
ofCaliforniatocausecancerandbirth
defectsorotherreproductiveharm.
Washhandsafterhandling.
PERSONALSAFETY
Alwaysweareyeprotection.
Alwayswearhearingprotectionwhenusing
thetool.
Operatorand
othersintheworkareashouldalwayswear
ANSI-approvedsafetygoggleswithsideshields.
Eyeprotectionisusedtoguardagainstflying
fastenersanddebris,whichmaycausesevere
eyeinjury.Youcanusethegogglespackedwith
thetool.
Prolongedexposuretohighintensity
noisemaycausehearingloss.
WDH100401AV-S10/10
Readoperatorsmanual':Toreducetheriskofinjury,usermustreadandunderstandoperator'smanual
beforeusingthisproduct.
Eyeprotection:,,
.
Alwayswearsafetygogglessafetyglasseswithsideshieldsorafullfaceshieldwhen
operatingthisproduct
Risktohearing:Alwayswearearprotectionwhenusingthistool.Failuretodosomayresultinhearingloss.
Riskofseriouspersonalinjury:Neverplacehandsoranyotherbodypartsinthefastenerdischargearea
ofthenailer.Thetoolmightejectafastenerandcouldresultindeathorseriouspersonalinjury.
SYMBOLS
Someofthefollowingsymbolsmaybeusedonthistool.Pleasestudythemandlearntheir
meaning.Properinterpretationofthesesymbolswillallowyoutooperatethetoolbetterandsafer.
Avoidunintentionalmisfires. Alwaysuse
cautiontoavoidaccidentallyfiring.Donotpoint
towardsyourselforanyonewhetheritcontains
fastenersornot.
IMPORTANTSAFETYINSTRUCTIONS
Toreducetherisksofelectricshock,fire,andinjury
topersons,readalltheinstructionsbeforeusingthe
tool.
INSTRUCTIONSPERTAININGTOARISKOF
FIRE,ELECTRICSHOCK,ORINJURYTO
PERSONS
02
GENERALSAFETYRULES
UNPACKING
FEATURES
OPERATION
MAINTENANCE
RECOMMENDEDHOOKUP
TROUBLESHOOTING
WARRANTIES
LOADINGCLEATNAILS
LOADINGSTAPLES
UNLOADINGCLEATNAILSANDSTAPLES
CHANGETHEFOOTPLATE
ADJUSTINGTHEFRONTFOOT
SETTINGTHEAIRPRESSURE
OPERATINGTHETOOL
CLEARINGJAMS
P3
P5
P5
P6
P6
P6
P6
P7
P7
P8
P8
P9
P10
P11
P12
Dressproperly.
Avoidunintentionalstarting.
Stayalert,watchwhatyouaredoinganduse
commonsensewhenoperatingapowertool.
Donotoverreach.Keepproperfootingand
balanceatalltimes.
Donotwearlooseclothingor
jewelry.Containlonghair.Keepyourhair,
clothing,andglovesawayfrommovingparts.
Looseclothes,jewelry,orlonghaircanbe
caughtinmovingparts. Besurethe
switch(hammercap)isoffbeforeconnectingto
theairsupply.Donotcarrythetoolwithyour
fingerontheswitch(hammercap)orconnectthe
tooltotheairsupplywiththeswitch(hammer
cap)on.
Donotusetoolwhiletiredorundertheinfluence
ofdrugs,alcohol,ormedication.Amomentof
inattentionwhileoperatingthetoolmaycause
seriousinjury.
Properfootingandbalance
enablesbettercontrolofthetoolinunexpected
situations.

04 05
OPERATION
Donotdrivefastenersnearedgeofmaterial.
Theworkpiecemaysplitcausingthefasteneror
ricochet,injuringyouorpeoplearound.
Neverengageinhorseplay.
Donotdrivefastenersontopofother
fastenersorwiththetoolatanoverlysteep
angleasthismaycausedeflectionof
fastenerswhichcouldcauseinjury.
Donotactuatethetoolunlessyouintendto
driveafastenerintotheworkpiece.
Alwayshandlethetoolwithcare:
◆Respectthetoolasaworkingimplement.
◆
◆Keepothersasafedistancefromthetool
whiletoolisinoperationasaccidental
actuationmayoccur,possiblycausinginjury.
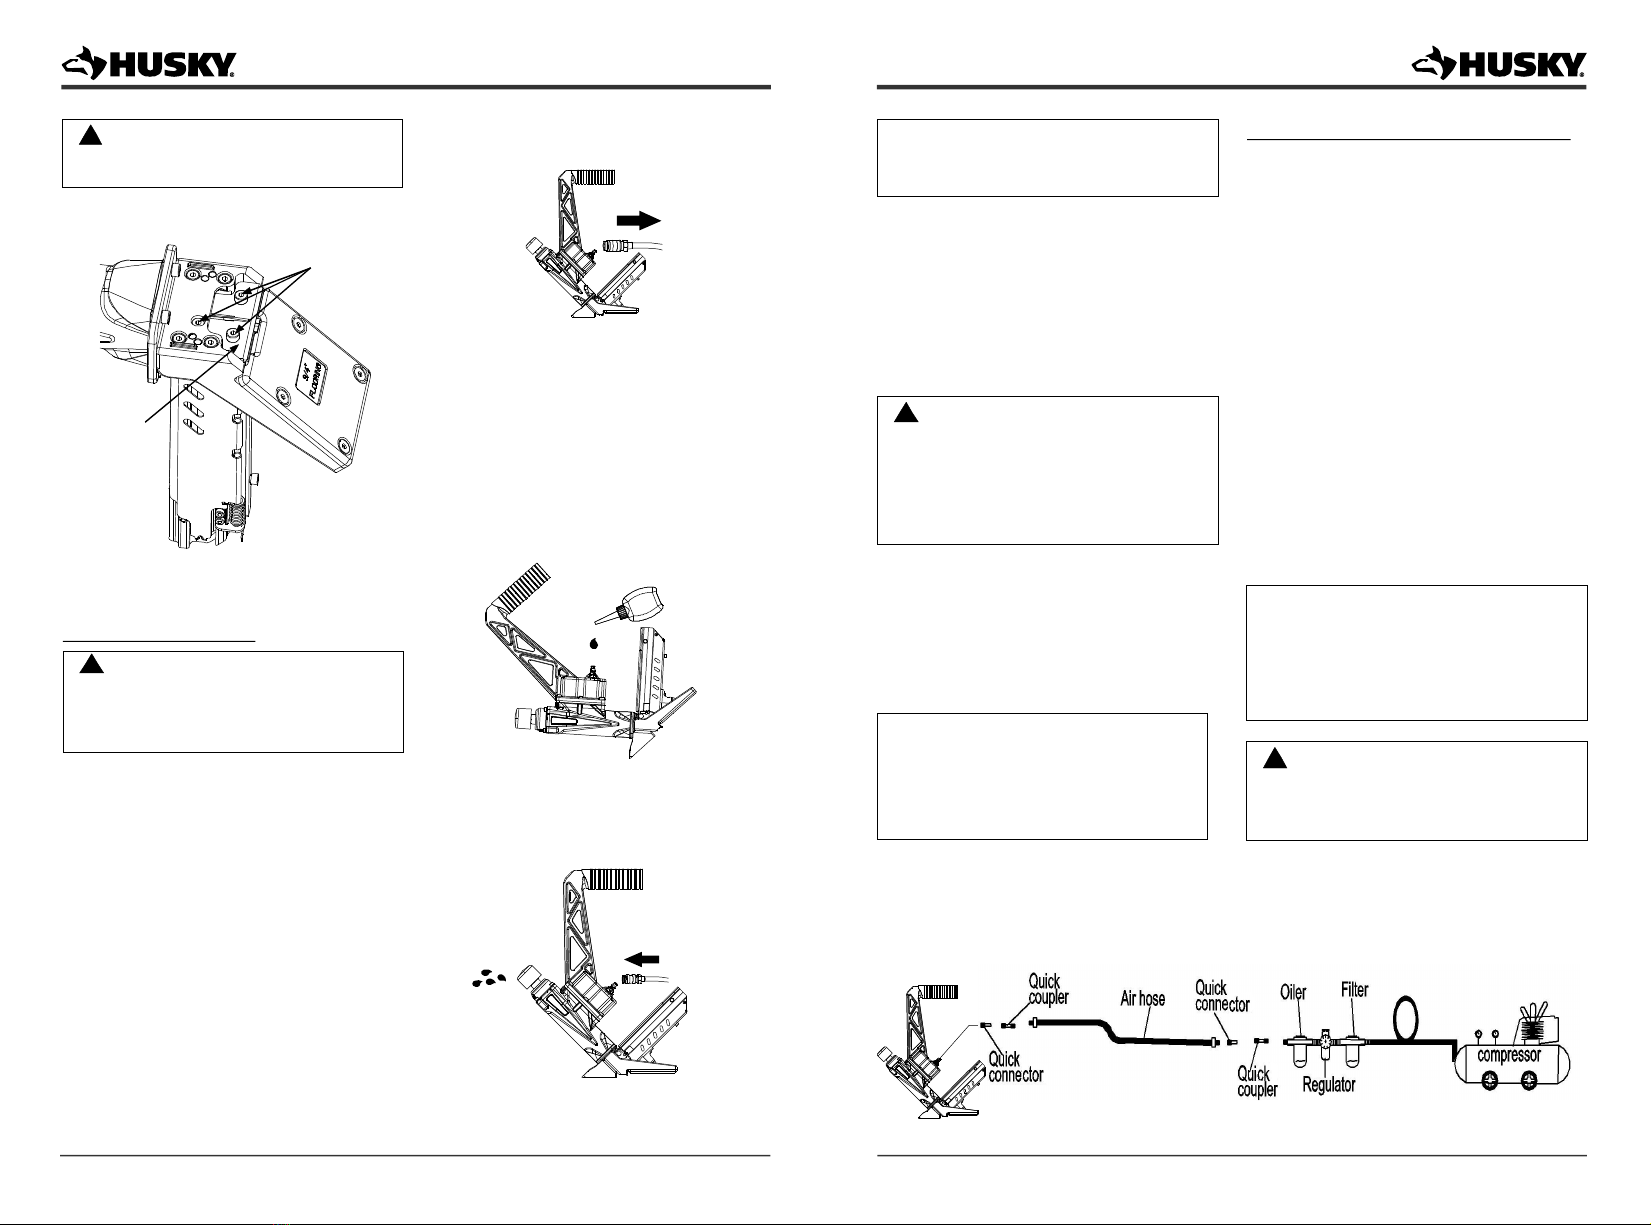
AIRSUPPLYANDCONNECTIONS
Theconnectoronthetoolmustnothold
pressurewhenairsupplyisdisconnected.
Neveruseoxygen,combustiblegasesor
bottledgassesasapowersourceforthistool.
explosionmayoccur,causinginjuryordeath.
Ifan
incorrectfittingisused,thetoolcanremain
chargedwithairafterdisconnectingandthuswill
beabletodriveafastenerevenaftertheairlineis
disconnected,possiblycausinginjury.
Neverconnectwithanaircompressorwhich
canpotentiallyexceed200Psi.
Alwaysdisconnectairresource:
Over
pressurizingthetoolisabletoresultinbursting,
abnormaloperation,breakageofthetoolor
seriousinjurytopersons.Useonlyclean,dry,
regulatedcompressedairattheratedpressureor
withintheratedpressurerangeasmarkedonthe
tool.Alwaysverifypriortousingthetoolthatthe
airsourcehasbeenadjustedtotheratedair
pressureorwithintheratedair-pressurerange.
Beforeunloadingormakingadjustments.
Whenmaintainingthetool.
Whenclearingajam.
Whentouchingthesafetyyoke.
Whentoolisnotinuse.
Whenmovingtoadifferentworkarea.
Suchprecautionarymeasuresreducetheriskof
injurytopersons.
SAVETHESEINSTRUCTIONS
Makesurethehoseisfreeofobstructionsor
snags. Entangledorsnarledhosescancause
lossofbalanceorfootingandmaybecome
damaged,resultinginpossibleinjury.
Attachthehosetothestructuretoreducetherisk
oflossofbalanceifthehoseshifts.
Donotpointthetooltowardyourself
oranyonewhetheritcontainsfastenersornot.
Donotattachthehoseortooltoyourbody.
Alwaysassumethatthetoolcontains
fasteners.
TOOLUSEANDCARE
Knowthistool.
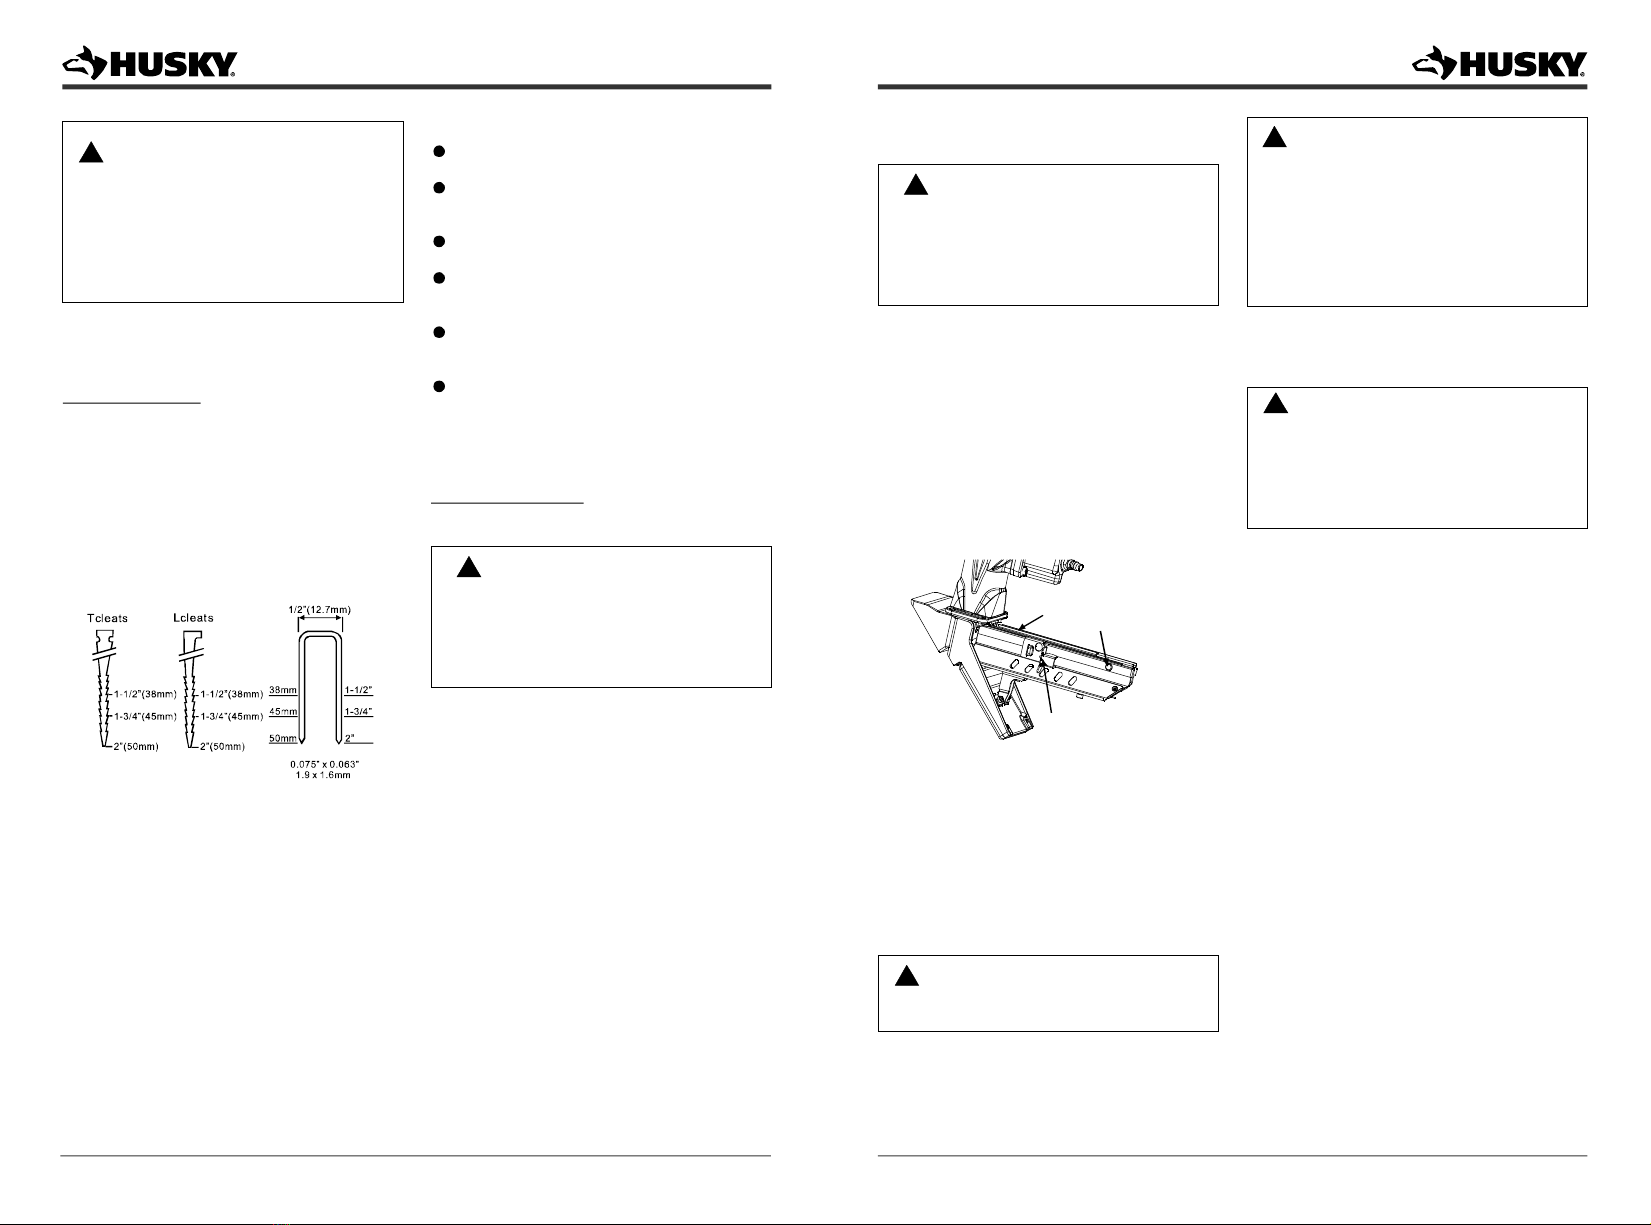
Useonlyfastenersthatarerecommendedfor
yourmodels.
Readmanualcarefully,learnits
applicationsandlimitations,aswellasthe
specificpotentialhazardsrelatedtothistool.
Donotusethewrongfastenersor
loadthefastenersincorrectly.
Useonlyaccessoriesthatareidentifiedby
themanufacturerforthespecifictoolmodel.
Useonlythosefastenersrecommendedfor
usewiththistool.
Useofunauthorizedpartsorfailuretofollow
maintenanceinstructionsmaycreateariskof
injury.
Fastenersnotidentiedfor
usewiththistoolbythetoolmanufacturerare
abletoresultinariskofinjurytopersonsortool
damagewhenusedinthistool.
fi
Checkformisalignmentorbindingofmoving
parts,breakageofparts,andanyother
conditionthatmayaffectthetool'soperation.
Maintaintoolswithcare.
Storetoolsoutofthereachofchildrenand
otheruntrainedpeoplewhenitisidle.
Checkoperationofthetoolbeforeuse.
Donotforcetool.
Neverusethistoolinamannerthatcould
causeafastenertobedirectedtoward
anythingotherthantheworkpiece.
Alwayscarrythetoolbythehandle.Never
carrythetoolbytheairhose.
Donotoperatethetoolifitdoesnotcontain
alegiblewarninglabel.
Donotusethetooliftheswitch(hammer
cap)doesnotturnthetoolonoroff.
Ifdamaged,havethetoolservicedbeforeusing.
Manyaccidentsarecausedbypoorlymaintained
tools.Thereisariskofburstingifthetoolis
damaged. Keeptoolclean.A
properlymaintainedtool,reducestheriskof
bindingandiseasiertocontrol.
Tools
aredangerousinthehandsofuntrainedusers.
Usethecorrecttoolforyour
application.Thecorrecttoolwilldothejobbetter
andsaferattherateforwhichitisdesigned.
Anytool
thatcannotbecontrolledwiththeswitchis
dangerousandmustberepaired.
Useclampsoranotherpracticalwayto
secureandsupporttheworkpiecetoastable
platform.
Keepthetoolanditshandledry,cleanand
freefromoilandgrease.
Donotusethetoolasahammer.
Donotusethetoolifitleaksairordoesnot
functionproperly.
Holdingatoolbyhandoragainstthe
bodyisunstableandmayleadtolossofcontrol.
Alwaysuseaclean
clothwhencleaning.Neverusebrakefluids,
gasoline,petroleum-basedproducts,orany
strongsolventstocleanyourtool.
TOOLSERVICE
Useonlyaccessoriesthatareidentifiedby
themanufacturerforthespecifictoolmodel.
Useofunauthorizedpartsorfailuretofollow
maintenanceinstructionsmaycreatearisk
ofinjury.
Useonlythelubricantssuppliedwiththe
toolorspecifiedbythemanufacturer.
Toolservicemustbeperformedonlyby
qualifiedrepairpersonnel.
Whenservicingatool,useonlyidentical
replacementparts.Useonlyauthorized
parts.
Disconnectthetoolfromtheairsource
beforemakingadjustments,doingtool
maintenance,clearingjams,leavingwork
area,orunloadingthetool.Such
precautionarymeasuresreducetheriskof
injurytopersons.
WARNING:
!
LOADINGTOOL
Donotloadthetoolwithfastenerswhenany
oneoftheoperatingcontrolsisactivated.
Neverplaceahandoranypartofbodyin
fastenerdischargeareaoftool.
Neverpointtoolatanyone.
Thewarningsandprecautionsdiscussed
abovecannotcoverallpossibleconditions
andsituationsthatmayoccur.Itmustbe
understoodbytheuserthatcommon
senseandcautionarefactorswhichcannot
bebuiltintothisproduct,butmustbe
suppliedbytheuser.
WARNING:
!
UNPACKING
Thistoolhasbeenshippedcompletely
assembled.
Makesurethatallitemslistedinthepacking
listareincluded.
Carefullyremovethetoolandanyaccessories
fromthebox.
Inspectthetoolcarefullytomakesureno
breakageordamageoccurredduringshipping.
Donotdiscardthepackingmaterialuntilyou
havecarefullyinspectedandsatisfactorily
operatedthetool.
Ifanypartsaredamagedormissing,please
call.1-888-669-5672
PACKINGLIST
3In1flooringnailer
Colorbox
Mallet
Airconnector(pre-attached)
Adjustmenttools
Lubricationoil
Anti-dustcap
5/8"otplate
Instructionmanual
Safetygoggles
(pre-attached)
fo
Ifanypartsaremissingdonotoperate
thistooluntilthemissingpartsare
replaced.Failuretodosocouldresultin
possibleseriouspersonalinjury.
WARNING:
!
Removefingerfromthehammercap
whennotdrivingfasteners. Nevercarrythe
toolwithngeronhammercap,thetoolis
abletoreafastener.
fi
fi
WARNING:
!
Donotnailontopofanothernail. Thisis
abletocausethenailtobedeectedandhit
someone,orcausethetooltoreactandresult
inariskofinjurytopersons.
fl
WARNING:
!

Useonlythosefastenersrecommendedfor
usewiththistool.Fastenersnotidentified
forusewiththistoolbythetool
manufacturerareabletoresultinariskof
injurytopersonsortooldamagewhen
usedinthistool.
WARNING:
!
06 07
OPERATION
LOADINGCLEATNAILS
PullthePusher(A)backtotheendofmagazine.
LockpusherintheplacebyusingtheLock
button(C).ThenpulltheMagazinesideshelter(B)
back.
PlacefullclipofdesiredFastenersintomagazine
fromtheside.Upto100cleatnailscanbeloaded
intomagazine.Benotedthat,whenloadingtheL
cleatnails,thesidewiththeLheadshouldbein
theleftoftheMagazinesideshelter(B).Pressthe
Lockbutton(C),thenthePusher(A)setbackto
maketheMagazinesideshelter(B)downback.
Thetoolmayfirewhenitfirstconnectedto
theairresource.Alwaysconnectthetool
totheairresourcebeforeloadingfasteners
topreventinjuryfromunintendedcycling.
Alwaysmakesurethetool'smagazineis
emptyatthebeginningofeachwork
session,beforeconnectingtoanair
resource.
WARNING:
!
LOADINGSTAPLES
PullthePusher(A)backtotheendofmagazine.
LockpusherintheplacebyusingLockbutton(C).
ThenpulltheMagazinesideshelter(B)back.
Placeafullclipof1/2"CrownStaplesinthe
magazinefromthetop.Upto90pcscanbe
loadedintothetool.
PresstheLockbutton(C),thenthePusher(A)
setsbacktomaketheMagazinesideshelter(B)
downback.
CHANGETHEFOOTPLATE
Thetoolisequippedwithafactorypre-installed
3/4"footplate(D).
Andanadditionaluninstalled5/8"footplate.
Tochangetheplate:
Disconnectthetoolfromtheairresource.
Emptythemagazinecompletely.
Firethetoolintoapieceofscrapwoodto
ensurethereisnocompressedairorfasteners
leftinthetool.
Setthetoolonitssidetoexposethefour
screws(E).
Removethefourscrews(E),then,removethe
footplate.
Alignthefourscrewholesinthereplacement
footplatewiththefourthreadedmountingholes.
Usingthefourscrewsyouremovedjustnow,
securethereplacementfootplatetothetool.
EnsurethecorrectFootPlateisinstalledby
firingintoascrappieceofflooringandchecking
forproperfastenerplacement.
⒈
⒉
⒊
⒋
⒌
⒍
⒎
⒏
⒈
⒉
⒈
⒉
⒊
Magazineside
shelter(B)
Lockbutton(C)
Pusher(A)
Thetoolmayfirewhenitisfirst
connectedtotheairresource.Always
connectthetooltotheairresource
beforeloadingfastenerstopreventinjury
fromunintendedcycling.
WARNING:
!
Thetoolmayfirewhenitisfirst
connectedtotheairresource.Always
connectthetooltotheairresource
beforeloadingfastenerstopreventinjury
fromunintendedcycling.
WARNING:
!
UNLOADINGCLEATNAILSAND
STAPLES
Unloadingisthereverseofloading.Always
disconnecttheairresourcebeforeunloading.
Alwaysunloadallfastenersbeforeremoving
toolfromservice.
WARNING:
!
FEATURES
SPECIFICATIONS
Operationpressure:
Nailscapacity:
Toolweight:
Airinlet:
Fasteners:
70-115psi
L:100pcs
T:100pcs
U
10.25lbs
1/4"NPT
1-1/2"to2"
:90pcs
FEATURES
REVOLUTIONARY3IN1DESIGN
ANODIZEDALUMINUMMAGAZINE
DURABLECONSTRUCTION
MALLETINCLUDED
ForusewithStaples,T-CleatsandL-Cleats.
Forlonglastingdurability.
Lightweightanddurablyconstructedofhigh-
strengthaluminumandheattreatedsteelparts.
NO-MARDESIGN
AIRFILTER
Keepsinteriorcomponentsdebrisfree,extending
toollife.
Providesincreasedprotectionfrommarring
whenworkingwithafinishedflooringsurface.
Donotattempttomodifythistoolor
createaccessoriesnotrecommendedfor
usewiththistool.Anysuchalterationor
modificationismisuseandcouldresultin
hazardousconditionleadingtopossible
seriouspersonalinjury.
WARNING:
!
CompatiblewithGenericBrands1/2"Staples,
T-Cleats,&L-Cleats.
16Ga. 16Ga. 15-1/2Ga.

08 09
HoldtheHandgrip(
worksurface.Makesurethe
plateisovertheastenertargetposition.
Pressdownhardsothatthefootplateisfirmly
contactingtheworksurface.Then,usingthe
malletpackedwiththeTool,strikethehammer
cap()firmlytodrivethefastenerintowork
surface.Liftthetoolofftheworksurface.Repeat
thisprocessuntilthejobiscompleted.
Whenfinished,makesuretostorethetoolina
clean,dry,safelocationoutofreachofchildren
andotherunauthorizedPeople.
J)securelyandPressthe
Footplate(D)tothe
f
K
Extremecautionmustbeusedwhenever
thistoolisconnectedtoanairresource.If
thetoolisdropped,oriftheHammer
cap(K)isaccidentallystruck,thenthetool
willfireafastener,potentiallycausing
SERIOUSPERSONALINJURY.
WARNING:
!
Keepyourfeetoffthetool.
WARNING:
!
Beforeusingthetoolonafloor,testthe
toolonascrappieceofwood.Adjustthe
drivingdepthbyprovidingmoreorlessair
pressure.Neverexceed115PSI.
WARNING:
!
2.
4.
3.
Animproperlyfunctioningtoolmustnotbe
used.Donotactuatethetoolunlessthe
toolisplacedfirmlyagainsttheworkpiece.
WARNING:
!
NOTE:MakesuretheHammerCapontheflooring
nailerisintheuppositionbeforeaddingtheairhose,
ifnot,thenailermaycycle(Seebelow):
HammerCap(DownPosition)
HammerCap(UpPosition)
HammerCap
(K)
Handgrip
(F)
Attachthetooltotheairresource.Startyour
compressorandcheckthepressure,making
sureitissetbetween70-115psi.Donotexceed
themaximum115psi.
OPERATINGTHETOOL
CLEARINGJAMS
Occasionally,fastenersmaybecomejammedin
thefiringmechanismofthetool,makingthetool
inoperable.Toremoveajammedfastener,follow
thestepsbelow:
Disconnectthetoolfromairresource.
Emptythemagazine.Makesureallfastenersare
removed.
Trytofirethetoolintoapieceofscrapwoodor
flooringtomakesurethatit'sincapableoffiring
anyfasteners.
SetthetoolonitssidetoexposethetwoBolts
(G)andtwoSmallPlates(H)underthescrews.
RemovedtheseNoseBolts(G)andtwoSmall
Plate(H).ThreeNoseBolts(L)canbeseenafter
removingtheFrontFoot(F).
RemovethreeNoseBolts(L),slidetheDriver
Guide(M)outtoexposethejammedfastener.
Removejammedfastener,usingplierora
screwdriverifrequired.
ReplacetheDriverGuide(M)andNoseBolts(L)
ReplacetheFrontFoot(F),Plate(H)andbolts
(G)back.
Reloadthetoolwithfasteners,thenreconnect
theairresourcetothetool.
PresstheDriveguide(M)againstapieceof
wood,andtestfirethefastenersseveraltimesto
checkforproperoperation.Ifthetoolisproperly
firing,youmaycontinueusingthetool.Ifthetool
failstoperformproperly,immediatelydiscontinue
usandhavethetoolrepairedbyaqualified
servicetechnician.
e
⒈
2.
3.
4.
5.
6.
7.
8.
9.
10.
11.
Disconnectthetoolfromtheairsource
wheneverchangingthefootplate.
Makesurethereisnofastenerinthe
magazinebeforechangingthefootplate.
WARNING:
!
ADJUSTTHEFRONTFOOT
Thetoolisequippedwithanadjustablefrontfoot,
canbeadjustedfor3/4"-5/8"woodfloors.Thistool
isshippedoutsetfor3/4"woodfloor.
Toadjustthefrontfoot(F):
Screws(E)
Footplate(D)
Disconnectthetoolfromtheairresource.
Emptythemagazinecompletely.
Firethetoolintoapieceofscrapwoodtoensure.
Thereisnocompressedairorfastenersleftinthe
tool.
SetthetoolonitssidetoexposethetwoBolts(G)
andtwoSmallPlates(H).
LoosethesetwoBolts(G)andtwoSmallPlates
(H)toensuremovetheFrontFoot(F)intherange
oftheAdjustGroove(I).
AdjusttheproperpositionoftheFrontFoot(F)
accordingtotheactualthicknessofwoodfloors
andthenlocktightlythesetwoBolts(G)andtwo
SmallPlates(H).
Ensurethecorrectfrontfootsetfortewoodfloor
byfiringintoascrappieceofflooringand
checkingforproperfastenerplacement.
3.
4.
5.
6.
7.
Disconnectthetoolfromtheairsource
wheneverchangingthefootplate.
Makesurethereisnofastenerinthe
magazinebeforechangingthefootplate.
WARNING:
!
Theamountofairpressurerequireddependson
thesizeofthefastenersandtheworkpiecematerial.
Begintestingthedepthofdrivebydrivingatestnail
intothesametypeofworkpiecematerialusedfor
theactualjob.
Driveatestfastenerwiththeairpressuresetat90-
95psi.Raiseorlowertheairpressuretofindthe
lowestsettingthatwillperformthejobwith
consistentresults.
SETTINGTHEAIRPRESSURE
FrontFoot
(F)
SmallPlate
(H)
Bolts(G)
Adjust
groove(I) Adjust
groove(I)
1.
2.

10 11
RECOMMENDEDHOOKUP
Theaircompressormustbeableto
maintainaminimumof70psiwhenthe
toolisbeingused.Aninadequateairsupply
cancausealossofpowerandinconsistent
driving.
CAUTION:
Donotconnectwithanaircompressor
whichcanpotentiallyexceed200psi.As
toolmayburst,possiblycausinginjury.
WARNING:
!
Lubricatetoolonlywithspecified
lubricants.
CAUTION:
Avoidusingsolventswhencleaningplasticparts.
Mostplasticsaresusceptibletodamagefrom
varioustypesofcommercialsolventsandmaybe
damagedbytheiruse.Usecleanclothstoremove
dirt,dust,oil,grease,etc.
CLEANING
Donotatanytimeletbrakefluids,gasoline,
petroleum-basedproducts,penetration
oils,ect.comeincontactwithplasticparts.
Chemicalscandamage,weakenordestroy
plasticwhichmayresultinserious
personalinjury.
WARNING:
!
Donotstoretoolsinacoldweather
environmenttopreventfrostorice
formationonthetools'operatingvalves
andmechanismsthatcouldcausetool
failure.
CAUTION:
COLDWEATHEROPERATION
Forcoldweatheroperation,nearandbelow
freezing,themoistureintheairlinemayfreezeand
preventtooloperation.Werecommendtheuseof
airtoollubricantorpermanentantifreeze(ethylene
glycol)asacoldweatherlubricant.
Theaircompressormustbeabletomaintaina
minimumof70psiwhenthetoolisbeingused.
Aninadequateairsupplycancausealossof
powerandinconsistentdriving.
Anoilercanbeusedtoprovideoilcirculation
throughthetool.Afiltercanbeusedtoremove
liquidandsolidimpuritieswhichcanrustorgum
upinternalpartsofthetool.
Alwaysuseairsupplyhoseswithaminimum
workingpressureratingequaltoorgreaterthan
thepressurefromthepowersourceifaregulator
fails,or150psi,whicheverisgreater.Use3/8"air
hoseforrunsupto50'.Use1/2"airhosesfor50'
runorlonger.Forbetterperformance,installa
3/8"quickplug(1/4"NPTthread)withaninside
diameterof0.315"(8mm)onthetooland3/8"
quickcouplerontheairhose.
Useapressureregulatoronthecompressor,
withanoperatingpressureof0-125psi.A
pressureregulatorisrequiredtocontrolthe
operatingpressureofthetoolbetween70and
115psi.
1.
2.
3.
4.
Makesurethereisnofastenerinthe
magazinebeforeclearingajam.
WARNING:
!
MAINTENANCE
Anytimeinspection,maintenance,and
cleaningaredone:
◆Disconnectthetoolfromtheair
Emptythemagazinecompletely.
resource.
◆
WARNING:
!
Eachtoolispackedwithananti-dustcapontheair
connector,checkitafterunpacking.Keeptheanti-
dustcaptocovertheairconnectorwhenthetoolis
notinusetopreventdebrisfromenteringthetool.
ANTI-DUSTCAP
LUBRICATION
Frequent,butnotexcessive,lubricationisrequired
forbestperformance.Oilforthetooladdedthrough
theairlineconnectionaddwilllubricatetheinternal
parts.Donotdetergentoiloradditivesasthese
lubricantswillcauseacceleratedweartotheseals
andbumpersinthetool,resultinginpoortool
performanceandfrequenttoolmaintenance.
Disconnecttheairsupplyfromthetooltoadd
lubricant.
⒈
Turnthetoolsotheairinletisfacingup.Place2-
3dropsofpneumaticfasteningtooloilintoair
inlet.Donotusedetergentoils,oiladditives,or
air-tooloils.Donotusedetergentoiloradditives
astheselubricantswillcauseacceleratedwear
tothesealsandbumpersinthetool,resultingin
poortoolperformanceandfrequenttool
maintenance.
2.
Afteraddingoil,runtoobriefly.Wipeoffany
excessoilfromthecapexhaust.
3.
NoseBolts(L)
Driverguide(M)

12
Ifwithintwoyearsfromthedateofpurchase,thisHuskyairtoolproductfailsduetoadefect
inmaterialsorworkmanship,pleaseimmediatelycontactProductSupportat1-888-669-
5672(8amto5pmEST,M-F,exceptnormalHoliday).Donotreturntheairtooltothestore.
Pleasebepreparedtosendtheproduct,postageprepaid,alongwithacopyofthedated
firstownerpurchasereceiptwiththetoolmodelto:PRIMEGLOBALPRODUCTS,INC.
Address:201RopemillParkway,suite#1,Woodstock,GA.30188.Adefectiveproduct
willbepromptlyreplacedwithanewoneofequalorgreatervalue.This
warrantyexcludesincidental/consequentialdamagesandfailuresduetomisuse,
abuseornormalwearandtear.Thiswarrantygivesyouspecificrights,andyou
mayalsohaveotherrights,whichvary,fromstatetostate.Pleasecallfor
details. 1-888-669-5672
WARRANTY
2YEARSLIMITEDWARRANTY
TROUBLESHOOTING
PROBLEMS POSSIBLECAUSES CORRECTIONACTIONS
Airleakinginheadcap. ⒈Loosescrews.
⒉WornordamagedO-ringsorseals. ⒈Tightenscrews.
Installoverhaulkit.⒉
Lackofpower.
Slowtocycle. ⒈Toolistoodry.
Airpressuretoolow.
Exhaustblocked.
⒉
⒊
⒈Addabout2-3dropsof
lubricationintotheairconnector.
⒉Makesuretheaircompressor
issetbetween70psiand115psi.
Cleanexhaustchannel.⒊
Notshootingfasteners. ⒈Damagedpusherspring.
Wrongsizeoffasteners.⒉
⒈Replacespring.
⒉Use1/2"crownstaplesor
1-1/2"to2"nails.
⒈Fixthedrivechannel.
Replacethepiston.
Removethebentfasteners,
replacewiththe1/2"crown
staplesor1-1/2"to2"nails.
Cleanmagazine.
Tightenscrews.
Verifythatfastenersarethe
correctsize.
⒉
⒊
⒋
⒌
⒍
⒈Drivechannelisworn.
Pistonisbrokenorworn.
Bentfasteners.
Dirtymagazine.
Loosemagazine.
Wrongfasteners.
⒉
⒊
⒋
⒌
⒍
Fastenersare
jammedinthetool
frequently.
Stopusingtoolimmediatelyifanyofthefollowingproblemsoccur.Seriouspersonalinjury
couldresult.Anyrepairsorreplacementsmustbedonebyaqualifiedservicepersonoran
authorizedservicecenter.
WARNING:
!
13

14-Sp
Lasadvertenciasyprecaucionesmencionadasenestemanualnocubrentodaslascondicionesy
situacionesposiblesquepudieranocurrir.Elusuariodebecomprenderqueelsentidocomunyla
precaucionsonfactoresquenosepuedenincorporarconelproducto,sinoquedebenser
suministradosporelusuario.
ADVERTENCIA:
GUARDARESTEMANUAL
Guardeestemanualcomoreferenciaparalas
advertenciasdeseguridad,precauciones,el
funcionamiento,lasinspeccionesyel
mantenimiento.Guardeestemanualyelrecibo
decompraenunlugarseguroysecopara
referenciafutura.
Paraevitarlesionespersonalesgraves,no
intenteusaresteproductohastaquehaya
ledoycomprendidocompletamenteel
manual.Guardeestemanualyconsultelo
frecuentementeparautilizarlaherramienta
deformasegurayparainstruiraotras
personasparaquepuedanutilizarla.
!
ADVERTENCIA:
SMBOLOS
WDH100401AV-S10/10
Leaelmanualdeloperadorde: Parareducirelriesgodelesiones,elusuariodebeleeryentender
elmanualdeloperadorantesdeusaresteproducto.
Proteccióndelosojos: Usesiempregafasdeseguridad,gafasdeseguridadconprotecciónlateralo
unacaretacompletacuandoutiliceestaproducto.
Elriesgoalaaudición: Siempreuseprotecciónparalosoídoscuandoseutilizaestetool.Failurelo
contrario,podríaresultarenlapérdidadeaudición.
Riesgodelesionespersonalesgraves: Nuncacoloquelasmanosocualquierotrapartedelcuerpo
enlazonadedescargadelsujetadordelaclavadora.Laherramientapuedeexpulsarunsujetadory
puedecausarlamuerteolesionesgraves.
Algunosdelossiguientessímbolospuedenserutilizadosenestaherramienta.Porfavor,
estudiarlosyaprendersusignificado.Unacorrectainterpretacióndeestossímboloslepermitirá
utilizarlaherramientamejorymásseguro.
CÓMOCARGARLISTONESLOSGRAPAS
P14
P16
P17
P17
P17
P18
P18
P19
P19
P19
P21
P21
P23
P24
P25
NORMASGENERALESDESEGURIDAD
DESEMBALAJE
CARACTER STICAS
MANTENIMIENTO
CONEXIÓNRECOMENDADA
SOLUCIÓNDEPROBLEMAS
GARANTIAS
FUNCIONAMIENTO
CMOCARGARLISTONES
CMOCARGARGRAPAS
CMOCAMBIARLAPLACABASE
CMOAJUSTARLAPATAFRONTAL
CMOCONFIGURARLAPRESINDEAIRE
CMOUSARLAHERRAMIENTA
CMORETIRARSUJETADORESATASCADOS
Ó
Ó
Ó
Ó
ÓÓ
Ó
Ó
GUARDAESTEMANUALPARACONSULTARLOENELFUTURO.
ADVERTENCIA:
Noseguirlasadvertenciascorrectamentepuedecausar
LAMUERTEOLESIONESGRAVES.
GUARDESUCOMPROBANTEDECOMPRACONFECHAPARAFINESDELAGARAT A.
DistribuidoPor:
HomeDepotU.S.A.,Inc.
2455PacesFerryRd,N.W.Atlanta,GA30339
MODELO:HDUFL50

15-Sp 16-Sp
Disconectenlagrapadoradeelaireantes
deajustes,mantenimiento,quitando
grapasquebradasyterminadoel
proyecto.Estovaayudarparaquenadien
tengaundano.
RetireeldedodelTapadelmartillo
cuandonocolocasujetadores.Nunca
transportelaherramientaconeldedoen
elTapadelmartillo,yaquelaherramienta
puededispararunsujetador.
Noclavesobreotroclavo.Estopuede
causarqueelclavosedesvíeyalcancea
alguien,oquelaherramientareaccionede
algunamaneraylesioneaalguien.
USOYCUIDADODELAHERRAMIENTA
Conozcaestaherramienta.
Utilicesólolossujetadoresrecomendadospara
cadamodelo.
Leaelmanual
cuidadosamente,conozcasusaplicacionesy
limitaciones,asícomotambiénlosposiblespeligros
específicosrelacionadosconestaherramienta.
Noutilicesujetadoresinadecuados
nicarguelossujetadoresdeformaincorrecta.
Usa únicamenteaccesoriosidentificadosporel
fabricanteparaesemodeloespecíficode
herramienta.
Usesolamentelossujetadoresrecomendados
paraestaherramienta.
Lautilizacióndepiezasno
autorizadasoelincumplimientodelasinstrucciones
demantenimientopuedenaumentarelriesgode
lesiones.
Lossujetadoresno
identificadosporelfabricantedelaherramienta
parausarseconlamismapuedencausarlesiones
alaspersonasoda osenlaherramientacuando
seusanconella.
Enestemanual,enlasetiquetas,losembalajesyentodalainformaciónincluidaconestaherramienta,
seusanlassiguientesindicacionesysussignificadosparaexplicarlosnivelesderiesgoasociadosa
estaherramienta.
SMBOLOS
INDICACIÓN
SIGNIFICADO
!
!
ADVERTENCIA:
PRECAUCIÓN:
PRECAUCIÓN:
Indicaunasituaciónpotencialmentepeligrosaque,denoevitarse,
puedeocasionarlamuerteolesionesgraves.
(Sinsímbolo)Indicaunasituaciónquepuedeocasionarda os
enlapropiedad.
NORMASGENERALESDE
SEGURIDAD Mantengael áreadetrabajolimpiaybien
iluminada. Losbancosdetrabajodesordenadosy
las áreasoscurasaumentanelriesgode
accidentes.
Noutilicelaherramientaenatmósferasenlas
queexistariesgodeexplosión,comopor
ejemploenpresenciadelíquidosinflamables,
gasesopolvo
Mantengaalostranseúntes,niñosyaotras
personasalejadascuandoestéutilizandola
herramienta.
Evitelosdisparosaccidentales
.Laherramientaproduceuna
chispaquepodríaencenderlíquidosinflamables,
gasesopolvo.
Lasdistraccionespodríanresultaren
elusoinapropiadoycausarlesiones.
.Siempretenga
precauciónparaevitardisparosaccidentales.No
apuntelaherramientahaciausteduotrapersona,
auncuandonocontengasujetadores.
INSTRUCCIONESENREFERENCIAALPELIGRO
DEINCENDIOS,CHOQUEELECTRICOO
LESIONESPERSONALES
ADVERTENCIA:
!
Cuandoseusenherramientas,siemprese
deberanseguirprecaucionesbasicas,
incluyendolassiguientes:
Parareducirlosriesgosdechoqueeléctrico,
incendioylesionespersonales,leatodaslas
instruccionesantesdeusarlaherramienta.
SEGURIDADPERSONAL
Usesiempreprotecciónparalosoídoscuando
utiliceestaherramienta.
Utiliceequipodeseguridad.
Useropaadecuada.
Laexposición
prolongadaaruidosdealtaintensidadpuede
causarlapérdidadelaaudición. Sedebenutilizar
unamáscaradepolvo,zapatosdeseguridad
antideslizantesyuncascoparalascondiciones
aplicables.Useunamáscaraquecubra
completamentesurostrosiestáproduciendo
partículasmetálicasoastillasdemadera
Nouseropaholgadaojoyas.
Tómeseelcabellolargo.Mantengaelcabello,ropa
yguanteslejosdelaspiezasenmovimiento.Las
ropasholgadas,joyasoelcabellolargopueden
quedaratrapadosenlaspiezasenmovimiento.
.
Cuidadocondisparosaccidentales.
Manténgasealerta,presteatenciónaloque
haceyutiliceelsentidocomúncuandoutilice
unaherramientaeléctrica.
Noseextiendademasiado.Mantengaunapoyo
depiesyunequilibrioadecuadosentodo
momento.
Asegúresedequelamangueraestélibrede
obstruccionesoenganches.
Nofijelamangueraoherramientaasu
cuerpo.
Siempredéporsentadoquelaherramienta
contienesujetadores.
Quitenla
cappadeplasticoquecubrelaconecciondeaire.
Nocargenlagrapadoraconsudedoenellabarilla
oconectenlagrapadoraconlacappadeplastico.
NOutilicela
herramientasiestácansadoobajolainfluenciade
drogasalcoholomedicamentosUnmomentode
desatenciónmientrasutilizalaherramientapuede
causarlesionesgraves.
Unapoyodepiesyequilibrio
adecuadospermitenunmejorcontroldela
herramientaensituacionesinesperadas.Nolause
siestáparadosobreunaescalerauotrasuperficie
inestable.Unapoyodepiesestablesobreuna
superficiesólidapermiteunmejorcontroldela
herramientaensituacionesinesperadas.
Lasmangueras
enredadasoenganchadaspuedencausarla
pérdidadeequilibrioodelapoyodepiesypodrían
da arseycausarposibleslesiones.
Fijelamangueraalaestructurapara
reducirelriesgodepérdidadeequilibrioencaso
quelamanguerasemueva.
Noapuntela
herramientahaciausteduotrapersona,aun
cuandonocontengasujetadores.
, .
Indicaunasituaciónpotencialmentepeligrosaque,denoevitarse,
puedeocasionarlesionesmenoresomoderadas.
AREADETRABAJO
INSTRUCCIONESDESEGURIDAD
IMPORTANTES
PROPOSICIÓN65DECALIFORNIA
ADVERTENCIA:
!
Esteproducto,asucordóneléctrico,
puedecontenerproductosquimicos
conocidosporelestadodeCaliforniacomo
causantesdecáncerydefectosde
nacimientouotrosdañosreproductiveos.
Lavesusmanosdespuésdeusar.
ADVERTENCIA:
!
ADVERTENCIA:
!
ADVERTENCIA:
!
Usesiemprelentesdeprotección. Eloperadory
cualquierotrapersonaqueestéenel áreade
trabajodebenusarsiempregafasdeseguridadcon
proteccioneslateralesaprobadasporlasnormas
ANSI.Loslentesdeprotecciónseusanparaevitar
quelossujetadoresolosdesperdiciosquese
expulsenpuedancausarunalesiónoculargrave.
Puedeusarlasgafasqueseincluyenconla
herramienta.

CÓMOCARGARLAHERRAMIENTA
Lasadvertenciasyprecauciones
mencionadasanteriormentenocubren
todaslascondicionesysituaciones
posiblesquepudieranocurrir.Elusuario
debecomprenderqueelsentidocomúny
laprecauciónsonfactoresquenose
puedenincorporarconelproducto,sino
quedebensersuministradosporel
usuario.
ADVERTENCIA:
!
DESEMBALAJE
Estaherramientahasidoenviada
completamenteensamblada.
Asegúresedequeesténincluidostodoslos
artículosqueaparecenenlalistadeempaque.
Retirelaherramientaylosaccesoriosdela
cajacuidadosamente.
Inspeccionecuidadosamentelaherramienta
paraasegurarsedequenoseprodujo
ningunarupturaodañodurantesuenvío.
Nodesecheelmaterialdeembalajehastaque
hayainspeccionadocuidadosamentey
utilizadosatisfactoriamentelaherramienta.
Sihaypiezasdañadasofaltantes,llameal
1-888-669-5672.
LISTADEEMPAQUE
Clavadoraparapisos3en1
Cajadecolor
Mazo
Conectordeaire(Pre-unido)
Herramientasdeajuste
Aceitelubricante
Tapaantipolvo
Placabasede1,59cm
Manualdeinstrucciones
Gafasdeseguridad
(Pre-unido)
Sihaypiezasdañadasofaltantes,no
utiliceestaherramientahastareemplazar
dichaspiezas.Nohacerlopodríaprovocar
lesionespersonalesgraves.
17-Sp 18-Sp
ADVERTENCIA:
!
Nocarguelaherramientaconsujetadorescuando
algunodeloscontrolesdefuncionamientoesté
activado.
Nuncacoloqueunamanoocualquierpartedel
cuerpoenel áreadedescargadelossujetadores
delaherramienta.
Nuncaapuntelaherramientahaciaunapersona.
Antesdedescargarorealizarajustes.
Alrealizarelmantenimientodela
herramienta.
Aldesatascarla.
Altocarlahorquilladeseguridad.
Cuandolaherramientanoestáenuso.
Aldesplazarseaotraáreadetrabajo.
Dichasmedidasdeprecauciónreduciránel
riesgodelesionesapersonas.
EXCEPTOESTASINSTRUCCIONES
SUMINISTRODEAIREYCONEXIONES
Elconectordelaherramientanodebetener
presióncuandoelsuministrodeaireestá
desconectado. Siseutilizaunconector
incorrecto,laherramientapuedepermanecer
cargadaconairedespuésqueseledesconectey
podríadispararunsujetadorinclusoconlalínea
deairedesconectada,causandoposibles
lesiones.
Noutiliceoxígeno,gasescombustiblesu
otrosgasesembotelladoscomofuentede
alimentaciónparaestaherramienta.
Noconecteaunacompresoradeaireque
puedaexcederlos13,79bar.
Desconectesiemprelafuentedeaire:
Puede
provocarunaexplosiónycausarlesionesola
muerte.
Elexcesode
presióndelaherramientaescapazdeocasionar
unaexplosión,funcionamientoanormal,roturade
laherramientaolesionesgravesapersonas.
Utilicesóloairelimpioyseco,yreguladoala
presiónnominalodentrodelrangodepresión
indicadoenlaherramienta.Verifiquesiempre
antesdeutilizarlaherramientaquelafuentede
airesehaajustadoalapresióndeaire
especificadaodentrodelrangonominalde
presióndeaire.
Verifiquequenoexistanpiezasmóvilesmal
alineadasotrabadas,piezasrotasnicualquier
otracondiciónquepuedaafectarel
funcionamientodelaherramienta.
Realiceunmantenimientoadecuadodelas
herramientas.
Cuandonoestanusandolagrapadora,pongan
lagrapadoraenunlugarseguro.
Reviseelfuncionamientodelaherramienta
antesdeusarla.
Nofuercelaherramienta.
Utiliceabrazaderasuotrométodoprácticopara
asegurarysostenerlapiezadetrabajoenuna
plataformaestable.
Mantengalaherramientaysumangosecos,
limpiosysinaceitenigrasa.
Siseda a,
hagarepararlaherramientaantesdeusarla.
Muchosaccidentessonproductodelmal
mantenimientodelasherramientas.
Mantengalaherramientalimpia.
Unaherramientamantenidaadecuadamentenose
trabaráconfrecuenciayserámásfácildecontrolar.
Las
herramientassonpeligrosasenmanosdeusuarios
sincapacitación.
Noutilicelaherramientasiel
mecanismodecontactodelapiezadetrabajono
funcionacorrectamente,yaquesepodríadisparar
unsujetadoraccidentalmente.Utilicelaherramienta
adecuadaparasuaplicación.Laherramienta
adecuadarealizaráuntrabajomásseguroyde
mejorcalidadalritmoparaelquefuedise ada.
Sostenerlaherramientacon
unasolamanooapoyadaensucuerpoes
inestableypuedecausarlapérdidadelcontrol.
Siempreutiliceun
pa olimpioparalimpiarla.Nuncautilicelíquidos
parafrenos,gasolina,productosabasedepetróleo
ocualquiersolventefuerteparalimpiarla
herramienta.
Hayunpeligro
deexplocionsilagrapadoraestada iada.
Nuncatransportelaherramientaporla
mangueradeairecomprimido.
Mandenlagrapadoraquela
compongan.
Noutilicelaherramientacomounmartillo.
Nuncautiliceestaherramientadeunamanera
quepuedacausarqueunsujetadorseadirigido
haciacualquiercosaquenosealapiezade
trabajo.
Siempretransportelaherramientaporel
mango.
Noutilicelaherramientasihayunafiltraciónde
aireosinofuncionacorrectamente.
Noutilicelaherramientasinotieneuna
etiquetadeadvertencialegible.
Nousenlagrapadorasilabarillaesta
quebrada.
REPARACIÓNDELAHERRAMIENTA
Usesóloaccesoriosidentificadosporel
fabricanteparautilizarseconelmodelo
específicodelaherramienta.
Elusodepiezasnoautorizadasonoseguirlas
instruccionesdemantenimientopodrían
provocarriesgodelesiones.
Usesóloloslubricantesincluidosconla
herramientaoespecificadosporelfabricante.
Sólopersonaldereparacióncalificadopuede
llevaracabolareparacióndelaherramienta.
Cuandohaganmantenimiento,usenpartes
autorizadas.
FUNCIONAMIENTO
Nodisparesujetadorescercadelbordedel
material.
Nodispararelossujetadoressobreotros
sujetadoresoconlaherramientaenun ángulo
demasiadoinclinado,yaqueestopuede
provocarquelossujetadoressedesvíeny
causarlesiones.
Noaccionelaherramientaalmenosqueintente
dispararelsujetadorenlapiezadetrabajo.
Siempremanipulelaherramientaconcuidado:
Lapiezadetrabajosepuedepartir,
causandoqueelsujetadorrebotelastimándoloa
ustedolaspersonasqueesténasualrededor.
Respetelaherramientacomoimplementode
trabajo.
Nuncajuegueconlaherramienta.
Mantengaaotraspersonasaunadistancia
seguramientraslaherramientaestáen
funcionamiento,yaquesepuede
accionaraccidentalmenteycausarlesiones.

19-Sp 20-Sp
Laherramientapuededispararsecuando
seconecteporprimeravezaunafuente
deaire.Siempreconectelaherramientaa
lafuentedeaireantesdecargarlos
sujetadoresparaprevenirlesiones
causadasporciclosaccidentales.
Asegúresesiempredequeelcargadorde
laherramientaestévacíoalcomienzode
cadasesióndetrabajoantesdeconectar
laherramientaalaaire.fuentede
ADVERTENCIA:
!
Segurolateraldel
cargador(B)
Botóndebloqueo(C)
Palanca(A)
Usesolamentelossujetadores
recomendadosparaestaherramienta.Los
sujetadoresnoidentificadosporel
fabricantedelaherramientaparausarse
conlamismapuedencausarlesionesalas
personasodañosenlaherramienta
cuandoseusanconella.
:ADVERTENCIA
!
Ladescargaesloopuestoalacarga,(Excepción)
siempredesconectelafuentedeaireantesde
realizarladescarga.
CÓMOCARGARLISTONESLOSGRAPAS
Placabase
(D)
Tornillos
(E)
CÓMOCAMBIARLAPLACABASE
Laherramientavieneequipadaconunaplacabase
(D)de3/4"preinstaladadefábrica.También
incluyeunaplacabaseadicionalnoinstaladade
5/8".
Paracambiarlaplaca:
Desconectelaherramientadelafuentedeaire.
Vacíeelcargadorcompletamente.
Disparelaherramientahaciauntrozode
maderaquenoutiliceparaasegurarsedeque
nohayaairecomprimidoosujetadoresenla
herramienta.
Coloquelaherramientadeladoparaverlos
cuatrotornillos(E).
Retireloscuatrotornillos(E)yluegoretirela
placabase.
Alineeloscuatroorificiosdelostornillosenla
placabasederepuestoconloscuatroorificios
demontajeroscados.
Usandoloscuatrotornillosqueretiro,fijela
placabasederepuestoalaherramienta.
Asegúresedehaberinstaladolaplacabase
correctadisparandolaherramientahaciaun
trozodemaderaquenoutiliceyverificandola
colocaciónadecuadadelsujetador.
⒈
⒉
⒊
⒋
⒌
⒍
⒎
⒏
Desconectelaherramientadelafuentede
airecadavezquecambielaplacabase.
Asegúresedequenohayasujetadoresen
elcargadorantesdecambiarlaplaca
base.
ADVERTENCIA:
!
Pisode
1,59cm
Siempredescarguetodoslos
sujetadoresantesderetirarla
herramientadelservicio.
:ADVERTENCIA
!
Nointentemodificarestaherramientani
crearaccesoriosquenoseanlos
recomendadospara ésta.Cualquier
alteraciónomodificaciónesconsiderada
malusoypodríallevaraunacondición
peligrosaquepuedecausarunalesión
personalgrave.
ADVERTENCIA:
!
CARACTER STICAS
ESPECIFICACIONES
CARACTER STICAS
REVOLUCIONARIODISEÑO3EN1
DISEÑOquenoraya
CARGADORDEALUMINIOANODIZADO
FABRICACIÓNDURADERA
ParausarcongrapasylistonesenTyL.
Brindaprotecciónalassuperficiesacabadasde
lospisos.
Paraunamayordurabilidad.
Fabricaciónlivianayduraderaenaluminiode
altaresistenciaypiezasdeacerocon
tratamientotérmico.
FILTRODEAIRE
Compatiblecongrapasde12,7mmylistonesen
TyLdemarcasgenéricas.
Presióndefuncionamiento:
Capacidaddeclavos:L:100pzas
T:100pzas
U:90pzas
Pesodelaherramienta:4,66kgs
Entradadeaire:NPTDE6,35mm
Sujetadores:3,8cm-5,0cm
4,83-7,93bar
Ga./Calibre:16 Ga./Calibre:16 Ga./Calibre:15-1/2
(ListonesenT) (ListonesenL)
CÓMOCARGARGRAPAS
Jalelapalanca(A)haciaelextremodel
cargador.Asegurelapalancaenlaposición
usandoelbotóndebloqueo(C).Luegojale
haciaatráselsegurolateraldelcargador(B).
Coloqueunacargacompletadegrapasde
coronade1/2"porlapartesuperiordel
cargador.Sepuedencargarhasta90pzas.
(listones)enlaherramienta.
Presioneelbotóndebloqueo(C).Lapalanca
retrocederá(A)yharáqueelsegurolateraldel
cargador(B)tambiénretroceda.
⒈
⒉
⒊
FUNCIONAMIENTO
CÓMOCARGARLISTONES
Jalelapalanca(A)haciaelextremodelcargador.
Asegurelapalancaenlaposiciónusandoel
botóndebloqueo(C).Luegojalehaciaatrásel
segurolateraldelcargador(B).
Coloqueunacargacompletadelossujetadores
deseadosporellado.Sepuedencargarhasta
100listonesenelcargador.Tengaencuenta
quecuandocarguelistonesenL,elladoconla
cabezaenLdebeestaralaizquierdadelseguro
lateraldelcargador(B).Presioneelbotónde
bloqueo(C).Lapalanca(A)retrocederáyhará
queelsegurolateraldelcargador(B)también
retroceda.
⒈
⒉
ADVERTENCIA:
!
Laherramientapuededispararsealser
conectadaporprimeravezalafuentede
aire.Conectasiemprelaherramientaala
fuentedeaireantesdecargarlos
fijadoresparaevitarlesionescausadas
porciclosaccidentales.
ADVERTENCIA:
!
Laherramientapuededispararsealser
conectadaporprimeravezalafuentede
aire.Conectasiemprelaherramientaala
fuentedeaireantesdecargarlos
fijadoresparaevitarlesionescausadas
porciclosaccidentales.

21-Sp 22-Sp
Mantengasuspiesalejadosdela
herramienta.
ADVERTENCIA:
!
Antesdeusarlaherramientasobreunpiso,
pruebelaherramientaenuntrozode
maderaquenoutilice.Ajustela
profundidaddedisparoincrementandoo
reduciendolapresióndeaire.Nunca
excedaelmáximode7,93bar.
ADVERTENCIA:
!
Sedebetenerextremaprecaucióncuando
estaherramientaestéconectadaauna
fuentedeaire.Silaherramientasecae,osi
latapadelmartillo(K)segolpea
accidentalmente,laherramientadisparará
unsujetador,pudiendocausarunaLESIÓN
PERSONALGRAVE.
ADVERTENCIA:
!
Tapadelmartillo(K)
Agarremanual(F)
Nosedebeutilizarunaherramientaque
funcionedeformainadecuada.Noaccione
laherramientaamenosqueseencuentre
biencolocadaenlapiezadetrabajo.
NOTA:Asegúresedequelatapadelmartilloen
laclavadoradepisosestéhaciaarribaantesde
colocarlamangueradeaire,sino,laclavadora
puedegirar.(Veracontinuación)
Tapadelmartillo
()Posiciónhaciaabajo.
Tapadelmartillo
Posiciónhaciaarriba)(
ADVERTENCIA:
!
Laherramientavieneequipadaconunapata
frontalajustable,laquesepuedeajustarparapisos
demaderade3/4”a5/8”.Estaherramientase
envíaajustadaparapisosdemaderade3/4".
Paraajustarlapatafrontal(F).
1.Desconectelaherramientadelafuentedeaire.
2.Vacíeelcargadorcompletamente.
3.Disparelaherramientahaciauntrozodemadera
quenoutiliceparaasegurarsedequenohaya
airecomprimidoosujetadoresenla
herramienta.
4.Coloquelaherramientadeladoparaverlosdos
pernos(G)ylasdosplacaspeque as(H).
5.Aflojelospernos(G)ylasdosplacaspeque as
(H)paramoverlapatafrontal(F)enelespacio
delaranuradeajuste(I).
6.Ajustelapatafrontal(F)enlaposiciónadecuada
deacuerdoalgrosordelospisosdemaderay
luegoasegurelospernos(G)ylasdosplacas
peque as(H)firmemente.
7.Asegúresedequelapatafrontalseaadecuada
paraelpisodemaderadisparandola
herramientahaciauntrozodepisoquenoutilice
yverificandolacolocaciónadecuadadel
sujetador.
CÓMOAJUSTARLAPATAFRONTAL
Pernos(G)
PataFrontal
(F)
Placapequea
(H)
Desconectelaherramientadelafuentede
airecadavezqueajustelapatafrontal.
Asegúresedequenohayasujetadoresenel
cargadorantesdeajustarlapatafrontal.
ADVERTENCIA:
!
Ranuradeajuste(I) Ranuradeajuste(I)
CÓMOCONFIGURARLAPRESIÓNDEAIRE
Lacantidaddepresióndeairerequerida
dependerádeltama odelossujetadoresydel
materialdelapiezadetrabajo.
Comienceaprobarlaprofundidaddedisparo,
disparandounsujetadordepruebaenelmismo
tipodematerialdelapiezadetrabajoqueocupará.
Dispareunsujetadordeprueba,conlapresiónde
aireconfiguradaentre6,21-6,55bar.Incrementeo
reduzcalapresióndelairehastaencontrarla
configuraciónmínimarequeridaparaobtener
resultadosóptimos.
CÓMOCONFIGURARLAPRESIÓN
DEAIRE
CÓMOUSARLAHERRAMIENTA
Conectelaherramientaalafuentedeaire.
Enciendasucompresoryverifiquelapresión,
asegurándosedequeestéconfiguradaentre
4,83-7,93bar.Noexcedalapresiónmáximade
7,93bar.
Sostengaelagarremanual(J)firmementey
presionelapatafrontal(D)enlasuperficiede
trabajo.Asegúresedequelaplacaestésobreel
lugardondedeseacolocarelsujetador.
Presionehaciaabajoconfuerzaparaquela
patafrontalentrefirmementeencontactoconla
superficiedetrabajo.Luego,usandoelmazo
incluidoconlaherramienta,golpeelatapadel
martillo(K)firmementeparadispararelsujetador
enlasuperficiedetrabajo.Levantela
herramientadelasuperficiedetrabajo.Repita
esteprocesohastaquetermineeltrabajo.
Unavezquehayaterminado,asegúresede
guardarlaherramientaenunlugarlimpio,seco
yseguro,fueradelalcancedelosni osyde
personasnoautorizadas.
1.
2.
3.
4.

23-Sp 24-Sp
Laherramientaestádise adaexclusivamentepara
nonecesitarlubricacióndiaria.Perolalubricación
esnecesariaparaunmejorrendimientoluegode
periodosdeusoprolongados.Siseagregaaceitea
laherramientaatravésdelaconexióndelalínea
deaireselubricaránlaspiezasinternas.Noutilices
aceitedetergenteniaditivospuestoqueestos
lubricantescausaráneldesgasteaceleradodelos
sellosyamortiguadoresdelaherramienta,loque
resultaráenelmalfuncionamientodelamismay
elevarálafrecuenciadelmantenimiento.
LUBRICACIÓN
Desconectalaherramientadelafuentedeaire,
aagreguelubricantesparaherramientas.
⒈
Eviteutilizarsolventesparalimpiarlaspiezasde
plástico.Lamayoríadelosplásticostiendena
da arseconlosdistintostiposdesolventes
comerciales.Utilicepa oslimpiosparaeliminarla
suciedad,elpolvo,elaceite,lagrasa,etc.
LIMPIEZA
Nopermitanuncaquelíquidosparafrenos,
gasolina,productosabasedepetróleo,aceites
penetrantes,etc.entrenencontactoconlas
piezasplásticas.Losquímicospuedendañar,
debilitarodestruirelplástico,loquepuede
causarlesionespersonalesgraves.
ADVERTENCIA:
!
Despuésdeagregarelaceite,hagafuncionarla
herramientaporunbreveperiodo.Limpieel
excesodeaceitedelasalidadelacubierta.
3.
Girelaherramientadeformatalquelaentrada
deairedéhaciaarriba.Coloque2a3gotas
deaceiteneumáticodelaherramientadela
cerraduraenlaentradadeaire.Noutilicesaceite
detergenteniaditivospuestoqueestos
Lubricantescausaráneldesgasteaceleradode
lossellosyamortiguadoresdelaherramienta,lo
queresultaráenelmalfuncionamientodela
mismayelevarálafrecuenciadel
mantenimiento.
2.
Lubricalaherramienta únicamenteconlos
lubricantesespecificados.
:PRECAUCIÓN
Lalubricaciónexcesivapuededañarla
superficiedetrabajo.Esresponsabilidad
delpropietariolubricardeformaadecuada.
Elincumplimientodedichatareareducirá
significativamentelavida útildela
herramientayanularálagarantía.
:PRECAUCIÓN
CÓMORETIRARSUJETADORES
ATASCADOS
Desconectelaherramientadelafuentede
aire.
Vacíeelcargador.Asegúresederetirar
todoslossujetadores.
Intentedispararauntrozodemaderaopiso
quenoutiliceparaasegurarsedequeno
puededispararningúnsujetador.
Coloquelaherramientadeladoparaverlos
dospernos(G)ylasdosplacaspeque as
(H)debajodelostornillos.
Retirelospernos(G)ylasdosplacas
peque as(H).Verátrespernosconnariz(L)
despuésderetirarlapatafrontal(F).
Retirelostrespernosconnariz(L)ydeslice
laguíadedisparo(M)haciafueraparaverel
sujetadoratascado.
Retireelsujetadoratascadousandounas
pinzasoundestornilladorsiesnecesario.
Vuelvaacolocarlaguíadedisparo(M)ylos
pernosconnariz(L).
Vuelvaacolocarlapatafrontal(F),laplaca
(H)ylospernos(G)ensulugar.
Recarguelaherramientaconsujetadoresy
uegovuelvaaconectarlaalafuentedeaire.
Presionelaguíadedisparo(M)contraun
trozodemaderaydisparevariossujetadores
paraasegurarsedequelaherramientafunciona
correctamente.Silaherramientadisparade
formaadecuada,puedeseguirusándola.Sila
herramientanofuncionacorrectamente,
suspendasuusodeinmediatoyhagaqueun
técnicocalificadolarepare.
Enocasiones,unsujetadorpuedeatascarseenel
mecanismodedisparo,dejandolaherramienta
inoperante.Pararetirarelsujetadoratascado,siga
lossiguientespasos:
⒈
2.
3.
4.
5.
6.
7.
8.
9.
Asegúresedequenohayasujetadoresen
elcargadorantesderetirarunsujetador
atascado.
ADVERTENCIA:
!
MANTENIMIENTO
Cadavezquerealiceunainspección,
mantenimientoolimpieza:
Desconectelaherramientadelafuentede
aire.
Vacíeelcargadorcompletamente.
ADVERTENCIA:
!
Todaslasherramientasvienenconunatapa
antipolvoparaelconectordeaire.Revísela
despuésdedesembalarla.Mantengalatapa
antipolvopuestasobreelconectordeairecuando
laherramientanoestéenusoparaevitarque
entrenresiduosenlaherramienta.
ANTIPOLVOCASQUILLO
11.
10.
PernosconnarizL()
Guíade
disparo(M)
Pisode1,91cm

24-Sp 25-Sp
PROBLEMA CAUSAPOSIBLE ACCIONESCORRECTIVAS
Hayunafiltraciónde
aireenlatapa.
1.
Lostornillosestánsueltos.
2.Hayjuntastóricasosellosda adoso
desgastados.
Faltapotencia.
Elcicloeslento. 1.Laherramientaestámuyseca.
2.Lapresióndeaireesdemasiadobaja.
3.Lasalidadeaireestábloqueada.
1.Aada2ó3gotasdelubricanteenel
conectordeaire.
2.Asegúresedequelacompresorade
3.Limpielacanaletadelasalidadeaire.
aireesteajulstadaentrelos
4,83-7,93bar.
Laherramientano
disparalossujetadores. 1. Elresortedeldisparadorestáda ado.
2.Noestáusandosujetadoresdel
tama oapropiado.
1.Cambieelresorte.
2.Usegrapasdecoronade12,7mm(½")o
sujetadores38,1mm(1-1/2)a50,8mm
(2). "
"
1. Reparelacanaletadedisparo.
2.Cambieelpistón.
3.Retirelossujetadorestorcidosy
reemplácelosporgrapasdecoronade
12,7mm(1/2")osujetadoresde
38,1mm(1-1/2)a50,8mm(2).
4.Limpieelcargador.
5.Aprietelostornillos.
6.Verifiquequelossujetadoresseandel
tama oapropiado.
""
1. Lacanaletadedisparoestádesgastada.
2.Elpistónestárotoodesgastado.
3.Lossujetadoresestántorcidos.
4.Elcargadorestásucio.
5.Elcargadorestásuelto.
6.Estáutilizandolossujetadores
incorrectos.
Lossujetadoresse
atascanfrecuentemente
enlaherramienta.
1. Aprietelostornillos.
2.Instaleelkitderepuesto.
Dejedeutilizarinmediatamentelaherramientasisepresentaalgunodelosproblemas
descritosacontinuación,delocontrariopodríanocurrirlesionespersonalesgraves.
Cualquierreparaciónoreemplazodebellevarseacaboporuntécnicocalificadoouncentro
deservicioautorizado.
:ADVERTENCIA
!
SOLUCIÓNDEPROBLEMAS
Lacompresoradeairedebesercapazde
mantenerunmínimoduandola
herramientaestéenuso.Unsuministro
inadecuadodeairepuedecausarelcortedel
suministrodeelectricidadyundisparo
ineficaz.
e4,83barc
Noconecteaunacompresoradeaireque
puedaexcederlosLa
herramientapodríaquemarseycausar
lesiones.
13,79bar.
ADVERTENCIA:
!
PRECAUCIÓN:
Conector
rápido
Lubricador
Regulador
Filtro
Conector
rápido
Acople
rápido
Compresor
Acoplerápido Manguerade
airecomprimido
CONEXIÓNRECOMENDADA
1.
Siempreusemanguerasdeairecomprimidocon
unaclasificacióndepresióndetrabajoigualo
superioralapresióndelafuentedealimentación
encasoqueelreguladorfalle,ode10,34bar,el
queseamayor.Usemanguerasdeaire
comprimidode3/8"paradistanciasdehasta
15,24m.Usemanguerasdeairecomprimidode
½” paradistanciasde15,24mosuperiores.
Paraobtenerunmejorrendimiento,instaleun
tapóndeconexiónrápidade3/8(roscaNPTde
¼)conundiámetrointeriorde0,315(8mm)en
laherramientayunacopladordeconexión
rápidade3/8enlamangueradeaire
comprimido.
Useunreguladordepresiónenelcompresor
conunapresióndetrabajode0a8,62bar.Se
necesitaunreguladordepresiónquecontrolela
presióndetrabajodelaherramientaentre4,83
ybar.7,93
"
""
"
2.
3.
4.
USOENCLIMAFR O
Siutilizalaherramientaenclimafríocon
temperaturascercanasoinferioresaloscero
gradosCelsius,lahumedadenlalíneadeaire
podríacongelarseeinutilizarlaherramienta.
Recomendamosusarunlubricantepara
herramientasneumáticasounanticongelante
permanente(etilenglicol)comolubricantepara
climafrío.
Noalmacenelasherramientasenun
entornodeclimafríoparaevitarquese
formeescarchayohieloenlasválvulasy
mecanismosdefuncionamientodelas
herramientas,yaqueestopodría
inutilizarlas.
PRECAUCIÓN:
Elcompresordeairedebesercapazde
mantenerunmínimode4,83barmientrasla
herramientaestáenuso.Unsuministro
inadecuadodeairepuedecausarunapérdida
depotenciayunclavadodesigual.
Sepuedeusarunlubricadorparaproporcionar
circulacióndeaceiteentodalaherramienta.Se
puedeusarunfiltropararetirarlasimpurezas
líquidasysólidas,lasquepuedenoxidarpiezas
internasdelaherramientaohacerque éstasse
apelmacen.
Table of contents
Languages:
Other Husky Nail Gun manuals

Husky
Husky XAKC9032 User manual

Husky
Husky HDN104 User manual

Husky
Husky H250SFA User manual

Husky
Husky HDN00420 User manual

Husky
Husky DPBR50 User manual

Husky
Husky F32/9032 User manual

Husky
Husky DPP123 User manual

Husky
Husky HD289000 User manual

Husky
Husky DPFR2190 User manual

Husky
Husky HDN10500 User manual
Popular Nail Gun manuals by other brands

DeWalt
DeWalt DMF1550-XJ Technical data

Milwaukee
Milwaukee 7145-21 Service parts list

DeWalt
DeWalt DCN650 Original instructions

Campbell Hausfeld
Campbell Hausfeld Maxus MXN20100 operating instructions

Sunex HD
Sunex HD SX8200 Product safety information

Omer
Omer 92.740 Use, maintenance and spare parts manual