HydroAir SLIMLITE User manual
49-21-19x4-5 - www.hydroair.dk – March 2009
SLIMLITE COLOUR CHANGE/STOP INCL. TRANSFORMER
Ø52 mm: 21-1954-5 & Ø83 mm: 21-1974-5
Specifications
Rated voltage: 230V
Rated power: Ø52 = 1W / Ø83 = 1.6W
Installation depth: Maximum 1m
Expected lifetime: 50.000 hours
21-19x4-5: Slimlite – colour change/stop LED light incl. connector and standard touch.
Important
The Slimlite requires external potentiel equalization.
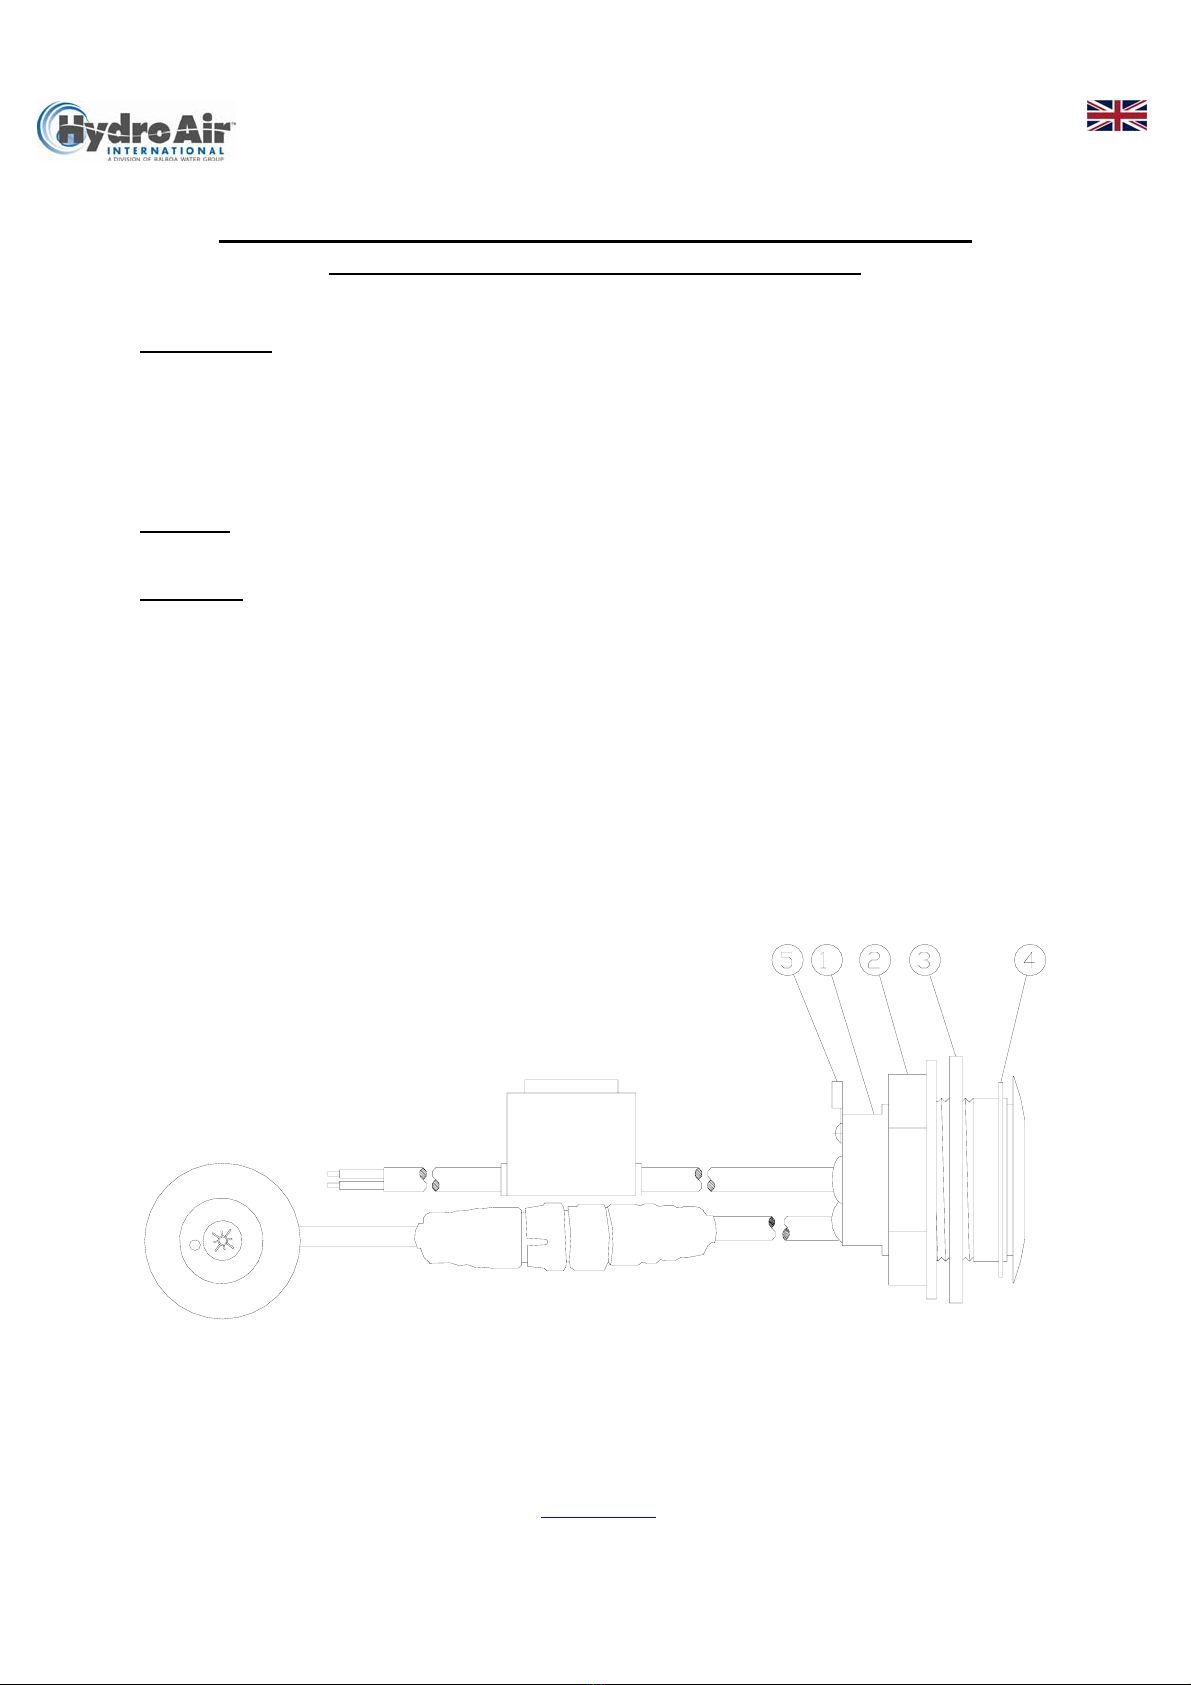
Installation
1. Drill a 42 or 64 mm hole in the tub for the LED bulb.
2. Fix the small silicone gasket (4) on the body (1) and add, if necessary, silicone. Pass the lead,
transformer & body through the hole from the inside of the tub.
3. Place the foam gasket (3) (from outside) around the body.
4. Fix the nut (2) from outside and fasten it tightly on the body.
5. Drill a 32 mm hole in the bathtub rim for the touch. Place it in position and hand tighten the nut from
the backside of the tub. The touch can be mounted without nut if removal from front side is wished.
In this case, use a little silicone to hold it in position and place the touch in the hole.
6. Connect the signal cable from the LED bulb and the cable from the touch with the two black IPX5
connectors.
7. Carry out external potential equalization via the connector (5) on lightbody.
8. Connect the cable to a 230V power supply.
49-21-19x4-5 - www.hydroair.dk – March 2009
SLIMLITE FARBWECHSEL/STOP-LED INKL. TRANSFORMATOR
Ø52 mm: 21-1954-5 & Ø83 mm: 21-1974-5
Spezifikationen
Nennspannung: 230V
Nennleistung: Ø52 = 1W / Ø83 = 1,6W
Einbautiefe: Max. 1 m
Standzeit: 50.000 Stunden
21-19x4-5: Slimlite – Farbwechsel/Stop-LED inkl. Stecker und Schalter
Achtung
Für die Unterwasserlampe ist ein externer Potentialausgleich vorgesehen.
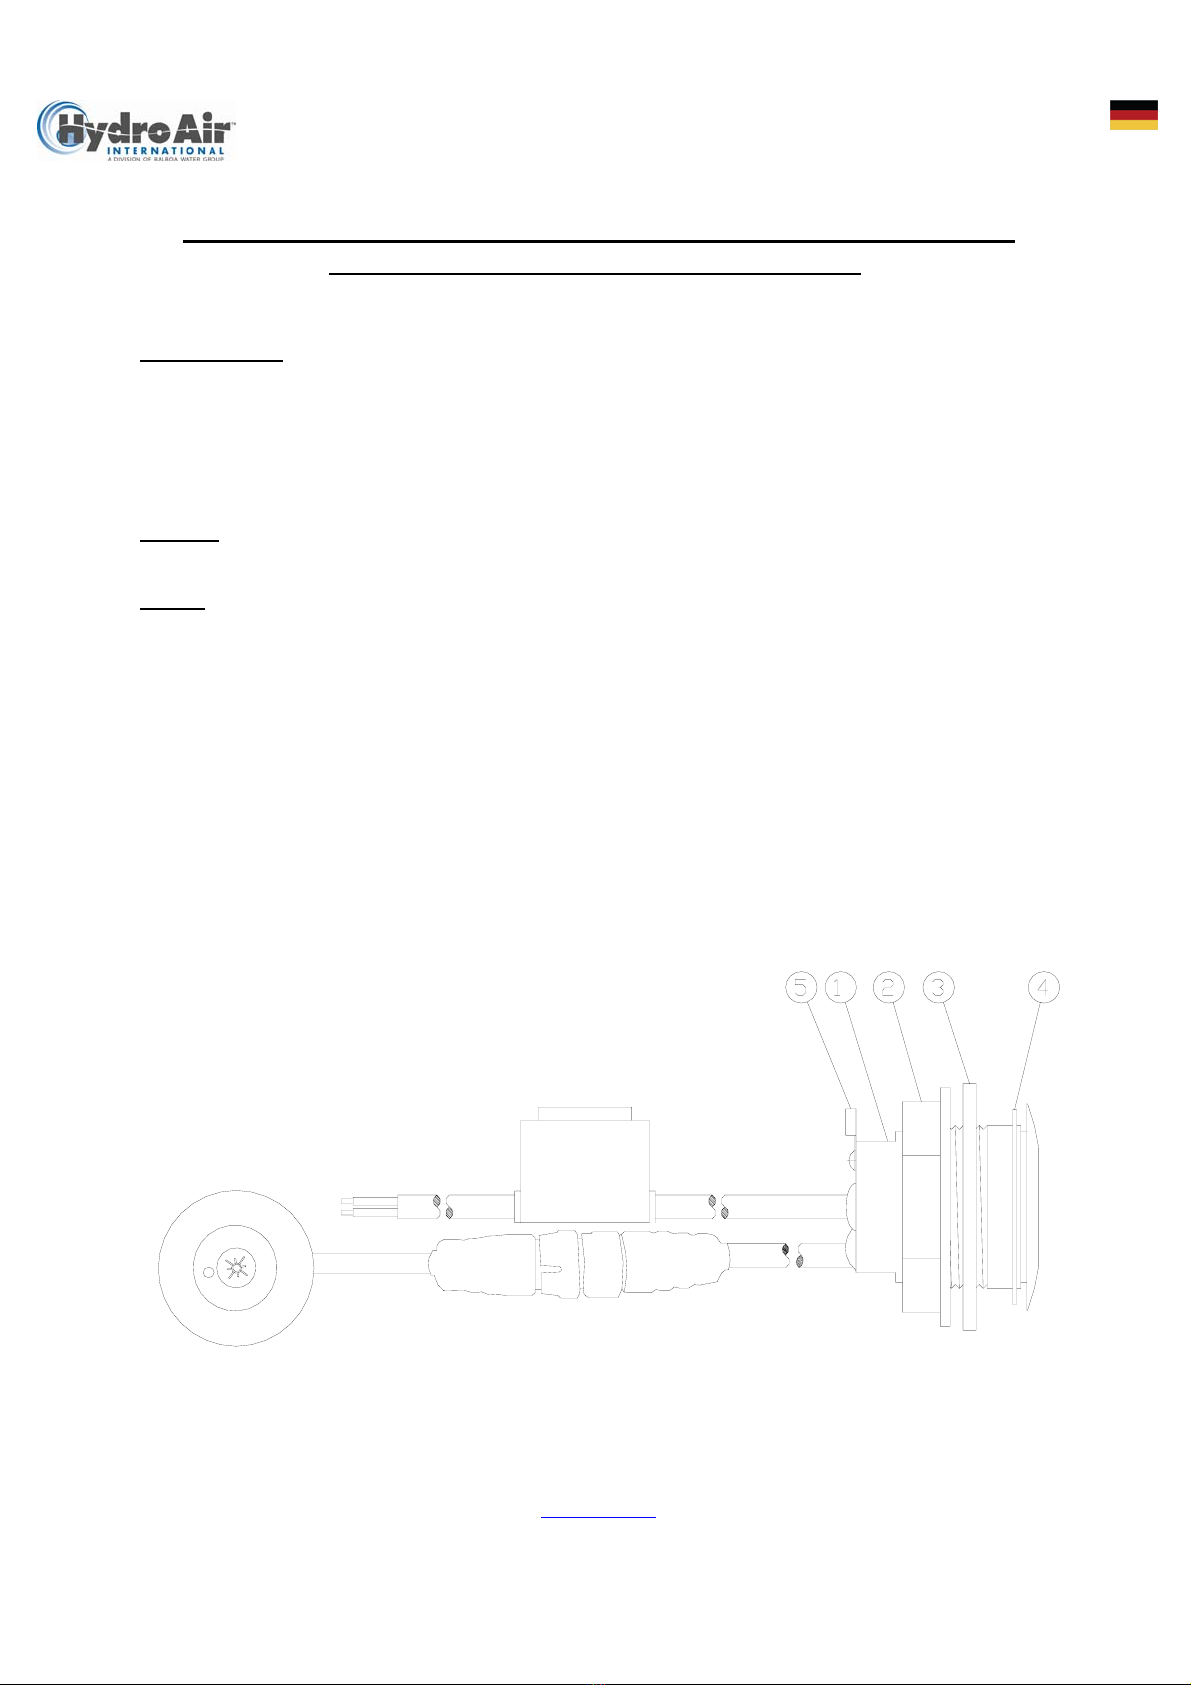
Einbau
1. Ein 42- oder 64-mm-Loch für die LED Lampe in die Wanne bohren.
2. Silikondichtung (4) am Lampengehäuse (1) anbringen und, wenn nötig, Silikon auftragen. Führen
Sie die Leitung, den Trafo und das Lampengehäuse durch das Loch von der Innenseite der Wanne
ein.
3. Bringen Sie die PE-Dichtung (3) (von der Rückseite) am Lampengehäuse an.
4. Montieren Sie die Mutter (2) an der Rückseite und ziehen Sie diese am Lampengehäuse fest an.
5. Zur Befestigung des Schalters bohren Sie ein 32-mm-Loch in den Rand der Badewanne. Danach
bringen Sie ihn in Position und ziehen die Mutter auf der Rückseite des Wannenrandes mit der
Hand fest. Der Schalter kann auch ohne Mutter eingebaut werden, wenn die Möglichkeit eines
Austauschs über die Vorderseite des Wannenrandes gewünscht wird. Hierfür fixieren Sie den
Schalter bitte mit etwas Silikon.
6. Verbinden Sie das Steuerkabel der LED und das Kabel des Schalters mit den beiden schwarzen
IPX5-Steckern.
7. Führen Sie den externen Potentialausgleich an der Klemme (5) durch.
8. Nun können Sie sie am Netz (230V) anschließen.
49-21-19x4-5 - www.hydroair.dk – March 2009
SPOT SLIMLITE A COULEUR CHANGEANTE/ARRET AVEC
TRANSFORMATEUR, Ø52 mm : 21-1954-5 et Ø83 mm : 21-1974-5
Spécifications
Tension nominale : 230 V
Puissance nominale : Ø52 = 1 W / Ø83 = 1,6 W
Profondeur d'installation : Maximum 1 m
Durée de vie estimée : 50000 heures
21-19x4-5 : Slimlite – spot à LED à couleur changeante/arrêt avec connecteur
et touche standard.
Important
Le Slimlite nécessite une égalisation de potentiel externe.
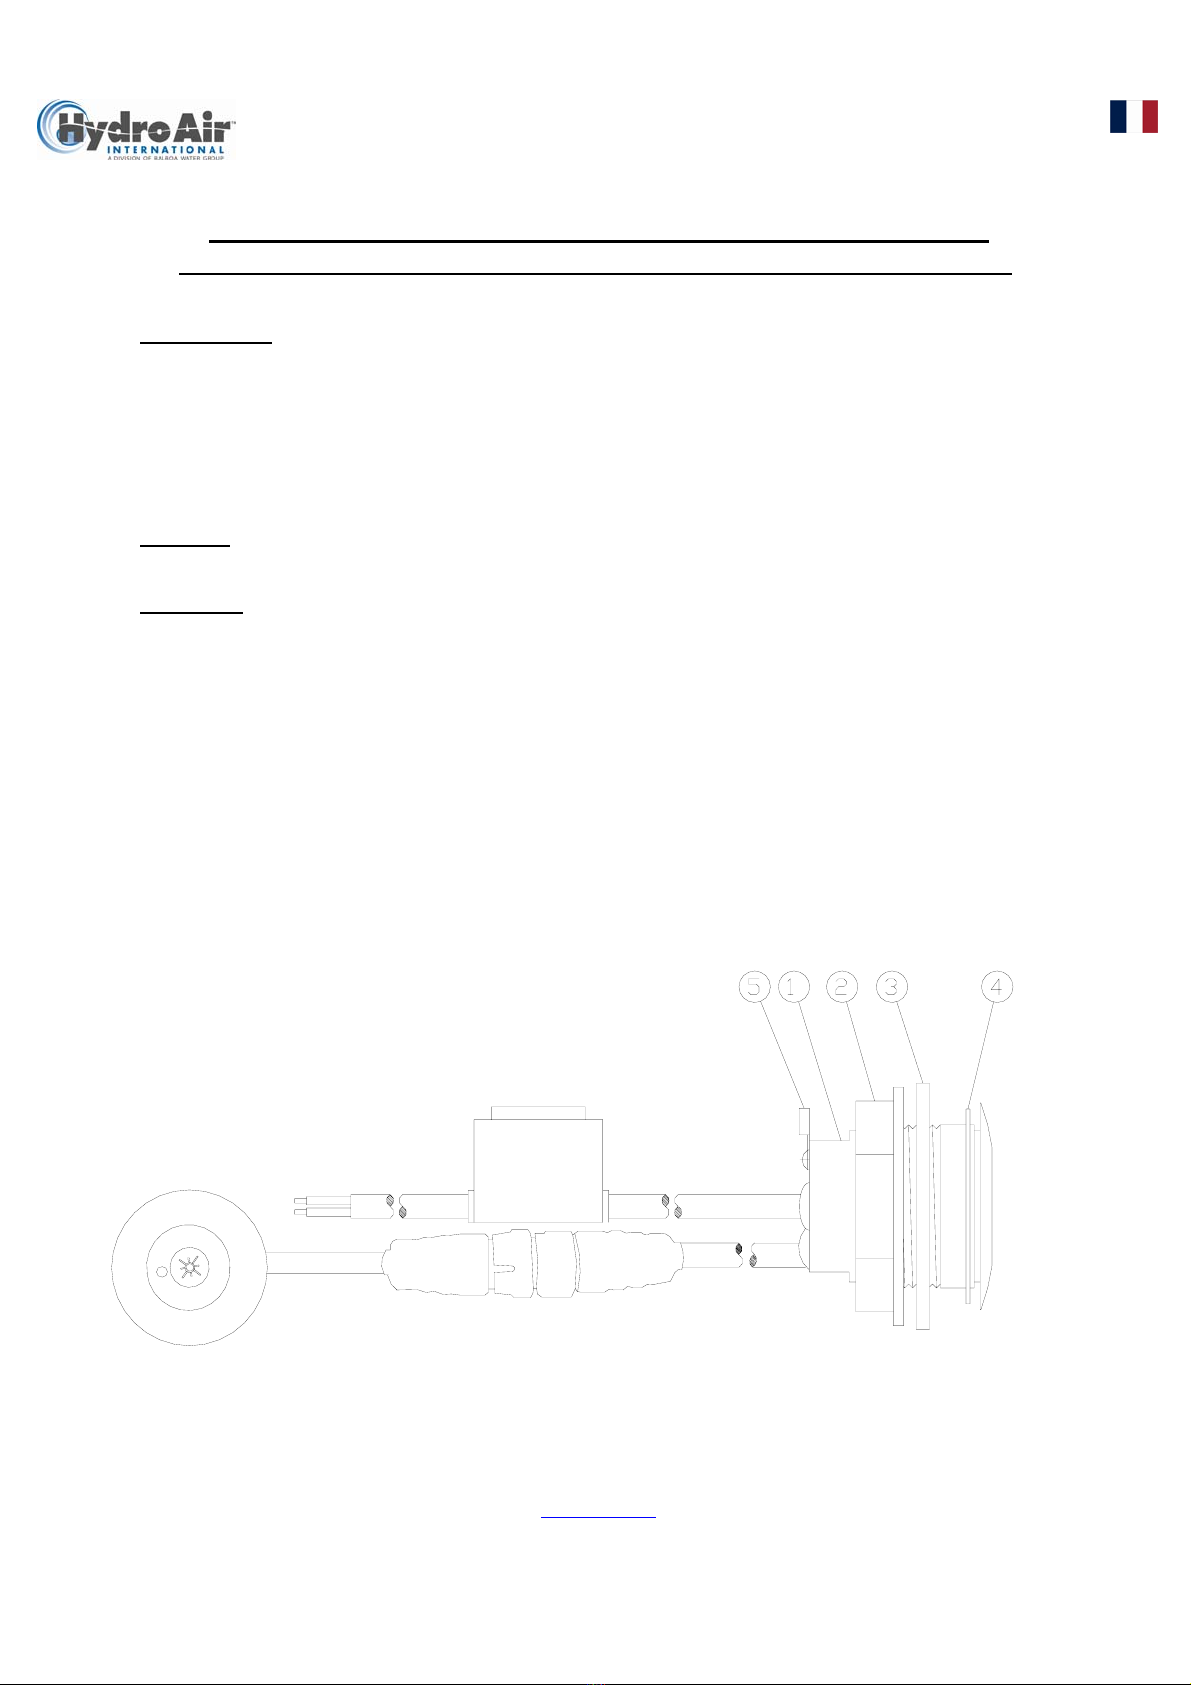
Installation
1. Percez un trou de 42 ou 64 mm de diamètre dans la baignoire pour l’ampoule LED.
2. Fixez le petit joint en silicone (4) sur le corps du spot (1) et ajoutez, au besoin, du silicone. Faites
passer le câble, le transformateur et le corps du spot par l'orifice depuis l’intérieur de la baignoire.
3. Placez le joint en mousse (3) (à partir de l'extérieur) autour du corps du spot.
4. Fixez l'écrou (2) à partir de l'extérieur et serrez-le fermement sur le corps du spot.
5. Percez un trou de 32 mm de diamètre dans le bord de la baignoire pour la touche. Positionnez
l'écrou et serrez-le à la main à partir de l'arrière de la baignoire. Il est possible de monter la touche
sans écrou si vous souhaitez pouvoir démonter l’ensemble par l’avant. Dans ce cas, utilisez un peu
de silicone pour la maintenir en position et insérez la touche dans l'orifice.
6. Raccordez le câble de signal de l’ampoule LED et le câble de la touche sur les deux connecteurs
IPX5 noirs.
7. Effectuez l’égalisation de potentiel externe par l’intermédiare du connecteur (5) du corps du spot.
8. Raccordez le câble à une alimentation électrique de 230 V.
49-21-19x4-5 - www.hydroair.dk – March 2009
SLIMLITE FARVESKIFT/STOP INKL. TRANSFORMER
Ø52 mm: 21-1954-5 & Ø83 mm: 21-1974-5
Specifikationer
Mærkespænding: 230V
Mærkeeffekt: Ø52 = 1W / Ø83 = 1,6W
Indbygningsdybde: Maximum 1 m
Forventet levetid: 50.000 timer
21-19x4-5: Slimlite – farveskift/stop LED lys med kobling og standard touch.
Vigtigt
Undervandslampen skal eksternt potentialudlignes.
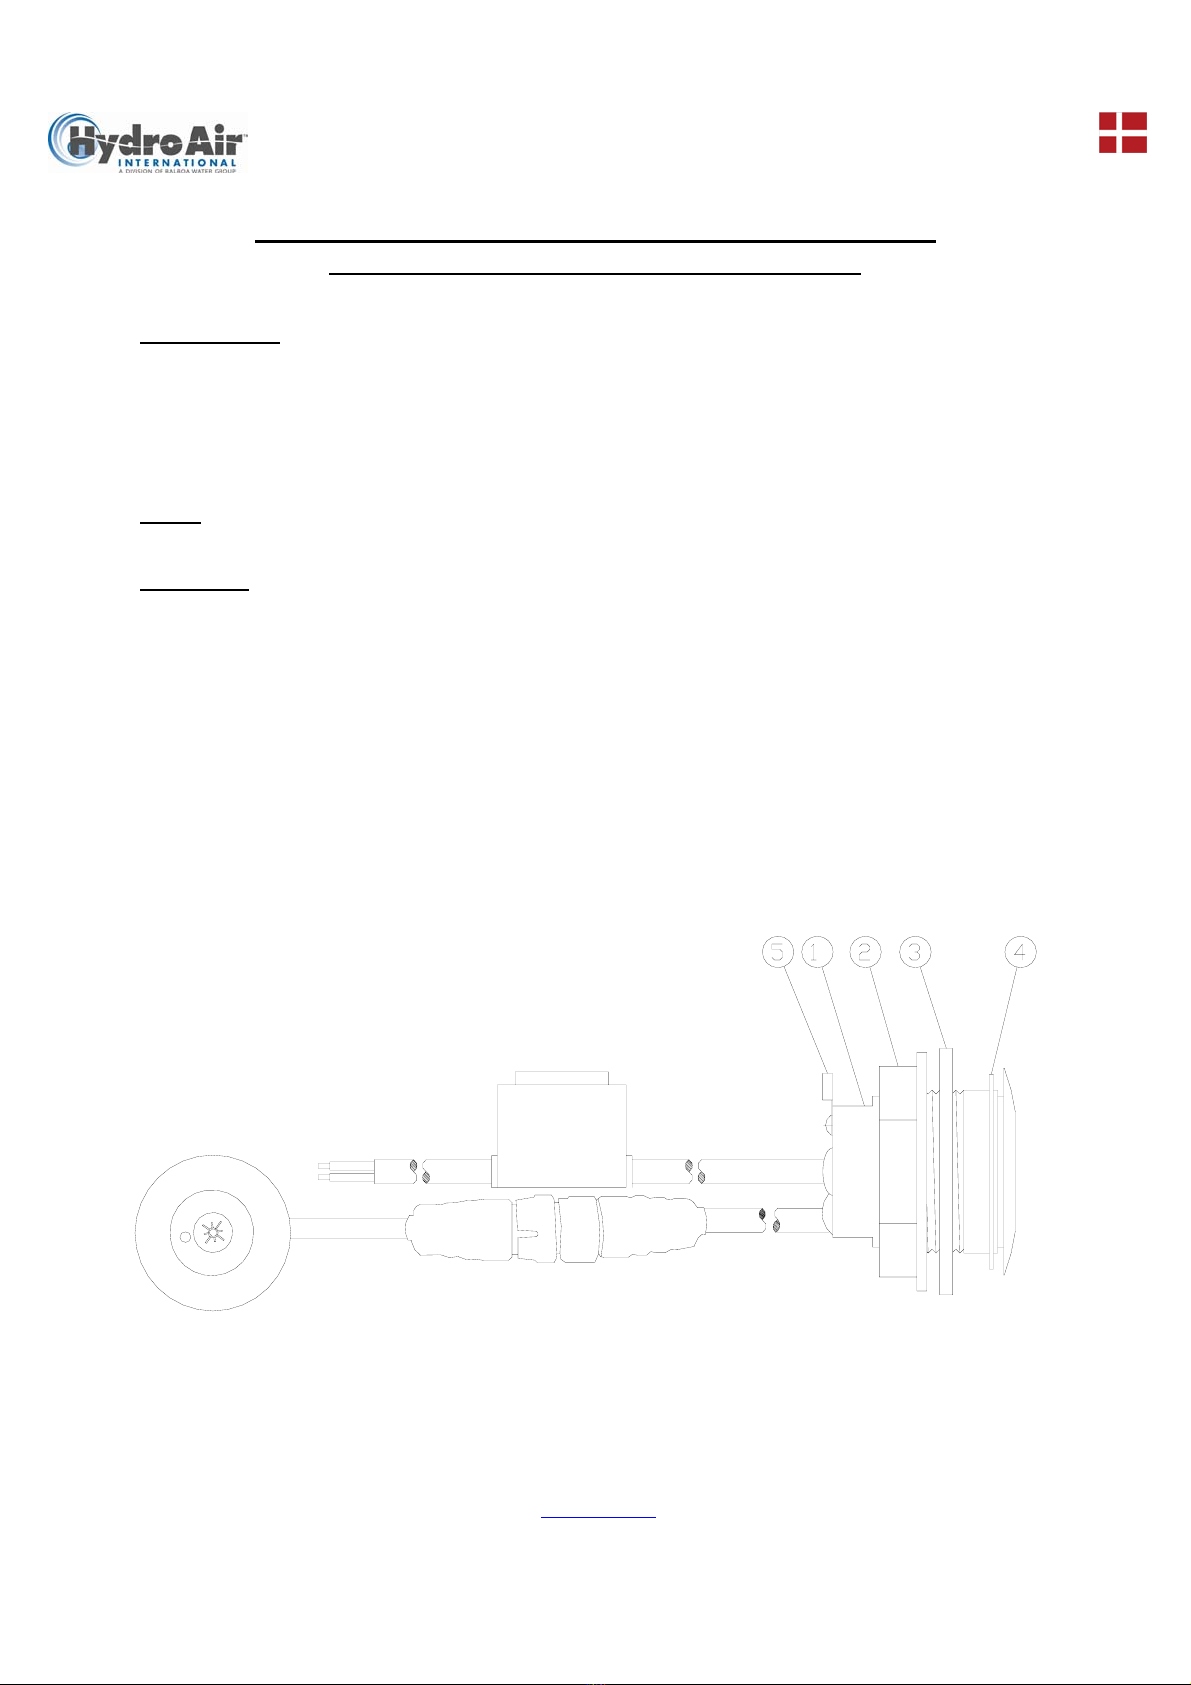
Installation:
1. Bor et 42 eller 64 mm hul i karret til LED lampen.
2. Anbring den lille silikone pakning (4) på lampehuset (1), brug silikone hvis nødvendigt. Før ledning,
transformer og lampehus gennem hullet fra karrets inderside.
3. Sæt skumpakningen (3) på lampehuset (fra karrets yderside).
4. Sæt møtrikken (2) på fra karrets yderside og fastspænd møtrikken på lampehuset.
5. Bor et 42 mm hul i badekarrets kant til touchen, som så placeres i den rigtige position. Spænd
derefter møtrikken fra bagsiden af karret. Touchen kan også påsættes uden møtrik, såfremt den
skal kunne fjernes fra forsiden. I givet fald, påfør lidt silikone for at fastholde den og placer den i
den korrekte position.
6. Forbind signal kablet fra LED lyset og kablet fra touchen med de 2 sorte IPX5 stik.
7. Udfør ekstern potentialudligning via klemmen (5) på lampehuset.
8. Tilslut kablet til 230V.
This manual suits for next models
1
Table of contents
Languages:
Popular Swimming Pool Lighting manuals by other brands

BEGA
BEGA 88 913 Instructions for use

Wibre
Wibre 4.0171 installation manual

Pentair
Pentair INTELLIBRITE 5G Installation and user guide

S.R.Smith
S.R.Smith poolLUX Plus pLX-PL60 installation instructions

Pentair Pool Products
Pentair Pool Products FIBERworks 20100100 owner's manual

GRE
GRE LAGP8 Installation and maintenance manual


ACQUA SOURCE
ACQUA SOURCE WPLD-5R Installation instruction

OR STEEL light
OR STEEL light HIPPOCAMPE Technical manua

ASTEL LIGHTING
ASTEL LIGHTING METEOR LSR0640 operating instructions

emaux
emaux UL-S100 operating instructions

Albixon
Albixon 18W/12V Installation and user guide

emaux
emaux S100 Series Installation procedures