CHROMATISCHES CLIP-STIMMGERÄT
PU10
BEDIENUNGSANLEITUNG
Achtung
●Kurzschlüsse, elektrische Schläge und
Fehlfunktionen vermeiden:
Öffnen Sie niemals das Gerät.
Lagern Sie das Gerät nicht an extrem heißen oder
feuchten Orten, wie beispielsweise auf einer Hei-
zung, im direkten Sonnenlicht, im Bad oder auf
einem feuchten Fußboden.
Setzen Sie das Gerät keinen starken Erschütte-
rungen aus.
Lagern Sie das Gerät nicht an staubigen oder ver-
schmutzten Orten.
Bedienen Sie das Gerät nicht mit nassen Händen.
●Schäden vermeiden
Bedienen Sie die Steuerelemente nicht mit über-
mäßiger Kraft.
Achten Sie darauf, das Stimmgerät nicht fallen zu
lassen.
●Reinigung
Verwenden Sie kein Lösemittel oder Alkohol zur
Reinigung, sondern nur ein trockenes, sauberes
Tuch.
●Batterieverbrauch minimieren
Nehmen Sie die Batterie aus dem Stimmgerät
heraus, sollte es längere Zeit nicht benutzt wer-
den.
Schalten Sie das Stimmgerät immer aus, wenn es
nicht benutzt wird.
Funktionen und Leistungsmerkmale
1Taste POWER ON/OFF
Diese Taste schaltet das Gerät ein und aus (ON/
OFF). Wenn eingeschaltet (ON), leuchtet die
LED-Anzeige. Wenn ausgeschaltet (OFF),
leuchtet die LED-Anzeige auf der anderen Seite
als im eingeschalteten Zustand. Das Gerät
schaltet sich automatisch aus, wenn das PU10
mehr als 20 Minuten lang nicht mehr bedient
wurde.
2Taste MODE
Mit dieser Taste wählen Sie aus, ob das Tonsignal
vom eingebauten Mikrofon oder über die Schwin-
gungen des Gitarrenkopfes am CLIP empfangen
werden soll.
CLIP-Eingabe: Im CLIP-Eingabemodus blinkt die
mittlere rote LED (+30 Cent) im Display.
MIC-Eingabe: Im MIC-Eingabemodus blinkt die
mittlere gelbe LED (–30 Cent) im Display.
Das PU10 arbeitet als chromatisches Stimmgerät.
3Taste FLAT
Wenn Sie die FLAT-Taste drücken, ist ein Flat-Tu-
ning möglich, von einem Halbton bis zu eineinhalb
Ganztönen. Mit jedem Druck auf die FLAT-Taste
ändert sich die Anzeige des Segments wie in die-
ser Abbildung.
Sie können die Referenz-NOTE (A, A#, H, C, C#,
D, D#, E, F, F#, G, G#) auf die Flat-Note von ei-
nem Halbton bis zu eineinhalb Ganztönen abstim-
men.
4Taste PITCH
Wenn Sie die PITCH-Taste drücken, können Sie
die Referenztonhöhe (die Frequenz der Note A)
einstellen. Mit jedem Druck auf die PITCH-Taste
ändern Sie die Referenztonhöhe im Bereich von
436 Hz bis 445 Hz.
440441445436439
5LCD
6MICROPHONE
Wenn Sie mit der MODE-Taste den MIC-Modus
wählen, nimmt das Stimmgerät den Klang direkt
über das Mikrofon auf. Der CLIP-Modus ist nicht
aktiv, wenn der MIC-Modus ausgewählt ist.
7CLIP
Wenn Sie mit der MODE-Taste den CLIP-Modus
CLIP CHROMATIC TUNER
PU10
OWNER’S MANUAL
Caution
●
To avoid short circuit, electric shock or malfunction:
Do not disassemble for repair.
Do not place in high temperature and humid space
such as electric heater, direct sunlight, bathroom,
wet floor etc.
Do not place in excessive vibration.
Do not place in dusty or dirty space.
Do not operate the tuner with wet hands.
●To avoid breakdown
Do not handle all controls with excessive power.
Do not drop the tuner.
●Cleaning
Do not use thinner or alcohol for cleaning.
Use only dry and clean cloth.
●To prevent battery loss
Remove the battery when the tuner is not in use
for a long time.
Turn the power button off when the tuner is not in use.
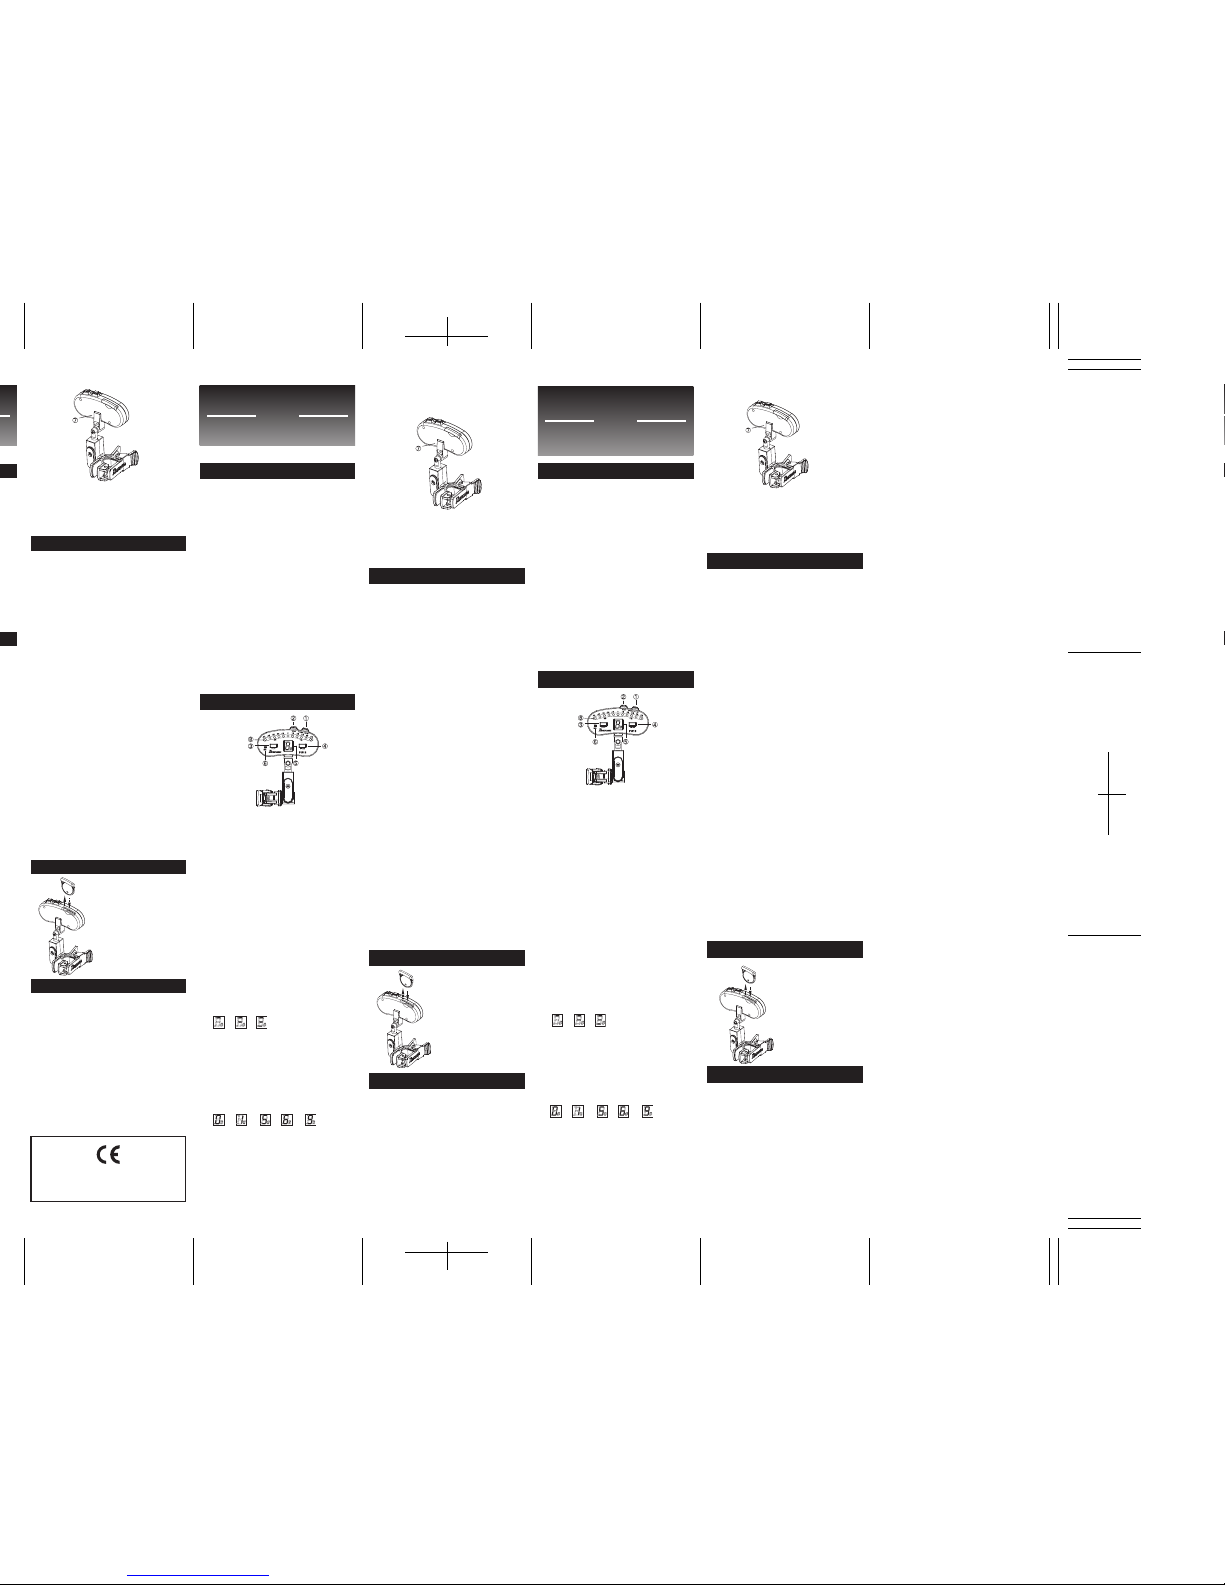
Functions and Features
1POWER ON/OFF button
This button turns the power ON/OFF. When the
power is ON, the LED indicator will be lit. When
the power is turned OFF, the LED indicator will be
lit in the opposite direction from when the power is
turned ON. The power will automatically goes OFF
if PU10 is not used for more than 20 minutes.
2MODE button
With this button you can select whether to pick up
the sound from the built-in microphone or to pick
up the vibrations of the headstock of your guitar
from the CLIP.
CLIP input: In CLIP input mode, the middle red LED
(+30 cent) on the display blinks.
MIC input: In MIC input mode, the middle yellow
LED (-30 cent) on the display blinks.
PU10 functions as a chromatic tuner.
3FLAT button
If you press the FLAT button, flat tuning is possible
from one semitone to one and a half tone.
Each time you press the FLATbutton, the indication
of the segment changes as in this figure.
You can tune the reference NOTE (A, A#, B, C,
C#, D, D#, E, F, F#, G, G#) with flatted from one
semitone to one and a half tone.
4PITCH button
If you press the PITCH button, you can set the
reference pitch (frequency of A). Each time you
press the PITCH button, you can change the
reference pitch in the range of 436Hz~445Hz.
440441445436439
5LCD
6MICROPHONE
If you select MIC mode with the MODE button, the
tuner picks up sound directly from the microphone.
CLIP mode does not function when MIC mode is
selected.
7CLIP
If you select CLIP mode with the MODE button,
the tuner picks up the vibrations of the instrument.
MIC mode does not function when CLIP mode is
selected.
ACCORDEUR CHROMATIQUE À PINCE
PU10
MANUEL DE L'UTILISATEUR
Prudence
●Pour éviter des court-circuits, des électrocu-
tions ou des dysfonctionnements:
N’essayez jamais de démonter cet appareil.
Evitez de placer l’appareil dans des endroits sou-
mis à une chaleur ou une humidité excessive.
Exemples: près d’un radiateur, en plein soleil, dans
une salle de bains, sur un sol humide, etc.
Evitez de soumettre l’appareil à de fortes vibra-
tions.
Evitez les endroits poussiéreux et sales.
Ne manipulez jamais cet accordeur avec des
mains mouillées.
●Pour éviter des dysfonctionnements
Manipulez les commandes avec soin.
Ne laissez jamais tomber cet accordeur.
●Nettoyage
N’utilisez jamais de détergent ou du benzène pour
le nettoyage.
Nettoyez l’appareil avec un chiffon sec et doux.
●Pour économiser la pile
Si vous ne pensez pas utiliser cet appareil durant
une longue période, retirez la pile.
Mettez l’accordeur hors tension tant que vous n’en
avez pas besoin.
Fonctions de l'accordeur
1Bouton POWER ON/OFF
Ce bouton permet de mettre l'appareil sous/hors
tension. Lorsque l'appareil est sous tension, le té-
moin indicateur s'allume. Lorsque l'appareil est hors
tension, le témoin indicateur s'allume dans le sens
inverse de la mise sous tension. Le PU10 s'éteint
automatiquement s’il n'est pas utilisé pendant plus
de 20 minutes.
2Bouton MODE
Ce bouton permet d'indiquer si vous souhaitez cap-
ter le son à partir du microphone intégré ou à tra-
vers les vibrations de la tête de votre guitare via la
pince CLIP.
Entrée CLIP : En mode d'entrée CLIP, le témoin
indicateur central rouge (+30 cents) sur l'écran cli-
gnote.
Entrée MIC : En mode d'entrée MIC, le témoin in-
dicateur central jaune (-30 cents) sur l'écran cli-
gnote.
Le PU10 fonctionne comme un accordeur chroma-
tique.
3Bouton FLAT
Si vous appuyez sur le bouton FLAT, l'accordage
bémol est possible d'un demi-ton à un ton et demi.
Chaque fois que vous appuyez sur ce bouton, l'in-
dication du segment change comme illustré dans
cette figure.
Vous pouvez régler la NOTE de référence (A, A#,
B, C, C#, D, D#, E, F, F#, G, G#) d'un accord plus
bas, d'un demi-ton à un ton et demi.
4Bouton PITCH
Si vous appuyez sur le bouton PITCH, vous pou-
vez définir la hauteur de référence (fréquence de
A). Chaque fois que vous appuyez sur ce bouton,
vous pouvez changer la hauteur de référence
dans la plage 436 Hz~445 Hz.
440441445436
439
5Écran LCD
6MICROPHONE
Si vous sélectionnez le mode MIC à l'aide du bou-
ton MODE, l'accordeur capte directement le son à
partir du microphone. Le mode CLIP ne fonctionne
pas si le mode MIC est sélectionné.
7CLIP
Si vous sélectionnez le mode CLIP à l'aide du bou-
ton MODE, l'accordeur capte les vibrations de l'ins-
wählen, nimmt das Stimmgerät den Klang über die
Vibrationen des Instruments auf. Der MIC-Modus ist
nicht aktiv, wenn der CLIP-Modus ausgewählt ist.
8Stimm-LEDs
Wenn die Stimmung korrekt ist, leuchtet die grüne
LED in der Mitte. Die gelben LEDs auf der linken
Seite zeigen an, dass die Tonhöhe zu niedrig ist,
und die roten LEDs auf der rechten Seite zeigen
an, dass die Tonhöhe zu hoch ist.
Bedienung
[Stimmvorgang]
Um Ihr Instrument möglichst genau zu stimmen,
• Verwenden Sie das PU10 nicht in der Nähe nderer
Audiogeräte, z. B. Radio oder Fernsehgeräten.
• Zum schnelleren Stimmen drücken Sie die Saiten
mit wenig Kraft herunter und dämpfen Sie sie ab,
sobald eine Saite fertig gestimmt ist.
[Im CLIP-Eingabemodus]
Montieren Sie zunächst den CLIP an einem gut sicht-
baren Ort, an dem die Schwingungen der Gitarre gut
erkannt werden.
Da das PU10 vier Drehachsen zwischen CLIP und
Stimmgerät besitzt, kann das Display immer gut ab-
gelesen werden, egal wo am Gitarrenhals der CLIP
montiert wird. Wählen Sie den Montageort des PU10
jedoch trotzdem mit Bedacht aus, so dass der Stimm-
vorgang nicht durch Drehen der Wirbel unterbrochen
wird oder umgekehrt.
Schalten Sie das Gerät ein, nachdem die Montage
erfolgt ist. Wenn das Gerät eingeschaltet ist, leuchtet
die LED-Anzeige.
Stellen Sie nun mit der MODE-Taste den CLIP-Mo-
dus aus und beginnen Sie zu stimmen.
Spielen Sie eine einzelne Note und versuchen Sie,
die im LCD angezeigte Note in Übereinstimmung mit
der Zielnote zu bringen.
Stimmen Sie dann den Ton ganz genau, bis die grüne
LED aufleuchtet.
Die gelben LEDs zeigen an, dass die Tonhöhe niedri-
ger als die angezeigte Note ist.
Die roten LEDs zeigen an, dass die Tonhöhe höher
als die angezeigte Note ist.
[Im MIC-Eingabemodus]
Wenn Sie das eingebaute Mikrofon verwenden, kann
es Hintergrundgeräusche aufnehmen und Stimmfehler
verursachen. Wir empfehlen Ihnen daher, an einem
ruhigen Ort mit leisen oder gar keinen Hintergrund-
geräuschen zu stimmen, und das Instrument so nah
wie möglich am Mikrofon zu spielen. Gehen Sie dann
zum Stimmen des Instruments in der gleichen Rei-
henfolge vor wie im CLIP-Eingabemodus.
Einsetzen oder Austauschen der Batterie
Technische Daten
Stimm-Modi: MIC-Eingabemodus/CLIP-Eingabemodus
Stimmbereich: A0 (27,50 Hz) – C8 (4.186,00 Hz)
Stimmbare Noten: A,A#,H,C,C#,D,D#,E,F,F#,G,G#
Flat-Tuning: 1–3 Halbtöne
Genauigkeit: +/–1 Cent
Kalibrierung: 436 Hz – 445 Hz
Anzeigen: LCD, LEDs
Eingabe: Eingebautes MIC, CLIP (Piezoabnehmer)
●
Spannungsversorgung: 1 Lithiumbatterie (CR2032) 3 V
●Abmessungen: 110 (B) X 56 (H) X 39.5 (T) mm
●Gewicht: 52 g (einschließlich Batterie)
* Design und Technische Daten können sich zwecks
Verbesserung des Produkts ohneAnkündigung ändern.
trument. Le mode MIC ne fonctionne pas si le mode
CLIP est sélectionné.
8Témoin indicateur d'accord
Une fois la guitare accordée correctement, le té-
moin indicateur vert central s’allume. Le témoin
indicateur jaune à gauche indique que la hauteur
correspond aux graves et le témoin indicateur rouge
à droite indique que la hauteur correspond aux
aigus.
Fonctionnement
[Accord]
Pour accorder votre instrument avec précision, pro-
cédez comme suit :
• N'utilisez pas le PU10 à proximité d'appareils audio,
tels qu'une radio ou un téléviseur.
• Pour un accord plus rapide, appuyez légèrement
sur les cordes et atténuez le son après avoir ac-
cordé chacune d'elles.
[En mode d'entrée CLIP]
Installez tout d'abord la pince à un endroit visible et
où les vibrations de la guitare seront facilement dé-
tectées.
Le PU10 comportant quatre angles de rotation entre
la pince et l'accordeur, l'écran reste visible quel que
soit l'emplacement de la pince sur la tête de la gui-
tare. Toutefois, choisissez avec soin l'emplacement
d'installation du PU10 de sorte que l'accordage ne
soit pas interrompu lors de la rotation de la tête de
l'instrument ou inversement.
Mettez l'appareil sous tension une fois l'installation
terminée. Lorsque l'appareil est sous tension, le té-
moin indicateur s'allume.
Sélectionnez ensuite le mode CLIP à l'aide du bouton
MODE et commencez à accorder l'instrument.
Jouez une seule note et essayez de faire correspon-
dre la note affichée sur l'indicateur de l'écran LCD à
la tonalité cible.
Puis, accordez-la de manière plus précise jusqu'à ce
que le témoin indicateur vert s'allume.
Le témoin indicateur jaune indique que la hauteur est
inférieure à la note affichée.
Le témoin indicateur rouge indique que la hauteur est
supérieure à la note affichée.
[En mode d'entrée MIC]
Lorsque vous utilisez le microphone intégré, un bruit
de fond peut être capté et une erreur peut survenir
lors de l'accord. Nous vous recommandons d'accor-
der l'instrument dans un endroit silencieux avec peu
ou pas de bruit de fond et de jouer de l'instrument
aussi près que possible du microphone. Puis, pour
accorder l'instrument, suivez la même procédure qu'en
mode d'entrée CLIP.
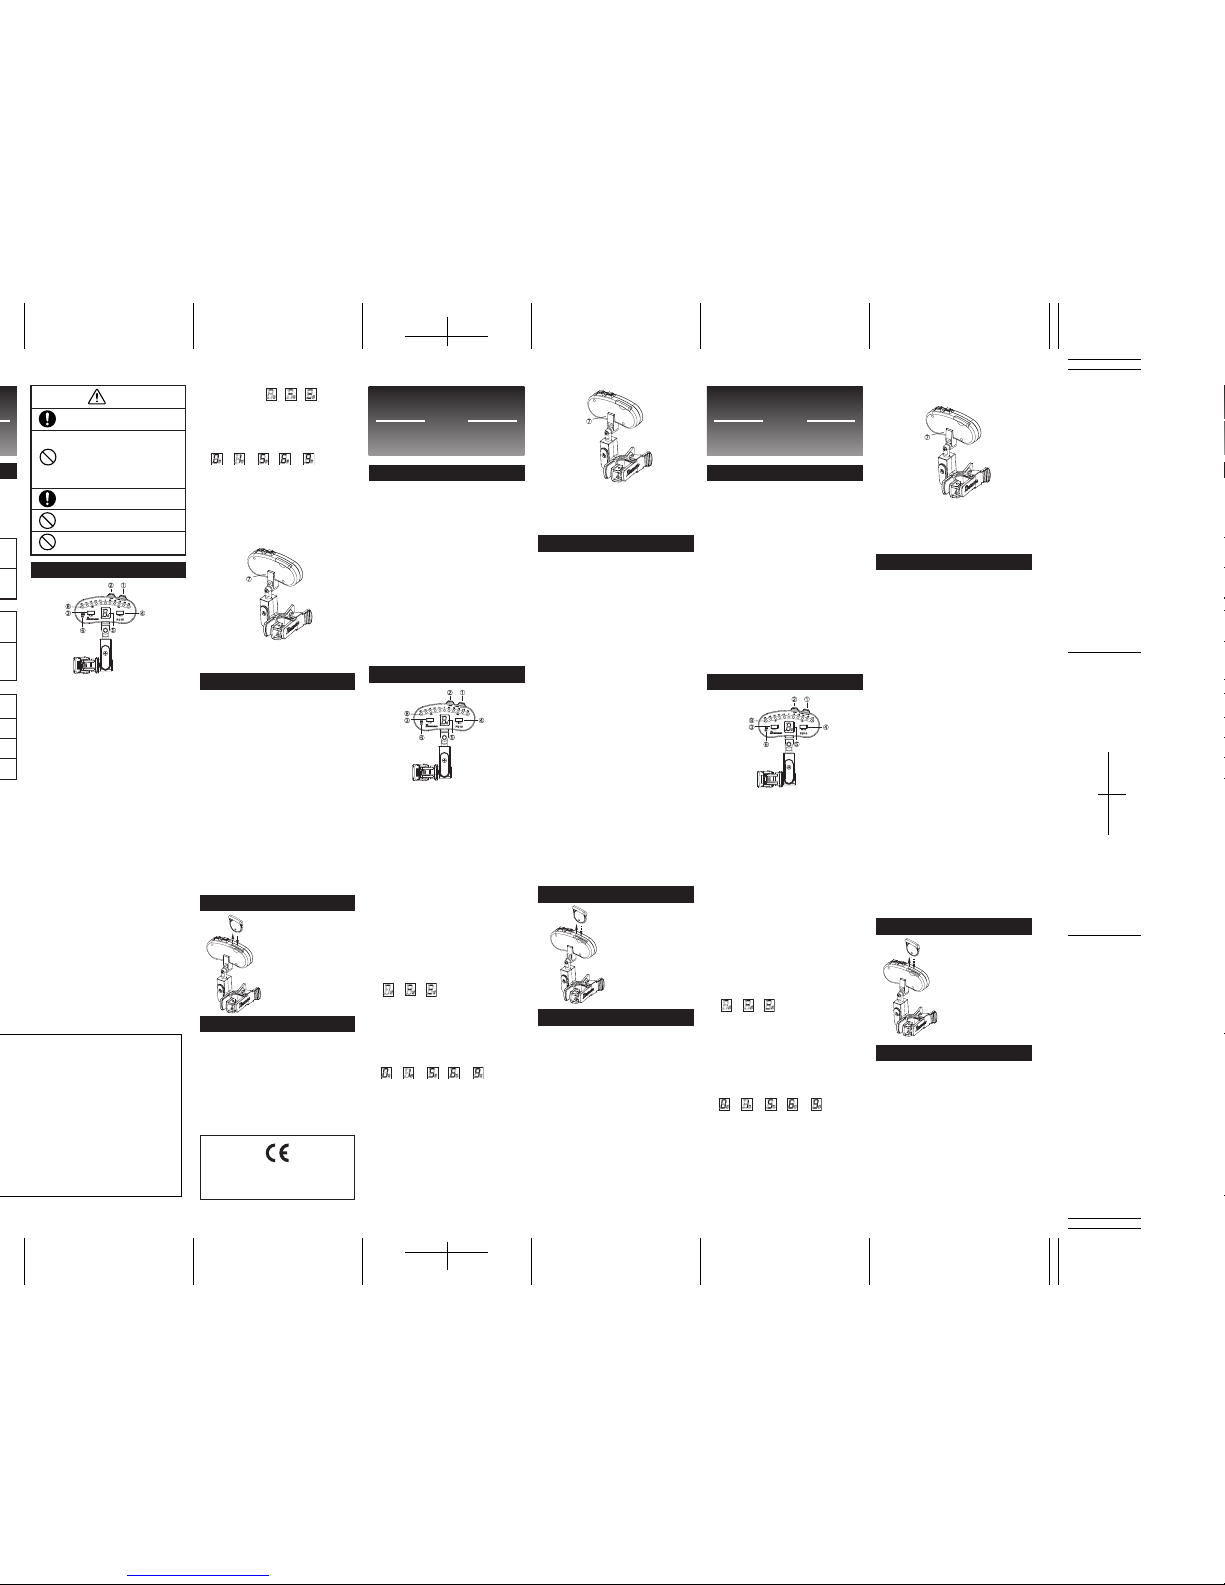
Installation ou remplacement de la pile
Fiche technique
Mode : Accord en entrée MIC/CLIP
Fréquences reconnues : A0 (27,50 Hz)~
C8 (4 186,00 Hz)
Notes d'accord : A,A#,B,C,C#,D,D#,E,F,F#,G,G#
Accord bémol : 1~3 demi-tons
Précision : +/-1 cent
Calibrage : 436 Hz~445 Hz
Affichage : Écran LCD, témoin indicateur
Entrée : MIC intégré, CLIP (PIEZO)
●Alimentation : Pile au lithium (CR2032) x 1, 3 V
●Dimensions : 110 (L) X 56 (H) X 39.5(P) mm
●Poids : 52 g (pile comprise)
* Les caractéristiques et le design sont susceptibles
d'être modifiées sans avis préalable pour l'amélio-
ration du produit.
1. Retirez le couvercle de
la pile situé sur la par-
tie supérieure à l'arrière
en le faisant glisser.
2.
Insérez la pile (CR2032)
en respectant la pola-
rité et remettez le cou-
vercle en place.
3. Vérifiez si le PU10 fonc-
tionne correctement en
le mettant sous tension
après le remplacement
de la pile.
Schieben Sie die Batterie-
fachabdeckung oben an
der Rückseite auf.
Setzen Sie die Batterie
(CR2032) mit der richtigen
Polarität ein und schieben
Sie die Batteriefachab-
deckung wieder zu.
Prüfen Sie, ob das PU10
korrekt funktioniert, indem
Sie die POWER-Taste
nach dem Einsetzen der
Batterie einschalten.
1.
2.
3.
8Tuning Guide LED
When the tuning is correct, the center green LED
will be lit. The yellow LED on the left side indicates
that the pitch is low and the red LED on the right
side indicates that the pitch is high.
Operation
[Tuning]
In order to tune your instrument accurately,
•Do not use PU10 near audio equipment, such as a
radio or television.
•For faster tuning, press down the strings lightly and
mute each time after tuning one string is finished.
[In CLIP input mode]
First, install the CLIP in a visible place where the
vibrations of the guitar will be detected easily.
As PU10 has four rotating shafts between the CLIP
and the TUNER, the display is visible regardless of
where on the guitar’s headstock the CLIP is installed.
However, carefully choose the area where to install
PU10 so that your tuning is not interrupted by turning
machine head or vice versa.
Turn the power ON when the installation is completed.
When the power is ON, the LED indicator will be lit.
Next, use MODE button to select CLIP and begin
tuning.
Play a single note and try to match the note which is
displayed on the LCD indicator with the target tone.
Then, tune more precisely until the green LED is lit
up.
The yellow LED indicates that the pitch is lower than
the displayed note.
The red LED indicates that the pitch is higher than the
displayed note.
[In MIC input mode]
When you use the built-in microphone, it may catch
background noise and cause an error in tuning. We
recommend you tune in a quiet place with little or no
background noise and play the instrument as close to
the microphone as possible. Then, follow the same
process as the CLIP input mode to tune the instrument.
Installing or replacing the battery
Specifications
Mode: MIC input tuning/CLIP input tuning
Tuning range: A0 (27.50Hz)~C8 (4,186.00Hz)
Tuning notes: A,A#,B,C,C#,D,D#,E,F,F#,G,G#
Flat tuning: 1~3 semitones
Accuracy: +/-1 cent
Calibration: 436Hz~445Hz
Display: LCD, LED
Input: Built-in MIC, CLIP (PIEZO)
●Power supply: Lithium battery (CR2032) x 1, 3V
●Dimensions: 110 (W) x 56 (D) x 39.5(H)mm
●Weight: 52 g (including batteries)
* Design and specifications are subject to change
without notice for improvement of the product.
1. Slide off the battery
cover on the upper part
of the back.
2.
Insert the battery
(CR2032) in the correct
polarity and put the
battery cover back.
3.
Check if PU10 operates
correctly by turning on
the Power SW after
replacing the battery.
The PU10 fully conforms to the protection requirements
of the following EC Council Directives.
2004/108/EC : ELECTROMAGNETIC COMPATIBILITY
→→
→→
→→