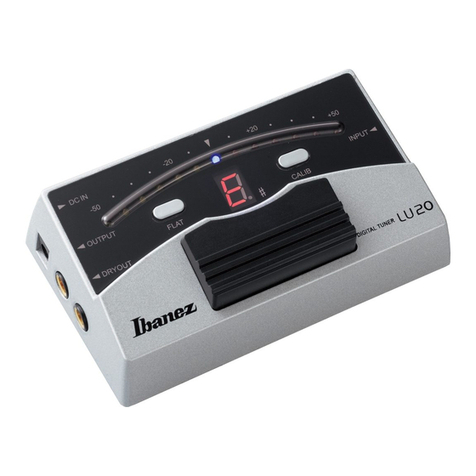
CHROMATISCHES BODEN-STIMMGERÄT
LU30
BEDIENUNGSANLEITUNG
Attention
1
Pour éviter des courts-circuits, des
électrocutions ou des dysfonctionnements :
N’essayez jamais de démonter ou réparer
cet appareil.
Evitez de placer cet appareil dans des
endroits soumis à une chaleur ou une
humidité excessive (p. ex. près d’un
radiateur, en plein soleil, dans une salle de
bains ou sur un sol humide).
Evitez de soumettre cet appareil à de fortes
vibrations.
Evitez de placer cet appareil dans des
endroits poussiéreux ou sales.
N’utilisez pas cet appareil avec des mains
humides.
2
Pour éviter des dommages
N’appliquez pas trop de pression sur les
commutateurs et autres commandes.
Ne laissez pas tomber cet appareil.
3
Nettoyage
N’utilisez pas de détergent, de benzène
ou d’autres solvants pour nettoyer cet
appareil.
4
Pour économiser la pile
Si vous n’utilisez pas cet appareil pendant
une période prolongée, retirez la pile.
Fonctionnement
1 Pour prolonger la durée de vie des piles,
débranchez l’appareil de la prise d’entrée si
vous ne l’utilisez pas.
2 Appuyez sur le bouton CALIB pour définir la
fréquence de référence de la note A4.
La fréquence de référence peut être
comprise entre 435 et 445 Hz, selon votre
convenance, par incréments de 1 Hz.
La fréquence de référence s’affiche dans
l’angle droit de l’écran.
Appuyez sur le bouton DISPLAY pour définir
le mode d’affichage.
Chaque fois que vous appuyez sur le
bouton DISPLAY, le mode d’affichage
change dans l’ordre indiqué ci-dessous.
NEEDLE (Aiguille) –
STROBE (Stroboscopique)
3 Branchez la sortie de votre guitare à l’entrée
de la pédale.
Lorsque l’accordeur est hors tension, le son
passe directement à travers la pédale.
Lorsque l’accordeur est sous tension, la
sortie est coupée à partir de la pédale.
4
Branchez votre guitare à l’accordeur LU30 et
réglez le volume et la tonalité au maximum.
5 Lorsque vous jouez une note sur la guitare,
la note correspondante s’affiche sur
l’indicateur au milieu de l’accordeur.
Les LED déterminent la nature de la note :
dièse ou bémol. Suivez les indications des
LED pour un accord précis.
Accord en mode NEEDLE (Aiguille)
Si la LED rouge est allumée, cela indique
que la note jouée s’écarte de la note
affichée d’au moins ±20 CENT, ce qui
nécessite un réglage conséquent.
La LED jaune allumée indique qu’un
accordage fin est suffisant.
ACCORDEUR CHROMATIQUE AU PIED
LU30
MANUEL DE L’UTILISATEUR
Si l’accordage a été exécuté correctement,
la LED verte centrale s’allume.
Accord en mode STROBE
(Stroboscopique)
Si les LED se déplacent vers la gauche, cela
signifie que la note d’entrée est plus basse
que la note affichée. Si elles se déplacent
vers la droite, cela signifie que la note
d’entrée est plus haute que la note affichée.
Ces deux situations nécessitent un réglage
conséquent.
Estimez l’écart à partir de la note précise
en vous basant sur la vitesse et la direction
des LED allumées. Réglez l’accord dans
la direction opposée aux LED jusqu’à ce
qu’elles s’éteignent.
Connexions
Utilisation des piles
En utilisation normale, ce produit fonctionne
très bien avec une pile. Toutefois, pour de
longues périodes d’utilisation, nous vous
recommandons d’utiliser un adaptateur secteur.
1 Desserrez la vis du couvercle du logement
de pile situé au bas de l’accordeur LU30 et
retirez le couvercle en le faisant glisser.
2 Retirez la pile usagée de son emplacement.
3
Placez la pile neuve dans l’emplacement
correspondant (veillez à respecter la polarité
+/-).
4
Une fois la pile en place, remettez le couvercle
du logement de pile et resserrez la vis.
Remarque : Retirez la pile si vous n’utilisez
pas l’accordeur LU30 pendant une
période prolongée. Vous éviterez
ainsi des accidents tels qu’une
fuite au niveau de la pile.
Fiche technique de l’accordeur LU30
Puissance Pile 9 V (S-006P) ou
adap
tateur IBANEZ DC9V
Consommation 30 mA maximum
Fréquences
reconnues
C1 (27,50 Hz)--B5 (4,186 Hz)
Précision +/-1 cent
Fréquence
de référence 435 Hz--445 Hz
Prise Entrée, Sortie, DC Entrée,
DC Sortie
Dimensions 120 (L) x 45 (H) x 75 (P) mm
Poids 350g
* L’aspect et les caractéristiques sont
susceptibles d’être modifiés sans avis
préalable pour l’amélioration du produit.
Caution
1
To avoid short circuit, electric shock, or
malfunction
Do not disassemble or attempt to repair this unit.
Do not place this unit in locations of high
temperature or high humidity (such as near-
by heating equipment, in direct sunlight, in
a bathroom, or on a wet floor).
Do not place this unit where it will be sub-
jected to heavy vibration.
Do not place this unit in dusty or dirty locations
.
Do not operate this unit with wet hands.
2
To avoid damage
Do not apply excessive force to the switch-
es or other controls.
Do not drop this unit.
3
Cleaning
Do not use thinner, alcohol, or other sol-
vents to clean this unit.
4
To prevent battery failure
Remove the battery if you won’t be using
this unit for an extended time.
Operation
1 The power will turn on automatically when
you insert a plug into the Input jack.
To prolong battery life, remove plug from
input jack when not in use.
2 Press the CALIB button to set the reference
frequency to a value in A4.
The reference frequency can be set between 435
and 445 Hz, as desired, in increments of 1 Hz.
The reference frequency appears on the
display in the right hand corner.
Press the DISPLAY button to set display mode.
Each time the DISPLAY button is pressed,
the display mode will switch to in the order
shown below.
NEEDLE – STROBE
3 Plug the output of your guitar into the input
of the pedal.
When the tuner is off, sound will pass
through the pedal.
When the tuner is on, the output is cut from
the pedal.
LU30 utilizes a bypass system using a me-
chanical contact point, without using a buffer.
4 Connect your guitar to the LU30 and turn
your volume and tone to their max.
For the pickup microphone, use the bridge
pickup.
5 When you play a note on the guitar, the cor-
responding note will display on the indicator
in the middle of the tuner.
LEDs will indicate whether the note is sharp or
flat. Follow the LED indicators for accurate tuning.
Tuning in NEEDLE mode
When the red LED is on, the note is off the
displayed tone name by at least by ±20
CENT, requiring further adjustment.
When the yellow LED is on, fine tuning is
needed.
When tuning has been done correctly, the
green LED in the middle will illuminate.
CHROMATIC PEDAL TUNER
LU30
OWNER’S MANUAL
Tuning in STROBE mode
When the LED lights are running toward
the left side, this is indicating that the input
note is lower than the displayed note. When
it runs toward the right side, it indicates that
the input note is higher than the displayed
note. Both of the above cases indicate the
need for further adjustment.
Judge the discrepancy from the accurate note
based on the velocity and direction of the run-
ning LED lights. Adjust tuning in the counter
direction of the LEDs until they stop running.
Connections
Using batteries
In normal use, this product operates perfectly on a
battery. However, when using it for long periods of
time, we recommend that you use an AC adapter.
1 Loosen the screw of the cover of the bat-
tery compartment at the bottom of LU30,
and slide the cover off.
2
Detach the old battery from the battery snap.
3 Attach the new battery to the battery snap.
(Make sure the correct +/- polarity.)
4 After setting the battery in place, put the
battery cover back, and tighten the screw.
Note :
Remove the battery if you won’t be using the
LU30 for an extended period of time. This will
prevent accidents such as battery leakage.
LU30 specifications
Power 9V battery (S-006P) or
IBANEZ DC9V adapter
Current
consumption Maximum 30 mA
Tuning range
A0 (27.5 Hz)--C8 (4,186 Hz)
Accuracy +/-1 CENT
Reference frequency
435 Hz--445 Hz
Jack Input, Output, DC Input,
DC Output
Dimensions
120 (W) x 45 (H) x 75 (D) mm
Weight 350g
* Appearance and specifications are subject to
change without notice for improvement.
This equipment fully conforms to the protection
requirements of the following Council Directives.
2004/108/EC : Electromagnetic Compatibility
MANUFACTURE : HOSHINO GAKKI CO., LTD.
22-3 Chome, Shumoku-Cho, Higashi,
Nagoya, Aichi, Japan
CE EU REPRESENTATIVE : HOSHINO
BENELUX B.V.
J.N. Wagenaanweg 9, 1422 AK Uithoorn,
Netherlands
Vorsicht
1Um Kurzschlüsse, elektrische Schläge
oder Funktionsstörungen zu vermeiden
Nehmen Sie das Gerät nicht auseinander
und versuchen Sie nicht, es zu reparieren.
Platzieren Sie dieses Gerät nicht an extrem
heißen oder feuchten Orten (zum Beispiel
in der Nähe von Heizungen, in direktem
Sonnenlicht, im Bad oder auf einem
feuchten Fußboden).
Setzen Sie dieses Gerät keinen starken
Erschütterungen aus!
Platzieren Sie dieses Gerät nicht an
staubigen oder schmutzigen Orten!
Bedienen Sie dieses Gerät nicht mit
nassen Händen!
2Um Beschädigungen zu vermeiden
Üben Sie keine übermäßigen Druck auf die
Schalter oder andere Bedienungselemente aus.
Lassen Sie dieses Gerät nicht fallen!
3Reinigung
Verwenden Sie zum Reinigen keine
Lösungsmittel, Alkohol oder andere
Reinigungsmittel.
4Um Schäden an der Batterie zu vermeiden
Nehmen Sie die Batterie heraus, wenn Sie
das Gerät längere Zeit nicht benutzen.
Bedienung
1
Um die Batterielebensdauer zu verlängern,
ziehen Sie den Stecker aus der Eingangsbuchse
heraus, wenn das Gerät nicht in Gebrauch ist.
2 Drücken Sie die Taste CALIB, um die
Referenztonhöhe für die Note A4 auf einen
Wert einzustellen.
Die Referenzfrequenz lässt sich in Schritten
von 1 Hz beliebig zwischen 435 und 445 Hz
einstellen.
Die Referenzfrequenz erscheint rechts im
Display.
Drücken Sie die Taste DISPLAY, um den
Anzeigemodus umzuschalten.
Mit jedem Druck auf die Taste DISPLAY
schaltet der Anzeigemodus in der folgend
dargestellten Reihenfolge um.
NADEL – STROBOSKOP
3 Stecken Sie das Ausgangskabel von Ihrer
Gitarre in die Eingangsbuchse des Pedals.
Wenn das Stimmgerät ausgeschaltet ist,
passiert das Signal das Pedal unverändert.
Wenn das Stimmgerät eingeschaltet ist,
wird das Signal im Pedal stummgeschaltet.
Das LU30 verwendet ein Bypass-System
mit mechanischen Kontaktpunkt ohne
Puffer („Hardwire Through“).
4
Schließen Sie Ihre Gitarre am LU30 an und
drehen Sie Volume- und Tone-Regler ganz auf.
Bei Pickup-Mikrofonen verwenden Sie den
Bridge-Pickup.
5 Wenn Sie eine Note auf der Gitarre spielen,
wird die entsprechende Note in der Mitte
der Anzeige des Stimmgeräts angezeigt.
LEDs zeigen an, ob die Note zu hoch oder
zu tief gestimmt ist. Folgen Sie den LED-
Anzeigen für die akkurate Stimmung.
Stimmen im NEEDLE-Modus (NADEL)
Wenn die rote LED leuchtet, weicht der
klingende Ton um mehr als ±20 CENT von
der angezeigten Note ab und muss deutlich
in der Höhe verändert werden.
Wenn die gelbe LED leuchtet, ist eine
Feinstimmung notwendig.
Wenn der Stimmvorgang richtig abgeschlossen
wurde, leuchtet die grüne LED in der Mitte.
Stimmen im STROBE-Modus
(STROBOSKOP)
Wenn die LEDs zur linken Seite laufen, zeigt
dies an, dass der klingende Ton tiefer ist als die
angezeigte Note. Wenn sie zur rechten Seite
laufen, zeigt dies an, dass der klingende Ton höher
ist als die angezeigte Note. Beide oben erwähnten
Fälle erfordern deutliche Veränderungen.
Sie können die Abweichung von der
genauen Notentonhöhe anhand der
Geschwindigkeit und Richtung der laufend
aufleuchtenden LEDs beurteilen. Stimmen
Sie die Tonhöhe gegen die Laufrichtung der
LEDs, bis sie aufhören zu laufen.
Anschlüsse
Verwenden von Batterien
Bei normaler Verwendung funktioniert dieses
Produkt sehr gut im Batteriebetrieb. Wenn Sie
es jedoch längere Zeit verwenden, empfehlen
wir den Einsatz eines Netzadapters.
1
Lösen Siedie Schraubeder Batteriefachabdeckung
unten am LU30, und öffnen Sie die Abdeckung.
2 Nehmen Sie die alte Batterie aus der
Halterung heraus.
3
Befestigen Sie die neue Batterie an der
Halterung. Achten Sie auf korrekte Polarität (+/-).
4 Nachdem Sie die neue Batterie eingelegt haben,
schlie ßen Siedie Batteriefachabdeckung
wieder und ziehen Sie die Schraube fest.
Hinweis: Nehmen Sie die Batterie heraus, wenn
Sie das LU30 für längere Zeit nicht
benutzen. Dies vermeidet Schäden
durch eine auslaufende Batterie.
Technische Daten LU30
Stromversorgung 9-V-Batterie (S-006P) oder
Netzadapter IBANEZ DC9V
Stromverbrauch Maximal 30 mA
Stimmbereich
C1 (27,50 Hz) bis B5 (4,186 Hz)
Genauigkeit +/-1 Cent
Referenzfrequenz
435 Hz bis 445 Hz
Buchsen Input (Eingang),
Output (Ausgang),
DC Input (Eingang),
DC Output (Ausgang)
Abmessungen
120 (B) x 45 (T) x 70 (H) mm
Gewicht 350g
*
Erscheinungsbild und technische Daten können
sich aus Gründen der Weiterentwicklung ohne
Ankündigung ändern.


