ibis Mojo Hd 160 User manual

Instruction Manual
Notes on Tuning and Maintenance of Ibis Bicycles, Rev. A
Reprinting Permitted if Source Quoted

2
Introduction
3
Contents
Salutations
This Set-Up Guide will help you with
assembly tips, get you started on
adjusting the suspension, maintain-
ing your frame and explain how to
perform basic mechanical jobs.
This guide does not attempt to
address full bike assembly, fitting,
brake and shifting set-up, riding
techniques etc. Please utilize a
professional level service for these
items to get the best performance
and enjoyment from your Ibis.
This Set-Up Guide is also available
online with enhanced functions and
additional information:
www.ibiscycles.com/downloads/
setupguide.pdf
3
4–7
8 –11
12
13
15
20–22
23
24–27
27
28–29
32–35
36
38–39
40
41
42
43
Introduction
Build
Geometry/Quick Specs
Cable Routing
Chain Guides
Front Derailleur Compatibility Chart
Head Angle Chart
Ride
Fork Setup
Fork Air Pressure Chart
Rear Shock Set-Up
Rear Shock Air Pressure Chart
Maintain
A Note on Chainsuck
Frame Hardware Drawings
(Part Numbers and Exploded Views)
Frame Hardware Torque Spec Chart
Swingarm Removal
Warranty/Warranty Registration
Serial Number
Chuck’s Recipe
Contact Info

5
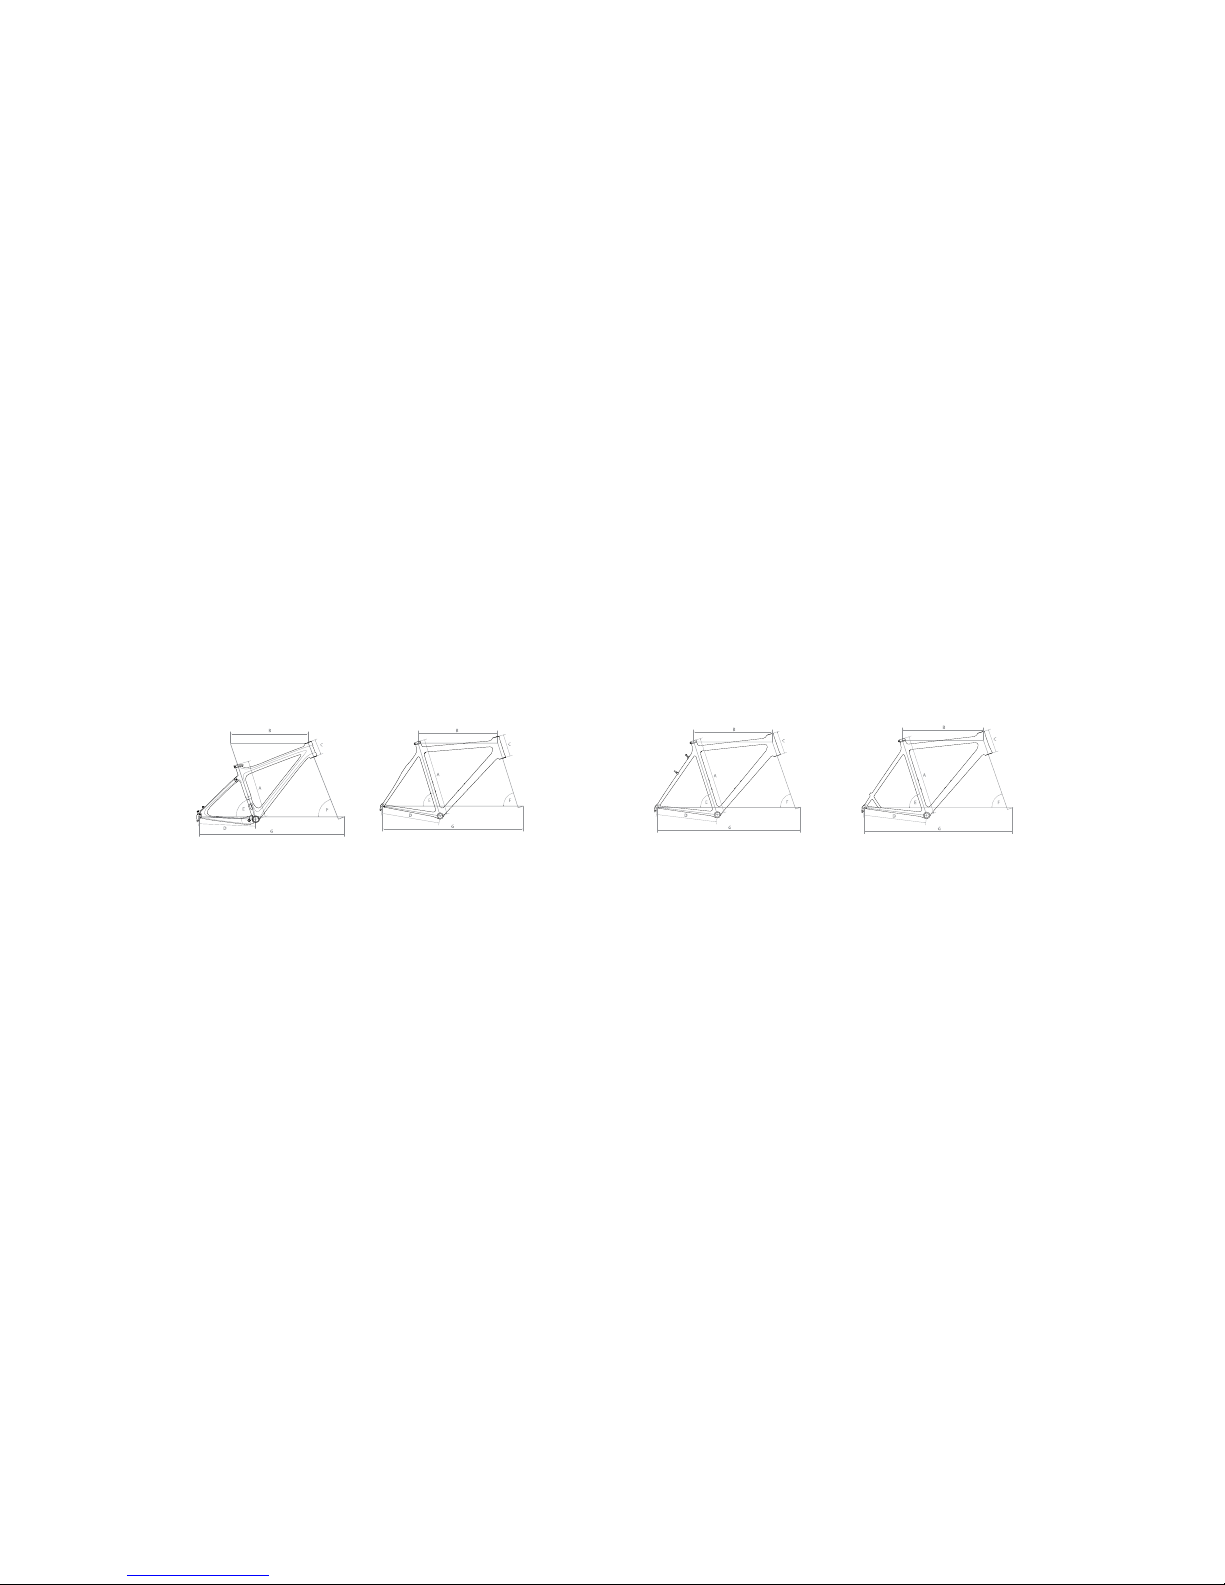
Frame Geometry Chart
4
Frame Geometry Chart
• 140mm rear wheel travel
• 130 to 160mm fork travel compatibility
• 31.6mm seat post
• 135mm hub with a 12mm through axle*
• 68mm bottom bracket
• Shock Specs: 7.875” (200mm) eye to eye, 2.0” (50mm) travel
• 2.8:1 leverage ratio
• For tapered steerer, use this headset: IS ZS44/28.6 | EC49/40
• For 11
/8” straight steerer, use this headset: IS ZS44/28.6 | EC49/30
• 140mm rear wheel travel
• 130 to 160mm fork travel compatibility
• 31.6mm seat post
• 34.9mm clamp top pull front derailleur
• 135mm hub with a standard dropout
• 68mm bottom bracket
• Shock Specs: 7.875” (200mm) eye to eye, 2.0” (50mm) travel
• 2.8:1 leverage ratio
• 11
/8” Integrated Standard Headset: S.H.I.S. IS41/28.6 | IS41/30
• 160mm rear wheel travel
• 160 to 180mm fork travel
• 31.6mm seat post
• 135mm hub with a 12mm through axle*
• 68mm bottom bracket
• Shock Specs: 8.5” (216mm) eye to eye, 2.5” (63.5mm) travel
• 2.52:1 leverage ratio
• For tapered steerer, use this headset: IS ZS44/28.6 | EC49/40
• For 11
/8” straight steerer, use this headset: IS ZS44/28.6 | EC49/30
Mojo Sl
Mojo Hd 140 Mojo Hd 160
*Measurements Taken With 160mm Fork, Geometry Specs with
180mm Fork Available on Ibis website.
*Measurements Taken With 150mm Fork.
Size
Seattube
Toptube
Headtube
Chainstay
Seat Angle
Head Angle
Wheelbase
A
B
C
D
E
F
G
Small
15”
564mm
94mm
435mm
71°
67°
1093mm
Medium
17”
587mm
103mm
435mm
71°
67°
1114mm
Large
19”
604.5mm
118mm
435mm
71°
67°
1134mm
X-large
21”
625mm
134mm
435mm
71°
67°
1155mm
Size
Seattube
Toptube
Headtube
Chainstay
Seat Angle
Head Angle
Wheelbase
A
B
C
D
E
F
G
Small
15”
560mm
100mm
429mm
73°
69°
1063.6mm
Medium
17”
580mm
115mm
429mm
73°
69°
1084.5mm
Large
19”
600mm
130mm
429mm
73°
69°
1105mm
X-Large
21”
620mm
145mm
429mm
73°
69°
1126mm
Mojo Sl-R
Size
Seattube
Toptube
Headtube
Chainstay
Seat Angle
Head Angle
Wheelbase
A
B
C
D
E
F
G
Small
15”
560mm
94mm
429mm
73°
69°
1063.6mm
Medium
17”
580mm
103mm
429mm
73°
69°
1084.5mm
Large
19”
600mm
118mm
429mm
73°
69°
1105mm
X-Large
21”
620mm
134mm
429mm
73°
69°
1126mm
Size
Seattube
Toptube
Headtube
Chainstay
Seat Angle
Head Angle
Wheelbase
A
B
C
D
E
F
G
Small
15”
561mm
94mm
435mm
72°
68°
1085mm
Medium
17”
584mm
103mm
435mm
72°
68°
1106mm
Large
19”
602mm
118mm
435mm
72°
68°
1128mm
X-large
21”
622mm
134mm
435mm
72°
68°
1148mm
• Depending on date of manufacture, the Mojo HD could have either a
Down Swing High Direct Mount front derailleur or a 34.9mm clamp
top pull front derailleur. See note on page 11.
• *Beginning in June of 2011, the Mojo HD and HD 140 use a
142 x 12mm Maxle rear axle.
• 140mm rear wheel travel
• 130 to 150mm fork travel
• 31.6mm seat post
• 142mm x 12mm Maxle through axle
• BB92/Press GXP Bottom Bracket
• Shock Specs: 7.875” (200mm) eye to eye, 2.0” (50mm) travel
• 2.8:1 leverage ratio
• For tapered steerer, use this headset: IS ZS44/28.6 | EC49/40
• High Direct mount front derailleur
• Rear Brake Mount: Post Mount, 160mm
S.H.I.S.=Standardized Headset Identification System
• 140mm rear wheel travel
• 130 to 160mm fork travel compatibility
• 31.6mm seat post
• 135mm hub with a 12mm through axle*
• 68mm bottom bracket
• Shock Specs: 7.875” (200mm) eye to eye, 2.0” (50mm) travel
• 2.8:1 leverage ratio
• For tapered steerer, use this headset: IS ZS44/28.6 | EC49/40
• For 11
/8” straight steerer, use this headset: IS ZS44/28.6 | EC49/30
• 140mm rear wheel travel
• 130 to 160mm fork travel compatibility
• 31.6mm seat post
• 34.9mm clamp top pull front derailleur
• 135mm hub with a standard dropout
• 68mm bottom bracket
• Shock Specs: 7.875” (200mm) eye to eye, 2.0” (50mm) travel
• 2.8:1 leverage ratio
• 11
/8” Integrated Standard Headset: S.H.I.S. IS41/28.6 | IS41/30
• 160mm rear wheel travel
• 160 to 180mm fork travel
• 31.6mm seat post
• 135mm hub with a 12mm through axle*
• 68mm bottom bracket
• Shock Specs: 8.5” (216mm) eye to eye, 2.5” (63.5mm) travel
• 2.52:1 leverage ratio
• For tapered steerer, use this headset: IS ZS44/28.6 | EC49/40
• For 11
/8” straight steerer, use this headset: IS ZS44/28.6 | EC49/30
Mojo Sl
Mojo Hd 140 Mojo Hd 160
*Measurements Taken With 160mm Fork, Geometry Specs with
180mm Fork Available on Ibis website.
*Measurements Taken With 150mm Fork.
Size
Seattube
Toptube
Headtube
Chainstay
Seat Angle
Head Angle
Wheelbase
A
B
C
D
E
F
G
Small
15”
564mm
94mm
435mm
71°
67°
1093mm
Medium
17”
587mm
103mm
435mm
71°
67°
1114mm
Large
19”
604.5mm
118mm
435mm
71°
67°
1134mm
X-large
21”
625mm
134mm
435mm
71°
67°
1155mm
Size
Seattube
Toptube
Headtube
Chainstay
Seat Angle
Head Angle
Wheelbase
A
B
C
D
E
F
G
Small
15”
560mm
100mm
429mm
73°
69°
1063.6mm
Medium
17”
580mm
115mm
429mm
73°
69°
1084.5mm
Large
19”
600mm
130mm
429mm
73°
69°
1105mm
X-Large
21”
620mm
145mm
429mm
73°
69°
1126mm
Mojo Sl-R
Size
Seattube
Toptube
Headtube
Chainstay
Seat Angle
Head Angle
Wheelbase
A
B
C
D
E
F
G
Small
15”
560mm
94mm
429mm
73°
69°
1063.6mm
Medium
17”
580mm
103mm
429mm
73°
69°
1084.5mm
Large
19”
600mm
118mm
429mm
73°
69°
1105mm
X-Large
21”
620mm
134mm
429mm
73°
69°
1126mm
Size
Seattube
Toptube
Headtube
Chainstay
Seat Angle
Head Angle
Wheelbase
A
B
C
D
E
F
G
Small
15”
561mm
94mm
435mm
72°
68°
1085mm
Medium
17”
584mm
103mm
435mm
72°
68°
1106mm
Large
19”
602mm
118mm
435mm
72°
68°
1128mm
X-large
21”
622mm
134mm
435mm
72°
68°
1148mm
• Depending on date of manufacture, the Mojo HD could have either a
Down Swing High Direct Mount front derailleur or a 34.9mm clamp
top pull front derailleur. See note on page 11.
• *Beginning in June of 2011, the Mojo HD and HD 140 use a
142 x 12mm Maxle rear axle.
• 140mm rear wheel travel
• 130 to 150mm fork travel
• 31.6mm seat post
• 142mm x 12mm Maxle through axle
• BB92/Press GXP Bottom Bracket
• Shock Specs: 7.875” (200mm) eye to eye, 2.0” (50mm) travel
• 2.8:1 leverage ratio
• For tapered steerer, use this headset: IS ZS44/28.6 | EC49/40
• High Direct mount front derailleur
• Rear Brake Mount: Post Mount, 160mm
S.H.I.S.=Standardized Headset Identification System

6 7
• 100mm fork travel
• 31.6mm seat post
• 34.9mm clamp top pull front derailleur
• 135mm hub with a standard dropout
• 73mm bottom bracket
• 11
/8” Integrated Standard Headset: S.H.I.S. IS41/28.6 | IS41/30
Tranny
Silk Sl
Hakkalügi
Size
Seattube
Toptube
Headtube
Chainstay
Seat Angle
Head Angle
Wheelbase
A
B
C
D
E
F
G
Small
15”
550mm
105mm
425mm
73°
70°
1034mm
Medium
17”
580mm
115mm
425mm
73°
70°
1065mm
Large
19”
605mm
135mm
425mm
73°
70°
1091mm
X-Large
21”
630mm
155mm
425mm
73°
70°
1117mm
Size
Seattube
Toptube
Headtube
Chainstay
Seat Angle
Head Angle
Wheelbase
A
B
C
D
E
F
G
47
420mm
514mm
110mm
430mm
73.1°
70.5°
998mm
50
451mm
530mm
115mm
430mm
72.8°
70.2°
1004mm
53
490mm
542mm
145mm
430mm
72.9°
71.5°
1010mm
55
493mm
559mm
160mm
430mm
72°
71.5°
1016mm
58
529mm
574mm
185mm
430mm
71.6°
71.4°
1030mm
61
555mm
581mm
200mm
430mm
72°
72.4°
1032mm
Size
Seattube
Toptube
Headtube
Chainstay
Seat Angle
Head Angle
Wheelbase
A
B
C
D
E
F
G
47
420mm
526mm
110mm
406mm
74.6°
72°
971mm
50
450mm
530mm
115mm
406mm
74.5°
72°
972mm
53
472mm
537mm
145mm
406mm
74.5°
72°
979mm
55
493mm
560mm
160mm
406mm
73.5°
73°
985mm
58
529mm
574mm
195mm
406mm
73°
73°
995mm
61
554mm
590mm
200mm
406mm
73°
73.5°
998mm
• Seatpost Diameter 31.6mm
• Front Derailleur 34.9mm
• Bottom Bracket 68mm (BSA) English Thread
• 130mm dropout spacing
• Campagnolo Hiddenset Standard S.H.I.S. IS42/28.6 | IS42/30
• Seatpost Diameter 31.6mm
• Front Derailleur 34.9mm
• Bottom Bracket 68mm (BSA) English Thread
• 130mm dropout spacing
• Campagnolo Hiddenset Standard S.H.I.S. IS42/28.6 | IS42/30
S.H.I.S.=Standardized Headset Identification System
• 100mm fork travel
• 31.6mm seat post
• 34.9mm clamp top pull front derailleur
• 135mm hub with a standard dropout
• 73mm bottom bracket
• 11
/8” Integrated Standard Headset: S.H.I.S. IS41/28.6 | IS41/30
Tranny Silk Sl
Hakkalügi
Size
Seattube
Toptube
Headtube
Chainstay
Seat Angle
Head Angle
Wheelbase
A
B
C
D
E
F
G
Small
15”
550mm
105mm
425mm
73°
70°
1034mm
Medium
17”
580mm
115mm
425mm
73°
70°
1065mm
Large
19”
605mm
135mm
425mm
73°
70°
1091mm
X-Large
21”
630mm
155mm
425mm
73°
70°
1117mm
Size
Seattube
Toptube
Headtube
Chainstay
Seat Angle
Head Angle
Wheelbase
A
B
C
D
E
F
G
47
420mm
514mm
110mm
430mm
73.1°
70.5°
998mm
50
451mm
530mm
115mm
430mm
72.8°
70.2°
1004mm
53
490mm
542mm
145mm
430mm
72.9°
71.5°
1010mm
55
493mm
559mm
160mm
430mm
72°
71.5°
1016mm
58
529mm
574mm
185mm
430mm
71.6°
71.4°
1030mm
61
555mm
581mm
200mm
430mm
72°
72.4°
1032mm
Size
Seattube
Toptube
Headtube
Chainstay
Seat Angle
Head Angle
Wheelbase
A
B
C
D
E
F
G
47
420mm
526mm
110mm
406mm
74.6°
72°
971mm
50
450mm
530mm
115mm
406mm
74.5°
72°
972mm
53
472mm
537mm
145mm
406mm
74.5°
72°
979mm
55
493mm
560mm
160mm
406mm
73.5°
73°
985mm
58
529mm
574mm
195mm
406mm
73°
73°
995mm
61
554mm
590mm
200mm
406mm
73°
73.5°
998mm
• Seatpost Diameter 31.6mm
• Front Derailleur 34.9mm
• Bottom Bracket 68mm (BSA) English Thread
• 130mm dropout spacing
• Campagnolo Hiddenset Standard S.H.I.S. IS42/28.6 | IS42/30
• Seatpost Diameter 31.6mm
• Front Derailleur 34.9mm
• Bottom Bracket 68mm (BSA) English Thread
• 130mm dropout spacing
• Campagnolo Hiddenset Standard S.H.I.S. IS42/28.6 | IS42/30
S.H.I.S.=Standardized Headset Identification System
• 100mm fork travel
• 31.6mm seat post
• Front Derailleur 34.9mm Top Pull
• 135mm hub with a standard dropout
• 73mm bottom bracket
• 11
/8” Integrated Standard Headset: S.H.I.S. IS41/28.6 | IS41/30
Tranny Silk Sl Hakkalügi
Size
Seattube
Toptube
Headtube
Chainstay
Seat Angle
Head Angle
Wheelbase
A
B
C
D
E
F
G
Small
15”
550mm
105mm
425mm
73°
70°
1034mm
Medium
17”
580mm
115mm
425mm
73°
70°
1065mm
Large
19”
605mm
135mm
425mm
73°
70°
1091mm
X-Large
21”
630mm
155mm
425mm
73°
70°
1117mm
Size
Seattube
Toptube
Headtube
Chainstay
Seat Angle
Head Angle
Wheelbase
A
B
C
D
E
F
G
47
420mm
514mm
110mm
430mm
73.1°
70.5°
998mm
50
451mm
530mm
115mm
430mm
72.8°
70.2°
1004mm
53
490mm
542mm
145mm
430mm
72.9°
71.5°
1010mm
55
493mm
559mm
160mm
430mm
72°
71.5°
1016mm
58
529mm
574mm
185mm
430mm
71.6°
71.4°
1030mm
61
555mm
581mm
200mm
430mm
72°
72.4°
1032mm
Size
Seattube
Toptube
Headtube
Chainstay
Seat Angle
Head Angle
Wheelbase
A
B
C
D
E
F
G
47
420mm
526mm
110mm
406mm
74.6°
72°
971mm
50
450mm
530mm
115mm
406mm
74.5°
72°
972mm
53
472mm
537mm
145mm
406mm
74.5°
72°
979mm
55
493mm
560mm
160mm
406mm
73.5°
73°
985mm
58
529mm
574mm
195mm
406mm
73°
73°
995mm
61
554mm
590mm
200mm
406mm
73°
73.5°
998mm
• Seatpost Diameter 31.6mm
• Front Derailleur 34.9mm
• Bottom Bracket 68mm (BSA) English Thread
• 130mm dropout spacing
• Campagnolo Hiddenset Standard S.H.I.S. IS42/28.6 | IS42/30
• Seatpost Diameter 31.6mm
• Front Derailleur 34.9mm
• Bottom Bracket 68mm (BSA) English Thread
• 130mm dropout spacing
• Campagnolo Hiddenset Standard S.H.I.S. IS42/28.6 | IS42/30
S.H.I.S.=Standardized Headset Identification System
Hakkalügi Disc
Size
Seattube
Toptube
Headtube
Chainstay
Seat Angle
Head Angle
Wheelbase
A
B
C
D
E
F
G
47
470mm
520mm
100mm
430mm
74.5°
70.5°
1007mm
50
500mm
530mm
115mm
430mm
74°
71°
1009mm
53
530mm
540mm
135mm
430mm
73.5°
71.5°
1011mm
55
550mm
555mm
155mm
430mm
73°
71.5°
1024mm
58
580mm
570mm
175mm
430mm
73°
71.5°
1037mm
61
610mm
590mm
195mm
430mm
73°
71.5°
1057mm
• Seatpost Diameter 31.6mm
• Front Derailleur 34.9mm Top Pull
• Bottom Bracket BB86 Press Fit
• 135mm dropout spacing
• Post Mount for Rear Disc Brake 140mm
• 1.5" Tapered Head Tube
• Headset Standard S.H.I.S. IS41/28.6 upper, IS 52/40 lower
S.H.I.S.=Standardized Headset Identification System
Frame Geometry ChartFrame Geometry Chart
• 100mm fork travel
• 31.6mm seat post
• Front Derailleur 34.9mm Top Pull
• 135mm hub with a standard dropout
• 73mm bottom bracket
• 11
/8” Integrated Standard Headset: S.H.I.S. IS41/28.6 | IS41/30
Tranny
Silk Sl Hakkalügi
Size
Seattube
Toptube
Headtube
Chainstay
Seat Angle
Head Angle
Wheelbase
A
B
C
D
E
F
G
Small
15”
550mm
105mm
425mm
73°
70°
1034mm
Medium
17”
580mm
115mm
425mm
73°
70°
1065mm
Large
19”
605mm
135mm
425mm
73°
70°
1091mm
X-Large
21”
630mm
155mm
425mm
73°
70°
1117mm
Size
Seattube
Toptube
Headtube
Chainstay
Seat Angle
Head Angle
Wheelbase
A
B
C
D
E
F
G
47
420mm
514mm
110mm
430mm
73.1°
70.5°
998mm
50
451mm
530mm
115mm
430mm
72.8°
70.2°
1004mm
53
490mm
542mm
145mm
430mm
72.9°
71.5°
1010mm
55
493mm
559mm
160mm
430mm
72°
71.5°
1016mm
58
529mm
574mm
185mm
430mm
71.6°
71.4°
1030mm
61
555mm
581mm
200mm
430mm
72°
72.4°
1032mm
Size
Seattube
Toptube
Headtube
Chainstay
Seat Angle
Head Angle
Wheelbase
A
B
C
D
E
F
G
47
420mm
526mm
110mm
406mm
74.6°
72°
971mm
50
450mm
530mm
115mm
406mm
74.5°
72°
972mm
53
472mm
537mm
145mm
406mm
74.5°
72°
979mm
55
493mm
560mm
160mm
406mm
73.5°
73°
985mm
58
529mm
574mm
195mm
406mm
73°
73°
995mm
61
554mm
590mm
200mm
406mm
73°
73.5°
998mm
• Seatpost Diameter 31.6mm
• Front Derailleur 34.9mm
• Bottom Bracket 68mm (BSA) English Thread
• 130mm dropout spacing
• Campagnolo Hiddenset Standard S.H.I.S. IS42/28.6 | IS42/30
• Seatpost Diameter 31.6mm
• Front Derailleur 34.9mm
• Bottom Bracket 68mm (BSA) English Thread
• 130mm dropout spacing
• Campagnolo Hiddenset Standard S.H.I.S. IS42/28.6 | IS42/30
S.H.I.S.=Standardized Headset Identification System
Hakkalügi Disc
Size
Seattube
Toptube
Headtube
Chainstay
Seat Angle
Head Angle
Wheelbase
A
B
C
D
E
F
G
47
470mm
520mm
100mm
430mm
74.5°
70.5°
1007mm
50
500mm
530mm
115mm
430mm
74°
71°
1009mm
53
530mm
540mm
135mm
430mm
73.5°
71.5°
1011mm
55
550mm
555mm
155mm
430mm
73°
71.5°
1024mm
58
580mm
570mm
175mm
430mm
73°
71.5°
1037mm
61
610mm
590mm
195mm
430mm
73°
71.5°
1057mm
• Seatpost Diameter 31.6mm
• Front Derailleur 34.9mm Top Pull
• Bottom Bracket BB86 Press Fit
• 135mm dropout spacing
• Post Mount for Rear Disc Brake 140mm
• 1.5" Tapered Head Tube
• Headset Standard S.H.I.S. IS41/28.6 upper, IS 52/40 lower
S.H.I.S.=Standardized Headset Identification System

Bike Set-Up Tips and Tricks
Mojo / Mojo SL:
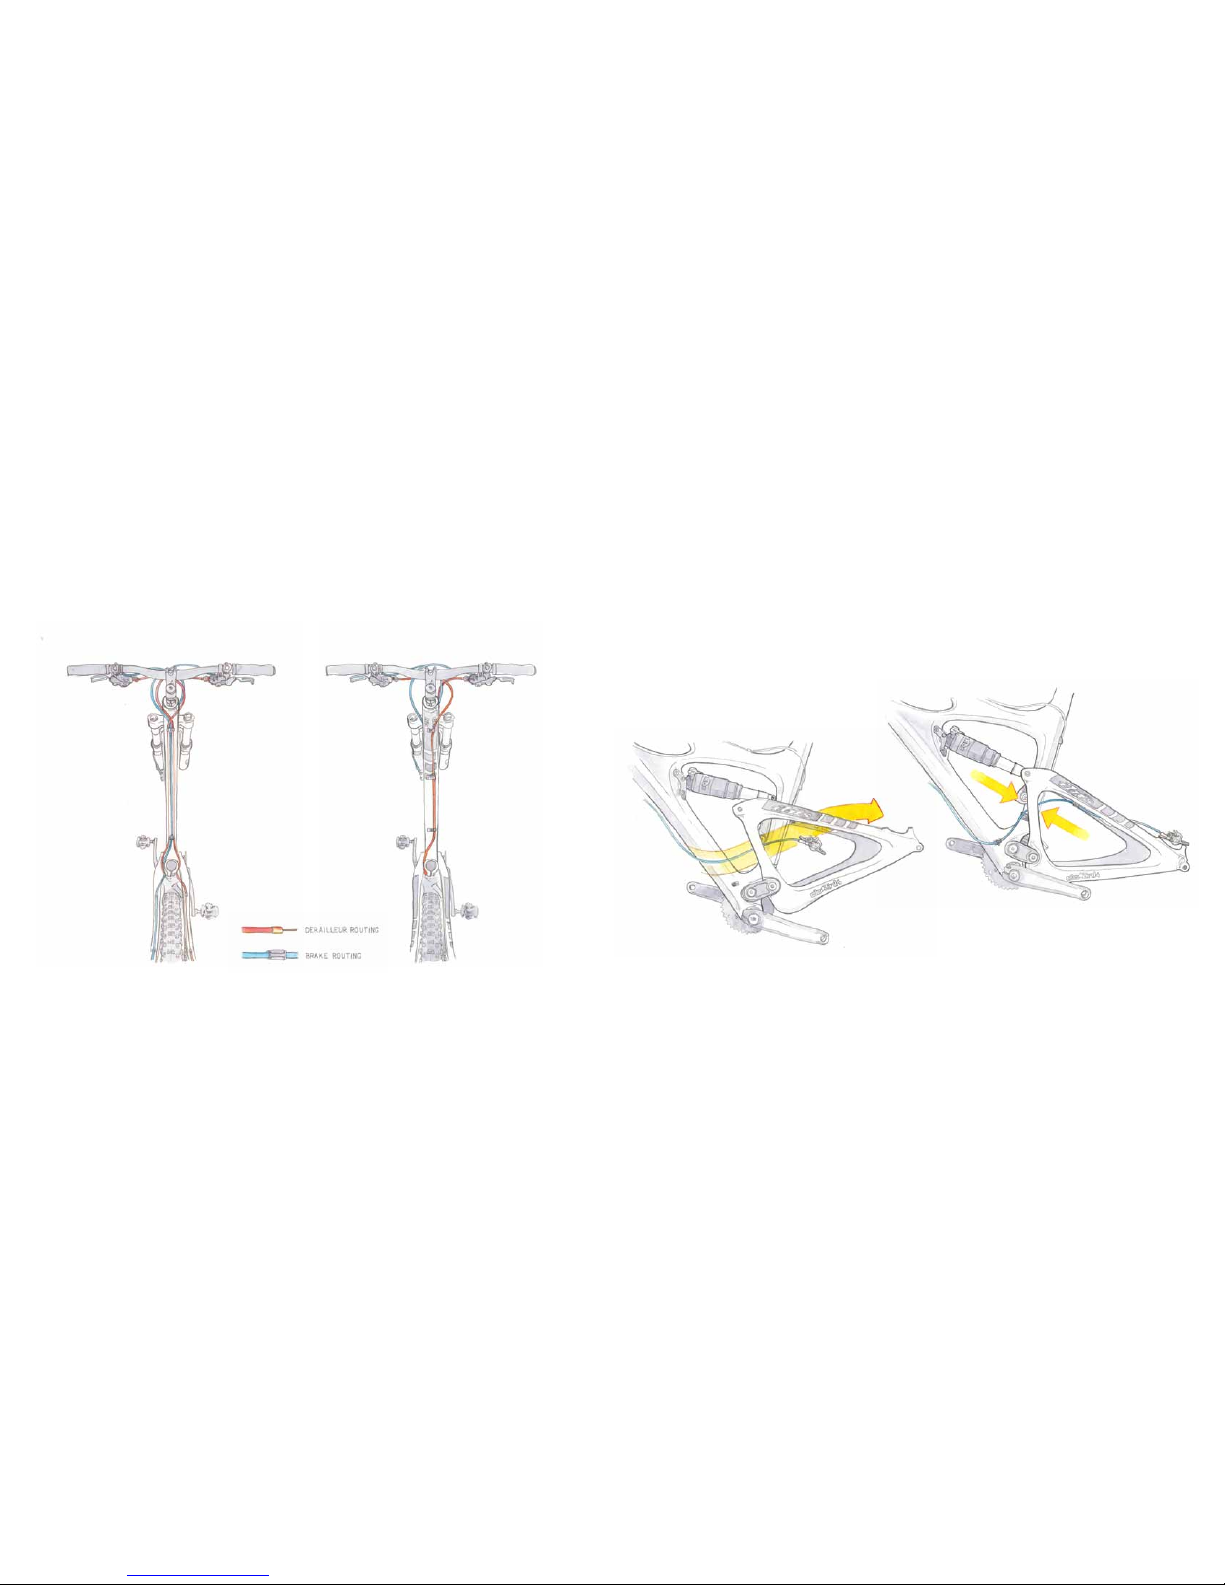
The derailleur housing and rear
brake hydraulic hose can be routed
around the opposite side of the
stem. The length of housing be-
tween the rear top-tube stop and
the upper swing arm stop for the
rear derailleur should be kept as
short as possible to keep it from
bowing out and contacting your
leg. We recommend you use a
piece of innertube about 3 cm long,
feeding the rear brake and derail-
leur cables through it just behind
the seat tube as shown. Zip Ties
work well too.
Cable Routing for Mojo HD and SL-R
It’s designed to run full housing to the
rear derailleur. This means that the
housing has no interruptions,
and runs as one continuous piece
from the shifter to the rear derailleur.
The top-tube cable stops work best
with front derailleur or adjustable
height seatpost cables. See page 10
for an illustration of the proper rear
derailleur cable routing. On the Mojo
98
HD, if you’re not going to be using
them, remove the cable stops and
screw the Allen head bolt back in
place for a clean look.
Rear Brake Hydraulic Hose Routing
for Mojo HD and SL-R.
The easiest way to get the brake hose
between the main frame and swing-
arm is to feed it through when you dis-
connect the hose to cut down the lines.
If you do not have to cut down the line
the rear caliper can be fed between
the main frame and swingarm without
disconnecting the line. This saves hav-
ing to bleed the brake system.
First, remove the rear shock eye bolt
and move the swingarm to its most
forward position. Then, remove one
set of bolts from the upper link.
(The forward ones where they attach
to the front triangle are easiest.)
At that point the rear caliper should
just fit through the space between
them and on back to its place on the
rear dropout. Keep the line between
the swingarm and the frame as short
as possible or it could get pinched by
the upper link bolt.
HD Cable Guard
We’ve designed a cable bash
guard to protect the cable housing
along the downtube from rocks.
The guard is optional, but should
be used if you are riding in areas
where big rocks might crush or slice
the cable housing. It’s available
in the Ibis store on our website or
through your Ibis retailer. You can
also use this cable guard on the
Mojo and Mojo SL and SL-R. On
the Mojo and Mojo SL, you will
need to secure the upper end of the
guard, as the original Mojos do not
have the upper mounting bolt on
the down tube. We use double-stick
tape for this when mounting the
guard on a Mojo or Mojo SL.
Cable Routing Mojo SL Routing
Bike Set-Up Tips and Tricks

1110
Mojo SL Routing Mojo HD and
Mojo SL-R Routing
Mojo HD and Mojo SL-R
Caliper Routing
Cable Routing
Bike Set-Up Tips and Tricks Bike Set-Up Tips and Tricks
Cable Routing

13
12
MRP and Ibis have designed two
custom single ring chain guides
for the Mojo HD and Mojo SL.
They are called the Mini-G
and the Lopes SL.
Both mount directly
to the frame via the
bottom bracket and the main pivot
shaft. This fixes the guide in place so
it won’t rotate. The pivot shaft on the
HD is already drilled and threaded
to accept either guide. For the Mojo
and Mojo SL, we make a special main
pivot shaft that facilitates mounting of
either chain guide.
If you’re converting your
triple crankset to be
compatible with either
guide, we recomend
a non–ramped
replacement chainring
(34 and 36 tooth rings are available
in our webstore.) To do this conversion
you should start with a triple crank
and remove the inner and outer rings.
Double cranks do not have the right
chainline to make the guides work.
The Mini-G is designed for
a 32t–36t single chainring
and features bash protec-
tion as well as chain
retention.
The Lopes SL is nearly
identical to the guide
that helped Brian Lopes
win his 5th consecutive
Air DH race at Crank-
wor x 2010.
At 104 grams, it’s
the lightest full chain
retention system on the
market. If you want chain
retention and you’re willing
to sacrifice bash protection, this
is the guide for you. The Lopes SL
will accommodate chainrings from
32t–38t. (34, 36, and 38 tooth rings
are available in our webstore.)
Webstore direct links:
Mini-G: http://store.ibiscycles.com/
P r o d u c t111
Lopes SL http://store.ibiscycles.com/
Product132
Chainrings http://store.ibiscycles.com/
Product134 *In mid 2011, Mojo HD’s started shipping with a new type of front derailleur mounting system called direct mount. To help you identify if your
frame is direct mount, refer to the frame drawing on page 30. The exploded drawing shows a direct mount front derailleur equipped frame.
Component specification and component availability frequently change. We will update any new information in our online setup guide on the
Ibis support page on the Ibis website. You are also welcome to contact Ibis if you have any specific questions about compatibility.
Front Derailleur Compatibility
Bike Set-Up Tips and Tricks
Chain Guides
Bike Set-Up Tips and Tricks
If You Use This Crank: Use This Front Derailleur:
Mojo HD w/ 35mm Seat Tube OD:
Sram 38/24 Sram 2x10 High Direct Mount 38/36 w/ Problemsolvers adapter
Sram 39/26 Sram 2x10 High Direct Mount X.O/X.9 (XX does not exist) w/ Problem Solvers 68mm Direct Mount Adapter
Sram 42/28 Sram 2x10 High Direct Mount X.O/X.9 w/ Problem Solvers Adapter or XX High Clamp Top Pull 34.9, Modified
XTR 38/26 Shimano 2x9 Down Swing Dual Pull 34.9 SLX (M667L5)
XTR 40/28 Shimano 2x9 Down Swing Dual Pull 34.9 SLX (M667L5)
Sram 3x10 Shimano 3x10 Down Swing Dual Pull 34.9 (M981L6 / M77110L6 / M66110L6)
Shimano 3x10 Shimano 3x10 Down Swing Dual Pull 34.9 (M981L6 / M77110L6 / M66110L6)
Mojo/SL/Tranny w/ 35mm Seat Tube OD:
Sram 36/22
Sram 38/24
Sram 38/36 High Direct Mount with Problemsolvers adapter
Sram 39/26 Sram 2x10 High Direct Mount X.O/X.9 (XX does not exist) w/ Problem Solvers 68mm Direct Mount Adapter
Sram 42/28 Sram 2x10 High Direct Mount X.O/X.9 w/ Problem Solvers Adapter or XX High Clamp Top Pull 34.9, Modified
XTR 38/26 Shimano 2x9 Down Swing Dual Pull 34.9 SLX (M667L5)
XTR 40/28 Shimano 2x10 Down Swing Dual Pull 34.9 XTR (M986L6)
Sram 3x10 Shimano 3x10 Down Swing Dual Pull 34.9 (M981L6 / M77110L6 / M66110L6)
Shimano 3x10 Shimano 3x10 Down Swing Dual Pull 34.9 (M981L6 / M77110L6 / M66110L6)
Mojo HD w/ Direct FD mounting:
Sram 38/24 Sram 2x10 High Direct Mount 38/36
Sram 42/28 and 39/26 Sram 2x10 High Direct Mount X.O/X.9 (XX does not exist)
Shimano 38/26 Not Compatible
Shimano 40/28 Shimano 2x10 Direct Mount (M986-D / M786-D) not E-type
Sram 3x10 Shimano 3x10 Direct Mount (M981-D / M77110-D / M66110-D) not E-type
Shimano 3x10 Shimano 3x10 Direct Mount (M981-D / M77110-D / M66110-D) not E-type
Mojo SL-R (Direct Mount):
Sram 38/24 Sram 38/36 High Direct Mount
Sram 42/28 and 39/26 Sram 2x10 High Direct Mount X.O/X.9 (XX does not exist)
Shimano 38/26 Not Compatible
Shimano 40/28 Shimano 2x10 Direct Mount (M986-D / M786-D) not E-type
Sram 3x10 Shimano 3x10 Direct Mount (M981-D / M77110-D / M66110-D) not E-type
Shimano 3x10 Shimano 3x10 Direct Mount (M981-D / M77110-D / M66110-D) not E-type
Not Compatible
Sram 36/22
Sram 36/22 Not Compatible
Sram 36/22 Sram 38/36 High Direct Mount
The Lopes SL and the Mini G are not
compatible with the Mojo SL-R.
Dual Ring Guides
For dual ring guide compatibility,
we recommend getting in touch
with our friends at e*thirteen.
You can use the Heim2 or the DRS
for either bike. The DRS requires
3mm material removal off top of the
baseplate for main pivot clearance.
Single Ring Guides
For you 1X10 lovers, we've got great
news. In June 2011, Shimano began
shipping a new rear derailleur call the
XTR Shadow Plus.
It uses heavier chain tension plus a
friction stabilizer to dampen the cage
and thus chain movement (chain
slap). It also dramatically reduces
derailing of chains. Combined with
either an e*thirteen XCX-ST D-Type
(available August 2011) or an MRP
1X, the Shadow Plus virtually elimi-
nates the need for the lower half of
your chain guide, plus makes your
bike nearly silent.

15
Bike Set-Up Tips and Tricks
14
Mojo Head Angle Chart
Chain length
To get the correct chain length shift
into the large chainring and largest
cog and let all the air out of your
shock. Thread the chain through the
gears and derailleurs, compress the
suspension all the way to bottom
out, and cut the chain at the mini-
mum length needed with the rear
derailleur stretched out.
Tapered Head Tube
The HD and SL-R feature a tapered
headtube that works with new
tapered steerer forks. Known as
mixed tapered, or “ZS44/28.6
| EC49/40” in the Standardized
Headset Identification System.
If you want information about these
standards visit
www.bicycleheadsets.com.
This standard is compatible with both
the Chris King Mixed Tapered and
certain Cane Creek headsets (see our
webstore for the offerings.) If you are
getting a King headset for your HD,
be sure to order the ‘five over’ version.
If you’ve already got a perfectly
usable fork with a traditional 11/8”
steerer tube that you’d like to use,
simply install an adapter that will
make your fork work on the Mojo
HD. Both Chris King and Cane
Creek make adapter style headsets
that will adapt our 1.5 cup to your
11/8”fork.
For those who like to experiment with
head angle and changing steering
geometry, Cane Creek now offers a
headset called the AngleSet, which
is compatible with the Mojo HD and
Mojo SL–R. The AngleSet allows you
to adjust the head tube angle of the
bike in 1/2”degree increments, from
+1.5˚ t o –1.5˚.
Rear Dropouts and Disc Brake
Mounts
The one–piece disc brake boss/non
drive side dropout on the HD and
SL-R is molded carbon. The bosses
are designed to bolt a post–mount
standard caliper directly to the
frame for a 160mm rotor or to a
180mm or 185mm rotor with a post
to post style adapter.
The rear axle is called a Maxle,
and it’s very similar to the new
through axle fork axles.
The derailleur hanger is different
than the one found on the Mojo
Carbon, Mojo SL, and Tranny.
Replacements are available via your
Ibis retailer or in the online Ibis store.
Depending on date of manufacture,
the Mojo HD could have a 135mm
or 142mm Maxle, easy to determine
with a measurement. The Mojo SL-R
has a 142mm x 12mm Maxle.
Tire Clearance
The Mojo HD will fit tires up to
685mm (26.95”) in diameter and
most tires up to 2.5” width. Please
note that there really isn’t much of a
standard for measuring tire width,
so not all 2.5” or smaller tires will
fit. (We’ve found width has little to
do with height.) The rim width will
also affect the fit; wider rims tend
to make the tires a bit larger in
diameter.
Bottlecage
There are two heavy duty Riv–Nut
inserts on the underside of the
down tube of all of the Mojos to
allow the mounting of a bottle
cage. We’ve put it there primar-
ily for a spare water bottle, a tool
kit or for a battery if you’re night
riding.
Please do not attempt to retrieve a
water bottle from this cage location
during riding!
There are extra long socket head
screws provided for you use in
these holes. They are longer than
your average screw. We suggest
using a heavy–duty cage for hold-
ing batteries since the lighter weight
cages don‘t seem to hold up to this
sort of abuse.
Head Tube Angle
140mm Fork
69°
68.5°
68.5°
150mm Fork
68.5°
68°
68°
160mm Fork
67.5°
67°
67°
180mm Fork
n/a
n/a
Mojo SL
Mojo HD140
Mojo HD 160
Low Speed, Tight And Twisty, Technical High Speed, Steeps, Jumps
66°
Bike Set-Up Tips and Tricks
Head Angle Chart

1716
of the Slot Machine. Slide the rear
end onto the frame, then assemble
and install the upper pivot shaft
and bolts. Smatter a healthy dose
of grease on the inside of the Slot
Machine shaft (on the threads) and
insert it through the Slot Machine.
Assemble the gray Slot Machine
bolt with the small steel washer,
followed by the larger aluminum
washer. Thread the bolt in, but
don’t tighten it to fighting specs all
the way quite yet. After building
the complete bike, put it on the
ground with the Slot Machine bolt
still loose. Push down firmly on the
seat, and the chain will become
taught. Now you’re ready to torque
down the Slot Machine bolt, which
requires a good torque wrench.
Start by torquing the bolt to 15 ft
lbs. That’s a lot, so use a good,
fresh 5mm Allen wrench bit. A ball
end bit isn’t going to work for this
amount of torque.
Hold the rear brake and give the
right pedal a swift kick forward.
If this causes the chain to become
noticeably slacker, that’s ok, as
the frame may need to complete
its break–in cycle. Loosen the bolt,
re–tension the chain, and torque the
Slot Machine bolt back to 15 ft lbs.
Your Slot Machine will now stay
tight, but we recommend that you
take something better than a multi
tool on the first ride just to be safe.
Single Speed Build Suggestions
Use a single speed specific rear
hub to take advantage of a dishless
wheel build. Doing so is well worth
the effort, as it makes for a respon-
sive and durable wheel. Use a BMX
chain, a rampless chainring, and a
single speed specific cog for best
performance.
There is a single speed specific
drop out hanger replacement avail-
able in the Ibis store or installed on
the frame when originally ordered
as a single speed set-up.
The chainstays on a Tranny are
large so we recommend using a
bigger chainring and cog combo
than might be considered “normal”.
Tranny
Congrats on bringing home a
Tranny! There are a few things you
need to know to fully enjoy the ben-
efits of the design. The key element
of the bike is the adjustable chain-
stay bridge called the Slot Machine.
It is the lower junction between the
front and rear ends of the frame that
allows you to adjust the chainstay
length when configured as a single
speed and also take the frame apart
for more compact shipping.
Setting-Up with Gears
If you plan to use gears, just slide
the stays all the way forward,
tighten the main chain stay bridge
bolt to 12 ft lbs, and you’re done.
Single Speed
If the frame is new, all of the steps
in this paragraph have already
been done for you during assembly:
With the frame apart, paint a thin
film of FSA or Tacx carbon
assembly compound on the vertical
clamping surfaces on the outside
Bike Set-Up Tips and Tricks
Anything less than a 34T ring up
front and you’re apt to get noisy
chain slap–even when properly
tensioned. Bigger ring/cog combos
are smoother and more efficient.
If you want to use smaller chain
rings, you can use a neoprene
or rubber chain stay protector to
silence things.
Cable Stops
The Tranny has special cable stops
that can be removed if you’re not
using gears. The derailleur cable
stops on the top-tube are remov-
able by unscrewing the brake hose
guides and removing the derailleur
stop portions of the assemblies.
If you’re using a mechanical disk
brake you’ll need to run full housing
down the seat stay. The derailleur
stops on the right seat stay aren’t
designed to withstand brake forces,
so don’t use them as brake stops on
the left.
Bike Set-Up Tips and Tricks

18
Silk
Building a SIlk SL from a frame to a
complete bike is straightforward,
using standard practices. Be sure
to use assembly lube on a carbon
seatpost. The integrated headsets
use more preload than you might be
used to. If you hear any creaking in
the head tube area after your first
ride, simply increase the headset top
cap tension slightly, until the creak
goes away.
Try angling your brake levers in
slightly for a comfortable and
aero position on the hoods. Wear
glasses that do not intrude on your
field of vision. This is more comfort-
able for your neck and faster too
as you can hold your head lower
and still see up the road. On your
first few rides bring an Allen wrench
set with you and experiment with
the angles of the seat, bars, brake
levers etc. There is a lot to gain from
making yourself comfortable on the
bike and small changes can have a
large effect.
After you’ve got your new bike
dialed, try this technique on your next
group ride:
1. Shoot off the front using the
slingshot draft off the group, soft
pedal as they catch you with a big
reaction. Do it again in a minute or
so, then again.
2. About the 3rd or 4th time you do
this, they will give you some slack
and not chase you down right
away.
3. Gradually apply some power until
you get 150–200+ meters and
then ramp up to full pace. They will
all look at each other eventually
and wait for someone to do it and
it’s often a standoff since nobody
wants to spend that much energy.
At some point a few cross–eyed
guys may show up exhausted from
the battle that happens followed
by the bridge up.
4. Hakkalügi for added emphasis.
General Frame Information
Care for Carbon
The carbon fiber monocoque frame
is extremely strong, and should
provide years of trouble–free use,
provided you care for it properly
and don’t overly huck every 50 foot
gap you see.
Keep your bike clean and inspect
it often. Although each and every
bike gets tested at the factory for
strength, it never hurts to look at the
areas where the tubes join, where
the shocks and dropouts mount and
any other areas that may receive
stress during usage. Check for
loose bearings, headsets, shocks
and forks and such. Visually inspect
the bike before each ride and also
during each cleaning.
Carbon Assembly Compound
This stuff is grease, but with a
bunch of tiny plastic beads added.
This increases friction between
components, great for holding your
carbon seat post or handlebars in
place without excessive clamping
19
Bike Set-Up Tips and Tricks
force. While grease won’t hurt any
of our seat tubes, carbon assembly
paste works even better.
Do not use the carbon assembly
compound when installing the
headset, bottom bracket, shock,
water bottle cage, or anything that
has bearings.
Paint
There is a protective clear coat ap-
plied over the final carbon weave on
all of our gloss clear or matte clear
frames. You can repair small chips
and scratches with clear nail polish
(not supplied.) Colored frames are
painted with a high quality polyure-
thane enamel.
You should have received a small bot-
tle of touch–up paint with your colored
frame. If it’s used up or lost, you can
call and order one from us. Both of
these finishes can wear through with
repeated rubbing of cables or chain
slap. Using the set of adhesive vinyl
protectors provided to guard against
cable rub and chain slap can help
limit wear and tear on your frame.
We try to make our frame finishes
as durable as possible, but it is
impossible to test in all conditions
and against all chemicals.
Be aware that use of certain clean-
ers, lubricants, or food stuffs, includ-
ing Simple Green and Pedro’s Bike
Lust, may damage the paint. Please
note that paint damage is not cov-
ered under the warranty. Clean the
frame with mild soap and water.
Bike Set-Up Tips and Tricks
Hakkalügi
Building a Hakkalügi from a frame to
a complete bike is straightforward,
using standard practices. Be sure
to use assembly lube on a carbon
seatpost. The integrated headsets use
more preload than you might be used
to. If you hear any creaking in the
head tube area after your first ride,
simply increase the headset top cap
tension slightly, until the creak goes
away.
Use an approved fork, please call for
a current list: 831–461–1435.
Brake Set-Up:
Adjust the pads so the front of the
pad contacts first. This will help to
reduce noise and shuddering. You
can also trim trailing edge with a
razor blade if needed to stop shud-
der. Another way to improve brak-
ing performance is to make sure the
straddle cable is straight with minimal
slack. A higher straddle placement in
front improves modulation.

21
Fork Setup
20
Fork Setup Information
Read this first for a general un-
derstanding of fork set-up or skip
straight to the air pressure charts
(p. 23) if you just want to go ride.
Positive Pressure
This is the main air spring that sup-
ports your weight. Adjust the air
pressure so that you come close to
using all the travel on a typical ride.
Usually you can mimic your maxi-
mum impacts by grabbing the front
brake and pushing down HARD on
the bars. If you are getting 80–90%
of the fork’s travel doing this, your
positive air spring is in the right
range. Actual riding will often push
the fork a little further than this test.
Negative Pressure
On forks where you can adjust the
negative air spring, start with a pres-
sure close to what you ended up with
on the positive air spring and adjust
from there to your preference. More
negative spring pressure rides a bit
lower and has a smoother transition
into the first part of the travel. Less
negative spring pressure rides higher
and a bit firmer.
Low Speed Compression Damping
Low speed compression damping is
used to reduced unwanted move-
ment and over travel due to low
speed changes like out of the sad-
dle pedaling and subtle variations
in the trail that can cause wallow-
ing etc. Adjust to your preference.
Lockout
As the name implies this turns the
fork rigid (or close to it) for out of
the saddle efforts or riding on the
road. Most forks have a “blowoff”
so that the fork will move if a large
enough impact is felt. The thresh-
old or “blowoff” when the lockout
lets the fork start to move is often
adjustable. It’s called Gate in Rock
Shox parlance and Blowoff Thresh-
old in Fox’s language. Usually the
goal is to have the lockout at the
minimum setting needed to stop
the fork movement while pedaling
out of the saddle, but allowing it
to still move fairly easily when an
impact is felt.
High Speed Compression Damping
If your fork has a high speed
compression damping control,
this would usually be used to slow
things down during big hits to avoid
bottoming. It would usually be set
at the lowest level needed to avoid
bottoming out.
Rebound
Adjust the rebound so that the front
end does not bounce off the ground
after a drop off or large bump. If
adjusted too slow, the fork may “pack
down” and feel sluggish. In order
to conserve momentum and remain
compliant the suspension needs to
recover fairly quickly and push off the
back side of bumps and holes. If the
rebound is adjusted too slow, rolling
energy is lost to damping and vibra-
tion. If it is adjusted too fast the bike
will bounce after bumps and drops.
Adjust to your preference.
Fork Setup
and compression damping are all
adjusted via the knobs at the top and
bottom of the right fork leg. (Note:
rebound was moved to the bottom of
the right fork leg for 2010.)
Fox Talas 36
We supply the 160/120mm travel
version of the Talas 36. It has the
same adjustability as the Float
RLC. The air pressures required are
slightly different than the Float so
we’re reprinting them on page 23.
Fork Adjustments
The travel adjustment knob is on top
of the left fork leg. By turning it, the
fork can be set to 160mm or 120mm
of travel. Rebound, lockout, blowoff
and compression damping are all
adjusted via the knobs at the top and
bottom of the right fork leg.
(Note: rebound was moved to the
bottom of the right fork leg for 2010.)
Rock Shox Revelation Team
Rock Shox refers to two air chambers,
one being positive and the other
negative. Fill the positive air chamber
by adding air to the Schrader valve on
the top of the left leg. We have found
that the spring rate guide printed on
the left fork leg suggests air pressures
that make the fork ride significantly
too stiff for our liking. The negative
chamber uses the Schrader valve on
the bottom of the left leg. Try various
air pressures in both chambers, but it is
important to keep a higher or equal air
pressure in the positive chamber than
in the negative chamber.
Damping adjustments are on the
right fork leg. The small gold knob
adjusts the “Floodgate”. Increase the
Floodgate for maximum pedaling ef-
ficiency, decrease for maximum small
bump compliance.
The larger blue knob is the high
speed compression damper. Turn this
knob to its extreme clockwise position
and it will activate the lockout. The
red knob at the bottom of the fork is
the rebound adjuster.
Fox Float RLC
Rebound damping, lockout and com-
pression damping are all adjusted
via the knobs at the top and bottom
of the right fork leg.
Lockout and blowoff controls are
the ones on top. (Note: rebound
was moved to the bottom of the
right fork leg for 2010.) The blowoff
threshold can be adjusted so that
when the fork is locked out it will not
move during out of the saddle climb-
ing, yet still soaks up the bumps.
Fox Talas 32
Fox Talas forks feature adjust-
able travel. We supply a custom
150/130mm travel version of the
Talas 32 (The standard Talas is
150/120mm.) The rest of the adjust-
ments are the same as the Float
RLC. The air pressures required are
slightly different than the Float so
we’re reprinting them (on page 23.)
The travel adjustment knob is on top
of the left fork leg. By turning it, the
fork can be set to 150 or 130mm
of travel. Rebound, lockout, blowoff

Fork Setup
Air Pressure Charts
23
Ibis’ Handy Sag Measurer in Milimeters
22
36 Talas Air Pressure
RIDER WEIGHT
LBS
<125
125-135
135-145
145-155
155-170
170-185
185-200
200-215
215-230
230-250>
KG
<57
57-61
61-66
66-71
70-77
78-84
84-91
91-97
98-104
104-113
KG
<57
57-61
61-66
66-71
70-77
78-84
84-91
91-97
98-104
104-113
160MM
PSI
45
48
50
53
55
60
70
80
90
100
BAR
3.10
3.31
3.45
3.65
3.79
4.14
4.83
5.52
6.21
6.90
BAR
3.10
3.45
3.79
4.48
4.83
5.17
5.52
6.21
6.90
7.58
BAR
2.76
3.10
3.45
4.14
4.48
4.83
5.52
6.21
6.90
7.58
BAR
3.10
3.31
3.45
3.65
3.79
4.14
4.83
5.52
6.21
6.90
180MM
PSI
45
48
50
53
55
60
70
80
90
100
32 Float RLC Air Pressure
KG
<57
57-61
61-66
66-71
70-77
78-84
84-91
91-97
98-104
104-113
BAR
3.10
3.31
3.45
3.65
3.79
4.48
5.17
5.86
6.55
7.24
32 Float RLC Air Pressure
RIDER WEIGHT
LBS
<125
125-135
135-145
145-155
155-170
170-185
185-200
200-215
215-230
230-250>
140MM
PSI
45
50
55
65
70
75
80
90
100
110
150MM
PSI
40
45
50
60
65
70
80
90
100
110
RIDER WEIGHT
LBS
<125
125-135
135-145
145-155
155-170
170-185
185-200
200-215
215-230
230-250>
160MM
PSI
45
48
50
53
55
65
75
85
95
105
Revelation Air Pressure
RIDER WEIGHT
LBS
<140
140-160
160-180
180-200
>200
KG
<64
64-73
73-82
82-91
>91
150MM
PSI
70-90
90-105
105-120
120-135
135+
BAR
4.83-6.21
6.21-7.24
7.24-8.27
8.27-9.31
9.31+
32 Talas Air Pressure
RIDER WEIGHT
LBS KG
<125 <57
125-135 57-61
135-145 61-66
145-155 66-71
155-170 70-77
170-185 78-84
185-200 84-91
200-215 91-97
215-230 98-104
230-250> 104-113
140MM
PSI BAR
50 3.45
55
60
70
75
85
95
105
115
125
150MM
PSI BAR
55 3.79
60 4.14
65 4.48
70 4.83
80 5.52
90 6.21
100 6.90
110 7.58
120 8.27
125 8.62
3.79
4.14
4.83
5.17
5.86
6.55
7.24
7.93
8.62
Fork Setup
Sag Illustration
1.Add recommended air for rider
weight (on facing page.) Slide
o-ring unitl it rests on the wiper.
2.Sit on bike in riding position,
on level ground. Dismount without
disturbing o-ring's position.
3.Measure sag–the distance from
o-ring to wiper. Start with sag of
25% of travel and adjust to your
preference.
36 Talas Air Pressure
RIDER WEIGHT
LBS
<125
125-135
135-145
145-155
155-170
170-185
185-200
200-215
215-230
230-250>
KG
<57
57-61
61-66
66-71
70-77
78-84
84-91
91-97
98-104
104-113
KG
<57
57-61
61-66
66-71
70-77
78-84
84-91
91-97
98-104
104-113
160MM
PSI
45
48
50
53
55
60
70
80
90
100
BAR
3.10
3.31
3.45
3.65
3.79
4.14
4.83
5.52
6.21
6.90
BAR
3.10
3.45
3.79
4.48
4.83
5.17
5.52
6.21
6.90
7.58
BAR
2.76
3.10
3.45
4.14
4.48
4.83
5.52
6.21
6.90
7.58
BAR
3.10
3.31
3.45
3.65
3.79
4.14
4.83
5.52
6.21
6.90
180MM
PSI
45
48
50
53
55
60
70
80
90
100
32 Float RLC Air Pressure
KG
<57
57-61
61-66
66-71
70-77
78-84
84-91
91-97
98-104
104-113
BAR
3.10
3.31
3.45
3.65
3.79
4.48
5.17
5.86
6.55
7.24
32 Float RLC Air Pressure
RIDER WEIGHT
LBS
<125
125-135
135-145
145-155
155-170
170-185
185-200
200-215
215-230
230-250>
140MM
PSI
45
50
55
65
70
75
80
90
100
110
150MM
PSI
40
45
50
60
65
70
80
90
100
110
RIDER WEIGHT
LBS
<125
125-135
135-145
145-155
155-170
170-185
185-200
200-215
215-230
230-250>
160MM
PSI
45
48
50
53
55
65
75
85
95
105
Revelation Air Pressure
RIDER WEIGHT
LBS
<140
140-160
160-180
180-200
>200
KG
<64
64-73
73-82
82-91
>91
150MM
PSI
70-90
90-105
105-120
120-135
135+
BAR
4.83-6.21
6.21-7.24
7.24-8.27
8.27-9.31
9.31+
32 Talas Air Pressure
RIDER WEIGHT
LBS KG
<125 <57
125-135 57-61
135-145 61-66
145-155 66-71
155-170 70-77
170-185 78-84
185-200 84-91
200-215 91-97
215-230 98-104
230-250> 104-113
140MM
PSI BAR
50 3.45
55
60
70
75
85
95
105
115
125
150MM
PSI BAR
55 3.79
60 4.14
65 4.48
70 4.83
80 5.52
90 6.21
100 6.90
110 7.58
120 8.27
125 8.62
3.79
4.14
4.83
5.17
5.86
6.55
7.24
7.93
8.62

24 25
ProPedal
This is a damping system used by
Fox to minimize unwanted suspen-
sion bob. The dw–link suspension
is good at minimizing suspen-
sion bob but there are situations
where you might want to use some
ProPedal. It is turned on or off with
the simple movement of the easily
accessible blue lever at the top of
the shock. You can run the shock
open or engage the ProPedal set-
tings on any of the shocks.
2011 and Earlier RP23 (non-Kashima)
Note: We don’t usually run
ProPedal on our bikes except in
rare circumstances like riding on
the road. Choose the ProPedal
level 1, 2 or 3 by pulling out and
turning the outer blue knob on
top of the lever. If you want to
experiment with ProPedal though,
a good all around setting is #1.
If you are riding on the road or
doing a lot of out of the saddle
climbing, the #2 or #3 positions
work well.
Suspension Setup Chart
On the Fly RP23 ProPedal controls
Position 1: blue lever towards the
drive side=shock open,
no ProPedal.
Position 2: blue lever toward the
non–drive side=ProPedal level
based on dial setting 1–3.
Kashima RP23
The 2012 Kashima shocks have
Adaptive Logic, and work differ-
ently than the prior RP23's. Set
the lever to the left, and you have
the firmest ProPedal setting. To the
right is 0 (open) or ProPedal 1 or
2. The other settings are the same
as prior RP23s.
RPL
The RPL is a full lockout capable
shock. It features three adjustable
on the fly settings. This shock is
often chosen for XC racing use
due to the lockout function. Set-
ting sag and rebound damping is
identical to the RP23, mentioned
above.
On the Fly RPL ProPedal and
Lockout control
Position 1: Blue lever towards
the drive side: Shock open,
no ProPedal or lockout.
Position 2: Blue lever toward the
non–drive side: ProPedal
Position 3: Blue lever pointing
up: Shock locked out
DHX Air
The DHX air has a main air spring,
a boost chamber, a bottom out resis-
tance adjuster, a rebound adjuster,
and the option of turning ProPedal on
or off at the flick of a switch.
With all these variables it requires
more attention to be set–up properly.
Follow these guidelines to get the
most out of the DHX Air. For a much
more complete set of instructions,
follow the Fox Manual or get it from
their website:
http://www.foxracingshox.com/
fox_tech_center/manuals.html.
Mojo, Mojo SL, and SL-R Sag
We recommend starting with air
pressure in the RP23 equal to 90%
of your riding weight in pounds. You
should measure about .5” (~13mm)
of sag on the shock. Less pressure
gives a slacker seat angle and over-
all smoother ride. More pressure
gives a firmer suspension feel and
steeper seat angle and more over
the pedals riding position.
Mojo HD Sag
We recommend starting with air
pressure in the RP23 equal to your
riding weight in pounds. You should
measure about .625” (~16mm) of
sag on the shock.
Check the Sag
Sit on your bike in a normal riding
position. Reach down and slide the
o–ring up the shock shaft against
the wiper seal. Next, gently step off
of the bike taking care not to further
compress the suspension. For the Mo-
jos up to HD140, the distance from
the o–ring to the wiper seal should be
about 10–13mm for XC type riding
and 13–15mm for more gravity
oriented off road riding.
On the Mojo HD, sag should be
about 16mm for XC and 19–21mm
for gravity rides. Experiment and see
what works best for your trails and
riding style.
Adjusting Rebound
The RP23 has adjustable rebound
damping. It’s adjusted by turning
the red dial on the inside of the
ProPedal adjust lever. Turning the
dial clockwise slows the rebound,
and counterclockwise achieves
faster rebound. Generally you want
it as fast as you can set it without
getting bounced off the saddle after
a bump or drop (like riding off a
curb in the saddle.) If the rebound
setting is too slow the shock will be
partially compressed when you hit
the next bump resulting in “pack-
ing down”. Too fast and the bike
will bounce you up in the air after
bumps and drops. Adjust to your
preference.
Rear Shock Setup

2726
Rear Shock Set-Up Rear Shock Set-Up
ProPedal
On the DHX Air, ProPedal is adjusted
using the blue dial at the top of the res-
ervoir. Clockwise adjustment increases
ProPedal, and vice versa. There are 15
clicks of adjustment. Adjust it to where
you like it. There is also a blue lever to
turn the ProPedal on or off.
Bottom Out Resistance
This can be set by a knob adjuster at
the bottom of the air reservoir. There
are three rotations of adjustment
available. Start with a pressure in the
Schrader boost valve of 125 psi.
For more bottom out resistance,
turn the knob clockwise; it might
help to use a 4mm Hex key inserted
in the holes in the knob if you have
difficulty moving it by hand. With
the DHX Air, do not exceed 200 psi
and do not go below 125 psi pres-
sure in the bottom out air reservoir.
Coil Spring Shocks:
Coil shocks will work on the
Mojo HD if they have late stroke
compression control to mimic the
more progressive spring curve
of an air shock. We are offering
the excellent Fox RC4 coil shock
as a result. The RC4 is available
for the HD in the 160mm travel
configuration only.
Fitting Your Own Coil Shock
We like the Fox shocks for their per-
formance and reliability but realize
that some people might want to use
another brand. If you do, be sure
the stroke and eye to eye lengths
are IDENTICAL on the new shock,
otherwise you could be dealing
with a catastrophic frame failure.
Pertinent Specs
All Mojos use the same shock
mounting hardware:
Upper Hardware: 21.8mm wide
with an 8mm bore
Lower Hardware = 40mm wide
with an 8mm bore
Mojo HD shock: 8.5” eye to eye
2.5” shaft travel
Mojo SL shock 7.875” eye to eye
2.0” shaft travel.
MOJO, SL, HD140
PSI BAR
100 45 90 6.2 105 7.2
110 50 99 6.8 116 8.0
120 55 108 7.4 126 8.7
130 59 117 8.1 137 9.4
140 64 126 8.7 147 10.1
150 68 135 9.3 158 10.9
160 73 144 9.9 168 11.6
170 77 153 10.6 179 12.3
180 82 162 11.2 189 13.0
190 86 171 11.8 200 13.8
200 91 180 12.4 210 14.5
210 95 189 13.0 221 15.2
220 100 198 13.7 231 15.9
230 105 207 14.3 242 16.7
240 109 216 14.9 252 17.4
250 114 225 15.5 263 18.1
HD 160
LBS KG
PSI BAR
RIDER WEIGHT
RP23 Rear Shock Pressure
Spring and Rebound Balance
When you get the suspension set
up, ride around a little bit and
push down on the pedals and
bars to load the bike and note
how it feels. Does it feel balanced
front to rear? Adjust if needed.
The springy feel and return speed
should be close to the same front
and rear.

29
few things that can cause a sudden
decrease in tension. One is shifting
from a larger to a smaller chainring.
Because the ring diameter is decreas-
ing, the derailleur has more slack to
take up and it can’t do that instantly,
so while the rear derailleur is mov-
ing to the new position the chain is
momentarily de-tensioned.
Another factor that influences the
chain sticking to the chainring is to
suddenly pedal harder as the higher
chain force against the chainring
teeth can wedge the chain in place.
This works both ways, if you ease
up a bit you can actually reduce the
chain/chainring stick. If you put the
last two concepts together and ease
up a bit right as you shift then you’ll
probably have better results. Since
you usually can’t ease up like this
in the middle of a steep climb, you
should plan ahead to get front shifts
done before you need them. Your
drivetrain will thank you.
Most of what causes chainsuck is
covered in the sticky ring and chain
tension part above. Unfortunately
suspension frames are not completely
innocent. Most modern suspension
designs use chain growth to create
anti-squat and keep your bike from
bobbing. The rebound part of the sus-
pension motion shortens the distance
from BB to rear axle and creates slack
in the chain, thus reducing tension.
There’s no real way around this but if
you do everything mentioned above
it’s not usually an issue. It’s all about
managing the combination of factors,
so if you’re riding in the mud, stay
out of your granny gear if possible. If
you do have to shift down try to plan
ahead so that your suspension is not
rebounding at the same time as you
suddenly put down full power.
Sometimes the mud is just so bad
that nothing is going to help. In that
case, a single speed is the best tool
for the job!
Before we finish let’s stop to clear up
some misconceptions:
1. Low chainstays do not cause chain
suck. They can make it more difficult
to extract the chain if it gets caught
above or against the chainstay but it
is not the cause of the chainsuck.
2. Aftermarket / new parts are not a
guarantee that chainsuck will be
solved. In addition to the factors
discussed above, some chainrings
are better than others at releasing
the chain, even when new.
We have had the best luck with
Shimano and SRAM chainrings.
3. The lower roller of a dual ring chain-
guide does not help chainsuck.
It doesn’t provide any additional
spring tension and in fact is there
to keep your chain on your ring
past where it normally detaches.
Depending on the roller design,
it can increase chain suck because
the chain is forced to go through a
step on the roller at the same time
it’s being forced the other direction
on the rings. To do that the chain
has to twist in a small space and
that increases the chance of the
chain sticking to the ring.
OK, that’s it! If you don’t master the
techniques explained above on the
first ride, don’t worry, it will come
with a little practice!
28
The Dark Art of Shifting in Mud:
How to Avoid Chainsuck.
“Chainsuck” is when your chain does
not detach correctly from the bottom
of your chainring, and instead wraps
around the ring until something jams.
Chainsuck happens when the force
provided by the rear derailleur is less
than the force causing the chain to
stick to your chainring. There are many
ways to reduce chainsuck, but they can
be broken down into two categories:
1. Preventing the chain from sticking to
the ring.
2. Maintaining chain tension while
riding.
Let’s start with the chain sticking to ring
past the correct departure point.
The most important thing you can do is
to keep your drivetrain clean and your
chain lubed. Even if you do nothing
else to your bike, you should at least
wipe the chain down with a rag and
put some lube on either before or after
almost every ride. If it’s wet out then
use a wet lube, like Finish Line Wet
Lube or Pedros Synlube. Sometimes it’s
necessary to actually clean and lube
the chain during a ride.
Another cause of sticking is a worn
drive train, particularly if your
chainrings are more or less worn than
your chain. Drivetrains work best when
they wear together as a unit. If it’s time
for a new chain, then be sure to care-
fully check your rings. Another thing
that causes chains to stick is mud.
It all depends on what type of mud
you have, but if the drivetrain gets too
dirty, the chain is going to start sticking
and it will take careful chain manage-
ment to keep it from sticking.
That brings us nicely to the next part;
maintaining chain tension. Let’s as-
sume that your chain is the minimum
length needed to go around the big
chainring and large cog at bottom out
(standard full suspension chain length
spec.) The more tension you have pull-
ing the chain off the chainring, the less
likely the chain will become stuck to
the teeth. The component that provides
this chain tension is the rear derailleur.
However, the derailleur’s pulling force
is not always the same. It pulls less in
smaller gears and more in larger ones.
That means you should use your small
chainring as little as possible. If you’re
in the small ring and more than three
or four gears down from the top of the
cassette then it is time to shift back into
the middle ring for a larger diameter
gear combination. For example,
instead of running a 22 front 24 rear,
run the 32 front 34 rear for the same
ratio but much higher tension.
Another way to increase your average
chain tension and still use the small
ring is to remove the big chainring and
shorten the chain accordingly. This
will provide significantly more chain
tension. If you’re trudging though sticky
mud you probably don’t need that
high of a gear.
A final trick is to tighten your rear
derailleur’s B tension screw a few
more turns than normal to increase
your derailleur’s spring force. This nice
write up from Park Tool tells how to do
that: http://www.parktool.com/blog/
repair-help/rear-derailler-adjustments-
derailleur
Now that you’ve got your average
tension up a few notches, there are a
A Note on Chainsuck A Note on Chainsuck

30 31
Maintenance Maintenance
Working on your Mojo SL, SL-R, HD
The link assemblies on the Mojos
are designed to be easily removed
and replaced. Be sure to purchase
a fresh link set before removing the
old ones to skip any downtime. There
are no bearings to press out, nor any
axles to hammer. New Lopes Link
(upper) and lower pivot assemblies
are available in the buy section of
our website, or you can have your
dealer order them from Ibis for you.
Replacement is super simple and
requires these common tools:
• 2x 4mm Allen wrenches
• 2x 6mm Allen wrenches
• 2x 5mm Allen wrenches
• Loctite 242 blue thread locker or
anti–seize (depending on model
of bike)
Linkages
The upper and lower links for the HD
are more robust versions of the ones
used on the original Mojo and Mojo
SL. Please don’t try to mix and match
them. It looks like they might fit but they
are not interchangeable. Removal and
installation procedures are identical.
Please refer to the section on Mojo SL
and Mojo Carbon link maintenance in
this manual (PP 38–39.)
Bearing Replacement:
If you’re handy with a bench vice
and have a good supply of sockets,
you can attempt the replacement of
the bearings in the Lopes Link and
lower link yourself. While we don’t
have step–by–step instructions, you
are welcome to purchase the bear-
ings and try it yourself. New links with
bearings installed are available in
the Ibis webstore as well. The current
version of the Mojo SL lower link has
been extensively redesigned and
provides a 100% increase in torsional
stiffness along with a 7.5% increase
in lateral stiffness. You may want to
consider this upgrade rather than
replacing your bearings.
Bearing Specs:
Mojo, Mojo SL, SL-R Lower Link
• Front: 15 ID x 28 OD x 7 W
(Enduro P/N 6902 2RS)
• Rear: 10 ID x 22 OD x 6 W
(Enduro P/N 6900 2RS)
Mojo, Mojo SL, SL-R Upper Link
• 608 2RS 8 ID x 22 OD x 7 W
(Enduro P/N 608 2RS MAX)
Mojo HD Lower Link
• Front: 15 ID x 26 OD x 10 W
Dual Row Angular Contact
(Enduro DR 1526 RS)
• Rear: 15 ID x 28 OD x 7 W
(Enduro P/N 6902 2RS)
Mojo HD Upper Link
• 608 2RS 8 ID x 22 OD x 7 W
(Enduro P/N 608 2RS MAX)
You can find bearings used on the
Mojo here:
www.endurobearings.com/bicycle/
enduro_bearings.html on the
Enduro website. Here’s the direct
link to the Ibis Mojo/SL bearing kit:
www.enduroforkseals.com/id245.
html
The kit includes bearings for the
upper and lower links.

Frame Hardware
Mojo SL
3332
Frame Hardware
Mojo HD
hd front triangle
hd rear triangle
203802 front lower pivot bushing
203804 upper pivot bushing
203806 seat post sleeve
203807 m8 swingarm insert
203831 lower shock piv lhs
203832 lower shock piv rhs
203888 upper shock pin
00-4325 2.4 x.9.5 stainless rivet
00-5330 m3 nut insert
00-5433 m4 rivnut
00-5533 m5 riv nut
00-7508 m5x8 shcs
00-7860 m8x60 shcs
00-8408 m4x8 bhcs
00-8816 m8x16 bhcs
00-9597 m5 washer
03-150 der cable stop
04-010 upper ht cup
04-030 lower ht cup
04-100 hd cable guide
04-210 r 6.3 shock mount
04-220 shock mount pin
04-230 l 6.3 shock mount
04-400 hd upper link
04-500 hd lower link
04-520 lower pivot shaft
04-530 lower pivot nut
04-590 lwr piv bushing sa
04-600 bb shell
04-650 chainsuck plate
04-670 bash guard
04-810 r rear dropout
04-815 carbon drop insert
04-820 deraileur hanger
04-860 l rear dropout
608-2rs upper link bearings
6902rs rear lower link bearings
qr seat collar
99-001 ibis head badge
99-825 chainring bolt
99-826 chaninring nut
dr1526llb angular contact bearing
203784-brace-upperlink-ibis
203812-shaft-pivot-lower-ft
203813-nut-piv-shft-lwr-ft
203818-assy-ft-large
203826-assy-swingarm
203828-lwrlink-m6-washer
203830-bolt-button-m8
203888-pin-upper-shockeye
203889-washer-m6-immt
203894-m6-pin-lwrlnk-sa
bolt-m8x60-shcs
ibis-assy-lwrlink
ibis-assy-uprlink
m5-lo-shcs-bolt
seat-binder
shock-reducer-fox-uprpiv
203812-shaft-pivot-lower-ft
203813-nut-piv-shft-lwr-ft
203818-assy-ft-large
203826-assy-swingarm
203828-lwrlink-m6-washer
203830-bolt-button-m8
203888-pin-upper-shockeye
203889-washer-m6-immt
203894-m6-pin-lwrlnk-sa
203925-chainsuck-plate
bolt-m8x60-shcs
ibis-assy-lwrlink
ibis-assy-uprlink
m5-lo-shcs-bolt
seat-tube insert
shock-reducer-fox-uprpiv
seat-binder

3534
Frame Hardware
TRANNY FRONT TRIANGLE
TRANNY REAR TRIANGLE
00-5323 M3 NUT INSERTS
00-5557 WATER BOTTLE RIVNUTS
00-7508 M5 SHCS
00-7516 WATER BOTTLE BOLTS
00-8308 M3x8 BHCS
03-010 HEADSET CUP UPR
03-030 HEADSET CUP LWR
03-120 TT BR GUIDE
03-130 TT DR GUIDE
03-150 SEAT STAY GUIDE
03-160 SS BR GUIDE
03-400 UPPIV PIN
03-410 UPPIV WASHER
03-500 LWPIV SHAFT
03-510 LWRPIV WASHER
03-550 FRAME BOX STIFFENER 03-600 TRANNY BB SHELL
03-650 CHAINPLATE
03-660 CHAINSTAY PROTECTOR
03-665 SEATSTAY PROTECTOR
03-805 NUT DER MALE
03-806 NUT DER FEMALE
203806 SLEEVE SEATPOST
203810 DER HANGER
204168 INSERT BR CRDROP
204197 AXLE PLATE CRDROP
204303 M6x15 SHCS
204336 UPPIV FRAME
204338 CRDROP RHS
204339 CRDROP LHS
204384 SEAT BINDER SL
204386 SEAT BINDER BOLT SL
99-001 IBIS HEAD BADGE
tranny front triangle
tranny rear triangle
00-5323 m3 nut inserts
00-5557 water bottle rivnuts
00-7508 m5 shcs
00-7516 water bottle bolts
00-8308 m3x8 bhcs
03-010 headset cup upr
03-030 headset cup lwr
03-120 tt br guide
03-130 tt dr guide
03-150 seat stay guide
03-160 ss br guide
03-400 uppiv pin
03-410 uppiv washer
03-500 lwpiv shaft
03-510 lwrpiv washer
03-550 frame box stiffener
03-600 tranny bb shell
03-650 chainplate
03-660 chainstay protector
03-665 seatstay protector
03-805 nut der male
03-806 nut der female
203806 sleeve seatpost
203810 der hanger
204168 insert br crdrop
204197 axle plate crdrop
204303 m6x15 shcs
204336 uppiv frame
204338 crdrop rhs
204339 crdrop lhs
204384 seat binder sl
204386 seat binder bolt sl
99-001 ibis head badge
Mojo SL-R
203812-shaft-pivot-lower-ft
203813-nut-piv-shft-lwr-ft
203818-assy-ft-large
203826-assy-swingarm
203828-lwrlink-m6-washer
203830-bolt-button-m8
203888-pin-upper-shockeye
203889-washer-m6-immt
203894-m6-pin-lwrlnk-sa
bolt-m8x60-shcs
ibis-assy-lwrlink
ibis-assy-uprlink
m5-lo-shcs-bolt
seat-tube insert
seat-binder
99-820 142 deraileur hanger
02-650 chainsuck plate
Frame Hardware
Tranny

36
Frame Hardware
Torque Specs
37
Dramatic Pause

3938
Step 1
Put your freshly cleaned Mojo in a
work stand. Remove the front derail-
leur, cranks, and the rear wheel.
Remove the shock by removing the
shock bolts with two 4mm and one
6mm Allen wrench.
Step 4
Next, remove the axle in the lower
link that passes through the front tri-
angle with two 6mm Allen wrenches.
This might take some force since we
use Loctite on this interface.
Step 2
Using a 5mm Allen wrench, remove
all four 5mm bolts that hold the
upper link to the swingarm and
front triangle. Since the strut on
the swingarm blocks access to the
final bolt, rotate the swingarm up to
remove that last 5mm bolt.
Step 5
Remove this main pivot axle.
Pull the swingarm and the lower
link away from the front triangle.
Step 3
Remove the upper link from the
front triangle. It will help to slightly
spread apart the stays of the swing-
arm while you remove the link.
Step 6
Remove the axle in the lower link
that passes through the swingarm
using two 5mm Allen wrenches.
*To reassemble your bike,
follow the steps in reverse order.
Remember to use a little Loctite
blue thread locker on all steel and
aluminum fasteners, and to use
anti–seize on all titanium fasteners.
Mojo Swingarm Removal Mojo Swingarm Removal
This manual suits for next models
4
Table of contents
Other ibis Bicycle manuals