ibis SilkTi Quick start guide

Frame Tuning Guide
Ibis SilkTi

SilkTi Technology
You’ve just purchased the finest softtail ever built. The SilkTi has numerous
features which combine to give you an extremely comfortable high performance
ride. The SilkTi is in a class of its own, with nearly double the travel of typical
softtails, and plushness similar to heavier cross-country linkage suspension
bikes.
In order to attain long travel, superior front end torsion and excellent lateral
rigidity, the SilkTi has a highly evolved and integrated system of components
and features. To maximize the performance and pleasure you experience while
riding your SilkTi, we recommend you familiarize yourself with the frame and
its features by reading through this guide, and spending an appropriate amount
of time on setup and tuning.
And don’t forget to activate your warranty!
Table of Contents
Key Components pg 3 Reassembly pg 8
Shock Tuning Guidelines pg 4-5 Shock Diagram pg 9
Lubrication pg 6 Parts List pg 10
Disassembly pg 7 Warranty pg 11
Quick Guide
Impatient are we? Although we recommend you read this manual in its entirety,
here is the quick and dirty tuning guide:
Step 1—Set the sag of the shock (the amount of travel you see when you sit
on the saddle without moving) to 0.4-0.6 inches. Adjust the sag with a
Shimano (TL-UN74S) or Park (BBT-2) BB tool or with either a 19mm or
3/4” socket by turning the preload adjuster (part # 12 pg. 9) at the
bottom of the shock. Righty tighty increases spring force/decreases sag.
Step 2—Ride the bike for a few hours to allow the springs (part #9 pg. 9) to set.
Step 3—Check sag occasionally, as the springs will continue to find their
groove thang.
Step 4—Lube the shock every 20 hours of riding (or as needed) by pulling
up the shock boot and injecting each of the two chamfered holes with
SRAM Jonnisnot®. You’re finished when you see lube coming out of the
non chamfered holes. DO NOT USE ANY OTHER LUBES
Step 5—Ride 2

Key Components
Chainstays
Perhaps the most striking and technologically unique feature of the SilkTi is
the flat chainstay. This structure is able to provide significant vertical move-
ment and lower levels of stress than round stays. Since our flat stay is only
.25” tall, for a given amount of travel the plate has one third the bending
stress of a .75” round tube. The result is our stay can provide nearly double the
travel seen on other softtails with far less stress. As with any spring—and our
chainstay is essentially a leaf spring—low stress means long life.
The chainstays are designed as a planar truss to increase lateral stiffness. In
fact, the SilkTi chainstays are 50% stiffer side-to-side than the round
chainstays used on other softtails.
The CDE Shock
Due to the SilkTi’s significantly increased suspension travel, we needed to
design a shock absorber appropriate to the application. As a result, the SilkTi
uses our Critically Damped Elastomer shock, a simple engineering marvel with
few moving parts. It is reliable, lightweight, user-friendly, and provides
excellent travel with minimal maintenance.
In the first part of its travel, the CDE shock is supple and undamped, which
allows it to be very active on small amplitude/high frequency bumps (small
bumps). On higher amplitude/low frequency bumps (the big hits) the shock
becomes progressively stiffer and the damping kicks in. The purpose of the
damper is to absorb bump energy to keep you on the bike and the tire on the
ground. Most short travel softtails leave out the damper. But a good damper is
critical to performance particularly as travel increases.
Das Boot
Because we like to build bikes that last a long time and require minimal
maintenance, we’ve built the SilkTi shock as a sealed system. Since there is a
large change in air volume inside the shock when the shock goes through its
range of motion, we needed to design a shock boot that absorbs all the excess
air without ballooning and trying to suck nasty stuff into its nicely sealed inner
environment. Using a bunch of fancy math that most of us forget after our last
calculus final, we’ve designed a custom boot that accomplishes this goal.
3

Tuning and Maintenance
Shock Tuning Guidelines
The SilkTi provides a wide range of adjustment based on rider weight, size of
bike and personal rider preference. The primary adjustment you need to make is
to add preload for heavy riders, or back it off for light riders.
Ibis offers tuning kits with softer and stiffer springs, and you are invited to
call us any time for help in tuning.
The factory-set spring configuration for the SilkTi is measured with the adjuster
(part # 12 pg. 9) mid-travel (factory preload settings on next page). Turning
the adjuster out two turns will give you the light preload (left picture below),
and turning the adjuster in two complete revolutions will provide you with the
heavy preload configuration (right picture below). There are 4 complete turns
of adjustment available on the shock, each corresponding to approximately 10
pounds of rider weight adjustment.
Note: Do not adjust farther than the two extremes (4 turns apart). You will
know when you are at either extreme by a visual inspection of the adjuster. If
the bottom of the adjuster is flush with the bottom of the titanium shock
mount (2" diameter piece) you are at maximum preload. The adjuster won’t
turn any further. If you need more preload, first use a new supple spring (part
# 3 pg. 9), and then use harder main spring discs (part #9 page 9).
If you begin to see the o-ring groove on the side of the adjuster, you are at the
minimum preload setting. If you are not getting enough sag and you are at
this setting call us to get softer spring discs.
Minimum Shock Preload Maximum Shock Preload
4

Initial Set Up
Use the following table as a guideline for setting up the SilkTi for the first
time, and then go put a few hours riding on the bike. The numbers in the boxes
represent the rider’s weight. If you fall outside of these weights, contact Ibis
for different shock tuning set-ups.
eziSemarFdaolerPthgiL )snrutowtsunim( daolerPyrotcaF )levart-dim( daolerPyvaeH )snrutowtsulp(
llamS.sbl041-031.sbl061-041.sbl071-061
muideM.sbl061-051.sbl081-061.sbl091-081
egraL.sbl081-071.sbl002-081.sbl012-002
Breaking In The Shock
Important: The microcellular polyurethane springs in the SilkTi shock will
actually take some time to break in and take a set. Four hours of riding will be
adequate to set the springs. Once the sag has been set after the break in
period, heavier and more aggressive riders should check the sag every couple of
months.
Measuring and Setting Sag
After your break-in period you’ll need to adjust the sag. When you sit on the
bike, the shock should sag 0.4-0.6". You can fine-tune the shock to provide
the appropriate sag.
To measure the sag, we recommend
using a tape measure to record the
unsagged distance between the rear
axle and the seat post bolt (see
photo). Now sit on the bike in your
riding position, bounce up and down a
couple times gently to make sure you
get an accurate reading, and have
someone and re-measure the distance.
The difference between the first and
second measurement is known as the
sag. To increase the sag, turn adjuster
screw counter-clockwise. Clockwise
adjustment decreases sag (duh).
Setting the Sag
5

Lubrication
Rules number 1, 2, 3, 4 and 5: Do Not Mix Lubes
The SilkTi comes factory lubed with SRAM Jonnisnot Silicon based lubricant. It
comes in a syringe, and the SilkTi shock sleeve lube port is designed to be
lubricated using this syringe.
Please do not use any other lubricants, use only SRAM Jonnisnot.
Polyalaolephin based lubes attack polyurethane, and will ruin the springs! Also,
mixing of lubes can result in unknown and possibly detrimental reactions, skin
rash, bloated feelings general melancholy and a tendency to vote across party
lines.
1—Use only SRAM Jonnisnot (available at bike shops and from Ibis)
2—NEVER mix lubricants.
3—Cut off all but 1/2”of the
Jonnisnot syringe tip.
4—Clamp the seatpost in a bike
repair stand, getting all weight
off the rear wheel of the bike.
Using your hands, pull the
shock apart so the shock is at
maximum extension. This will
align the lube ports with the
chamfers on the damper discs.
5—Lift the bottom of the shock
boot up, revealing the lube
ports. The two chamfered holes
are for lube injection, the non
chamfered holes are for
verifying lube penetration.
6—Inject grease into the lube
ports until it comes out the
adjacent ports. This will take
considerable pressure on the
syringe, and approximately 30 seconds of injection to fill the shock.
(Note: If you run a lot of preload and are unable to inject grease, it’s
likely that the lube ports are misaligned with the damper disc chamfers.
Loosen the shock adjuster until you are able to inject grease. Reset the
preload when you are done.)
7—Wipe away any excess grease and replace the shock boot.
Lubing with Jonnisnot
6

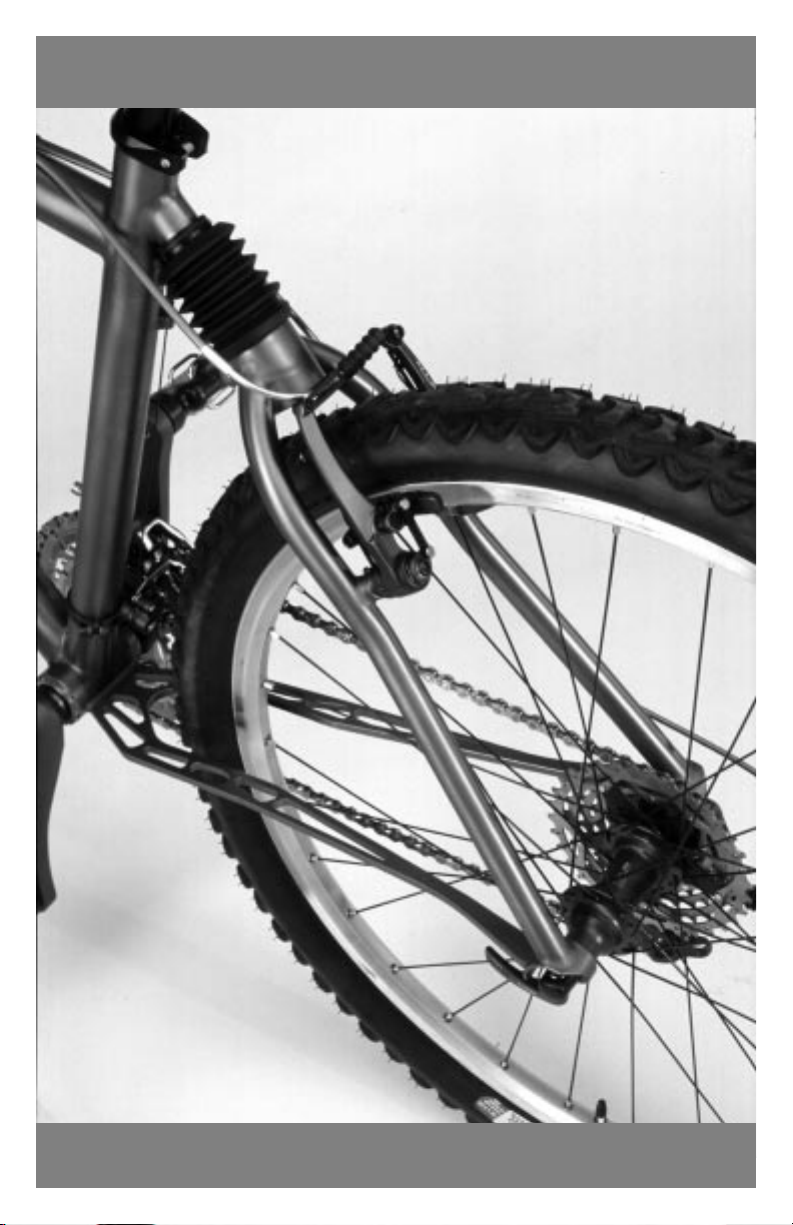
Burping Das Shock Boot
It’s no accident that the shock boot is not held on with zip ties. Unless you’re
in a nasty environment with lots of mud or dust, you don’t need to zip tie the
boot to the frame. Once the boot is set into place, it will find its own length
without any intervention by the user.
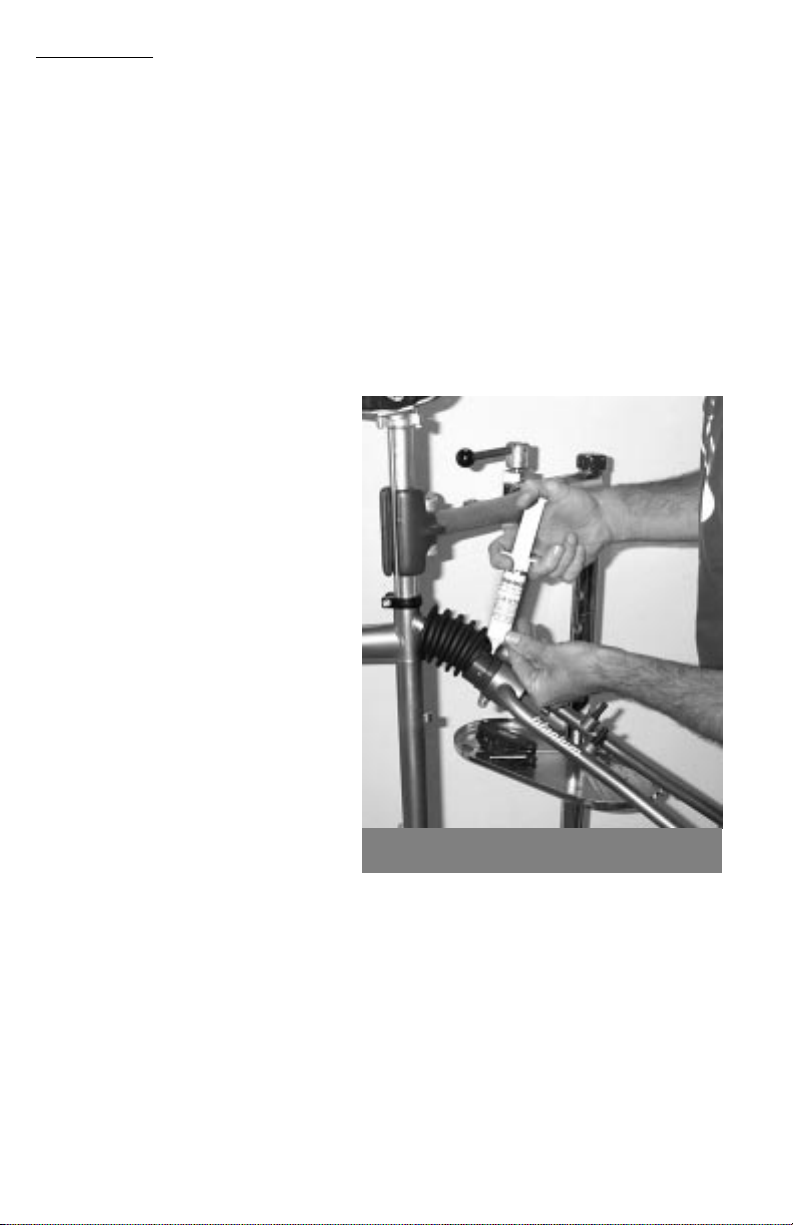
If you would like to zip tie the boot, there are a couple of steps you to follow.
1—Set the over all boot length to 3.1 inches end to end.
2—Pull up the one end of the boot slightly to allow equilibrium between the
inside and outside air. The technical term for this is “burping the boot”.
3—Zip tie
Following these three steps will allow proper expansion and contraction of the boot.
Disassembly
To simply lube the shock, you do not need to disassemble the shock. Instead,
go to the lube instructions above. Should you wish to disassemble the shock
for cleaning or replacement of any parts, use the following instructions:
1—When working on the SilkTi shock, always use a bicycle repair stand,
and clamp the seatpost, not the frame. When the shock is disas-
sembled, the plate chainstays could be vulnerable to damage if you
do not perform these steps properly.
2—After placing the bike in the stand, remove the rear wheel.
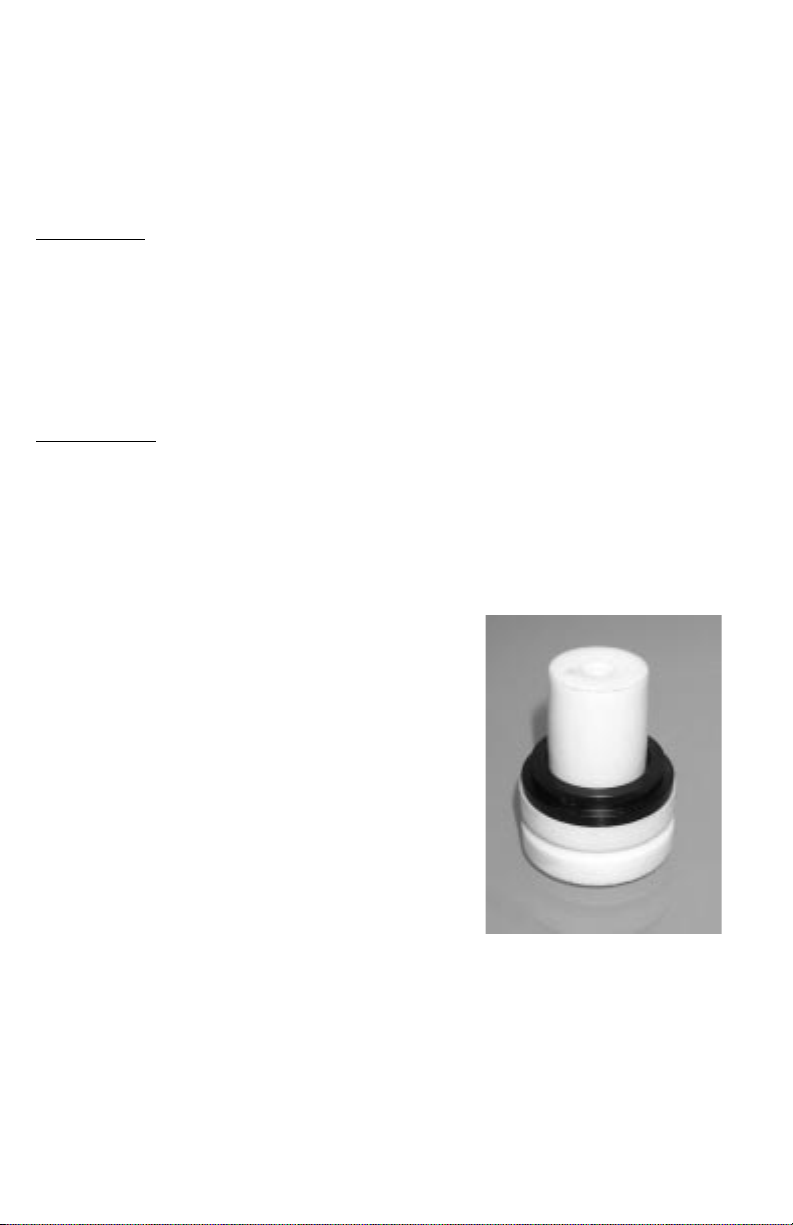
3—Unscrew adjuster (part #12 pg. 9) all the way, using a Shimano (TL-
-UN74S) or Park (BBT-2) BB
tool. You may also use a 19mm
or a 3/4”socket wrench to
remove the adjuster.
4—Remove the main spring discs
(part #9 pg. 9). The last of the
four discs can be coaxed out by
compressing the shock by hand
slightly. If you are replacing
the main spring discs only,
proceed to reassembly step 5.
5—Remove the central bolt (part
#8 pg. 9) with a 5mm hex (aka
allen wrench). You may need to
compress the shock slightly to
reach the bolt head with the
wrench.
6—Slide the boot off the shock
Removing the Upper Stack
7

Removing
the Upper
Stack
sleeve (part #2 pg. 9)
7—Push upper shock assembly out (pg 7). If you are replacing any part of the
upper shock assembly, not the main springs, proceed to reassembly step 4.
8—Slide the boot off the frame.
9—Loosen the pinch bolt on the frame and remove the aluminum shock
sleeve, taking care not to spread the frame apart.
Inspection
While the shock is apart, Inspect the boot for cracks or holes, replace if
necessary. Also check the shock sleeve for gouges or worn anodization. Small
longitudinal scratches along the shock inner bore will not affect performance,
large gouges will. Replace if necessary. Inspect the main shock springs and
upper shock parts for bulging or cracks, and inspect the delrin guide and inner
sleeve for wear or damage. Replace worn components.
Reassembly
1—Using a cloth, clean all the parts you are reassembling, including threads
in shock sleeve and adjuster. Do not use solvents, as they could attack
the spring material.
2—Slide shock sleeve into frame, tighten pinch bolt to 65 inch pounds.
3—Slide boot onto 1" frame stub.
4—Upper Stack:
a) Spread a small amount of lube on the inside
bore of the supple spring and damper discs. You
can tell the difference between the damper discs
and the spring discs by the chamfer found on
one edge of the damper discs. The springs have
no chamfer.
b) Insert inner sleeve 3/4 of the way into the
supple spring.
c) Install the Delrin guide.
d) Slide the two damper discs onto inner sleeve,
with chamfers facing each other (right).
e) Remove excess lube from each end of inner
sleeve, use q-tip to remove from lube from inside
the supple spring.
Important: Be sure to remove excess grease or Loctite will not adhere.
f) Lube the outside surface of the damper discs liberally and reinsert stack
g) Apply light grade thread lock (Loctite®Threadlocker 242) to first half
inch of central bolt threads, insert and tighten to 75 inch pounds.
Important: this is a critical measurement, and improper torque can
cause failure of the shock bolt.
Upper Stack
8

5—Lubricate the outside of the main spring discs, insert.
6—Pull down on shock to release pressure and thread in shock adjuster. You
should be able to turn two full turns by hand before needing to use the
wrench.
7—Set the preload and sag as mentioned above.
8—Ride. A lot.
9
Shock Diagram
What They’re Called
1—Shock Boot
2—Shock Body
3—Supple Spring
4—Delrin Guide
5—Damper Discs (2 required for each shock)
6—Inner Sleeve
7—Center Bolt Washer
8—Center Bolt
9—Main Spring Discs (4 needed for each shock)
10—Bottom Out Bumper
11—O-Ring
12—Adjuster

Ordering Parts
To keep you SilkTi all dressed up and looking good, we’ve got replacement
parts, tuning kits, and lots of friendly advice. Use the following part numbers
for ordering replacements. Call us for the advise.
metI srebmuNtraPsibI
ydoBkcohSEVEELSKCOHS-RAZ
eveelSrennIEVEELSRENNI-RAZ
retsujdARETSUJDA-RAZ
ediuGnirleDNIRLED-RAZ
tloBretneCTLOBRETNEC-RAZ
rehsaWtloBretneCREHSAW-RAZ
gnirpSelppuS06.LYCUCM-RAZ
)dedeen2(csiDrepmaDREPMADUCM-RAZ
)kcohshcaerofdedeen4(csiDgnirpSniaM
thgiLartxE-csiDgnirpSLERPSUCM-RAZ
thgiL-csiDgnirpSLRPSUCM-RAZ
)dts(deM-csiDgnirpSMRPSUCM-RAZ
yvaeH-csiDgnirpSHRPSUCM-RAZ
yvaeHartxE-csiDgnirpSHERPSUCM-RAZ
gniR-OGNIR-O-RAZ
tooBTOOBKCOHS-RAZ
ebuLtonsinnoJMARSTONSINNOJ-RAZ
looTS47NU-LTonamihS47NULOOTJDA-RAZ
teslaceDREBMUNTRAPON
egdaBdaeHEGDABDAEH-XX
ralloCtaeSMRALLOC-XX
10

Ibis Lifetime Warranty
IMPORTANT –PLEASE READ:
YOU MUST ACTIVATE YOUR NEW PRODUCT WARRANTY WITHIN 14 DAYS OF
PURCHASE BY CALLING IBIS AT 800-283-0943 OR BY VISITING OUR
WEBSITE: www.ibiscycles.com/warranty
Lifetime Limited Warranty on Bicycle Frames
Subject to the limitations, terms and conditions set forth below, Ibis warrants
to the original owner of each Ibis frame that, when new, the frame is free of
defective materials and workmanship. This Lifetime Limited Warranty (“War-
ranty”) covers Ibis Bicycle frames for the lifetime of the frame. This Warranty
does not apply to paint/finish or components attached to the frame such as
front forks, wheels, drive train, brakes, seatpost, handlebar and stem or any
suspension related parts or components.
Warranty Conditions
In order to initiate coverage under the Warranty, the original owner must
register with Ibis within 14 days of purchasing the frame. In order to exercise
a claim under the Warranty, the frame must be presented to an authorized Ibis
dealer, together with a receipt, or other proof of purchase which identifies the
frame by serial number. Should the frame be determined by Ibis to be covered
by this Warranty, it will be repaired or replaced, at Ibis’s sole option, which will
be conclusive and binding. If repaired or replaced, the original owner will
receive a credit towards the cost of such repair or replacement based on the
number of years since original purchase of the frame, according to Ibis’
standard warranty schedule. This Warranty does not include the cost of travel
or shipment to and from an authorized Ibis dealer or Ibis factory. Such costs,
if any, shall be born by the original owner.
This Warranty does not apply to normal wear and tear, nor to claimed defects,
malfunctions or failures that result from abuse, neglect, improper assembly,
improper maintenance, alteration, collision, crash or misuse. This frame has not
been designed, engineered, distributed, manufactured, or sold for uses in trick
riding, ramp riding, jumping, aggressive riding, riding on severe terrain, riding
in severe climates, riding with heavy loads, commercial activities, or any
similar activities. Such uses may damage the frame, can cause serious injury to
the rider, and in all cases will void this Warranty.
This Warranty is made only to the original owner of a new Ibis Bicycle frame
purchased from an authorized Ibis dealer. This Warranty is not transferable.
11

Owner’s Responsibility and Proper Maintenance
All Ibis Bicycle frames should be periodically checked by an authorized Ibis
dealer for indicators of stress and/or potential failure, including cracks,
deformations, corrosion, paint peeling, dents, and any other indicators of
potential problems, inappropriate use, or abuse. These are important safety
checks that can help prevent accidents, bodily injury to the rider and shortened
product life of an Ibis frame. This Warranty does not cover malfunctions or
failures caused by delay in bringing a problem or potential problem to the
attention of Ibis or an authorized Ibis dealer.
Please fill in the following information:
Frame Numbers:
Size __________________________ Where Purchased __________________
Serial Number __________________ _______________________________
Date purchased _________________ _______________________________
Tuning Info:
Once you’ve tuned your bike, we recommend you jot down your settings for
future reference, and reording of components.
Date Tuned ____________________
Adjuster Preload Setting, turns (0 being in the middle, factory preset).
-2 -1 0 +1 +2
Sag Setting ____________________ Rider Weight _____________________
And a final reminder, did you contact Ibis to complete your warranty registra-
tion? Hint: www.ibiscycles.com/warranty or call us.
Contact Information
Ibis LLC
5850 Commerce Blvd. Suite D
Rohnert Park, CA 94928
800-283-0943
707-588-5852
707-588-8047 (fax)
info@ibiscycles.com
www.ibiscycles.com
Table of contents
Other ibis Bicycle manuals