manuals.online logo
Brands
  1. Home
  2. •
  3. Brands
  4. •
  5. Ibiza
  6. •
  7. Lighting Equipment
  8. •
  9. Ibiza 15-1025 User manual

Ibiza 15-1025 User manual

© Copyright Lotronic 2011 © Copyright Lotronic 2011
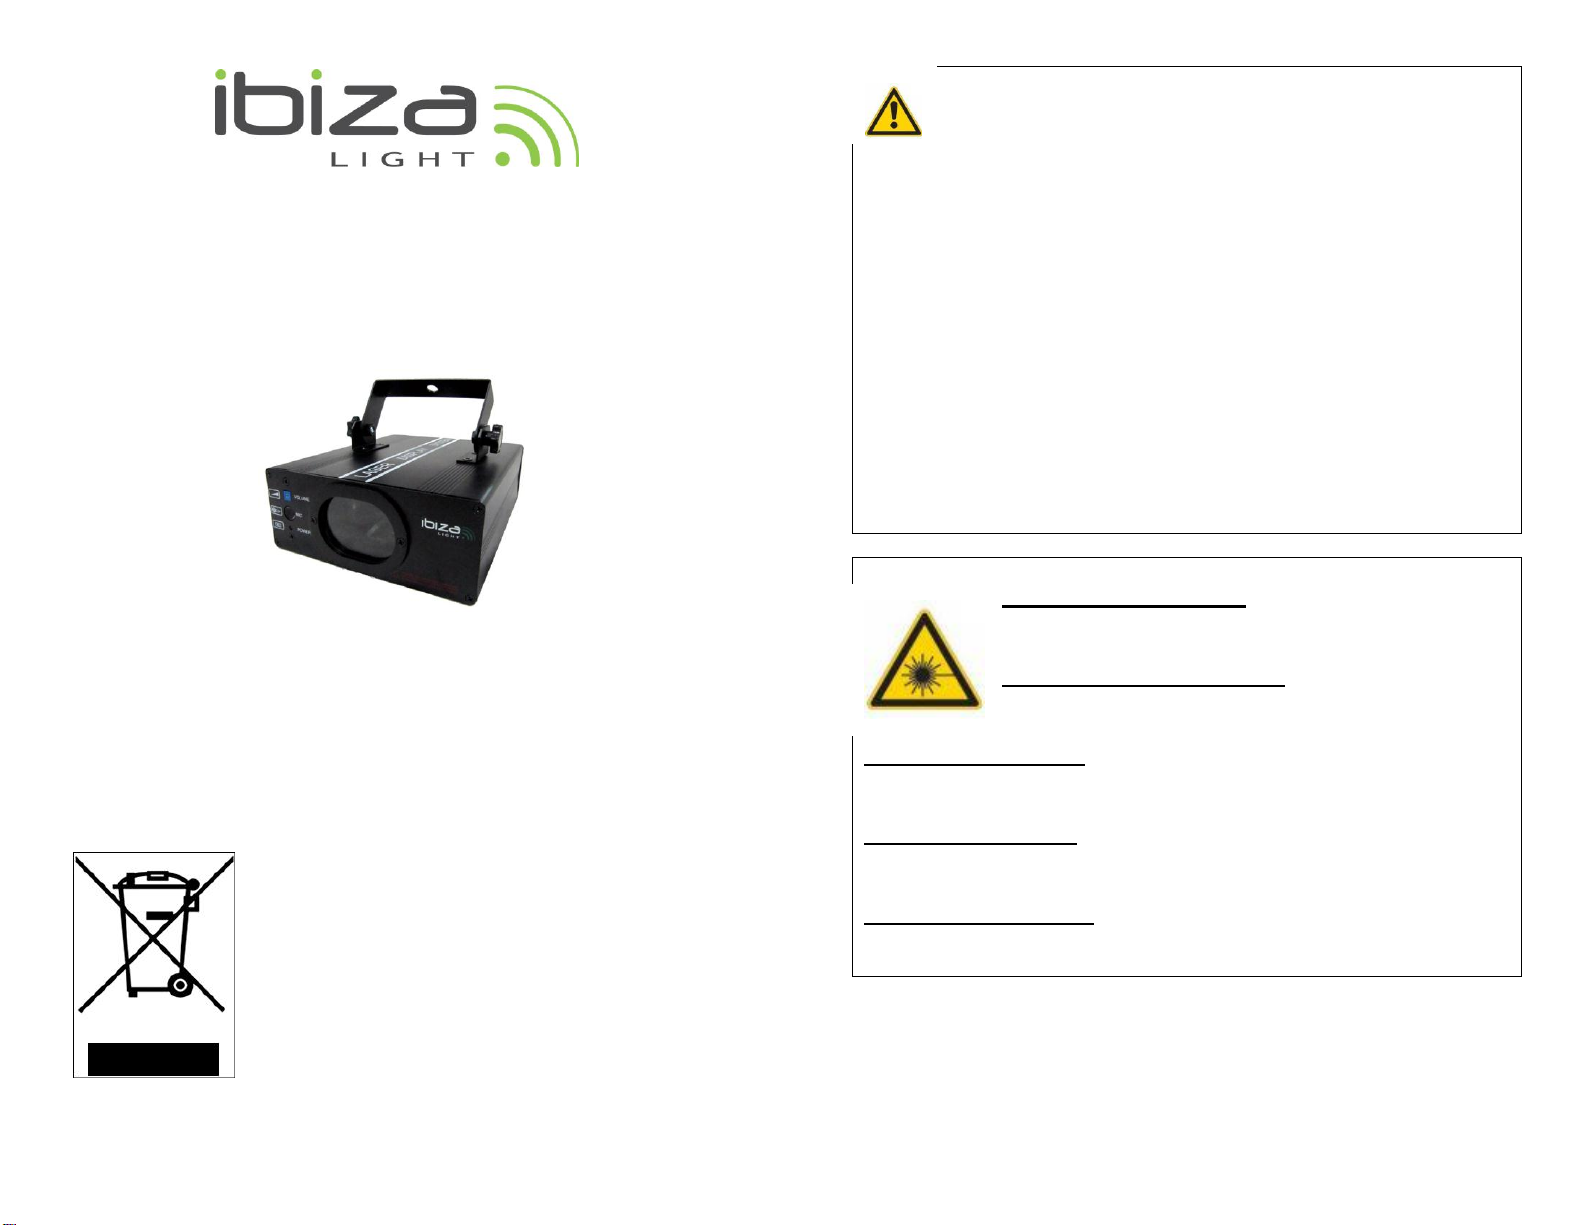
RED DMX LASER LIGHT 200mW
LASER DMX ROUGE 200mW
DMX LASER ROT 200mW
EFEITO LASER VERMELHO 200mW
LAS200R (15-1025)
GB - User Manual
F - Manuel d’Utilisation
D - Bedienungsanleitung
PT - Manual de Instruções
IMPORTANT NOTE: Electric products must not be put into household waste.
Please bring them to a recycling centre. Ask your local authorities or your dealer
about the way to proceed.
NOTE IMPORTANTE : Les produits électriques ne doivent pas être mis au rebut
avec les ordures ménagères. Veuillez les faire recycler là où il existe des
centres pour cela. Consultez les autorités locales ou votre revendeur sur la
façon de les recycler.
WICHTIGER HINWEIS: Elektrogeräte gehören nicht in den Hausmüll. Sie
müssen in speziellen Betrieben recycelt werden. Bringen Sie sie zu einer
speziellen Entsorgungsstelle für Elektrokleingeräte (Wertstoffhof)!
BELANGRIJK: De elektrische producten mogen niet naast het huisvuil geplaatst
worden. Gelieve deze te laten recycleren daar waar er centra’s hiervoor
voorzien is. Raadpleeg de plaatselijke autoriteiten of uw verkoper ivm de manier
van recycleren.
NOTA IMPORTANTE: Produtos eléctricos não deverão ser postos em contentores de lixo caseiros. Por favor,
deposite-os em contentores para reciclagem. Questione as autoridades locais ou onde adquiriu o produto
sobre como deverá proceder.
GB - This LASER effect is built for PROFESSIONAL use only. It must be used and controlled by a
professional in sufficiently large premises because of its high output power. Always set up and
install all laser effects so that all laser light is at least 3 meters (9.8 feet) above the floor. Never
create a fixed point.
F - Cet effet LASER est un appareil conçu uniquement pour un usage PROFESSIONNEL. Il doit utilisé et
installé par un professionnel à une hauteur minimale de 3m dans des salles suffisamment grandes en raison
de sa puissance importante. Toujours installer et configurer le laser de sorte que tous les effets du laser sont
au moins à 3 mètres au-dessus du sol. Ne jamais créer de point fixe.
D –Dieser LASER Effekt ist nur für GEWERBLICHEN Gebrauch. Aufgrund seiner hohen Ausgangsleistung
darf das Gerät nur von einem Fachmann in ausreichend großen Räumen installiert und betrieben werden. Es
muss in mindesten 3m Bodenhöhe angebracht werden. Der Strahl darf auf keinen Fall auf einen festen Punkt
gerichtet sein.
NL - Dit LASER effect is alleen voor professioneel gebruik. Door zijn hoge vermogen mag het apparaat alleen
van een specialist in voldoende grote ruimten worden geïnstalleerd en bediend. Het moet worden aangebracht
in tenminste 3m vloerhoogte. In geen geval de beam op een vast punt richten.
PT - Este efeito LASER foi desenhado apenas para uso PROFISSIONAL. Deve ser usado e controlado por um
profissional em locais grandes devido à sua elevada potência de saída. Configurar sempre e instalar todos os
efeitos laser de modo a que a luz do laser esteja a pelo menos 3 metros (9,8 pés) do chão. Nunca crie um
ponto fixo.
GB-LASER RADIATION !
DANGEROUS EXPOSURE TO LASER RADIATION
CLASS 3B LASER
F-RAYONNEMENT LASER !
EXPOSITION AU FAISCEAU DANGEREUSE
APPAREIL À LASER DE CLASSE 3B
D-LASERSTRAHLEN !
GEFÄHRLICHE AUSSETZUNG AN LASERSTRAHLEN
LASERKLASSE 3B
NL-LASERSTRALEN!
GEVAARLIJKE BLOOTSTELLING AAN LASERLICHT
LASER CLASSE 3B
PT-RADIAÇÃO LASER!
EXPOSIÇÃO PERIGOSAA RADIAÇÃO LASER
LASER DE CLASSE 3B
GB
© Copyright Lotronic 2011 © Copyright Lotronic 2011
User’s manual
Thanks for your purchasing, please read this manual carefully before
operating the system. It gives you general information for your safe and
better operation.
INSPECTION
Check for the contents in the package. Refer to the following list:
1. Laser lighting: 1
2. Power cable: 1
3. User’s manual: 1
Technical parameters
1. Laser diode: DPSS, Red 650nm
2. Power supply: AC100-240V, 50/60Hz
3. Laser power: 200mW red
4. Motor: N1.8 high precision step motor
5. Control mode: sound control/auto/ DMX
6. Dimensions : 158mm x 196mm x 63mm
7. Net weight: 1.6kG
8. Gross weight: 2.0kG
DANGER
LASER RADIATION AVOID EXPOSURE
TO BEAM CLASS 3B LASER PRODUCT
When using this laser, the effect will change to the music. When you
change the sound and rhythm, the machine will change its speed and
direction.
Function Setting
0=OFF 1=ON X=OFF or ON
DIPSWITCH CHART
FUNCTION
#1
#2
#3
#4
#5
#6
#7
#8
#9
#10
0
X
X
X
X
X
X
X
X
1
SOUND ACTIVE
1
X
X
X
X
X
X
X
X
1
AUTO MODE
0
SET DMX ADDRESS FOR DMX
MODE
0
DMX/SLAVE
DIPSWITH CHART
Installation
1. Firstly, be sure that the mains voltage matches the voltage marked on
the base of the laser lighting;
2. Installation should be made by professional technician. Fix the laser
lighting and adjust the angle of the laser lighting to your needs;
3. Please check whether the fan and the exhaust are blocked;
4. There is a hole for connection. When hang the laser lighting, be sure
the cable can undertake 10 times of the lighting weight;
5. The laser lighting should be fixed;
6. It is essential to be earthed well for the sake of safety.
DMX512
This laser light is controlled by the standard DMX. Please connect control
panel with the lighting as following
Before using the DMX512 controller, you should set the channel address.
It can be set 001 ~ 511 address. Every binary address switch has a digital
no. Please refer to:
No.
Digital No.
No.
Digital No.
1st
1
6th
32
2nd
2
7th
64
3rd
4
8th
128
4th
8
9th
256
5th
16
10th
Function switch
Maintenance
Please clean the lens regularly. Do not use the wet cloth or other
chemical. The frequency depends on the usage and surrounding
conditions; it is recommended that it should be cleaned every 20 days;
Please clean the lighting surface and engine outlet regularly.
Be sure that there is no flammable or explosive subject nearby. The least
distance is 0.5 meters.
Warning
Power off before installation or maintenance. The danger class of this
laser lighting is CLASS 3B. it’s dangerous to look into the laser beam. The
safe minimum distance is 50cm, the safe maximum time is 10 seconds;
Keep at least 0.5 meters distance between the lighting and inflammable
material.
GB
© Copyright Lotronic 2011 © Copyright Lotronic 2011
DMX Control Parameter Chart
Channel No
DMX512
fig.
Content
Channel 1
Control
mode
0-139
Black out
140-209
Auto play
210-255
manual
Channel 2
Pattern
Selection
0-33
Static pattern
34-255
Dynamic Geometric
pattern
Channel 3
Strobe
0-255
8 grade speed
Channel 4
Spot and line
0-255
From line to spot effect
Channel 5
Horizontal
move
1~160
Manual
161~190
From left to right move
191-220
From right to left move
221-255
Right and left in-phase
move
Channel 6
Vertical
move
1-160
Manual
161-190
From down to up
191-220
From up to down
221-255
Up and down in-phase
move
Channel 7
Zoom(+/-)
pattern size
0-255
pattern size change
Channel 8
No special
Channel 9
Reset
0-255
The number come to more
than 200, the machine
reset
Channel
10
Gradually
paint
0-255
Gradually paint
When the CH2 is selected the Static pattern mode (DMX value is 0--33),
you can use channel CH2, CH3-CH10 to control laser beam, otherwise
CH2, CH3-CH10 are invalid
GB - LASER RADIATION !
DANGEROUS EXPOSURE TO LASER RADIATION
CLASS 3B LASER
ONLY FOR FOR PROFESSIONAL USE
Manuel d’Utilisation
Nous vous remercions pour l’achat de cet produit. Lire attentivement
cette notice avant la première mise en service. Il contient des
informations générales pour une meilleure utilisation en toute sécurité.
VERIFICATION
Vérifiez le contenu de l’emballage qui doit contenir les pièces suivantes:
1. Laser: 1
2. Cordon d’alimentation: 1
3. Mode d’emploi: 1
Caractéristiques techniques
1. Diode Laser: DPSS, Rouge 6505nm
2. Alimentation: AC100-240V, 50/60Hz
3. Puissance du laser: 200mW rouge
4. Moteur: A pas haute precision N1.8
5. Modes de fonctionnement: Commande audio/auto/ DMX
6. Dimensions : 158mm x 196mm x 63mm
7. Poids net: 1.6kg
8. Poids brut: 2.0kg
DANGER
RAYON LASER NE PAS REGARDER DANS
LE RAYON - LASER DE CLASSE IIIB
Le changement du motif est commandé par la musique, c’est-à-dire que
le rythme de la musique commande l’effet laser.
Réglage des fonctions par commutateurs DIP
0=ARRET 1=MARCHE X=ARRET ou MARCHE
Tableau des commutateurs DIP
FONCTION
#1
#2
#3
#4
#5
#6
#7
#8
#9
#10
0
X
X
X
X
X
X
X
X
1
ACTIVE PAR LE SON
1
X
X
X
X
X
X
X
X
1
MODE AUTO
0
Réglage de l’adresse DMX pour le
mode DMX
0
DMX/ESCLAVE
F
© Copyright Lotronic 2011 © Copyright Lotronic 2011
Installation
oAssurez-vous que la tension secteur correspond à celle qui est
marquée sur le produit.
oL’appareil doit être installé par un spécialiste, fixé solidement et
ajusté sur le bon angle de radiation.
oAssurez-vous qu’aucun matériau inflammable ne se trouve à moins
de 1m de l’appareil. La distance entre l’appareil et le mur ne doit pas
être inférieure à 15cm.
oN’obstruez pas le ventilateur et les fentes de ventilation.
oPour des raisons de sécurité, le câble de fixation doit pouvoir porter
au moins 10 fois le poids de l’appareil.
oCet appareil doit être relié à la masse.
DMX512
Commandez l’appareil avec votre console DMX. Connectez la console à
l’effet de la manière suivante:
Avant d’utiliser la commande DMX512, vous devez régler l’adresse du
canal. L’adresse est réglable entre 001 et 511. Chaque commutateur
d’adresse binaire porte un numéro digital. Reportez-vous au tableau
ci-dessous:
N°
N° Digital
N°
N° Digital
1er
1
6ème
32
2nd
2
7ème
64
3ème
4
8ème
128
4ème
8
9ème
256
5ème
16
10ème
Commutateur de fonction
Maintenance
Entretenez ce produit régulièrement afin d’optimiser la puissance
lumineuse. Ne pas utiliser de torchons humides ou autres solvants
chimiques pour nettoyer le verre. La fréquence de nettoyage dépend de
la fréquence et des conditions d’utilisation. Nous conseillons un
nettoyage tous les 20 jours.
Vérifiez qu’aucun objet inflammable ne se trouve à proximité.
Avertissement
Avant toute intervention, débranchez l’appareil du secteur. Ce laser fait
partie de la classe IIIB. Il est dangereux de regarder dans le rayon laser.
La distance minimum de radiation est de 13cm et la durée de radiation la
plus longue est inférieure à 10 secondes.
La distance entre la lumière et un objet inflammable doit être d’au moins
0,5m.
Paramètres DMX
N° canal
DMX512
fig.
Contenu
Canal 1
Mode de
contrôle
0-139
Black out
140-209
Automatique
210-255
manuel
Canal 2
Sélection du
motif
0-33
Motif statique
34-255
Motif géométrique
dynamique
Canal 3
Stroboscope
0-255
8 niveaux de vitesse
Canal 4
Point & ligne
0-255
Effet ligne vers point
Canal 5
Déplacement
horizontal
1~160
Manuel
161~190
Dépl. Gauche à droite
191-220
Dépl. Droite à gauche
221-255
Dépl. Gauche-droite en
phase
Canal 6
Déplacement
vertical
1-160
Manuel
161-190
De bas en haut
191-220
De haut en bas
221-255
Haut-bas en phase
Canal 7
Zoom(+/-)
Dimension
motif
0-255
Changement de dimension
du motif
Canal 8
-
Canal 9
Reset
0-255
Au-delà de 200, l’appareil se
remet à zéro
Canal 10
Coloration
progressive
0-255
Coloration progressive
Lorsque canal 2 est réglé sur le motif statique (valeur DMX 0-33), vous
pouvez utiliser les canaux 3-10 pour commander le rayon laser, sinon les
canaux 3-10 ne sont pas actifs.
RAYONNEMENT LASER !
EXPOSITION AU FAISCEAU DANGEREUSE
APPAREIL À LASER DE CLASSE 3B
UNIQUEMENT POUR UTILISATION PAR DES
PROFESSIONNELS
D
© Copyright Lotronic 2011 © Copyright Lotronic 2011
Bedienungsanleitung
Wir danken Ihnen für den Kauf unseres Geräts. Bitte lesen Sie die
Anleitung sorgfältig vor der Inbetriebnahme durch. Sie enthält allgemeine
Informationen für einen problemlosen und sicheren Betrieb.
INSPEKTION
Packen Sie das Gerät aus. Die Verpackung muss folgende Teile
enthalten:
1. Laser Gerät: 1
2. Stromkabel: 1
3. Bedienungsanleitung: 1
Technische Daten
1. Laserdiode: DPSS, Rot 650nm
2. Versorgungsspannung: AC100-240V, 50/60Hz
3. Laserleistung: 200mW rouge
4. Motor: N1.8 Schrittmotor
5. Steuerungsart: Musiksteuerung/Automatik/ DMX
6. Abmessungen : 158mm x 196mm x 63mm
7. Nettogewicht: 1.6kg
8. Bruttogewicht: 2.0kg
VORSICHT
LASERSTRAHLEN. NICHT IN DEN
STRAHL BLICKEN. KLASSE 3B LASER
Der Musterwechsel wird von der Musik gesteuert. Wenn Lautstärke und
Rhythmus sich ändern, ändert das Gerät auch seine Geschwindigkeit
und Drehrichtung.
Einstellung der Betriebsart
0=AUS 1=EIN X=AUS oder EIN
DIP SCHALTER TABELLE
FUNKTION
#1
#2
#3
#4
#5
#6
#7
#8
#9
#10
0
X
X
X
X
X
X
X
X
1
MUSIKAKTIVIERT
1
X
X
X
X
X
X
X
X
1
AUTOMATIK
0
EINSTELLUNG DER DMX
ADRESSE FÜR DMX BETRIEB
0
DMX/SLAVE
Installation
1. Prüfen Sie, ob Ihre Netzspannung der Versorgungsspannung auf
dem Gerät entspricht.
2. Das Gerät muss von einem Fachmann installiert, sicher befestigt und
auf den richtigen Abstrahlwinkel eingestellt werden.
3. Beachten Sie einen Sicherheitsabstand von mindestens 1m
zwischen dem Gerät und brennbaren Materialien. Der Abstand
zwischen Wand und Gerät muss mindestens 15cm betragen. Nicht
den Lüfter blockieren oder die Belüftungsschlitze verstopfen.
4. Aus Sicherheitsgründen muss das Befestigungskabel mindestens 10
mal das Gewicht des Geräts tragen können.
5. Das Gerät muss geerdet sein.
DMX512
Dieser Laser wird über das Standardprotokoll DMX512 gesteuert. Bitte
schließen Sie das Gerät wie folgt an die DMX Konsole an:
Bevor Sie den DMX Controller benutzen, müssen Sie die Kanaladresse
einstellen. Die Adressen reichen von 1-511. Jeder Schalter für die
Binäradresse besitzt eine digitale Nummer, d.h.:
Nr.
Digital Nr.
Nr.
Digital Nr.
1.
1
6.
32
2.
2
7.
64
3.
4
8.
128
4.
8
9.
256
5.
16
10.
Funktionsschalter
Pflege
Pflegen Sie das Gerät regelmäßig. Zur Glasreinigung keine feuchten
Tücher oder chemische Reinigungsmittel benutzen. Die Häufigkeit der
Reinigung hängt vom Gebrauch und den Umgebungsbedingungen ab.
Wir empfehlen eine Reinigung alle 3 Wochen.
Wischen Sie das Gehäuse mit einem sauberen Tuch ab. Es dürfen sich
keine brennbaren oder explosiven Gegenstände oder Stoffe in der Nähe
befinden. Der Mindestabstand beträgt 50cm.
D
© Copyright Lotronic 2011 © Copyright Lotronic 2011
Warnung
Bevor Sie irgendwelche Arbeiten am Gerät vornehmen, Netzstecker
abziehen. Dieser Laser gehört zur Klasse IIIB. Es ist gefährlich, in den
Laserstrahl zu blicken. Der kleinste Strahlabstand beträgt 13cm und die
längste Strahlungszeit beträgt weniger als 10 Sekunden.
Der Abstand zwischen Laserstrahl und entzündlichen Materialien muss
mindestes 0,5m betragen.
DMX Parameter Tabelle
Kanalnr.
DMX512
fig.
Bedeutung
Kanal 1
Steuerart
0-139
Black out
140-209
Automatik
210-255
manuell
Kanal 2
Musterwahl
0-33
Statisches Muster
34-255
Dynamisches
geometrisches Muster
Kanal 3
Stroboskop
0-255
8-stufige
Geschwindigkeit
Kanal 4
Punkt und Strich
0-255
Von Strich auf Punkt
Kanal 5
Horizontalbewegung
1~160
Manuell
161~190
Von links nach rechts
191-220
Von rechts nach links
221-255
Rechts-links in Phase
Kanal 6
Vertikalbewegung
1-160
Manuell
161-190
Von unten nach oben
191-220
Von oben nach unten
221-255
Auf-/Abwärtsbewegung
in Phase
Kanal 7
Zoom(+/-)
Mustergrösse
0-255
Wechsel der
Mustergrösse
Kanal 8
Unbelegt
Kanal 9
Reset
0-255
Wenn die Zahl 200
übersteigt, führt das
Gerät ein Reset durch
Kanal 10
Allmähliche
Verfärbung
0-255
Allmähliche Verfärbung
Wenn in Kanal 2 der statische Musterbetrieb gewählt wird (DMX Wert
0-33), kann der Laser mit den Kanälen 3-10 gesteuert werden, ansonsten
sind die Kanäle 3-10 inaktiv.
Leia este manual de instruções antes de usar o equipamento
Verifique o conteúdo ao abrir a embalagem
A embalagem contém:
Laser: 1 Unid.
Manual de Instruções: 1 Unid.
Cabo de Alimentação: 1 Unid.
Parâmetros Técnicos
1. Diodo Laser: DPSS, Vermelho 650nm
2. Voltagem: AC100-240V, 50/60Hz
3. Potência Laser: 200mW vermelho
4. Motor: Motor step N1.8 de alta precisão
5. Modo Controlo: Controlo som/auto/DMX
6. Dimensões : 158mm x 196mm x 63mm
7. Peso Liquido: 1.6kG
8. Peso Bruto: 2.0kG
PERIGO
RADIAÇÃO LASER EVITE EXPOSIÇÃO
AOS RAIO DE CLASSE 3B
Ao mudar o som e o ritmo a unidade mudará a velocidade e direcção.
Configuração de Funcionamento
0=OFF 1=ON X=OFF ou ON
DIPSWITCH CHART
Função
#1
#2
#3
#4
#5
#6
#7
#8
#9
#10
0
X
X
X
X
X
X
X
X
1
ACTIVAÇÃO SOM
1
X
X
X
X
X
X
X
X
1
MODO AUTO
0
AJUSTA ENDEREÇO DMX PARA
MODO DMX
0
DMX/SLAVE
MAPA DIPSWITCH
Instalação
1. Certifique-se de que a voltagem existente é compatível com a
voltagem mencionada na base do equipamento.
2. A instalação deve ser feita por um profissional. Fixe ao equipamento e
ajuste o ângulo de acordo com as suas necessidades;
PT
© Copyright Lotronic 2011 © Copyright Lotronic 2011
3. Verifique se a ventoinha ou saída de ar se encontram bloqueadas;
4. Existe um orifício para o suporte. Ao pendurar o equipamento,
certifique-se de que o cabo suporta até 10 vezes mais do que o peso
da unidade;
5. A unidade deve ser fixa;
6. Deve existir uma ligação terra por razões de segurança.
DMX512
Esta unidade é controlada por uma unidade padrão DMX. Ligue a
unidade ao painel de controlo de acordo com as seguintes
especificações:
Antes de usar o controlador DMX512, deve ajustar os endereços dos
canais. Pode ser ajustado entre 001~511, todos os interruptores dos
endereços binários têm um número digital. Consulte:
No.
Digital No.
No.
Digital No.
1º
1
6º
32
2º
2
7º
64
3º
4
8º
128
4º
8
9º
256
5º
16
10º
Interruptor de
Função
Manutenção
Faça a manutenção do equipamento com regularidade. Não use panos
molhados ou outros químicos para limpar a unidade. A frequência de
limpeza deve ser proporcional à frequência de utilização e condições
ambientais. Sugerimos uma limpeza a cada 20 dias;
Limpe o equipamento e a saída do motor regularmente.
Certifique-se de que a distância entre a luz e substâncias inflamáveis é
de pelo menos 0,5m.
Aviso
Desligue antes da instalação ou manutenção;
A classe de perigo deste laser é CLASSE III B. É perigoso observar o
laser directamente. A distância mínima de segurança é de 13cm e o
tempo máximo é de 10 seg.
Mantenha pelo menos 0,5 m de distância entre o laser e materiais
inflamáveis.
Controlo de Parâmetros Gráficos DMX
Canal
DMX512
fig.
Conteúdo
Canal 1
Modo
Controlo
0-139
Black out
140-209
Auto play
210-255
Manual
Canal 2
Selecção de
Padrão
0-33
Padrão Estáticos
34-255
Padrão Geométrico
Dinâmico
Canal 3
Strobe
0-255
8 Graus de Velocidade
Canal 4
Ponto e
Linha
0-255
Efeito de Linha para Ponto
Canal 5
Movimento
Horizontal
1~160
Manual
161~190
Movimento da esquerda
para a direita
191-220
Movimento da direita para a
esquerda
221-255
Movimento direita e
esquerda in-phase
Canal 6
Movimento
Vertical
1-160
Manual
161-190
De baixo para cima
191-220
De cima para baixo
221-255
Cima e baixo in-phase
Canal 7
Tamanho
Padrão
Zoom(+/-)
0-255
Mudança de tamanho
padrão
Canal 8
Num.
Especial
Canal 9
Reset
0-255
Numero maior que 200, a
unidade reinicia
Canal 10
Pintura
Gradual
0-255
Pintura gradual
Quando o CH2 está seleccionado, o modo padrão estático (valor DMX
entre 0--33), pode usar o CH2, CH3-CH10 para controlar o raio laser,
caso contrário os canais CH2, CH3-CH10 não são válidos.
RADIAÇÃO LASER!
EXPOSIÇÃO PERIGOSA A RADIAÇÃO LASER
LASER DE CLASSE 3B

This manual suits for next models

1

Other Ibiza Lighting Equipment manuals

Ibiza THINPAR-36X1WHITE User manual

Ibiza

Ibiza THINPAR-36X1WHITE User manual

Ibiza MUSHROOM 15-1000 User manual

Ibiza

Ibiza MUSHROOM 15-1000 User manual

Ibiza LMH330LED User manual

Ibiza

Ibiza LMH330LED User manual

Ibiza LMH350LED User manual

Ibiza

Ibiza LMH350LED User manual

Ibiza SATURNE User manual

Ibiza

Ibiza SATURNE User manual

Ibiza HYPNO40-LED User manual

Ibiza

Ibiza HYPNO40-LED User manual

Ibiza TINYLED-RGB-ASTRO User manual

Ibiza

Ibiza TINYLED-RGB-ASTRO User manual

Ibiza BIZA200FIREFLY User manual

Ibiza

Ibiza BIZA200FIREFLY User manual

Ibiza STROBE20LED User manual

Ibiza

Ibiza STROBE20LED User manual

Ibiza LBL38 User manual

Ibiza

Ibiza LBL38 User manual

Ibiza LZR430RGB User manual

Ibiza

Ibiza LZR430RGB User manual

Ibiza LAS100V User manual

Ibiza

Ibiza LAS100V User manual

Ibiza LED-UVBAR User manual

Ibiza

Ibiza LED-UVBAR User manual

Ibiza JDL008R-LED User manual

Ibiza

Ibiza JDL008R-LED User manual

Ibiza THINPAR-LED-RING User manual

Ibiza

Ibiza THINPAR-LED-RING User manual

Ibiza LEDFLAME-RGB User manual

Ibiza

Ibiza LEDFLAME-RGB User manual

Ibiza LAS-S130RG-MULTI User manual

Ibiza

Ibiza LAS-S130RG-MULTI User manual

Ibiza IBIZA1000 User manual

Ibiza

Ibiza IBIZA1000 User manual

Ibiza LP64LED-BAT User manual

Ibiza

Ibiza LP64LED-BAT User manual

Ibiza LS58W-BLUE User manual

Ibiza

Ibiza LS58W-BLUE User manual

Ibiza BIGPAR-16RGBW4A User manual

Ibiza

Ibiza BIGPAR-16RGBW4A User manual

Ibiza TINYLED-LASRGB User manual

Ibiza

Ibiza TINYLED-LASRGB User manual

Ibiza LS103RGB-RC User manual

Ibiza

Ibiza LS103RGB-RC User manual

Ibiza MINI PARTY LIGHT SET User manual

Ibiza

Ibiza MINI PARTY LIGHT SET User manual

Popular Lighting Equipment manuals by other brands

Lanta Aurora 1000 Owner's handbook

Lanta

Lanta Aurora 1000 Owner's handbook

Knightsbridge EMPOWER2 Installation & maintenance manual

Knightsbridge

Knightsbridge EMPOWER2 Installation & maintenance manual

PR Lighting PR-8836 manual

PR Lighting

PR Lighting PR-8836 manual

Emos CHERRY COLORS quick guide

Emos

Emos CHERRY COLORS quick guide

Oase Profilux 100 operating instructions

Oase

Oase Profilux 100 operating instructions

Rockwell Automation Allen-Bradley GuardShield 450L-B4FN YD... installation instructions

Rockwell Automation

Rockwell Automation Allen-Bradley GuardShield 450L-B4FN YD... installation instructions

Chauvet LRG-55 supplementary guide

Chauvet

Chauvet LRG-55 supplementary guide

Ecosense Trov Flex installation guide

Ecosense

Ecosense Trov Flex installation guide

ADJ X-MOVE LED PLUS User instructions

ADJ

ADJ X-MOVE LED PLUS User instructions

Eternal Lighting CUBEecho RGBWA+UV user manual

Eternal Lighting

Eternal Lighting CUBEecho RGBWA+UV user manual

Braun 59223 Owner's manual & safety instructions

Braun

Braun 59223 Owner's manual & safety instructions

LumX LED F-30 instruction manual

LumX

LumX LED F-30 instruction manual

ExamVision Essential Alpha manual

ExamVision

ExamVision Essential Alpha manual

Cooper Lighting Halo Lazer LZR305 Specification sheet

Cooper Lighting

Cooper Lighting Halo Lazer LZR305 Specification sheet

Nicols PAR COB 100 MW user manual

Nicols

Nicols PAR COB 100 MW user manual

Soltech CEGONIA PRO installation manual

Soltech

Soltech CEGONIA PRO installation manual

Inspire KENSHI 780593 instruction manual

Inspire

Inspire KENSHI 780593 instruction manual

Rainbow Colour Changers 15" Plus Operator's manual

Rainbow Colour Changers

Rainbow Colour Changers 15" Plus Operator's manual

manuals.online logo
manuals.online logoBrands
  • About & Mission
  • Contact us
  • Privacy Policy
  • Terms and Conditions

Copyright 2025 Manuals.Online. All Rights Reserved.