ice-watch ICE CLEAR SUNSET User manual

Getting started
Press
the winder.
Remove the plastic
stopper (in the direction
of the arrow).
Instructions
The watch must be serviced regularly in order for it to work correctly. The length of time between
services will vary depending on the model, climate and the care you take of your watch. As a
general rule, we recommend the following steps so that you can keep your watch in tip-top
condition for as long as possible.
- Temperature: avoid temperatures below 0°C (30°F) or above 35°C (100°F).
- Avoid prolonged exposure to sun, steam, contact with alcohol, detergents, perfume or
cosmetic products to prevent distorsion, discoloration or any damaging reaction.
- Do not use any watch button while under water to prevent water from entering the
mechanism.
The information contained in this document belongs to ICE Universal Ltd and may not be
reproduced without its authorisation.
ENGLISH
A) SETTING THE DATE
1. Gently pull the winder out to the 1st position.
2. Turn the winder anticlockwise to set the date. If the date is set between around 9pm and
1am, it is possible that it will not change the next day.
3. Return the winder to its normal position.
B) SETTING THE TIME
1. Gently pull the winder out to the 2nd position.
2. Turn the winder to set the hour and minute hands to the correct positions.
3. The second hand starts again when the winder is pushed back into its normal position.
C) SETTING THE DAY OF THE WEEK
1. Gently pull the winder out to the 1st position.
2. Turn the winder clockwise to set the day of the week. If the day is set between around 9pm
and 1am, it is possible that it will not change the next day.
3. Return the winder to its normal position.
Hour hand
Second hand
Minute hand 2nd position
1st position
Normal winder position
Date
Day of the week (the position may
vary depending on the model)
(the position may vary depending
on the model)
(the position may vary depending on
the model)

Mise en marche
Appuyez
ensuite sur
le remontoir.
Enlevez le stopper
en plastique dans le
sens de la flèche.
Instructions
La montre doit être entretenue régulièrement pour garantir un bon fonctionnement. Les in-
tervalles d’interventions varient en fonction du modèle, du climat et du soin apporté à la
montre par son propriétaire. En règle générale, nous recommandons l’application des étapes
ci-dessous en vue de préserver le plus longtemps possible l’état irréprochable de votre montre.
- Température: évitez les températures en-dessous de 0°C (30°F) et au-dessus de 35°C
(100°F).
- Evitez une exposition prolongée au soleil, les contacts avec la vapeur, l’alcool, les
détergents, les parfums et tout produit cosmétique en vue de prévenir toute déformation,
décoloration ou autre mauvaise réaction.
- N’appuyez sur aucun bouton de la montre sous l’eau afin d’éviter les pénétrations d’eau
dans le mécanisme.
Les informations contenues dans ce document sont la propriété de ICE Universal Ltd et ne
peuvent pas être reproduites sans son autorisation.
FRANÇAIS
A) RÉGLAGE DE LA DATE
1. Tirez délicatement le remontoir dans sa 1ère position.
2. Tournez le remontoir à l’inverse des aiguilles d’une montre pour régler la date. Si la date est
réglée entre environ 21h. et 01h., il est possible que la date ne change pas le lendemain.
3. Repoussez le remontoir dans sa position normale.
B) RÉGLAGE DE L’HEURE
1. Tirez délicatement le remontoir dans sa 2ème position.
2. Tournez le remontoir pour régler les aiguilles des heures et des minutes.
3. L’aiguille des secondes redémarre lorsque le remontoir est repoussé dans sa position normale.
C) RÉGLAGE DU JOUR DE LA SEMAINE
1. Tirez délicatement le remontoir dans sa 1ère position.
2. Tournez le remontoir dans le sens des aiguilles d’une montre pour régler le jour. Si le jour est
réglé entre environ 21h. et 01h., il est possible que le jour ne change pas le lendemain.
3. Repoussez le remontoir dans sa position normale.
Aiguille des heures
Aiguille des secondes
Aiguille des minutes
2ème position
1ère position
Position normale du remontoir
Dateur
(le positionnement de la date peut
différer en fonction du modèle)
Jour de la semaine (le positionnement
peut différer en fonction du modèle)

Ingangsetzen
Anschließend auf den
Aufzug drücken.
Den Kunststoffstopper
in Pfeilrichtung
entfernen.
Gebrauchsanweisungen
Eine Uhr ist regelmäßig zu warten, soll ein einwandfreies Funktionieren gewährleistet sein.
Die Wartungsabstände variieren je nach Modell, Klima und Sorgfalt des Uhrenbesitzers. Im
Allgemeinen empfehlen wir Ihnen, nachstehende Schritte zu beachten, um so lange wie
möglich ein vollkommen fehlerfreies Funktionieren Ihrer Uhr sicherzustellen.
- Temperatur: Temperaturen unter 0°C und über 35°C vermeiden.
- Längere Aussetzung gegenüber der Sonne und Dampf sowie jeden Kontakt mit Alkohol,
Putzmitteln, Parfum und Kosmetika vermeiden. Verformungen, Verfärbungen oder sonstige
schädigende Reaktionen könnten die Folge sein.
- Betätigen Sie keinen Knopf unter Wasser, da andernfalls Wasser in das Uhrwerk eindringen
kann.
Die hier enthaltenen Informationen sind Eigentum von ICE Universal Ltd und können nicht
ohne deren Genehmigung wiedergegeben werden.
DEUTSCH
A) EINSTELLEN DES DATUMS
1.
Die Krone vorsichtig in die erste Position ziehen.
2. Durch Drehen der Krone entgegen dem Uhrzeigersinn das Datum einstellen. Erfolgt die Einstellung
des Datums zwischen 21 Uhr und 1 Uhr, kann es sein, dass das Datum nicht am darauf
folgenden Tag ändert.
3. Die Krone in die Normalposition zurückbringen.
B) EINSTELLEN DER UHRZEIT
1. Die Krone vorsichtig in die zweite Position ziehen.
2. Durch Drehen der Krone die Stunden- und Minutenzeiger einstellen.
3. Der Sekundenzeiger bewegt sich erneut, nachdem die Krone in die Normalposition
zurückgebracht wurde.
C) EINSTELLEN DES TAGES
1.
Die Krone vorsichtig in die erste Position ziehen.
2. Durch Drehen der Krone um den Tag einzustellen. Erfolgt die Einstellung des Tages zwischen 21
Uhr und 1 Uhr, kann es sein, dass der Tag nicht am darauf folgenden Tag ändert.
3. Die Krone in die Normalposition zurückbringen.
Stundenzeiger
Sekundenzeiger
Minutenzeiger
Position 2
Position 1
Normale Position der Krone
Datumanzeige
(Die Datumanzeige kann je nach
Modell anders angebracht sein.)
Tag (Die Anzeige kann je nach Modell
anders angebracht sein.)

In werking stellen
Druk
vervolgens op het
opwindmechanisme.
Verwijder de plastic
stopper in de richting
van de pijl.
Instructies
Het horloge moet regelmatig worden onderhouden om goed te blijven werken. Hoe vaak dat
precies moet gebeuren, hangt af van het model, het klimaat en de zorg die de eigenaar draagt
voor zijn horloge. In het algemeen raden wij aan om de onderstaande regels te volgen, zodat
uw horloge zo lang mogelijk in onberispelijke staat blijft.
- Temperatuur: vermijd temperaturen onder 0°C (30°F) of boven 35°C (100°F).
- Vermijd langdurige blootstelling aan de zon, stoom, contact met alcohol, detergenten,
parfums of cosmetica om vervorming, verkleuring of eender welke schade te voorkomen.
- Gebruik de knoppen van het horloge niet onder water, om te voorkomen dat er water in
het mechanisme dringt.
De informatie in dit document is eigendom van ICE Universal Ltd en mag niet zonder zijn
toestemming worden overgenomen.
NEDERLANDS
A) REGELING VAN DE DATUM
1. Trek het opwindmechanisme voorzichtig in de 1e stand.
2. Draai het opwindmechanisme tegen de wijzers in om de datum te regelen. Als de datum wordt
ingesteld tussen ongeveer 21u en 01u, is het mogelijk dat hij de volgende dag niet verandert.
3. Druk het opwindmechanisme terug in de normale stand.
B) REGELING VAN HET UUR
1. Trek het opwindmechanisme voorzichtig in de 2e stand.
2. Draai aan het opwindmechanisme om de uur- en minutenwijzers te regelen.
3. De secondewijzer zet zich weer in beweging wanneer het opwindmechanisme terug in zijn
normale stand wordt gedrukt.
C) REGELING VAN DE DAG
1. Trek het opwindmechanisme voorzichtig in de 1e stand.
2. Draai het opwindmechanisme om de dag te regelen. Als de dag wordt ingesteld tussen
ongeveer 21u en 01u, is het mogelijk dat hij de volgende dag niet verandert.
3. Druk het opwindmechanisme terug in de normale stand.
Uurwijzer
Secondewijzer
Minutenwijzer 2e stand
1e stand
Normale stand van het
opwindmechanisme
Datumaanduiding
(de plaats van de datum kan verschillen
afhankelijk van het model)
Dag (de plaats kan verschillen afhankelijk
van het model)

Puesta en marcha
A continuación,
presione la corona
Retire el dispositivo
de retención tirando
en el sentido de la
flecha.
Instrucciones
Para asegurar el correcto funcionamiento del
reloj
, es necesario efectuar cierto mantenimiento
periódico. La frecuencia de dicho mantenimiento depende del modelo, de las condiciones climáticas y
el cuidado del usuario. Por regla general, le recomendamos seguir las instrucciones que se describen
a continuación para mantener su reloj en las mejores condiciones durante el mayor tiempo posible.
- Temperatura: evite las temperaturas inferiores a 0°C (30°F) o superiores a 35°C (100°F).
- Evite la exposición prolongada al sol y al vapor, así como el contacto con alcohol,
detergentes, perfumes o productos cosméticos para evitar daños, decoloración o cualquier
reacción perjudicial de otro tipo.
- No use los botones del reloj bajo el agua para evitar que esta penetre en el mecanismo.
La información contenida en este documento es propiedad de ICE Universal Ltd y no puede ser
reproducida sin su autorización.
ESPAÑOL
A) AJUSTE DE LA FECHA
1. Tire con suavidad de la corona hasta colocarla en la 1ª posición.
2. Gire la corona para ajustar la fecha. Para asegurarse de que la fecha cambia al día siguiente,
procure ajustarla antes de las 21 h. del día. Si lo hace entre las 21 h. y la 1 h., es posible que no
cambie al día siguiente.
3. Presione la corona para colocarla en su posición normal.
B) AJUSTE DE LA HORA
1. Tire con suavidad de la corona hasta colocarla en la 2ª posición.
2. Gire la corona para ajustar la hora y los minutos hasta colocar las manecillas en la hora deseada.
3. La aguja de los segundos empieza de cero al volver a colocar la corona en su posición normal.
C) AJUSTE DEL DÍA
1. Tire con suavidad de la corona hasta colocarla en la 1ª posición.
2. Gire la corona para ajustar el día. Para asegurarse de que el día cambia al día siguiente, procure
ajustarla antes de las 21 h. del día. Si lo hace entre las 21 h. y la 1 h., es posible que no cambie
al día siguiente.
3. Presione la corona para colocarla en su posición normal.
Horaria
Segundera
Minutera
2ª posición
1ª posición
Posición normal de la corona
Recuadro de la fecha
(la ubicación de la fecha puede
variar según el modelo)
Día (la ubicación puede variar según
el modelo)

Messa in marcia
Premere
in seguito
il pulsante
di ricarica.
Togliere il blocco di
plastica nel senso della
freccia.
Istruzioni
L’orologio richiede una manutenzione regolare per garantire il suo buon funzionamento.
Gli intervalli di intervento variano in funzione del modello, del clima e della cura portata
all’orologio da parte del proprietario. Come regola generale, raccomandiamo di seguire la
procedura seguente per preservare il più a lungo possibile l’orologio in uno stato ottimale.
- Temperatura: evitare temperature inferiori a 0°C o superiori a 35°C.
- Evitare l’esposizione prolungata a sole e vapore e il contatto con alcol, detergenti,
profumi o prodotti cosmetici per evitare distorsioni, scoloramenti o qualsiasi reazione che
provochi danni.
- Non utilizzare i tasti dell’orologio mentre si è sott’acqua per evitare che l’acqua entri nel
meccanismo.
Le informazioni contenute in questo documento sono proprietà di ICE Universal Ltd e non
possono essere riprodotte senza la sua autorizzazione.
ITALIANO
A) REGOLAZIONE DELLA DATA
1. Tirare delicatamente il pulsante sulla prima posizione.
2. Girare il pulsante di ricarica in senso antiorario per regolare la data. Se la data è regolata tra
le ore 21 e l’1, è possibile che la data non cambi l’indomani.
3. Rispingere il pulsante di ricarica sulla posizione normale.
B) REGOLAZIONE DELL’ORA
1. Tirare delicatamente il pulsante sulla seconda posizione.
2. Girare il pulsante di ricarica per regolare le lancette delle ore e dei minuti.
3. La lancetta dei secondi riparte quando il pulsante di ricarica è spinto sulla posizione normale.
C) REGOLAZIONE DEL GIORNO
1. Tirare delicatamente il pulsante sulla prima posizione.
2. Girare il pulsante di ricarica per regolare il giorno. Se il giorno è regolata tra le ore 21 e l’1, è
possibile che il giorno non cambi l’indomani.
3. Rispingere il pulsante di ricarica sulla posizione normale.
Lancetta delle ore
Lancetta dei secondi
Lancetta dei minuti
2a posizione
1a posizione
Posizione normale del pulsante
di ricarica
Datario
(il posizionamento della data può
cambiare in funzione del modello)
Giorno (il posizionamento può cambiare
in funzione del modello)

Colocação em
funcionamento
De seguida,
prima a coroa.
Retire o sistema de
bloqueio em plástico no
sentido da seta.
Instruções
O relógio deve ser regularmente sujeito a procedimentos de manutenção a fim de garantir um
correcto funcionamento. Os intervalos para as intervenções variam em função do modelo, do
meio ambiente e do cuidado do proprietário com o relógio. Regra geral, recomendamos as
etapas que se seguem com vista a preservar, durante o maior período de tempo possível, o
estado impecável do seu relógio.
- Temperatura: evitar temperaturas inferiores a 0º (ª30ºF) ou superiores a 35º (100ºF).
- Evitar a exposição prolongada ao sol, vapor, contacto com álcool, detergentes, perfumes ou
produtos de cosmética, para evitar a deformação, descoloração, ou qualquer reacção que
possa danificar o relógio.
- Não utilize os botões do relógio enquanto estiver debaixo de água, de modo a evitar que
esta possa entrar dentro do mecanismo.
As informações constantes deste documento são da propriedade da ICE Universal Ltd e não
podem ser reproduzidas sem a sua autorização.
PORTUGUÊS
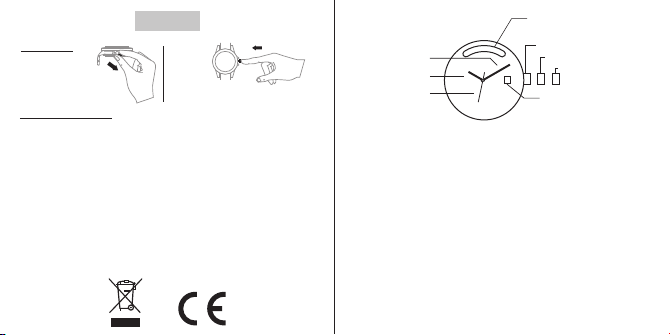
A) REGULAÇÃO DA DATA
1. Puxe cuidadosamente a coroa até à 1ª posição.
2. Rode a coroa no sentido contrário ao dos ponteiros de um relógio para regular a data. Se a
data for regulada entre as 21:00 e a 01:00, é possível que não mude no dia seguinte.
3. Volte a colocar a coroa na posição normal.
B) REGULAÇÃO DA HORA
1. Puxe cuidadosamente a coroa até à 2ª posição.
2. Rode a coroa para ajustar os ponteiros das horas e dos minutos.
3. O ponteiro dos segundos recomeça a movimentar-se assim que a coroa seja recolocada
na posição normal.
C) REGULAÇÃO DA DIA
1. Puxe cuidadosamente a coroa até à 1ª posição.
2. Rode a coroa para regular o dia. Se o dia for regulada entre as 21:00 e a 01:00, é
possível que não mude no dia seguinte.
3. Volte a colocar a coroa na posição normal.
Ponteiro das horas
Ponteiro dos segundos
Ponteiro dos minutos
2ª posição
1ª posição
Posição normal da coroa
Data
(o posicionamento da data pode
diferir em função do modelo)
Dia(o posicionamento pode diferir em
função do modelo)

简体中文
星期(星期位置视乎不同
型号而有所不同)
调校星期的方法
顺时针转动柄轴以设置星期。如果在晚上九时至凌晨一时之
间进行星期调整,翌日星期可能没有改变。
星期
This manual suits for next models
1
Table of contents
Languages:
Other ice-watch Watch manuals
Popular Watch manuals by other brands

Garmin
Garmin D2 DELTA PX owner's manual

Izzo Golf
Izzo Golf Swami instruction manual

Citizen
Citizen H990 Eco-Drive Satellite Wave Abbreviated Manual

Iget
Iget GX1 BLACKVIEW Sport quick start guide

Zeon
Zeon IN7300 CALIBRE 640 Operation manual

Momentum
Momentum HEARTWARE Operating instructions & warranty information