Icom IC-FR3000 Series User manual

VHF FM REPEATER
iC-fr3000
iC-fr3100

INTRODUCTION
This service manual describes the latest service informa-
tion for the IC-FR3000/IC-FR3100 VHF FM REPEATER.
To upgrade quality, all electrical or mechanical parts and
internal circuits are subject to change without notice or
obligation.
DANGER
USE ONLY the specified AC voltage described on the
AC power socket. Other voltages may causes repeater
damage or personal injury.
DO NOT expose the repeater to rain, snow or any liquids.
DO NOT reverse the polarities of the power supply when
connecting the repeater.
DO NOT apply an RF signal of more than 20 dBm (100
mW) to the antenna connector. This could damage the
repeater’s front end.
ORDERING PARTS
Be sure to include the following four points when ordering
replacement parts:
1. 10-digit order numbers
2. Component part number and name
3. Equipment model name and unit name
4. Quantity required
<SAMPLE ORDER>
1110003780 S.IC NJM2902V IC-FR3000 LOGIC UNIT 1 piece
8930056450 2368 6-key IC-FR3000 CHASSIS 5 pieces
Addresses are provided on the inside back cover for your
convenience.
REPAIR NOTES
Make sure a problem is internal before disassembling
the repeater.
DO NOT open the repeater until the repeater is discon-
nected from its power source.
DO NOT force any of the variable components. Turn
them slowly and smoothly.
DO NOT short any circuits or electronic parts. An insu-
lated tuning tool MUST be used for all adjustments.
DO NOT keep power ON for a long time when the re-
peater is defective.
DO NOT transmit power into a signal generator or a
sweep generator.
ALWAYS connect a 40 dB or 50 dB attenuator be-
tween the repeater and a deviation meter or spectrum
analyser when using such test equipment.
READ the instructions of test equipment thoroughly
before connecting equipment to the repeater.
1.
2.
3.
4.
5.
6.
7.
8.
VersionModel
Europe
U.S.A.
Germany
Symbol AC supply
USA2
FRG2
Power
50 W
100 V–120 V
100 V–120 V
GeneralIC-FR3000
IC-FR3100
GEN2 50 W
220 V–240 VGeneral GEN4 50 W
220 V–240 V
220 V–240 V
EUR2 25 W
25 W

TABLE OF CONTENTS
SECTION 1 SPECIFICATIONS
SECTION 2 INSIDE VIEWS
SECTION 3 CIRCUIT DESCRIPTION
3 - 1 RECEIVER CIRCUITS ................................................................................................... 3 - 1
3 - 2 TRANSMITTER CIRCUITS ............................................................................................ 3 - 3
3 - 3 PLL CIRCUITS................................................................................................................. 3 - 4
3 - 4 OTHER CIRCUITS .......................................................................................................... 3 - 5
3 - 5 POWER SUPPLY CIRCUITS ......................................................................................... 3 - 5
3 - 6 PORTALLOCATIONS .................................................................................................... 3 - 6
SECTION 4 ADJUSTMENT PROCEDURES
4 - 1 PREPARATION................................................................................................................ 4 - 1
4 - 2 PLL ADJUSTMENST ...................................................................................................... 4 - 4
4 - 3 RECEIVER ADJUSTMENT ............................................................................................ 4 - 6
4 - 4 SOFTWARE ADJUSTMENT............................................................................................ 4 - 7
SECTION 5 PARTS LIST
SECTION 6 OPTION UNIT INSTALLATION
SECTION 7 MECHANICAL PARTS AND DISASSEMBLY
SECTION 8 SEMI-CONDUCTOR INFORMATION
SECTION 9 BOARD LAYOUTS
9 - 1 FRONT UNIT..................................................................................................................9-1
9 - 2 VR UNIT ......................................................................................................................... 9 - 1
9 - 3 TVCO UNIT .................................................................................................................... 9 - 1
9 - 4 RVCO UNIT.................................................................................................................... 9 - 1
9 - 5 LOGIC UNIT................................................................................................................... 9 - 3
9 - 6 RX UNIT ......................................................................................................................... 9 - 5
9 - 7 TX UNIT ......................................................................................................................... 9 - 7
9 - 8 50PA UNIT...................................................................................................................... 9 - 9
9 - 9 VARISTER UNIT ............................................................................................................ 9 - 9
9 - 10 REG UNIT ...................................................................................................................... 9 - 11
9 - 11 JACK1 UNIT................................................................................................................... 9 - 11
9 - 12 JACK2 UNIT................................................................................................................... 9 - 11
SECTION 10 BLOCK DIAGRAM
SECTION 11 VOLTAGE DIAGRAM

Measurement method
Frequency range
Type of emission
Channel spacing
Frequency stability
Number of channels
Antenna connector
Power supply requirement
Current drain (approx.)
Operating temperature range
Dimensions (proj. not included)
Weight
RF output power (High/Low)
Modulation system
Maximum frequency deviation
Spurious emissions
Adjacent channel power
Input impedance
Receive system
Intermediate frequencies
Sensitivity (typical)
Adjacent channel selectivity (typical)
Spurious response
Intermodulation (typical)
Audio output power
Audio output impedance
[USA2], [GEN2], [GEN4] [EUR2], [FRG2]
SECTION 1 SPECIFICATIONS
1-1
All stated specifications are subject to change without notice or obligation.
RECEIVER TRANSMITTER GENERAL
EIA / TIA-603 ETS 300 086
150.000–174.000 MHz
W/N (25 kHz; Wide / 12.5 kHz; Narrow): 16K0F3E / 8K50F3E
[USA2], [GEN2], [GEN4], [EUR2]
M/N (20 kHz; Middle / 12.5 kHz; Narrow): 14K0F3E / 8K50F3E [FRG2]
25 or 12.5 kHz (Wide / Narrow)
20 or 12.5 kHz (Middle / Narrow)
±2.5 ppm ±1.0 kHz
Max. 32 channel
N-type ×2 (50 Ω)
100 V–120 V [USA2], [GEN2]
220 V–240 V [GEN4], [EUR2], [FRG2]
13.6 V DC (negative ground) 13.2 V DC (negative ground)
TX (at 50 W) 15.0 A TX (at 25 W) 10.0 A
RX (max. audio) 2 A
(stand-by) 1 A
–30˚C to +60˚C (–22˚F to +140˚F) –25˚C to +55˚C
410(W) ×110(H) ×360(D) mm; 16.1 (W) ×4.3 (H) ×14.1 (D) inch
12 kg; 26.5 lb
50 W / 10 W 25 W / 5 W
Variable reactance frequency modulation
±5.0 kHz [Wide], ±4.0 kHz [Middle], ±2.5 kHz [Narrow]
70 dBc typical 0.25 µW ≤1GHz, 1.0 µW >1 GHz
70 dB [Wide]/[middle], 60 dB [Narrow]
600 Ω
Double-conversion superheterodyne system
1st: 31.65 MHz, 2nd: 455 kHz
0.5 µV at 12 dB SINAD 6 dBµV (emf) at 20 dB SINAD
70 dB [Wide]/[Middle], 60 dB [Narrow]
70 dB
70 dB
2.5 W typical at 10% distortion with a 4 Ωload
4 Ω

2 - 1
JACK1 unit*
FRONT unit
JACK2 unit*
TX unit
RX unit
PA unit
REG unit
LOGIC unit*
SECTION 2 INSIDE VIEWS
• BOARD LAYOUT
*: Located under side of this point.
• PA UNIT
Top view
Pre-drive
(Q4: 2SK3475)
APC CTRL
(IC1: TA75S01F
Q9: DTC143ZU
Q10: DTC114EU)
+9 V switch
(Q7: DTC114EU
Q8: 2SA1362)
+5 V regulator
(IC7: TA78L05)
Power amplifier
(IC2:S-AV32 50 W type
S-AV33 25 W type)

2 - 2
• LOGIC UNIT
Top view
Bottom view
Splatter filter
(IC4: NJM2902V)
CTCSS decoder
(IC29: FX805LG)
D/A converter
(IC25: M62364)
Mic mix amplifier
(IC2: NJM2902V)
Mic amplifier
(IC1: NJM2902V)
AF amplifier
(IC17: LA4425A)
Mic mute
(IC13: BU4066)
LED current CTRL
(Q18, Q19, Q20: XP1114)
Temperature switching
circuit (IC32: TC4W53)
MIC amplifier, Limitter
(IC3: NJM2902V)
ON-HOOK signal output
(IC45: LM567M)
High-pass filter,
De-emphasis circuts
(IC9: NJM2902V)
RESET
(IC34: S-80842C)
CPU
(IC33: HD64F2238BF)
Ringer detect circuit
(IC48: TLP121)
EEPROM
(IC37: HN58X2464TI)
DTMF decoder
(IC30: TC4W53FU,
IC31: LC7387M)

2 - 3
• TX UNIT
Top view
*: Located under side of this point.
• RX UNIT
Top view
*: Located under side of this point.
PLL reference
oscillator
12.8 MHz
(X1: CR-759)
PLL IC*
(IC2: MB1511PFV)
TX VCO circuit
Mixer
(IC6: NJM2107F)
D/A converter*
(IC5: M62364FP)
RF amplifier
(Q1: 2SC5337)
PLL IC*
(IC4: MB1511PFV)
RX VCO circuit
IF amplifier
(Q3: 2SK1771)
2nd Lo oscillator
31.195 MHz
(X2: CR-757)
IF IC
(IC2: TA31136FN)
Noise amplifier
(IC8: NJM2902V)
Reference oscillator
12.8 MHz
(X3: CR-732)
1st Mixer
(IC1: GN2011)
Lo amplifier*
(Q8: 2SC4226,
Q9: 2SC4703)

SECTION 3 CIRCUIT DESCRIPTION
3 - 1
3-1 RECEIVER CIRCUITS
3-1-1 RF CIRCUIT
(RX
UNIT
)
Received signals from the RX antenna connector enter the
RX unit J1 and pass through a tuned bandpass filter (D3,
D4, L2, L3, C5–C8, C12, C13, C205, C206, C220, 221)
which is controlled by the D/A converter IC (LOGIC unit;
IC25). The filtered signals are applied to an RF amplifier
(Q1). The amplified signals are applied to a bandpass filter
(L6, L7, L12, L13, C9–C11, C14, C15, C21, C22, C24, C30,
C207, C208), and are then applied to the 1st mixer circuit.
3-1-2 1ST MIXER AND 1ST IF CIRCUITS (RX UNIT)
The 1st mixer circuit converts the received signals to a fixed
frequency of the 1st IF signal with the PLL output frequency.
By changing the PLL frequency, only the desired frequency
will pass through a crystal filter at the next stage of the 1st
mixer.
The filtered signals are applied to the 1st mixer circuit (L8,
L9, L10, IC1) and are then mixed with the 1st LO signal from
the PLL circuit to produce a 31.65 MHz 1st IF signal.
The 1st IF signal passes through a MCF (Monolithic Crystal
Filter; FI1) to suppress out-of-band signals. The filtered sig-
nal is applied to the 2nd mixer circuit (IC2, pin 16) via the
buffer amplifier (Q3).
3-1-3 2ND IF AND DEMODULATOR CIRCUITS
(RX UNIT)
The 2nd mixer circuit converts the 1st IF signal to a 2nd IF
signal. A double-conversion superheterodyne system
improves the image rejection ratio and obtains stable receiv-
er gain.
The amplified signal is applied to the 2nd mixer section of
the FM IF IC (IC2, pin 16), and is then mixed with the 2nd
LO signal for conversion to a 455 kHz 2nd IF signal.
The 455 kHz 2nd IF signal is applied to a ceramic bandpass
filter (narrow; FI5, wide; FI6) where unwanted signals are
suppressed and are then applied to a limiter amplifier sec-
tion in the system IC (IC2, pin 5).
IC2 contains the 2nd mixer, limiter amplifier, quadrature
detector, active filter and noise amplifier circuits, etc. The
local oscillator section and X2 generate 31.195 MHz for the
2nd LO signal.
The 2nd LO signal is then amplified at the limiter amplifier
section (IC2, pin 5) and applied to the quadrature detector
section (IC2, pins 10, 11 and X1) to demodulate the 2nd IF
signal into AF signals.
The AF signals are output from pin 9 (IC2) and are then
applied to the AF amplifier circuit on the LOGIC unit.
3-1-5 AF AMPLIFIER CIRCUIT (LOGIC UNIT)
The AF amplifier circuit amplifies the demodulated AF sig-
nals to drive a speaker.
The AF signals from the FM IF IC (RX unit; IC2, pin 9) are
applied to a buffer amplifier (IC9, pins 8, 9). The amplified
signals pass through the high-pass filter (IC9, pins 5, 7, 12,
14) which removes CTCSS or DTCS signals.
The filtered AF signals are output from pin 7 (IC9), and are
applied to the de-emphasis circuit (IC9, pins 1, 2) with fre-
quency characteristics of –6 dB/octave, and then passed
through a low-pass filter (IC10, pins 1, 3, 5, 7). The filtered
signal is applied to a volume control (VR unit; R1) to control
the audio level.
The output AF signals from a volume control (VR unit; R1)
pass through the analog switch IC (IC16, pins 1, 7), and are
then applied to the AF power amplifier (IC17, pins 1, 4) to
drive a speaker.
• 2ND IF AND DEMODULATOR CIRCUITS (RX UNIT)
FI5
2nd IF filter
455 kHz
IF
amp.
QUAD.
detector
Active
filter
"DISC" signal to
LOGIC unit J1 X1
RSSI 2nd
Mixer
X2
1st IF from the IF amplifier (Q3)
"RSSI" signal to the CPU
87531
16
13
11
109
IC2
TA31136FN
Noise
comp.
Noise
amp.
12
FI6
"N-DET" to the CPU
"SQL" signal to the
LOGIC unit J1
NARROW
WIDE

3 - 2
3-1-6 RECEIVER MUTE CIRCUITS (LOGIC UNIT)
• NOISE SQUELCH
The noise squelch circuit cuts out AF signals when no RF
signals are received. By detecting noise components in the
AF signals, the squelch circuit switches the AF mute switch.
Some noise components in the AF signals from the FM IF IC
(RX unit; IC2, pin 9) are passed through the SQL level con-
troller (VR unit; R2). The level controlled signals are applied
to the active filter section in the FM IF IC (RX unit; IC2, pin
8). Noise components about 10 kHz are amplified and out-
put from pin 7 (RX unit; IC2).
The filtered signals are converted to the pulse-type signals
at the noise detector section and output from pin 13 (RX
unit; IC2).
The NDET signal from the FM IF IC (RX unit; IC2) is applied
to the CPU (IC33, pin 40). The CPU analyses the noise con-
dition and controls the AF mute signal via “AFMUTE1” line
(IC40, pin 4) to the AF mute switch (IC16, pin 5).
• TONE SIGNALS
The tone squelch circuit detects AF signals and opens the
squelch only when receiving a signal containing a matching
subaudible tone (CTCSS or DTCS).
The CTCSS signal passes through a low-pass filter circuit
(IC8, pins 1, 3, 5, 7, 8, 10), and is then applied to the CTCSS
decoder IC (IC29, pin 16). The detected signal is applied to
the CPU (IC 33) via the serial signal line.
The DTCS signal passes through a low-pass filter circuit
(IC12, pins 1, 3, 8, 10), and is then applied to the DTCS
decoder which is inside the CPU (IC33, pin 52) via the
“DTCSI” line.
The 2/5TONE signals are passes through a low-pass filter
circuit (IC12, pins 5, 7) and are then applied to the 2/5 TONE
decoder which is inside the CPU (IC33, pin 51) via “25TI”
line.
The DTMF signal is pass through the DTMF switch IC (IC30
pin 7) and is then applied to the DTMF decoder which is
inside the CPU (IC33, pins 82, 85, 86).
The DTMF switch (IC30) selects the signal from telephone
line or RX unit.
3-2 TRANSMITTER CIRCUITS
3-2-1 AF AMPLIFIER CIRCUIT (LOGIC UNIT)
• INCASE OF THE AF SIGNALS FROM THE MIC JACK
The AF signals from the MIC jack (FRONT unit; J7) are
amplified at the AF amplifier (IC1). The amplified signals are
mixed with the “E_MOD”, “E_MOD2” and “TELAFO” signals
from IC1. The mixed signals pass though the high-pass filter
(IC2, pins 1, 2, 6, 7) via the pre-emphasis circuit (IC2, pins
8, 9).
The filtered signals are applied to the limiter amplifier (IC3),
and are then mixed with the DTMF signal from the CPU
(IC33, pin 43) via the TX-signal filter (IC3, pins 8, 10, 12, 14).
•TONE SIGNALS CIRCUITS (LOGIC UNIT)
DTMF
SW
LPF
LPF
LPF
AMP
AMP
CTCSS
DTCS
2/5TONE
DTMF
CTCSS
DETECTOR
DTMF
DECODER
CPU; IC33
DATA B U S
DATA B U S
DISC signal
from RX unit To the AF amplifier
AMP
IC9
IC8
IC12
IC31
IC30
IC12
IC12
IC8
IC29
•AF AMPLIFIER CIRCUITS (LOGIC UNIT)
AMP
AMP
AMP
AMP SW-D
SW-C
SW-B
SW-A
AMP
MIX PRE
EMP HPF LIMIT SIG
MIX
SPLAT
FIL
RPT AF
MUTE
LPF
E_MOD3
To TX unit
From the FRONT
unit
RPT AF signal
from IC25
From the telephone
circuit
From the REMOTE
connector
From the ACC
connector
From the REMOTE
connector
25TONE
BEEP
CW
DTMF
From CPU (IC33)
MIC
E_MOD
TELAFO
E_MODE2
IC13
MIC MUTE
AFATTO
IC2 IC3 IC3 IC4
IC26
IC14

3 - 3
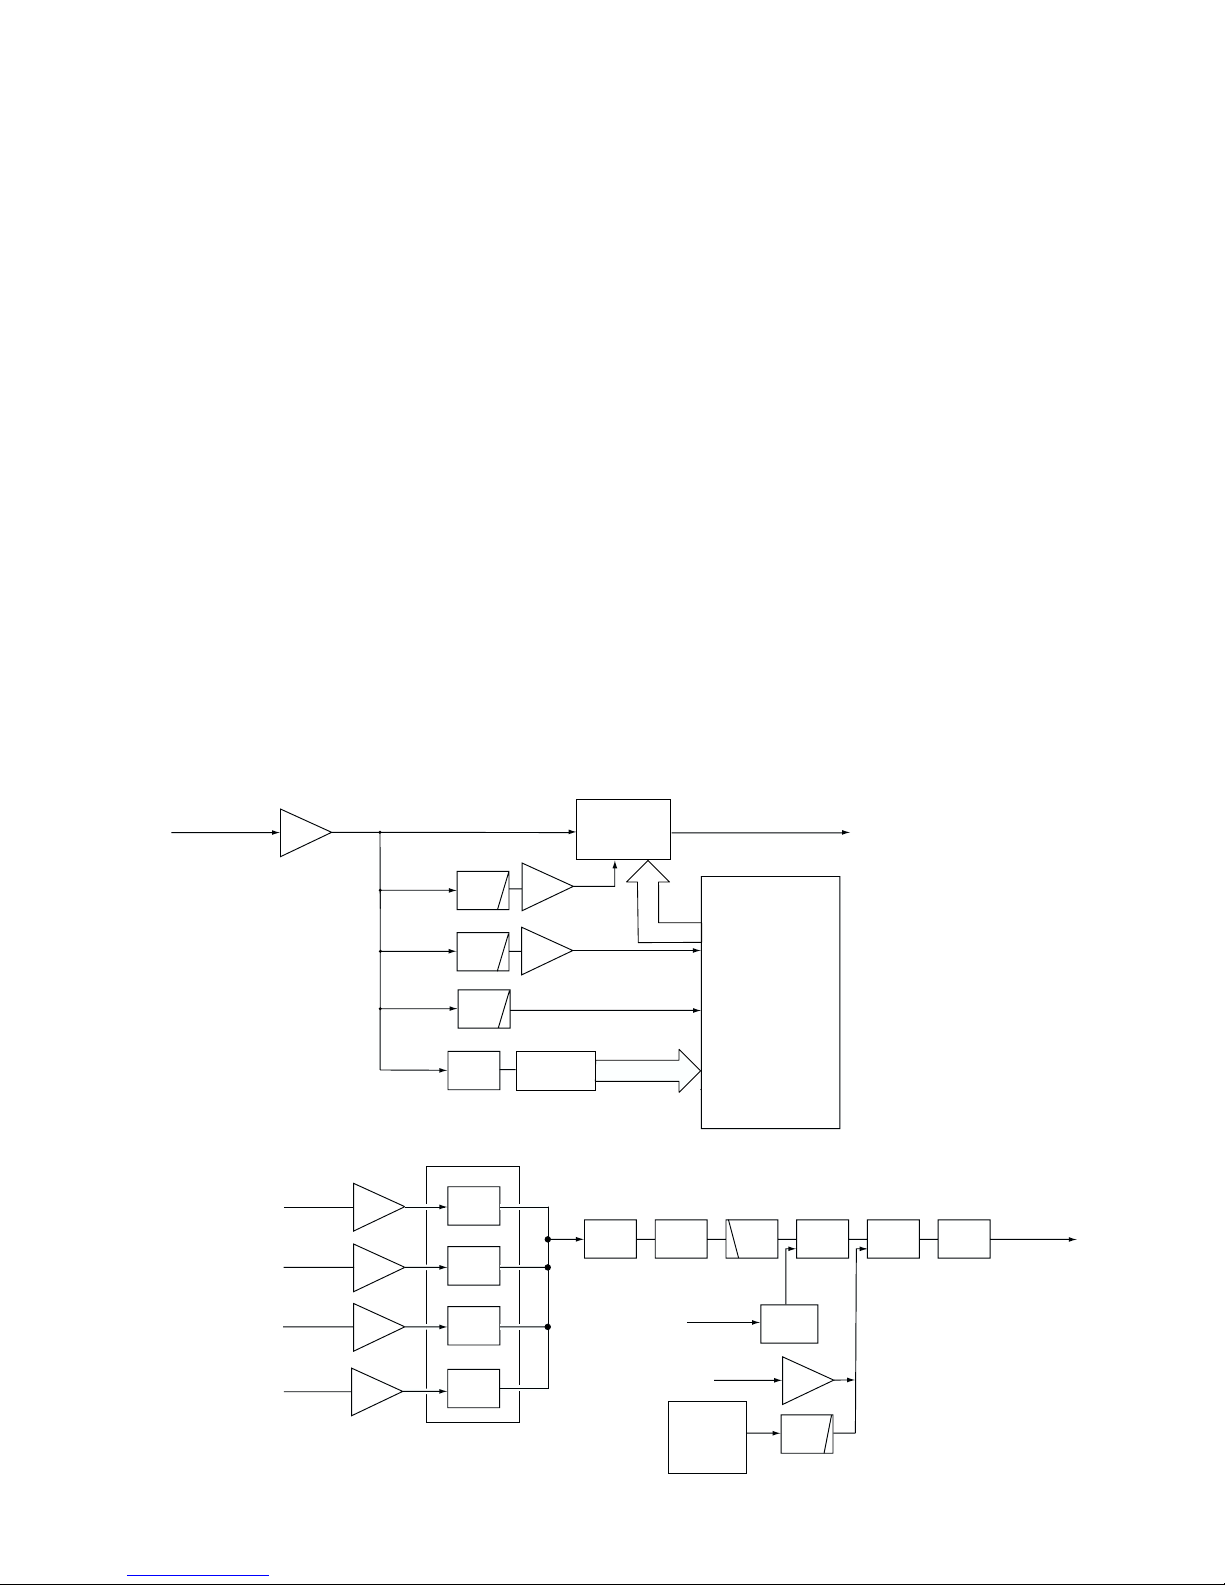
The mixed signals are applied to the splatter filter (IC4).
•INCASE OF THE AF SIGNALS FROM THE ANTENNA
CONNECTOR
The AF signals (received signals) from the antenna connec-
tor (RX unit; J1) are applied to the buffer amplifier (IC9),
CTCSS detector (IC29) and AF amplifier (IC6). The ampli-
fied signals are applied to the D/A converter IC (IC25, pins
8, 9) to adjust a level needed. The adjusted signals pass
through the RPT AF mute switch (IC14), and are applied to
the limiter amplifier (IC3).
•INCASE OF THE 2/5TONE SIGNALS
The 2/5TONE signals from the CPU (IC33, pin 43) are
applied to the limiter amplifier (IC3) via TX signal filter circuit
(IC3, pins 8, 10, 12, 14).
•INCASE OF THE DTMF SIGNALS FROM DIALER
IC
The DTMF from dialer IC (IC47, pin 14) are applied to the
mixer amplifier (IC3) via the TX signal filter circuit (IC3, pins
8, 10, 12, 14).
•INCASE OF THE CTCSS AND DTCS SIGNALS
FROM THE CPU
The CTCSS and DTCS signals from the CPU (IC33, pin 44)
are applied to the TX-tone filter (IC4, pins 12, 14). The fil-
tered signal are applied to the D/A converter IC (TX unit;
IC5) to adjust a tone level needed, and are then mixed with
AF signal at the mixer amplifier IC (TX unit; IC6).
3-2-2 MODULATION CIRCUIT (TX UNIT)
The modulation circuit modulates the VCO oscillating signal
(RF signal) using the AF audio signals.
The filtered signals from the LOGIC unit are applied to the
D/A converter (IC5, pin 4) to adjust AF level. The adjusted
signals are applied to the mixer amplifier IC (IC6, pin 1) with
the CTCSS/DTCS signals.
The mixed signals are applied to the TX VCO circuit to mod-
ulate the oscillated signal (TVCO unit; D5) and modulate the
oscillated signal at VCO circuit (TVCO; Q1, D1–D4). The
modulated VCO output is amplified at the buffer amplifier
(Q1) and is then applied to the drive amplifier circuit on the
PA unit.
3-2-3 POWER AMPLIFIER CIRCUIT (PA UNIT)
The power amplifier circuit amplifies the driver signal to an
output power level.
The RF signal from the TX unit is applied to the pre-drive
(Q4) to amplify the level needed at the power amplifier. The
amplified signal passes through the attenuator circuit
(R29–R31) and is then applied to the power amplifier (IC2).
The RF signal from the pre-drive (Q4) is applied to the
power amplifier (IC2) to obtain 50 W ([EUR2], [FRG2]: 25 W)
of RF power.
The amplified signal is passed through a low-pass filter cir-
cuit (L6, L7, L20, C1–C3, C48, C73, C98, C100) and APC
detector (D2, D4, R7, R8, R20, R21, R25, R26, R29, R36,
R37, C78, C79), and is then applied to the TX antenna con-
nector (CHASSIS; J1).
Control voltage for the pre-drive (Q4) and power amplifier
(IC2) comes from the APC amplifier (IC1, Q9, Q10) to obtain
stable output power. The transmit mute switch (Q7, Q8) con-
trols the pre-drive (Q4) and power amplifier (IC2) when
transmit mute is necessary.
3-2-4 APC CIRCUIT (PA UNIT)
The APC circuit protects the power amplifier from a mis-
matched output load and stabilizes the output power.
The APC detector circuit detects forward signals and reflec-
tion signals at D2 and D4 respectively. The combined volt-
age become minimum level when the antenna impedance is
matched at 50 Ω, and the voltage is increased when it is
mismatched.
The detected voltage is applied to the APC amplifier (IC1 pin
3), and the power setting “PCON” signal from the D/A con-
verter (TX unit; IC5), controlled by the CPU (LOGIC unit;
IC33), is applied to the the APC amplifier (IC1 pin 1) for ref-
erence. When antenna impedance is mismatched, the
detected voltage exceeds the power setting voltage. Then
the output voltage of the APC amplifier IC (IC1, pin 4) con-
trols the input current of the drive amplifier (Q4) and power
amplifier IC (IC2, pin 2) to reduce the output power.
•APC CIRCUIT (PA UNIT)
DRIVE
AT T DET
LPF
+9V
SW
APC
CTRL
FWSWR
RVSWR
POWER AMP
PCON
(TX UNIT; IC5)
Q4
VCC
TX UNIT
TMUTE2
Q7, Q8
To IC33; pin 46 (LOGIC UNIT)
To IC33; pin 47 (LOGIC UNIT)
IC2
IC1, Q9, Q10

3 - 4
3-3 PLL CIRCUITS
3-3-1 GENERAL
Each receiver and transmitter circuit has an independent
PLL circuit for controlling frequencies. All PLL circuits are
shielded and installed on the RX and TX units.
PLL circuits steadily oscillate the transmit frequency and the
receive local frequency. The PLL output frequency is con-
trolled by divided ratio (N-data) of the programmable divider.
3-3-2 RECEIVER PLL CIRCUIT (RX UNIT)
The PLL IC (IC4) which includes in the prescaler, the pro-
grammable counter and the phase comparator generates
the 1st LO frequency with the VCO circuit (RVCO unit; Q1,
D1–D4). The PLL IC sets the divided ratio which bases on
N-data from the CPU (LOGIC unit; IC33) to control the pro-
grammable counter. The PLL IC compares a phases of the
VCO signal with the reference oscillator frequency, and is
then applied to the VCO circuit (RVCO unit; Q1, D1–D4).
3-3-3 RECEIVER REFERENCE OSCILLATOR
CIRCUIT (RX UNIT)
The 12.8 MHz reference frequency is produced by the oscil-
lator (X3). The frequency is adjusted by the D/A converter IC
(LOGIC unit; IC25). The reference frequency is applied to
the PLL IC (IC4, pin 1).
3-3-4 RECEIVER VCO CIRCUIT (RVCO UNIT)
The VCO circuit (Q1, D1–D4) generates the receive fre-
quency. The signal is applied to the buffer amplifier (Q2) and
is then applied to the PLL IC (RX unit; IC4). The signal is
amplified at the buffer amplifiers (RX unit; Q8, Q9) and then
passes through the low-pass filter (RX unit; L23, L24, L39,
L53, C112–C114, C184, C216, C217) and attenuator (RX
unit; R81, R136, R137). The filtered signal is applied to the
1st mixer circuit (RX unit; IC1) as 1st LO signal.
A part of the signal is applied to the PLL IC (IC4) via the
amplifier (Q14) as RX PLL lock voltage.
3-3-5 TRANSMITTER PLL CIRCUIT (TX UNIT)
The PLL IC (IC2) which includes in the prescaler, the pro-
grammable counter and the phase comparator. The PLL IC
sets the divided ratio which bases on N-data from the CPU
(LOGIC unit; IC33) to control the programmable counter.
The PLL IC compares a phases of the VCO signal with the
reference oscillator frequency, and is then applied to the
VCO circuit (TVCO unit; Q1, D1–D4).
3-3-6 TRANSMITTER REFERENCE OSCILLATOR
CIRCUIT (TX UNIT)
The 12.8 MHz reference frequency is produced by the oscil-
lator (X1). The frequency is adjusted by the D/A converter IC
(IC5, pin 14). The reference frequency is applied to the PLL
IC (IC2, pin 1).
3-3-7 TRANSMITTER VCO CIRCUIT (TVCO UNIT)
The VCO circuit (Q1, D1–D4) generates the transmit fre-
quency. The signal is applied to the buffer amplifier (Q2) and
is then applied to the PLL IC (TX unit; IC2) and buffer ampli-
fier (TX unit; Q1, Q2). The amplified signal is applied to the
PA unit.
A part of the signal is applied to the PLL IC (IC2) via the
amplifier (Q3) as TX PLL lock voltage.
•PLL CIRCUITS
To the PA unit
To the 1st mixer circuit
AMP
AMP
AMP
PLL IC
PLL IC
RVCO
TVCO
AMP
AMP
X1
X3
CPU; IC33
TX UNIT
RX UNIT
LOGIC UNIT
DATA B U S
DATA B U S D1–D4
Q1
D1–D4
Q1
Q14
Q8 Q9
Q1
Q3
IC2
IC4

3 - 5
3-4 OTHER CIRCUIT
3-4-1 TELEPHONE IF CIRCUIT (LOGIC UNIT)
The signals from the telephone line (FRONT, J13) are
applied to the ringer detect circuit (IC48, D1, D5, R131,
R143, R145, C100, C103, C375). The detected signals are
applied to the CPU (IC33, pin 73) via “RING”line. The
“HOOKC”signal from the CPU (IC33, pin 72) and the “DP”
signal from IC47 are applied to the hook switch (RL1, RL2)
to off-hook.
Received AF signals from the RX unit pass through the high-
pass filter (IC9, pins 5, 7, 12, 14), de-emphasis (IC9, pins 1,
2) and low-pass filter circuits (IC10, pins 1, 3, 5, 7, 8, 9). The
filtered AF signals are amplified at IC7 (pins 12, 14) and are
then applied to the network IC (IC46, pin 16) via T6. The out-
put signals from IC46 are applied to the J13 (FRONT unit)
via L1, L2.
AF signals from J13 (FRONT unit) are applied to the network
IC (IC46, pins 8, 9). The output signals from IC46 (pins 8, 9)
are applied to the AF amplifier IC (IC1, pins 1, 2) via T8.
Amplified signals pass through the MIC mute switch (IC1,
pins 3, 4), the MIC mixer amplifier (IC2, pins 13, 14), the pre-
emphasis circuit (IC2, pins 8, 9), the high-pass filter circuit
(IC2, pins 1, 2, 6, 7), limiter amplifier circuit (IC3, pins 1, 2),
S-mixer circuit (IC3,
, pins 6, 7), and splatter filter circuit (IC4,
pins 1, 3, 5, 7, 8, 10). The filtered signals are applied to the
TX unit.
After off-hook condition, DTMF signal from telephone line is
applied to the decoder IC (IC31) to decode the DTMF signal.
The DTMF signal is applied to the CPU (IC33) via serial sig-
nal line.
The end signal is detected at IC45 and is then applied to the
CPU (IC33). The “HOOKC”signal from the CPU (IC33, pin
72) and the “DP”signal from IC47 are applied to the hook
switch (RL1, RL2) to on-hook.
3-4-2 EEPROM CIRCUIT (LOGIC UNIT)
The detector IC (IC34) detects power supply ON-OFF volt-
age. The signal from IC34 is applied to IC33 (CPU). IC35,
IC36 are reset signal circuit which stabilizes memory data
for the EEPROM (IC37).
EEPROM (IC37) memories clone data and adjust setting
condition data.
3-4-3 TEMPERATURE DETECT CIRCUIT
(LOGIC UNIT)
The temperature detect circuit protects the power amplifier
and power supply circuit from high temperature and stabi-
lizes the output power.
Inside temperature of the PA unit is detected at D15 (PA unit)
and is then applied to the amplifier IC (PA unit; IC3). The
amplified signal is applied to the CPU (IC33) to analyze the
temperature via IC32.
Inside temperature of the REG unit is detected at D6 (REG
unit) and is then applied to the amplifier (REG unit; IC9). The
amplified signal applied to the CPU (IC33) to analyze the
temperature via IC32.
IC32 selects “PATEMP”or “REGTEMP”signals from the PA
or REG unit.
Description
The voltage from the DC power unit (CHASSIS;
EP1).
The same voltage as the PS 15V line which is
controlled by the power switch.
Common 9 V for converted from the VCC1 line
by the M9V regulator circuit (REG unit; IC1, Q8,
Q9). The voltage is applied to the TX and RX
units.
Common 9 V converted from the VCC1 line by
the L9V regulator circuit (REG unit; IC2).
Common 5 V converted from the L9V line by the
A5V regulator circuit (REG unit; IC3).
Common 5 V converted from the L9V line by the
L5V regulator circuit (LOGIC unit; IC38, Q48,
D43).
Common 5 V converted from the L9V line by the
C5V regulator circuit (LOGIC unit; IC38, Q45,
D13).
Common 5 V converted from the M9V line by the
TEL5V regulator circuit (LOGIC unit; IC11).
Line
PS 15V
VCC1
M9V
L9V
A5V
L5V
C5V
TEL5V
3-5 POWER SUPPLY CIRCUITS
3-5-1 LOGIC AND REG UNITS VOLTAGE LINES
Description
Transmit 5 V converted from the M9V line by the
T5V regulator circuit (TX unit; IC1).
Transmit 6 V converted from the M9V line by the
T6V regulator circuit (TX unit; IC4).
Common 9 V converted from the M9V line by the
V9V regulator circuit (TX unit; Q6).
Line
T5V
T6V
V9V
3-5-2 TX UNIT VOLTAGE LINES
Description
Common 5 V converted from the M9V line by the
+5V regulator circuit (RX unit; IC3).
Common 6 V converted from the M9V line by the
+6V regulator circuit (RX unit; IC7).
Receive 5 V converted from the R9V line by the
R5V regulator circuit (RX unit; IC6).
Receive 9 V controlled by the R9V regulator cir-
cuit (RX unit; Q15) using “R9C”signal from IC39
(LOGIC unit).
Common 9 V converted from the M9V line by the
V9V regulator circuit (RX unit; Q24).
Line
+5V
+6V
R5V
R9V
V9V
3-5-1 RX UNIT VOLTAGE LINES

Input port for the strobe signal.
Input port for the clock signal.
Outputs the serial data to the CPU
(LOGIC unit; IC33).
Input port for the received AF signal.
Outputs the adjusted AF signal for the
repeater output.
Outputs the adjustment signal for the
PLL reference frequency on the RX
unit.
Outputs the BPF tuning signal to the
RX unit.
6
7
8
9
10
14
15
DA2STB
SCK
SDTO
AFFTTI
AFATTO
RVCON
TUNE
Pin Port Description
number name
3-6-4 D/A CONVERTER IC (LOGIC UNIT; IC25)
3 - 6
Outputs the switch control signal for
the received AF signal to the micro-
phone amplifier.
Outputs the control signal for nar-
row/wide bands.
Outputs the control signal for the +9V
regulator on the RX unit.
Outputs the control signal for the M9V
regulator on the Rx unit and TX unit.
Output the detection signals for the
optional boards installed or not.
Outputs the speaker mute signal for
the received AF.
Outputs the speaker mute signal for
the received 2/5TONE and DTMF
signals.
Outputs the MIC mute signal for the
hand microphone.
Outputs the MIC mute signal for the
REMOTE connector.
Outputs the pulse control signal for
the telephone dialer IC
Outputs the MOD mute signal for
AF signal from the telephone line.
Outputs the telephone mute signal for
the received AF signal.
Outputs the MIC mute signal for the
ACC connector.
AFMUTE1
AFMUTE2
MICMUTE1
MICMUTE2
TELBMR
TELMUTE2
TELMUTE1
MICMUTE3
4
5
6
7
11
12
13
14
Pin Port Description
number name
R/BSW
W/NS
R9C
M9C
OPT1
OPT3
5
6
7
12
13
14
Pin Port Description
number name
3-6-2 EXPANDER IC (LOGIC UNIT; IC40)
3-6-3 EXPANDER IC (LOGIC UNIT; IC41)
BASL
RMTL
BUSYL
TXL
D5C
PROGL
DCL
Outputs the control signal for “BASE”
LED on the FRONT unit.
Outputs the control signal for
“REMOTE” LED on the FRONT unit.
Outputs the control signal for “BUSY”
LED on the FRONT unit.
Outputs the control signal for “TX”
LED on the FRONT unit.
Outputs the control signal for the D5V
on the FRONT unit.
Outputs the control signal for “P” LED
on the FRONT unit.
Outputs the control signal for “DC”
LED on the FRONT unit.
4
5
6
7
12
13
14
Pin Port Description
number name
3-6 PORT ALLOCATIONS
3-6-1 EXPANDER IC (LOGIC UNIT; IC39)

3 - 7
Outputs the strobe signal for the PLL
IC (RX unit; IC4).
Outputs the strobe signal for the PLL
IC (TX unit; IC2).
Input port for the unlock signal from
the PLL IC (TX unit; IC2).
Outputs the TX mute control signal for
the TX unit.
Outputs the TX mute control signal for
the PA unit.
Input port for the PTT switch signal
from the microphone.
Input port for the [SPMUTE] switch.
Input port for the [REMOTE] switch.
Input port for the [R/B] switch.
Outputs the BEEP signal for modula-
tion.
Input port for the [MONI] switch.
Input port for the [CHUP] switch.
Input port for the [CHDN] switch.
Input port for the [DISP] switch.
Input port for the [PROG] switch.
Outputs the antenna switching signal.
Outputs the CW signal for transmit-
ting.
Outputs the beep audio signals to the
speaker.
Outputs the master/slave switching
signal.
Input port for the master/slave switch-
ing signal.
Input port for the PTT signal form the
REMOTE connector.
Input port for the PTT signal from the
ACC connector.
Input port for the memory channel
control signal.
Input port for the noise signal from the
FM IF IC (RX unit; IC2).
Outputs the temperature or PLL lock
voltage switching signal.
Outputs the 2/5 TONE and DTMF sig-
nals.
Outputs the CTCSS/DTCS signals.
Input port for the detection signal from
the REG unit.
Input port for the FW SWR signal from
the PA unit.
RPLSTB
TPLSTB
TUNLK
TMUTE
TMUTE2
M_PTT
SPMUTE
REMOTE
R/B
MBEEP
MONI
CHUP
CHDN
DISP
PROG
COAXSW
CWO
KBEEP
M/SO
M/SI
E_PT1
E_PT2
D0–D4
NDET
SW
2/5T
DTMFO
CTDTO
PSD
FWSWR
1
2
3
4
5
8
9
10
11
13
15
16
17
18
19
26
27
28
29
30
33
34
35–39
40
41
43
44
45
46
Pin Port Description
number name
Input port for the TONE signal from
the ACC connector.
Outputs the adjusted external TONE
signal.
Outputs the TX AF signal to the TX
modulation.
Input port for the AF signal.
Input port for the strobe signal.
Input port for the clock signal.
Outputs the serial data signal to the
CPU (LOGIC unit; IC33).
Input port for the TONE signal.
Outputs the adjusted TONE signal.
Outputs the TX power control signal.
Outputs the adjustment signal for the
TX unit PLL reference frequency.
Outputs the control signal for modula-
tion balance.
Input port for the mixed signal with the
external signal, TX AF signal and
internal signals.
Outputs the adjustment signal for
TONE balance.
Outputs the adjusted AF signal for the
TX modulation.
Input port for the mixed signal with the
ETONE, TX AF and TONE signals.
ETONE
ETONEO
TXAFO
TXAF
DA1STB
SCK
SDTO
TONE
TONEO
PCON
TVCON
MODC
MIXO
REFMOD
MOD
MIXO
1
2
3
4
6
7
8
9
10
11
14
15
21
22
23
24
Pin Port Description
number name
3-6-6 CPU (LOGIC UNIT; IC33)
3-6-5 D/A CONVERTER IC (TX UNIT; IC5)

3 - 8
Outputs the strobe signal for the port
expander IC (LOGIC unit; IC41).
Outputs the strobe signal for the port
expander IC (LOGIC unit; IC40).
Outputs the strobe signal for the port
expander IC (LOGIC unit; IC39).
Outputs the strobe signal for the D/A
converter IC (LOGIC unit; IC25).
Outputs the strobe signal for the D/A
converter IC (TX unit; IC5).
Outputs the serial data signal for the
PLL IC (RX unit; IC4, TX unit; IC2),
dialer IC (LOGIC unit; IC47), port
expander IC (LOGIC unit; IC39–IC41)
and optional boards.
Outputs the clock signal for the PLL IC
(RX unit; IC4, TX unit; IC2), dialer IC
(LOGIC unit; IC47), port expander IC
(LOGIC unit; IC39–IC41) and optional
boards.
Input port for the unlock signal from
the PLL IC (RX unit; IC4).
Outputs the control signal for the TX-
TONE filter (LOGIC unit; IC4).
PE3STB
PE2STB
PE1STB
D2STB
D1STB
SDTO
SCK
RUNLK
C/DSW
89
90
91
95
96
97
98
99
100
Pin Port Description
number name
CPU-Continued
Input port for the RV SWR signal from
the PA unit.
Input port for the temperature signals
of PA and REG units.
Input port for the VCO lock voltage to
the TX and RX unit.
Input port for the RSSI signal from the
FM IF IC (RX unit; IC2).
Input port for the 2/5TONE signals.
Input port for the DTCS signal.
Input port for the busy signal from the
pulse tone dialer IC (LOGIC unit;
IC47).
Outputs the serial clock signal for the
EEPROM (LOGIC unit; IC37).
I/O port for the serial data signal
from/to the EEPROM (LOGIC unit;
IC37).
Outputs strobe signal for the pulse
tone dialer IC (LOGIC unit; IC47).
Outputs the ON/OFF HOOK control
signal for the telephone line.
Input port for the ringer detecting sig-
nal from the telephone line.
Outputs the control signal for the clock
shift circuit.
Input port for the power supply detec-
tion signal.
Outputs the serial data signal to the
ACC connector.
Input port for the serial data signal
from the ACC connector.
Outputs the control signal for the
DTMF SW IC (LOGIC unit; IC50).
Outputs the clone data signal.
Input port for the clone data signal.
Outputs the control signal for the
DTMF SW IC (LOGIC unit; IC30).
Input port for the TONE detecting sig-
nal from the DTMF decoder IC
(LOGIC unit; IC31).
Input port for the data decoding signal
from the DTMF decoder IC (LOGIC
unit; IC31).
Outputs the clock signal for the DTMF
decoder IC (LOGIC unit; IC31).
Input port for the detection signal of
the ON-HOOK signal.
Outputs the control signal for the port
expander IC (LOGIC unit; IC39–IC41).
RVSWR
TEMP
T/RLV
RSSI
25TI
DTCSI
TEL-
BUSY
MCK
MDT
TELSTB
HOOKC
RING
SHIFT
INT
TXDTO
RXDTO
DTSEL1
TXDT1
RXDT1
DTSEL2
DTSTD
DTMFD
DTACK
ONHOOK
IOE
47
48
49
50
51
52
68
69
70
71
72
73
74
75
76
77
78
79
80
81
82
85
86
87
88
Pin Port Description
number name
CPU-Continued

4 - 1
4-1 PREPARATION
Some adjustments must be performed on the “ADJUSTMENT MODE”. Refer to the next page in detail.
■REQUIRED TEST EQUIPMENT
SECTION 4 ADJUSTMENT PROCEDURES
EQUIPMENT
DC power supply
RF power meter
(terminated type)
Frequency counter
FM deviation meter
Digital multimeter
GRADE AND RANGE
Output voltage : 13.6 V DC
Current capacity : 25 A or more
Measuring range : 1–100 W
Frequency range : 100–300 MHz
Impedance : 50 Ω
SWR : Less than 1.2 : 1
Frequency range : 0.1–600 MHz
Frequency accuracy : ±1 ppm or better
Sensitivity : 100 mV or better
Frequency range : DC–600 MHz
Measuring range : 0 to ±5 kHz
Input impedance : 10 MΩ/V DC or better
EQUIPMENT
Audio generator
Attenuator
Standard signal
generator (SSG)
AC millivoltmeter
Oscilloscope
FM deviation meter
GRADE AND RANGE
Frequency range : 300–3000 Hz
Output level : 1–500 mV
Power attenuation : 40 or 50 dB
Capacity : 100 W or more
Frequency range : 120–600 MHz
Output level : 0.1 µV–32 mV
(–127 to –17 dBm)
Measuring range : 10 mV–10 V
Frequency range : DC–20 MHz
Measuring range : 0.01–20 V
Frequency range : 30–600 MHz
Measuring range : 10 mV–10 V
RF power mater
1–100 W / 50 Ω
Attenuator
40 dB or 50dB
FM deviation meter
(DC measurable) Oscilloscorp
DC power supply
13.6V / 25A
Standard signal
generator
–127 to –17 dBm
Frequency
counter
+
.
pin 6 (MIC)
pin 4 (PTT)
pin 7 (GND)
pin 5 (MICE)
Audio generator
300 Hz to 3 kHz
[TX]
[RX]
[BATTERY]
[MIC]
[SP]
• CONNECTION
Distortion meter
AC millivoltmeter

■ENTERING THE ADJUSTMENT MODE
1Turn the power OFF.
2Push and hold [CH-DN] and [CH-UP] buttons, then turn the power ON, keep on pushing [CH-DN] and [CH-UP] buttons until
sounds 1 beep audio.
3Push [CH-DN] button, then sounds 2 beep audio.
■EXITING THE ADJUSTMENT MODE
1Turn the power OFF.
2Push and hold [CH-UP] button, then turn the power ON, keep pushing [CH-UP] button until sounds 2 beep audio.
3Push the [CH-UP] button, then sounds 1 beep audio.
■OPERATING IN THE ADJUSTMENT MODE
•Change the adjustment frequency channel (+1). : Push the [CH-UP] button.
•Change the adjustment frequency channel (–1). : Push the [CH-DN] button.
•Change the next adjustment item. : Push the [PROG] button.
•Adjust the specified value (+1). : Push the [PRT/BASE] button.
•Adjust the specified value (–1). : Push the [MONI] button.
4 - 2
[CH-UP]
[CH-DN]
[RPT/BASE]
[MONI]
[PROG]
[POWER] [CH-UP]
[CH-DN]

173.725
173.725
162.275
150.275
150.275
162.275
162.275
150.275
173.725
162.275
162.275
162.275
165.275
165.275
4 - 3
■ADJUSTMENT MODE CH LIST
A01
A02
A03
A04
A05
A06
A07
A08
A09
A10
A11
A12
A13
A14
A01 LW TXREF ***
A02 LW HRTUN ***
A03 LW MRTUN ***
A04 LW LRTUN ***
A05 LW RPTSQL ***
A06 HW POWER ***
A07 LW M DEV ***
A08 LW LMODC***
A09 LW HMODC***
A10 LW CTCDEV***
A11 LW DTCADJ ***
A12 LN CTCDEV ***
A13 LW RPTAF ***
A14 LN RPTAF ***
W
W
W
W
W
W
W
W
W
N
W
N
W
N
TVCO/RVCO adjustment.
Reference frequency adjustment.
RX sensitivity adjustment.
RPT SQL adjustment.
TX power adjustment.
TX modulation adjustment.
CTCSS modulation adjustment
DTCS modulation adjustment.
CTCSS modulation adjustment. (NARROW)
RPT modulation adjustment. (WIDE)
RPT modulation adjustment. (NARROW)
CH LCD DISPLAY ADJUSTMENT
RX TX W/N
173.925
173.925
162.075
150.075
150.075
162.075
162.075
150.075
173.925
162.075
162.075
162.075
160.275
160.275
A01 LW TXREF 127
Adjustment frequency channel
TX power (LOW)
Band width (WIDE)
Adjustment item
Adjustment value
■LCD DISPLAY IN THE ADJUSTMENT MODE

4 - 4
4-2 PLL ADJUSTMENT
TX VCO LOCK
VOLTAGE
RX VCO LOCK
VOLTAGE
REFERENCE
FREQUENCY
1
1
1
2
• LCD display : A01 LW TXREF 127
• Transmitting
• LCD display : A01 LW TXREF 127
• Receiving
• Wait for 5 minutes after power ON.
• LCD display : A01 LW TXREF
Connect an RF power meter or 50 Ω
dummy load to the [TX] antenna con-
nector.
• Transmitting
• LCD display : A01 LW RXREF
• Receiving
TX
RX
REAR
panel
RX
Connect a digital multi
meter or oscilloscope
to check point CP4.
Connect a digital multi
meter or oscilloscope
to check point CP3.
Loosely couple a fre-
quency counter to the
[TX] antenna connec-
tor.
Connect a frequency
counter to check point
CP2.
4.0 V
4.0 V
173.7250 MHz
142.2750 MHz
TVCO
RVCO
FRONT
FRONT
C17
C17
[PRT/BASE]
/[MONI]
[PRT/BASE]
/[MONI]
ADJUSTMENT ADJUSTMENT CONDITIONS
UNIT LOCATION
VALUE
UNIT ADJUST
MEASUREMENT ADJUSTMENT

CP4
C17 (TVCO unit)
TX VCO lock voltage
adjustment
CP4
TX VCO lock voltage
check point
CP4
4 - 5
CP18
CP2
CP1 CP3
LV
C17 (RVCO unit)
RX VCO lock voltage
adjustment
CP2
Reference frequency
check point
CP3
RX VCO lock voltage
chack point
CP2
L10
•TX UNIT TOP VIEW
RX UNIT
TX UNIT
DC/REG UNITS
PA UNIT
•IC-FR3000 TOP VIEW
•RX UNIT TOP VIEW
Other manuals for IC-FR3000 Series
6
This manual suits for next models
1
Table of contents
Other Icom Repeater manuals

Icom
Icom D-STAR ID-31A; D-STAR ID-31E User manual

Icom
Icom IC-FR5000 Series User manual

Icom
Icom IC-RP4020 User manual

Icom
Icom FR9020 11 User manual

Icom
Icom UHF IC-FR6000 Installation and operating instructions

Icom
Icom IC-FR5200H User manual

Icom
Icom IC-FR4000 Series User manual

Icom
Icom ID-RP4000V User manual

Icom
Icom IC-FR4000 Series User manual

Icom
Icom IC-FR6100 User manual