Idmed NeuroLight User manual
User Manual NeuroLight 1
USER MANUAL
USER MANUAL
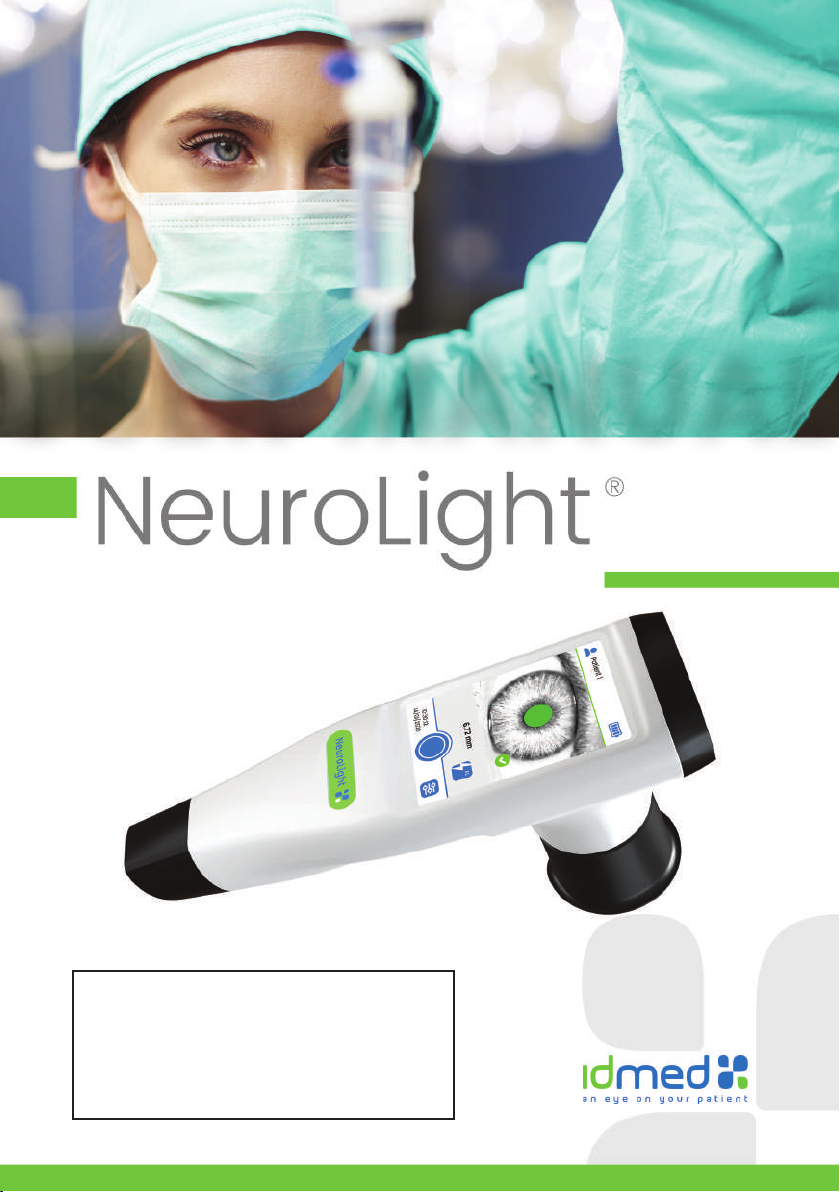
NeuroLight
Version 3.2 - EN
Last Update 2021/03/01
Ref: NL-IFU_EN

User Manual NeuroLight 3
CONTENTS
About this manual............................................................................................... 4
Indications of use................................................................................................. 4
Expected performance....................................................................................... 4
Clinical Benets..................................................................................................... 4
Important information about the use of NeuroLight........................... 4
I SAFETY MEASURES .............................................................................................. 5
I.1 Warnings.........................................................................................................................5
I.2 Caution...........................................................................................................................6
I.3 Symbols denition....................................................................................................7
II GENERAL DESCRIPTION..................................................................................... 9
Overview of the NeuroLight and its accessories............................................9
Display screen ..................................................................................................................9
Touch Screen.....................................................................................................................9
General Use...................................................................................................................... 10
Fitting the positioning eyecup................................................................................ 10
Installation and positioning of the NeuroLight .............................................. 10
Turning the device ON/OFF...................................................................................... 10
Patient Files / Measurements identication................................................... 10
Settings Menu....................................................................................................................11
III USING THE NEUROLIGHT ................................................................................12
Create or select a patient’s le...............................................................................12
Hold function ....................................................................................................................13
Display of the results....................................................................................................13
Review saved les / Trend charts ...................................................................... 15
Selecting a patient registration le..................................................................... 16
IV PREVENTIVE MAINTENANCE, CLEANING AND DISINFECTION...........16
Preventive maintenance........................................................................................... 16
Battery and battery charging..................................................................................17
Cleaning and Disinfection........................................................................................ 18
V APPENDIX 1 ..........................................................................................................19
Troubleshooting............................................................................................................. 19
VI APPENDIX 2.........................................................................................................19
End of life equipment / Recycling........................................................................ 19
Specication and warranty ..................................................................................... 19
Environment..................................................................................................................... 19
Technical specications...........................................................................................20
VII APPENDIX 3: ACCESSORIES ....................................................................... 23

User Manual NeuroLight 4
About this manual
This operating manual contains all the information necessary to set up and use the
portable pupillometer NeuroLight manufactured by IDMED. It also describes the specic
cleaningandcheckingproceduresthatyoumayneedtoperform.Thismanualisintendedforuseby
qualied medical personnel only (state registered Nurses, Anaesthetists and Doctors).
Keep this operating manual with the NeuroLight. It serves as a maintenance and repair
manual.
Read the safety information in this manual carefully before using the NeuroLight.
Indications of use
The NeuroLight is a portable video pupillometer. It measures in a quick and simple way the
pupil of the patient. Simultaneously to measuring the size, it can also measure the reactivity of
the pupil following a ash of light.
It provides the user with reliable, accurate and reproducible measurements. The NeuroLight
measures patient pupil size at rest as well as its minimal/maximal size, latency to constriction
and percentage dilation during a light stimulation.
There is one part of the NeuroLight that is or may be applied to the patient: the eyecup.
Expected performance
The following features are the essential performance characteristics of the NeuroLight:
- Measure the average diameter of a patient’s pupil to an accuracy of +/- 0.1 mm (simulated
pupil of 3 mm diameter).
- Generate a white light stimulation with an intensity of 320 lux +/- 10%, and a duration of
1 sec +/- 0.1 sec.
Clinical Benets
The clinical benets of the NeuroLight are:
- Accurate anisocoria detection.
- A reproducible and quantitative measurement of the photomotor reex (Pupil Light Reex)
in neurological assessment
Important information about the use of NeuroLight
The NeuroLight compact video pupillometer is designed to be used by an authorised health
professional (anaesthetist, ophthalmologist or state registered nurse - anaesthetist nurse)
who has received special training in its use. The system and all the associated parameters
are designed for use on adult and paediatric patients in a hospital or health establishment to
monitor pupil size and reactivity.
The NeuroLight measurement results on pupil size and reactivity can be used to complete the
neurological assessment of the patient.
The interpretation of the results obtained with the NeuroLight must always be clinically
appraised and compared to other clinical signs observed.
The NeuroLight conforms to the European directive covering medical devices and to the
regulations in force in the country of distribution

User Manual NeuroLight 5
For further information please contact IDMED, the manufacturer of the NeuroLight via their
website WWW.IDMED.FR or by post to the following address:
IDMED
Hôtel Technoptic
2 rue M.DONADILLE
13013 MARSEILLE
FRANCE
Telephone: +33 (0)4.91.11.87.84
I SAFETY MEASURES
INTRODUCTION
The user must read carefully the whole manual before operating the NeuroLight.
WARNING, CAUTION, REMARK
All parts of this manual contains warning, caution and remark statements about the
NeuroLight.
WARNING statements give important information that, if ignored, could lead directly to
personal injury or death
CAUTION statements give important information that, if ignored, could lead directly to
equipment damage, erroneous data or cancelled procedure and indirectly to personal injury
REMARK statements provide useful information for a function or a procedure
EXPLANATION OF SYMBOLS
The symbols that may appear on the NeuroLight display are compiled and explained at the
end of this chapter.
Any serious incident occurring in connection with the device must be notied to the
manufacturer and to the competent authority of the Member State or country in which the
user and the patient are established.
I.1 Warnings
Explosion risk: do not use the NeuroLight in a ammable atmosphere or in places where
ammable anaesthetic products may accumulate.
The NeuroLight is not designed to operate in the environment of a SCANNER, M.R.I or any
other appliance creating powerful magnetic elds.
Never use the NeuroLight in the vicinity of short-wave or micro-wave therapy appliances.
Before use, check the device, display and cable for damage. Never use the unit if any
defect or damage is found.
After taking any measurements, check the patient’s complete eyelid closure to protect
the eye from dryness and cornea alteration.
In order to prevent electromagnetic disturbance, keep minimum separation from RF
communication equipment of 30cm.

User Manual NeuroLight 6
Use of this equipment adjacent to or stacked with other equipment should be avoided
because it could result in improper operation. If such use is necessary, this equipment
and the other equipment should be observed to verify that they are operating normally.
Any hardware or software modications to the device are prohibited.
Use of accessories, transducers and cables other than those specied or
provided by the manufacturer of this equipment could result in increased electromagnetic
emissionsorde-creasedelectromagneticimmunityofthisequipmentandresultinimproper
operation.
The use of the NeuroLight should not result in any signicant pressure of its eye cup on the
patient’s face but only putting it in contact. If too much pressure is applied, light marks
or red patches may appear on the skin in the contact area due to pressure points. They
should remain limited and not related to an injury.
I.2 Caution
Read the complete manual carefully before using the NeuroLight.
Do not autoclave the NeuroLight or any of its components or accessories other than the
eyecup.
Never submerge the appliance or any of its components in liquid, or spray it or clean it with
liquid.
The NeuroLight and its components are not compatible with sterilisation processes by gas,
radiation (gamma or other), baths, steam or heat.
Follow the instructions for cleaning and disinfecting the NeuroLight given in the “Cleaning and
Disinfection” chapter.
The NeuroLight contains a lithium-ion battery. The NeuroLight battery must never in any
circumstances be removed, modied or replaced. Any intervention on the battery presents
a risk of combustion or explosion, only a qualied technician or from the IDMED company is
competent to intervene.
After a long period of non-use (storage), recharge the battery of the NeuroLight for at least
4 hours before use. If the NeuroLight does not start when the device is picked up (motion
detection), the NeuroLight must not be used and must imperatively undergo maintenance
operations.
Only qualied biomedical technicians are qualied to do repairs and maintenance, after
obtaining permission from IDMED.
It should be noted that in all cases, in order to avoid any risk of corneal dryness, the use of
the device on the patient (open eye) should not exceed 60 seconds continuously. In order to
avoid any risk of corneal or retinal damage, the number of measurements performed on a
single patient should not exceed 10 per hour.
The user of NeuroLight must take care not to be in contact with any other electrical appliances
when using the NeuroLight.
User Manual NeuroLight 7
Use only the accessories/components supplied by IDMED.
In order to prevent electrostatic shock, the device must be used in an electrostatic limited
environment. (see Environment section)
Notice on Electromagnetic Compatibility (EMC) : This device generates, uses, and can
radiate radio frequency energy. If not set up and used in accordance with the instructions in
this manual, electromagnetic interferences may result.
The equipment has been tested and found to comply with the norm IEC60601-1-2 for medical
electrical equipment.
These limits provide reasonable protection against electromagnetic interferences when
operated in the intended environments (e.g. hospitals)
Known contraindications to use the NeuroLight: orbit structure damaged, surrounding soft
tissue oedematous, abraded skin.
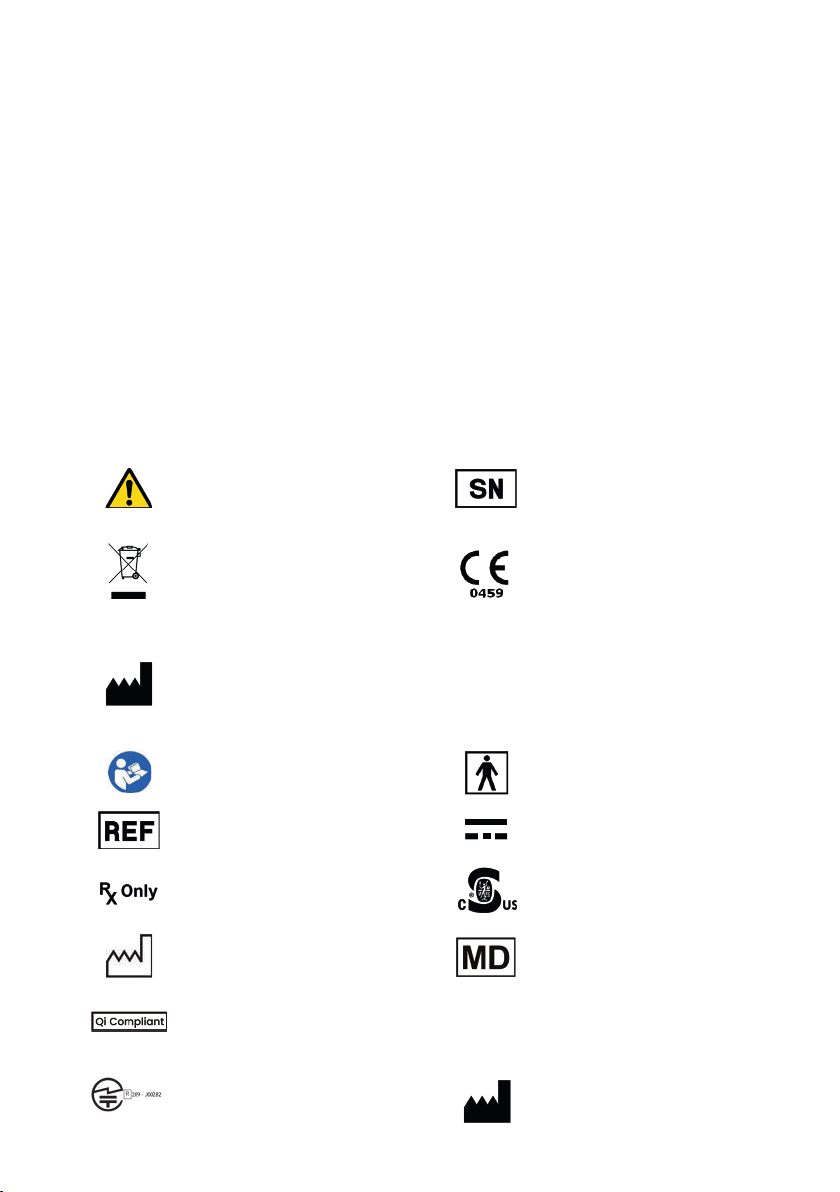
I.3 Symbols denition
Symbols are on the labels
Caution Serial Number
Indicates the necessity for
a separate processing from
household waste.
Marking for conformity with
the European directive cov-
ering medical appliances
Date of rst CE marking:
2010
Manufacturer IP 30
Protection class against
solid foreign bodies and
liquids.
Not protected against
liquids.
Refer to the user manual Type BF Applied Part
Catalog reference Direct Current DC
Prescription use only in the
USA Curtis-Straus Mark
(USA and Canada)
Medical device
Qi Compliant Contains
FCC ID
Bluetooth module
compliant with the FCC
regulation part 15
Bluetooth module compliant
with Japanese regulation
MM
YYYY Manufacturing date,
Manufacturer

User Manual NeuroLight 8
Symbols on NeuroLight screen
Main button Home button
Settings menu Previous step
Delete measurements or le Conrmation of the record-
ing of the measurement
Pause activated Show records
Patient menu / Access to
patient records Add new patient’s le
Battery Charge level (full) Battery Charge level
(intermediary)
Battery Charge level
(empty) Mode selection
NeuroLight ready for taking
a measurement Measurement impossible
Left eye Right eye
Left eye/right eye
comparison Trend for the « Flash Mode »
Navigation arrows Time and date setting
Transport mode 3h / 24h data display
Bar code scanning function « Flash » mode
Data transfer function Data transfer menu /
Communication

User Manual NeuroLight 9
II GENERAL DESCRIPTION
Overview of the NeuroLight and its accessories
Display screen
Eyecup
Display screen
6.72 mm
10:30:12
14/01/2020
FL
Patient 1
Pupil correctly detected
(green surface)
Real-time
measured value
Video Image
Battery Charge Level
Main menu
Touch Screen
The NeuroLight is designed in such a way that all controls are accessible with a
simple touch of a symbol or icon. The touch screen is designed to work even if the operator is
wearing gloves for the examination.
Note: The normal time to press the screen is approximately 1 to 60 seconds. Do not stay in
contact with the screen for more than 1 minute.
User Manual NeuroLight 10
General Use
The NeuroLight measures pupil size and reactivity (photomotor reex) of a patient.
Fitting the positioning eyecup
The NeuroLight has a silicone eyecup so it can be positioned on the patient’s face.
Before each use, the operator must clean this part. For more information about cleaning, refer
to the “CLEANING AND DISINFECTION” chapter. This eyecup is the only part in contact with the
patient. The eyecup is to be placed on the NeuroLight by simply pushing it onto the black lens.
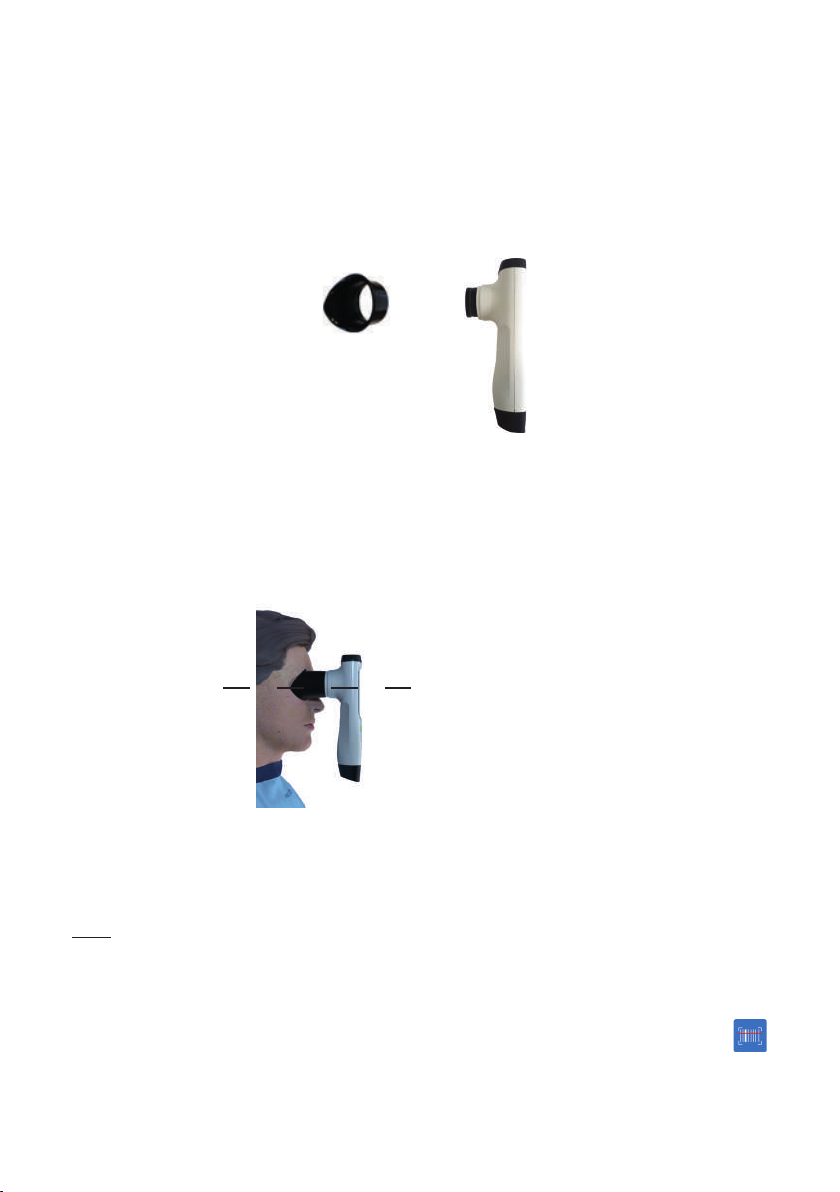
Installation and positioning of the NeuroLight
To obtain accurate measurements the NeuroLight must be positioned correctly on
the lmed eye of the patient. The black silicone eyecup on the NeuroLight must be in contact
with the upper and lower part of the eye socket bone without pressing. In this way there will
never be any pressure on the eye-ball itself. It should never be in contact with the patient’s
eye. The operator must hold the device vertically and rmly to prevent any movements while
lming.
Correct positioning of the
NeuroLight
Turning the device ON/OFF
The NeuroLight switches on automatically when the device is held in the hand
(movement detection).
Note: the device switches off automatically if it is not used for 2 minutes or if it is repositioned
on its charging station.
Patient Files / Measurements identication
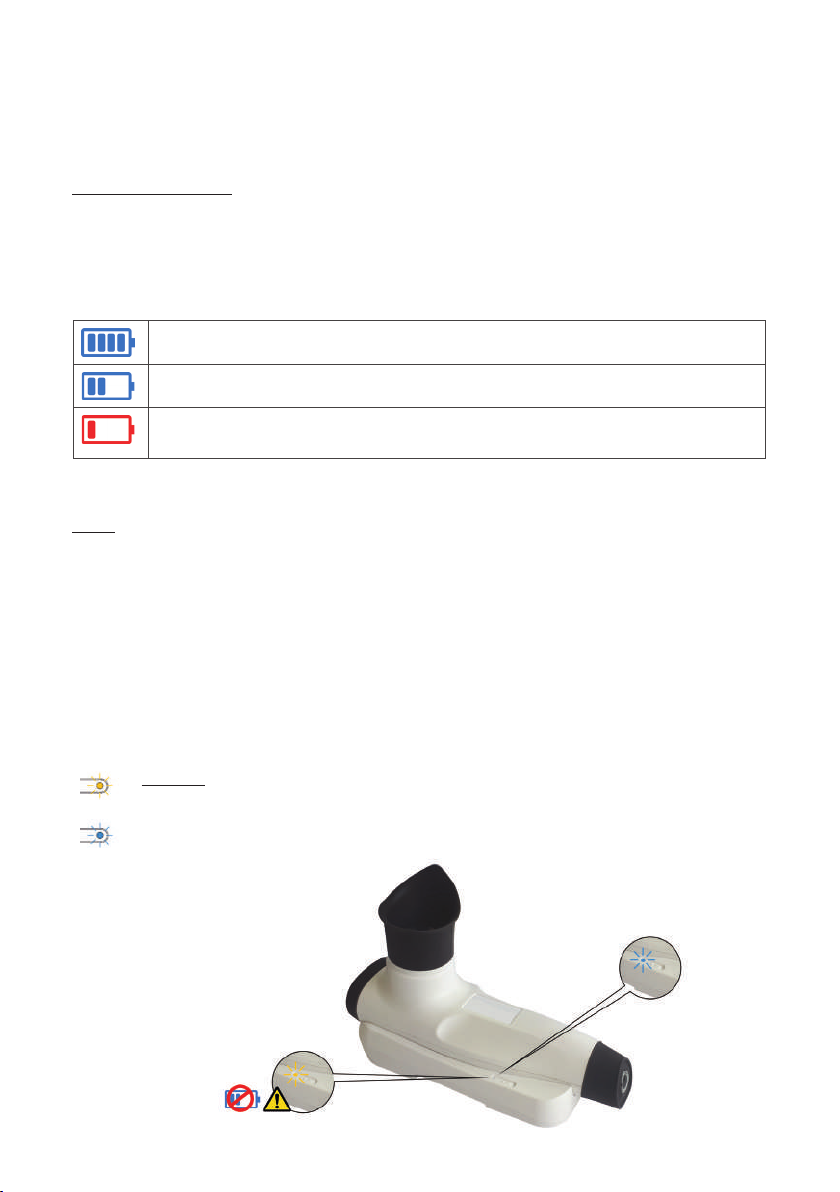
The NeuroLight has a barcode reader. Activation of the red light beam for reading
barcodes identifying the patient is done by pressing and holding the dedicated button
and directing the light beam towards the barcode.
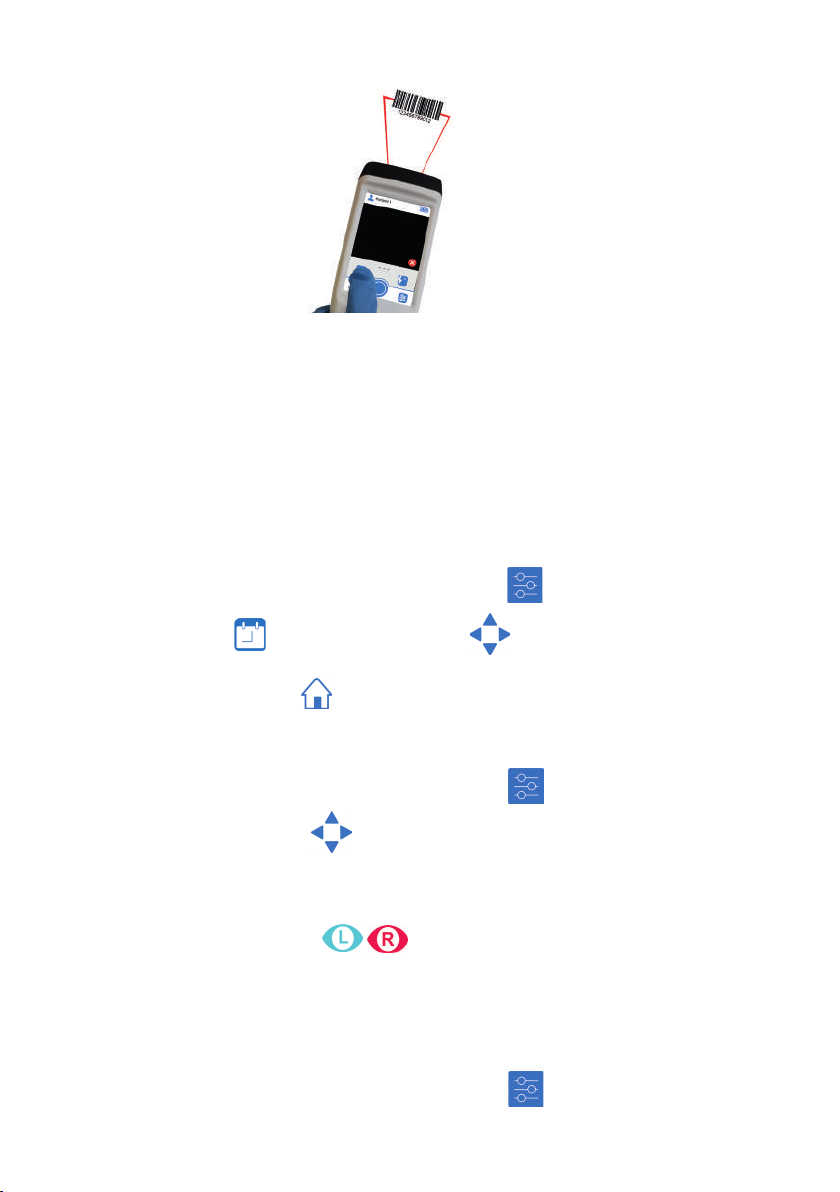
User Manual NeuroLight 11
Scan window
When a label is read, it creates a le with the label encoded ID number or retrieves
an existing le created by a previous scan of that same label.
The NeuroLight has also 20 pre-set les numbered 1 to 20. If there is no barcode
scanning, the user will either choose one of those les or create additional les numbered 21
and above to save the measurement results.
Settings Menu
Setting date and time
The NeuroLight contains a clock that is set at the factory. The operator can
update the date and time of the NeuroLight. To access the time setting and date change
menu proceed as follows:
• Select the menu “settings” by pressing the following icon
Then select this icon : . Use the navigation arrows , to adjust the “date”, the “time” and
“format” of the date as desired.
By pressing the “Home” button , the changes will be automatically validated.
Changing the language
If necessary, the operator can change the language of the NeuroLight. To access the
menu for changing the language, follow the procedure below:
• Select the “Settings” menu by pressing the following icon
Then use the navigation arrows to select the desired “language”.
Right Eye/ Left Eye Indicator
In the Flash mode, it is possible to identify the eye being lmed during measurement.
A pop-up window appears at the end of the measurement allowing the user to identify the
eye used with the following icons .
Transport Mode
The operator can set the NeuroLight to “transport mode.” This mode switches off
the unit for transport or storage. It prevents the unit from switching on every time a motion is
detected.
To access the “transport mode”, follow the procedure below:
• Select the “Settings” menu by pressing the following icon

User Manual NeuroLight 12
• Then select the transport mode by pressing .
To deactivate the transport mode, position the device on its charging station. The device will
automatically switch on when it is removed from the station.
Data transfer / Communication
The user can select the mode and the data destination.
To access the data transfer menu, follow the steps below:
• Select settings menu by pressing on
• Then select data transfer by pressing on .
• Using the arrows select the transfer mode (PC/HL7)
• Connect your receiver module ; on PC (ref: NL-WDT) or HL7 (ref: IDM-GTW)
• Validate your choice by pressing on
Note: When activating the data transfer, the user must be at less than 1m (3ft) away from the
receiver.
When pairing, the type and identication (ID) at the bottom left of the screen must ll
automatically.
If not, get closer of the module and press again the following icon .
III USING THE NEUROLIGHT
Create or select a patient’s le
It is strongly advised to create a patient’s le or select an existing one to be able to
save the measurements.
To select an existing patient’s le:
• Press the icon “Patient File” and select the correct le with the left or right arrow
Or
• Scan the patient’s barcode that was previously used to create the le
To create a new patient’s le:
• Press the icon “Patient File” and select the icon “New patient’s le”. Numbering starts at 21.
Or
• Create a patient le by reading a barcode identifying a patient.
Taking a measurement
Positioning of the device and detection of the pupil
Positioning the device on the patient’s face is an important step to obtain reliable
measurements (see: Installation and positioning).
If the patient is conscious, ask him/her to keep his/her head straight, open the lmed
eye wide and look straight ahead without blinking. The other eye is closed.
If the patient is unconscious or not able to cooperate, the operator may need to
raise and/or lower the patient’s eyelids so that the pupil measured by the NeuroLight appears
completely unobstructed.
The patient’s pupil should be centered on the screen and totally in green color. Only
the pupil will be colored in the image displayed by the NeuroLight. If this is not the case,
reposition or position differently the NeuroLight.
User Manual NeuroLight 13
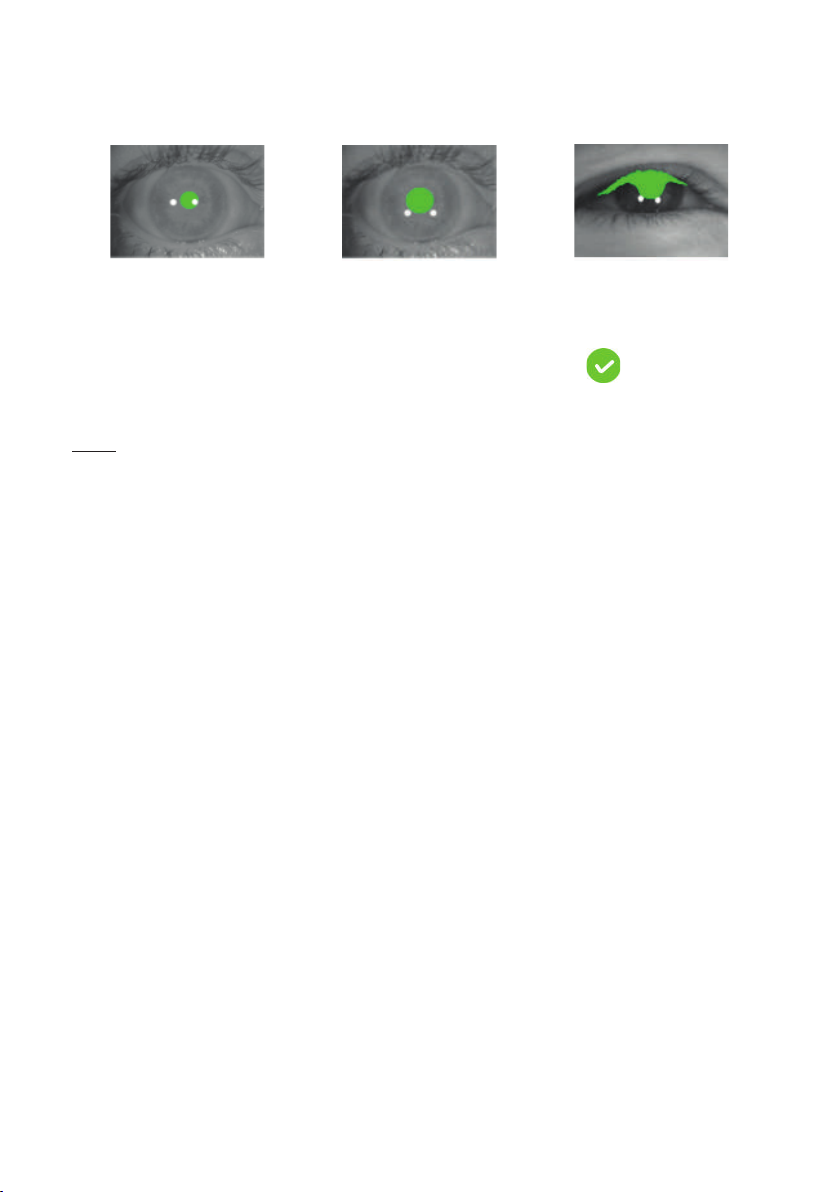
It is important when measuring a very small pupil to position the NeuroLight so that
the white spots (reections of the infra-red diodes) do not deform the detected pupil contour.
If this is the case reposition the NeuroLight or position it differently.
NO
White spots deform the pupil YES
Correct positioning and
detection of the pupil
NO
Poor pupil detection
When the pupillometer is ready for a measure the following icon will appear at the
bottom right of the video image.
Note : when the pupil detection is not correct, the red icon will appear at the bottom right of
the video image. The pupillometer does not detect the pupil in the video image.
Do not move the NeuroLight when taking measurements
Taking a measurement
Once the device correctly positioned, the NeuroLight displays the green icon when the
pupil is detected. It is necessary to ensure that the size of the pupil is stable before taking the
measurement.
Start taking the measurement by pressing continuously on the main button until the
countdown at the bottom right corner of the screen reaches 0.
A beep will indicate the start and end of the measurement period. In “Flash” mode, at
the end of the measurement, the user can record the patient’s eye used for the measurement
(right or left).
Bilateral Pupil Exam: If a measurement on the other eye is done within 2 minutes of
the rst one, a comparison chart of the bilateral pupil exam will be displayed.
Hold function
It is possible to freeze the analysed image of the pupil by putting the NeuroLight on pause.
To pause press on the video image. It freezes the pupil size and the image. Press again on to
deactivate the pause mode.
Display of the results
The NeuroLight displays the results of the measurement of the eye that has been
lmed. The results and measurements displayed depend on the protocol used. It is important
to control the quality of the displayed curve and to verify that measurement values are not
artefacts. For example, the horizontal blue and black lines show respectively the pupil size
baseline (size of the pupil before stimulation) and the smallest size of the pupil during the
measurements (maximum pupil variation). The lines must be appended to the curve and not
to an isolated point (artefact)

User Manual NeuroLight 14
Reactivity : VERY GOOD
6.90
3
(mm)
(s)
Vel. : 5.55 mm/s
Lat. : 205 ms
Flash
4.05
10:30:12
14/01/2020
Patient 1
Var 41.0 %
(-2.85 mm)
6.90 mm
Base
R
R
L
06/13
Control curve of the
pupillary reex
Pupil size
Amplitude of the reex
Optional choice
left eye / right eye
Speed and latency
of reex
Suggested
interpretation
Example of a result
After each measurements, results can be saved or deleted. These measurements
will be recorded in the current folder.
Press the ‘Save’ icon to validate and keep the results.
Press the ‘Delete’ icon to delete the results.
Note: If a data transfer mode is active, the following icon is displayed on the screen.
It allows to save and send the data to the congured receiver module.
The results displayed are:
• Results control curve with the following markers:
o Duration of the ash (light blue area)
o Baseline diameter of the pupil (blue horizontal line)
o Maximum variation in pupil size (black horizontal line)
• Diameter baseline before stimulation (Base in mm)
• Variation percentage (Var. in %):
(Var%=(Abs(Variation(mm))/Base(mm))*100)
• Maximal size variation of the pupil (value in mm in brackets)
• Constriction Velocity (speed in mm/s)
• Latency of constriction (latency in ms)
• A commentary on reactivity level
• Selected eye for the measurement
Quantitative and qualitative scale of the photomotor reex (5 levels, 3 colours) to
determine commentary on pupil reactivity level.
The quantitative and qualitative scale of the photomotor reex and resulting commentary
are based on the amplitude of the reex (value in %). They are only indicative and must be
corroborated with other physiological indicators commonly used.
Amplitude of the
photomotor reex
(RPM) (in %) RPM >=30% 20%<=RPM<30% 12%<=RPM<20% 5%<=RPM<12% RPM<5%
Commentary and
colour
Reactivity
VERY
GOOD
(green)
Reactivity
GOOD
(green)
Reactivity
WEAK
(orange)
Reactivity
VERY WEAK
(red)
Reactivity
NULL
(red)
User Manual NeuroLight 15
Review saved les / Trend charts
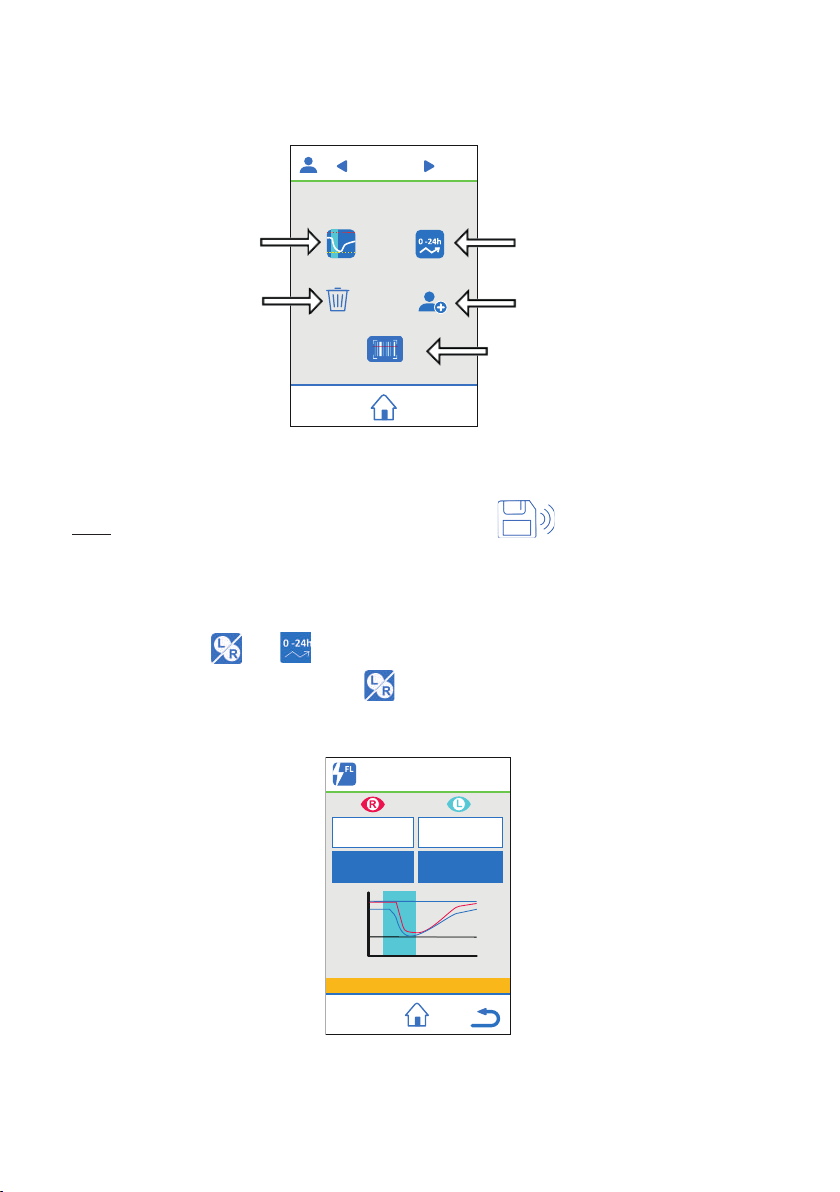
Press the icon “patient’s le”, select a le with the left/right arrow and access results
with “show records”
7 record (s)
Patient 1
Historical data trending
Delete records
File selection
Show records
Barcode reading
Create new
patient’s le
Home page
Note: If a data transfer mode is active, the following icon is displayed on the screen.
It allows send all the patient’s data to the congured receiver module.
Comparison and trend monitoring
The display of the recordings is done through 2 pages.
Press on the icons and to access comparison and historical data.
Left eye / right eye comparison page
This page displays the measurement performed for one eye together with the measurement
performed for the other eye, if both measurements are taken within 2 minutes.
Right eye
measurement Left eye
measurement
Anisocoria 0.7mm
3.60
3
(mm)
(s)
Flash
2.05
Var 30.0 %
(-1.08 mm)
3.60 mm
Base Base
2.90 mm
Var 28.0 %
(-0.85 mm)
10:30:12
14/01/2020
Patient 1
This screen shows the pupil reaction curve to the light stimulus and a table comparing
baseline sizes, photomotor reex amplitude for the left and right eye.
User Manual NeuroLight 16
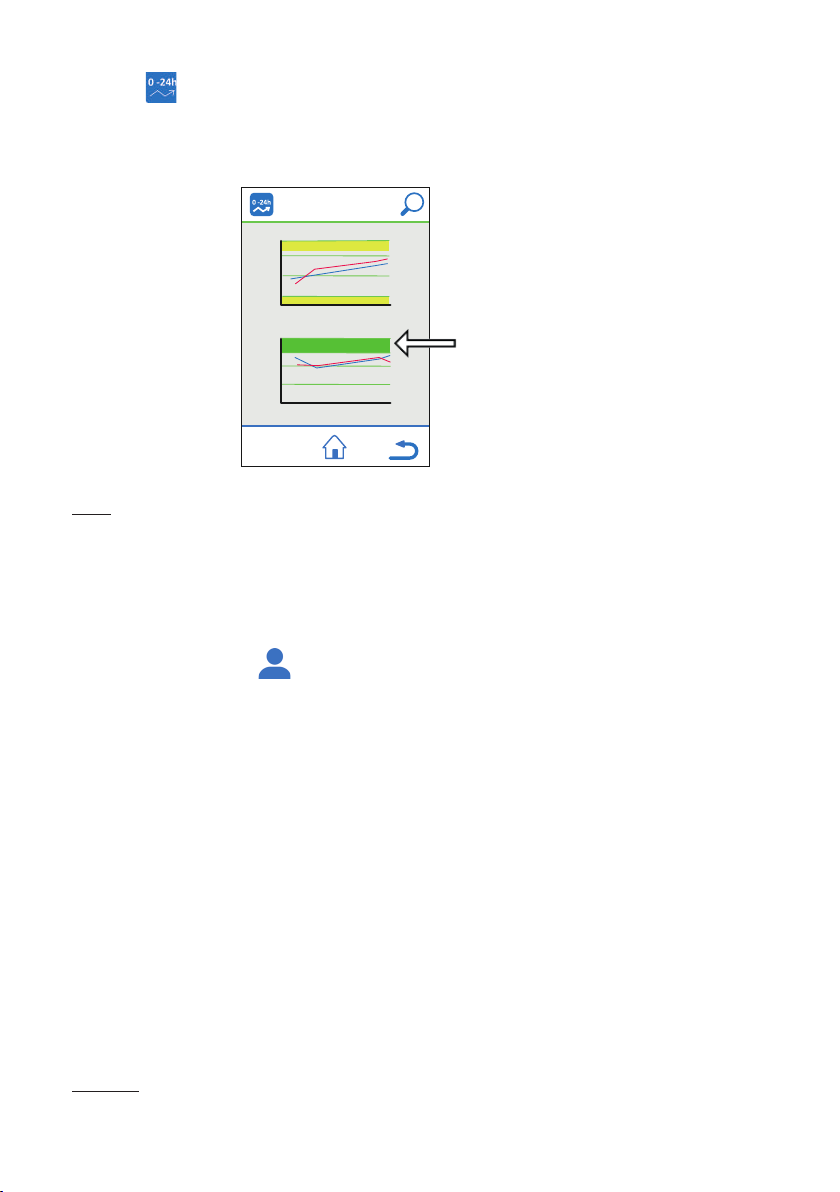
Trending
On the patient selection page press the “Trend” icon.
This page allows you to visualize the evolution of the diameters of both eyes over time.
It also displays the evolution of the variations in pupil size for the same le over time.
Normal zone
(strong reactivity)
Diameter 10/01
12h00 12h00
2
mm
4
6
8
Variation
%
10
20
30
40
History
scale 24h
Note: right eye values are in red, and blue for the left eye.
Selecting a patient registration le
The measurement’s folder or patient’s le enables to save a set of measurements of
the same patient in a single le. The selection of the le can be done very simply by scanning
the identication bar code of the electrode used for patient stimulation. Thus by identifying the
patient, the NeuroLight is positioned on the patient’s le.
Alternatively the user can select the patient’s le manually by selecting the
«registration folder» icon .
Once positioned in the «registration folder» menu, the user can select the desired
patient’s le by using the navigation arrows.
IV PREVENTIVE MAINTENANCE, CLEANING AND DISINFECTION
Preventive maintenance
To be sure of maintaining the performance level, we strongly recommend having the
appliance checked every two years on the following points:
• Check the casing, the screen and the labels for damage
• Check the quality of the lmed image (sharpness and contrast)
• Check the cleanliness of the lens
• Check the battery charging process
• Check the absolute values measured
• Check the light stimulation
• Battery replacement
The lifetime of the NeuroLight, under the required conditions of use and maintenance, is 5
years (2 years for accessories).
Caution:
Only technicians trained by IDMED are authorised to carry out repairs or maintenance
operations
User Manual NeuroLight 17
Battery and battery charging
Battery
The NeuroLight contains a rechargeable Lithium-Ion battery. It is tted with thermal
protection and protection against short-circuits.
Battery specications
• 2900 mA/h (or higher)
• Nominal value 3.7 V (3.6- 4.2 V)
• Contains a thermal protection system (overheating)
• Contains a short-circuit protection system.
The NeuroLight indicates the battery charge level using icons
Charge level OK
Intermediate battery charge level
Discharged battery symbol. If this symbol appears the
NeuroLight must be recharged immediately (Battery red)
The battery has a 6-month warranty.
Note :
Only qualied technicians trained by IDMED or IDMED personnel are authorised to carry out
repairs or maintenance operations on the battery.
Battery recharging and maintenance
The battery can be recharged using IDMED wireless charger (ref: STA-W2). The complete
charge time is about 10 hours. Charger specications are given in the «power supply»
paragraph under the «Technical Specications» section.
The battery can be recharged regardless the current level of charge.
To recharge the battery, place the unit on its charging station.
Caution: if the indicator light is orange
Remove and reposition the NeuroLight on the charging station.
Charging in progress
Charging
station
indicator

User Manual NeuroLight 18
No maintenance is required for the NeuroLight battery but it is recommended to change it
every two years.
Note :
Only qualied technicians trained by IDMED or IDMED personnel are authorised to
carry out repairs or maintenance operations on the battery.
Cleaning and Disinfection
Caution :
Do not autoclave the NeuroLight or any of its components or accessories except for the
eyecup.
Under no circumstances should the NeuroLight or any of its components or accessories
other than the eyecup, be in direct contact, immersed, sprayed or lled with any liquid.
In order to avoid inadvertently changing the settings of the device, we advise you to put
it in transport mode before cleaning it.
The NeuroLight, its parts and accessories are non-sterile. In no circumstances should the
NeuroLight be sterilized.
The surface of the NeuroLight has to be cleaned with a lint-free cloth moistened with a
quaternary ammonium disinfectant, 70% isopropyl alcohol or a cold decontamination solution
(e.g. ANIOS). Before using any of these solutions, refer to the manufacturer’s documentation
and carry out a test on a small area.
Example of recommended products :
- Incidin™ OxyWipe from the manufacturer Ecolab Inc.
Please check with your local authorized distributor or the manufacturer which products are
available and approved in your country.
The eyecup, the only part in contact with the patient, will be removed from the NeuroLight
and cleaned in the same way as the NeuroLight and then put back in place on the clean
NeuroLight. It can also be cleaned by autoclaving (maximum temperature 135°C). The eyecup
can withstand 50 autoclave washing cycles. Any alteration, degradation or modication of the
eyecup must lead to its replacement.
The eyecup must be cleaned or changed between each patient.
The NeuroLight must be cleaned and disinfected between each patient. Low-level disinfection
is usually sufcient.
The lens should always be free of stains or scratches to avoid the risk of distorting the
measurements made. It should be cleaned with a lint-free cloth and wiped carefully to avoid
any stains or reections.

User Manual NeuroLight 19
V APPENDIX 1
Troubleshooting
The table below is a list of possible malfunctions as well as the solution to be implemented
for their resolution.
Issue Solution
Device will not turn ON, or turn OFF by itself
after a few seconds
Charge the battery by positioning the device
on the charger (See «Battery and battery
charging chapter»)
The LED charge indicator will not illuminate
while charging the device Remove and reposition the device on its
charger.
The video image is blurred Check the cleanliness
(see « Cleaning / Disinfection»)
Note :
All other malfunctions must be handled by the manufacturer (IDMED) or by
qualied biomedical technicians trained by IDMED and authorised to carry out repairs or
maintenance operations on the NeuroLight.
VI APPENDIX 2
End of life equipment / Recycling
In order to protect the environment, it is mandatory to hand over your worn out
system to a collecting body capable of processing appliances containing electronic
components and Lithium-Ion accumulators.
For the disposal or recycling of the appliance components, contact a company specialising in
the recycling of electronic appliances.
Electronic goods that have not been selectively sorted are potentially dangerous for the
environment.
Packaging materials should be disposed of or recycled according to the regulations in force.
Specication and warranty
Environment
Storage and expedition
The NeuroLight and its accessories should be stored or transported within the
limits of the following conditions. These conditions apply to storage and transport situations
excluding operation.
Temperature 10°C to +50°C
Humidity 15% to 95% (without condensation)
Pressure 500hPa to 1060 hPa
The original factory packaging should be used for storage and transport.
Protect the NeuroLight from sudden temperature changes that could cause condensation.

User Manual NeuroLight 20
Operating environment
Reminders:
Explosion risk: do not use the NeuroLight in a ammable atmosphere or in places where
ammable anaesthetic products could concentrate.
The NeuroLight is not designed to operate in the environment of a SCANNER, M.RI or any other
appliance creating powerful magnetic elds.
The NeuroLight is designed to operate in complete safety in the following conditions. Any
situation outside those described is likely to affect the reliability of the appliance.
Temperature 10°C to +40°C
Humidity 35% to 90% (without condensation)
Pressure 700hPa to 1060 hPa
Technical specications
Safety
• Eyecup (part in contact with the patient). Latex free
• Conforms to European directive CEE 93/42
• Visible and infrared lighting conforms to IEC 62471 safety standards
• CE marking (certifying body 0459 LNE/G-Med) – Class 2a.
• Compliant with standard IEC 60601-1. Class II equipment. / Continuous mode of operation
• EMC: IEC 60601-1-2
EMC Emission
Emission test Compliance EMC Instructions/cautions
RF Emissions CISPR 11 Group 1 The NeuroLight uses RF energy only for internal
functions. Therefore RF emissions are very low and
should not disturb other nearby devices.
RF Emissions CISPR 11
Harmonics IEC 61000-3-2 Class B The NeuroLight must be used in professional
healthcare facility environment
Voltage uctuations Class A
and icker IEC 61000-3-3 Compliant The NeuroLight can be connected to the public
mains network
EMC Immunity
Phenomenon Basic EMC
standard
Professional
healthcare
facility
environment
Immunity Test
Levels
Compliance
levels
EMC
Instructions/precautions
ELECTROSTATIC
DISCHARGE
(ESD)
IEC
61000-4-2
± 8 kV contact ± 8 kV contact In order to reduce ESD, the device
must be used in a 35% humidity
environment or more
± 2 kV, ± 4 kV,
± 8 kV,
± 15 kV air
± 2 kV, ± 4 kV,
± 8 kV air
Table of contents
Other Idmed Medical Equipment manuals


