IDS 816 User manual

IDS816 User Manual 700-283-01H Issued January 2009
1

IDS816 User Manual 700-283-01H Issued January 2009
2
Contents
ContentsContents
Contents
Glossary-------------------------------------------------------------------------------------------------------------------6
1. Introduction to the IDS 816---------------------------------------------------------------------------7
2. Before Operating our Alarm System ------------------------------------------------------------7
3. Understanding the Keypad Indicators------------------------------------------------------------8
4. The Keypad Buzzer-----------------------------------------------------------------------------------------9
5. Programmable Functions -----------------------------------------------------------------------------9
6. Arming the Control Panel --------------------------------------------------------------------------- 10
6.1 Away Arming------------------------------------------------------------------------------------------------10
6.2 Quick Away Arm--------------------------------------------------------------------------------------------10
6.3 Stay Arm-----------------------------------------------------------------------------------------------------10
6.3.1 How to Stay Arm-------------------------------------------------------------------------------------------11
6.4 Quick Stay Arm---------------------------------------------------------------------------------------------11
6.4.1 How to Stay Arm and Go---------------------------------------------------------------------------------11
6.5 Key- witch or Remote Arming (If Fitted)--------------------------------------------------------------12
6.6 Auto Arm-----------------------------------------------------------------------------------------------------12
7. Disarming the Control Panel----------------------------------------------------------------------- 12
7.1 How to Di arm with a U er Code----------------------------------------------------------------------12
7.2 How to Di arm U ing a Key- witch or Remote-----------------------------------------------------12
8. Bypassing Zones--------------------------------------------------------------------------------------- 13
8.1 Bypa ing/Un-bypa ing a Zone----------------------------------------------------------------------13
9. Emergency Alarms ------------------------------------------------------------------------------------ 13
9.1 Fire Alarm --------------------------------------------------------------------------------------------------13
9.2 Panic Alarm ------------------------------------------------------------------------------------------------13
9.3 Medical Alarm ---------------------------------------------------------------------------------------------14
9.4 Dure Alarm ----------------------------------------------------------------------------------------------14
10. Alarm Memory ------------------------------------------------------------------------------------------ 14
11. User Codes----------------------------------------------------------------------------------------------- 15
11.1 Adding, Deleting and Editing U er Code -----------------------------------------------------------15
12. User Program Mode----------------------------------------------------------------------------------- 15
13. Explanation of Programmable Options--------------------------------------------------------- 18
13.1 Add a new U er Code - Option 0----------------------------------------------------------------------16
13.2 Edit a U er Name - Option 1 (LCD Keypad Only)------------------------------------------------16
13.3 Edit a Selected U er Code - Option 2----------------------------------------------------------------16
13.4 View a U er Code Slot Number - Option 3----------------------------------------------------------17
13.5 U er Code Propertie - Option 4-----------------------------------------------------------------------17
13.5.1 Explanation of U er Code Propertie -----------------------------------------------------------------18
13.5.1.1 Dure Code------------------------------------------------------------------------------------------------18
13.5.1.2 Maid' Code-------------------------------------------------------------------------------------------------18

IDS816 User Manual 700-283-01H Issued January 2009
3
13.5.1.3 Global Arm/Di arm Code--------------------------------------------------------------------------------18
13.6 A ign a U er Code to Partition - Option 5--------------------------------------------------------18
13.7 Adding U er Remote - Option 8----------------------------------------------------------------------19
13.8 Delete a U er Code - Option 9 (Code Known)-----------------------------------------------------19
13.9 Delete a U er Code - Option 10 ("Slot" Known)----------------------------------------------------19
13.10 Viewing a U er Name - Option 11 (Slot Known)---------------------------------------------------20
14. Stay Zones ----------------------------------------------------------------------------------------------- 20
14.1 How to Select a Stay Profile-----------------------------------------------------------------------------20
14.2 How to Program Stay Zone ----------------------------------------------------------------------------20
15. Buzz Zones----------------------------------------------------------------------------------------------- 21
15.1 How to Program a Buzz Zone--------------------------------------------------------------------------21
16. Chime Zones -------------------------------------------------------------------------------------------- 22
16.1 How to Program Chime Zone -------------------------------------------------------------------------22
17. Viewing Trouble Conditions------------------------------------------------------------------------ 22
18. Changing a Partition ---------------------------------------------------------------------------------- 23
19. Output Control via a Keypad----------------------------------------------------------------------- 23
Index
IndexIndex
Index-
--
----------------------------------------------------------------------------------------------------------------------25
2525
25
Tables
TablesTables
Tables
Table 1 User Programming Options ------------------------------------------------------------------------ 15
Table 2 User Code Properties -------------------------------------------------------------------------------- 18
Table 3 Trouble Conditions------------------------------------------------------------------------------------ 23

IDS816 User Manual 700-283-01H Issued January 2009
4

IDS816 User Manual 700-283-01H Issued January 2009
5

IDS816 User Manual 700-283-01H Issued January 2009
6
Glossary
GlossaryGlossary
Glossary
Alarm Memory
Thi i the hi tory of the mo t recent tamper and violation that occurred the la t time the y tem wa
armed, a well a which zone were bypa ed.
Arm
Arming the y tem et the y tem into the ARMED mode. In thi mode, violating a zone will activate an
alarm condition. If the y tem i programmed correctly, thi will cau e an appropriate reporting code to
be ent to the monitoring company.
Bypass
Bypa ing deactivate a zone. When the panel i ARMED, violation of a bypa ed zone will be ignored.
Disarm
Di arming deactivate the y tem. Fire, medical and panic function remain active while the y tem i
di armed.
Entry/Exit Zones
The e are zone that you may pa through during the entry/exit delay period without triggering an alarm.
Their purpo e i to provide a mean by which you can exit after arming the y tem – and a mean of
getting to the panel to di arm it after gaining acce to the premi e . Generally, the la t exit point of the
building and the fir t entry point, thi i the front door of the home in mo t ca e .
Follower Zone
A zone that may be temporarily violated during the Exit Zone delay period or after a violation of an
Entry/Exit zone. Thi allow the u er (limited time) acce to di arm the y tem when entering or exiting,
and ufficient time to exit before arming come into effect. A Follower zone will behave a per an In tant
zone if violated prior to the violation of an Entry/Exit zone when armed.
Instant Zone
When the y tem i armed, violation of an In tant Zone will immediately cau e an alarm condition to be
regi tered.
Partition
A partition i a group of zone that may be armed and di armed independently without affecting zone or
u er a igned to other partition . The alarm panel may have been programmed by your in taller to have
1 or 2 partition . Typically, a gue t cottage appended to a main hou e may be partition 2, and the main
hou e partition 1.
Stay Arm
Thi i an arming mode that allow certain pre-programmed, Stay zone to be bypa ed (temporarily
di abled) while the y tem i armed. If you arm the y tem and do not leave the premi e within the exit
delay, the y tem will a ume that you are taying home and will tay arm.
Stay Arm and Go
Arming that allow the u er to Stay arm and leave the premi e .
Stay Zone
A zone that i bypa ed automatically when the y tem i Stay armed.

IDS816 User Manual 700-283-01H Issued January 2009
7
Violate
A zone i “violated” when a en or connected to a zone input regi ter a door opening, a window
opening, omebody moving in the room, or gla breaking – depending on the en or for that zone.)
Zone
A zone i a pecific area of your premi e monitored by en or , for that zone, that detect violation
(door /window opening or people moving) in that area.
1.
1. 1.
1.
Introduction to the
Introduction to the Introduction to the
Introduction to the IDS 816
IDS 816IDS 816
IDS 816
The IDS 816 i a ver atile, microproce or-ba ed eight-zone alarm panel. It ha two partition and can
be expanded to monitor ixteen burglary zone . Mo t feature are optional and may be programmed
directly through the keypad. There i a dedicated panic zone, monitored iren output, auxiliary power
output and five (expandable to even) programmable output that may be programmed to perform
variou trigger/ witching function .
For correct operation, the e Alarm Panel mu t be u ed in conjunction with the pecified
tran former/battery combination and appropriate peripheral en or and ignalling device .
2.
2. 2.
2.
Before O
Before OBefore O
Before Operatin Y
peratin Yperatin Y
peratin Your
our our
our Alarm S
Alarm SAlarm S
Alarm System
ystemystem
ystem
Read the entire manual carefully and keep it in an acce ible place.
Note that your ecurity y tem hould be in talled and erviced by a qualified ecurity
profe ional who hould in truct you regarding the level of protection provided and the operation
of the y tem.
Should you have any que tion regarding the operation of the y tem, contact your ecurity
company repre entative.
Note that your y tem hould be te ted on a regular ba i . Before te ting the y tem, plea e
notify your ecurity company of your intention to do o.
NEVER di connect the main power, a the back-up battery will eventually di charge thereby
cau ing the control panel to hutdown.
Note that a ecurity y tem cannot prevent emergencie . It i only intended to alert you and (if
applicable) your central tation, of an emergency ituation.
Note that moke and heat detector may not detect all fire ituation .

IDS816 User Manual 700-283-01H Issued January 2009
8
3.
3. 3.
3.
Understandin the Keypad Indicators
Understandin the Keypad IndicatorsUnderstandin the Keypad Indicators
Understandin the Keypad Indicators
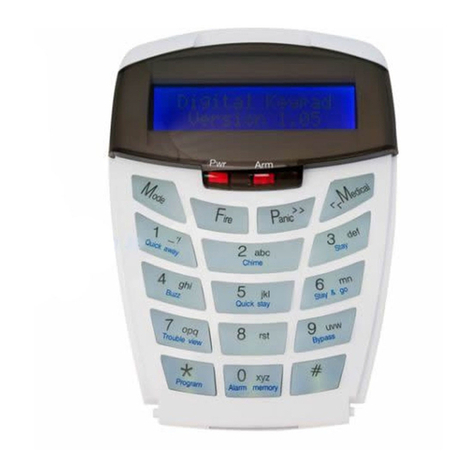
Refer to the labelled picture of the keypad .
1. ARMED Indicator (Red)
On Sy tem Armed
Off Sy tem Di armed
Fla hing Alarm Condition
(Check Alarm Memory zone detail BEFORE re-arming)
2. AWAY Indicator (Red)
On Sy tem Armed in Away Mode
Off Sy tem Di armed / Armed in Stay Mode
Fla hing U er Programming (Chime/Buzz/Stay zone )
3. POWER Indicator (Red)
On Main Power i Pre ent
Fla hing Trouble Condition
4. READY Indicator (Green)
On Sy tem i Ready to be Armed
5. ZONE Indicator (Yellow)
On Zone Bypa ed
Off Zone Clear
Fla hing Zone Violated or Tampered

IDS816 User Manual 700-283-01H Issued January 2009
9
4.
4. 4.
4.
The Keypad Buzzer
The Keypad BuzzerThe Keypad Buzzer
The Keypad Buzzer
[#] WITH any key from [0] to [3] for 1 second
The keypad include a buzzer that i u ed for audible ignalling and verification of certain keypad
function . There are 4 po ible volume etting : loud, medium, oft and click, loud being the default
etting. To program the keypad volume, u e the following table:
Key Entry
Key EntryKey Entry
Key Entry
Keypad Buzz
Keypad BuzzKeypad Buzz
Keypad Buzzer Options
er Optionser Options
er Options
[#] [3] Loud (Default etting)
[#] [2] Medium
[#] [1] Soft
[#] [0] Click
To change the volume (for thi example to the “ oft” etting) pre the [#] and [1] key imultaneou ly for
1 econd (long pre ). After a 1 econd time lap e, the keypad will re pond with a beep at the new
volume etting. Thi i a keypad pecific etting, and applie to the keypad that thi operation i
performed on.
All zone programmed a Chime or Buzz zone , will ound with a loud buzz regardle of the
keypad volume et above.
5.
5. 5.
5.
Pro rammable Functions
Pro rammable FunctionsPro rammable Functions
Pro rammable Functions
Function include:
Quick Away Arm
Quick Stay Arm
Arm with Entry/Exit or Follower zone violated
Stay Arm
Stay Arm and Go
Forced Arm
Pu h to Arm
Siren Sound on Arm/Di arm ( ingle toot – arm / double toot – di arm)
Panic Alarm
Fire Alarm
Medical Alarm
Chime zone
Buzz zone
Zone Tamper
Arm with Key- witch or Remote Control

IDS816 User Manual 700-283-01H Issued January 2009
10
6.
6. 6.
6.
Armin the Control Panel
Armin the Control PanelArmin the Control Panel
Armin the Control Panel
6.1
6.1 6.1
6.1
Away Arm
Away ArmAway Arm
Away Arm
[#] [USER CODE]
(Leave via Entry/Exit zone)
1. En ure that the READY indicator i on. If not, check that all protected door and window are
clo ed and that all movement ha cea ed in area covered by motion detector . If nece ary,
clo e the front door.
2. Pre the [#] key.
3. Enter a valid [USER CODE]. If an incorrect code i entered, the keypad buzzer will beep three
time . In the event of an error pre the [#] key and re-enter the code.
4. The ARMED indicator will come on and the keypad buzzer will beep repeatedly for the duration of
the exit delay. Any bypa ed zone will be indicated by a teady on zone indicator.
5. Leave only via a de ignated exit route (leaving by any other can et off the alarm). The panel will
arm at the end of the exit delay.
6.2
6.2 6.2
6.2
Quick Away Arm
Quick Away ArmQuick Away Arm
Quick Away Arm
Hold down the [1] key until the beep
If thi function i enabled, it i po ible to AWAY arm by imply holding down the [1] key until the keypad
buzzer ound and the arming proce begin .
NOTE:
If the partition i already STAY armed, thi key will initiali e AWAY arming. It i therefore po ible to
change directly from STAY armed to AWAY armed.
6.3
6.3 6.3
6.3
Stay Arm
Stay ArmStay Arm
Stay Arm
Stay arming allow the u er to monitor elected perimeter zone and bypa interior zone . The u er can
remain on the premi e with acce to de ignated area during the STAY ARM cycle. Any zone that may
be violated accidentally hould be programmed a a BUZZ ZONE. When violated, a BUZZ ZONE will
cau e the keypad buzzer to ound for thirty (30) econd before ounding the iren. Entering a valid
USER CODE before the iren ound will ilence the keypad buzzer and prevent the iren from ounding.
To provide greater flexibility the panel cater for the programming of two different STAY
PROFILES. Each STAY PROFILE contain a unique combination of STAY, BUZZ and ALARM zone that
cater for a particular STAY ARM requirement.
Example:
PROFILE 1 might be u ed when the family goe to bed in the evening. In thi profile, ome interior zone
may be programmed a alarm zone or buzz zone , wherea PROFILE 2 i u ed while watching
televi ion when all interior zone would be bypa ed.
(See How to Select a Stay Profile, under Stay Zone )

IDS816 User Manual 700-283-01H Issued January 2009
11
6.3.1
6.3.1 6.3.1
6.3.1
How to Stay A
How to Stay AHow to Stay A
How to Stay Arm
rmrm
rm
[#] [USER CODE]
(Do not leave premi e )
1. Select the required STAY PROFILE (See page 19)
2. En ure that the READY indicator i on. If not, check that all protected door and window are
clo ed and that all movement ha cea ed in the area covered by motion detector .
3. Pre the [#] key.
4. Enter a valid [USER CODE]. If an incorrect code i entered, the keypad will give an error beep. In
the event of an error pre the [#] key and re-enter the [USER CODE].
5. The ARMED indicator will come on and the keypad buzzer will ound for the duration of the exit
delay.
6. DO NOT violate the Entry/Exit zone (normally the front door). If the Entry/Exit zone i violated the
y tem will arm in the AWAY mode.
7. Upon expiry of the exit delay, the AWAY indicator will remain off.
8. Any STAY zone will be automatically bypa ed (indicated by a teadily on indicator).
9. En ure that you enter only tho e area that are bypa ed.
6.4
6.4 6.4
6.4
Quick Stay Arm
Quick Stay ArmQuick Stay Arm
Quick Stay Arm
Hold down the [5] key until the beep
It i po ible to STAY arm by holding down the [5] key until the keypad buzzer ound . The panel will
immediately arm into the tay mode without any exit delay. All tay zone will be bypa ed.
N
NN
NOTE
OTEOTE
OTE:
::
:
Holding the button down again will cau e the panel to toggle between tay profile . Thi STAY profile
then become the active profile and the panel will STAY arm u ing thi profile - until you elect to witch
profile again.
6.4.1
6.4.1 6.4.1
6.4.1
How to Stay Arm
How to Stay ArmHow to Stay Arm
How to Stay Arm and Go
and Go and Go
and Go
Hold down the [6] key until the beep
Thi i a ingle key arm function that allow the u er to STAY arm and leave the premi e . If a partition i
already tay armed, holding down the [6] key initiate an exit delay, thu allowing the u er to leave the
premi e without di arming. At the end of the exit delay, the partition will re-arm in the ame tay profile it
wa armed in before the [6] key wa held down.
1. Hold down the [6] key until the keypad buzzer ound . The keypad buzzer will ound for the
duration of the exit delay. Only leave via a de ignated exit route.
2. At the end of the exit delay, the ARMED indicator will come on and the AWAY indicator will remain
off. All tay zone will be bypa ed.
NOTE
NOTENOTE
NOTE:
: :
:
Holding down the [6] key until the keypad buzzer ound al o en ure an entry delay on entering the
premi e .

IDS816 User Manual 700-283-01H Issued January 2009
12
6.5
6.5 6.5
6.5
Key
KeyKey
Key-
--
-s
ss
switch or Remote Armin (If F
witch or Remote Armin (If Fwitch or Remote Armin (If F
witch or Remote Armin (If Fitted)
itted)itted)
itted)
1. En ure that the READY indicator i on before leaving.
2. Leave and clo e the door (remembering to lock!)
3. Activate the remote or the key- witch. (A remote can be u ed to Stay Arm or Away Arm.) The panel
will arm in the away mode.
NOTE:
If a remote control i u ed it i advi able to have the iren toot on arm function enabled. Thi provide
verification that the y tem ha armed. (Speak to your in taller about thi feature)
6.6
6.6 6.6
6.6
Auto Arm
Auto ArmAuto Arm
Auto Arm
The panel may be programmed to arm automatically at a pre-programmed time. Should the premi e be
occupied at the time of auto-arming, a valid u er code entered during the pre-arm delay will terminate the
arming equence. The pre-arm delay i ignalled by an exit beep.
7.
7. 7.
7.
Disarmin the Control Panel
Disarmin the Control PanelDisarmin the Control Panel
Disarmin the Control Panel
7.1
7.1 7.1
7.1
How to Disarm
How to DisarmHow to Disarm
How to Disarm with a
with a with a
with a U
UU
User
ser ser
ser C
CC
Code
odeode
ode
[#] [USER CODE]
1. Enter the premi e through a de ignated entry route. Entering via any other route will cau e an
alarm.
2. A oon a the Entry/Exit zone i violated, the entry delay will begin. The keypad buzzer will ound
for the duration of the entry period.
3. Pre the [#] key and enter a valid [USER CODE].
4. Once the y tem di arm , the ARMED indicator will turn off and the keypad buzzer will top
ounding.
5. If no valid u er code ha been entered prior to the expiry of the entry delay period an alarm
condition will be regi tered.
6. If the entry period i too hort, have your in taller change the entry delay period.
NOT
NOTNOT
NOTE
EE
E:
: :
:
If a trobe (or fla hing light) ha been in talled and an alarm condition i regi tered, the trobe will
continue fla hing after the iren ha topped ounding. Entering a valid u er code will cancel the trobe.
7.2
7.2 7.2
7.2
How to
How to How to
How to D
DD
Di
ii
isarm
sarmsarm
sarm
U
UU
Usin a Key
sin a Keysin a Key
sin a Key-
--
-s
ss
switch or Remote
witch or Remotewitch or Remote
witch or Remote
1. Activate the remote or key- witch.
2. The y tem will di arm and the remote indicator (if in talled) will turn off. If the iren toot on di arm
option i enabled, the iren will provide a double toot when the panel i di armed
NOTE:
Speak to your in taller about activating thi feature.

IDS816 User Manual 700-283-01H Issued January 2009
13
8.
8. 8.
8.
Bypassin Zones
Bypassin ZonesBypassin Zones
Bypassin Zones
The term BYPASS i u ed to de cribe a zone that ha been deactivated; i.e. violation of a
bypa ed zone i ignored and will not cau e an alarm condition.
Once the y tem i armed, it i not po ible to bypa zone .
All bypa ed zone will be automatically cancelled each time the panel i di armed and mu t be
re-bypa ed before the next arming.
8.1
8.1 8.1
8.1
Bypass
BypassBypass
Bypassin
inin
in /Un
/Un/Un
/Un-
--
-b
bb
bypass
ypassypass
ypassin
inin
in
a Zone
a Zonea Zone
a Zone
Hold down [9] key until the beep,
then enter [ZONE NUMBER] [*] [#]
1. En ure that the panel i not armed (Armed LED OFF).
2. To enter bypa mode, hold down the [9] key for one econd (until the keypad buzzer ound ).
The Away LED will fla h, and bypa ed zone will be indicated by zone LED’ that are on.
3. Entering a zone number [ZONE NUMBER] [*] will toggle the corre ponding LED. For example,
[2] [*] will turn LED 2 on (if it wa off) and off (if it wa on).
4. Turn on the LED’ corre ponding to the zone you need to bypa . The LED zone indicator
hould now indicate only the zone that require bypa ing.
5. Once ati fied with your election, pre the [#] key to exit the bypa mode.
NOTE:
Panic zone cannot be bypa ed – and remember that all bypa ed zone are re et at every panel
di arm cycle.
9.
9. 9.
9.
Emer ency Alarms
Emer ency AlarmsEmer ency Alarms
Emer ency Alarms
9.1
9.1 9.1
9.1
Fire Alarms
Fire AlarmsFire Alarms
Fire Alarms
Hold down the [F] key until the beep
1. If the [F] key i pre ed until the keypad beep (approximately 1 econd) a FIRE ALARM condition
will be activated.
2. The FIRE ALARM condition may al o be triggered by a moke detector connected to an
appropriately programmed zone.
3. The iren will ound on and off repeatedly if programmed and the FIRE REPORTING CODE will be
tran mitted to the monitoring company.
4. To ilence the iren enter a valid [USER CODE].
9.2
9.2 9.2
9.2
Panic Alarms
Panic AlarmsPanic Alarms
Panic Alarms
Hold down the [P] key until the beep
If the [P] key i pre ed until the keypad beep (approximately 1 econd) a PANIC ALARM
condition will be activated.

IDS816 User Manual 700-283-01H Issued January 2009
14
A PANIC ALARM may al o be activated u ing any FIXED PANIC button or a REMOTE PANIC
button (if in talled).
If the audible panic option ha been elected, the iren will ound. A PANIC ALARM will be
tran mitted to the monitoring company.
To ilence the iren, enter a valid [USER CODE].
Pre the [P] key only in an emergency ituation that require re pon e by emergency per onnel.
9.3
9.3 9.3
9.3
Medical Alarms
Medical AlarmsMedical Alarms
Medical Alarms
Hold down the [M] key until the beep
If the [M] key i pre ed until the keypad beep (approximately 1 econd) a MEDICAL ALARM
condition will be activated.
The keypad buzzer will beep 5 time .
A medical reporting code will be reported to the monitoring company.
9.4
9.4 9.4
9.4
Duress
Duress Duress
Duress Alarms
AlarmsAlarms
Alarms
[#] [DURESS CODE]
Thi i a pecial u er code that hould only be u ed in the unique ituation where an intruder
force one to di arm the y tem “under dure ”.
When a [DURESS CODE] i entered, the control panel di arm .
A Dure Alarm Code (if programmed) will be reported to the monitoring company, but the iren
will not ound..
It i advi able to choo e a Dure code that can be ea ily remembered by all family (or taff)
member .
10.
10. 10.
10.
Alarm Memory
Alarm MemoryAlarm Memory
Alarm Memory
Hold down the [0] key until the beep
The Alarm Memory di play any zone that were violated, tampered with, or bypa ed during the la t
arm cycle. A fla hing ARMED indicator notifie the u er of an alarm memory condition. To view the alarm
memory, di arm the panel and continue a follow :
1. Hold down [0] until the keypad buzzer ound .
2. The READY and POWER indicator will turn off and the keypad buzzer will ound briefly.
3. Zone indicator that are on, how which zone were violated during the la t armed period.
4. Pre 2 to di play zone that were bypa ed.
5. Pre 3 to di play which zone were tampered with.
6. Pre 1 to return to violated zone .
7. Note that the alarm memory i era ed at the beginning of each arm cycle – o it hould alway be
checked BEFORE re-arming, if nece ary.

IDS816 User Manual 700-283-01H Issued January 2009
15
11.
11. 11.
11.
U
UU
User Codes
ser Codesser Codes
ser Codes
The IDS 816 Alarm Panel ha 32 programmable u er code . By default, u er code 1 i the Ma ter U er
Code that contain a pre-programmed 4-digit code of 1234.
NOTE
NOTENOTE
NOTE:
: :
:
U er code may be 4 (default) or 6 digit long (with default code of 123456). Thi i a programmable
feature. Check with your in taller to verify which option ha been programmed.
11.1
11.1 11.1
11.1
Addin , Deletin and Editin User
Addin , Deletin and Editin User Addin , Deletin and Editin User
Addin , Deletin and Editin User C
CC
Codes
odesodes
odes
Hold down the [*] key until the beep,
then enter [MASTER USER CODE] [*] [PROGRAMMABLE OPTION] [*]
The IDS 816 Panel ha a friendly programmable interface that allow you to add, modify or delete u er
code . See Table 1 for a ummary of programmable option . The programmable interface i acce ed
by entering the USER PROGRAMMING MODE.
Table 1 User Programming Options
Options
OptionsOptions
Options
Summary of Programmable Options
Summary of Programmable OptionsSummary of Programmable Options
Summary of Programmable Options
Option 0 Allow for the addition of new u er code .
Option 1 Allow editing of the u er name di played by LCD keypad .
This option is only applicable if LCD keypads are installed.
Option 2 Allow editing of a elected u er code.
Note that the user code properties are not edited, only the user code itself.
Option 3 Allow viewing of the u er code lot number for a elected code.
There are 32 available u er code lot .
Option 4 Allow editing of the u er code propertie for a elected u er code.
Thi i a bit mapped menu.
Option 5 Allow the allocation of a elected u er code to a de ignated partition( ).
Thi i a bitmapped menu.
Option 8 Adding U er Remote .
Option 9 Deleting a U er Code.
Option 10 Allow the deletion of a u er code u ing the u er code lot number.
Option 11 Allow viewing of a u er name if the lot number i known.
12.
12. 12.
12.
User Pro ram Mode
User Pro ram ModeUser Pro ram Mode
User Pro ram Mode
1. En ure that the panel i not armed.
2. Hold down the [*] key until the keypad buzzer ound .
3. The ARMED and READY indicator will fla h alternately.
4. Enter a [MASTER USER CODE]. The factory default i 1234. Should the [MASTER USER
CODE] be defaulted to ix digit , it will be 123456. Pre the [*] key. A valid entry will be
confirmed by a long beep.
5. If tep 1 to 4 are performed correctly, the READY indicator will fla h. If an invalid code wa
entered, the keypad buzzer will give an error beep. (3 hort beep ). If the error beep occur , pre
the [#] key (thi clear all previou entrie ) and repeat tep 2 to 5.
6. Select a programmable option from Table 1.

IDS816 User Manual 700-283-01H Issued January 2009
16
Example:
To add a new u er code, enter the U er Program Mode by completing tep 1 to 5 a li ted above.
To acce Option 0, enter a value of [0] (See table 1) followed by [*].
Enter a [NEW USER CODE] followed by the [*] key. Once the u er code i programmed, enter the next
code followed by [*]. To exit the program mode pre the [#] key. For a full li t of option , refer to Table
1. Programming of the e option i explained on the previou page.
13.
13. 13.
13.
Explanation of Pro
Explanation of ProExplanation of Pro
Explanation of Pro rammable Options
rammable Optionsrammable Options
rammable Options
13.1
13.1 13.1
13.1
Add a New
Add a New Add a New
Add a New User
UserUser
User C
C C
Code
ode ode
ode –
––
– Option 0
Option 0 Option 0
Option 0
Hold down the [*] key until the beep,
then enter [MASTER CODE] [*] [0] [*] [New USER CODE] [*]
1. Enter the U er Program Mode a per tep 1 to 4 on page 14.
2. Pre the [0] key followed by the [*] key to elect the programmable option 0 (zero). The Ready
and Armed indicator will fla h imultaneou ly.
3. Enter the [New USER CODE] followed by the [*] key.
4. Further code may be added by repeating tep 3 above.
5. After entering the la t code, pre the [#] key to exit the u er program mode.
13.2
13.2 13.2
13.2
Edit a User Name
Edit a User Name Edit a User Name
Edit a User Name –
––
– Option 1 (LCD Keypads O
Option 1 (LCD Keypads O Option 1 (LCD Keypads O
Option 1 (LCD Keypads Only)
nly)nly)
nly)
Hold down the [*] key until the beep,
then enter [MASTER CODE] [*] [1] [*] [User Name] [*]
1. Enter the U er Program Mode a per tep 1 to 4 on page 14.
2. Pre the [1] key followed by the [*] key to elect programmable option 1. The Armed indicator
will fla h.
3. Enter the [USER CODE] of the u er who e name you wi h to edit.
4. U er Name are di played a the U er Slot Number by default. Edit the U er Number o that it
read the correct U er Name. To confirm the entry pre [*].
5. The [P] key can be u ed to move the cur or toward the right, whil t the [F] key can be u ed to
move from the cur er toward the left. The [MODE] key toggle between upper and lower ca e
(under core cur er for lower ca e, block cur er for capital ).
6. Repeat tep 3 to 5 until you have edited all the name you require and then pre [#] to exit.
13.3
13.3 13.3
13.3
Edit a Selected
Edit a Selected Edit a Selected
Edit a Selected User
UserUser
User C
C C
Code
odeode
ode
–
––
– Option 2
Option 2 Option 2
Option 2
Hold down the [*] key until the beep,
then enter [MASTER CODE] [*] [2] [*] [Old Code] [*] [New Code] [*]
1. Enter the U er Program Mode a per tep 1 to 4 on page 14.
2. Pre the [2] key followed by the [*] key to elect programmable option 2. The READY and Armed
indicator will fla h imultaneou ly.
3. Enter the [USER CODE] which i to be edited followed by the [*] key.
4. The READY indicator will fla h and the AWAY indicator will be on.

IDS816 User Manual 700-283-01H Issued January 2009
17
5. Enter the [NEW CODE] followed by the [*] key.
6. The READY and ARMED indicator will fla h imultaneou ly.
7. To edit other code repeat tep 3 to 5.
8. Pre the [#] key to exit the U er Program Mode.
13.4
13.4 13.4
13.4
View a
View a View a
View a User
UserUser
User C
C C
Code
odeode
ode Slot Number
Slot Number Slot Number
Slot Number
–
––
– Option 3
Option 3 Option 3
Option 3
Hold down the [*] key until the beep,
then enter [MASTER CODE] [*] [3] [*] [USER CODE] [*]
1. Enter the U er Program Mode a per tep 1 to 4 on page 14.
2. Pre the [3] key followed by the [*] key to elect programmable option 3. The READY and
ARMED indicator will fla h imultaneou ly.
3. Enter the [USER CODE] followed by the [*] key.
4. The READY indicator will fla h and the AWAY indicator will be on.
5. The [USER CODE] lot number will be di played by the Zone indicator . (See table 2)
6. Pre the [#] key to exit the U er Program Mode.
13.5
13.5 13.5
13.5
User
UserUser
User C
C C
Code
odeode
ode Properties
Properties Properties
Properties
–
––
– Option 4
Option 4 Option 4
Option 4
Hold down the [*] key until the beep,
then enter [MASTER CODE] [*] [4] [*] [USER CODE] [*] [PROPERT No.] [*]
1. Enter the U er Program Mode a per tep 1 to 4 on page 14.
2. Pre the [4] key followed by the [*] key to elect programmable option 4. The READY and
ARMED indicator will fla h imultaneou ly.
3. Enter the [USER CODE] followed by the [*] key.
4. The READY indicator will fla h and the AWAY indicator will be on.
5. The propertie a igned to the u er code are di played by the Zone indicator . LED( ) that are on
indicate that certain propertie have been a igned to the u er code. Refer to Table 2 for a li t of
u er code propertie .
6. To elect a u er code property, pre the key which corre pond to that property followed by the
[*] key. The appropriate zone LED will come on. To de elect a property, pre the corre ponding
key followed by the [*] key and the LED will be turned off.
Example:
To enable a u er code to function a a dure code pre the [2] key followed by the [*] key. The
zone 2 LED will come on to confirm the election.
7. Repeat tep 6 until the de ired propertie have been programmed.
8. Pre the [#]
[#][#]
[#] key to exit the U er Program Mode.

IDS816 User Manual 700-283-01H Issued January 2009
18
Table 2 User Code Properties
Zone
ZoneZone
Zone LED
LED LED
LED
Property
PropertyProperty
Property
2 Dure code
3 Arm to di arm code [Maid’ code]
4 Global arm/di arm code
13.5.1
13.5.1 13.5.1
13.5.1
Explanation of
Explanation of Explanation of
Explanation of U
UU
User Code
ser Codeser Code
ser Code Properties
Properties Properties
Properties
13.5.1.1
13.5.1.1 13.5.1.1
13.5.1.1
Duress Code
Duress CodeDuress Code
Duress Code
Thi i a pecial 4 (default) or 6 digit u er code (check the code length with your in taller) which
hould only be u ed in the unique ituation where an intruder force one to di arm the y tem
“under dure ”.
When the DURESS CODE i entered, the control panel di arm normally - however, a DURESS
REPORTING CODE i tran mitted to the monitoring company to inform them that you have been
forced to di arm the control panel by an intruder.
It i advi able to choo e a code that can be ea ily remembered by all family (or taff) member .
13.5.1.2
13.5.1.2 13.5.1.2
13.5.1.2
Maid’s Code
Maid’s CodeMaid’s Code
Maid’s Code
Thi code may be u ed to limit acce to the premi e . The MAID’S CODE will only di arm the y tem if
the ame code wa u ed for arming. If armed with a code other than thi code, the y tem will view an
attempt to di arm u ing the MAID’S CODE a an invalid entry. Any valid u er code will di arm the y tem
if it ha been armed with the MAID’S CODE.
13.5.1.3
13.5.1.3 13.5.1.3
13.5.1.3
G
GG
Global
loballobal
lobal A
A A
Arm
rmrm
rm/D
/D/D
/Disarm
isarmisarm
isarm C
C C
Code
odeode
ode
Thi code, when entered, will either arm or di arm the partition a igned to that u er depending on their
tatu . If both partition are di armed, entering a global code will arm both partition . If both partition are
armed, entering a global code will di arm them. In the ca e where one partition i armed and the other
di armed, entering a global code at the keypad of the armed partition will di arm that partition and
entering a global code at the keypad of the di armed partition will arm that partition.
13.6
13.6 13.6
13.6
Assi n
Assi n Assi n
Assi n a
a a
a U
UU
User
serser
ser C
C C
Code
odeode
ode to Partitions
to Partitions to Partitions
to Partitions
–
––
– Option 5
Option 5 Option 5
Option 5
Hold down the [*] key until the beep,
then enter [MASTER CODE] [*] [5] [*] [USER CODE] [*] [ZONE LED No] [*] [#]
1. Enter the U er Program Mode a per tep 1 to 4 on page 14.
2. Pre the [5] key followed by the [*] key to elect programmable option 5. The READY and
ARMED LED’ will fla h imultaneou ly.
3. Enter the [USER CODE] followed by the [*] key.
4. The READY indicator will fla h and the AWAY indicator will be on.
5. The partition to which the u er code i a igned are di played by the by the zone LED’ . If zone
LED 1 i on, the u er code can arm or di arm partition 1. If zone LED 2 i on, the u er code can
arm or di arm partition 2. It i po ible to program code to arm/di arm both partition .
6. To elect which partition the u er code may arm or di arm, toggle zone LED’ by entering the
[ZONE LED NUMBER] followed by the [*] key.

IDS816 User Manual 700-283-01H Issued January 2009
19
7. Repeat tep 6 until the u er code ha been a igned to the correct partition( ).
8. Pre the [#] key to exit the U er Program Mode.
13.7
13.7 13.7
13.7
A
AA
Addin User Remotes
ddin User Remotesddin User Remotes
ddin User Remotes
–
––
–
Option 8
Option 8 Option 8
Option 8
Hold down the [*] key until the beep,
then enter [MASTER CODE] [*] [8] [*] [USER CODE] [*] <press remote button> [*] [#]
1. Enter the U er Program Mode a per tep 1 to 4 on page 14.
2. Pre the [8] key followed by the [*] key to elect programmable option 8. The READY and
ARMED LED’ will fla h imultaneou ly.
3. Enter the [USER CODE] followed by the [*] key.
4. The READY indicator will fla h and the AWAY indicator will be on.
5. Pre any button on the new remote. Thi will a ign the new remote to the u er code a entered
in Step 3.
6. Pre [*].
7. To add additional remote , repeat tep 3 - 6.
8. Pre the [#] key to exit U er Program Mode.
13.8
13.8 13.8
13.8
Delete
Delete Delete
Delete a
a a
a U
UU
User
serser
ser C
C C
Code
ode ode
ode –
––
– Option 9
Option 9 Option 9
Option 9 (Code
(Code (Code
(Code K
KK
Known)
nown)nown)
nown)
Hold down the [*] key until the beep,
then enter [MASTER CODE] [*] [9] [*] [USER CODE] [*] [#]
1. Enter the U er Program Mode a per tep 1 to 4 on page 14.
2. Pre the [9] key followed by the [*] key to elect Menu option 9. The READY and ARMED
indicator will fla h imultaneou ly.
3. Enter the [USER CODE] to be deleted followed by the [*] key. “Deleting” the code in lot one will
reprogram it to 1234
4. Further code may be deleted by repeating Step 3 above.
5. After deleting the final code, pre the [#] key to exit U er Program Mode.
13.9
13.9 13.9
13.9
Delete a
Delete a Delete a
Delete a User
UserUser
User C
C C
Code
ode ode
ode –
––
– Option 10
Option 10 Option 10
Option 10 (Slot
(Slot (Slot
(Slot K
K K
Known)
nown)nown)
nown)
Hold down the [*] key until the beep,
then enter [MASTER CODE] [*] [1] [0] [*] [SLOT NUMBER] [*] [#]
1. Enter the U er Program Mode a per tep 1 to 4 on page 14.
2. Pre the [1] key then the [0] key followed by the [*] key to elect Menu option 10. The ARMED
and READY indicator will fla h imultaneou ly.
3. Enter the [SLOT NUMBER] for the u er code you wi h to delete followed by the [*] key. You can
determine the lot number of a particular code by u ing programmable option 3.
4. Further u er code may be deleted by repeating Step 3.
5. After deleting the final code, pre the [#] key to exit

IDS816 User Manual 700-283-01H Issued January 2009
20
13.10
13.10 13.10
13.10
Viewin a User Name
Viewin a User Name Viewin a User Name
Viewin a User Name –
––
– Option 11
Option 11 Option 11
Option 11(Slot Known
(Slot Known(Slot Known
(Slot Known)
))
)
(LCD Keypad only)
Hold down the [*] key until the beep,
then enter [MASTER CODE] [*] [1] [1] [*] [SLOT NUMBER] [*] [#]
1. Enter the U er Program Mode a per tep 1 to 4 on page 14.
2. Pre the [1] key then the [1] key again followed by the [*] key to elect menu option 11. The
ARMED and READY indicator will fla h imultaneou ly.
3. Enter the [SLOT NUMBER] followed by the [*] key.
4. The u er name will be di played. Default name are di played a the SLOT NUMBER (i.e. If the
SLOT NUMBER ha not been edited a per Option 1)
5. Pre [#] to exit U er Program Mode.
14.
14. 14.
14.
Stay Zones
Stay ZonesStay Zones
Stay Zones
Stay zone are tho e zone that are bypa ed automatically when the y tem i “STAY ARMED”. To
avoid triggering the alarm, zone uch a bedroom that are protected by Pa ive Infra-Red (PIR)
detector or window that may be opened, mu t be bypa ed when “ taying at home”.
Stay zone need only be programmed once. Each time the y tem i armed in the Stay Mode
the pre- elected tay zone will be bypa ed automatically. The panel allow for two unique STAY
PROFILES to be tored. A STAY PROFILE tore a pre- elected combination of STAY and BUZZ zone to
uit a pecific STAY ARM requirement.
If a partition i tay armed u ing Profile one, it i po ible to toggle the panel arm tatu
directly to Stay Arm Profile two by holding the [5] key for two econd . STAY and BUZZ zone can be
programmed for each profile once the profile ha been elected (below).
14.1
14.1 14.1
14.1
How to Select a Stay Profile
How to Select a Stay ProfileHow to Select a Stay Profile
How to Select a Stay Profile
Hold down the [MODE] key until the beep,
then enter [2] [*] [PROFILE NUMBER] [*]
1. En ure that the Panel i di armed.
2. Pre the [#] key to clear any previou entrie .
3. Hold [MODE] down for one econd until the keypad beep .
4. Pre the [2] key followed by the [*] key.
5. Pre [1] or [2] for the required profile.
6. Pre [*] to enter. The buzzer will give a long beep.
7. Program STAY and BUZZ zone for the profile (See page 19 and 20) or ARM the profile
14.2
14.2 14.2
14.2
How to Pro ram Stay Zones
How to Pro ram Stay ZonesHow to Pro ram Stay Zones
How to Pro ram Stay Zones
After selecting the required stay profile (Page 19),
Hold down the [3] key until the beep,
then enter [ZONE NUMBER] [*] [#]
1. Select the required tay profile (See Page 19)
2. Hold down the [3] key until the keypad buzzer ound . The AWAY indicator will fla h indicating
that the panel i in the Stay zone programming mode.
Other manuals for 816
1
Table of contents
Other IDS Security System manuals
Popular Security System manuals by other brands

Honeywell
Honeywell Fire-Lite Alarms W-BG12LX(A) quick start guide
Mace
Mace DVR-9404~9408~9416 user manual
DSC
DSC PC2550 instruction manual

Precision Digital Corporation
Precision Digital Corporation VIGILANTE II instruction manual
Pentatech
Pentatech DA02 owner's manual

Teldat
Teldat VisorALARM PLUS 2U operating instructions
