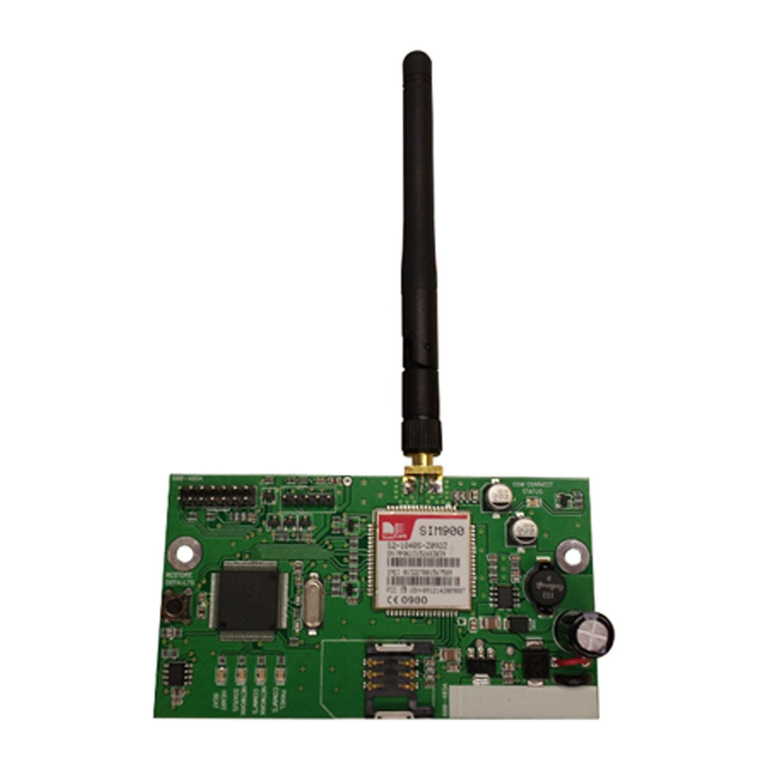
IDS X-Series X-SMS Instruction manual

X-SMS 700-485-01B
X-SMS Quick User Guide
THANK YOU FOR CHOOSING IDS TO PROTECT YOU
Thank you for purchasing an IDS X-SMS module. IDS X-SMS offers
powerful, versatile and highly configurable reporting and control
capabilities, which will keep you, informed and in control of your X-Series
alarm system when away from your premises.
NOTE: The X-SMS module works only with IDS X-Series panels above a
certain version. Your X-Series alarm panel is a sophisticated professional-
grade intrusion product designed to protect lives and property, and can
only be installed and maintained by a professional IDS-certified installer.
The Installer Manual included in this box does not cover all aspects of
installation; these are available only to installers via our sales offices.
Should you require assistance in finding an installer, please visit
www.idsprotect.com.
NOTE: Please read the entire Quick User Guide before attempting to use
the X-SMS device!
NOTE: Throughout this manual, the default user code 1234 is used.
Commands will only be accepted by the alarm panel if preceded by a
valid user code, programmed into the alarm panel by your installer.
FEATURES OF THE IDS X-SMS DEVICE
Take full remote control of your X-Series alarm panel
oArm / disarm
oBypass / un-bypass zones
oHome automation via PGM’s
Keep in touch with your premises
oReceive customised reports on panel status and events
oCheck current panel status
oCheck recent activity by retrieving event logs
Enhance the functionality of your X-Series alarm panel:
oUsing names in reporting and commands
oUpdate your panel’s time and date via the mobile network
Manage your X-SMS device remotely
oLock X-SMS in event of lost phone
oCheck and top up SIM airtime balance
oAdd, manage and remove X-SMS users
COMMAND FORMAT
Commands are not case sensitive and all follow the same format for ease
of use:
[code] space [command] space [extended command] space [data]
Code –Valid alarm user code stored in the alarm panel
Command –A string that identifies the function that you are wanting to
access in the alarm panel.
Extended Command –Any supplementary information the function
requires. (Not always required will depend on the function you are
accessing)
Data - Any extra information the extended command requires.
NOTE: The cell networks limit the number of characters to 160.
TAKE FULL REMOTE CONTROL OF YOUR X-SERIES ALARM PANEL
Arm / Disarm
The X-Series panel’s 8 partitions may be armed in multiple profiles.
Arming requires a valid user code. These are programmed by your
installer.
Valid command examples:
Desired action
Code
Command
Ext. Comm
Data
Away arm all partitions
1234
Arm
All
Away arm P1 & P3
1234
Arm
P1, P3
Stay arm P2 in stay profile 3
1234
Arm
S3
P2
Stay arm P1 & P4 in stay
profile 1
1234
Arm
S1
P1, P4
Disarm all partitions
1234
Disarm
All
Disarm P2
1234
Disarm
P2
Disarm P5 & P6
1234
Arm
P5, P6
NOTE: Stay profiles can be changed by sending a new stay arm command
If a partition is away armed and a stay arm command is sent the
message will be rejected. Away armed partitions must be disarmed
before being stay armed.
Bypass / un-bypass zones
The “Bypass” command will be sent by you to bypass specific zones, and
vice versa for “unbypass”. You must specify which zones to bypass in the
data field. Zones may be referred to by their number or, where
applicable, by their name.
Valid command examples:
Desired Action
Code
Command
Ext. Comm
Data
Bypass zone 1
1234
Bypass
1
Bypass zone 3,4,8,10
1234
Bypass
3,4,8,10
Bypass named zone
“Passage”
1234
Bypass
Passage
Bypass named zone “Lounge”
& “Kitchen”
1234
Bypass
Lounge,
Kitchen
Unbypass Zone 5
1234
Unbypass
5
Unbypass “Kitchen”
1234
Unbypass
Kitchen
Home automation via PGM’s
Programmable outputs (PGM’s) on your X-Series alarm panel may be
used to control electrical devices such as lights, gate and garage doors
motors, pumps, geysers, irrigation systems etc. The PGM command
controls the programmable outputs on the X- Series alarm panel.
Note: Installations controlling electrical devices often requires a certified
electrician. PGM outputs can only supply 80mA of current.
PGM’s can be triggered in several ways as below – consult your installer
for further support.
On –Turns the PGM on by putting 12V DC onto the output
Off –Turns the PGM off by removing the 12V DC
PulseH –Puts 12V DC onto the output for 2 seconds
PulseL –Removes 12V DC from the output for 2 seconds
Desired Action
Code
Command
Ext. Comm
Data
Turn PGM 1 on
1234
PGM
On
1
Turn PGM 3, 4 & 5 off
1234
PGM
Off
3,4,5
Pulse PGM 2 Low
1234
PGM
PulseL
2
Pulse PGM 3 High
1234
PGM
PulseH
3
KEEP IN TOUCH WITH YOUR PREMISES
Receive customised reports on panel status and events
The “report” command is sent to select what reports you want to receive
on that phone number. Each phone number can choose how they want
to receive the messages or turn off messages.
There are three types of SMSes:
Raw –A Contact ID string will be sent to the phone number
Full –All enabled events on the X-Series alarm panel will be sent in
English to the phone number
Partial –Only the following will be sent in English to the phone number:
Panics, Duress, zone violations AC Fail/Restore and Battery
low/restore
Valid extended commands: “Type”
Desired Action
Code
Command
Ext. Comm
Data
Turn on partial reporting
1234
Report
Type
Partial
Turn on global reporting
1234
Report
Type
Full
NOTE: Only a “Master Phone Number” can allocate partitions to a phone
number.
Check current panel status
Current arm status, zone status, and PGM status can be checked.
Arm Status
Desired Action
Code
Command
Ext. Comm
Data
Retrieve the status of all
partitions
1234
Arm
Status
All
Retrieve the status of P1
1234
Arm
Status
P1
Retrieve the status of P3 &
P6
1234
Arm
Status
P3, S6
Zone Status
Desired Action
Code
Command
Ext. Comm
Data
Retrieve the status of zones
in partition 1
1234
Zone
Status
P1
Retrieve the status of zones
in partition 1 & 3
1234
Zone
Status
P1, P3
PGM Status
Desired Action
Code
Command
Ext. Comm
Data
Get PGM 8’s status
1234
PGM
Status
8
Get PGM Gate’s status
1234
PGM
Status
Gate

X-SMS 700-485-01B
Bypass Status
Desired Action
Code
Command
Ext. Comm
Data
Retrieve bypass status of
zone 1
1234
Bypass
Status
1
Retrieve status of “Lounge”
1234
Bypass
Status
Lounge
Check recent activity by retrieving event logs
The “Event” command is sent by you to retrieve a selectable number of
events from the Alarm event log.
Desired Action
Code
Command
Ext. Comm
Data
Retrieving 5 Events
1234
Event
Panel
5
NOTE: SMS text is limited by the networks to 160 characters and
retrieving event logs that exceed 160 characters will amount to a number
of SMSes being sent.
ENHANCE THE FUNCTIONALITY OF YOUR X-SERIES ALARM PANEL
Using names in reporting and commands
The X-SMS device itself, and all partitions, zones, and PGM’s can be
named. These names are used by default in all reports, and can be used
in commands in place of the default zone / partition / PGM numbers.
Desired Action
Code
Command
Ext. Comm
Data
Name PGM 5 Lights
1234
PGM
Name
5:Lights
Name the X-SMS device
“Home”
1234
Site
Name
Home
Name partition 1 “Main
House”
1234
Partition
Name
1:Main
House
Name partition 2 as
“Granny Flat” & partition 3
as “Garage”
1234
Partition
Name
2:Granny
Flat,
3:Garage
Name zone 1 as “Kitchen”
1234
Zone
Name
1:Kitchen
Name zone 2 “Lounge” &
zone 5 “Patio”
1234
Zone
Name
2:Lounge,
5:Patio
NOTES
The X-Series alarm system does not use site, partition or PGM
names, names and these cannot be added via the keypad.
If a zone is named via SMS it will over write the zone name on the
system
If a space is inserted before or after the name then the space
becomes part of the zone name.
Names are case sensitive
Update your panel’s time and date via the mobile network
Desired Action
Code
Command
Ext. Command
Data
Set the unit to retrieve the
time & date from the Cell
network
1234
Add
Time
Phone Number
(SIM card number
inserted in the
unit)
NOTE: Setting the unit to update time will require a SMS to be sent once
a week to retrieve the time from the cell network. This will be done
automatically if enabled.
MANAGE YOUR X-SMS DEVICE REMOTELY
Lock X-SMS in event of lost phone
This is the “disabled” mode for use when access to an authorised phone
number has been lost due to theft or misplacement. To activate the
lockout send the lockout command from an authorised phone number.
Once in this mode, the SMS Module will ignore all incoming SMS’s apart
from a re-enable command from the same number that the disable
command originated from. There are only two ways to re-enable a
disabled SMS Module: via the re-enable SMS or by physically pressing
the reset switch on the module.
Desired Action
Code
Command
Ext. Comm
Data
Temporarily disable the
SMS module
1234
Lockout
On
Enable the SMS module
after being disabled
1234
Lockout
Off
Check and top up SIM airtime balance
You will use the “Airtime” command to query the current airtime
balance of the SIM card in the module or to add airtime to the module. It
is your responsibility to supply the network-dependant strings to
manage their airtime.
Desired Action
Code
Command
Ext. Comm
Data
Save balance string in the
SMS module
1234
Airtime
Command
Enter the
string
supplied
Query airtime balance
1234
Airtime
Balance
Add airtime
1234
Airtime
Network
supplied
string
Add, manage and remove X-SMS users
Phone Number Categories
All phone numbers fall into one of three categories, Master, Arming, or
Reporting, as below.
Entering phone numbers into the SMS unit is done via SMS’s from a
“Master Phone Number”. In the default state any cell phone can be used
to enter the first “Master Phone Number”, once entered the phone with
that cell number must be used to enter more cell numbers or control the
system.
Master Phone Number
Master phone numbers have the highest level of access to the SMS
Module. Master phone numbers are allowed access to all configuration
data. Only master numbers are permitted to add phone numbers to the
system.
Arming phone Numbers
Arming phone numbers are permitted enough access to the module to
be able to arm and disarm the Alarm Panel and receive reports.
Reporting Phone Numbers
Reporting phone numbers are only permitted to receive reports from the
SMS module, and to temporarily turn off reporting to that number.
How Phone Numbers relate to User Codes
The SMS module works on the basis of phone numbers, with each phone
number being a user on the SMS module. The SMS module users’ cell
numbers are in no way linked to User Codes on the alarm panel. The
SMS module will only accept commands from known phone numbers
and will reject commands from unknown numbers or numbers not
authorised for the command sent.
Any allowed messages are passed to the panel. The panel elects to
execute the command based on the following:
Validity of the user code within the alarm
The properties of the user code within the alarm
The current status of the panel
Therefore, for a person to send a successful command, the following
conditions must be met:
The phone number must be programmed into the SMS
The user’s cell phone must not be hidden
The phone number must be allocated to a group that allows the
specified command
The user code must be programmed into the panel
The user code properties must be enabled for the specified
command
The action must be possible in the current panel status
The command string must be correct and with all the required
information
The “Add” command is sent to add a new authorised phone number to
the SMS Module. You must specify whether the new phone number is a
Master Phone Number, User Phone Number or a Reporting Phone
Number.
Desired Action
Code
Command
Ext. Command
Data
Add phone number as a
Master number
1234
Add
Master
Phone Number
Add phone number as
an Arm number
1234
Add
Arming
Phone Number
Add phone number as a
Reporting number
1234
Add
Reporting
Phone Number
Deleting a phone
number
1234
Delete
Phone Number
SMS Threshold
By default the number of SMSes sent per day per phone number is
limited to 20.
To increase or decrease the number of SMSes sent to a phone number,
the “threshold”extended command is sent by the phone number that is
requesting the change.
Desired Action
Code
Command
Ext. Command
Data
Increase the reporting
threshold to 50 SMSes
1234
Report
Threshold
50
Decrease the reporting
threshold to 14
1234
Report
Threshold
14
Other IDS Security System manuals
