IFM O6E7 Series User manual

Operating instructions
Through-beam sensor
O6E7xx / O6S7xx
706460 / 00 04 / 2019
UK

2
Contents
1 Preliminary note���������������������������������������������������������������������������������������������������2
1�1 Symbols used ������������������������������������������������������������������������������������������������2
2 Safety instructions �����������������������������������������������������������������������������������������������3
3 Functions and features ����������������������������������������������������������������������������������������4
4 Installation������������������������������������������������������������������������������������������������������������4
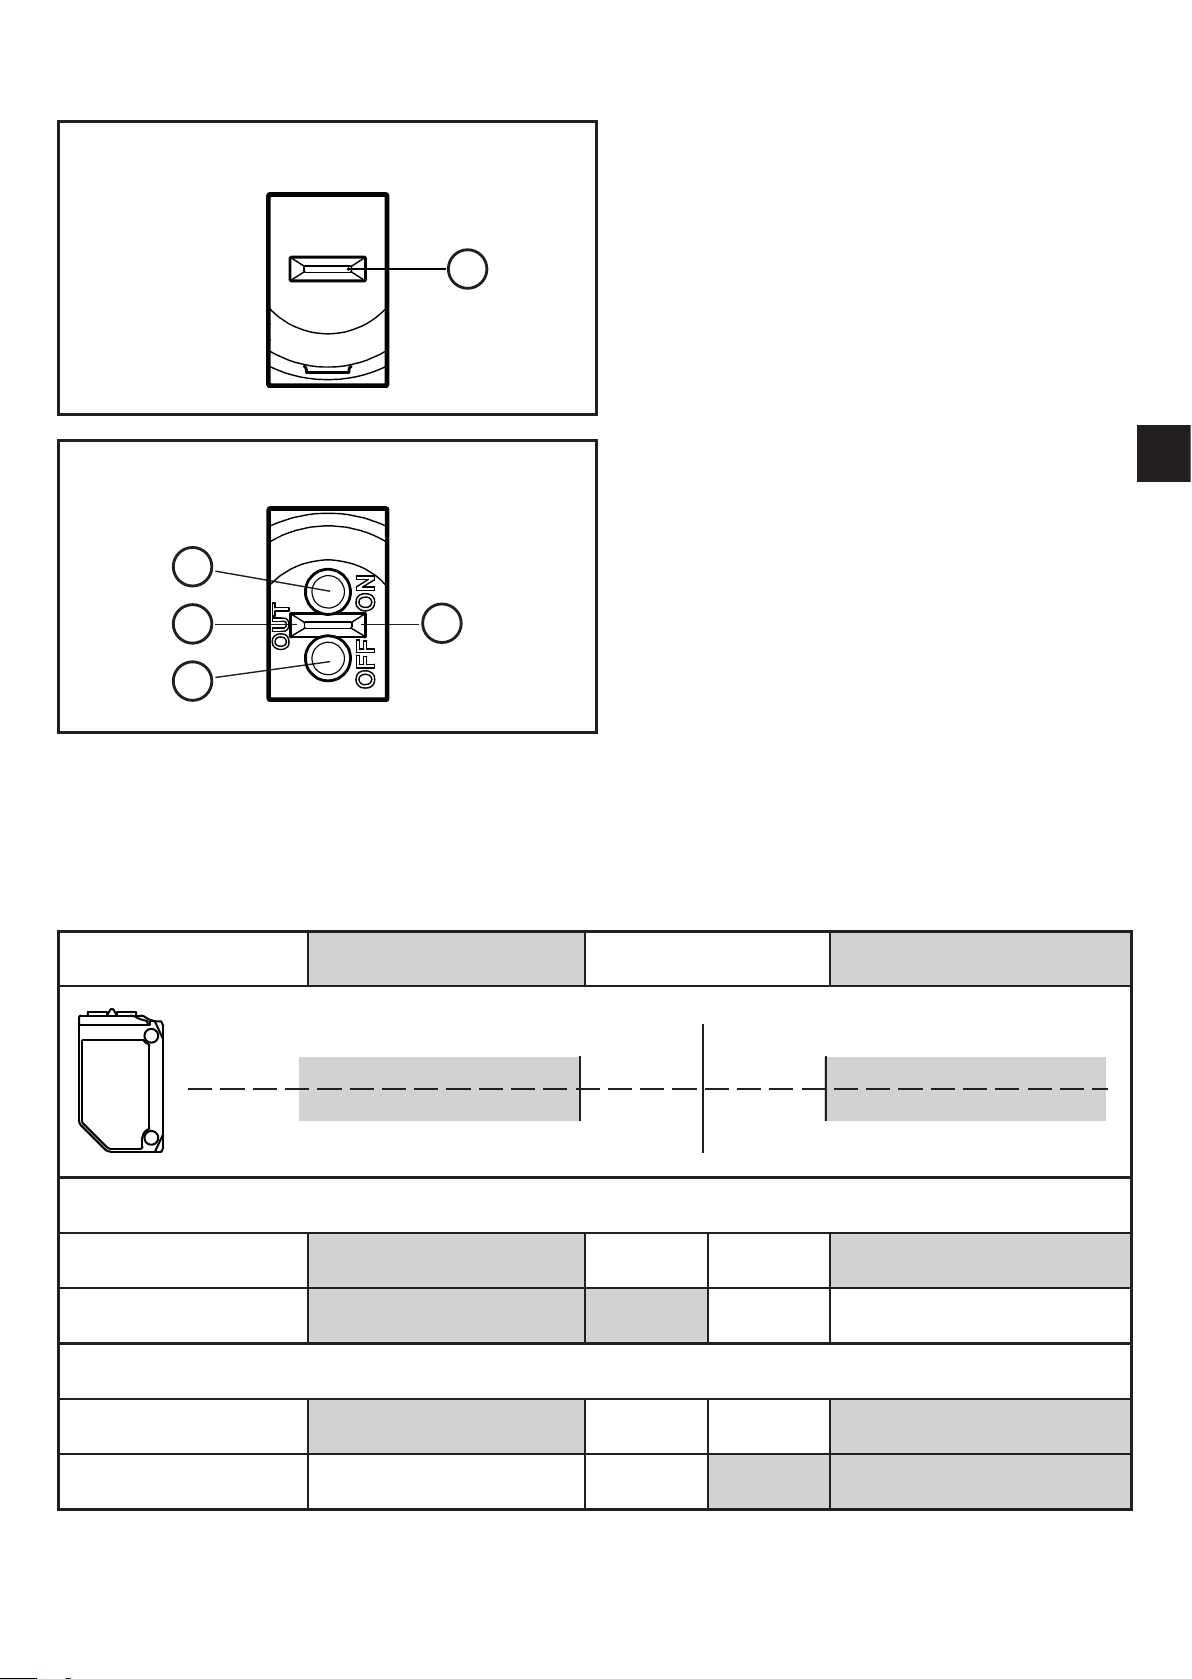
5 Operating and display elements ��������������������������������������������������������������������������5
5�1 Stability indication������������������������������������������������������������������������������������������5
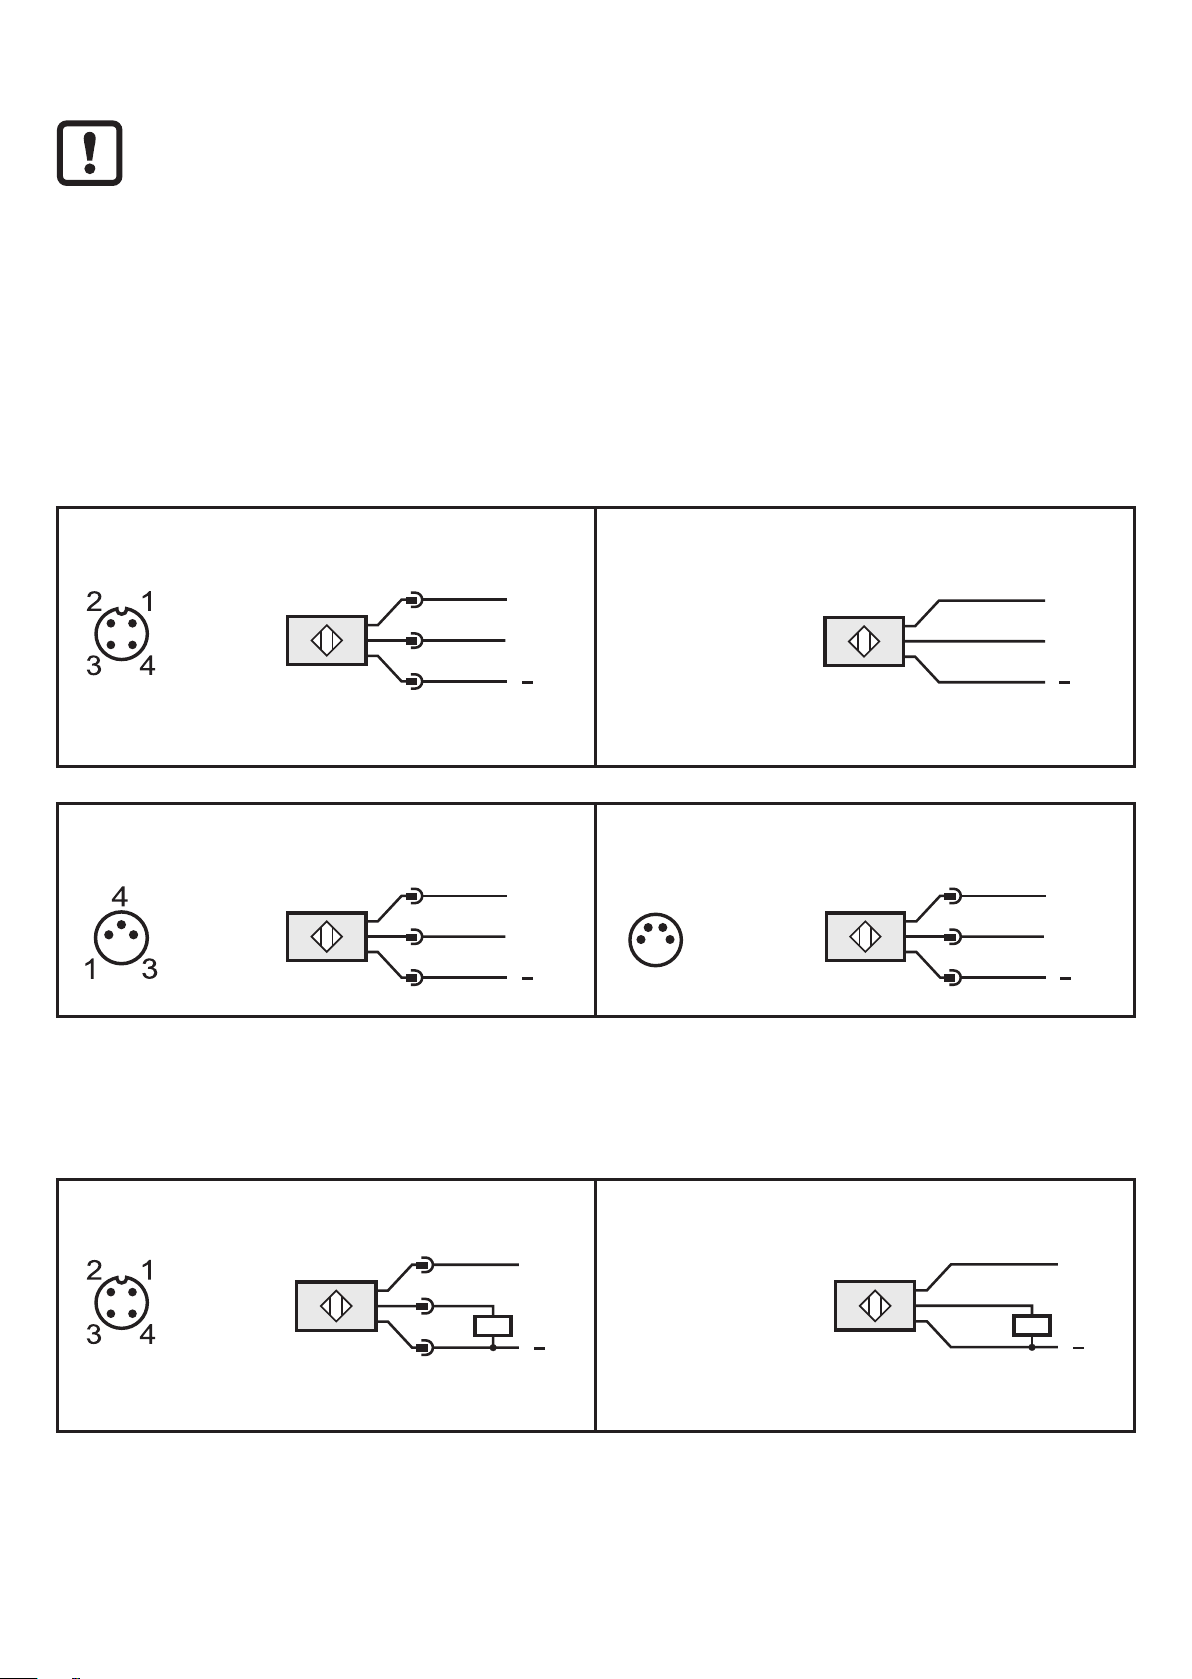
6 Electrical connection��������������������������������������������������������������������������������������������6
6�1 Transmitter�����������������������������������������������������������������������������������������������������6
6�2 Receiver���������������������������������������������������������������������������������������������������������6
6�2�1 PNP ������������������������������������������������������������������������������������������������������6
6�2�2 NPN ������������������������������������������������������������������������������������������������������7
7 Settings����������������������������������������������������������������������������������������������������������������8
7�1 Settings on the sensor�����������������������������������������������������������������������������������8
7�1�1 The sensor is to switch when the object is detected ����������������������������8
7�1�2 The sensor is not to switch when the object is detected ����������������������9
7�1�3 Setting the maximum sensitivity �����������������������������������������������������������9
7�1�4 Programming unsuccessful ������������������������������������������������������������������9
7�1�5 Electronic lock ��������������������������������������������������������������������������������������9
7�2 Setting via IO-Link �����������������������������������������������������������������������������������������9
7�2�1 Adjustable parameters������������������������������������������������������������������������10
7�2�2 Set the sensitivity with object��������������������������������������������������������������12
7�2�3 Setting the maximum sensitivity ���������������������������������������������������������12
8 Operation�����������������������������������������������������������������������������������������������������������13
9 Maintenance, repair, disposal����������������������������������������������������������������������������13
1 Preliminary note
Technical data, approvals, accessories and further information at
www�ifm�com�
1.1 Symbols used
►Instructions

3
UK
> Reaction, result
[…] Designation of keys, buttons or indications
→Cross-reference
Information
Supplementary note�
Important note
Non-compliance may result in malfunction or interference�
2 Safety instructions
• Read this document before setting up the product and keep it during the entire
service life�
• The product must be suitable for the corresponding applications and environ-
mental conditions without any restrictions�
• Only use the product for its intended purpose (→ 3 Functions and features)�
• If the operating instructions or the technical data are not adhered to, personal
injury and/or damage to property may occur�
• The manufacturer assumes no liability or warranty for any consequences
caused by tampering with the product or incorrect use by the operator�
• Installation, electrical connection, set-up, operation and maintenance of the
product must be carried out by qualified personnel authorised by the machine
operator�
• Protect units and cables against damage�
According to cULus
Caution - Use of controls or adjustments or procedures other than those
specified herein may result in hazardous radiation exposure�
Visible laser light; LASER CLASS 1�
EN/IEC 60825-1 : 2007 and EN/IEC 60825-1 : 2014
Complies with 21 CFR 1040 except for deviations
pursuant to Laser Notice No� 50, dated June 2007�

4
Position of the product label Explanatory label
3 Functions and features
The through-beam sensor detects objects and materials without contact and
indicates their presence by a switching signal�
4 Installation
1 2
1: Transmitter
2: Receiver
► Secure the receiver (O6E ...) to a bracket.
► Align the transmitter (O6S ...) to the receiver and secure it in the same way.
Maximum range only with accurate alignment�

5
UK
5 Operating and display elements
Transmitter
1
1: LED green - operation
Receiver
2: LED green - operation, stability
indication
3: OUT OFF button
4: LED yellow - switching output active
5: OUT ON button
3
42
5
5.1 Stability indication
The green LED is on when the supply voltage is applied and the sensor signal is
stable�
Stable signal Switch point Stable signal
Light-on mode
LED green on off off on
LED yellow on on off off
Dark-on mode
LED green on off off on
LED yellow off off on on

6
6 Electrical connection
The unit must be connected by a qualified electrician�
►The national and international regulations for the installation of electri-
cal equipment must be adhered to�
►Ensure voltage supply to EN 50178�
►Disconnect power�
►Connect the unit as follows:
6.1 Transmitter
M12 pigtail connector Cable
L+
L
1
4
3
BN: brown
BU: blue
BK
BN
L+
BU
L
Colours to DIN EN 60947-5-2
M8 connector, 3 pole M8 connector, 4 pole
L+
L
1
4
3
2
1
4
3
L+
L
1
4
3
6.2 Receiver
6.2.1 PNP
M12 pigtail connector Cable
BK: black
BN: brown
BU: blue
Colours to DIN EN 60947-5-2

7
UK
M8 connector, 3 pole M8 connector, 4 pole
2
1
4
3
6.2.2 NPN
M12 pigtail connector Cable
L+
L
1
4
3
BK: black
BN: brown
BU: blue
L
BN
BK
BU
L+
Colours to DIN EN 60947-5-2
M8 connector, 3 pole M8 connector, 4 pole
L+
L
1
4
3
2
1
4
3
L+
L
1
4
3

8
7 Settings
7.1 Settings on the sensor
7.1.1 The sensor is to switch when the object is detected
► Position object (Fig. 1).
►Press [OUT ON] for > 2 s�
> The yellow LED flashes�
> The setting of the sensitivity with object is made by releasing [OUT ON]�
► Remove object (Fig. 2).
►Press [OUT OFF]�
> The setting of the sensitivity without object is made by releasing [OUT OFF]�
> The yellow LED goes out� Programming is completed�
Fig� 1
1 2
Fig� 2
1 2
1: Transmitter
2: Receiver

9
UK
7.1.2 The sensor is not to switch when the object is detected
► Position the object (see Fig. 1) and press [OUT OFF] for > 2s.
► Remove the object (see Fig. 2) and press [OUT ON].
The settings can also be carried out first without object and then with
object�
7.1.3 Setting the maximum sensitivity
►Align the object so that no light is received�
1. The sensor is to switch when the object is detected
►Press [OUT ON] for > 2 s, then [OUT OFF]�
2. The sensor is not to switch when the object is detected
►Press [OUT OFF] for > 2 s, then [OUT ON]�
7.1.4 Programming unsuccessful
> The LED flashes quickly, 8 Hz�
• Insufficient difference in measurements�
• Max. programming time (15 min.) exceeded.
7.1.5 Electronic lock
Lock or unlock the buttons
►Press [OUT ON] and [OUT OFF] simultaneously for 10 s�
> Acknowledgement is indicated by a brief change of the LED switching status�
7.2 Setting via IO-Link
This unit has an IO-Link communication interface which enables direct access to
process and diagnostic data� In addition it is possible to set the parameters of the
unit while it is in operation� Operation of the unit via an IO-Link interface requires
an IO-Link master�
With a PC, suitable IO-Link software and an IO-Link adapter cable communication
is possible when the system is not in operation�
The IODDs necessary for the configuration of the unit, detailed information about
process data structure, diagnostic information, parameter addresses and the
necessary information about the required IO-Link hardware and software can be
found at www�ifm�com�

10
7.2.1 Adjustable parameters
Among others, the following parameters can be set via IO-Link�
A table of all adjustable parameters can be found at
www�ifm�com/de/io-link�
Parameters for the receiver (O6E7xx)
Parameter
name
Values Description Standard
setting
SSC1 Param�
SP1
1 ��� 100 Setting switch point in step increment "1"�
After a teach process the resulting value is
displayed�
100
Teach SP1 TP1 1� Part of the teach sequence to set switch
point SP1 by teach on object� Both parts of
the teach sequence for TP1 and TP2 (TP =
teach point) have to be carried out.
N� A�
Teach SP1 TP2 2� Part of the teach sequence to set switch
point SP1 by teach without object� The
second part of the teach sequence has to
be carried out after the first part�
N� A�
TI Result�State - Idle
- SP1
Success
- Wait for
command
- Busy
- Error
- Custom
Teach-in status; after successful teach the
value "SP1 Success" is displayed�
N� A�
SSC1 Config�
Logic
High
active
Low active
Switch point logic, status for detected object
(High: light-on mode / normally open, Low:
dark-on mode / normally closed)
→ Data
sheet value
"Output
function"
SSC1 switch-on
delay
0 ��� 2 Start-up delay; step increment 0�1 s 0
SSC1 switch-off
delay
0 ��� 2 Switch-off delay; step increment 0�1 s 0
Excess gain 0 ��� 5 Excess gain at receiver� N� A�
Number of
power cycles
0 ��� 65535 Number of switching operations (power up)
of the sensor
N� A�

11
UK
Parameter
name
Values Description Standard
setting
Operating hours 0 ��� 65535 Operating hours N� A�
Parameters for the transmitter (O6E7xx)
Parameter
name
Values Description Standard
setting
Transmitter
configuration
- On
- Off
Configuration transmitted light on / off On
Number of
power cycles
0 ��� 65535 Number of switching operations (power up)
of the sensor
N� A�
Operating hours 0 ��� 65535 Operating hours N� A�

12
7.2.2 Set the sensitivity with object
►Start the LR DEVICE software�
► Align the transmitter to the object (Fig. 1).
►Press [Teach SP1 TP1] in the LR DEVICE software�
► Align the receiver to the transmitter (Fig. 2).
►Press [Teach SP1 TP2] in the LR DEVICE software�
Fig� 1
TP1
1 2
Fig� 2
TP2
1 2
1: transmitter; 2: receiver; TP1: teach point 1; TP2: teach point 2
Either the object can be set first and then the background, or the other
way around�
7.2.3 Setting the maximum sensitivity
►Start the LR DEVICE software�
►Align the object so that no light is received�
►Press [Teach SP1 TP1] in the LR DEVICE software�
►Press [Teach SP1 TP2] in the LR DEVICE software�

13
UK
8 Operation
►Check whether the unit operates correctly�
> The green LED is on when the unit is ready for operation�
> Setting the dark-on mode: The output is switched / the yellow LED is on when
no object is detected�
> Setting the light-on mode: The output is switched / the yellow LED is on when
an object is detected�
9 Maintenance, repair, disposal
►Keep the lens of the sensor free from soiling�
►For cleaning do not use any solvents or cleaning agents which could damage
the plastic parts�
►After use dispose of the unit in an environmentally friendly way in accordance
with the applicable national regulations�
Faulty sensors must only be repaired by the manufacturer�
Technical data and further information at www�ifm�com
This manual suits for next models
1
Table of contents
Other IFM Accessories manuals
Popular Accessories manuals by other brands

Leviton
Leviton ODS15-ID quick guide

Awntech
Awntech Dallas Retro RR22 Owner's Manual & Installation Instructions

Cooper Lighting
Cooper Lighting WaveLinx Outdoor installation instructions

fontastic
fontastic Kari 10 user manual

MMM
MMM CLIMACELL 111 Instructions for use

PCB Piezotronics
PCB Piezotronics ICP 356A32/NC Installation and operating manual