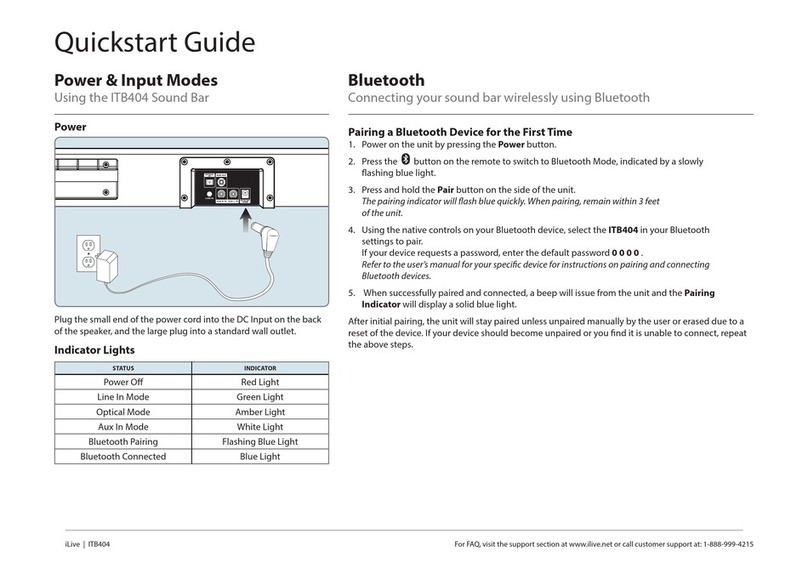
Play/Pause/
Memory/Clock
Press to play or pause in
Bluetooth mode.
Press to browse through
preset stations in Radio mode.
Press and hold to begin saving
a station as a preset. With
the power o, press to begin
setting the clock.
Features & Controls
Wireless Under Cabinet, Bluetooth, Radio Music System
User’s Guide for Model IKB318S v2016-01
Power
Plug the included AC/DC power adapter into the DC
POWER INPUT on the unit and an AC power outlet to
power the unit.
MEM/CLK
Battery Backup
The battery backup is intended for short power
outages only. The unit’s primary functions cannot
run o of the battery backup alone.
Requires 2 AAA-size batteries (not included).
Pair Indicator
Volume +/-
Press to adjust the volume up
or down.
Alarm
Press to begin
setting the alarm.
Tune +/-
Press to tune the radio.
Press and hold to search for
the next available station.
Timer
Press to begin
setting the timer.
Source
Press to switch
between Bluetooth
and Radio mode.
Power
Press to turn the
unit on or o.
Pair
Press to begin pairing
a Bluetooth device.
Light/Dimmer
Press to turn the under
cabinet light on.
Press and hold to
dim the display.
IMPORTANT SAFETY
INSTRUCTIONS
• ReadtheseInstructions.
• KeeptheseInstructions.
• HeedallWarnings.
• Followallinstructions.
• Donotusethisapparatusnearwater.
• Cleanonlywithadrycloth.
• Donotblockanyventilationopenings.Installinaccordancewiththe
manufacturer’sinstructions.
• Donotinstallnearanyheatsourcessuchasradiators,heatregisters,stoves,or
otherapparatus(includingampliers)thatproduceheat.
• Donotdefeatthesafetypurposeofthepolarizedorgrounding-typeplug.A
polarizedplughastwobladeswithonewiderthantheother.Agroundingtype
plughastwobladesandathirdgroundingprong.Thewidebladeorthethird
prongareprovidedforyoursafety.Whentheprovidedplugdoesnottinto
youroutlet,consultanelectricianforreplacementoftheobsoleteoutlet.
• Protectthepowercordfrombeingwalkedonorpinchedparticularlyatplugs,
conveniencereceptacles,andthepointwheretheyexitfromtheapparatus.
• Onlyuseattachments/accessoriesspeciedbythemanufacturer.
• Unplugthisapparatusduringlightningstormsorwhenunusedforlong
periodsoftime.
• Referallservicingtoqualiedservicepersonnel.Servicingisrequired
whentheapparatushasbeendamagedinanyway,suchaspower-supply
cordorplugisdamaged,liquidhasbeenspilledorobjectshavefalleninto
theapparatus,theapparatushasbeenexposedtorainormoisture,doesnot
operatenormally,orhasbeendropped.
• Useonlywithacart,stand,tripod,bracket,ortablespeciedbythe
manufacturer,orsoldwiththeapparatus.Whenacartisused,usecaution
whenmovingthecart/apparatuscombinationtoavoidinjuryfromtip-over.
FCC WARNINGS
Warning:Changesormodicationstothisunitnotexpresslyapprovedbythe
partyresponsibleforcompliancecouldvoidtheuser’sauthoritytooperatethe
equipment.
NOTE:Thisequipmenthasbeentestedandfoundtocomplywiththelimits
foraClassBdigitaldevice,pursuanttoPart15oftheFCCRules.Theselimits
aredesignedtoprovidereasonableprotectionagainstharmfulinterferencein
aresidentialinstallation.Thisequipmentgenerates,uses,andcanradiateradio
frequencyenergyand,ifnotinstalledandusedinaccordancewiththeinstructions,
maycauseharmfulinterferencetoradiocommunications.However,thereis
noguaranteethatinterferencewillnotoccurinaparticularinstallation.Ifthis
equipmentdoescauseharmfulinterferencetoradioortelevisionreception,which
canbedeterminedbyturningtheequipmentoffandon,theuserisencouragedto
trytocorrecttheinterferencebyoneormoreofthefollowingmeasures:
• Reorientorrelocatethereceivingantenna.
• Increasetheseparationbetweentheequipmentandreceiver.
• Connecttheequipmentintoanoutletonacircuitdifferentfrom
thattowhichthereceiverisconnected.
• Consultthedealeroranexperiencedradio/TVtechnicianforhelp.
ADDITIONAL WARNINGS
AND PRECAUTIONS
• CAUTION:TOPREVENTELECTRICSHOCK,MATCHWIDEBLADE
OFPLUGTOWIDESLOT,FULLYINSERT.
• Mainsplugisusedasdisconnectdeviceanditshouldremainreadilyoperable
duringintendeduse.Inordertodisconnecttheapparatusfromthemains
completely,themainsplugshouldbedisconnectedformthemainssocket
outletcompletely.
• WARNING: Toreducetheriskofreorelectricshock,donotexposethis
apparatustorain,moisture,dripping,orsplashing.
• CAUTION:Useofcontrolsoradjustmentsorperformanceofprocedures
otherthanthosespeciedmayresultinhazardousradiationexposure.
• WARNING:Changesormodicationstothisunitnotexpresslyapprovedby
thepartyresponsibleforcompliancecouldvoidtheuser’sauthoritytooperate
theequipment.
• WARNING:Donotplacethisunitdirectlyontofurnituresurfaceswithany
typeofsoft,porous,orsensitivenish.Aswithanyrubbercompoundmade
withoils,thefeetcouldcausemarksorstainingwherethefeetreside.We
recommendusingaprotectivebarriersuchasaclothorapieceofglass
betweentheunitandthesurfacetoreducetheriskofdamageand/orstaining.
• WARNING:Useofthisunitnearuorescentlightingmaycauseinterference
regardinguseoftheremote.Iftheunitisdisplayingerraticbehaviormove
awayfromanyuorescentlighting,asitmaybethecause.
• WARNING:Shockhazard-DoNotOpen.
• Cautionandmarkinginformationislocatedattherearorbottomofthe
apparatus.
• Objectslledwithliquids,suchasvases,shallnotbeplacedontheapparatus.
• Keepnewandusedbatteriesawayfromchildren.Ifthebatterycompartment
doesnotclosesecurely,stopusingtheproductandkeepitawayfromchildren.
• Ifyouthinkbatteriesmighthavebeenswallowedorplacedinsideanypartof
thebody,seekimmediatemedicalattention.
• CAUTION:Dangerofexplosionifbatteryisincorrectlyreplaced.Replace
onlywiththesameorequivalenttype.
• WARNING:Thereisadangerofexplosionifyouattempttochargestandard
Alkalinebatteriesintheunit.OnlyuserechargeableNiMHbatteries.
• Batteryshallnotbeexposedtoexcessiveheatsuchassunshine,re,orthe
like.
• Donotmixoldandnewbatteries.
• Completelyreplacealloldbatterieswithnewones.
• Donotmixalkaline,standard(carbon-zinc),orrechargeable(ni-cad,ni-mh,
etc)batteries.
• Batteriesshouldberecycledordisposedofasperstateandlocalguidelines.
• ThisproductmeetsandcomplieswithallFederalregulations.
WARNING : This product can expose you to
chemicals including lead, which is known to the
State of California to cause cancer and birth
defects or other reproductive harm. For more
information go to www.P65Warnings.ca.gov.
Warning:Toreducetheriskofelectricshock,do
notremovecover(orback).Nouser-serviceable
partsinside.Referservicingtoqualiedservice
personnel.
ATTENTION
RISQUE D' ÉLECTROCUTION
NE PAS OUVRIR
CAUTION
RISK OF ELECTRIC SHOCK
DO NOT OPEN
Theexclamationpointwithinanequilateral
triangleisintendedtoalerttheusertothe
presenceofimportantoperatingandmaintenance
(servicing)instructionsintheliterature
accompanyingtheappliance.
Thelightningashwitharrowheadsymbol,
withinanequilateraltriangle,isintendedtoalert
theusertothepresenceofuninsulated“dangerous
voltage”withintheproduct’senclosurethatmay
beofsufcientmagnitudetoconstituteariskof
electricshocktopersons.
Warning: Do not ingest battery,
chemical burn hazarD.
FCC Radiation Exposure Statement
between the radiator & your body.
distance 20cm
This equipment complied with FCC radiation exposure limits set forth for an
uncontrolled environment. This equipment should be installed and operated
with minimum

