VERY IMPORTANT SAFETY INFORMATION:
Close supervision is necessary when this product is used near children. ASSEMBLY INSTRUCTIONS 5 - Motor
Do not operate in the presence or explosives and/or flammable fumes.
Do not operate without fan grills properly inplace.
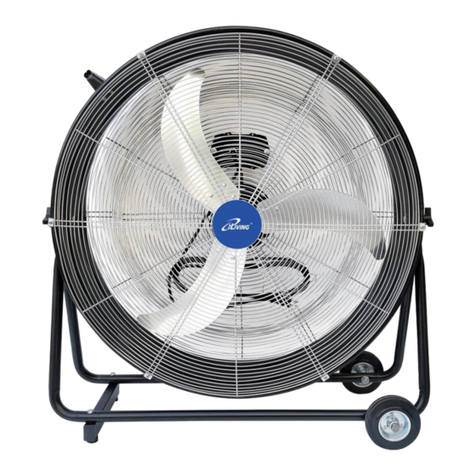
This fan is intended for outdoor use but may be used indoors without the misting feature.
This appliance is not intended for use by persons (including children) with reduced
physical, sensory or mental capabilities, or lack of experience and knowledge, unless
they have been given supervision or instruction concerning use of the appliance by a
person responsible for their safety.
Children should be supervised to ensure that they do not play with the appliance.
If the supply cord is damaged, it must be replaced by the manufacturer, its service
agent or similarly qualified persons in order to avoid ahazard.
DANGER: Do not submerge motor in water or allow motor to be exposed to water.
Personal injury and/or death could result.
4 - Back guard
2 -Fan blade
1 - Front guard
19 - Misting base
18 - Screw
17 - Water hose
16 - Connector
6 - Plinth
7 - Pivot Bolt
8- PositionScrew
9 - InnerTube
10 - Set Knob
11 - Outer Tube
12 - Screws
13 - Coupling
Never handle the fan or motor with wet hands or when standing on wet or damp surface
or in water. Fatal electrical shock could occur.
WARNING:Electricshockhazards—maycauseseverepersonal injuryor death.
For your safety, turn off the electrical power supply before installing,
moving, or servicing your fan to avoid any possible electrical shock hazards.
Figure 1
oscillation
cam
screw
fan motor Figure 2
oscillation
cam
screw
fan motor
14 - Base
Never make adjustments to the fan when in power is on.
WARNING:
Do not under any circumstances remove the power plug’s ground prong or ground fault
OPERATING INSTRUCTIONS
NOTE: Do not turn on the water tap until the fan has been turned on.
1.
Place fan on a flat stable surface in desired position.
15 - Nut
unit. For your personal safety, the fan must be grounded. The fan is equipped with a
power supply with ground fault circuit interrupting device. Removal or tampering of
power cord will void warranty.
Never use an extension cord to connect the fan to an outlet. All installations must be
made into a grounded outlet.
UNPLUG THE FAN WHEN NOT IN USE.
WARNING: To reduce the risk of fire or electrical shock, do not use this fan with any
solid-state speed control device. This appliance has a 3-prong plug. To reduce the risk
of electrical shock, this plug is intended to fit in an outlet only one way. If this does not
fit outlet, contact a qualified electrician. Do not attempt to bypass this procedure.
CAUTION: Read and follow all instructions before operating fan. Do not use fan if any
part is damaged.
RULE FOR SAFE OPERATION:
Never insert fingers or any other objects through the grill guard when fan is in
operation. Disconnect the fan when moving from one location toanother.
Disconnect the fan when removing guards for cleaning.
Be sure fan is on a stable, flat surface when in operation.
DO NOT use fan in windows. Rain may create electrical hazard.
IMPORTANT: Spray angle and droplet size is determined by water pressure at your
location. Maximum inlet water pressure: 0.6 Mpa. Minimum inlet water pressure: 0.2
Mpa.
2.
Attach the water hose to a compatible threaded tap(you may first need to attach one
or both of the provided tap size adaptors to the hose, before connecting to the tap).
3.
Speed control: Select air speed by setting switch to either HIGH-LOW-OFF.
4.
Turn on water at tap (only when used outdoors).
5.
To adjust airflow upward or downward: Tilt head of fan to desired angle.
6.
IMPORTANT: Do not turn off the fan until you have turned off the tap, otherwise
water will leak from the front of the fan.
Note: Your misting fan will use approximately 34 liters of water for each hour of
operation. This is equivalent to running a typical garden hose for 1 minute.
SETTING OSCILLATING MODE:
●To oscillate the fan: Loosen the screw on the oscillation rod and move to the end of
the oscillation cam. Tighten the screw to lock the position. (See Figure 1)
●To stop the oscillation: Loosen the screw on the oscillation rod and move to the center
of the oscillation cam. Tighten the screw again to lock the position. (See Figure 2)
CAUTION: Disconnect from mains before changing the setting.
CLEANING
WARNING: Unplug from electrical supply source before cleaning.
1.
Use soft damp cloth then wipe with dry cloth.
2.
Do not use harmful cleaners to paints or plastics.
3.
Do not bend the blades.
RATING: ILG8P30M: 120V~ 60Hz 1.8A 220W
CFM: 8400 RPM:1100
3 - Set screw


