924
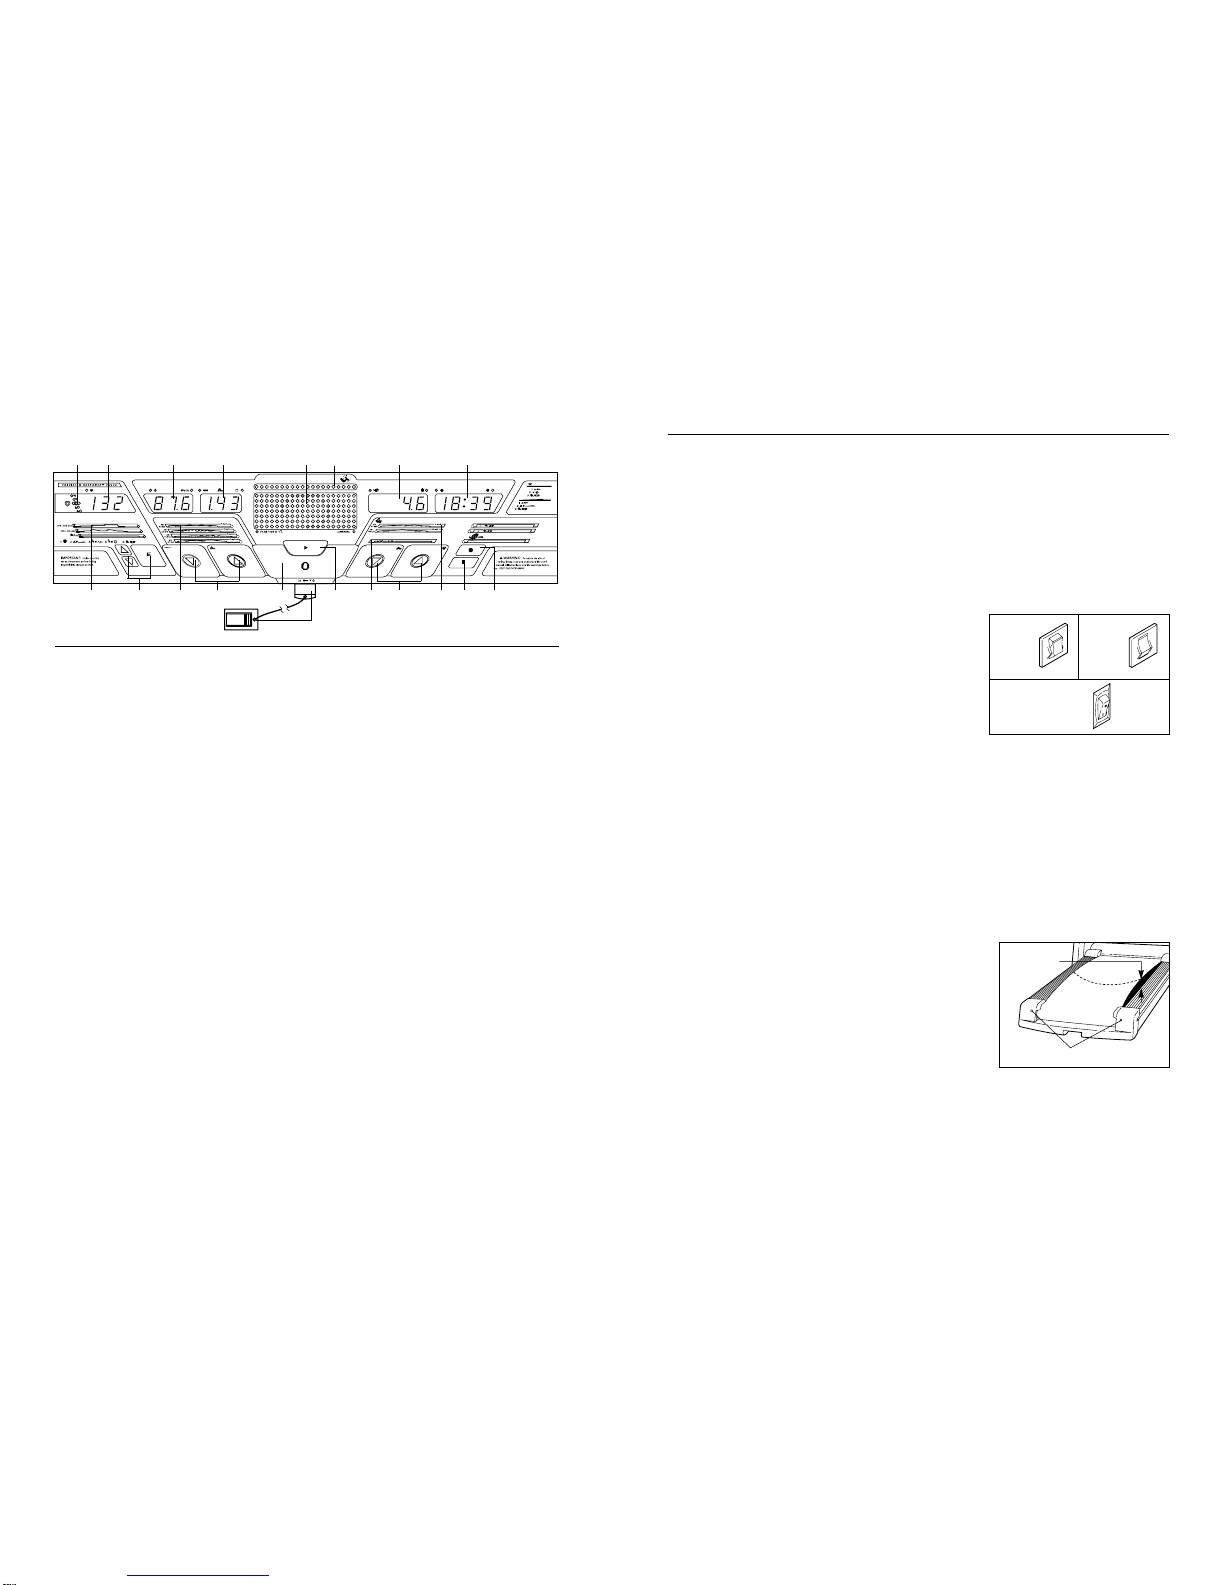
DIAGRAM OF THE CONSOLE
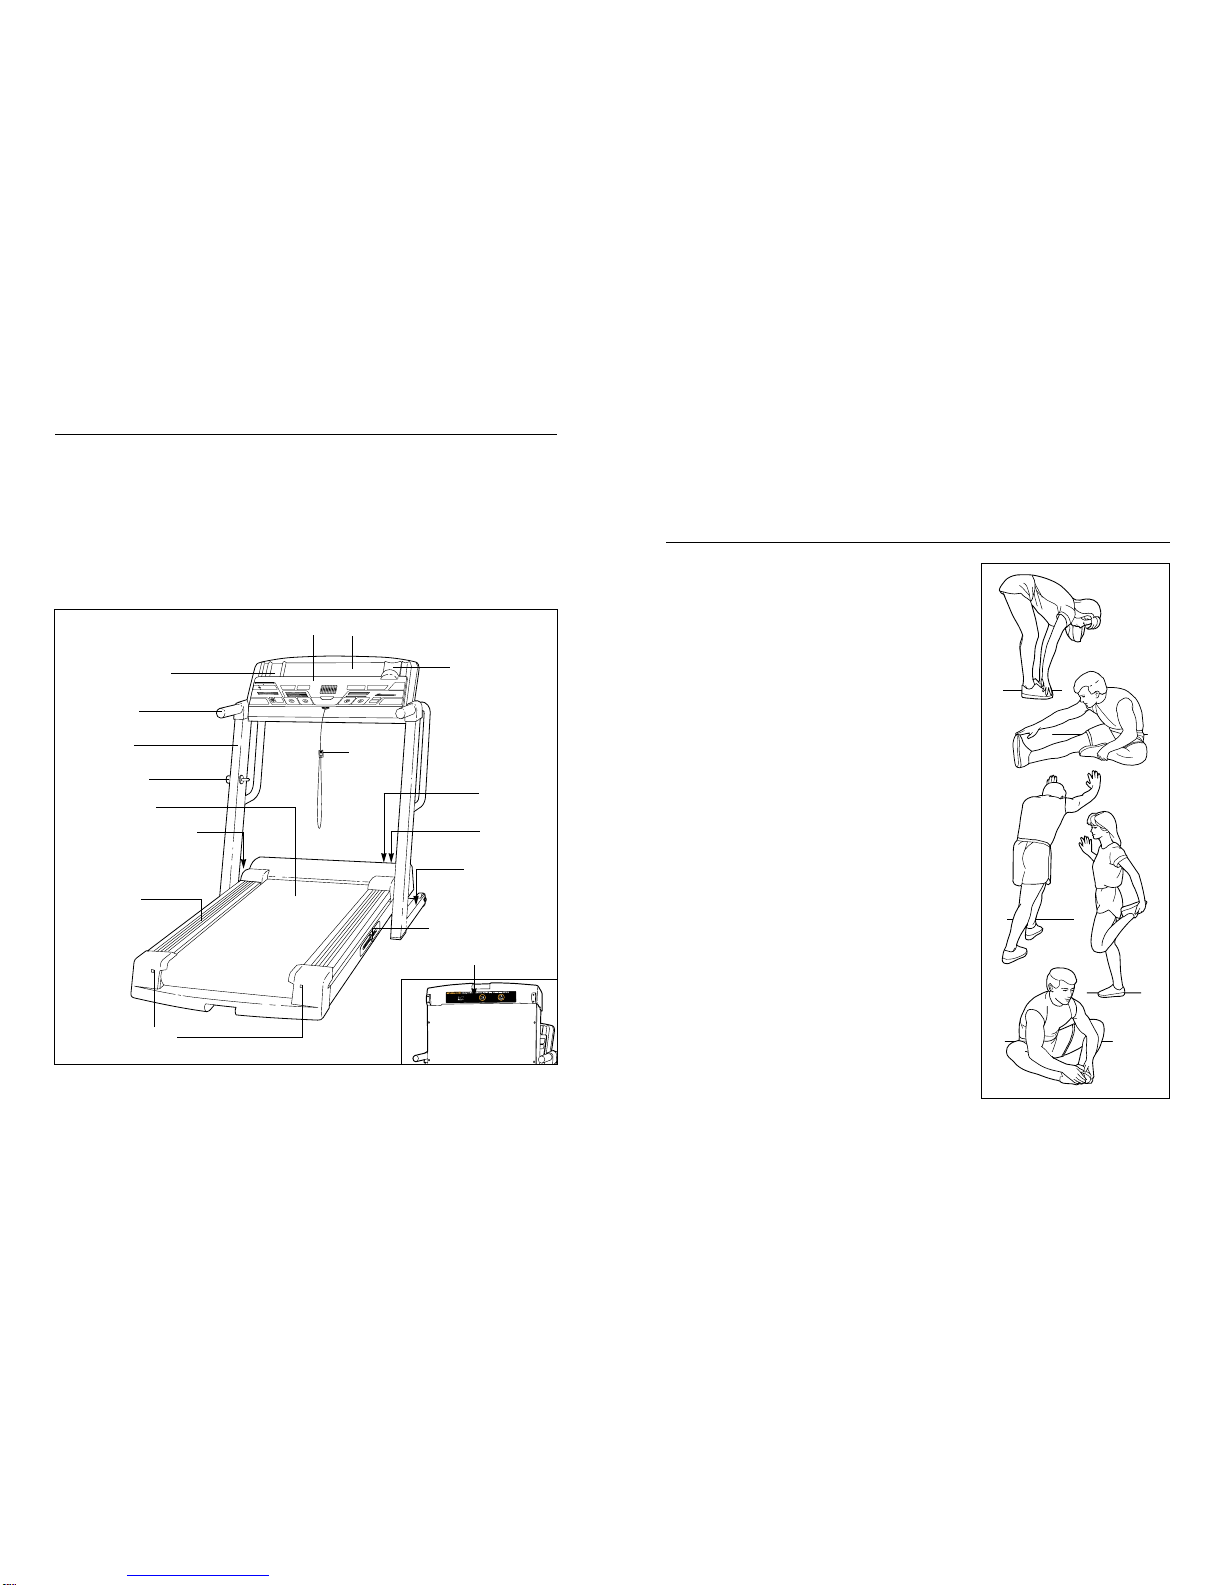
Refer to the drawing on the opposite page. Note: The
console can display exercise feedback in either
miles or kilometres. For simplicity, all instructions
in this section refer to miles.
A. Target Heart Rate display—When you are using a
pulse program, this display will show whether your
heart rate is near the target heart rate.
B. Pulse display—This display shows your heart rate
when the heart rate monitor is worn. The heart-
shaped indicator will flash each time your heart
beats.
C. Calories/watts display—This display shows the ap-
proximate number of calories you have burned and
your current power output in watts.
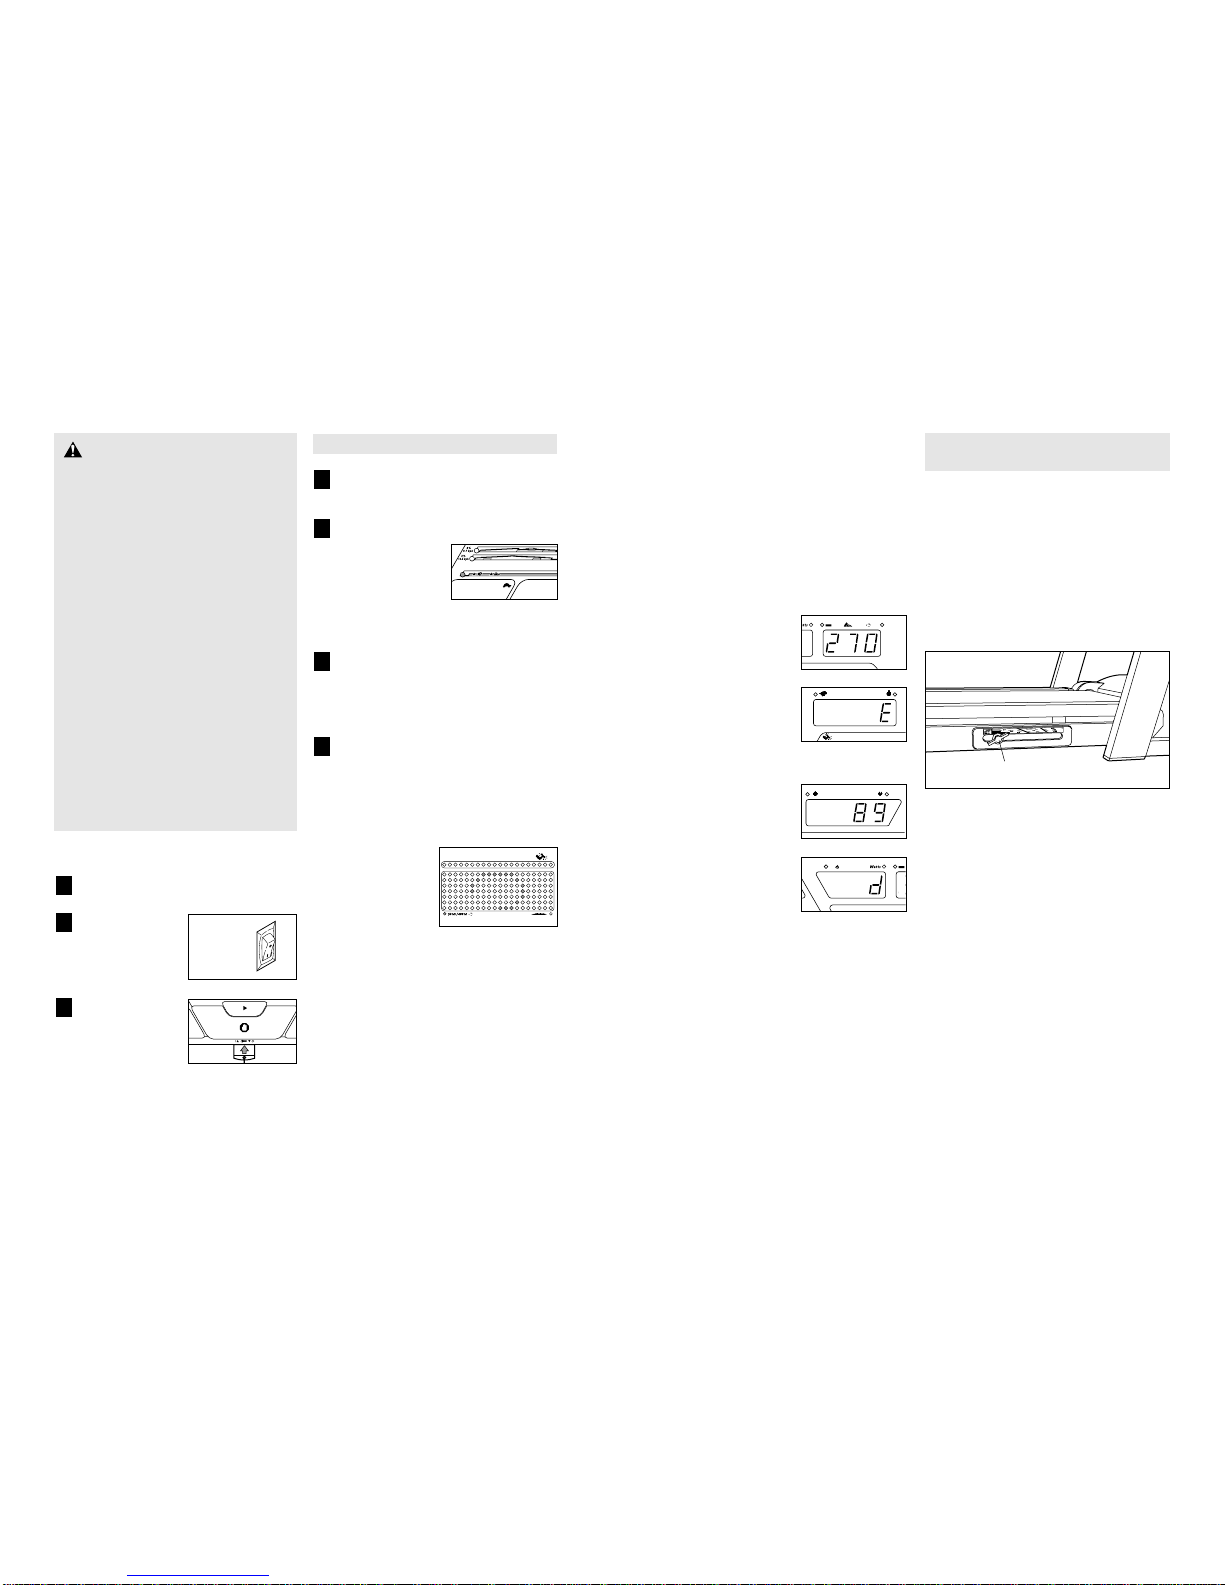
D. Distance/Incline/Laps display—This display shows
the distance you have walked, the number of 1/4-
mile laps you have completed, and the incline level
of the treadmill. The display will change from one
number to the next every seven seconds. Note:
Each time the Incline buttons are pressed, the
display will show the incline setting.
E. Program display—When the manual mode or an
iFIT.com program is selected, this display will show
your progress on an LED track. When a perfor-
mance program, a total-body workout program, a
pulse program, or a custom program is selected,
the display will show the program’s speed or heart
rate settings.
F. Hand Weight display—During the two total-body
workout programs, this display will prompt you to
use the included hand weights for upper-body
exercise as you walk on the treadmill.
G. Speed/Minutes-Mile display—This display shows
the speed of the walking belt and your current pace
(pace is measured in minutes per mile). The display
will alternate between one number and the other
every seven seconds. Note: Each time the Speed
buttons are pressed, the display will show the speed
setting.
H. Time/Segment Time display—When the manual
mode or an iFIT.com program is selected, this dis-
play will show the elapsed time. When a perfor-
mance program, a total-body workout program, a
pulse program, or a custom program is selected,
the display will show both the time remaining in the
program and the time remaining in the current
period of the program. The display will alternate
between one number and the other every seven
seconds. Note: When the Select Target program is
selected, the display will show the elapsed time
and the time remaining in the current period of the
program.
I. Pulse program profiles—These profiles show how
the target heart rate will change during pulse pro-
grams.
J. Age and Enter buttons—These buttons are used to
enter your age for pulse programs.
K. Performance program profiles—These profiles
show how the speed and incline of the treadmill will
change during performance programs.
L. Incline buttons—These buttons control the incline of
the treadmill. The incline range is 0% to 10%.
M. Stop button—This button is used to stop the walking
belt.
N. Key with clip—The key turns the console on and off.
The clip is worn on the waistband of your clothes.
O. Start button—This button is used to start the walking
belt.
P. Mode indicators—These indicators show whether
the manual mode, a performance program, a total-
body workout program, a pulse program, a custom
program, or an iFIT.com program is selected.
Q. Speed buttons—These buttons control the speed
of the walking belt. The speed range is 0.5 mph to
12 mph. Note: When the Start button is pressed,
the walking belt will begin to move at 1.0 mph.
R. Total-body workout program profiles—These pro-
files show how the speed and incline of the tread-
mill will change during total-body workout programs.
S. Program Select button—This button is used to
select the manual mode, performance programs,
total-body workout programs, pulse programs,
custom programs, and iFIT.com programs. Note:
If the walking belt is moving when the Select
Program button is pressed, the walking belt will
slow to a stop and the displays will be reset.
T. Record button—This button is used to program
speed and incline settings for custom programs.
HOW TO FOLD AND MOVE THE TREADMILL
HOW TO FOLD THE TREADMILL FOR STORAGE
Before folding the treadmill, adjust the incline to the
lowest position. If this is not done, the treadmill may be per-
manently damaged. Next, unplug the power cord. Caution:
You must be able to safely lift 45 pounds (20 kg) in order to
raise, lower, or move the treadmill.
1. Hold the treadmill with your hands in the locations shown at
the right. To decrease the possibility of injury, bend your
legs and keep your back straight. As you raise the tread-
mill, make sure to lift with your legs rather than your
back. Raise the treadmill about halfway to the vertical posi-
tion.
2. Move your right hand to the position shown and hold the
treadmill firmly. Hold the lock knob with your left hand and
pull it to the side. Raise the treadmill until the lock knob is
aligned with the catch. Slowly release the lock knob. Make
sure that the pin on the lock knob is inside of the catch.
To protect the floor or carpet from damage, place a mat
under the treadmill. Keep the treadmill out of
direct sunlight. Do not leave the treadmill in the storage
position in temperatures above 30° Celsius (85° F).
HOW TO MOVE THE TREADMILL
Before moving the treadmill, convert the treadmill to the storage
position as described above. Make sure that the pin on the
lock knob is inside of the catch.
1. Hold the handrails and place one foot on a front wheel as
shown.
2. Tilt the treadmill back until it rolls freely on the front wheels.
Carefully move the treadmill to the desired location. Never
move the treadmill without tipping it back. To reduce
the risk of injury, use extreme caution whilst moving the
treadmill. Do not move the treadmill over an uneven sur-
face.
3. Place one foot on the base and carefully lower the treadmill
until it is resting on the base.
HOW TO LOWER THE TREADMILL FOR USE
1. Refer to drawing 2 above. Hold the upper end of the treadmill with your right hand as shown. Hold the lock
knob with your left hand and pull it to the side. Pivot the treadmill down a few inches.
2. Refer to drawing 1 above. Hold the treadmill firmly with both hands, and lower the treadmill to the floor. To
decrease the possibility of injury, bend your legs and keep your back straight.
Lock
Knob
Catch
Pin
Base
Front Wheels
1
2