manuals.online logo
Brands
  1. Home
  2. •
  3. Brands
  4. •
  5. IMG STAGE LINE
  6. •
  7. Microphone
  8. •
  9. IMG STAGE LINE ECM-140 User manual

IMG STAGE LINE ECM-140 User manual

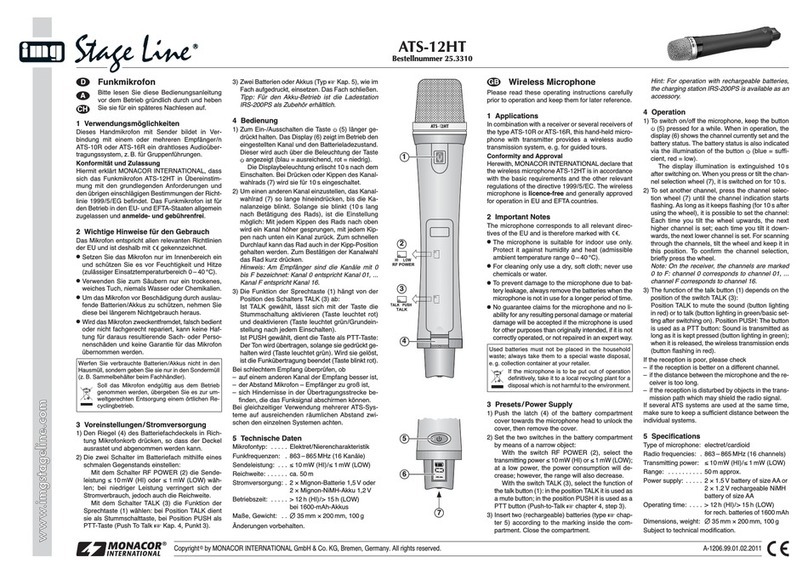
ECM-140
Best.-Nr. 23.4350
www.imgstageline.com
Großmembran-
Elektret-Mikrofon
Bitte lesen Sie diese Anleitung vor dem Betrieb
gründlich durch und heben Sie sie für ein späteres
Nachlesen auf.
1 Einsatzmöglichkeiten
Das Mikrofon ECM-140 mit extrem dünner, goldbe-
schichteter 25,4-mm-Membran (1″) ist für profes-
sionelle Studio- und Live-Einsätze konzipiert und
eignet sich sowohl für die Schallabnahme von
Instrumenten als auch für Gesangs- und Sprach-
anwendungen. Zum Betrieb benötigt das Mikrofon
eine Phantomspeisung von 48 V .
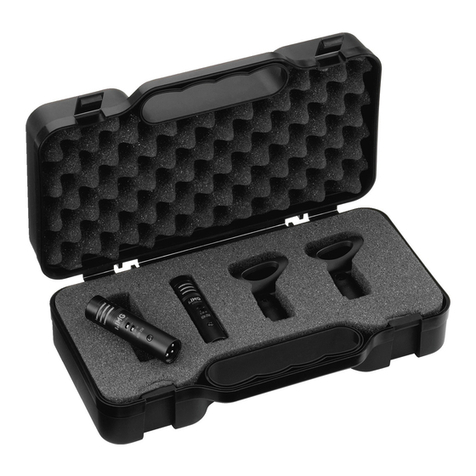
Zum Lieferumfang gehören ein Koffer, ein vibrati-
onsdämpfender Halter (Spinne) und ein Windschutz.
2 Wichtige Hinweise für den Gebrauch
Das Mikrofon entspricht allen relevanten Richtlinien
der EU und ist deshalb mit gekennzeichnet.
GSetzen Sie das Mikrofon nur im Innenbereich ein.
Schützen Sie es vor Feuchtigkeit und Hitze
(zulässiger Einsatztemperaturbereich 0 – 40 °C).
GVerwenden Sie für die Reinigung nur ein trockenes,
weiches Tuch, niemals Chemikalien oder Wasser.
GWird das Mikrofon zweckentfremdet, falsch ange-
schlossen oder nicht fachgerecht repariert, kann
keine Haftung für daraus resultierende Sach-
oder Personenschäden und keine Garantie für
das Mikrofon übernommen werden.
3 Inbetriebnahme
1) Die Spinne auf ein Stativ mit 15,9-mm-Gewinde
(5/8″) oder, mit Gewindeadapter, auf ein Stativ mit
9,5-mm-Gewinde (3/8″) schrauben. Die beiden
Drahtbügel an der Halterung zusammendrücken
und das Mikrofon einsetzen.
2) Zum Ausrichten des Mikrofons die Feststell-
schraube an der Halterung lösen, das Mikrofon
so positionieren, dass die Seite mit dem Symbol
in Richtung der Schallquelle zeigt (die Mikro-
fonachse steht senkrecht zur Hauptschallrich-
tung) und die Schraube wieder festdrehen.
3) Das Mikrofon über ein Kabel mit XLR-Stecker
(z. B. ein Kabel der MEC-Serie von „img Stage
Line“) an einen Mikrofoneingang des verwende-
ten Audiogeräts (z. B. Mischpult) anschließen.
Der Mikrofoneingang muss eine 48-V-Phantom-
speisung aufweisen. Stellt das Audiogerät keine
Phantomspeisung bereit, das Mikrofon über ein
Phantomspeisungsgerät (z. B. EMA-3 von „img
Stage Line“) an das Audiogerät anschließen.
4) Bei Bedarf den Windschutz aufstecken. Der
Windschutz oder ein als Zubehör erhältlicher
Poppschutz (z. B. WS-100 von „img Stage Line“)
verhindert bei Sprach- oder Gesangsanwendun-
gen nicht nur die Überbetonung von Explosivlau-
Soll das Mikrofon endgültig aus dem Be-
trieb genommen werden, übergeben Sie
es zur umweltfreundlichen Entsorgung
einem örtlichen Recyclingbetrieb.
ten, sondern schützt das Mikrofon auch vor der
Feuchtigkeit des Atems.
5) Zur Unterdrückung tiefer Frequenzen (z. B. Tritt-
schall), das Hochpassfilter einschalten: Den Fil-
terschalter in die Position stellen.
6) Bei sehr hohen Schalldrücken (z. B. bei naher
Abnahme von Schlagzeug oder Blechbläsern)
kann zum Schutz gegen Übersteuerung nachfol-
gender Geräte eine 10-dB-Dämpfung einge-
schaltet werden: Den Dämpfungsschalter in die
Position „
-
10 dB“ stellen.
4 Technische Daten
System: . . . . . . . . . . . . . Druckgradientenempfänger,
Nierencharakteristik
Hochpassfilter: . . . . . . . . 150 Hz, 6 dB/Oktave
Dämpfungsschalter: . . . .
-
10 dB
Empfindlichkeit: . . . . . . . 15 mV/Pa bei 1 kHz
Impedanz: . . . . . . . . . . . 200 Ω
Max. Schalldruck: . . . . . . 130 dB bei 0,5 % Klirrfaktor
Signal-Rausch-Abstand: 80 dB (A-Filter)
Stromversorgung: . . . . . . Phantomspeisung 48 ±4 V
Anschluss: . . . . . . . . . . . XLR, symmetrisch
Kontaktbelegung: . . . . 1 = Schirm/Phantomspeisung
-
2 = Signal +/Phantomspeisung +
3 = Signal
-
/Phantomspeisung +
Abmessungen, Gewicht:
∅
50 mm × 195 mm, 470 g
Änderungen vorbehalten.
Large Diaphragm Electret
Microphone
Please read these operating instructions carefully
prior to operation and keep them for later reference.
1 Applications
The microphone ECM-140 with extra thin, gold-coat-
ed 25.4 mm (1″) diaphragm is designed for profes-
sional studio and live applications and is both suit-
able for the sound pick-up of musical instruments
and for vocal sound and speech applications. For
the operation the microphone requires a phantom
power of 48 V .
The microphone is supplied with a case, a vibra-
tion-dampening support (spider), and a windshield.
2 Important Notes
The microphone corresponds to all relevant direc-
tives of the EU and is therefore marked with .
GThe microphone is only suitable for indoor use.
Protect it against humidity and heat (admissible
ambient temperature range 0 – 40 °C).
GFor cleaning only use a dry, soft cloth, by no
means chemicals or water.
GNo guarantee claims for the microphone and no
liability for any resulting personal damage or
material damage will be accepted if the micro-
phone is for other purposes than originally intend-
ed, if it is not correctly connected, or not repaired
in an expert way.
3 Setting into Operation
1) Screw the spider onto a stand with 15.9 mm (5/8″)
thread or, with thread adapter, onto a stand with
9.5 mm (3/8″) thread. Press the two wire brackets
at the support together and insert the micro-
phone.
2) To align the microphone, release the setscrew at
the support, position the microphone so that the
side with the symbol is directed towards the
sound source (the microphone axis is vertically to
the main sound direction) and retighten the screw.
3) Connect the microphone via a cable with XLR
plug (e. g. a cable of the MEC series from “img
Stage Line”) to a microphone input of the audio
unit used (e. g. mixer). The microphone input
must have a 48 V phantom power supply. If the
audio unit does not provide any phantom power,
connect the microphone via a phantom power
supply unit (e. g. EMA-3 from “img Stage Line”) to
the audio unit.
4) If required, place the windshield. The windshield
or a pop protection available as an accessory
(e. g. WS-100 from “img Stage Line”) does not
only prevent the overemphasis of pop noise in
case of vocal sound or speech applications but
If the microphone is to be put out of oper-
ation definitively, it must be disposed of in
a local recycling plant.
also protects the microphone against the hu-
midity of the breath.
5) To suppress low frequencies (e. g. impact
sound), switch on the high pass filter: Set the fil-
ter switch to position .
6) With very high sound pressures (e. g. close pick-
up of drums or brass) a 10 dB attenuation can be
switched on as a protection against overload of
subsequent units: Set the attenuation switch to
position “
-
10 dB”.
4 Specifications
System: . . . . . . . . . . . . . pressure gradient microphone,
cardioid
High-pass filter: . . . . . . . 150 Hz, 6 dB/octave
Attenuation switch: . . . . .
-
10 dB
Sensitivity: . . . . . . . . . . . 15 mV/Pa at 1 kHz
Impedance: . . . . . . . . . . 200 Ω
Max. sound pressure: . . . 130 dB at 0.5 % THD
S/N ratio: . . . . . . . . . . . . 80 dB (A filter)
Power supply: . . . . . . . . . phantom power 48 ±4 V
Connection: . . . . . . . . . . XLR, balanced
contact configuration: . 1 = screen/phantom power
-
2 = signal +/phantom power +
3 = signal
-
/phantom power +
Dimensions: . . . . . . . . . .
∅
50 mm × 195 mm
Weight: . . . . . . . . . . . . . . 470 g
Subject to technical modification.
-
40
[dB]
-
30
-
20
-
50
50 100 500 1k 2k 5k 10k20 20k [Hz]200
 Richtcharakteristik bei 1 kHz
Polar pattern at 1 kHz
Frequenzgang
Frequency response
®
MONACOR INTERNATIONAL GmbH & Co. KG • Zum Falsch 36 • 28307 Bremen • Germany
Copyright
©
by MONACOR INTERNATIONAL. All rights reserved. A-0614.99.03.08.2012
GB
D A CH
ECM-140
Best.-Nr. 23.4350
www.imgstageline.com
Microphone électret
à grande membrane
Veuillez lire la présente notice avec attention avant
le fonctionnement et conservez-la pour pouvoir
vous y reporter ultérieurement.
1 Possibilités dʼutilisation
Le microphone ECM-140 avec une membrane
25,4 mm (1″) extrêmement fine, avec revêtement
or, est conçue pour des utilisations professionnelles
en studio et en direct. Il est tout aussi bien adapté
pour des prises de son dʼinstruments que pour des
applications de chant et discours. Pour le fonction-
nement, le microphone requiert une alimentation
fantôme de 48 V .
Sont livrés un coffret, une bonnette de protection
et un support atténuateur de vibrations (araignée).
2 Conseils dʼutilisation importants
Le microphone répond à toutes les directives
nécessaires de lʼUnion Européenne et porte donc le
symbole .
GLe microphone nʼest conçu que pour une utilisa-
tion en intérieur. Protégez-le dʼune humidité éle-
vée et de la chaleur (plage de température de
fonctionnement autorisée : 0 – 40 °C).
GPour le nettoyer, utilisez uniquement un chiffon
sec et doux, en aucun cas de produits chimiques
ou dʼeau.
GNous déclinons toute responsabilité en cas de dom-
mages matériels ou corporels résultants si le micro-
phone est utilisé dans un but autre que celui pour
lequel il a été conçu, sʼil nʼest pas correctement
branché ou sʼil nʼest pas réparé par une personne
habilitée ; en outre, la garantie deviendrait caduque.
3 Fonctionnement
1) Vissez lʼaraignée sur un pied doté dʼun filetage
15,9 mm (5/8″) ou, avec un adaptateur fileté, sur
un pied avec un filetage 9,5 mm (3/8″). Appuyez
sur les deux étriers métalliques ensemble dans le
support et insérez le microphone.
2) Pour diriger le microphone, desserrez la vis de
réglage sur le support, positionnez le micro-
phone de telle sorte que le côté avec le symbole
soit en direction de la source audio (lʼaxe du
microphone est vertical par rapport à la direction
principale du son) puis revissez la vis.
3) Reliez le microphone via un cordon avec fiche
XLR mâle (p. ex. un cordon de la série MEC- de
“img Stage Line”) à une entrée micro de lʼappa-
reil audio utilisé (p. ex. table de mixage). Lʼentrée
micro doit avoir une alimentation fantôme 48 V. Si
lʼappareil audio ne délivre pas dʼalimentation fan-
tôme, reliez le microphone via un appareil à ali-
mentation fantôme (p. ex. EMA-3 de “img Stage
Line”) à lʼappareil audio.
4) Si besoin, placez la bonnette. La bonnette ou une
protection anti-pop disponible en option (p. ex.
WS-100 de “img Stage Line”) empêche lors dʼap-
Lorsque le microphone est définitivement
retiré du service, vous devez le déposer
dans une usine de recyclage adaptée pour
contribuer à son élimination non polluante.
plications de chant ou de discours, non seule-
ment une accentuation excessive de sons explo-
sifs mais protège aussi le microphone de lʼhumi-
dité de la respiration.
5) Pour éliminer les fréquences basses (p. ex. bruits
de pas), allumez le filtre passe-haut : mettez lʼin-
terrupteur du filtre sur la position .
6) Pour des pressions sonores très élevées (par
exemple dans le cas dʼune prise de son proche
de batterie ou de cuivres), une atténuation de
10 dB peut être allumée pour protéger les appa-
reils suivants dʼune surcharge. Mettez lʼinterrup-
teur dʼatténuation sur la position “
-
10 dB”.
4 Caractéristiques techniques
Système : . . . . . . . . . . . . récepteur à gradient de pression/
cardioïde
Filtre passe-haut : . . . . . 150 Hz, 6 dB/octave
Interrupteur atténuation :
-
10 dB
Sensibilité : . . . . . . . . . . . 15 mV/Pa à 1 kHz
Impédance : . . . . . . . . . . 200 Ω
Pression sonore max : . .
130 dB pour taux de distorsion 0,5 %
Rapport signal/bruit : . . . 80 dB (filtre A)
Alimentation : . . . . . . . . . alimentation fantôme 48 ±4 V
Branchement : . . . . . . . . XLR, symétrique
Configuration contacts : 1 = blindage/alim. fantôme
-
2 = signal +/alim. fantôme +
3 = signal
-
/alim. fantôme +
Dimensions, poids : . . . .
∅
50 mm × 195 mm, 470 g
Tout droit de modification réservé.
Microfono a elettrete
a grande membrana
Vi preghiamo di leggere attentamente le presenti
istruzioni prima della messa in funzione e di con-
servarle per un uso futuro.
1 Possibilità dʼimpiego
Il microfono ECM-140 con la sua membrana di
25,4 mm (1″), estremamente sottile, placata dʼoro,
è stato realizzato per impieghi professionali negli
studi di registrazione e dal vivo; è adatto sia per pre-
levare il suono da strumenti musicali che per appli-
cazioni di canto e di lingua parlata. Il microfono fun-
ziona con unʼalimentazione phantom di 48 V .
Il kit comprende una valigetta, un supporto del
microfono che riduce le vibrazioni (spider) e una
spugna antivento.
2 Avvertenze di sicurezza
Il microfono è conforme a tutte le direttive rilevanti
dellʼUE e pertanto porta la sigla .
GUsare il microfono solo allʼinterno di locali. Pro-
teggerlo dallʼ umidità e dal calore (temperatura
dʼimpiego ammessa fra 0 e 40 °C).
GPer la pulizia usare solo un panno morbido,
asciutto; non impiegare in nessun caso prodotti
chimici o acqua.
GNel caso dʼuso improprio, di collegamenti sba-
gliati o di riparazione scorretta del microfono, non
si assume nessuna responsabilità per eventuali
danni consequenziali a persone o a cose e non si
assume nessuna garanzia per il microfono.
3 Messa in funzione
1) Avvitare lo spider su uno stativo con filettatura di
15,9 mm (5/8″) oppure, tramite un adattatore, su
uno stativo con filettatura di 9,5 mm (3/8″). Eser-
citare una pressione sulle due staffe di filo di ferro
dello spider ed inserire il microfono.
2) Per orientare il microfono, allentare la vite di bloc-
caggio del supporto, posizionare il microfono in
modo che il lato con il simbolo indichi verso la
sorgente sonora (lʼasse del microfono è verticale
rispetto alla direzione principale del suono) e
stringere di nuovo la vite.
3) Collegare il microfono con un ingresso microfono
dellʼapparecchio audio utilizzato (p. es. di un
mixer), servendosi di un cavo con connettori XLR
(p. es. un cavo della serie MEC di “img Stage
Line”). Lʼingresso deve essere equipaggiato con
un alimentazione phantom di 48 V. Se lʼapparec-
chio audio non dispone di alimentazione phan-
tom, occorre collegare il microfono con lʼapparec-
chio audio per mezzo di un alimentatore phantom
esterno (p. es. EMA-3 di “img Stage Line”).
4) Se necessario montare la spugna antivento. Tale
dispositivo antivento, o una protezione corri-
spondente disponibile come accessorio (p. es.
Se si desidera eliminare il microfono defi-
nitivamente, consegnarlo per lo smalti-
mento ad unʼistituzione locale per il rici-
claggio.
WS-100 di “img Stage Line”), esclude nella lin-
gua parlata e nel canto non solo la riproduzione
esagerata delle consonanti occlusive, ma pro-
tegge il microfono anche dallʼumidità del respiro.
5) Per sopprimere le frequenze basse (p. es. da cal-
pestio) attivare il filtro passa-alto, portando lʼin-
terruttore del filtro in posizione .
6) Nelle pressioni sonore molte alte (p. es. in caso
di vicinanza di percussioni o ottoni), per evitare il
sovrapilotaggio degli apparecchi a valle, si può
attivare lʼattenuazione di 10 dB, portando il rela-
tivo interruttore in posizione “
-
10 dB”.
4 Dati tecnici
Sistema: . . . . . . . . . . . . . a gradiente di pressione,
caratteristica a cardioide
Filtro passa-alto: . . . . . . . 150 Hz, 6 dB/ottava
Attenuazione: . . . . . . . . .
-
10 dB
Sensibilità: . . . . . . . . . . . 15 mV/Pa con 1 kHz
Impedenza: . . . . . . . . . . 200 Ω
Pressione sonora max.: . 130 dB
con fattore di distorsione 0,5 %
Rapporto S/R: . . . . . . . . 80 dB (filtro A)
Alimentazione: . . . . . . . . alimentazione phantom 48 ±4 V
Collegamento: . . . . . . . . XLR, simmetrico
Piedinatura: . . . . . . . . . 1 = schermo/alim. phantom
-
2 = segnale +/alim. phantom +
3 = segnale
-
/alim. phantom +
Dimensioni, peso: . . . . . .
∅
50 mm × 195 mm, 470 g
Con riserva di modifiche tecniche.
-
40
[dB]
-
30
-
20
-
50
50 100 500 1k 2k 5k 10k20 20k [Hz]200
 Diagramme polaire à 1 kHz
Diagramma direttivo con 1 kHz
Réponse
en fréquences
Risposta
in frequenza
I
F B CH
®
MONACOR INTERNATIONAL GmbH & Co. KG • Zum Falsch 36 • 28307 Bremen • Germany
Copyright
©
by MONACOR INTERNATIONAL. All rights reserved. A-0614.99.03.08.2012
ECM-140
Best.-Nr. 23.4350
www.imgstageline.com
Micrófono electret
de gran membrana
Lea atentamente estas instrucciones de funcionamiento
antes de utilizar el aparato y guárdelas para usos posteriores.
1 Aplicaciones
El micrófono ECM-140 con membrana extremada-
mente fina recubierta de oro de 25,4 mm (1″) ha
sido diseñado para aplicaciones en estudio profe-
sional y en directo y también está indicado para
captar el sonido de instrumentos musicales y para
aplicaciones de sonido vocal y de habla. Para el
funcionamiento el micrófono requiere una alimenta-
ción de energía phantom de 48 V .
El micrófono se entrega con una caja, un soporte
amortiguador de vibraciones (spider), y un protector
contra el viento.
2 Notas importantes
El micrófono corresponde a todas las directivas rele-
vantes por la UE y por ello está marcado con .
GEl micrófono sólo es recomendable para un uso
en interior. Protéjalo contra la humedad y el calor
(rango de temperatura ambiente admisible
0–40°C).
GPara la limpieza utilice sólo un paño suave y
seco, no use productos químicos o agua.
GNo se aceptará ninguna reclamación para el mi-
crófono ni se asumirá responsabilidad alguna si se
utiliza el micrófono para otros fines distintos a los
originalmente concebidos, si no se conecta co-
rrectamente, o si no se repara de manera experta.
3 Puesta en funcionamiento
1) Atornille el spider en un pie con rosca de
15,9 mm (5/8″) o, con adaptador de rosca, en un
pie con rosca de 9,5 mm (3/8″). Presione los dos
soportes de alambre en el soporte juntos e in-
serte el micrófono.
2) Para alinear el micrófono, suelte el tornillo de
presión en el soporte, coloque el micrófono de
manera que el lado con el símbolo se dirija
hacia la fuente de sonido (el eje del micrófono es
vertical a la dirección principal del sonido) y
vuelva a apretar el tornillo.
3) Conecte el micrófono mediante un cable con
toma XLR (p. ej. un cable de la serie MEC de “img
Stage Line”) a una entrada de micrófono de la
unidad audio usada (por ejemplo un mezclador).
La entrada de micrófono debe tener una alimen-
tación de energía phantom de 48 V. Si la unidad
audio no suministra ninguna energía phantom,
conecte el micrófono mediante una unidad de ali-
mentación de energía phantom (p. ej. el EMA-3
de “img Stage Line”) a la unidad audio.
4) Si se requiere, coloque el protector contra el
viento. El protector contra el viento o una panta-
lla de protección para micrófono disponible como
accesorio (por ejemplo la WS-100 de “img Stage
Si el micrófono debe ser retirado del fun-
cionamiento definitivamente, debe depo-
sitarse en una planta de reciclaje local.
Line”) no sólo debe prevenir el énfasis excesivo
de ruido en caso de aplicaciones de sonido vocal
o de discurso sino que también protege el micró-
fono contra la humedad del aliento.
5) Para suprimir frecuencias bajas (por ejemplo
sonido de impacto), encienda el filtro pasa alto:
Ponga el interruptor del filtro en posición .
6) Con presiones de sonido muy altas (por ejemplo
la toma de sonido cercana de baterías o metales)
puede encenderse una atenuación de 10 dB
como una protección contra sobrecargas de uni-
dades subsiguientes: Ponga el interruptor de
atenuación en la posición “
-
10 dB”.
4 Características técnicas
Sistema: . . . . . . . . . . . . . micrófono de pendiente de pre-
sión, cardioide
Filtro pasa alto: . . . . . . . 150 Hz, 6 dB/octava
Interruptor de atenuación:
-
10 dB
Sensibilidad: . . . . . . . . . . 15 mV/Pa a 1 kHz
Impedancia: . . . . . . . . . . 200 Ω
Presión de sonido máx.: . 130 dB a 0,5 % THD
Relación señal/ruido: . . . 80 dB (filtro A)
Alimentación: . . . . . . . . . phantom 48 ±4 V
Conexión: . . . . . . . . . . . . XLR, simétrico
config. de contacto: . . . 1 = pantalla/energía phantom
-
2 = señal + / energía phantom +
3 = señal
-
/ energía phantom +
Dimensiones, peso: . . . .
∅
50 mm × 195 mm, 470 g
Sujeto a modificaciones técnicas.
Wielkomembranowy mikrofon
pojemnościowy
Przed przystąpieniem do użytkowania urządzenia
prosimy zapoznać się z instrukcją obsługi, a następ-
nie zachować ją do wglądu.
1 Zastosowanie
Mikrofon ECM-140, wyposażony w bardzo cienką,
pozłacaną membranę 25,4 mm (1″), został zapro-
jektowany dla profesjonalistów. Znajduje zastoso-
wanie zarówno w studiu, jak i na sali koncertowej,
doskonale nadaje się do zbierania dźwięku komuni-
katów słownych oraz instrumentów muzycznych.
Mikrofon wymaga zasilania fantomowego o warto-
ści 48 V prądu stałego.
W skład wyposażenia mikrofonu wchodzi futerał,
zawieszenie antywibracyjne (“pająk”) oraz wiatro-
chron.
2 Bezpieczeństwo użytkowania
Ponieważ urządzenie spełnia wszelkie normy obo-
wiązujące w Unii Europejskiej, zostało oznaczone
symbolem .
GUrządzenie przeznaczone jest do użytku jedynie
wewnątrz pomieszczeń. Należy chronić je przed
działaniem wilgoci oraz wysokiej temperatury
(dopuszczalna temperatura otoczenia pracy to
0 – 40 ºC).
GDo czyszczenia urządzenia należy używać
suchej, miękkiej tkaniny. Nie wolno stosować
wody, ani chemicznych środków czyszczących.
GProducent ani dostawca nie ponoszą odpowie-
dzialności za wynikłe szkody (uszkodzenie
sprzętu lub obrażenia użytkownika), jeśli urząze-
nie używano niezgodnie z przeznaczeniem, nie-
prawidłowo podłączono bądź poddano nieautory-
zowanej naprawie.
3 Przygotowanie do pracy
1) Należy przykręcić zawieszenie antywibracyjne
do statywu z gwintem 15,9 mm (5/8″) lub z przej-
ściówką gwintową do statywu z gwintem 9,5 mm
(3/8″). Należy wcisnąć oba metalowe uchwyty
przy statywie, następnie zamocować mikrofon.
2) Aby ustawić mikrofon w odpowiedniej pozycji,
należy poluzować śrubę dociskową przy staty-
wie, ustawić mikrofon w taki sposób, aby miejsce,
w którym widnieje symbol , było skierowane w
stronę źródła dźwięku (oś mikrofonu poziomo do
kierunku dźwięku), następnie dokręcić śrubę.
3) Należy podłączyć mikrofon za pomocą kabla z
wtykiem XLR (np. kabel z serii MEC z oferty “img
Stage Line”) do wejścia mikrofonowego urzą-
dzenia audio (np. miksera). Na wejściu musi być
obecne zasilane fantomowe o wartości 48 V.
Jeżeli urządzenie audio nie dostarcza zasilania
fantomowego, należy podłączyć mikrofon do
urządzenia przez zewnętrzny zasilacz fanto-
mowy (np. EMA-3 z oferty “img Stage Line”).
Po całkowitym zakończeniu eksploatacji
urządzenie należy oddać do punktu uty-
lizacji odpadów.
4) W razie potrzeby należy założyć wiatrochron.
Wiatrochron i osłona mikrofonowa są dostępne
jako wyposażenie dodatkowe (np. WS-100 z
oferty “img Stage Line”), zapobiegają powstawa-
niu trzasków podczas komunikatów słownych
oraz partii wokalnych, chronią również mikrofon
przed wilgocią.
5) Aby odfiltrować niskie częstotliwości, należy włą-
czyć filtr górnoprzepustowy, ustawiając włącznik
filtra w pozycji .
6) Przy bardzo wysokim ciśnieniu akustycznym (np.
przy zbieraniu dźwięku z niewielkiej odległości
od bębnów lub instrumentów blaszanych) można
włączyć tłumik 10 dB, jako zabezpieczenie przed
przeciążeniem innych urządzeń: należy ustawić
włącznik tłumika w pozycji “
-
10 dB”.
4 Dane techniczne
System: . . . . . . . . . . . . . . mikrofon gradientowy/kardioida
Filtr górnoprzepustowy: . . 150 Hz, 6 dB/oktawę
Włącznik tłumika: . . . . . .
-
10 dB
Czułość: . . . . . . . . . . . . . 15 mV/Pa/1 kHz
Impedancja: . . . . . . . . . . . 200 Ω
Maks. ciśnienie akustyczne: 130 dB/0,5 % THD
Stosunek S/N: . . . . . . . . . 80 dB (filtr A)
Zasilanie: . . . . . . . . . . . . . moc fantomowa 48 ±4V
Złącze: . . . . . . . . . . . . . . XLR, symetryczne
konfiguracja styków: . . 1 = ekran/moc fantomowa
-
2 = sygnał +/moc fantomowa +
3 = sygnał
-
/moc fantomowa +
Wymiary, waga: . . . . . . . .
∅
50 mm ×195 mm, 470 g
Z zastrzeżeniem możliwości zmiany.
-
40
[dB]
-
30
-
20
-
50
50 100 500 1k 2k 5k 10k20 20k [Hz]200
 Diagrama polar a 1 kHz
Wykres biegunowy przy 1 kHz
Respuesta
de frecuencia
Charakterystyka
częstotliwościowa
®
MONACOR INTERNATIONAL GmbH & Co. KG • Zum Falsch 36 • 28307 Bremen • Germany
Copyright
©
by MONACOR INTERNATIONAL. All rights reserved. A-0614.99.03.08.2012
E
PL

This manual suits for next models

1

Other IMG STAGE LINE Microphone manuals

IMG STAGE LINE ATS-12HT User manual

IMG STAGE LINE

IMG STAGE LINE ATS-12HT User manual

IMG STAGE LINE EMG-450 User manual

IMG STAGE LINE

IMG STAGE LINE EMG-450 User manual

IMG STAGE LINE DM-5000LN User manual

IMG STAGE LINE

IMG STAGE LINE DM-5000LN User manual

IMG STAGE LINE TXS-821HT User manual

IMG STAGE LINE

IMG STAGE LINE TXS-821HT User manual

IMG STAGE LINE HSE-80 User manual

IMG STAGE LINE

IMG STAGE LINE HSE-80 User manual

IMG STAGE LINE DM-800 User manual

IMG STAGE LINE

IMG STAGE LINE DM-800 User manual

IMG STAGE LINE ECM-170 User manual

IMG STAGE LINE

IMG STAGE LINE ECM-170 User manual

IMG STAGE LINE TXS-875HT User manual

IMG STAGE LINE

IMG STAGE LINE TXS-875HT User manual

IMG STAGE LINE TXS-895HT User manual

IMG STAGE LINE

IMG STAGE LINE TXS-895HT User manual

IMG STAGE LINE TXS-900HT User manual

IMG STAGE LINE

IMG STAGE LINE TXS-900HT User manual

IMG STAGE LINE TXS-871HT User manual

IMG STAGE LINE

IMG STAGE LINE TXS-871HT User manual

IMG STAGE LINE DM-1800 User manual

IMG STAGE LINE

IMG STAGE LINE DM-1800 User manual

IMG STAGE LINE TXS-813SX User manual

IMG STAGE LINE

IMG STAGE LINE TXS-813SX User manual

IMG STAGE LINE ECM-140 USB User manual

IMG STAGE LINE

IMG STAGE LINE ECM-140 USB User manual

IMG STAGE LINE 0253540 User manual

IMG STAGE LINE

IMG STAGE LINE 0253540 User manual

IMG STAGE LINE ECM-300W User manual

IMG STAGE LINE

IMG STAGE LINE ECM-300W User manual

IMG STAGE LINE TXS-606DT/2 User manual

IMG STAGE LINE

IMG STAGE LINE TXS-606DT/2 User manual

IMG STAGE LINE ECM-285 User manual

IMG STAGE LINE

IMG STAGE LINE ECM-285 User manual

IMG STAGE LINE TXS-707HT User manual

IMG STAGE LINE

IMG STAGE LINE TXS-707HT User manual

IMG STAGE LINE TXS-606DT User manual

IMG STAGE LINE

IMG STAGE LINE TXS-606DT User manual

IMG STAGE LINE TXS-606HT User manual

IMG STAGE LINE

IMG STAGE LINE TXS-606HT User manual

IMG STAGE LINE 25.5400 User manual

IMG STAGE LINE

IMG STAGE LINE 25.5400 User manual

IMG STAGE LINE TXS-611SET User manual

IMG STAGE LINE

IMG STAGE LINE TXS-611SET User manual

IMG STAGE LINE DM-3400 User manual

IMG STAGE LINE

IMG STAGE LINE DM-3400 User manual

Popular Microphone manuals by other brands

Axis Device Microphone A installation guide

Axis

Axis Device Microphone A installation guide

Electro-Voice PolarChoice 12 Specifications

Electro-Voice

Electro-Voice PolarChoice 12 Specifications

Electro-Voice US621L Service manual

Electro-Voice

Electro-Voice US621L Service manual

Sennheiser Evolution E 815-S brochure

Sennheiser

Sennheiser Evolution E 815-S brochure

Josephson C716 quick start guide

Josephson

Josephson C716 quick start guide

Comica CVM-WM200 user manual

Comica

Comica CVM-WM200 user manual

Motorola solutions PMMN4135 Series user guide

Motorola solutions

Motorola solutions PMMN4135 Series user guide

Micro Innovations MM760M quick start guide

Micro Innovations

Micro Innovations MM760M quick start guide

Audio Technica AT4050 AT4050 Specifications

Audio Technica

Audio Technica AT4050 AT4050 Specifications

ADX FIRECAST C01 instruction manual

ADX

ADX FIRECAST C01 instruction manual

Sony ECMMS907 - Stereo Type Mic operating instructions

Sony

Sony ECMMS907 - Stereo Type Mic operating instructions

Boya BY-BM3030 user manual

Boya

Boya BY-BM3030 user manual

Shure PE548V Unidyne IV user manual

Shure

Shure PE548V Unidyne IV user manual

ETS SM1-EJ instructions

ETS

ETS SM1-EJ instructions

Sennheiser MKE 400 Instructions for use

Sennheiser

Sennheiser MKE 400 Instructions for use

AKG C562BL Specifications

AKG

AKG C562BL Specifications

Boya BY-BM6060L user manual

Boya

Boya BY-BM6060L user manual

Point Source Audio CO-3 user guide

Point Source Audio

Point Source Audio CO-3 user guide

manuals.online logo
manuals.online logoBrands
  • About & Mission
  • Contact us
  • Privacy Policy
  • Terms and Conditions

Copyright 2025 Manuals.Online. All Rights Reserved.