Immergas CRD PLUS Product manual

CRD PLUS
Modulating Digital
Remote Control
IE
Instructions and
warning book

2
Dear Client,
Our compliments for having chosen a
top-quality Immergas product, able to
assure well-being and safety for a long
period of time.
As an Immergas customer you can also
count on a qualied aer-sales service,
prepared and updated to guarantee
constant efficiency of your “Remote
Control”.
We would like to supply you with some
important indications, the respect of
which will confirm your satisfaction
with the Immergas product:
• Read the following pages carefully:
you will obtain useful suggestions
regarding the correct use of the
appliance.
• For any interventions or routine
maintenance contact “Authorised
After-Sales centres”: they have
original spare parts and specific
preparation.

3
INDEX
How to use instruction book ................................ 4
General instruction................................................ 4
Case cleaning .......................................................... 5
Main features........................................................... 6
1. Installation...................................................... 6
2. Description of controls............................... 10
3. Congurating operating parameters ........ 12
4. Disabling thermoregulation....................... 15
5. Selecting operating mode........................... 16
6. Setting up clock and temperature.............. 18
6.1 Setting up clock............................................19
6.2 Setting up room day temperature.............. 21
6.3 Setting up room night temperature .......... 22
6.4 Setting up heating temperature ................. 22
6.5 Setting up domestic hot water
temperature.................................................. 23
6.6 Setting up outside probe KD value ........... 24
7. Setting up clock and temperatures............ 25
7.1 Manual operation........................................ 25
7.2 Automatic operation................................... 26
8. Weekly heating program ............................ 27
8.1 Display heating program............................ 28
8.2 Change heating program............................ 29
9. Storage tank unit weekly program ............ 30
9.1 Display storage tank unit program............ 30
9.2 Change storage tank unit program ........... 32
10. Temporary change room temperature set
point .............................................................. 33
11. Fault signalling............................................. 34
12. Display values .............................................. 35
12.1 Display set room temperature ................... 36
12.2 Display temperature domestic hot water
probe ............................................................. 36
12.3 Display temperature delivery probe.......... 37
12.4 Display temperature outside probe........... 37
12.5 Display system water pressure................... 38
13. Reset of default values................................. 39
14. Complete resetting ...................................... 40
15. Room anti-freeze function......................... 41
16. Technical features........................................ 42
16.1 Product sheet ............................................... 43
4
HOW TO USE THE INSTRUCTION
BOOK.
is booklet is divided into two sections, each
of which having its own addressee:
• Installer section, this gives instructions
regarding the accurate installation and
conguration of the remote control device.
• User section, this gives detailed instructions
regarding the steps to carry out in order to
personalize the functioning of the CRD
PLUS remote control device.
Some hints
• When a numeric value is blinking you can
change it by turning button .
• The value as changed by turning button
will be automatically stored when the
blinking stops.
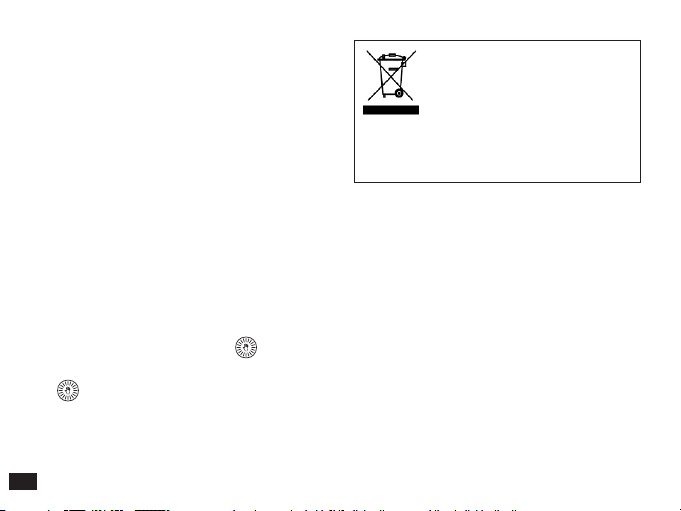
The use of the symbol shows
the impossibility to dispose this
product as domestic waste.
e correct disposal of this pro-
duct helps to prevent potential
negative consequences for the
environment and human health.
GENERAL INSTRUCTIONS
• Carefully read this manual because it will give
you important instructions regarding the
safety of use, installation and maintenance.
• e system must be implemented in com-
pliance with the safety regulations in force.
• Aer unpacking and before installing check
that the product is intact.
• is device is to be used only for the use it
has been designed for: any dierent use is
improper.

5
• In case of repair contact only technical servi-
ce centers authorized by the manufacturer.
• Non-compliance with the above may endan-
ger the safety of the device.
• If the device is installed to control a low tem-
perature zone, this zone must be equipped
with a low temperature safety thermostat
surveying it.
• e manufacturer cannot be held liable for
any damages resulting from bad operation,
extraordinary events, conguration errors
or improper, wrong and unreasonable use
of the device.
• The manufacturer reserves the right to
eventually make changes to the device and
whatever else appears necessary for the
continual improvement thereof.
CASE CLEANING.
To clean the case of CRD PLUS remote control
use damp cloths. Never use abrasive or powder
detergents.
WARNING
Immergas reserves the right to make
improvements and modications to details
and accessories, excepting the essential
features of the model described and illustrated
herein.

6
MAIN FEATURES
e CRD PLUS remote control device has
been designed to guarantee ideal temperature
conditions at any moment of the day oering
the possibility to set the boiler from remote.
e programming of the CRD PLUS remote
control device is extremely easy a large LCD-
display makes it possible to check and change
the set values at any time.
The CRD PLUS remote control device is
electrically connected to the boiler by means
of two nonpolarized conductors.
ey give it the necessary supply
to operate and constitute also the communi-
cation between the two devices.
Aer installing it is immediately ready to run
with its memorized standard program.
is program can be changed according to the
needs of the user.
1. INSTALLATION
e CRD PLUS remote control device must be
installed only by expert personnel.
To correctly install the device and in com-
pliance
with the regulations in force about electrical
appliances, use a dedicated line to connect it.
In case this is impossible, any interferencedue
to electric wires may cause poor working of the
remote control device.
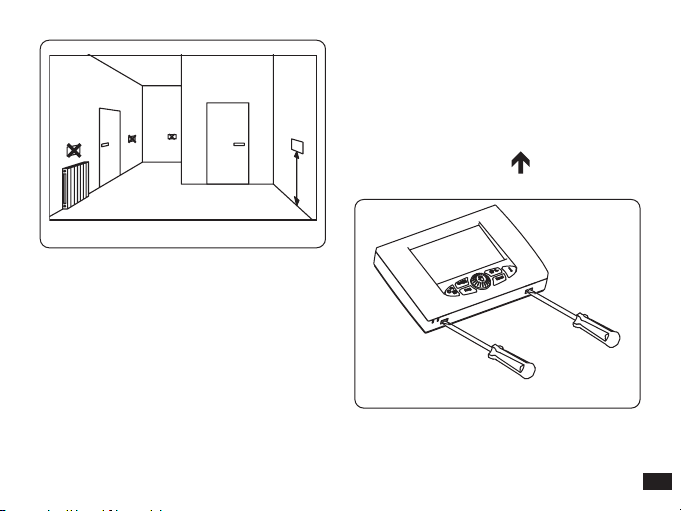
Install the CRD PLUS remote control device
at approx. 1.5 m over oor in a place suitable
for correct sensing of the room temperature.
Do not install behind doors, curtains, near
heat sources nor expose to direct sunlight or
water sprinkles.
7
NONO
NO SI
1.5 mt
1. Cut o electricity from boiler
2. Use a screwdriver and gently press on the
two lower splines to take o the device from
the back of its xing template.
3. Insert both ends of the connecting wire into
their proper seat on the xing template. Use
the proper holes to install the CRD PLUS
remote control device directly onto the wall
or onto a housing. e necessary screws
are supplied together with the device. Pay
attention to the sign “ U P ”.
2
1

8
3
4. Connect electricity to the terminal box.
4
N.B.: e connection is not polarized.
5. Fix your remote control device to its tem-
plate. First insert the upper part and then
press and turn until its completely closed.
5
6. Check in the boiler if there is a request to
eliminate the jumper on the room thermo-
stat terminals (if installed).
7. Supply power to the boiler.

9
Now the installation is completed. If it was
done correctly the remote control device is
now powered and the LCD display will show
the following message for a few seconds:
6
As soon as the connection is established the
normal operating condition will be displayed:
7
10
8
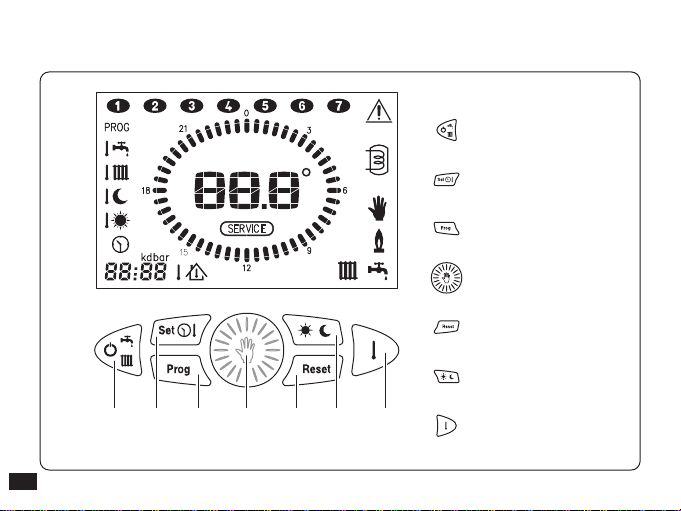
A B C D E F G
ASelect operation status
BSet time and
temperature
CWeekly program
D
Change displayed
value (turn)
Select automatic /
manual (press)
EAlarm reset
FSelect temperature level
(day/night)
GTemperature display
Keys
2. DESCRIPTION OF CONTROLS
Table of contents
Other Immergas Controllers manuals

Immergas
Immergas System Manager Kit Product manual

Immergas
Immergas 3.022648 User manual

Immergas
Immergas 3.021523 User manual

Immergas
Immergas 3.021523 User manual

Immergas
Immergas 3.015265 User manual

Immergas
Immergas CARV2 Product manual

Immergas
Immergas 3.030863 Product manual

Immergas
Immergas BCM Operating instructions
Popular Controllers manuals by other brands

Digiplex
Digiplex DGP-848 Programming guide

YASKAWA
YASKAWA SGM series user manual

Sinope
Sinope Calypso RM3500ZB installation guide

Isimet
Isimet DLA Series Style 2 Installation, Operations, Start-up and Maintenance Instructions

LSIS
LSIS sv-ip5a user manual

Rockwell Automation
Rockwell Automation 1769-L31 installation instructions


