Inateck SA02003 User manual

Instruction Manual
SA02003 USB3.0 Dual SATA HDD Docking Station
With Oine Clone Function
English · Deutsch · 日本語 · Français · Italiano · Español

1
English
Introduction
This product support data copy and clone between dual HDDs.
Meanwhile, it adopts USB3.0 (Super Speed) with date transfer rate up to
5Gbps and SATA3 (6Gbps) and backward compatible with earlier versions
as well. This excellent transmission performance and good compatibility
is convenient for data exchange and perfectly suitable for the men who
need to batch processing and clone data at some certain places, such
as lm and television production, Backup & processing IT data, Schools
batch processing data etc.
Overview
LED Indicator
Clone Button
SATA HDD Slot
USB 3.0
DC-IN Jack
Power Switch

2
How to Use
1. Connect the external power adapter from the hard drive dock to an
electrical outlet.
2. Connect the included USB 3.0 cable from the hard drive dock to an
available USB port on the computer system.
3. Insert a 2.5” or 3.5” hard drive into the top loading slot.
4. Press the power button. A pop-up bubble in the task bar at the bottom-
right of your screen notifying you once your hard drive has been
recognized. You may also nd the hard drive in Disk Management.
Note:
a. To remove the hard drive, make sure it is currently not being accessed
by the computer then unmount or uninstall the disk drive from the
operating system. Never remove the docking station while the hard
drive is in use. Doing so may corrupt the data on the hard drive or
damage the hard drive, docking station, or computer.
b. When connected via USB, the dock will automatically go into sleep
mode if the connection is left idle for more than 30 minutes. The power
LED indicator will always be on and the colorful atmosphere light at
the bottom will enter the slow ashing state. Accessing the hard drive
will automatically cancel sleep mode and power the drive back up.
The hard drive LED indicator will ash, the power LED indicator will be
constantly on and the bottom colorful atmosphere light will enter the
fast ashing state.
c. Please do not remove your hard drive or insert a new one while
the other hard drive is being accessed, as doing so the other drive
temporarily disconnects and this could damage your hard drive and
result in data loss.
Hard Drive Oine Clone
1. Make sure there are no connection on the USB.
2. Insert the drives straight down until the connection is secured. Oine
clone is from HDD A to HDD B. Make sure your Main Drive is in HDD
A and slave in HDD B. The capacity of HDD B must be equal or bigger
than HDD A.
3. Press and hold the oine button for 3 seconds, the LED indicator that
marks 100% clone progress will light up. Quickly press the button
again, and oine clone starts. 4 LED lights indicate the clone progress.
One by one they will ash and be on. When the oine clone is 100%
completed, 4 LED lights will stay on.

3
Technical Specications
Product Name USB3.0 Dual SATA HDD Docking Station with Oine Clone Function
Model Number Inateck SA02003
Weight 410g
Color Black
Drive Size 2.5”/3.5” SATA I/II/III HDD/SSD
Interface USB3.0 up to 5Gbps
Material ABS plastic
Hot Plug, Plug & Play Supported
Licenses CE, FCC
Dimensions 150mm length × 109mm width × 60mm height
Environmental Storage: -20 to 70 ° C; Operating: 5 to 40 ° C
Operating Systems Windows XP/7/8/8.1/10, Mac OS 9.0 and higher
Tool free Yes
Driver No software or drivers required
Package Contents
SA02003 Docking Station × 1
USB 3.0 Data Cable × 1
DC Power Adapter × 1
Instruction Manual × 1
Troubleshooting/FAQ
a. Unable to clone: Please check if the capacity of Disk B is larger or
equivalent to that of Disk A. Here the capacity means the actual
capacity that can be used, instead of the one marked on the product.
For example, the actual capacity of a disk marked 500GB might be
480GB only. The actual capacity of disks with the same marked capacity
differs if they are produced by different producers. To ensure two
disks of the same marked capacity have the same actual capacity, they
should be produced by the same producer in the same batch with the
same model number.

4
b. Indicator light stops ashing up during oine duplicating: it might
because of disk bad sectors so that data couldn’t be cloned as usual.
It’s better to change a good disk.
c. After cloning, the rest capacity of B disk is showed and operated via
“Computer management - Storage - Disk management”.
d. Why over 2TB hard disk couldn’t be identied by USB? Because the
maximum capacity of hard disk which Windows XP can supports is 2TB
and couldn’t be identied by system if over 2TB. It only supports after
upgrading the operating system above Vista (64 bit) version and we
suggest changing hard disk into a GPT disk partition, or the operating
system will not support over 2 TB disk partitions.
e. Please make sure that B hard disk data can be covered before cloning
data. Because once you start cloning, B hard disk partition methods
and data are completely cloned as A hard disk. Our company does NOT
undertake any responsibility for data or economy loss which could
bring by damaged data.
f. Please do not remove your hard drive or insert a new one while
the other hard drive is being accessed, as doing so the other drive
temporarily disconnects and this could damage your hard drive and
result in data loss.
Support
For any inquiries or comments concerning our products, please send an
email to [email protected], and we will respond to you as soon as
possible.

5
Deutsch
Einführung
Dieses Produkt ermöglicht simultanen Zugriff, Kopiervorgänge und
Duplikation auf und
zwischen zwei HDDs. Außerdem entspricht die Station den USB 3.0-
(theoretischer Maximal-transfer von 5 Gb/s) und SATA-III-Standards
(theoretisch 6 Gb/s), welche natürlich auch abwärtskompatibel sind. Das
hohe Maß an Übertragungsleistung und Kompatibilität gewährleistet,
dass diese Station für Nutzer geeignet ist, die große Mengen an Daten
verarbeiten und duplizieren müssen, zum Beispiel im Rahmen von
Video- und Audiobearbeitung, IT-Datensicherung und-verarbeitung,
Massendatenverarbeitung in Büro und Bildungseinrichtungen etc.
Produktübersicht
LED-Anzeige
Klon-Bedienknopf
SATA HDD-Einschübe
USB-3.0-Anschluss
DC-Netzeingang
Netzschalter

6
Betrieb und Verwendung
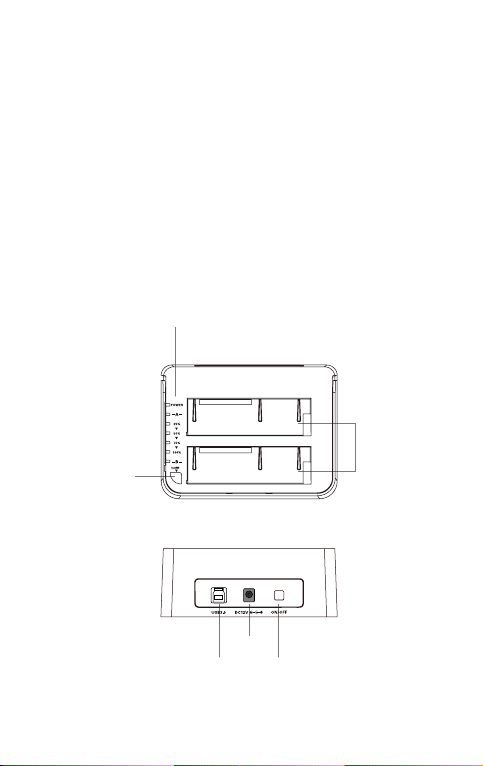
1. Verbinden Sie das Netzteil mit der Steckdose und den
Gleichstromstecker mit der Netzbuchse an der Station.
2. Verbinden Sie das USB 3.0 Kabel mit den entsprechenden Anschlüssen
an Station und Rechner.
3. Setzen Sie ein Laufwerk in einen der Einschübe an dere Oberseite ein.
4. Betätigen Sie den Netzschaltewr. Eine Systemmitteilung in der
Statusleiste des Systems teilt Ihnen zeitnah mit, wenn der Treiber
installiert wurde und der Datenträger zwecks Zugriff verfügbar ist.
Außerdem kann der Datenträger in der Datenträgerverwaltung
aufgefunden und eventuell noch einmal initialisiert werden.
Bitte beachten:
a. Um Laufwerke sicher zu entfernen, achten Sie bitte darauf, das skein
Zugri auf den Datenträger erfolgt. Werfen Sie den Datenträger nun
über das System aus. Bitte das Laufwerk nicht entfernen, während es in
Betrieb ist, um Datenverlust und Beschädigungen zu vermeiden.
b. Im USB-Modus geht die Dockingstation automatisch nach 30 Minuten
in den Ruhezustand über, wenn kein Zugri erfolgt. In diesem Zustand
leuchtet die Netz-LED immer, und das bunte Atmosphären LED
unten wechselt in den langsam blinkenden Zustand. Bei erneutem
systemseitigen Zugriff fährt das Laufwerk automatisch hoch. Die
Betriebs-LED blinkt dann, während die Netz-LED permanent leuchtet,
und das bunte Atmosphären LED wechselt in den schnell blinkenden
Zustand.
c. Laufwerke sollten niemals während des laufenden Betriebs gewechselt
oder entnommen werden, da sonst schwere Beschädigungen und
Datenverlust auftreten können.
Duplikation von Datenträgern
1. Stellen Sie sicher, dass die USB-Verbindung zum Rechner getrennt ist.
2. Setzen Sie die Laufwerke in die Schächte, bis diese fest in den SATA-
Schnittstellen sitzen. Die Duplikation geschieht von Schacht A auf
Schacht B. Das Quelllaufwerk muss daher in Schacht A und das
Ziellaufwerk in Schacht B stecken. Die Kapazität des Ziellaufwerks muss
gleich groß oder größer als die des Quelllaufwerks sein.
3. Halten Sie den Oine-Duplikations-Knopf für drei Sekunden gedrückt,
bis die 100%-LED aueuchtet. Bitte drücken Sie den Knopf dann noch
einmal für drei Sekunden, während die 100%-LED noch leuchtet, damit
die Offline-Duplikation startet. Die vier LED (25%-50%-75%-100%)
zeigen den Klonfortschritt an, nach und nach blinkend und dann
permanent leuchtend, wenn das jeweilige Viertel dupliziert wurde.
Wenn der Klonvorgang zu 100% abgeschlossen wurde, bleiben die vier
LED an, bis die Station ausgeschaltet wird.

7
Technische Daten
Produktname USB3.0 Dual SATA HDD Docking Station mit Oine Klonfunktion
Typenbezeichnung Inateck SA02003
Gewicht 410g
Farbe Schwarz
Unterstützte Laufwerke 2.5”/3.5” SATA I/II/III HDD/SSD
Schnittstelle USB 3.0 mit theoretisch bis zu 5 Gb/s
Material ABS-Kunststo
Hot Plug, Plug & Play Unterstützt
Zertikanzen CE, FCC
Maße 450mm Länge × 109mm Tiefe × 60mm Höhe
Umgebungsbedingungen Lagerung: -20 bis 70 ° C; Betrieb: 5 bis 40 ° C
Kompatible Betriebssysteme Windows XP/7/8/8.1/10, Mac OS 9.0 und höher
Werkzeuglos Ja
Treiber Keine gesonderten Treiber oder Programme nötig
Lieferumfang
SA02003 Dockingstation × 1
USB 3.0 Datenkabel × 1
Netzteil AC/DC × 1
Bedienungsanleitung × 1
Lösungsansätze und Antworten
a. Kann nicht geklont werden: Bitte überprüfen Sie, ob die reale
physikalische Kapazität von Laufwerk B größer oder gleich groß der von
Laufwerk A ist. Die reale Kapazität ist die, die auf dem Laufwerk wirklich
genutzt werden kann, erkennbar an der Sektorenanzahl, anstatt der auf
dem Etikett angegebenen theoretischen Kapazität. Zum Beispiel kann
ein Datenträger mit 500GB Kapazität ausgewiesen sein, verfügt jedoch
real nur über eine reale Kapazität von 48 0GB. In der Regel verfügen
Laufwerke von verschiedenen Herstellern über unterschiedliche
Kapazitäten, auch wenn auf dem Etikett die gleiche Kapazität

8
angegeben ist. Um wirklich sicher zu gehen, daß deklarierte und reale
Kapazität zumindest gleich groß sind, empehlt sich ein Rückgri auf
Laufwerke mit der gleichen Typen- und Chargenbezeichnung des
gleichen Herstellers.
b. Wieso hören die Fortschritts-LED während der Duplikation auf
zu blinken? Dies könnte daran liegen, dass auf einem Laufwerk
beschädigte Sektoren vorhanden sind, die zu einem Abbruch der
Duplikation führen. Es sollten unbeschädigte Laufwerke verwendet
werden.
c. Wenn nach der Duplikation auf dem Ziellaufwerk noch Restkapazität
vorhanden sein sollte, so kann diese über die Datenträgerverwaltung
(siehe Punkt VII.) einem neuen Laufwerk zugeordnet werden.
d. Weshalb wird mein Laufwerk mit über 2 TB Kapazität nicht erkannt? Hier
liegt die Ursache in der Tatsache, dass bei MBR-Partitionszuweisungen
unter XP Kapazitäten über 2 TB nicht unterstützt werden. Es
wird daher empfohlen, bei Systemen ab Vista 64bit auf die GPT-
Partitionszuweisung zurückzugreifen, um die Windows-XP-
Beschränkung zu umgehen. Danach sollte eine Initialisierung und
Formatierung von Laufwerken von gar 6 TB oder 8 TB Größe kein
Problem darstellen.
e. Bitte überprüfen Sie zuvor den Inhalt der Festplatten, die Sie
überschreiben, Inateck übernimmt KEINE Garantie für verlorene Daten
und anderweitige Verluste.
f. Bitte entfernen Sie die Festplatte nicht während diese in Benutzung ist
oder wechseln Sie diese während der Nutzung aus. Unsachgemäßes
entfernen der Festplatte während der Nutzung kann Ihre Festplatte
beschädigen und zu Datenverlust verführen.
Kundenservice
Bei Fragen und Problemen besuchen Sie bitte unsere Webseite www.
inateck.com/de oder schreiben Sie un san: [email protected]

9
日本語
主な機能
本製品は2台 HDD の間にデータのコピーやクローンをサポートしてい
ます。そして、USB3.0(超高速の 5Gbps に達する)や SATA3(超高速の
6Gbps に達する)にサポートしながら、下位互換性があります。優れた
転送性能や良好の互換性によって、データの転送がより便利になります。
ご利用シーン例:学校や企業のデータバッチ処理、データのクローン、
データのバックアップなどを簡単に実現できます。
製品概要
LED インジケーター
クローンボタン
SATA HDD スロット
USB 3.0
DC - IN ジャック
電源スイッチ

10
ハードドライバ インストールステップ
1. DC パワーアダプタをドッキングステーションに接続してください。
2. USB ケーブルを通して、このドッキングステーションをパソコンに接
続してください。
3. ご使用の HDD をドッキングステーションのスロットに正確に挿入して
ください。
4. パワーボタンを押せるとスクリーンの右下には「モバイルハードウェ
ア」という表示が出ます。識別されたデバイスはディスクマネージャ
にも表示されます。
ご注意 :
a. ストレージがを正常に取り出せるために、データ記憶装置を取り外す
前に、すべてのデータアクセスを停止してください。強制的に取り出
すと、デバイスの損壊またはお大切なデータの損失につながる可能性
があります。
b.USB ポートを通して本製品をコンピュータに接続するとき、30 分の
間にハードディスクに読み込みまたは書き込みの動作がなかった場合
は、自動的にスリープモードに移行され、電源 LED インジケータが点
灯し、底部の七色ムードランプがスローフラッシュ状態になります。
ハードディスクにアクセスするとスリープモードが自動的にキャンセ
ルされ、ハードディスクの LED インジケータが点滅し、電源 LED イ
ンジケータが点灯し、底部の七色ムードランプが走馬状態に入ります。
c. 一つのハードディスクがアクセスする時に、他のハードディスクを取
り外したり、新しいハードディスクを挿入したりしないでください。
アクセスしているハードディスクが一時的に切断され、ハードドライ
ブが損傷し、データが失われる可能性があります。
オフラインコピー機能
この製品は、オフラインのコピー機能をサポートしています。コンピュ
ータに接続せずに、本製品を利用して直接に HDD のクローンを作成する
ことができます。
1. ご使用の HDD を「A」と「B」ポートに挿入してください。A にはク
ローンされる HDD で、B にはクローニングターゲット HDD を挿入し
ます。HDD の容量:B≥A が必要です。
2. オフラインボタンを 3 秒間押し続けると、「100%」LED インジケー
タが点灯し、すぐにオフラインボタンをもう一度押すとオフラインク
ローンが開始されます。LED インジケータはクローン進展を示します。
オフラインクローンが 100%完了すると、4 つの LED ライトが消えず
に点灯しているままです。

11
テクニカルデータ
商品名称 USB3.0 デュアル SATA HDD ドッキングステーションオフライン
クローン機能付き
商品型番 Inateck SA02003
重量 410g
カラー ブラック
対応ドライブ 2.5”/3.5” SATA I/II/III HDD/SSD
インターフェイス USB3.0 (最大 5Gbps)
主な材料 ABS プラスチック
ホットプラグ、プラグ&プレイ サポート
ライセンス CE, FCC
商品寸法 450mm × 109mm × 60mm
動作環境 保存温度 : -20 ~ 70 ° C; 動作温度 : 5 ~ 40 ° C
対応 OS Windows XP/7/8/8.1/10, Mac OS 9.0 及び以降
取り付けに工具不要 はい
驅動ドライバ 不要
パッキングリスト
SA02003 ドッキングステーション × 1
USB3.0 データケーブル × 1
取扱説明書 × 1
DC パワーアダプター × 1
F&Q
a. クローンできない場合:ディスク B の実容量がディスク A の実容量よ
り大きいか同等であるかどうかを確認してください。実容量とは、製
品に記載されている表示容量ではなく、実際に使用できる容量という
ことです。 たとえば、表示容量 500GB のディスクは実際使用できる
容量が 480GB である可能性があります。 通常、表示容量が同じでも、
メーカー、ロットやモデル番号により、2 台のディスクの実容量が異
なります。そのため、同じ表示容量の 2 台のディスクを利用してクロ
ーンする場合は、2 台のメーカー、ロットとモデル番号が同じである
必要があります。

12
b. オフラインデュプリケーター途中にインジケーター LED が点滅停止し
ます。 HDD が不良セクタがありますので、データが順調に HDD に書
き込みすることができません。本製品は HDD 復旧ツールではありま
せんので、異常のある HDD を交換
c. クローンが完了あと空き容量を調べる方法。 「コンピュータの管理」
ウインドウを開きます。【記憶域】⇒【ディスクの管理】してください。
d. 2TB の HDD を 接続したが識別 されませ んでした。 Window XP に
2TB 超の HDD を接続した場合、OS 側の仕様では認識されません。
Windows Vista(64 Bit) 以降のバージョンは 2TB 超の HDD が認識され
ます が、HDD を GPT ディスクパーティションにする必要があります。
e. クローンする前にコピー先の HDD/SSD 中に消したくないデータの有
無をご確認く ださい。一旦クローンを実行したらコピー先 HDD/SSD
のパーティションとデータが完 全にコピー元と同じようにクローンさ
れますので、十分ご注意ください。本製品を使 用することによって生
じた、直接・間接の損害、データ消失等については、弊社では一 切そ
の責を負いません。
f. 本製品の保護規制により、B ハードディスクが動作中の場合、A ハー
ドディスクを外すと、B ハードディスクの接続は中止されてしまいま
すので、ご使用のハードディスクのデータまたは安全性を確保するた
めに、B ハードディスクが動作している間に、A ハードディスクを外
すことをご遠慮ください。
サポート
当社の製品に関するお問い合わせやコメントがございましたら、
たします。

13
Français
Introduction
Ce produit est capable de copier et cloner des données entre deux
HDDs. Il est muni de SATA3 (6 Gbps) et d’USB 3.0 (Grande Vitesse) avec
un ratio de transfert de données allant jusqu’à 5 Gbps. Et il est rétro-
compatible avec des anciennes versions. Sa capacité de transmission et
sa compatibilité universelle sont pratiques pour l’échange de données
et convenables pour le traitement et le clonage d’un grand nombre de
données. Vous pouvez facilement copier des films et des feuilletons,
traiter des données de Technologie de l’Information, les données des
écoles à traiter par lots.
Aperçu
Indicateur LED
Bouton de clonage
Slot de HDD SATA
USB 3.0
Prise de DC
Interrupteur

14
Comment l’utiliser
1. Connectez la station d’accueil à l’adaptateur d’alimentation.
2. Connectez la station d’accueil au port USB de votre ordinateur par le
câble USB 3.0 fourni.
3. Insérez le disque dur 2,5” ou 3,5” dans le slot.
4. Appuyez sur le bouton d’interrupteur. Une fois que votre disque dur
est lié, une notication apparaîtra en bas, à droite de votre écran. Vous
pouvez également trouver le disque dur dans la Gestion des Disques.
N.B.
a. Pour arracher le disque dur, veuillez vérier tout d’abord la déconnexion
de ce dernier à l’ordinateur. S’il n’est pas visité par l’ordinateur, vous
pouvez le désinstaller. Ne jamais le désinstaller quand le disque dur
fonctionne. Sinon des données seront peut-être perdues, et le disque
dur, la station d’accueil ou l’ordinateur endommagés.
b. Quand la station est connectée par USB, elle entrera auto matiquement
en mode veille après plus de 30 mins d’inaction. L'indicateur LED
d'alimentation sera toujours allumé et la lumière d'ambiance colorée
en bas passera à l'état de clignotement lent. Un accès au disque dur
réveillera la station, et le disque sera de nouveau alimenté. L'indicateur
LED du disque dur clignotera, l'indicateur LED d'alimentation sera
constamment allumé et la lumière d'ambiance colorée inférieure
passera à l'état de clignotement rapide.
c. Veuillez ne pas arracher le disque dur ni insérer un autre disque
dur quand le premier est accédé. Sinon, l’autre disque dur sera
temporairement déconnecté, ce qui engendra une perte de données,
voire un dommage au disque dur.
Clonage Hors-Ligne de Disque Dur
1. Veuillez vérier qu’il n’y a pas de connexion par USB.
2. Insérez les disques durs dans le slot jusqu’à la bonne connexion. Le
clonage hors-ligne est fait du HDD A au HDD B. Vériez si le Disque
Principal est dans le slot HDD A, et le disque destinataire dans le slot
HDD B. La capacité du HDD B doit être le même ou être plus grande
que celle du HDD A.
3. Maintenez enfoncé le bouton de duplication pendant 3 secondes.
L'achage LED s'allumera pour indiquer le processus de duplication.
Relâchez puis refaire un appui bref sur le bouton de duplication,
la duplication commencera. Les 4 indicateurs LED montreront le
processus du clonage. Ils clignoteront l'un après l'autre et puis
resteront allumés. Quand la duplication est nie, les 4 indicateurs LED
resteront tous allumés.

15
Spécications Techniques
Nom du Produit Station d’accueil USB3.0 de HDD SATA à double baie avec Fonction de
Clonage Hors-ligne
Modèle Inateck SA02003
Poids 410 g
Couleur Noir
Taille de disque dur 2,5”/3,5” HDD/SSD SATA I/II/III
Interface USB 3.0 – Jusqu’à 5 Gbps
Matériau Plastique ABS
Échangeable à chaud,
brancher et jouer
Oui
Licences CE, FCC
Dimensions 150 x 109 x 60 mm
Environnement Stockage : -20 à 70 ℃ ; Fonctionnement : 5 à 40 ℃
Systèmes compatibles Windows XP/7/8/8.1/10, Mac OS 9.0 et les derniers systèmes
Outil Pas besoin
Pilote Pas besoin
Contenu d’emballage
Station d’accueil SA02003 × 1
Câble de données USB 3.0 × 1
Adaptateur d’alimentation DC × 1
Mode d’emploi × 1
FAQ
a. Incapable de cloner : veuillez vérier si la capacité du HDD B égale ou
est plus grande que celle du HDD A. Ici la capacité signie la capacité
réelle, au lieu de celle mentionnée sur le disque dur. Par exemple, la
capacité réelle d’un disque dur de soi-disant 500 Go peut être 480 Go.
Cela dépend de producteur (marque). Si les deux disques qui ont la
même capacité mentionnée, ils n’ont toujours pas la même capacité
réelle. Sauf s’ils sont de la même marque, fabriqués dans le même lot
avec le même numéro de modèle.

16
b. L’indicateur arrête de clignoter pendant le clonage hors-ligne :
possiblement causé par les secteurs défectueux, qui conduisent à
l’échec du clonage. Mieux vaut changer de disque dur.
c. Après le clonage, le reste de la capacité du HDD B sera trouvé et géré
par « Gestion de l’ordinateur – Stockage – Gestion des diques ».
d. Pourquoi ne peut-on pas lire un disque dur de plus de 2 To par USB ?
Parce que le système Windows XP ne peut que lire le disque dur d’une
capacité maximale à 2 To. Ceux qui dépassent cette limite ne peuvent
pas être lus. Si le système est plus récent que Vista (64 bit), vous
pouvez utiliser des disques de plus de 2To. Et dans ce cas, nous vous
conseillons la conversion de disque MBR en GPT, sinon le système ne
peut pas partitionner un disque dur de plus de 2 To.
e. Veuillez vérifier si les données du HDD B peuvent être totalement
remplacées avant d’eectuer le clonage. Une fois que le clonage est
commencé, tout le contenu dans le HDD B sera remplacé par celui
du HDD A. Nous déclinons toute responsabilité d’une certaine perte
de données, y compris la responsabilité des résultats causés par cette
perte.
f. Veuillez ne pas arracher le disque dur ni insérer un autre disque
dur quand le premier est accédé. Sinon, l’autre disque dur sera
temporairement déconnecté, ce qui engendra une perte de données,
voire un dommage au disque dur.
SAV
En cas de moindre question, veuillez nous joindre par support@inateck.
com, nous allons vous répondre le plus vite possible.

17
Italiano
Introduzione
Questo prodotto supporta la copia di dati e la clonazione tra due HDD.
Compatibile con USB 3.0 (Super Speed) con velocità di trasferimento dati
no a 5 Gbps e SATA 3 (6Gbps), retro compatibile con versioni anteriori.
La trasmissione ad alta velocità e l’ottima compatibilità rendono questa
docking station perfetta per chi ha necessità di trasferire o clonare dati,
eettuare il back up o fare batch di dati di ogni tipo
Panoramica
Spia LED
Pulsante clonazione
SATA HDD
USB 3.0
Presa DC-IN
Interruttore

18
Come si usa
1. Collegare l’adattatore corrente esterno a una presa elettrica
2. Connettere la docking station al computer con il cavo USB 3.0 in
dotazione
3. Inserire un hard drive da 2.5 o 3.5 pollici nella slot superiore
4. Premere l’interruttore On /Off. Sulla parte in basso a destra dello
schermo del computer apparirà la notica di riconoscimento dell’hard
drive. È possibile trovare l‘hard drive in Disk Management
Note:
a. Prima di rimuoverlo dal sistema operativo, assicurarsi che l’hard disk
non sia accessibile al computer. Non rimuovere mai la docking station
quando l’hard disk è in uso, poiché si corre il rischio di perdere o
danneggiare i dati nell’hard drive o di danneggiare l’hard drive stesso,
la docking station o il computer.
b. Quando è connessa via USB, la docking station entrerà in Modalità
Sleep se la connessione rimane inattiva per più di 30 minuti.
L'indicatore LED di alimentazione sarà sempre acceso e la luce
colorata dell'atmosfera nella parte inferiore entrerà nello stato di
lampeggio lento. Quando si accede nuovamente all’hard drive, la
docking station riprenderà l’attività. L'indicatore LED di alimentazione
sarà costantemente acceso e la luce colorata inferiore dell'atmosfera
entrerà nello stato di lampeggio veloce.
c. Non rimuovere l’hard drive o inserire un nuovo hard drive mentre
l’altro è in uso, poiché quest'ultimo può disconnettersi brevemente
causando danni o perdite di dati
Clonazione Hard Drive Oine
1. Assicurarsi che la USB non sia connessa.
2. Inserire i drive correttamente. La clonazione oine è da HDD A a HDD
B. Assicurarsi che il drive master sia in HDD A e quello slave sia in HDD B.
La capacità di HDD B deve essere uguale o superiore a quella di HDD A
3. Mantenere premuto il pulsante offline per 3 secondi, la spia LED
100% si accende. Premere il pulsante rapidamente un'altra volta. La
clonazione offline comincia. Le 4 spie LED indicano la progressione
della clonazione. Una dopo l'altra lampeggiano e rimangono accese.
Quando la clonazione raggiunge il 100%, le 4 spie LED si accendono
tutte insieme e rimangono accese.

19
Speciche tecniche
Nome prodotto Docking Station USB3.0 con funzione di clonazione offline Dual
SATA HDD
Numero modello Inateck SA02003
Peso 410g
Colore nero
Dimensione Drive HDD/SSD SATA I/II/III 2.5”/3.5”
Interfaccia USB3.0 no a 5Gbps
Materiale Plastica ABS
Hot Plug, Plug & Play Sì
Certicazioni CE, FCC
Dimensioni Lunghezza 150mm × Larghezza 109mm × Altezza 60mm
Temperatura ambiente Magazzino: -20 a 70 ℃ ; Utilizzo: 5 a 40 ℃
Sistemi operativi Windows XP/7/8/8.1/10, Mac OS 9.0 e superiori
Tool free Sì
Driver Non sono necessari driver o programmi di installazione
La confezione contiene
Docking Station SA02003 × 1
Cavo dati USB 3.0 × 1
Adattatore corrente DC × 1
Manuale di istruzioni × 1
Soluzione dei problemi/FAQ
a. Non è possibile effettuare la clonazione: Controllare che la capacità
eettiva del Disco B sia maggiore o equivalente a quella del Disco A.
La capacità eettiva è quella che può essere realmente utilizzabile e
non quella indicata dal produttore. Ad esempio, un disco da 500GB in
realtà può avere una capacità eettiva di solo 480 GB. In genere i dischi
di marche diverse hanno capacità effettive diverse anche se viene
indicato diversamente. Per avere la certezza che le capacità eettive
siano le stesse, i dischi dovrebbero avere lo stesso numero di modello
e provenire dallo stesso lotto di produzione dello stesso fabbricante.
Table of contents
Languages:
Other Inateck Docking Station manuals

Inateck
Inateck fd2002 User manual

Inateck
Inateck FD2005C User manual

Inateck
Inateck FD1101 User manual

Inateck
Inateck fd2002 User manual

Inateck
Inateck HB9002 User manual

Inateck
Inateck FD2002C User manual

Inateck
Inateck FD1008 User manual

Inateck
Inateck FD2005 User manual

Inateck
Inateck SA02001 User manual

Inateck
Inateck HB9002 User manual