INDIWORK A10-NTG5 User manual

Instruction Manual
All in One Type Android System
A10-NTG5
Model Name A-LINK2-NTG5
Latest Firmware Date 2019 - 11 - 12
Manual Version Rev. 1.0
Language English
POWER/CAN LVDS OUTLVDS IN
KEYPAD AV IN AV IN/OUT SW GPS WIFI / BT
DEBUG
DIP SW HDMI IN R-KEY HDMI OUT USB 3.0 USB 2.0 MicroSD
ANDROID
INTERFACE
Release Date: 2019 – 12 - 09

Car Compatibility Chart
Car Models Specic
Models
Production
Year Specic Models Screen
Size
A-Class
*facelift W176 2016 - 2018 - COMAND APS
NTG 5.0/5.1/5.2 (ONLINE) and AUDIO 20.
7 inch
8 inch
CLA-Class
*facelift C117 2016 - 2018 - COMAND APS
NTG 5.0/5.1/5.2 (ONLINE) and AUDIO 20.
7 inch
8 inch
B-Class
*facelift W246 2015 - 2019 - COMAND APS
NTG 5.0/5.1/5.2 (ONLINE) and AUDIO 20.
7 inch
8 inch
C-Class W205 2014 - 2019 - COMAND APS
NTG 5.0/5.1/5.2 (ONLINE) and AUDIO 20.
7 inch
8.4 inch
E-Class W212 2015 - 2017 - COMAND APS
NTG 5.0/5.1/5.2 (ONLINE) and AUDIO 20. 7 inch
CLS- -Class W218 2015 - 2018 - COMAND APS
NTG 5.0/5.1/5.2 (ONLINE) and AUDIO 20. 7 inch
S-Class W222 2014 - 2018 - COMAND APS
NTG 5.0/5.1/5.2 (ONLINE) and AUDIO 20. 12.1 inch
GLA-Class X156 2015 - 2018 - COMAND APS
NTG 5.0/5.1/5.2 (ONLINE) and AUDIO 20.
7 inch
8 inch
GLC-Class X253 2015 - 2019 - COMAND APS
NTG 5.0/5.1/5.2 (ONLINE) and AUDIO 20.
7 inch
8.4 inch
GLE-Class W166 2015 - 2019 - COMAND APS
NTG 5.0/5.1/5.2 (ONLINE) and AUDIO 20. 8 inch
V-Class W447 2015 - 2019 - COMAND APS
NTG 5.0/5.1/5.2 (ONLINE) and AUDIO 20.
7 inch
8.4 inch
Mercedes NTG5 <8 inch> Mercedes NTG5 <12.1 inch>
Mercedes NTG5 <7 inch>Mercedes NTG5 <7 inch>
CLS-Class
*facelift
A, CLA-Class
*facelift
GLA-Class
B-Class
*facelift
GLC-Class
C-Class
GLE-Class
S-Class

Components
Main Power Cable AV IN / OUT Cable
BT / WIFI Antenna External Speaker
Main Harness LVDS Cable
(Male to Male)
LVDS Cable
(Female to male)
Capacitive Touch Cable External GPS KEYPAD MicroPhone IR Sensor
AV Cable

Body Connector specications
LVDS OUT
CABLE
AV CABLE
1 DVBT VIDEO INPUT
2DVBT AUDIO R
3DVBT AUDIO L
4 DVD VIDEO INPUT
5DVD AUDIO R
6DVD AUDIO L
7 FRONT-CAM VIDEO INPUT
8 RV-CAM VIDEO INPUT
9 GND_DVBT VIDEO
10 GND_DVBT AUDIO R
11 GND_DVBT AUDIO L
12 GND_DVD VIDEO
13 GND_DVD AUDIO R
14 GND_DVD AUDIO L
15 GND_FRONT-CAM VIDEO
16 GND_RV-CAM VIDEO
POWER/CAN
CABLE
NTG6
POWER CABLE
POWER / CAN CABLE
1 ACC IN 9
2GROUND 10 OMNI KEY
311 ECU CAN H
4 DVD IR 12 ECU CAN L
5 12V(ACC) OUT 13 MON CAN IN H
6 14 MON CAN IN L
7 REVERSE 12V IN 15 MON CAN OUT H
8 REAR 12V POWER OUT 16 MON CAN OUT L
DVBT IN VIDEO
DVBT IN AUDIO R
DVBT IN AUDIO L
DVD IN AUDIO R
DVD IN VIDEO
DVD IN AUDIO L
FRONT IN
REAR IN
1
9
8
16
AV CABLE
1 EXTERNAL_SPEAKER + 12 GND (EXTERNAL_SPEAKER)
2AUX AUDIO L 13 GND (AUX AUDIO L)
3AUX AUDIO R 14 GND (AUX AUDIO R)
4 MIC + 15 GND (MIC)
5 CAPACITIVE_SCL 16 CAPACITIVE_GND
6 CAPACITIVE_SDA 17 CAPACITIVE_VDD
7 CAPACITIVE_INT 18 CAPACITIVE_RST
8 UART_RX 19 UART_GND
9 UART_TX 20 IR_SIGNAL
10 DVB-T_IR 21 IR_GND
11 DVD_IR 22 IR_POWER
IR IN
CAP-TOUCH
MIC
DVB-T IR
UART
DVD IR
AUX OUT R
AUX OUT L
SPEAKER
IR IN
111
2212
Power/Can
Keypad
LVDS IN
LVDS OUT AV IN SW
GPS WIFI BT
AV IN/OUT
ON 1 2
1 3 5 7 9 11 13 15
2 4 6 8 10 12 14 16
ACC IN
GND
DVD IR
12V OUT
REVERSE 12V IN
REAR 12V
OMNI KEY
ECU CAN H
MON CAN IN H
MON CAN OUT H
ECU CAN H
MON CAN IN L
MON CAN OUT L

POWER/CAN LVDS OUTLVDS IN
KEYPAD AV IN AV IN/OUT SW GPS WIFI / BT
DEBUG
DIP SW HDMI IN R-KEY HDMI OUT USB 3.0 USB 2.0 MicroSD
ANDROID
INTERFACE
Full Installation Diagram
(Red) B+ Pin # 15 =
(Brwon) Ground Pin # 12 =
(Yellow) Pas Can Low Pin # 31 =
(Black) CMD CAN OUT L Pin # 32 =
(Yellow/Whaite) Pas Can High Pin # 37 =
(Black/Whaite) CMD CAN OUT H Pin # 38 =
NTG5 Main Connector
34
17
15
12
23 4037
31
28
22
38
32
GROUND
BAT +
12V OUT
(ACC12V OUT)
Rear 12V
12V POWER OUT
FOR BACKUP CAMERA
Reverse 12V IN
Reverse Signal Detection
Microphone
Microphone
AV IN/OUT Port
External Speaker
DVB-T , DVD
AUX OUT R
AUX OUT L
SPEAKER
MIC
DVB-T IR
DVD IR
IR IN
How to Wire & Setting
DVD,DTB-TV Remote controller
How to setting
Capacitive touch
CAP-TOUCH
Capacitive Touch
Film
Bottom
AV IN Port
DTV and DVD Front Camera Rear Camera
DVBT IN VIDEO
DVBT IN AUDIO R
DVBT IN AUDIO L
DVD IN AUDIO R
DVD IN VIDEO
DVD IN AUDIO L
REAR IN
FRONT IN
W205,W222 Head Unit
External GPS GPS Fakra IN / OUT Cable
W166 Head Unit
OFF
ON
OFF
ON
Reset Switch
Operation Operation
Press Shot time
1 seconds Start the Touch Calibration
Press Long time
5 seconds Restart the Device
12V ACC Power Out
For external device (Front Cam, DVD,DTV,Etc..) Power
REAR 12V
For the external rear view camera power
When the shift gear to reverse. the power will be "ON"
REVERSE IN
When the reverse gear is not detected by CAN-BUS,
the 'REVERSE 12V IN wire’
should be spliced with 12V power of reverse light.

DIP Switch Settings
No.7 No.8 No.9 No.10 Car Model Code Name Screen Size
OFF(▲) OFF(▲) OFF(▲) OFF(▲)
CLA-Class C177
7 inch
8 inch
B-Class W246
E-Class W212
CLS-Class C218
GLE-Class W166
OFF(▲) OFF(▲) ON(▼) ON(▼)
C-Class W205
7 inchGLC-Class X253
V-Class W447
OFF(▲) OFF(▲) OFF(▲) ON(▼)
C-Class W205
8.4 inchGLC-Class X253
V-Class W447
OFF(▲) OFF(▲) ON(▼) OFF(▲) S-Class W222 12.1 inch
OFF(▲) ON(▼) OFF(▲) OFF(▲) S-Class * Special case W222 12.1 inch
PIN ON (▼) OFF(▲)
1HDMI Mode Skip HDMI Mode
2External Rear View Camera Original Rear View Mode
(OEM CAMERA)
3External Front View
Camera(AV1 Mode)
Skip External Front View
Camera(AV1 Mode)
4DVB-T Mode Skip DVB-T Mode
5DVD Mode Skip DVD Mode
6
Select car model
7
8
9
10
ON
OFF
ON
OFF:ON:
PIN ON (▼) OFF(▲)
1Not Used (default "OFF")
2Using External GPS Using GPS Fakra Cable
DIP Switch Settings
OFF
ON
OFF:ON:
ON 1 2

Mercedes NTG5 Controller
Activation by original buttons
1
1
1
Steering Wheel Buttons 4
Button Function Operation Remarks
Back
Hang Up
Changing
Modes
Press the button 2 seconds Order : Android → HDMI → DVB-T → DVD → OEM
Press the button short time Return to the OEM mode in any modes.
Back
Changing
Modes
(Front Cam)
Press the button 2 seconds Order : AV1 (Front View Camera)
Press the button short time Order : AV1 → Previous screen
Back
Reset Press the button
10 seconds
You can use this function when you get in trouble
* Android power reset
Dial Up
Changing
Modes Move the dial to up 2 seconds
Switch Rear screen between OEM and External Rear Cam-
era in a shift gear "R"
* The screen mode is saved.
4
1 2
1
3
2

Android Firmware
A-LINK DEVICE SETTING
THERE ARE TWO WAYS FOR START THE FIRMWARE.
2. Copy the "system_roik10"folder to
the sd card root directory
* USB format type = FAT32
- Push hold “Recovery Key” and turn on (re-connect power cable),
It will start upgrade
- Select the ‘setting > system update’, and press the OK button.
It will start upgrade
- Copy the ‘system_roik10’ folder to the root of the SD card.
* Update Time will 4~5 min, and rst booting time will be 4~5 min.
* Should be factory reset. when it done rmware
ON
USB 2.0Recovery Key
Only USB2.0 port supports for Android Firmware
!
http://indiwork.co.kr/a-link-rmware-update-international/
1. Download rmware in "indiwork" website
system_roik10 system_roik10
system_roik10

3. OPEN le "update.cong" with notepad
Change to text and Save
erase_data = 1erase_data = 0
2. Copy the "system_a10"folder to
the sd card root directory
* USB format type = FAT32
Recovery Android Software
ON
RESET 1
2
ON
USB 2.0RESET
Only USB2.0 port supports for Recovery software
!
A-LINK DEVICE SETTING
- Copy the "system_a10" folder to the sd card root directory
- Hold the "Recovery Key" button and Re-connect power cable in the same time
* Update Time will 4~5 min, and rst booting time will be 4~5 min.
* Should be factory reset. when it done rmware
http://indiwork.co.kr/a-link-rmware-update-international/
1. Download rmware in "indiwork" website
POWER/CAN LVDS OUTLVDS IN
KEYPAD AV IN AV IN/OUT SW GPS WIFI / BT
DEBUG
DIP SW HDMI IN R-KEY HDMI OUT USB 3.0 USB 2.0 MicroSD
ANDROID
INTERFACE

DVB-T IR
DVD IR
IR IN
DVB-T Diagram
POWER
SIGNAL
GROUND
DVB-TV IR Sensor
Red
White
Black
IR IN
IR SIGNAL IN
CVBS
DVD IR
Wire To DVB-T IR
DVB-T OR DVD DEVICE
AV CABLE
DVB-T
DVD

1
1
2
2
3 4
KEYPAD - Function #1
KEYPAD - Function #2
DOWN UP SEL MENU
iw-evo-n23
digital multi interface
for evo id5,id6
1
2
3
4
Settings (How To Use KEYPAD)
Button Function Operation Remarks
MENU
Changing
Modes Press the button short time Order : HDMI → NAVI → DVB-T → DVD → OEM
SEL
Enter into the
setting menu Press the button short time
Button Function Operation
MENU
Back to previous menu
When press the button short. Press the button short time
SEL
Select the setting menu
and setting values. Press the button short time
UP DOWN
Move the menu-pointer
and adjust the setting values Press the button short time
POWER/CAN LVDS OUTLVDS IN
KEYPAD AV IN AV IN/OUT SW GPS WIFI / BT
DEBUG
DIP SW HDMI IN R-KEY HDMI OUT USB 3.0 USB 2.0 MicroSD
ANDROID
INTERFACE

Using for "HDMI" port should be select
"Input Device Model"in setting menu
If it does not selected input device model
The screen might be able to white,black screen(not working)
!Important
NBA
DEFAULT
INPUT SOURCE DEFAULT
DEFAULT
INPUT SOURCE DEFAULT
NAVIGATION
CONTRAST GREEN
DEFAULT
HDMI
----------
----------
REAR VIEW
CONTRAST BLUE
BRIGHT
AVM
FRONT VIEW
CONTRAST RED
DTV
DTV
DVD
CUSTOM
EXIT
INPUT DEVICE
NBA
DEFAULT
DEFAULT
DEFAULT
DEFAULT
DEFAULT
DEFAULT
DEFAULT
NAVIGATION
CONTRAST GREEN
INPUT SOURCE
INPUT DEVICE
DEFAULT
HDMI
----------
----------
REAR VIEW
CONTRAST BLUE
BRIGHT
AVM
FRONT VIEW
CONTRAST RED
DTV
DTV
DVD
CUSTOM
EXIT
Settings
- BRIGHT and CONTRAST
Adjust the values of brightness and contrast
- INPUT DEVICE ("DEFALUT" INPUT SOURCE)
HDMI - DEFALUT
- INPUT SOURCE ( Hdmi device model select )
· APCAST 720 *Supports Only 720P
· Apple TV 720 *Supports Only 720P
· Xiaomi TV 720 *Supports Only 720P
· DEFALUT (Basic HDMI Device)
· AVM ( 360° Around View Camera )
· DTV ( Digital Television )
HDMI INPUT - AVM
- BRIGHT and CONTRAST
Adjust the values of brightness and contrast
- PGS (Parking Guide System)
· Adjust position of parking guide lines and
select the lines ‘ON or OFF’.
- AVM KEEPING TIME
· When you shift gear ‘from reverse to drive’ or ‘from parking to drive’,
it just works automatically during the activation time you selected.
INPUT SOURCE

HDMI INPUT - DTV
- REMOTE OSD ON / OFF
· You can control to some of function on DTV remote control by OSD UI
- BRIGHT and CONTRAST
Adjust the values of brightness and contrast
Settings
- REMOTE TYPE
· ALPINE · HIT7700· GEX909DTV
NBA
NAVIGATION
CONTRAST GREEN 128
INPUT SOURCE DTV
----------
----------
HDMI
REAR VIEW
CONTRAST BLUE 128
BRIGHT
INPUT DEVICE
128
DEFAULT
FRONT VIEW
REMOTE OSD ON / OFF
REMOTE TYPE
ON
ALPINE
MEMORY OK 0x807f807f
CONTRAST RED 128
AV2 (DTV)
MEMORY UP 0x807f807f
MEMORY MENU 0x807f807f
DTV
MEMORY DOWN 0x807f807f
MEMORY EXIT 0x807f807f
DVD
MEMORY LEFT 0x807f807f
MEMORY ETC1 0x807f807f
EXIT
MEMORY RIGHT 0x807f807f
MEMORY ETC2 0x807f807f
1
2
3
4
5
6
7
8
9

NBA
NAVIGATION CONTRAST GREEN 128
INPUT SOURCE AVM ( AROUND VIEW)
----------
----------
HDMI
REAR VIEW CONTRAST BLUE 128
BRIGHT 128
FRONT VIEW AVM KEEPING TIME R → D 7 Sec
CONTRAST RED 128
DTV AVM KEEPING TIME P → D 7 Sec
DVD PGS ON / OFF OFF
CUSTOM PGS - HORIZONTAL 128
EXIT PGS - VERTICAL 128
NBA
NAVIGATION CONTRAST GREEN
INPUT SOURCE OEM CAMERA
----------
----------
HDMI
REAR VIEW CONTRAST BLUE
BRIGHT AVM (AROUND VIEW)
FRONT VIEW
CONTRAST RED EXTERNAL CAMERA
DTV
DVD
CUSTOM
EXIT
REAR VIEW INPUT - OEM CAMERA
REAR VIEW INPUT - AVM
- INPUT SOURCE
· OEM CAMERA
· AVM ( 360° Around View Camera )
· EXTERNAL CAMERA
- BRIGHT and CONTRAST
Adjust the values of brightness and contrast
- PGS (Parking Guide System)
· Adjust position of parking guide lines and
select the lines ‘ON or OFF’.
- AVM KEEPING TIME
· When you shift gear ‘from reverse to drive’ or ‘from parking to drive’,
it just works automatically during the activation time you selected.
- BRIGHT and CONTRAST
Adjust the values of brightness and contrast
Settings

NBA
NAVIGATION CONTRAST GREEN 128
INPUT SOURCE EXTERNAL CAMERA
HDMI
----------
----------
REAR VIEW CONTRAST BLUE 128
BRIGHT 128
FRONT VIEW PGS ON / OFF OFF
CONTRAST RED 128
DTV PGS - HORIZONTAL 128
DVD PGS - VERTICAL 128
CUSTOM
EXIT
REAR VIEW INPUT - EXTERNAL CAMERA
- BRIGHT and CONTRAST
Adjust the values of brightness and contrast
- PGS (Parking Guide System)
· Adjust position of parking guide lines and
select the lines ‘ON or OFF’.
Settings

NBA
NAVIGATION CONTRAST GREEN 128
INPUT SOURCE EXTERNAL CAMERA
----------
----------
HDMI
REAR VIEW CONTRAST BLUE 128
BRIGHT 128
FRONT VIEW
CONTRAST RED 128
DTV
DVD
CUSTOM
EXIT
AV1 (FRONT VIEW INPUT ) - EXTERNAL CAMERA
NBA
NAVIGATION
INPUT SOURCE OEM CAMERA
----------
----------
HDMI
REAR VIEW
CAM KEEPING TIME R → D
7 Sec
7 Sec
FRONT VIEW
CAM KEEPING TIME P → D
7 Sec
7 Sec
DTV
DVD
CUSTOM
EXIT
FRONT VIEW INPUT - OEM CAMERA
- CAM KEEPING TIME
Settings
· When you shift gear ‘from reverse to drive’ or ‘from parking to drive’,
it just works automatically during the activation time you selected.
- BRIGHT and CONTRAST
Adjust the values of brightness and contrast
- FRONT CAM KEEPING TIME
· When you shift gear ‘from reverse to drive’ or ‘from parking to drive’,
it just works automatically during the activation time you selected.

128
128
128
7 Sec
7 Sec
CONTRAST GREEN
CONTRAST BLUE
CONTRAST RED
CAM KEEPING TIME R → D
CAM KEEPING TIME P → D
NBA
NAVIGATION
CONTRAST GREEN 128
----------
----------
HDMI
REAR VIEW
CONTRAST BLUE 128
BRIGHT 128
FRONT VIEW
REMOTE OSD ON / OFF ON
MEMORY OK 0x807f807f
CONTRAST RED 128
DTV MEMORY UP
REMOTE TYPE
0x807f807f
ALPINE
MEMORY MENU 0x807f807f
DVD MEMORY DOWN 0x807f807f
MEMORY EXIT 0x807f807f
CUSTOM MEMORY LEFT 0x807f807f
MEMORY ETC1 0x807f807f
EXIT MEMORY RIGHT 0x807f807f
MEMORY ETC2 0x807f807f
1
2
3
4
5
6
7
8
9
DTV , DVD
- REMOTE OSD ON / OFF
· You can control to some of function on DTV remote control by OSD UI
- BRIGHT and CONTRAST
Adjust the values of brightness and contrast
Settings
- REMOTE TYPE
· ALPINE · HIT7700· GEX909DTV
NBA
NAVIGATION
TOUCH SEL ANDROID
----------
----------
HDMI
REAR VIEW
FIRST SCREEN OEM
FRONT VIEW
DTV
DVD
CUSTOM
EXIT
CUSTOM
- First Screen "ANDROID"
It will be changed to android screen in 5 sec automatically
When turn the key to ACC

This manual suits for next models
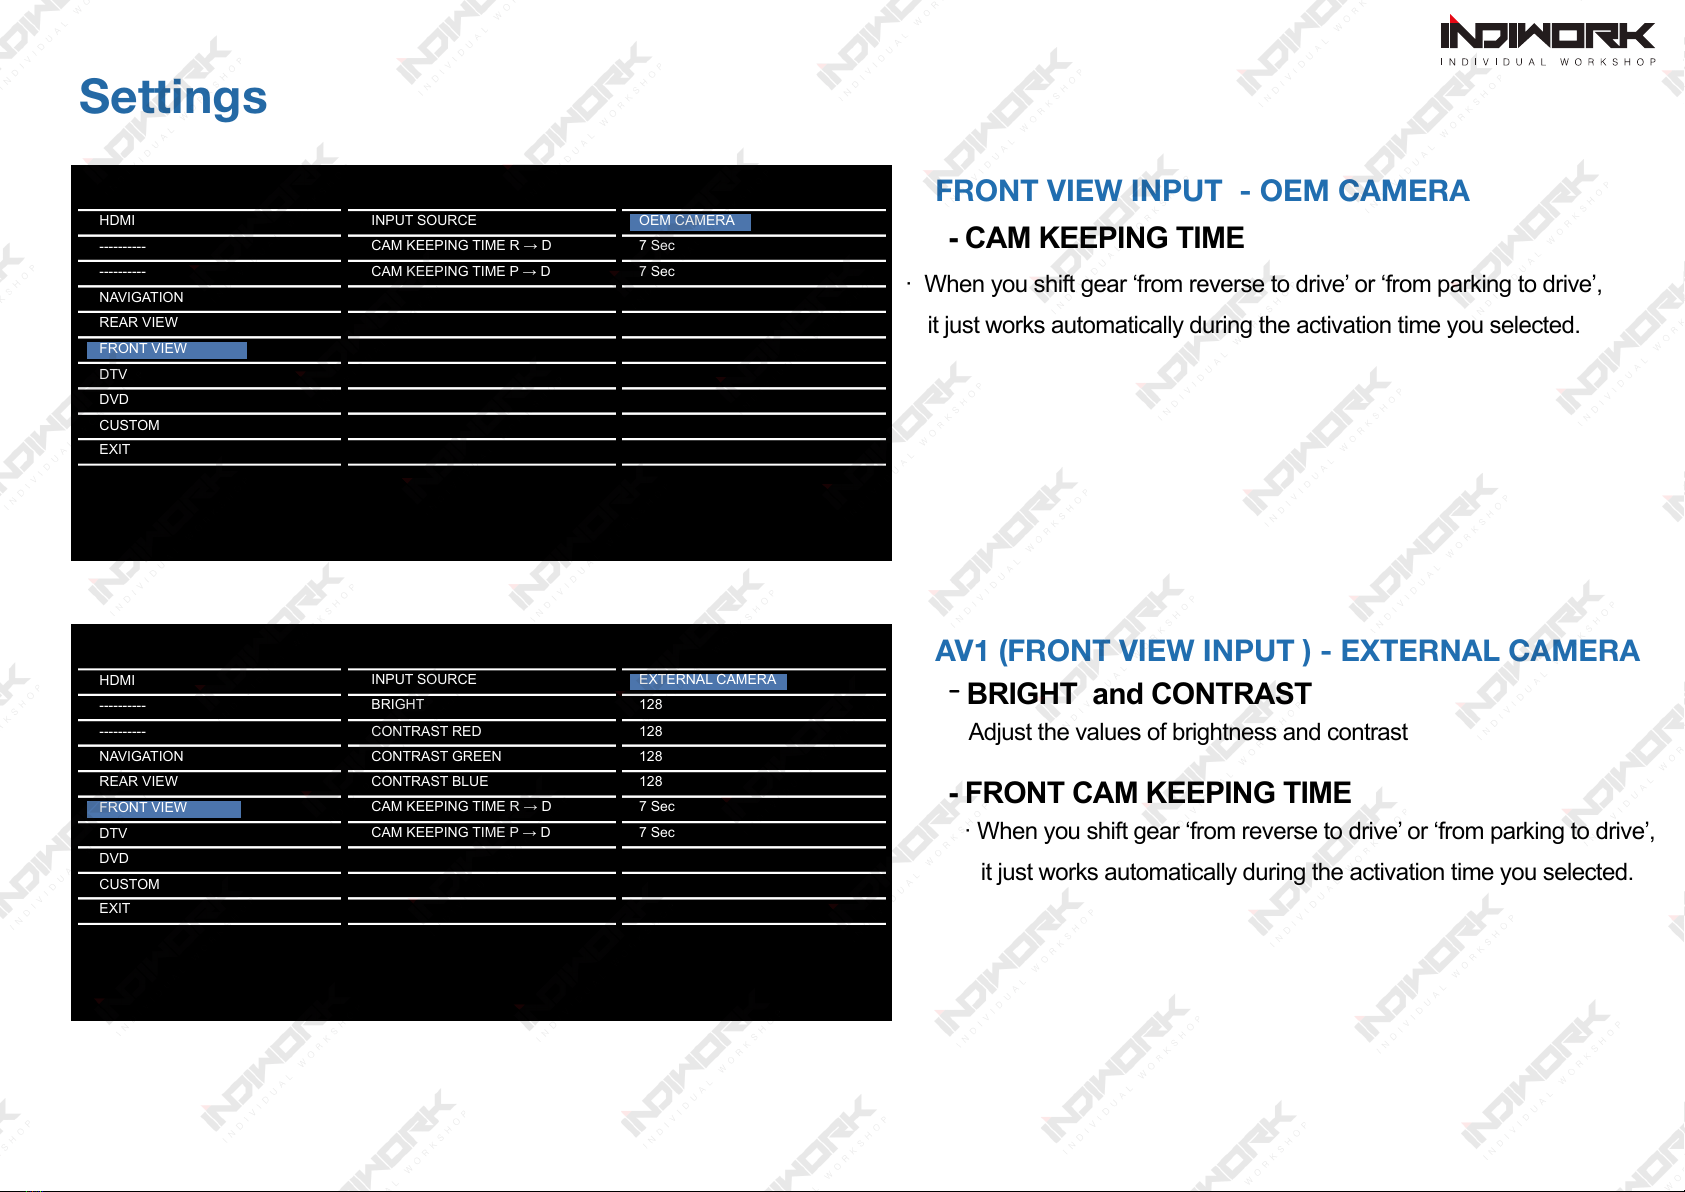
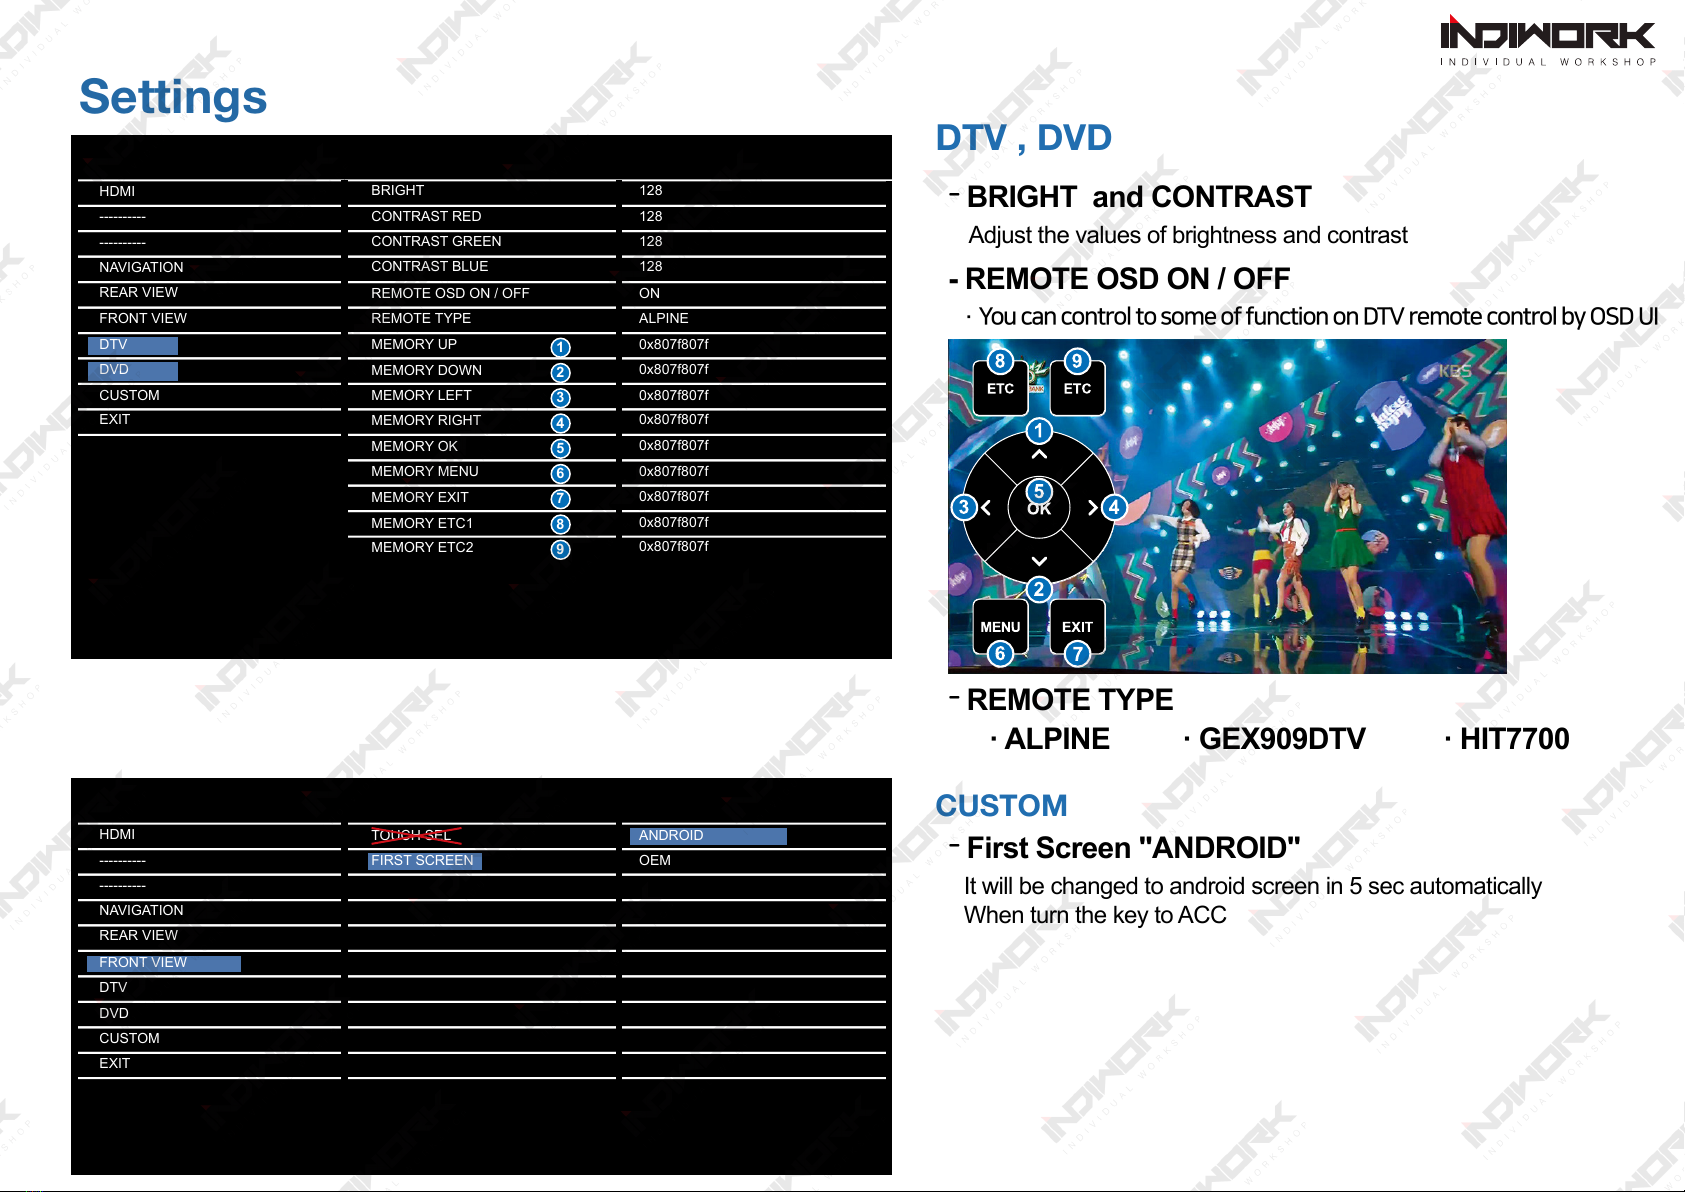
1
Table of contents
Other INDIWORK Automobile Accessories manuals

INDIWORK
INDIWORK IW04VW User manual

INDIWORK
INDIWORK A-LINK2-Volvo User manual

INDIWORK
INDIWORK BMW Easy Access User manual

INDIWORK
INDIWORK BMW Easy Access User manual

INDIWORK
INDIWORK IW-EVO5-N23 User manual

INDIWORK
INDIWORK IW-NTG55-N23 User manual

INDIWORK
INDIWORK IW04A-N User manual

INDIWORK
INDIWORK IW04A-4G User manual

INDIWORK
INDIWORK A-LINK HD NTG5.5 User manual

INDIWORK
INDIWORK IW03LX User manual