InfoPrint 6700 Series User manual

InfoPrint 6700 Series Thermal Printer
G550-0979-03
TGLTM Programmer’s Reference Manual


InfoPrint 6700 Series Thermal Printer
G550-0979-03
TGLTM Programmer’s Reference Manual

Fourth Edition (January 2010)
This edition applies to the InfoPrint 6700 Series Thermal Printer and replaces the following
publication:
InfoPrint 6700 Series Thermal Printer: TGLTM Programmer’s Reference Manual,
G550-0979-02.
You can send comments by e-mail to printpub@infoprint.com or by mail to:
InfoPrint Solutions Company, LLC
6300 Diagonal Hwy 002J
Boulder, CO 80301-9270
U.S.A.
This product is or contains commercial computer software and commercial computer software
documentation developed exclusively at private expense. As specified in Federal Acquisition
Regulation 12.212 in the case of civilian agencies and Defense Federal Acquisition Regulation
Supplement 227.7202 in the case of military agencies, use, duplication and disclosure by agencies
of the U.S. Government shall solely be in accordance with the accompanying International
Program License Agreement in case of software products and in accordance with the licensing
terms specified in the product’s documentation in the case of hardware products.
© Copyright InfoPrint Solutions Company 2007, 2010. All rights reserved.
Before using this information and the product it supports, read the information in “Notices” on
page 33.
Note!
Visit our home page at: http://www.infoprint.com
Internet

1 Introduction ........................................................... 7
About This Manual................................................................................. 7
TGL SETUP Menu................................................................................. 8
TGL SETUP Submenus .................................................................. 9
Active ........................................................................................ 9
Character Set............................................................................ 9
Slash Zero ................................................................................ 9
Image Scale.............................................................................. 9
SFCC Select ............................................................................. 9
SFCC ........................................................................................ 9
SFCC Separator ..................................................................... 10
SFCC Terminator.................................................................... 10
EURO Symbol ........................................................................ 10
Speed CMDs .......................................................................... 10
AY Intensity CMD ................................................................... 10
U1/U2 Move CMDs................................................................. 10
XS Sensor Param ................................................................... 11
XS Media ‘C’ Act..................................................................... 11
XS Media ‘D’ Act..................................................................... 11
AR Pre-Feed CMD.................................................................. 11
AX Fine Adj. CMD................................................................... 11
Page Alignment ...................................................................... 12
Vert. DPI Adjust ...................................................................... 12
Status Response .................................................................... 12
2 Fully Supported Commands ............................... 13
AR – Pre-Feed........................................................................ 13
AX – Position Fine Adjustment ............................................... 13
AY – Print Density Fine Adjustment........................................ 13
C – Image Buffer Clear ........................................................... 13
D – Label Size Set .................................................................. 13
D..E – Label Length Set.......................................................... 13
IB – Eject ................................................................................ 13
J1 – Flash Format................................................................... 13
LC – Line Format .................................................................... 14
PC – Bitmap Font Format ....................................................... 14
Table of Contents

Table of Contents
PV – Outline Font Format ....................................................... 15
RB / rB – Barcode Data .......................................................... 15
RC / rC – Bitmap Font Data.................................................... 16
RV / rV – Outline Font Data .................................................... 16
SG – Graphic .......................................................................... 16
SG0 / SG1 – Graphic.............................................................. 16
T – Feed ................................................................................. 16
U1 / U2 – Forward/Reverse Feed........................................... 16
WS – Status Request Command............................................ 17
XB – Barcode Format ............................................................. 17
XD – Bitmap Writable Character............................................. 18
XJ – Message Display ............................................................ 18
XO – Save Start...................................................................... 19
XP – Save Terminate.............................................................. 19
XQ – Saved Data Call............................................................. 19
XR – Clear Area...................................................................... 19
XS – Issue .............................................................................. 19
i / iN – Issue ............................................................................ 19
3 Ignored Commands............................................. 21
HD – Head Broken Dots Check .............................................. 21
RM – Ribbon Motor Drive Voltage Adjust ............................... 21
WR – Reset ............................................................................ 21
WS – Status Request ............................................................. 21
4 Command Enhancements And Differences ........ 23
J1 – Flash Format................................................................... 23
~LI – Listen Mode ................................................................... 23
T – Feed ................................................................................. 23
XB – Barcode.......................................................................... 23
XS – Issue .............................................................................. 23
~QU – Quiet Mode.................................................................. 23
A TGL Menu Conversions ...................................... 25
B Status Response................................................. 29
Serial And Ethernet Interface............................................................... 29
Notices ................................................................ 33

7
1Introduction
About This Manual
This manual explains the differences between the Printer Protocol Interpreter
TEC®Graphic Language (TGL) Utility and the TEC printer language. If you
have a 6700 printer use this manual with your
InfoPrint 6700 User’s Manual
for complete printer-protocol operation. If you have a 6700-M40 printer use
this manual with your
InfoPrint 6700-M40 User’s Manual
.
Subtle enhancements to the 6700 printer (models 5504-Rxx) were made in
late 2009. Printers manufactured prior to this date are referred to as "older
6700 printers" throughout this manual. Older 6700 printers do not have the
letter "J" as the third character in the printer's serial number.
NOTE: When substituting a TEC B-470/870 model printer with a 6700 or
6700-M40 printer, refer to TGL Menu Conversions on page 25.
8
Chapter 1 TGL SETUP Menu
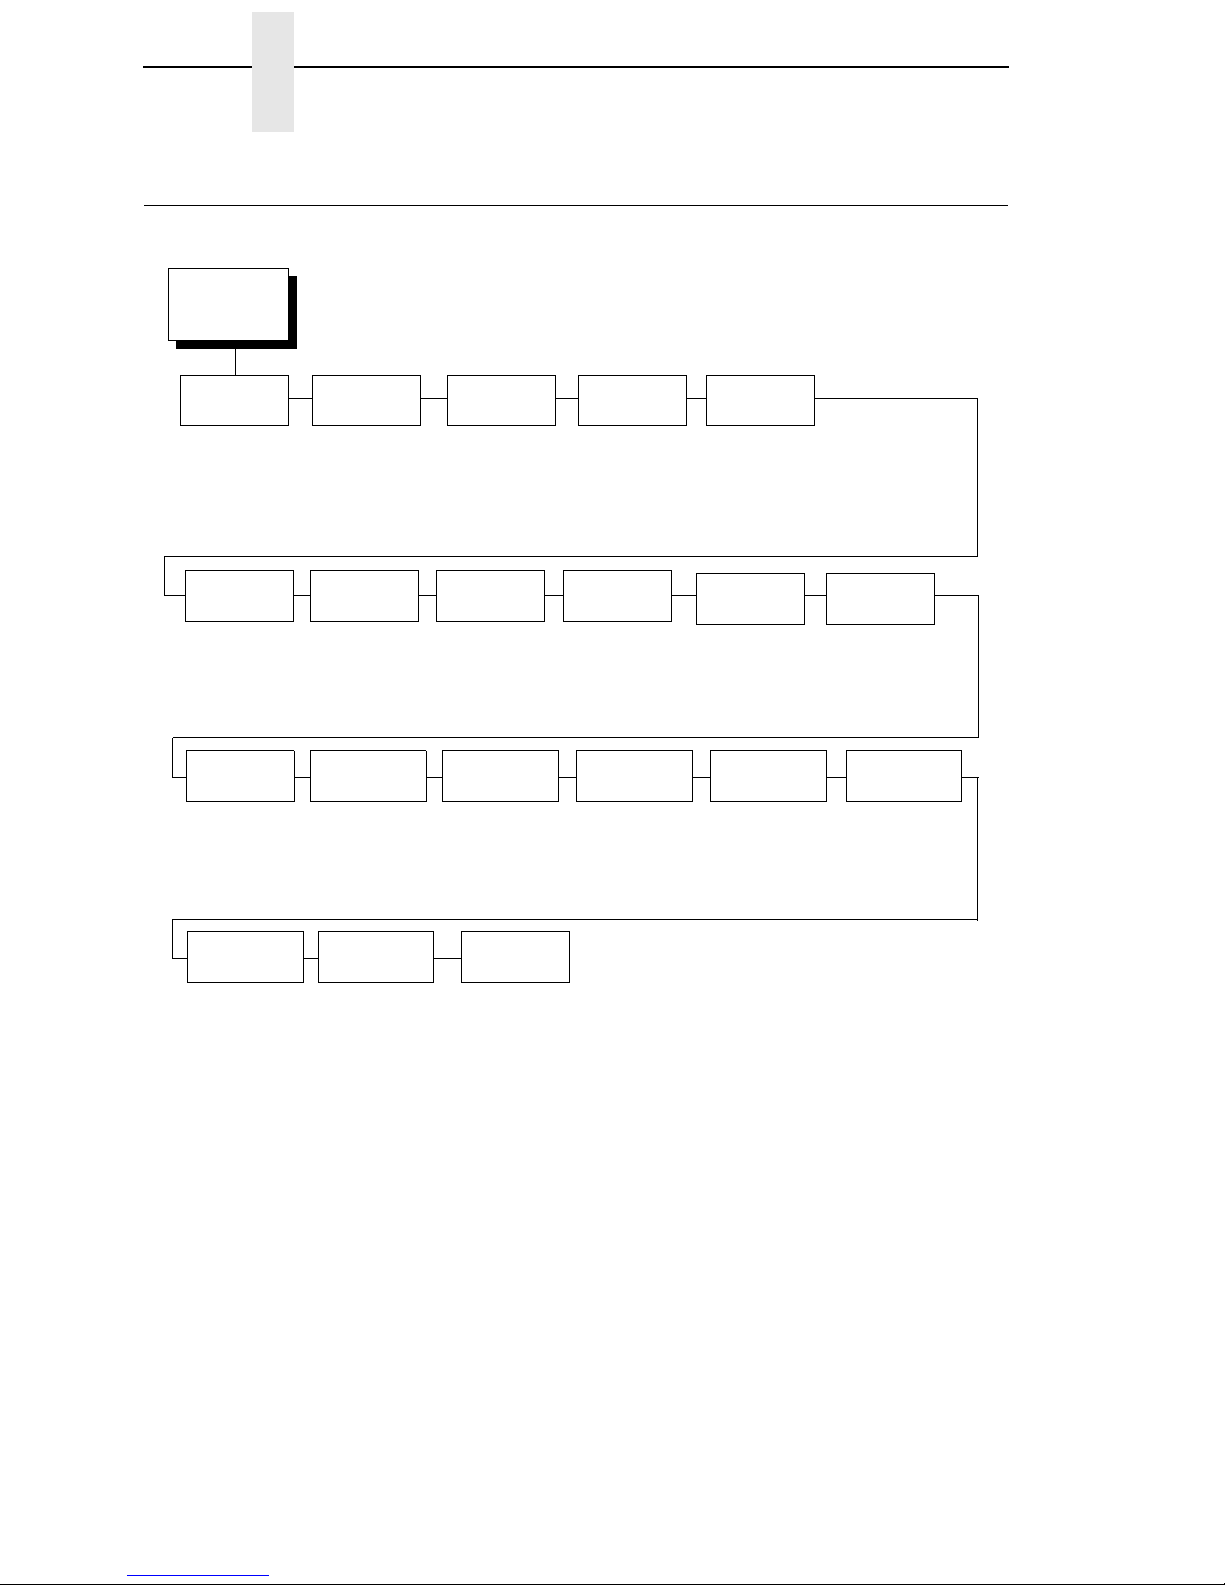
TGL SETUP Menu
TGL SETUP 1
Active Character
Set
Yes*
No
PC-850*
PC-8
8859-2 Latin 2
Slash Zero
Disable*
Enable
Image
Scale
Disable*
Enable
SFCC
Select
Auto Select*
<ESC><LF><NULL>
{|}
User Defined
SFCC 2
0x7B*
0x0 - 0xFF
SFCC
Separator 2
0x7C*
0x0 - 0xFF
SFCC
Terminator 2
0x7D*
0x0 - 0xFF
Euro
Symbol
0xB0*
0x20 - 0xFF
Speed
CMDs
Process*
Ignore
AY Intensity
CMD
Process*
Ignore
U1/U2 Move
CMDs
Process*
Ignore
XS Sensor
Param
Process*
Ignore
XS Media
‘C’ Act
Continuous*
Tear-Off Strip
Tear Off 4
Peel Off
Ignore
XS Media
‘D’ Act
Tear Off* 4, 5
Peel Off
Ignore
Continuous
Tear-Off Strip 6
Page
Alignment
Center*
Left
Right
Vert. DPI
Adjust 5
0*
-100 to 100
Status
Response
Disable*
On Request Only
On Request+Auto
AR Pre-Feed
CMD
Process*
Ignore
AX Fine Adj.
CMD
Process*
Ignore
Notes:
* = Default
For 6700 printers, italicized items are available only when you
enable Admin User in the PRINTER CONTROL menu.
For 6700-M40 printers, the TGL Setup Menu is available only
when you enable Admin User in the PRINTER SETUP menu.
1
When substituting a TEC B-470/870 model printer with a
6700 printer, refer to the menu conversion in Appendix F.
2These menus are available only when you select User
Defined in the SFCC Select menu.
3Available for 6700-M40 printers only.
4Available for 6700 printers only.
5Default option on 6700 printers.
6Default option on 6700-M40 printers.

TGL SETUP Submenus
9
TGL SETUP Submenus
Active
•Yes (default). When enabled, all data is parsed by the TGL emulation.
Non-TGL data is absorbed.
•No. When disabled, non-TGL text data prints.
Character Set
Selects the character set: either PC-850, PC-8, or 8859-2 Latin 2. The factory
default is PC-850.
Slash Zero
•Enable. When enabled, the zero character is overlaid with a slash
character.
•Disable (default). If disabled, the zero character does not have a slash
character.
Image Scale
•Enable. When enabled, images are scaled from TEC printer resolution
(306 dpi) to the resolution of the TGL printer (300 dpi).
•Disable (default). If disabled, scaling will not take place, resulting in
images that are 2% larger than images printed on the TEC printer.
Printing is faster though, and the image keeps the right proportions.
SFCC Select
Use this menu to select the SFCC, SFCC-Separator, and SFCC-Terminator
sets.
•Auto Select (default). The printer selects the SFCC set based upon the
received host data.
•<ESC><LF><NULL> is a predefined set. The ESC character is the
SFCC, the LF is the SFCC-Separator, and the NULL character is the
SFCC-Terminator.
•{ I } is a predefined set. The { character is the SFCC, the I is the SFCC-
Separator, and the } character is the SFCC-Terminator.
•User Defined. When you select User Defined, three additional menus
appear in the tree. These menus allow the SFCC, SFCC-Separator, and
SFCC-Terminator to be configured individually.
SFCC
This menu is only present when “User Defined” is selected in the SFCC
menu. Using this menu, the SFCC can be set to any value between 0x0 and
0xFF. The factory default is 0x7B.

10
Chapter 1 TGL SETUP Menu
SFCC Separator
This menu is only present when “User Defined” is selected in the SFCC
menu. SFCC-Separator can be set to any value between 0x0 and 0xFF. The
factory default is 0x7C.
SFCC Terminator
This menu is only present when “User Defined” is selected in the SFCC
menu. SFCC-Terminator can be set to any value between 0x0 and 0xFF.
The factory default is 0x7D.
EURO Symbol
This menu allows you to configure the position of the EURO symbol in the
code pages. EURO Symbol can be set to any value between 0x20 and 0xFF.
The factory default is 0xB0.
Speed CMDs
This option allows you to choose whether the engine commands that affect
the print/feed speed should be processed or ignored. To adjust the print/feed
speed through the front panel, use this menu to prevent the host commands
from overriding these settings. When you select “Ignore,” TGL ignores the
following commands or command parameters:
•The print speed parameter in the XS command. The parameter will have
no effect; the “Print Speed” value as configured in the “MEDIA
CONTROL” menu will be used.
•The feed speed parameter in the T command. The parameter will have no
effect; the “Slew Speed” value as configured in the “MEDIA CONTROL”
menu will be used.
The factory default is Process.
AY Intensity CMD
This option allows you to choose whether the engine command to set the print
intensity (AY) should be processed or ignored. If you want to adjust the print
intensity through the front panel, use this menu to prevent the host commands
from overriding these settings. When you select “Ignore,” the AY command
will be ignored and “Print Intensity” as configured in the “MEDIA CONTROL”
menu will be used.
The factory default is Process.
U1/U2 Move CMDs
This option allows you to choose whether the engine command to move
paper forward (U1) or backward (U2) will be processed or ignored. When you
select “Ignore,” the paper will not be moved when either command is
received.
The factory default is Process.

TGL SETUP Submenus
11
XS Sensor Param
This option allows you to choose whether the sensor type parameter in the XS
command will be processed or ignored. When you select “Ignore” TGL will
use the sensor type as configured through “Gap/Mark Sensor” under the
“CALIBRATE CTRL” menu.
The factory default is Process.
XS Media ‘C’ Act
This option defines which media mode TGL will operate on receipt of a ‘C’
(strip mode) for the issue mode parameter in the XS command. Any of the
supported media modes can be selected. When you select “Ignore,” TGL will
use the issue mode as configured through “Media Handling” under the
“MEDIA CONTROL” menu.
The factory default is Continuous.
XS Media ‘D’ Act
This option defines which media mode TGL will operate on receipt of a ‘D’
(strip mode) for the issue mode parameter in the XS command. Any of the
supported media modes can be selected. When you select “Ignore,” TGL will
use the issue mode as configured through “Media Handling” under the
“MEDIA CONTROL” menu.
Tear-Off is the default for 6700 printers. Tear-Off Strip is the default for
6700-M40 printers.
AR Pre-Feed CMD
This option allows you to choose whether the engine command for a paper
pre-feed (AR) should be processed or ignored. When you select “Ignore,” the
paper will not pre-feed.
The factory default is Process.
AX Fine Adj. CMD
This option allows you to choose whether the engine command for a position
fine adjust (AX) should be processed or ignored. When you select “Ignore,”
the paper will not fine-adjust.
The factory default is Process.

12
Chapter 1 TGL SETUP Menu
Page Alignment
This menu is used to define the alignment of the image on the page. If set to
Center, the image will be centered on the page, using the page width set in
the configuration. For example, if the image is 4 inches wide, and the label
width is 6 inches, a 1 inch margin is applied to the left and right sides of the
image.
If set to Left the image will align to the left side. When the label is printed in
portrait mode (top of label comes out first), the left side is the right side of the
label when standing in front of the printer. If the label is printed in inverted
portrait mode (bottom of label comes out first), left is also the left side of the
label when standing in front of the printer.
If set to Right the image will align to the right side. When the label is printed in
portrait mode (top of label comes out first), the right side is the left side of the
label when standing in front of the printer. If the label is printed in inverted
portrait mode (bottom of label comes out first), right is also the right side of the
label when standing in front of the printer.
The factory default is Center.
Vert. DPI Adjust
NOTE: Applies to 6700-M40 and older 6700 printers only.
This option fine adjusts the resolution used to convert the coordinates of page
elements (barcodes, font fields, graphic images, lines and boxes). The
coordinates received from the host are in 1/10 mm and are converted to
engine resolution (203 or 300 dpi). In cases where the printed image length is
incorrect, the vertical resolution value TGL uses for calculations can be fine
adjusted between –100 and +100. Negative values result in a lower DPI value
and thus a longer image. Positive values result in a higher DPI value and thus
a shorter image. Note that this adjustment does not affect the size of fonts
and barcodes, only the coordinates.
The factory default is 0.
Status Response
This option selects when a status response is sent back to the host. This
menu contains the following options:
•Disable. No status response will be sent to the host.
•On Request Only. A status response is sent to the host only after
receiving the WS command.
•On Request+Auto. A status response is sent to the host after receiving
the WS command, or automatically when specific conditions are met.
See Appendix B on page 29 for details.
The factory default is Disable.
When this menu item is enabled (Set to 'On Request Only' or
'On Request+Auto'), IGP Windows Drivers cannot be utilized.
For 6700 printers, the TN Protocol cannot be utilized.

13
2Fully Supported
Commands
AR – Pre-Feed
This legacy command sets the feed length in successive mode.
AX – Position Fine Adjustment
This command configures the feed, cut/strip, and back feed distances.
AY – Print Density Fine Adjustment
This command adjusts the print density.
C – Image Buffer Clear
This command clears the image buffer.
D – Label Size Set
This command defines the pitch, effective print width, and effective print
length of a label in 1/10 mm units. Any label printed on continuous media will
move the pitch length of media.
D..E – Label Length Set
This legacy command defines the pitch and gap length of a label in 1/10 mm
units. It does not define the label width. Any label printed on continuous media
will move the pitch length of media.
IB – Eject
This command ejects the current label.
J1 – Flash Format
This command formats the sections in flash memory where the host data
(through XO, XP commands) or bitmap graphic characters (through XD
command) are stored.
14
Chapter 2
LC – Line Format
Using this command, lines or squares can be drawn in the drawing space.
Coordinates are specified in 1/10 mm units. Squares can have rounded
corners. If the radius is set higher than the square width and height, circles
can be drawn.
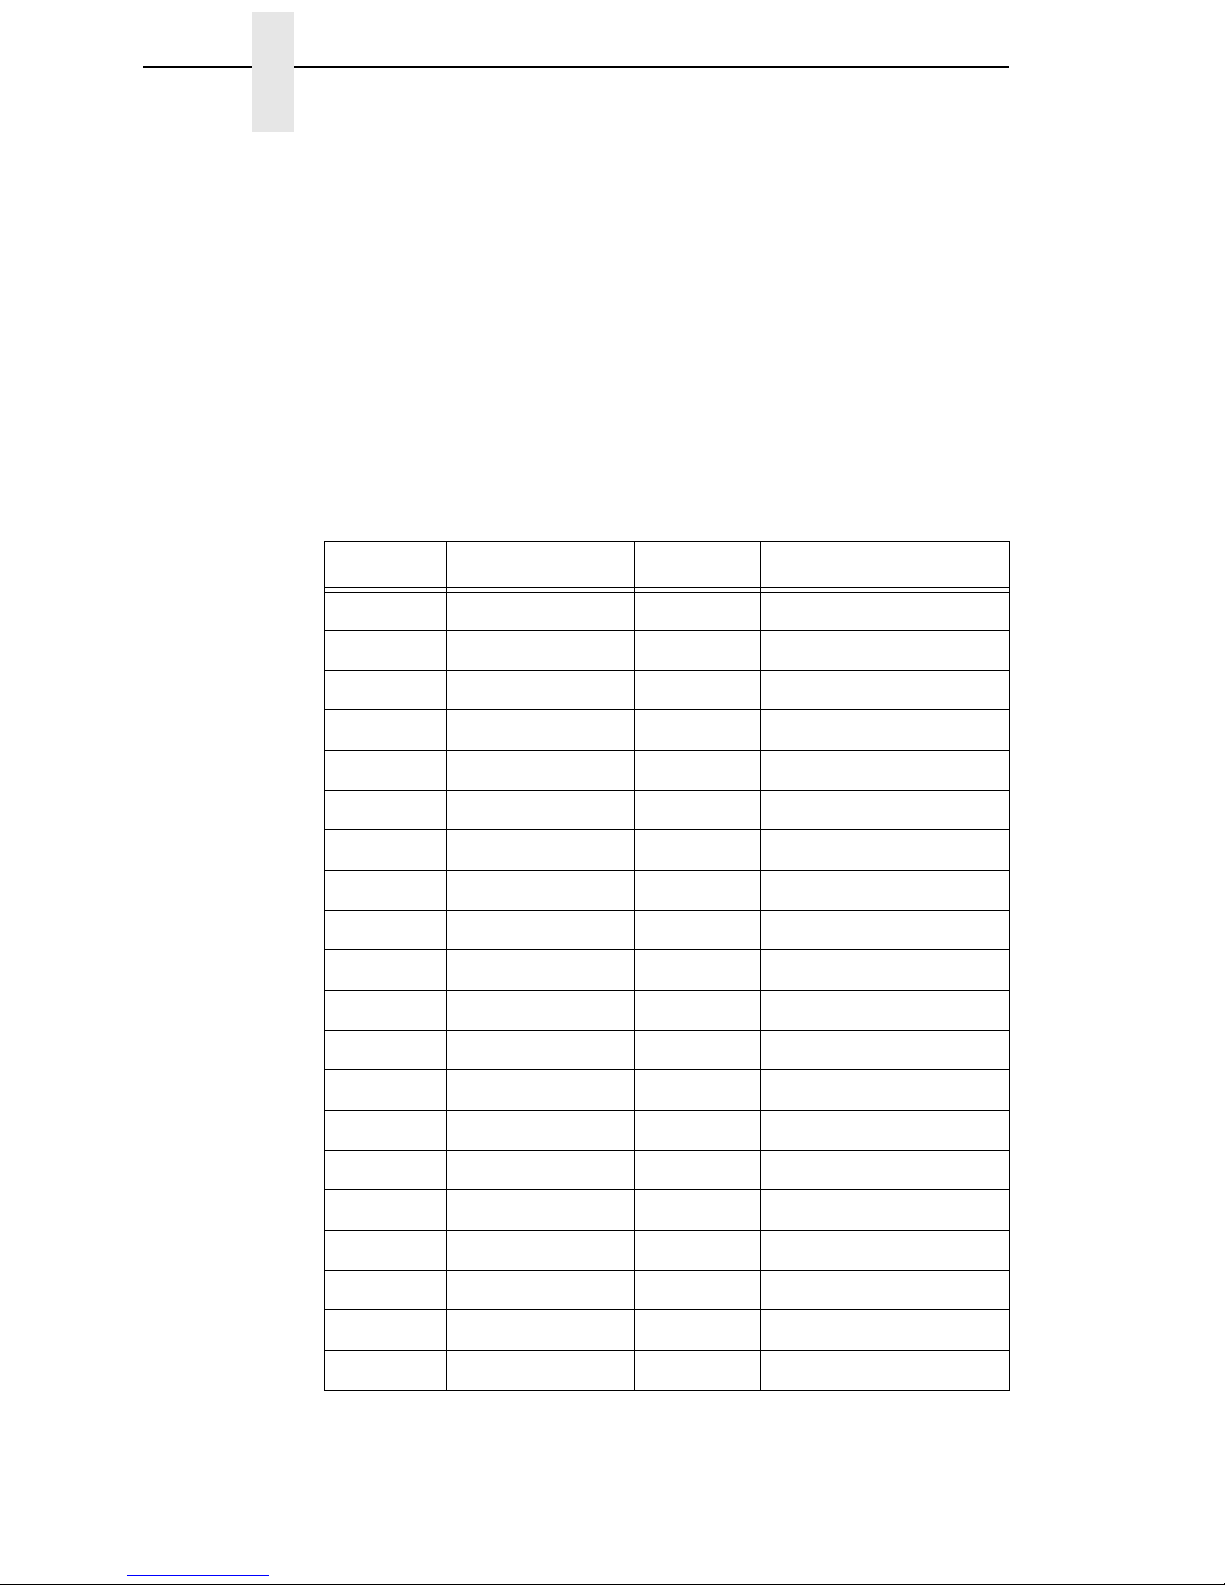
PC – Bitmap Font Format
This command formats bitmap font fields. The location coordinates are
specified in 1/10 mm units. The font type can be set to any of the types listed
in Table 1. Attributes like expansion and reverse can be applied. Data to be
printed can be included in this command or supplied separately through the
RC command.
Table 1.
Parameter Font Attributes Size
ATimes Roman medium 8 point
BTimes Roman medium 10 point
CTimes Roman bold 10 point
DTimes Roman bold 12 point
ETimes Roman bold 14 point
FTimes Roman italic 12 point
GHelvetica medium 6 point
HHelvetica medium 10 point
IHelvetica medium 12 point
JHelvetica bold 12 point
KHelvetica bold 14 point
LHelvetica italic 12 point
MPresentation bold 18 point
NLetter Gothic medium 9.5 point
OPrestige Elite medium 7 point
PPrestige Elite medium 10 point
QCourier medium 10 point
RCourier bold 12 point
SOCR-A 12 point
TOCR-B 12 point

15
PV – Outline Font Format
This command formats outline (scalable) font fields. The location coordinates
are specified in 1/10 mm units. The font type can be set to either a fixed pitch
or a proportional font. The fonts are printed at the configured size in 1/10 mm
units. Data to be printed can be included in this command or supplied
separately through the RV command.
If a scalable font with Font-ID H, I, or J (as supported on newer TEC printers)
is required, the font must be downloaded to the printer first. To ensure that the
size and pitch matches the output of TEC printers, the font must be bought at
www.myfonts.com, and converted to a download file using the cnvt2fls utility.
Use following table to select the correct font(s) and printer file name.
Usage of cnvt2fls utility: cnvt2fls file_name1 file_name2 file_name3 A FONT
<return>
file_name1: Input file name to be converted from
(the filename used by myfonts.com, e.g. tt0013m_.ttf )
file_name2: Output file name for file download
(download filename e.g. Dutch.dnl )
file_name3: Flash file name (as shown in table above, e.g. Dutch801.ttf )
hw_type: Specify A.
FONT: Optional, specify FONT.
Place the printer in download mode and send the converted file
(e.g. Dutch.dnl). The font will appear in the flash file system with the printer
name (e.g. Dutch801.ttf), and can be used through the PV command.
RB / rB – Barcode Data
This command supplies data for a barcode field configured by the XB
command. The data will replace the data supplied with the XB command or
with a preceding RB command.
01 ... 40 Writable char. 1 …
Writable char. 40
1 x 1 dot to 720 x 720
dots
FontID Font Name www.myfonts.com Flash File
HDutch 801 BT (OpenTtype TTF) Dutch801.ttf
IBrush 738 (OpenTtype TTF) Brush 738.ttf
JGothic 725 Black (OpenTtype TTF) Gothic725.ttf
Table 1. (continued)
Parameter Font Attributes Size

16
Chapter 2
RC / rC – Bitmap Font Data
This command supplies data for a bitmap font field configured by the PC
command. The data will replace the data supplied with the PC command or
with a preceding RC command.
RV / rV – Outline Font Data
This command supplies data for an outline font field configured by the PV
command. The data will replace the data supplied with the PV command or
with a preceding RV command.
SG – Graphic
This command is used to draw graphics. The location and size of the image
are specified in 1/10 mm units. Six modes are supported: Nibble mode
(Overwrite), Hex mode (Overwrite), Bitmap (.BMP) mode, Topix Compression
mode, Nibble mode (OR), and Hex mode (OR).
NOTE: A configuration setting (Scale Image) is provided to scale the images
drawn with this command in order to exactly match the size of images
on TEC printers (Scaling 306 > 300 dpi).
SG0 / SG1 – Graphic
These are two legacy commands that were supported on older TEC models.
The commands are used to draw graphics. The location of the image is
specified in 1/10 mm units. The size is specified in multiples of 8 dots. For
example, a width of 3 and a height of 2 will draw an image of 24 x 16 dots.
T – Feed
This command feeds one label of the size set by the D command. Parameters
specify the feed speed, sensor to be used, etc.
U1 / U2 – Forward/Reverse Feed
This command moves the media forward (U1) or reverse (U2) over the
specified distance in 1/10 mm units.
NOTE: For 6700-M40 printers, the Backward Feed is limited to a maximum of
1 inch. The valid range for this parameter on the 6700-M40 is
0030 to 0254 (in 0.1 mm units).

17
WS – Status Request Command
This command tells the printer to send its own status to the host computer.
The transmitted status is the current printer status, and indicates the latest
status only. The remaining count indicates the remaining batch count
currently being printed.
NOTE: The remaining batch count waiting to be printed is NOT transmitted.
Syntax: ESC WS LF NULL
Parameters:none
Response Format: See “Status Response” on page 12.
NOTE: The status request command is effective on serial (RS-232C) and
Ethernet interfaces only. Since the status cannot be sent via the
parallel interface (Centronics), this command is ignored.
After the code of the writable character command (XD) or the graphic
command (SG) is received, the status request command is not
processed until the printer receives the data type.
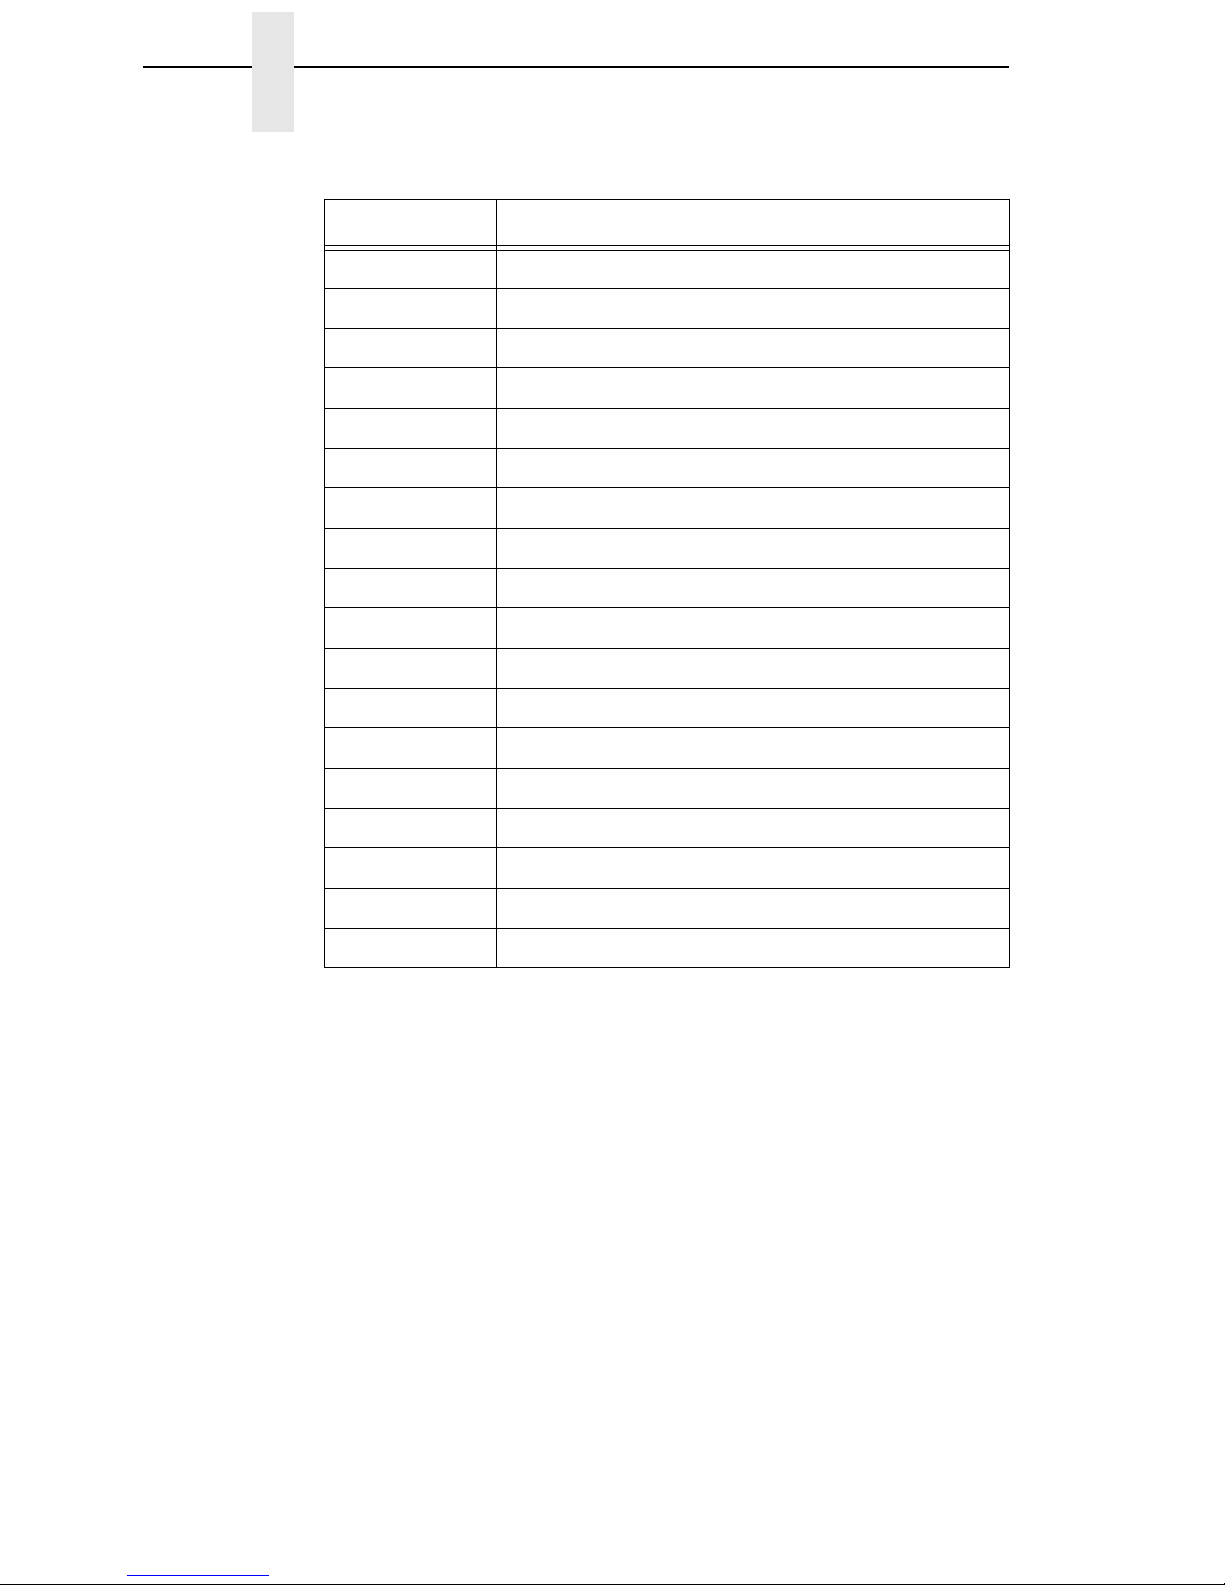
XB – Barcode Format
This command formats barcode fields. The location coordinates are specified
in 1/10 mm units. Many parameters of the barcode can be configured, like bar
and space widths, if and how the PDF must be printed, etc. The barcode
types listed in Table 2 can be printed. Data to be printed can be included in
this command or supplied separately through the RB command.
Table 2.
Parameter Type of Barcode
0JAN8, EAN8
1MSI
2Interleaved 2 of 5
3CODE39 (standard)
4NW7 (coda bar)
5JAN13, EAN13
6UPC-E
7EAN13 + 2 digits
8EAN13 + 5 digits
9CODE128 (with auto code selection)
ACODE128 (without auto code selection)
BCODE39 (full ASCII)
CCODE93
18
Chapter 2
XD – Bitmap Writable Character
This command downloads bitmap characters or logos into the flash memory
of the printer. User-defined character sets 01 to 40 have been reserved for
this. After downloading, the characters or logos can be printed through the
PC/RC commands.
XJ – Message Display
This command displays a message on the LCD of the printer’s front panel.
Since TEC printers have a 20-character display, and TGL printers have two
lines of 16 characters each, any text exceeding 16 characters is word
wrapped to the second line on the LCD. The message disappears when the
ONLINE key is pressed.
GUPC-E + 2 digits
HUPC-E + 5 digits
IEAN8 + 2 digits
JEAN8 + 5 digits
KUPC-A
LUPC-A+ 2 digits
MUPC-A + 5 digits
N UCC/EAN128
OIndustrial 2 of 5
PPDF417
QData Matrix
TQR
UPOSTNET (for US)
VRM4SCC (for UK)
WKIX CODE
XMicroPDF417
ZMaxicode
bRSS
Table 2. (continued)
Parameter Type of Barcode

19
XO – Save Start
After this command is received, all subsequent commands will be stored in a
file in flash memory until the save terminate command (XP) is received. The
ID in this command specifies the file name. The files can later be loaded from
flash and executed as host data using the XQ command.
XP – Save Terminate
This command terminates the saving of data into a file in flash memory.
Saving into a file is started through the XO command.
XQ – Saved Data Call
This command loads a saved file from flash memory and executes it as host
data. Files are saved in flash memory using the XO and XP commands.
XR – Clear Area
This command clears or inverts a specified area in the drawing space. The
area coordinates are specified in 1/10 mm units.
XS – Issue
This command prints the label. Several parameters are provided which
configure the print settings: speed, sensor type, and copy-count.
i / iN – Issue
This legacy command prints the label. If N is provided, a copy count can be
specified.

20
Chapter 2
Table of contents
Other InfoPrint Printer manuals

InfoPrint
InfoPrint 5504-R40 User manual

InfoPrint
InfoPrint G510-7276-00 User manual

InfoPrint
InfoPrint 6500 Series User manual

InfoPrint
InfoPrint 4247 Z03 Setup guide

InfoPrint
InfoPrint LQ-1600K User manual

InfoPrint
InfoPrint 4247 User manual

InfoPrint
InfoPrint 6500 Series User manual

InfoPrint
InfoPrint 6500 DBCS User manual

InfoPrint
InfoPrint 6500-v05 User manual


