Ingrasys D3010E User manual

D3010E
User’s Manual
Version 1.0

1
Table of Contents
Important Notices – Read Before Use ............................................................................2
Overview.........................................................................................................................2
Package Contents ............................................................................................................3
Installation.......................................................................................................................4
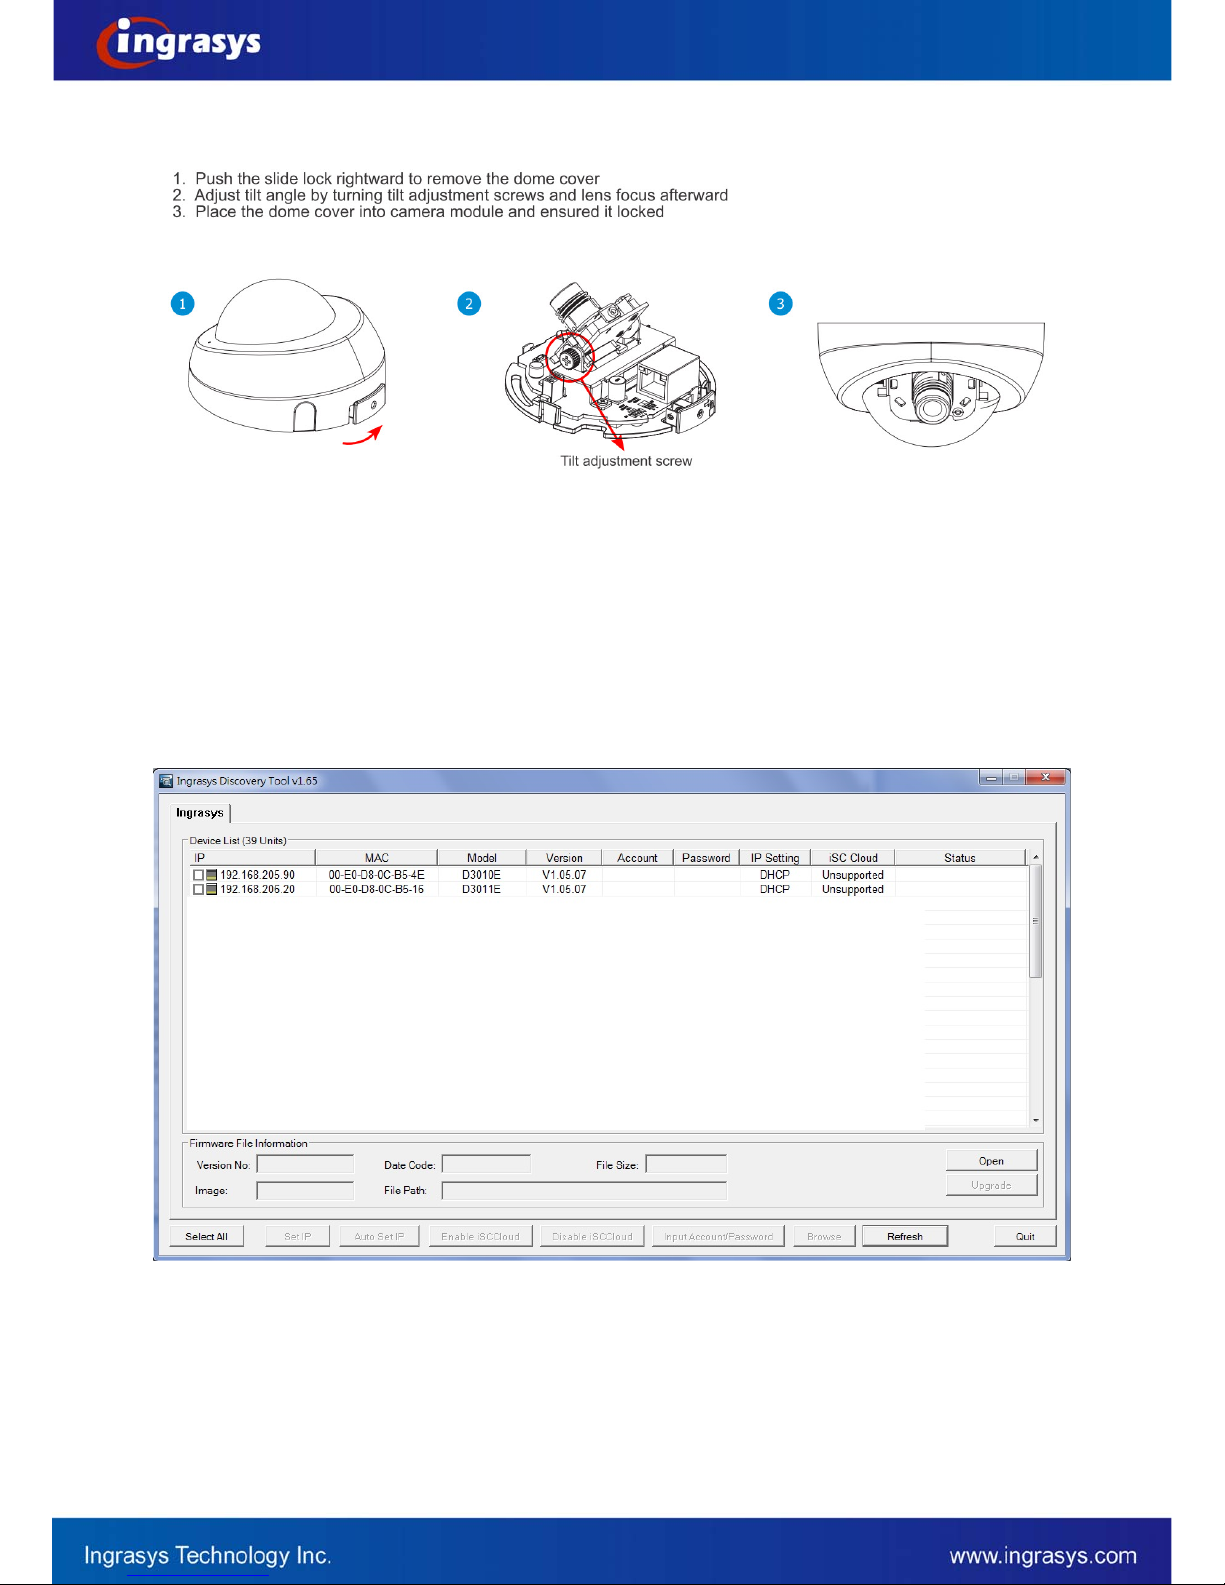
Hardware Installation.......................................................................................................................................................4
Software Installation........................................................................................................................................................5
Discover IP Cameras........................................................................................................................................................ 5
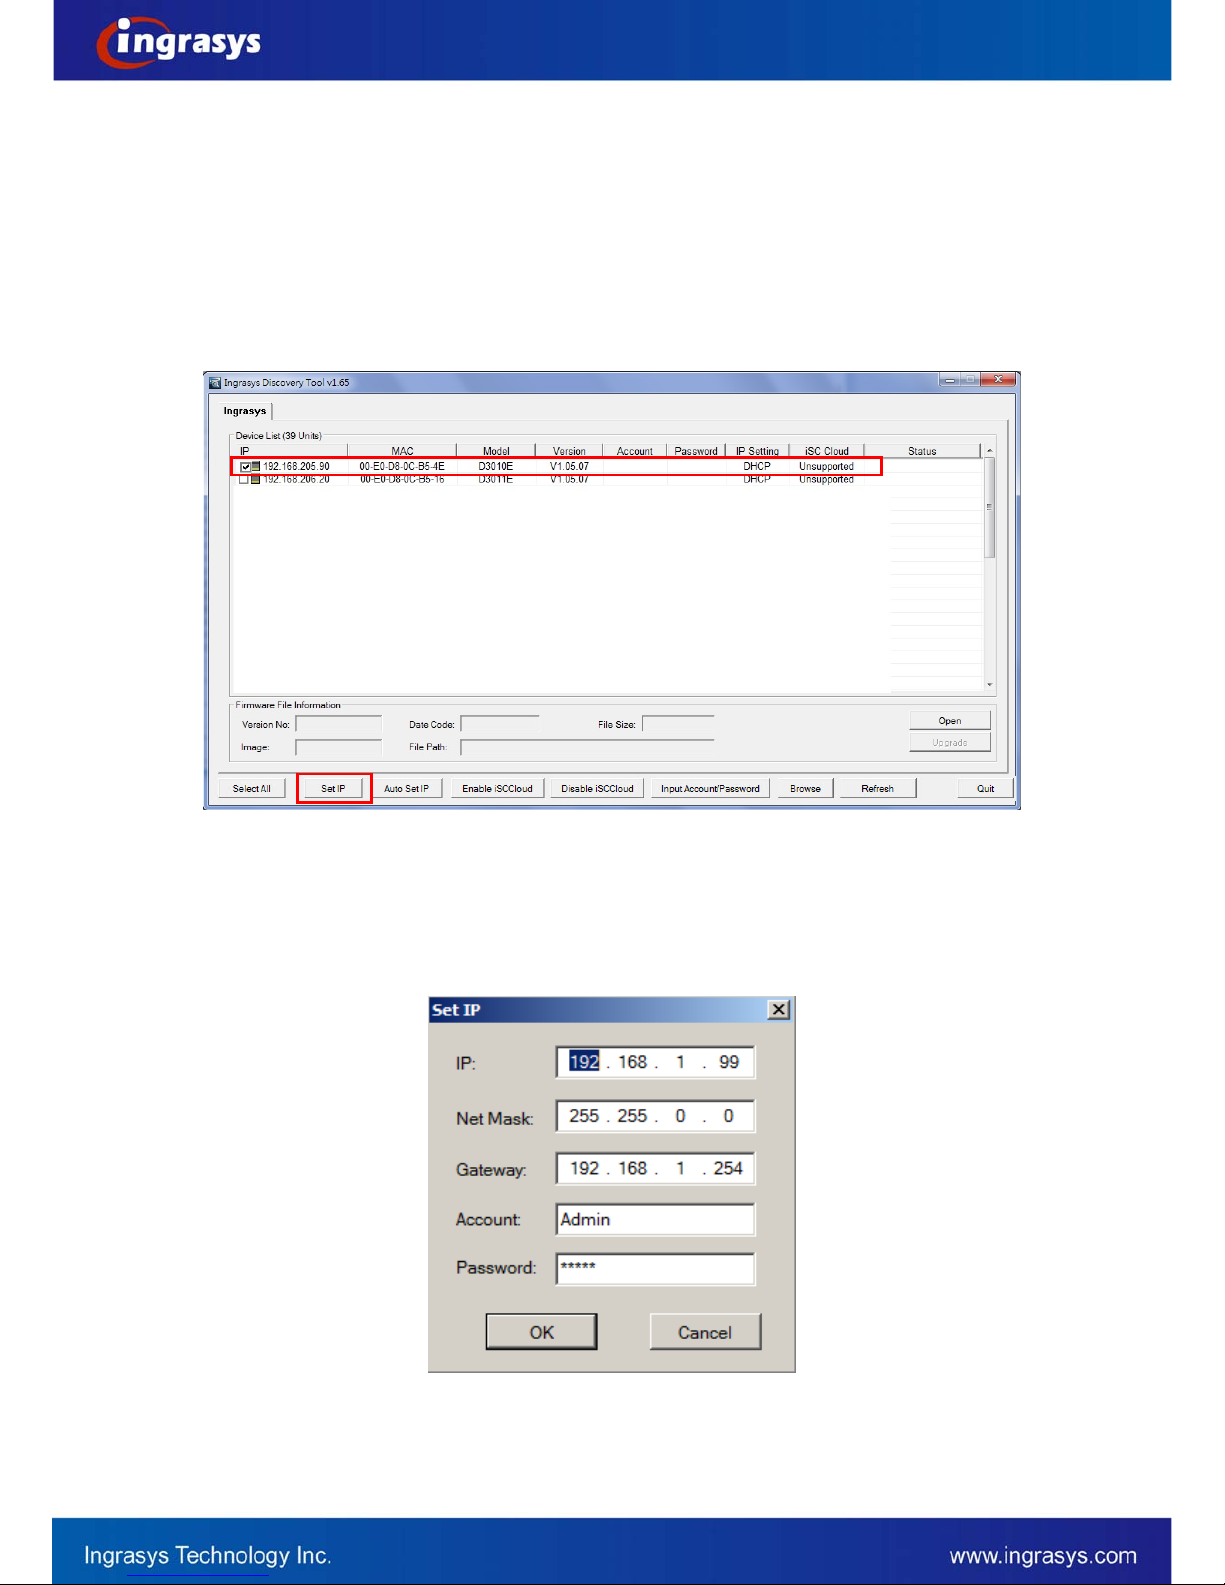
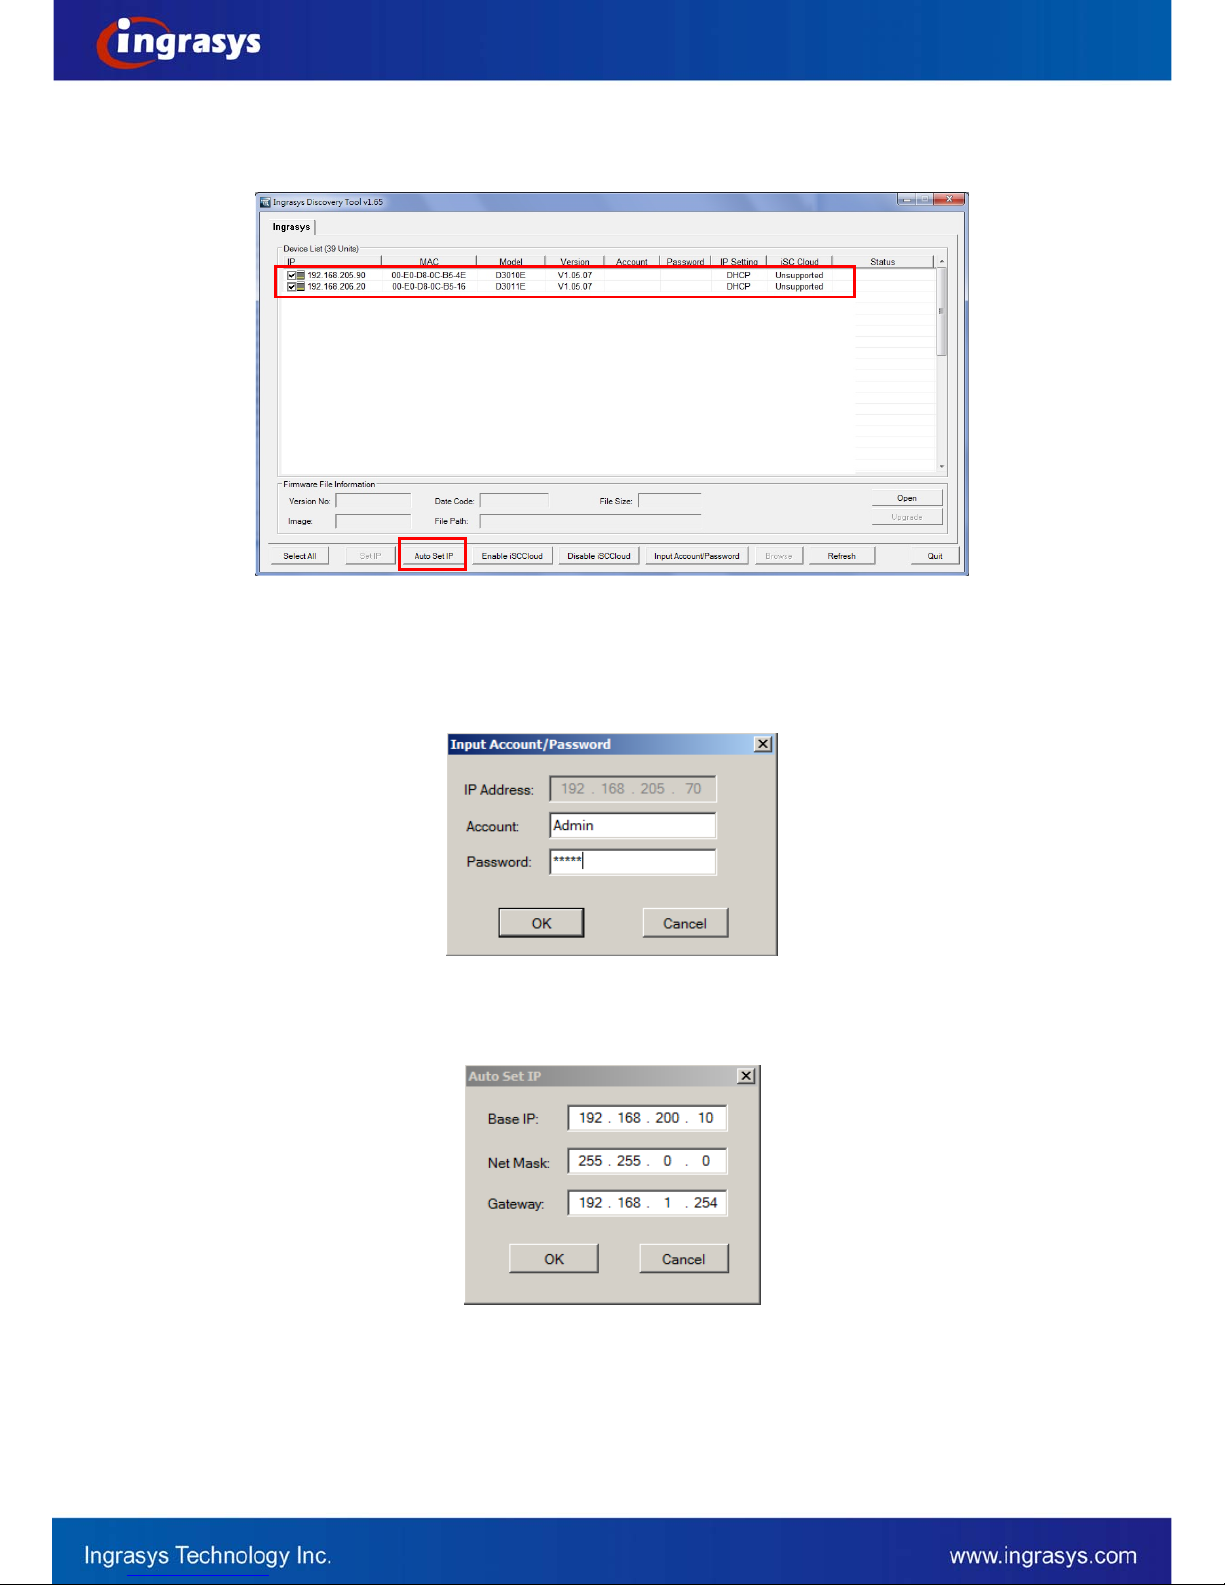
Assigning IP Address to the device .................................................................................................................................6
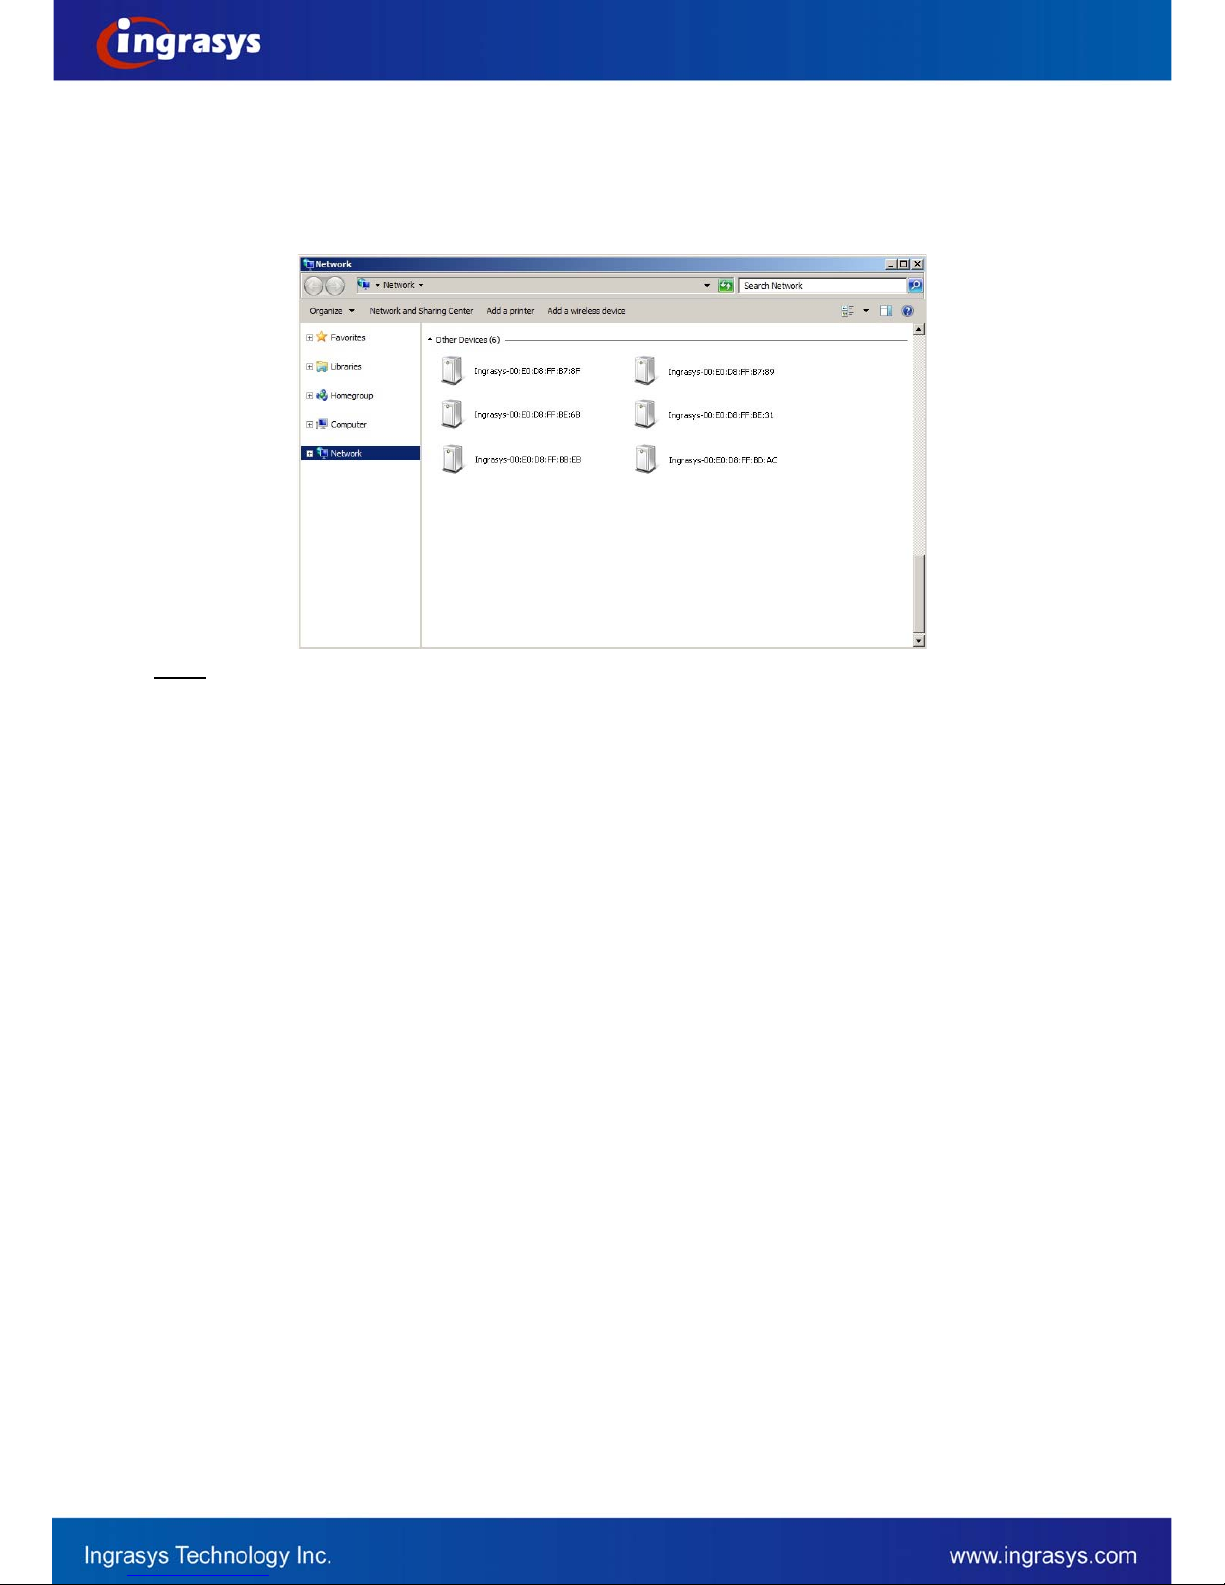
Discovering devices in Windows Network...................................................................................................................... 8
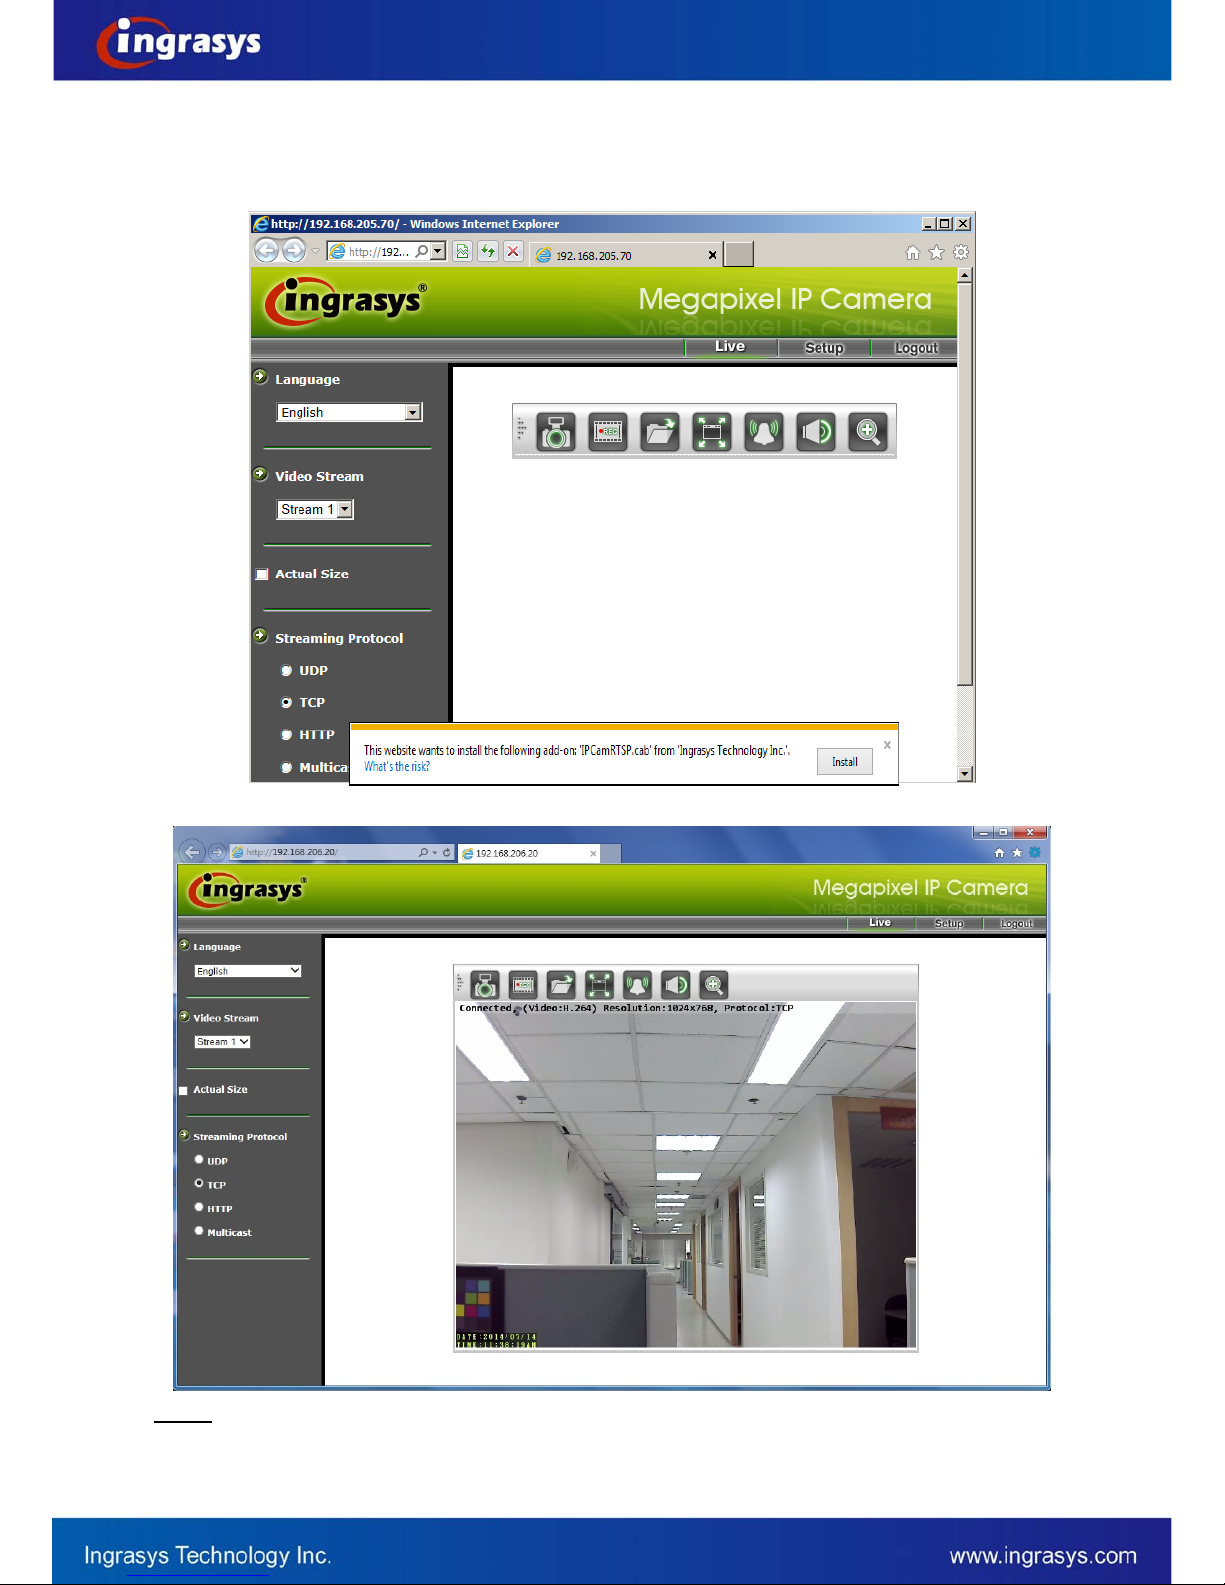
ActiveX add-on Installation.............................................................................................................................................9
Accessing the camera....................................................................................................11
Viewing the live video...................................................................................................................................................11
The Live view page........................................................................................................................................................13
Video & Audio..............................................................................................................15
Network Configuration .................................................................................................23
Recording......................................................................................................................28
Event Management........................................................................................................34
Configuration of Event Handling...................................................................................................................................34
Examples of Event Handling ......................................................................................................................................... 39
System Options .............................................................................................................42
Connectors & LED........................................................................................................46
Connectors..................................................................................................................................................................... 46
Schematic diagram of Digital I/O..................................................................................................................................46
LED Indicators...............................................................................................................................................................47
Troubleshooting ............................................................................................................48
Check firmware version.................................................................................................................................................48
Upgrade device firmware............................................................................................................................................... 48
Recover device settings..................................................................................................................................................50
Technical Specifications ...............................................................................................51

2
Important Notices
– Read Before Use
This instruction manual is intended for administrators and users of the Ingrasys D3010E IP Camera, including
instructions for using and managing the camera on your network. The use of video surveillance devices can
be prohibited by laws that vary from country to country. It is the user’s responsibility to ensure that the
operation of such devices is legal before installing this unit for surveillance purposes.
Heed all warnings
Before installing the IP Camera, please read and follow all the safety and operating instructions to avoid any
damages caused by faulty assembly and installation. The user must adhere to all the warnings on the product
and in this manual.
Liability
Every reasonable care has been taken in the preparation of this instruction manual. We cannot be held
responsible for any technical or typographical errors and reserves the right to make alterations to the product
and manuals without prior notice. We make no warranty of any kind with regard to the material contained
within this manual, including, but not limited to, the implied warranties of merchantability and fitness for a
particular purpose. The user should verify the relevant information is current and complete before placing
orders. All products are sold subject to our terms and conditions of sale at the time of order acknowledgement.
We shall not be liable nor responsible for the applications and resale of its products or bundled software with
statements different from or beyond the specification/parameters stated by us. We are under no obligation to
provide any further technical support service or product/software alteration beyond our representation.
Trademarks
All names used in this manual and products are probably registered trademarks of respective companies.
CE/FCC Statement (EMC)
This equipment has been tested and found to comply with the limits for a Class A digital device, pursuant to
Part 15 of the FCC Rules which are designed to provide reasonable protection against such interference
when the equipment is operated in a commercial environment. If the equipment is not installed and used in
accordance with the instruction, it generates, uses, and can radiate radio frequency energy which may cause
harmful interference to radio communications. Operation of this equipment in a residential area is likely to
cause interference, in which case the user at his/her own expense will be required to take whatever measures
may be required to correct the interference.
Overview
The D3010E is the compact size dome camera measuring only 90mm in diameter. This ultra mini dome
camera is built with PoE function design. With 3 steps setup makes installation easier and faster. Beside, the
D3010E supports various focal length to implement in different environment. With all of these traits, the
D3010E is the ideal solution to fulfill versatile needs for indoor application

3
Package Contents

4
Installation
Hardware Installation
Physical Description & Connection
Mounting the Camera

5
Tuning the Camera
Software Installation
Discover IP Cameras
Discovery Tool is a utility provided for not only searching and displaying the available IP cameras information
in a network but also managing the multiple networking settings such as static IP address assignment.
After completing the hardware installation, run ingrasysDiscovery.exe to search for the IP camera installed.

6
Assigning IP Address to the device
The steps of applying this search tool are described as below.
1. Launch IPCAM Discovery Tool (ingrasysDiscovery.exe)
2. Assign IP address
The selection is based on a single or multiple camera devices.
[Set IP]
This is applied to one specific camera selected from the Device List.
Step1: Select one specific camera device
Step2: Input desired IP information
The default settings of account /password are Admin / Admin. If that were been changed, please
enter the set values.

7
[Auto Set IP]
This is applied to a group of specific cameras selected from the Device List.
Step1: Select specific cameras
Step 2: Input Account / Password
The default account information is Admin/Admin. If the values have been re-set, please enter the set
values.
Step 3: Input IP information

8
Discovering devices in Windows Network
If the IP camera is installed in a network with DHCP and UPnP services, after obtaining an IP address from
DHCP server, it can then be discovered in “Windows Network” of a client PC, see figure below. The reason for
being automatically discovered is that the IP camera’s UPnP is default enabled (see Network
Network
Connectivity).
NOTE:
The term “Windows Network” in given figure above is used in Windows Vista / 7. It can be referred to Windows XP “My
Network Places” which possesses the same capability of discovering UPnP devices.
Right-click on the device and select “Properties”, the pop-up window shows all the information related to the
device, including the web access info. Use the web address to connect to the IP camera. Or simply double-
click on the selected device, which gets immediately access to the camera webpage.
To identify the camera from the listed devices in “Network”, utilize the UPnP name and the device’s MAC
address. This MAC address can be found on the label.

9
ActiveX add-on Installation
It is recommended to use Internet Explorer 8 or later as the primary browser to access the IP cameras website.
The first-time access to the camera webpage will be prompted to install the ActiveX. To allow the installation,
click “Install” on the message bar and follow the instructions to complete ActiveX installation.
When the installation is completed, IE browser can display the live video of the IP camera as the below figure.
NOTE:
If, however, there is not any prompted message or ActiveX cannot be installed at all, it is needed to
change the IE security level and settings.

10
<Example>
Internet Explorer 9: Internet Options Security Custom level
Ensure the “Download signed ActiveX controls” setting is either “Enable” or “Prompt” selected.

11
Accessing the camera
Viewing the live video
With the correct installation and IP settings, the camera device can be approached via network. There are
three ways to view the live video from the camera,
1. Internet Explorer
- Launch IE browser and input the IP address of the camera or
- Click on “Browse” button on the selected IP camera address from Ingrasys Discovery Tool.
OR

12
NOTE:
Ingrasys IP cameras also support the other web browsers for viewing the live video such as Firefox,
Google Chrome or Safari.
2. RTSP Player
The live video of the camera can be played with RTSP players, such as VLC or QuickTime.
The camera supports two simultaneous video streaming (see Video & Audio
Video Setting). To
gain access to the camera for each video stream, the RTSP URL will be required. The default paths
for the 3 streams are “stream1”, “stream2” and “stream3”. The URL format should be input as below.
Stream1: rtsp://Camera_IP/stream1
Stream2: rtsp://Camera_IP/stream2
Stream3: rtsp://Camera_IP/stream3
The example given below is the live video displayed with QuickTime player.
3. NVR / CMS Software
Ingrasys IP cameras are ONVIF conformant products. Most of ONVIF conformant NVR / CMS
software can retrieve the video from the cameras for both live view and recording. For more details
about the support information and operation, please contact the software vendors.

13
The Live view page
The following illustration shows the front page of Ingrasys IP camera website.
Live Video Window
Live Window
Quick Functional Buttons
OSD
Quick Index
V
ideo Stream O
p
erations

14
Snapshot: Press the button to capture an image photo
Record: Press the button to start recording. Press again to stop it.
Record Path: set up a file path that video clips and snapshots can be stored.
Full screen: Press the button to enter the full screen mode. Press ESC key to return.
Manual trigger: Press the button as triggering an event. See Event Management for detail.
Listen: Enable / Disable to receive video from camera
Digital Zoom: toggle the digital zoom function.
Video Stream Operations
Language selection for the WEB UI
Select video stream for displaying on live video window
Display the video in actual (configured) size or digital (scaled)
Select the preferred streaming protocol on the client

15
Video & Audio
This section describes how to configure the video streaming of the device and the related camera image
configurations. Users with Administrator or Operator authority (see System
User Management) are able to
do these configurations.
Click on “Setup” of Quick Index to enter the Video & Audio page shown as below.
There are 4 sub-settings under “Video & Audio”:
Camera Setting
Video Setting
ROI (Region Of Interest)
Audio Setting

16
Camera Setting
Image Setting
Brightness: the luminance of image view. Default value is 8; adjustable from 0 to 16.
Contrast: the ratio of luminance of white to black. Default value is 8; adjustable from 0 to 16.
Saturation: colorfulness of a color related to its own brightness. Default value is 8, adjustable from 0
to 16.
Sharpness: refer to image acutance, which presents in the edges contrast of an image. Default value
is 8, adjustable from 0 to 16.
The 4 correlates are referring image appearance in terms of color/vision that is adjustable according
to user preferences.
Video Orientation: change the image orientation
Mirror: rotate the image horizontally
Flip: rotate the image vertically
NOTE:
These operations are usually applied when camera must be installed in an exceptional position. For
the example of ceiling installation, camera must be installed upside-down.
Day/Night
Day/Night Mode:
Switch the video images for Day (plenty of light) or Night (Low light) scene. In default “Auto” mode,
camera will switch to Day or Night vision according to the environment light intensity.

17
Nightmode Enhancement
With this function enabled, the better night vision will be obtained. However, the number of FPS may
drop depends on the actual environmental illuminations.
Switch Time
The value reflects the delay time for both ways of day and night switch.
Level
The Day/Night mode switch is based on the sensed environment luminance. There are 3 Day/Night
switch threshold levels (Low/Standard/High), the Day/Night switch threshold of these 3 levels are
around 5-10 Lux (Low), 10-15 Lux (Standard), and 35-45 Lux (High).
Advanced Setting
AC Frequency: Anti-flicker setting for environment with fluorescent light sources, image sensor
needs to fit the frequency of light (power) source. For instance, the power frequency is 50Hz for most
European countries, while 60Hz is typically for US. This setting is therefore regionally different.
White Balance: The selections for different lightening condition, which is refereeing to color
temperature. The default value is set to AUTO.
Flickerless Mode: Flickering can also present in various exposure level. Set “Flickerless” Mode “On”
to fix the maximum shutter speed (auto exposure control). Thus, the flickers can be eliminated.
Exposure & Gain Mode: Select auto / manual Exposure & Gain control mode. The selection defines
the controlling in a range of or fixed value, according to the following two items (Shutter Speed and
Gain Value). The configurations will be limited at selected maximum rates when AUTO mode is on.
Exposure Level: Adjust Exposure level for a target level of sensed brightness. Auto exposure
function will adjust to exposure time to make the sense image brightness close to the target.
Max. Shutter Speed: Also refer to the exposure time. Higher shutter speed is normally applied under
strong light circumstance, so the image won’t be overexposure. Lower shutter speed, on the other
hand keeps image luminance in low light environment.
Max. Gain Value: Also refer to the amplification factor for the incoming light. Increasing the gain value
provides a brighter image, but the noises may also be increased.
WDR: Enable this function for image objects under backlight circumstances.
NOTE The “Exposure Level”, “Shutter Speed”, “Gain Value” and “WDR” can be configured for daytime and
nighttime. The configurations will be applied according to the current status of “Day/Night Mode“.
: represents the Day mode
: represents the Night mode
The setting items with the Day or Night mode symbol will be altered along with the setting of
Day/Night mode. The examples are illustrated as below.

18
Video Setting
Video Stream
This tab provides detailed stream configurations. These settings can affect resolution ratio, video size,
quality. The maximum transmission performance can be expected under the condition of full network
bandwidth.
The camera supports up to 3 video streams. Each stream can be configured with following items.

19
Resolution Ratio: 16:9 or 1.3M mode is selectable. The image ratio of Stream1 to Stream 3 will
change at the same time based on a pre-defined table if user changes the ratio mode.
Video Format: H.264, MPEG4 and MJPEG are available for the selection. The demand of bandwidth
and storage requirement differs from the selection of video format. In the request of same video
quality, H.264 contributes to less bandwidth and storage requirement, which can be more efficient
than MPEG4 or MJPEG.
Resolution: The resolution here describes an image size counted in width by height, e.g. 1280x1024,
referring to pixel resolution.
The available resolutions for Stream 1 to Stream 3 are listed in the following table.
Resolution Stream 1 Stream 2 Stream 3
1280x720V - -
800x450V V V
640x360V V V
320x180V V V
“V”: available
“-“: not available
Resolution Stream 1 Stream 2 Stream 3
1280x1024V - -
1024x768V - -
800x600V V V
640x480V V V
320x240V V V
160x120V V V
“V”: available
“-“: not available
1.3M =>
16:9 =>
Other manuals for D3010E
1
This manual suits for next models
1
Table of contents
Other Ingrasys IP Camera manuals

Ingrasys
Ingrasys N3211E User manual

Ingrasys
Ingrasys G2214H User manual

Ingrasys
Ingrasys G3211E User manual

Ingrasys
Ingrasys M2210E User manual

Ingrasys
Ingrasys G2334H User manual

Ingrasys
Ingrasys G2214H User manual

Ingrasys
Ingrasys G3211E User manual

Ingrasys
Ingrasys G3213E User manual

Ingrasys
Ingrasys M2210E User manual