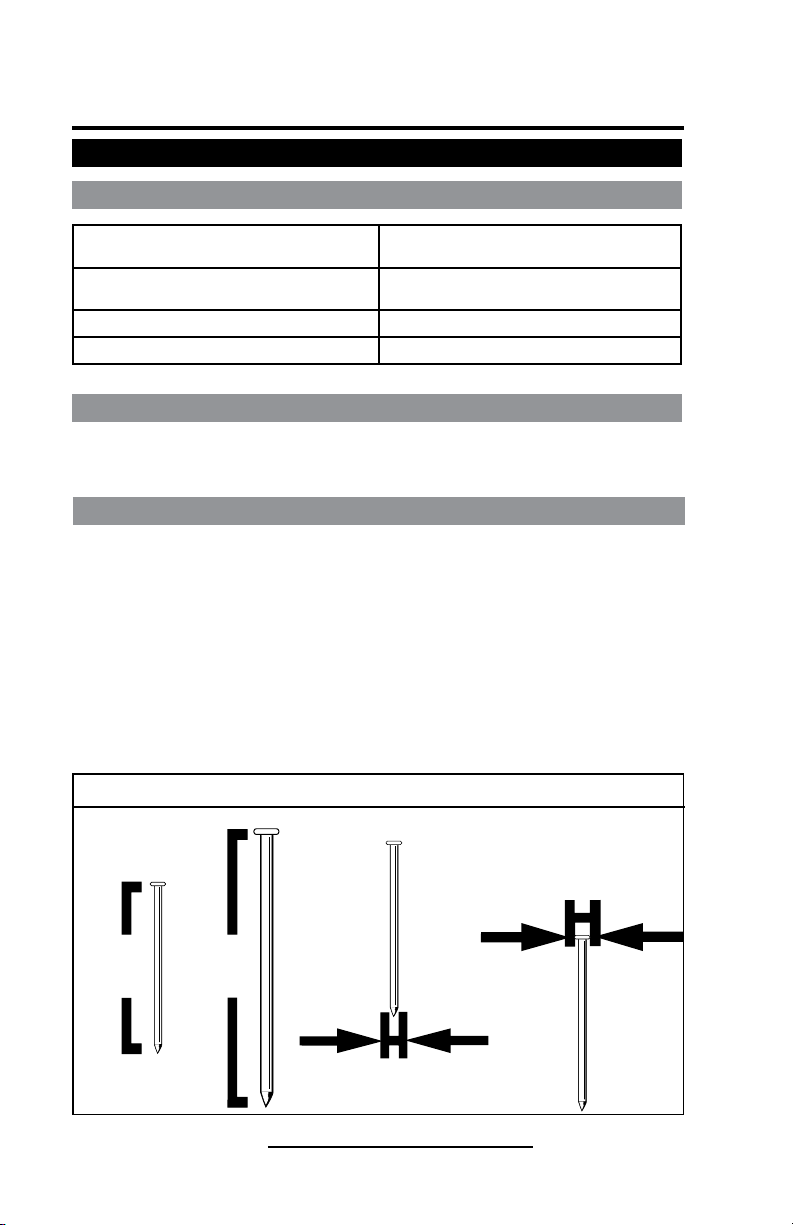
Interchange CN90-15 User manual

Operator’s Manual
NOTE: Please read and fully understand the instructions in this
manual before operating the pneumatic power tool. Carefully read
through this OPERATOR’S MANUAL to ensure efficient, safe operation. It is
recommended that the MANUAL be kept readily available as an important refer-
ence when using this tool.
15
o
Coil Nailer
Model No. CN90-15
Item No. 65590
Drives Wire Collated Nails
2" to 3-9/16" / 50 to 90mm
Ask for
Genuine
INTERCHANGE®
HWCF Nails

15
o
Coil Nailer
Drives Wire Collated Nails (2" to 3-9/16" / 50 to 90mm)
Model No. CN90-15
Item No. 65590
2Interchange Brands Operator’s Manual
Index
Information ........................... Page
Important Information ................................3
Tool Information
Nailer Specifications ............................4
Applications...................................4
Nail Specifications..............................4
Parts Identification..............................5
Accessories...................................5
Safety Information
Safety Instructions............................6-9
Employer’s Responsibilities.......................9
Operating the Nailer
Air Supply, Connections & Operating Pressure .....10-11
Lubrication ..................................11
Operating Instructions..........................12
Nail Loading .................................13
Testing the Nailer .............................14
Methods of Operation .......................14-15
Troubleshooting....................................15
Maintenance and Inspection..........................16
Parts Drawing/Schematics, Parts List, Parts Kits
Parts Drawing/Schematics ......................17
Parts List ....................................18
Parts Kits....................................19
Warranty ................................. Back Cover

15
o
Coil Nailer
Drives Wire Collated Nails (2" to 3-9/16" / 50 to 90mm)
Model No. CN90-15
Item No. 65590
3
Interchange Brands Operator’s Manual
SAVE THIS MANUAL
FOR FUTURE REFERENCE!
!
Important Information
WARNING: The warnings, cautions and instructions discussed
in this instruction manual can not cover all possible conditions and
situations that may occur. It must be understood by the operator
that common sense and caution are factors which can not be built
into this product, but must be supplied by the operator.
When using the tool, basic safety precautions should always
be followed to reduce the risk of personal injury and damage to
equipment.
Read and understand tool labels and operating instructions, safety precautions and
warnings in this manual before operating or maintaining this nailer.
Failure to follow warnings could result in DEATH or SERIOUS INJURY.
Most accidents that result from the operation and maintenance of nailers are caused
by the failure to observe basic safety rules or precautions. An accident can often
be avoided by recognizing a potentially hazardous situation before it occurs and by
observing appropriate safety procedures.
Basic safety precautions are outlined in the “SAFETY” section of this Manual and in
the sections which contain the operation and maintenance instructions.
Hazards that must be avoided to prevent bodily injury or tool damage are identified as
DANGERS or WARNINGS on the nailer and in this Manual.
Never allow the nailer to be operated by children or individuals who have not reviewed
this manual.
OPERATE THE NAILER ACCORDING TO THIS MANUAL.
WARNING!
■Always follow the tool manufacturer’s safety and
maintenance instructions.
■Always wear safety glasses with side shields when operating
or servicing tools.
■Always disconnect the air supply from the tool and empty the
magazine when servicing tools.
!

15
o
Coil Nailer
Drives Wire Collated Nails (2" to 3-9/16" / 50 to 90mm)
Model No. CN90-15
Item No. 65590
4Interchange Brands Operator’s Manual
0.113" to 0.131"
2.9mm to 3.3mm
2" to 3-9/16"
51mm to 90mm
0.236" to 0.315"
6.0mm to 8.0mm
Nail Length Shank Diameter Head Diameter
Tool Information
Nailer Specifications: CN90-15 Coil Nailer
Tool Dimensions -
Length x Height x Width
14-1/4" x 12-1/8" x 5-3/16"
﹙362mm x 307mm x 132mm﹚
Weight 9.02 lbs. ﹙4.10 kgs.﹚ Aluminum Body
8.14 lbs. ﹙3.70 kgs.﹚ Magnesium Body
Magazine Capacity 225 to 275 Nails
Recommended Operating Pressure 70 to 120 psi / 5 to 8.5 kgs.
Applications
Assembly and Repair of Pallets, Drums, Export Wooden Boxes and Wooden Fencing.
General Construction Applications Including: Siding, Decking, Crating and Sheathing.
Nail Specifications
WARNING: Be sure to use only the genuine nails recommended for the
CN90-15. The use of any other nails can result in tool malfunction, leading
to serious injuries.
Only the nail sizes shown in the table below can be driven with this nailer.
FASTENERS:
Wire Welded Nail Length 2" to 3-9/16" / 50 to 90mm
Shank Diameter 0.113" to 0.131" / 2.9 to 3.3mm
Shank Type Smooth, Ring, Screw
DIMENSIONS OF FASTENERS:
15˚ Coil Nails - Flat, Wire Weld Collated

15
o
Coil Nailer
Drives Wire Collated Nails (2" to 3-9/16" / 50 to 90mm)
Model No. CN90-15
Item No. 65590
5
Interchange Brands Operator’s Manual
Parts Identification
➊Casting
➋Cylinder Cap
➌Safety
➍Guide Body
➎Magazine
➏Trigger
➐Grip
➑Exhaust Cover
TOOL AIR FITTINGS: This tool uses a minimum 1/4" N.P.T. male plug. The inside
diameter should be 0.28" ﹙7mm﹚ or larger. The fitting must be capable of discharging
tool air pressure when disconnected from the air supply.
RECOMMENDED OPERATING PRESSURE:
70 to 120 psi / 5 to 8.5 kgs.
Select the operating air pressure within this range for best fastener performance.
Accessories
STANDARD ACCESSORIES
1Eye Protection 1
①
➊
➋
➌
➍
➎
➏
➐
➑

15
o
Coil Nailer
Drives Wire Collated Nails (2" to 3-9/16" / 50 to 90mm)
Model No. CN90-15
Item No. 65590
6Interchange Brands Operator’s Manual
!
Safety Information
Important Safety Instructions for
Operating Nailers
READ ALL INSTRUCTIONS
1. OPERATORS AND OTHERS IN WORK AREA MUST WEAR SAFETY
GLASSES WITH SIDE SHIELDS.
Danger to the eyes exists due to the possibility of flying fasteners
and debris when operating the nailer. To guard against these
hazards always wear safety glasses with side shields to protect both
the front and sides. Make sure others in the work area wear safety
glasses, too.
Eye protection equipment must conform to the requirements of
American National Standards Institute, ANSI Z87.1.
The employer is responsible to enforce the use of eye protection equipment by the tool
operator and other personnel in the work area.
2. EAR AND HEAD PROTECTION MAY BE NEEDED IN SOME
ENVIRONMENTS.
Some work areas may include exposure to high noise levels which
can lead to hearing damage. Always wear ear protection to protect
your ears from loud noise. Wear head protection to protect your
head from flying objects.
3. KEEP FACE, HANDS AND FEET AWAY FROM FIRING HEAD
AT ALL TIMES.
Never place your face, hands or feet near the firing head.
4. KEEP FINGER AWAY FROM TRIGGER WHEN NOT DRIVING FASTENERS
TO AVOID ACCIDENTAL FIRING.
Always carry the nailer by the handle only. Never carry the nailer with your finger
on trigger since you could drive a fastener unintentionally and injure yourself or
someone else.
5. NEVER POINT NAILER AT YOURSELF OR OTHERS IN WORK AREA.
Respect the nailer as a working implement. Always assume the nailer contains
fasteners and never point the nailer at yourself or others, whether or not it
contains fasteners. If fasteners are mistakenly driven, it can lead to severe
injuries. Never engage in horseplay with the nailer.
6. DRESS PROPERLY.
Do not wear loose clothing or jewelry as they can be caught in moving parts.
Rubber gloves and nonskid footwear are recommended when working outdoors.
Wear protective hair covering to contain long hair.
7. KEEP VISITORS AWAY.
All visitors should be kept safely away from work area and should not handle the
nailer.
8. KEEP OUT OF REACH OF CHILDREN.
9. DO NOT OVERREACH.
Keep proper footing and balance at all times.

15
o
Coil Nailer
Drives Wire Collated Nails (2" to 3-9/16" / 50 to 90mm)
Model No. CN90-15
Item No. 65590
7
Interchange Brands Operator’s Manual
10. STAY ALERT.
Watch what you are doing. Use common sense and do not operate the nailer
when you are tired. The nailer should never be used if you are under the influence
of alcohol, drugs or medication that makes you drowsy.
11. KEEP WORK AREA CLEAN.
Cluttered areas invite injuries. Clear all work areas of unnecessary tools, debris,
etc.
12. DO NOT USE THE NAILER AS A HAMMER.
13. NEVER CARRY THE NAILER BY THE HOSE.
14. HANDLE THE NAILER CAREFULLY.
This nailer was designed for driving nails into wood and similar items. Operate the
nailer safely and correctly and do not use for purposes other than those specified
in this manual.
Because of high air pressure in the nailer, cracks in the surface are dangerous.
To avoid tool damage, do not drop the nailer or strike the nailer against hard
surfaces, and do not scratch or engrave on the nailer. Handle the nailer carefully.
15. BEFORE USING THE NAILER, CHECK TO MAKE SURE PARTS ARE NOT
BROKEN OR MISSING AND THAT ALL SCREWS ARE TIGHT. DO NOT
OPERATE A TOOL THAT IS OPERATING ABNORMALLY.
If the nailer appears to be operating unusually, making strange noises, has parts
missing or appears to be defective, stop using it immediately and arrange for
repairs by an authorized service center.
16. BEFORE STARTING WORK, CHECK TO SEE IF YOUR TOOL HAS A
FASTENING OPERATION SWITCHING DEVICE.
(Not available on all tool models.)
If this nailer includes a fastening operation switching device, check the setting of
the operation switching device before starting work. If the switching device is not
set properly, the nailer will not operate correctly.
17. CHECK SAFETY/PUSH LEVER BEFORE USE.
Make sure the safety/push lever operates properly. Never use the nailer unless
the safety/push lever is operating properly, otherwise the nailer could drive a
fastener unexpectedly. Do not tamper with or remove the safety/push lever,
otherwise the safety/push lever becomes inoperable.
18. CHOICE OF TRIGGER METHOD IS IMPORTANT.
Read and understand section titled “Methods of Operation.”
(Choice of trigger method is not available on all tool models.)
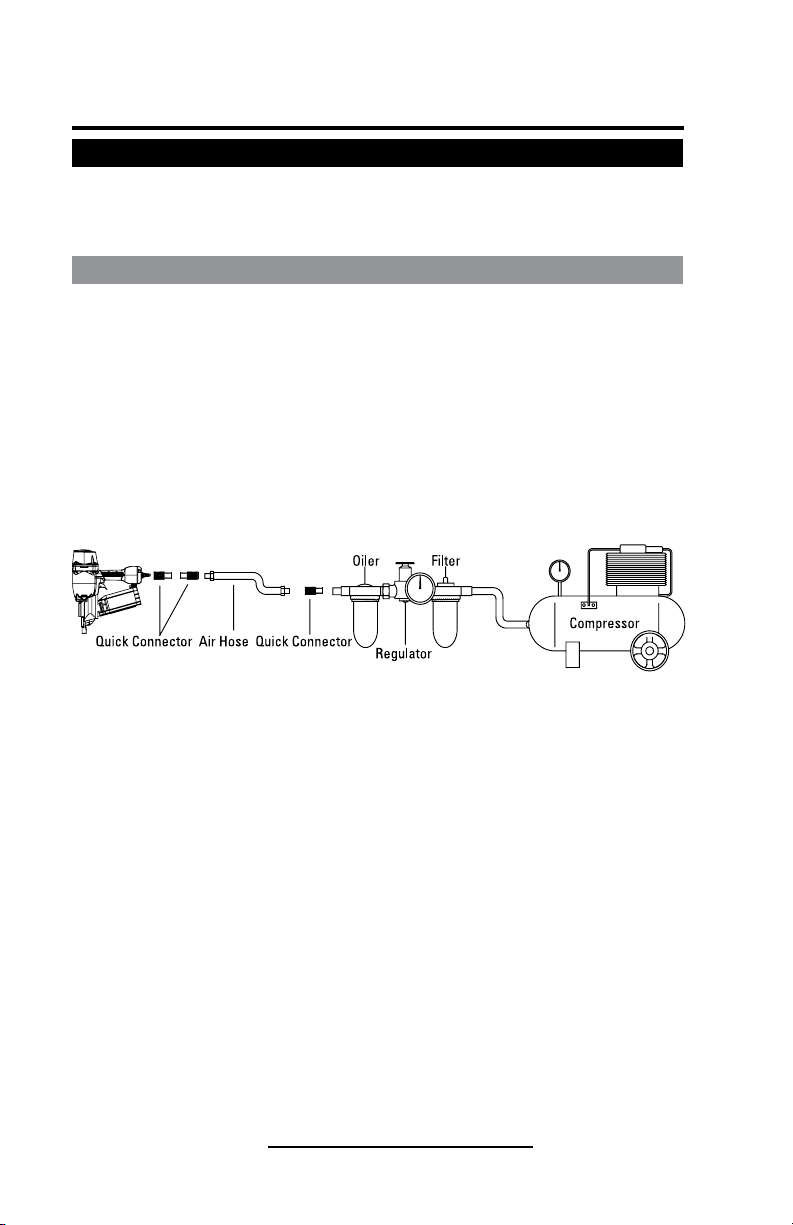
19. DO NOT USE OXYGEN, COMBUSTIBLE OR OTHER BOTTLED GASES.
EXPLOSION MAY OCCUR.
Never use oxygen, combustible gases or any other bottled gases as a power
source for the nailer. Use of these gases is dangerous, as the nailer will explode.
Use only clean, dry, regulated compressed air as a power source.
20. DO NOT EXCEED 120 psi.
Do not exceed maximum recommended air pressure 120 psi. Never connect the
nailer to pressure which potentially exceeds 150 psi as the nailer can burst.
21. NEVER USE IN PRESENCE OF FLAMMABLE LIQUIDS OR
COMBUSTIBLES.
The nailer produces sparks during operation. Never use the nailer on sites
containing lacquer, paint, benzine, thinner, gasoline, gases, adhesive agents or
other materials which are combustible or explosive.

15
o
Coil Nailer
Drives Wire Collated Nails (2" to 3-9/16" / 50 to 90mm)
Model No. CN90-15
Item No. 65590
8Interchange Brands Operator’s Manual
22. KEEP ALL SCREWS AND COVERS MOUNTED TIGHTLY IN PLACE.
Keep all screws and covers tightly mounted. Check their condition periodically.
Never use the nailer if parts are missing or damaged.
23. DO NOT USE THE WRONG FITTING ON NAILER.
The nailer and air hose must have a hose coupler so that all pressure is removed
from the nailer when the coupler is disconnected. The connector on the nailer
must not hold pressure when the air supply is disconnected. If the wrong fitting is
used, the nailer can remain charged with air after disconnecting and thus will be
able to drive a nail even after the air line is disconnected, possibly causing injury.
24. DO NOT LOAD FASTENERS WITH TRIGGER PULLED OR SAFETY/PUSH
LEVER DEPRESSED.
When loading fasteners into the nailer or when connecting the air hose:
Do not pull the trigger
Do not depress the safety/push lever
Keep the nailer pointed downward
25. CHECK FOR LIVE WIRES.
Avoid the risk of severe electrical shock by checking for live electrical wires that
may be hidden by walls, floors or ceilings. Turn off the breaker switch to ensure
there are no live wires.
26. HOSES.
Air hoses should be professional grade and have a minimum of 150 psi working
pressure. Make sure that the hose is securely fastened. If there is any damage to
the hose, replace it before using the nailer.
27. PLACE NAILER PROPERLY ON WORK PIECE.
Do not drive fasteners on top of other fasteners or with the nailer at too steep of
an angle. The fasteners can ricochet and hurt someone.
28. BE CAREFUL OF DOUBLE FIRING DUE TO RECOIL.
If the safety/push lever is unintentionally allowed to re-contact the work piece
following recoil, an unwanted fastener will be driven.
In order to avoid this undesirable double fire:
Intermittent operation ﹙trigger or single firing﹚
(not available on all models)
1﹚ Set the switching device to SINGLE ACTUATION MECHANISM.
2﹚ Pull the trigger rapidly and firmly.
Continuous operation﹙safety/push lever firing﹚
1﹚ Do not press the nailer against the wood with excessive force.
2﹚ Separate the nailer from the wood as it recoils after fastening.
29. DO NOT DRIVE FASTENERS CLOSE TO THE EDGE OR CORNER OF THE
WORK ESPECIALLY WHEN USING THIN MATERIAL.
The work piece is likely to split and the fastener could fly free and hit someone.
30. NEVER DRIVE FASTENERS FROM BOTH SIDES OF A WALL AT THE SAME
TIME.
The fasteners could be driven into and through the wall and hit a person on the
opposite side.
31. DO NOT DISCONNECT AIR HOSE FROM NAILER WHILE FINGER IS ON
THE TRIGGER.
The nailer can fire when it is re-connected to an air supply.

15
o
Coil Nailer
Drives Wire Collated Nails (2" to 3-9/16" / 50 to 90mm)
Model No. CN90-15
Item No. 65590
9
Interchange Brands Operator’s Manual
32. DISCONNECT THE AIR SUPPLY AND EMPTY THE MAGAZINE WHEN THE
NAILER IS NOT IN USE. NEVER LEAVE A NAILER UNATTENDED WITH
THE HOSE ATTACHED.
Always disconnect the air supply from the nailer and empty the magazine when
operation has been completed or suspended, when unattended, moving to a
different work area, adjusting, disassembling, or repairing the nailer, and when
clearing a jammed fastener.
33. DISCONNECT AIR HOSE FROM NAILER WHEN:
Doing maintenance and inspection
Loading fasteners
Clearing a jam
It is not in use
Leaving work area
Moving it to another location
Handing it to another person
34. MAINTAIN NAILER WITH CARE.
Keep the nailer clean and lubricated for better and safer performance.
35. USE ONLY AUTHORIZED OR RECOMMENDED PARTS, ACCESSORIES OR
FASTENERS.
Unauthorized parts, accessories or fasteners may void your warranty and can
lead to tool malfunction and resulting injuries. Only authorized service personnel
should repair the nailer.
36. NEVER MODIFY OR ALTER A NAILER.
Doing so may cause it to malfunction and personal injuries may result. The
warranty is no longer valid when a tool is modified or altered.
37. BE CAREFUL WHEN CLEANING TOOL WITH A BLOW GUN.
Do not touch the trigger, point the air outlet at a person, touch the safety/push
lever, or set it to pushed up status.
38. STORE NAILER PROPERLY.
When not in use, the nailer should be stored in a dry place. Keep out of reach of
children and lock the storage area.
Employer’s Responsibilities
1. Ensure that this manual is available to operators and personnel performing
maintenance.
2. Ensure that nailers are used only when operators and others in work area are
wearing EYE PROTECTION.
3. Keep nailer in safe working order.
4. Maintain nailer properly.
5. Ensure that the nailers that require repair are not used before the repair is
completed.

15
o
Coil Nailer
Drives Wire Collated Nails (2" to 3-9/16" / 50 to 90mm)
Model No. CN90-15
Item No. 65590
10 Interchange Brands Operator’s Manual
Operating the Nailer
NOTE: The information contained in this Manual is designed to assist you in the safe
operation of the nailer. Some illustrations in this Manual may show details or attach-
ments that are different from those on your nailer.
Air Supply, Connections and Operating Pressure
Read section titled SAFETY. Make sure of the following before operation:
Air Supply
Power Source (Compressor)
Use only clean, dry, regulated compressed air as a power source for this
nailer.
NEVER use oxygen or other bottled gases, as an explosion may occur.
Air compressors used to supply compressed air to this nailer must comply
with the requirements of the latest version of ANSI Standard
B 19.3 Safety Standard for Compressors for Process Industries.
Moisture or oil in the air compressor may accelerate wear and corrosion in
the nailer.
Drain daily.
Connections
1. Fittings
Install a female coupler to the hose. The female coupler will connect to the quick
release that fits the tool.
2. Filter-Regulator-Lubricator
NEVER connect nailer to pressure which potentially exceeds 150 psi.
Filter-regulator-lubricator units supply an optimum condition for the nailer
and extend the nailer life. These units should always be used.
Filter
The filter removes moisture and dirt mixed in compressed air.
Keep the filter clean by maintaining tool regularly.
Drain daily.
Regulator
The regulator controls the operating pressure for safe operation of the nailer.
Inspect the regulator before operation to be sure it operates properly.
Lubricator
The lubricator supplies an oil mist to the nailer.
Inspect the lubricator before operation to be sure the supply of lubricant is
adequate.
If an inline lubricator is not used, a few drops of oil will need to be added to
the air inlet before each use.

15
o
Coil Nailer
Drives Wire Collated Nails (2" to 3-9/16" / 50 to 90mm)
Model No. CN90-15
Item No. 65590
11
Interchange Brands Operator’s Manual
WARNING
NEVER connect nailer to pressure which potentially
exceeds 150 psi.
DO NOT USE THE WRONG FITTING ON NAILER.
The nailer and air hose must have a hose coupler so that
all pressure is removed from the nailer when the coupler is
disconnected. The connector on the tool must not hold pressure
when the air supply is disconnected. If the wrong fitting is
used, the tool can remain charged with air after disconnecting
and thus will be able to drive a nail even after the air line is
disconnected, possibly causing injury.
DANGER
NEVER use oxygen or other bottled gases, as an
explosion may occur.
!
!
3. Air Hose
Air hose must have a minimum working pressure rating of 150 psi or 150% of the
maximum pressure produced in the system, whichever is higher.
Operating Pressure
Recommended operating pressure range is 70 to 120 psi / 5 to 8.5 kgs.
Maximum permissible operating pressure is 150 psi.
Select the operating pressure within this range for the best fastener
performance. The nail length and thickness and the hardness of the wood
are factors in determining what the pressure should be set at.
Do not exceed this recommended operating pressure.
Lubrication
It is important that the tool be properly lubricated. Without proper lubrication, the tool
will not work properly and parts will wear prematurely.
Use INTERCHANGE pneumatic tool lubricant. Do not use detergent oil or
additives. These lubricants will harm the O-rings and other rubber parts. This
will cause the tool to malfunction.
Filter-regulator-lubricator units should always be used. Keep the lubricator
filled with INTERCHANGE pneumatic tool lubricant.
If a lubricator is not available, supply 3 to 5 drops of INTERCHANGE
pneumatic tool lubricant into the air plug on the tool twice a day.
NOTE: Dirt and water in the air supply are major causes of wear in the tool. An air
filter will help to get the best performance and minimum wear from the tool.
Frequent, but not excessive, lubrication is required for the best performance. Oil added
through the air line connection will lubricate the internal parts.

15
o
Coil Nailer
Drives Wire Collated Nails (2" to 3-9/16" / 50 to 90mm)
Model No. CN90-15
Item No. 65590
12 Interchange Brands Operator’s Manual
Operating The Nailer
DANGER: Operators and others in work area must wear safety glasses with side
shields that conform to ANSI Z87.1 specifications.
Read and understand METHODS OF OPERATION below.
Operating Instructions
Read section titled “SAFETY INSTRUCTIONS.”
BEFORE OPERATION
1. Wear safety glasses or goggles with side shields.
2. Do not connect the air supply.
3. Inspect screws and tighten if necessary.
4. Check operation of the contact arm and trigger to make sure they are moving
smoothly.
5. Connect the air supply.
6. Check the air-leakage. (The tool must not have any air-leakage.)
7. Hold the tool with finger off the trigger, then push the contact arm against the
work piece. (The tool must not operate).
8. Hold the tool with contact arm away from work piece and pull the trigger. (The
tool must not operate.)
9. Disconnect the air supply.
OPER ATION
Danger to the eyes exists due to the possibility of flying fasteners and debris when
operating the nailer. To guard against these hazards always wear safety glasses with
side shields to protect both the front and sides. Make sure others in the work area
wear safety glasses, too.
Eye protection equipment must conform to the requirements of American National
Standards Institute, ANSI Z87.1.
The employer and/or user must ensure that proper eye protection is worn. Eye
protection equipment must conform to the requirements of the American National
Standards Institute, ANSI Z87.1 and provide both frontal and side protection.
The employer is responsible to enforce the use of eye protection equipment by the tool
operator and all other personnel in the work area.
NOTE: Spectacles and face shields without the side shields do not provide adequate
protection.
Keep hands and body away from the discharge outlet when driving the fasteners to
prevent striking the hands or body by mistake.

15
o
Coil Nailer
Drives Wire Collated Nails (2" to 3-9/16" / 50 to 90mm)
Model No. CN90-15
Item No. 65590
13
Interchange Brands Operator’s Manual
Nail Loading
1. OPEN THE MAGAZINE
Hold door and door latch and pull
up door latch. Swing door open.
Swing magazine cover open.
2. CHECK ADJUSTMENT
The nail support can be moved
up and down to four settings. To
change setting pull up on the post
and twist to the correct step. The
nail support should be adjusted
correctly to the position indicated
in inches and millimeters inside
magazine.
3. NAIL LOADING
Place a coil of nails over the post in
the magazine. Uncoil enough nails
to reach the feed pawl and place
the second nail between the teeth
on the feed pawl. The nail heads fit
in slot on nose.
4. SWING COVER CLOSED
5. CLOSE THE DOOR
Check that the latch engages. ﹙If
it does not engage, check that the
nail heads are in the slot on the
nose﹚.

15
o
Coil Nailer
Drives Wire Collated Nails (2" to 3-9/16" / 50 to 90mm)
Model No. CN90-15
Item No. 65590
14 Interchange Brands Operator’s Manual
Testing The Nailer
Before using the nailer, test it by using the check list below.
If abnormal tests occur, stop using the nailer and contact an authorized service center
immediately.
Conduct the test in the following order.
1. Adjust the air pressure to 70 psi and connect the air hose.
2. Without touching the trigger, depress the contact arm against the work piece. Pull
the trigger. ﹙The tool must fire the fastener.﹚
3. With the tool off the work piece, pull the trigger. Depress the contact arm
against the work piece. ﹙The tool must fire the fastener.﹚
4. Adjust the air pressure to the lowest setting possible according to the diameters
and length of fastener and the hardness of work piece.
WARNING!
■Always follow the tool manufacturer’s safety and
maintenance instructions.
■Always wear safety glasses with side shields when
operating or servicing tools.
■Always disconnect the air supply from the tool and empty
the magazine when servicing tools.
!
■Bump Fire (Multi-Fire)
Pull the trigger with the nailer
off the workpiece.
Depress the push lever against
the workpiece to drive a nail.
Move the nailer along the
workpiece with a bouncing
motion.
Each depression of the push
lever will drive a nail.
As soon as the desired number
of nails have been driven,
remove finger from the trigger.
Methods of Operation
Explanation of the nailing operation
Trigger

15
o
Coil Nailer
Drives Wire Collated Nails (2" to 3-9/16" / 50 to 90mm)
Model No. CN90-15
Item No. 65590
15
Interchange Brands Operator’s Manual
Troubleshooting
Problem Cause Solution
Trigger valve leaks air O-ring is cut or cracked Replace o-ring
Nose leaks air O-ring or gasket is cut or cracked Replace o-ring or gasket
Bumper is cracked or worn Replace bumper
Failure to cycle Air supply restriction Check air supply equipment
Tool is dry, lack of lubrication Apply air tool lubricant
Cap malfunction Replace cap
Lack of power Air pressure is too low Check air supply equipment
Slow to cycle Cap malfunction Replace cap
O-ring or seal is cut or cracked Replace o-ring or seal
Tool is dry, lack of lubrication Apply air tool lubricant
Nails jam in tool Bent nails Replace with new nails
Broken or chipped driver Replace piston/driver
assembly/bumper
Wrong size nail Replace with correct type of nail
Driving Depth Adjustment Dial
(on some models)
WARNING: Always disconnect air supply
before changing the adjustment dial.
■With air pressure set, drive nails into a
piece of scrap material to determine if an
adjustment is necessary.
■If adjustment is required, disconnect air
supply.
■Refer to the mark on the contact arm for
direction to turn the adjustment dial.
■Reconnect air supply.
Directional Exhaust Cover
(on some models)
WARNING: Always disconnect air supply
before rotating the exhaust cover.
■Rotate Cover by Unscrewing
Loosen screw as shown. Adjust to
desired exhaust direction and tighten
screw.
■Rotate Cover by Hand
Direction of the exhaust air can be
changed by rotating exhaust cover by
hand.

15
o
Coil Nailer
Drives Wire Collated Nails (2" to 3-9/16" / 50 to 90mm)
Model No. CN90-15
Item No. 65590
16 Interchange Brands Operator’s Manual
Maintenance and Inspection
Read the section titled SAFETY.
SERVICE AND REPAIRS All quality tools will eventually require servicing or
replacement of parts due to wear from normal use. It is recommended that these
operations should be performed by a professional technician.
NOTE: The information contained in this Manual is designed to assist you in the
safe maintenance of the nailer. Some illustrations in this Manual may show details or
attachments that are different from those on your nailer.
WARNING: Disconnect air hose and remove nails from nailer when:
Doing maintenance and inspection Clearing a jam
Inspecting the magazine
1. DISCONNECT AIR HOSE.
2. Clean the magazine. Remove dust which may have accumulated in the
magazine.
3. Lubricate the nail rail with nailer lubricant.
Clearing a jam
Remove a jammed nail in the following order:
1. DISCONNECT AIR HOSE.
2. Remove all nails.
3. Remove the jammed nail with a slotted head screwdriver.
4. In case of frequent jams, contact an authorized service center.
A qualified person should perform repairs and maintenance.
Periodic maintenance to be performed:
Check that the piston bumper is operating normally. A damaged piston
bumper may cause damages to other component parts.
Check o-rings for wear or damage. Damaged o-rings may affect overall
performance.
Make sure all screws are secure. Loose screws may affect overall
performance.
When repairing a tool, make sure the internal parts are clean and lubricated.
Storing
When not in use for an extended period, apply a thin coat of the lubricant to
the steel parts to avoid rust.
Cold Weather Care
Do not store the tool in a cold weather environment.
Keep the tool in a warm area until beginning the work.
If the tool is already cold, bring it in a warm area and allow the tool to warm
up before use.
1. Reduce the air pressure to 60 to 80 psi ﹙4.2 bar 4.2 kgf/cm2﹚.
2. Remove all fasteners from the tool.
3. Connect the air hose and free-fire ﹙blank-fire﹚ the tool.
The lowered air pressure will be enough to free-fire the tool. Slow speed operation
tends to warm up the moving part.

15
o
Coil Nailer
Drives Wire Collated Nails (2" to 3-9/16" / 50 to 90mm)
Model No. CN90-15
Item No. 65590
17
Interchange Brands Operator’s Manual
PARTS DRAWING/SCHEMATICS FOR CN90-15
Parts Drawing/Schematics, Parts List & Parts Kits
1
2
4
5
3
6
8
9
10
11
13
7
12
16
15
18
20
21
23
24
25
26
19
22
57
68
75
82 79 81
70
69
65
63
66
64
62
60
61
59
74 27
80
76
78
77
71
29
27
28
40
53
39
43
36
35
34
37
38
33
31
95
30
41
32
96
54
83
84
86
85
87
91
90
92
89
97
47 46 56 55 49 50 52
51
48
54
44
45
98 99
67
58
42
88
93
94
101
100
73
102
P1
P2
103
56
CN90-15 Parts Drawing (04-12-12)

15
o
Coil Nailer
Drives Wire Collated Nails (2" to 3-9/16" / 50 to 90mm)
Model No. CN90-15
Item No. 65590
18 Interchange Brands Operator’s Manual
PARTS LIST FOR CN90-15
NO. ORDER NO. DESCRIPTION NO. ORDER NO. DESCRIPTION
1 610280 Bolt M8X20 54 420170 Pin Cap (A)
2 320480 Exhaust Cover 55 510430 O-ring 20X2.65
3 630070 Spring Washer 56 510320 O-ring 10X2.65
4 610240 Bolt M6X35 57 110110 Body
5 320470 Side Protector 58 510080 O-ring 3.75X1.8
6 110120 Cylinder Cap 59 420080 Trigger Valve Cap
7 520120 Gasket 60 320110 Trigger Stem
8 320460 Ring 61 510030 O-ring 2.5X1.4
9 420370 Piston Stop 62 620050 Trigger Valve Spring
10 620010 Compression Spring 63 330010 Trigger Valve Bushing
11 510570 O-ring 41.2X3.55 64 510240 O-ring 8.6X1.9
12 510730 O-ring 56X2.65 65 510180 O-ring 5.8X1.9
13 420360 Head Valve Piston 66 510210 O-ring 6.3X1.8
14 ###### Not Applicable 67 640250 Straight Pin B3X15
15 510970 O-ring 44X4.5 68 420090 Trigger Valve Cage
16 310120 Piston 69 510410 O-ring 18.3X2.65
17 ###### Not Applicable 70 510380 O-ring 16X1.8
18 323110 Driver Blade 71 320250 Safety Bracket
19 420350 Cylinder Sealing Ring 72 ###### Replaced by #102 #103
20 310110 Cylinder 73 640190 Roll Pin 3X32
21 510730 O-ring 56X2.65 74 640140 Roll Pin 3X22
22 520110 Cylinder Seal 75 410140 Handle Grip
23 420340 Cylinder Ring 76 320570 Trigger
24 510960 O-ring 90X3.05 77 320560 Contact Plate
25 410130 Bumper (A) 78 640110 Roll Pin 3X16
26 410120 Bumper (B) 79 420110 Filter
27 610330 Nut M6 80 110030 End Cap
28 420180 Guard Cover 81 510760 O-ring 58X3.55
29 320220 Safety 82 630020 Snap Ring
30 620100 Safety Spring 83 420190 Magazine Cover
31 320200 Check Pawl Pin 84 420200 Spring Holder (A)
32 210050 Door Pin 85 420210 Nail Support Plate
33 640080 Roll Pin 3X12 86 620110 Magazine Spring
34 621150 Latch Spring 87 420230 Magazine Post
35 210830 Latch 88 630030 Washer
36 420160 Pin Cap (B) 89 420240 Spring Holder (B)
37 210060 Check Pawl 90 320260 Magazine Pin
38 620070 Check Pawl Spring 91 421290 Magazine
39 610300 Bolt M8X25 92 410160 Plastic Washer
40 210660 Nose 93 610250 Bolt M6X40
41 510670 O-ring 50X1.8 94 322630 Spring Washer
42 420150 Pin Plug 95 420250 Dust Cover
43 320190 Door Pin 96 410060 Rubber Button
44 640110 Roll Pin 3X16 97 520030 Snap Ring
45 320210 Feed Pawl Pin 98 620120 Feed Piston Spring (A)
46 620610 Feed Spring 99 320280 Spring Guide
47 210080 Feed Pawl 100 322610 Plastic Washer
48 320290 Feed Piston 101 ###### Not Applicable
49 620130 Feed Piston Spring (B) 102 511020 O-ring 1.5X1.8
50 410150 Feed Piston Bumper 103 323150 Straight Pin
51 320590 Feed Piston Cap P1 D320191 Driver Unit
52 630050 Snap Ring P2 T420091 Trigger Valve
53 610240 Bolt M6X35

15
o
Coil Nailer
Drives Wire Collated Nails (2" to 3-9/16" / 50 to 90mm)
Model No. CN90-15
Item No. 65590
19
Interchange Brands Operator’s Manual
PARTS KITS FOR CN90-15
ORDER NO. DESC. CODE KIT # ITEM
98624 CN90K1 Kit #1 O-Ring/Gasket Kit for CN90-15*
(also fits CN70-15 & CN80-15)
98626 CN90K2 Kit #2 Piston/Driver Assembly for CN90-15
98628 CN90K3 Kit #3 Head Cap Assembly for CN90-15
98630 CN90K4 Kit #4 Trigger Valve Assembly with Trigger for CN90-15
98632 CN90K5 Kit #5 Magazine Assembly for CN90-15
98634 CN90K6 Kit #6 Guide Body Assembly for CN90-15
98635 CN90K7 Kit #7 Safety Kit for CN90-15
98637 CN90K8 Kit #8 Feeder Kit for CN90-15
98639 CN90K9 Kit #9 Bumper Kit for CN90-15
*Additional part in Kit #1: Order No. 510990 O-Ring 55X3.1
WARNING!
■Always follow the tool manufacturer’s safety and
maintenance instructions.
■Always wear safety glasses with side shields when
operating or servicing tools.
■Always disconnect the air supply from the tool and empty
the magazine when servicing tools.
!
NOTICE: The parts listed in this manual are for service assembly and for reference.
Changes to the tool and drawing may be made without notification.
Most parts or parts kits are available. Contact your local dealer for more information.
WARNING: When the tool needs repairing or servicing, it is strongly recommended
that you contact your local dealer. Do not disassemble the tool yourself, which might
waive your right for product guarantee.

CN90-15 Coil NailerDB
Limited Five (5) Year Warranty for
Pneumatic Nailers
Our products are designed and constructed using the highest standards of both mate-
rial and workmanship. We warrant to the original retail purchaser that their nailers will
be free from defects in material or workmanship for the warranty period of five years.
During the warranty period (which begins on the purchase date), we will repair or
replace, at our option and expense, any product or part that is defective in materials or
workmanship after examination by an Authorized Warranty Service Center, subject to the
exceptions, exclusions and limitations described below. Any replacement product or part
will carry a warranty for the balance of the warranty period applicable to the replaced
product or part. A DATED SALES RECEIPT OR PROOF OF PURCHASE FROM THE
ORIGINAL RETAIL PURCHASER IS REQUIRED TO MAKE A WARRANTY CLAIM. To make
a warranty claim, you must return the product, with proper receipt/proof of purchase
and return transportation charges prepaid, to us (your dealer) or an Authorized Warranty
Service Center. We will perform our obligations under this warranty within a reasonable
time after approval of the warranty claim.
WARRANTY EXCLUSIONS
The following warranty exclusions apply:
1. Normal wear parts are not covered under this warranty. Normal wear parts
include, for example, rubber o-rings, seals and driver blades.
2. This warranty does not cover parts damaged due to normal wear, misapplica-
tion, misuse, accidents, operation at other than recommended speeds, improper
storage, or damage resulting during shipping.
3. Products used in production/industrial applications are excluded from this war-
ranty.
4. Labor charges, maintenance, or loss, damage and repairs resulting from im-
proper operation are not covered by this warranty.
GENERAL WARRANTY CONDITIONS
This warranty will be honored, only if:
1. Clean, dry, regulated compressed air has been used at air pressure not exceed-
ing the maximum indicated on the tool casting;
2. No evidence of abuse, abnormal conditions, accident, neglect, misuse or im-
proper modifications or storage of the product exists; and
3. No deviations from following recommended operating instructions, specifi-
cations, and maintenance schedules exist. (Read Operator Manual for use,
specifications, and maintenance instructions).
This warranty is the only warranty for the product and we disclaim all other warran-
ties. Any implied warranties will be limited in duration to the applicable warranty period
specified above. Some states do not allow limitations on how long an implied war-
ranty lasts, so the above limitation may not apply to you. Your remedies are solely and
exclusively as stated above. We shall in no event be liable for incidental, consequential,
indirect or special damages. Some states do not allow the exclusion or limitation of
incidental or consequential damages, so the above limitation or exclusion may not apply
to you. In no event, whether as a result of a breach of contract, warranty, tort (including
negligence) or otherwise, shall our liability exceed the price of the product that has given
rise to the claim or liability. Any liability connected with the use of this product shall
terminate upon the expiration of the warranty period specified above. No employee or
representative of any distributor or dealer is authorized to make any change or modifica-
tion to this warranty.
This warranty gives you specific legal rights, and you may also have other rights,
which vary from state to state.
Interchange Brands CN90-15
Operator’s Manual (8/6/15)
This manual suits for next models
1
Table of contents
Other Interchange Power Tools manuals

Interchange
Interchange CN80-15 User manual

Interchange
Interchange CN565-15 User manual

Interchange
Interchange SN5016 User manual

Interchange
Interchange SBCS5016 User manual

Interchange
Interchange GENUINE CN55-15 User manual

Interchange
Interchange CN70-15 User manual

Interchange
Interchange SGSW5016 User manual

Interchange
Interchange SHB100-A User manual

Interchange
Interchange SAB100-A User manual

Interchange
Interchange SFNC4010 User manual