Iwata HP-AH User manual

- 1 -
■エアーブラシ
この取扱説明書に示された警告事項および注意事項は必ず守ってください。
使用時に不用意に色材が噴出したり、有機溶剤の吸引により重大な身体上の障害を起こすことがあります。
印付きの下記マークは、安全上、特に重要な項目ですので、必ずお守りください。
警告内容を怠った場合、人が死亡又は重傷を負う可能性が想定されることを示します。
注意内容を怠った場合、人が傷害を負う可能性、または物的損害の発生する可能性が想定されることを
示します。
機械の性能や機能を十分に発揮してお使いいただくために守っていただきたい内容を示しています。
尚、本取扱説明書で示す安全事項は、必要最低限のものであります。
国や自治体の消防、電気、安全関連の法規、規則、またそれぞれの企業や事業所で規則、規定として守
るべき事項に従ってください。
■安全にご使用いただくための警告事項
警告
火災と爆発
1.吹き付け作業場は、火気厳禁。
・色材は引火性があり火災の危険性があります。
(ラッカー、セラックスワニスなどの有機溶剤系)
・たばこ、点火、電気機器等、引火の恐れがあるものは、必ず避けた所でご使用ください。
2.次のハロゲン化炭化水素系溶剤は使用しない。
化学反応により、本体(アルミニウム部分)にクラック、溶解が発生します。
不適合溶剤:塩化メチル、塩化エチル、二塩化メチレン、二塩化エチレン、四塩化炭素、
トリクロルエチレン、1.1.1 トリクロロエタン 等
(特殊な色材やシンナーは充分適合性を検討した上でご使用ください。適合性検討のための
材質リストを提出する用意があります。)
機器誤用
1.ネイルアート、ボディアート等の専用色材で吹き付けする用途以外、人体や動物に向けて
絶対にスプレーしない。目や皮膚の炎症、人体への危険があります。
2.最高使用圧力以上でのご使用は絶対に避けてください。エアーブラシが、破損・破裂し非常
に危険です。
3.洗浄、分解、保守作業をする前および作業中断時は、必ず色材と空気の圧力を逃がす。圧力
が残っていますと、誤作動、洗浄液の飛散により人体に危険があります。圧力を逃がす方法
はエアーブラシへの圧縮空気の供給を停止し、押しボタンを軽く押すことにより行います。
人体保護
1.吹き付け作業は、換気扇等を使用し換気の良いところで使用。換気が不十分
ですと色材の吸い込みによる健康障害や引火の危険が増えます。
2.常に適切な服装または保護具を着用。(眼鏡、マスク、手袋) 目や皮膚に
洗浄液等がつき炎症を起こします。目や皮膚に異常を感じたら直ちに医師の
治療を受けてください。
その他
1.製品の改造はしない。十分な性能が発揮できないばかりか故障の原因となります。
2.食品用や化学薬品用には使用しない。色材通路内部の腐食による事故発生や異物混入による
健康障害の可能性があります。
取扱説明書
この取扱説明書は、安全にご使用いただくために重要な警告および注意
事項、取扱い方法について記載しています。ご使用前に、必ずお読みに
なり、十分理解してからご使用ください。本書はすぐに確認できる場所に
大切に保管してください。
The English version is Printed on the back page.
注意
警告
HP-AH・BH・CH
HP
-
AP
・
BP
・
SBP
・
CP
・
BC1P
・
BC2P

- 2 -
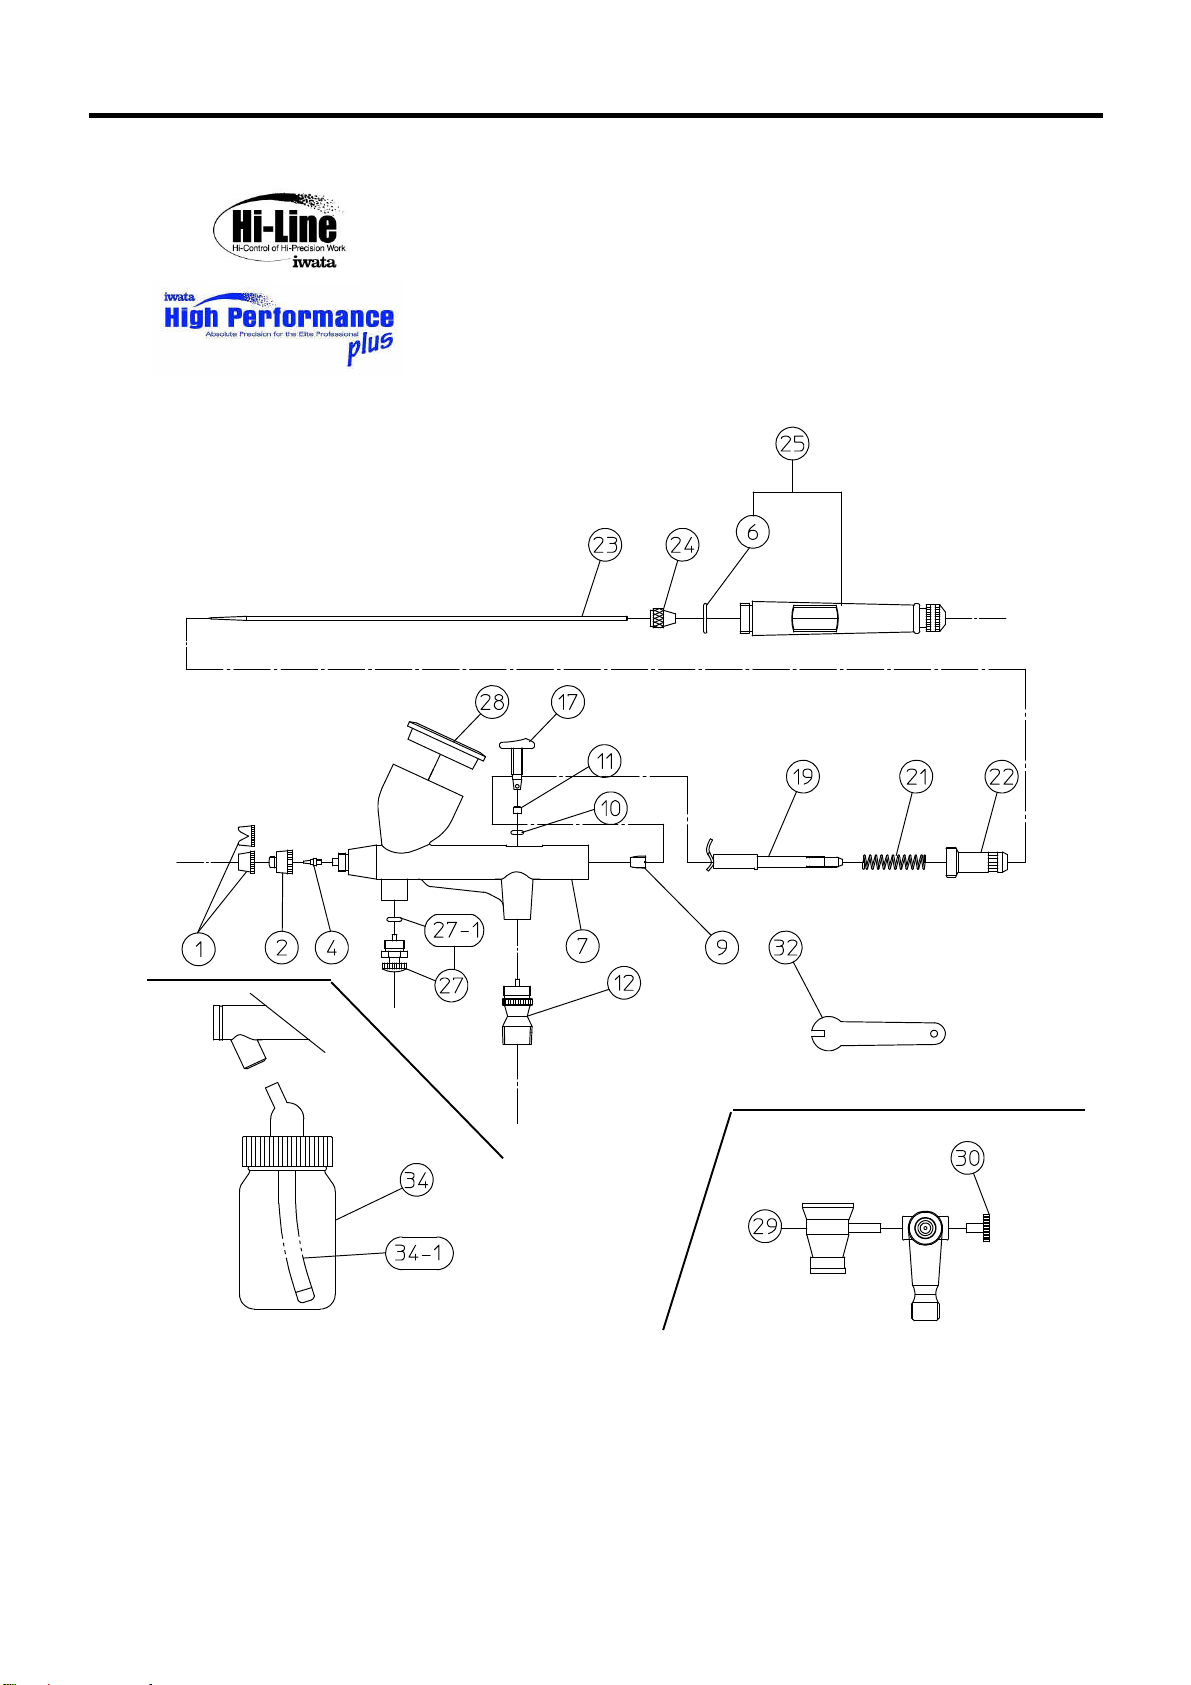
■PROFESSIONAL AIRBRUSHES
Be sure to observe warnings, cautions and instructions in this instruction manual.
Inadvertent jetting of paint or inhalation of organic solvents can cause serious bodily injury.
Be sure to observe important items especially those shown by the marks below.
Indicates a potentially hazardous situation which, if not avoided, may result in
serious injury or loss of life.
Indicates a potentially hazardous situation which, if not avoided, may result in minor
or moderate injury or property damage.
Important Indicates notes which we ask you to observe. They are helpful to achieve full
performance and functions of the equipment.
■Warnings for safe operation
WARNING
Fire or explosion hazard
1. Painting job site shall be free of fire.
*Paint is flammable and combustible (organic solvent base paints
such as lacquer or ceramic varnish).
*Never use flammable things such as cigarettes or electrical equipment .
2. Never use the following halogenated hydrocarbon solvents which can cause
cracks or dissolution on airbrush body.
*Improper solvents: methyl chloride, ethyl chloride, ethylene
dichloride, methyl dichloride, carbon tetrachloride, trichloroethylene,
1.1.1 trichloroethylene, etc .(Be sure that all fluids and solvents are compatible with airbrush parts.
We are ready to supply details of materials used in the airbrush on request.)
Misuse hazard
1. Never point airbrush in the direction of human body or animal except
when using exclusive fluids such as body painting or nail art. If done, it can
cause inflammation of eyes or skin, and danger to the human body.
2. Never exceed max. operating pressure of airbrush. If done, airbrush can explode
and cause damage which is very dangerous.
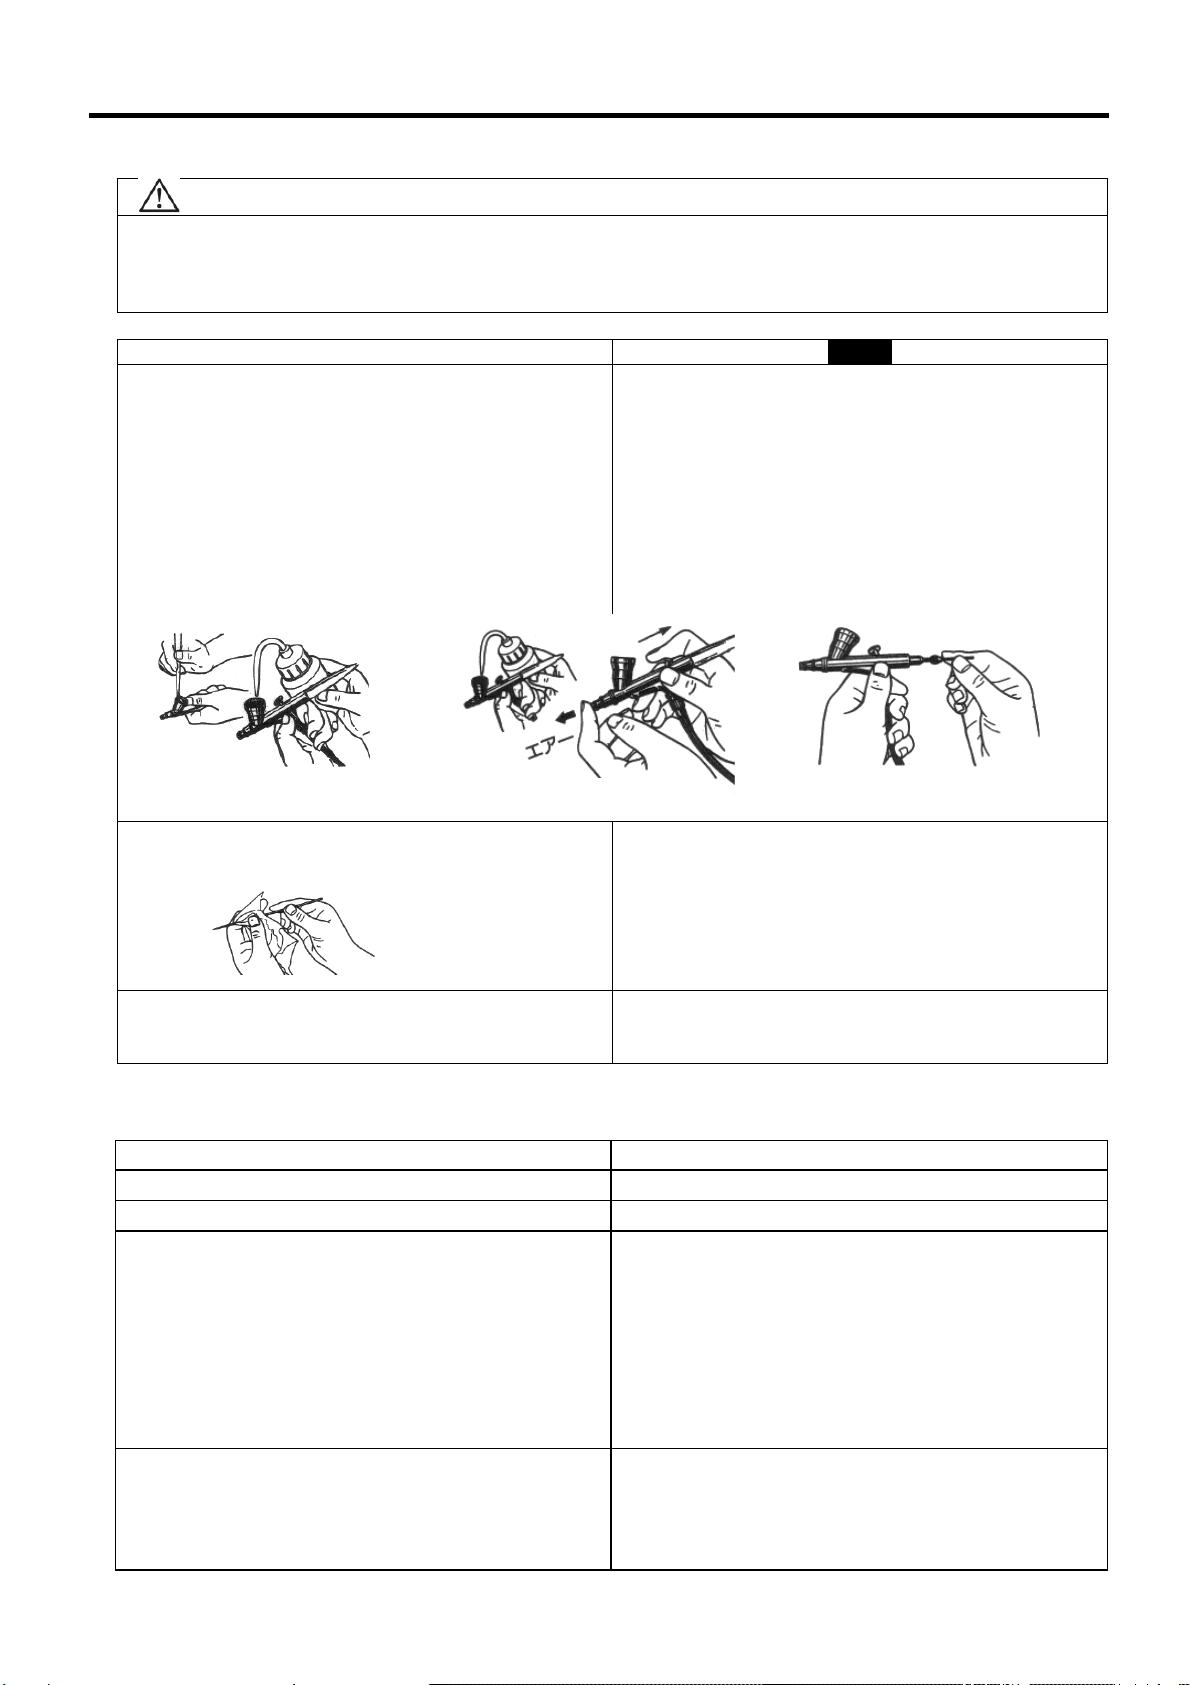
3. Always release air pressure before cleaning, disassembling or servicing. If not, remaining pressure can
cause damage to the human body by the splashing of cleaning liquid or other misuse. In order to release
pressure, stop supply of compressed air to airbrush and slightly push main lever.
Hazard to human body
1. Use airbrush in areas where air is well-ventilated by an exhaust fan.
If not, human health will be impaired by the inhalation of fluid, and danger of ignition
will increase.
2. Always wear protective clothing or gear (eyewear, gloves, respirator, etc.).
If not, cleaning liquid, etc., will come into contact with your eyes or skin and
cause inflammation. If you feel something is wrong with your eyes or skin, see a doctor immediately.
Other hazards
1. Never alter airbrush. If done, it can cause failure and poor performance.
2. Never use for food industry or chemicals. If done, it can cause an accident due to corrosion of paint
passage or health problem due to inclusion of foreign matter.
INSTRUCTION MANUAL(For Overseas Sales)
This manual contains IMPORTANT
WARNINGS and INSTRUCTIONS.
Read and understand the instruction manua
l,
before use and retain for reference.
和文取説は、裏面にあります
HP-AH・BH・CH
HP
-
AP
・
BP
・
SBP
・
CP
・
BC1P
・
BC2P

- 3 -
■1. 仕様 Specifications
形式 色材供給方式 噴霧方式 色材ノズル口径 容器容量 最高使用吹付空気圧力
Model Type of Feed Pattern Fluid Nozzle Cup MAX Air Pressure
φ(mm) (ml)( MPa )
HP-AH 0.4
HP-BH 0.2 1.5
HP-CH 0.3 7
HP-AP 0.4
HP-BP
重力式
Gravity
HP-SBP サイドカッフ Side Siphon
0.2 1.5
HP-CP 重力式 Gravity 7
HP-BC1P 0.3
HP-BC2P
吸上式
Siphon
丸吹き
Round
0.4 20
0.29
備考:
1)プリセットハンドルで色材噴出量が調整できます。
2)HP-AH・BH・CHは、空気調節ツマミで空気噴出量が調整できます。
3)HP-SBP は、カップセットを左右どちらでも取付けできます。
4)吹付空気圧力は、押しボタンを押し空気を流した時の吹付空気入口の圧力です。
5)使用温度範囲:5~40℃
Note
1)HP-AH, BH, and CH are equipped with a pre-set handle for adjusting material flow.
2)HP-AH, BH, and CH are equipped with an air adjusting valve for precise adjustment of airflow.
3)For HP-SBS, side cup can be attached to right or left side.
4)Atomizing air pressure means air pressure at airbrush inlet when main lever is depressed and air flows.
5)Operating ambient temperature: 5~40℃
HP-AH
HP-BH
HP-CH
空気調節ツマミ
air adjusting valve
押しボタン
main lever
プリセットハンドル
pre-set handle
吹付空気入口
air inlet
カップセット
cup set
HP-AP
HP-BP
HP-SBP
HP-CP
HP-BC1P
HP-BC2P

- 4 -
■2.構成部品 Parts list
※風船№32 スパナは、風船№4 ノズル取外し時(洗浄および交換)に使用する専用部品です。
HP-AH・BH・CH
HP-AP・BP・SBP・CP・BC1P・BC2P
HP-SBP
HP-BC1P
HP-BC2P

- 5 -
◎部品をご注文の際は、エアーブラシの形式および下記№、品名をご指定ください。
When ordering parts, specify model name of airbrush, ref. No. and parts name.
◎開封時、破損や欠品がないことを確認してください。
When opening package, be sure that there is no breakage or shortage of goods.
◎欠品、輸送上の損傷がある場合は、危険防止のため使用せず、お買い求め販売店または当社営業所までご連絡ください。
If there is any shortage or damage during transportation, refrain from using parts in order to avoid future risk, and contact
the store where you purchased them.
◎エアーブラシ形式は、本体に表示されています。
Model name of each airbrush is indicated on the body.
◆印は消耗品です。 ◆marked parts are replacement parts.
△▲印は共通部品を示します。 △▲marked parts are common parts.
□■印は専用部品を示します。 □■marked parts are model specific parts.
☆Body differs according to model.
No 品名 Part Name HP-AH HP-BH HP-CH HP-AP HP-BP HP-SBP HP-CP HP-BC1P HP-BC2P 備考
1 ニードルキャップ Needle Cap △ △ ▲ △ △ △ ▲ ▲ □
2 ノズルキャップ Nozzle Cap △ △ ▲ △ △ △ ▲ ▲ □
◆4 ノズル Nozzle △ △ ▲ △ △ △ ▲ ▲ □
◆6 Oリング(8*1) Head O ring △ △ △ △ △ △ △ △ △
7 本体 Body 各種☆
9 ニードルパッキンネジ Needle Packing Screw △ △ ▲ △ △ △ ▲ ▲ ▲
◆10 ピストンOリング Piston O ring △ △ △ △ △ △ △ △ △
11 ピストン Piston △ △ △ △ △ △ △
◆12 エアーバルブセット Air Valve Set △ △ ▲ △ △ △ ▲ ▲ ▲
◆17 押しボタン Main Lever △ △ △ ▲ ▲ ▲ △ □ □
19 ボタンオシニードルチャック
Needle Chucking Guide
with Auxiliary Lever △ △ ▲ △ △ △ ▲ ▲ ▲
◆21 ニードルバネ Needle Spring △ △ □ △ △ △ ▲ ▲ ▲
22 スプリングケース Spring Guide △ △ △ ▲ ▲ ▲ △ ▲ ▲
◆23 ニードル Needle △ △ ▲ △ △ △ ▲ ▲ □
24 ニードル止めネジ Needle Chucking Nut △ △ △ △ △ △ △ △ △
25 プリセットキャップセット Preset Cap Set △ △ △ ▲ ▲ ▲ △ △ △
27 空気調整ツマミセット Air Adjusting Valve Set △ △ △
◆27-1 Oリング(5×1) O ring(5×1) △ △ △ 2ヶ入 P
28 カップ蓋 Lid for Cup △ △
29 カップセット(シヨウ) Cup Set (1.5ml) ■
30 カバー Blanking Cover ■
32 スパナ Spanner △ △ △ △ △ △ △ △ △
34 ボトルセット Bottle set ■ ■
34-1 チューブセット Tube set ■ ■

- 6 -
■3.使用方法
3-1.接続
注 意
・エアーフィルタを通した圧縮空気を使用してください。作業に使用する空気が汚れていると吹き付け不良を起こします。
・購入後初めてご使用になる際は、色材通路内部の防錆油を取り除くため、洗浄液を吹き内部の洗浄を行ってください。
防錆油が残っていると、はじき等の吹き付け不良の原因となります。(はじき:塗膜が押しのけられたような凹みが生じ
る現象)
・エアーホース、色材容器は、エアーブラシにしっかりと固定してください。
エアーホースの外れ、容器の落下により、人体に傷害を起こす可能性があります。
1)エアーホースは、エアーブラシ専用の細いホースを使用してください。φ4×φ6mmチューブ等
2)吹付空気圧力は、0.10~0.29MPa にて使用します。一定圧力の空気を取り出すためには空気減圧弁、空気圧縮機から
出る水、油、塵埃を除去するためにはエアーフィルタを使用してください。
3-2吹き付け
重 要
・ノズルが詰まることがありますので、色材を細かいろ紙にて充分ろ過してから使用してください。
・ラッカーおよびセラックスワニスは、リターダ(かぶり止め)を加えないと、吹き付け面が白化(かぶり)を生じることがあり
ます。(かぶり:塗膜表面が、白くボケてツヤが無くなる現象)
・プリセットハンドルは、ニードルの引きしろを調節しながら色材噴出量を調節するものです。軽くねじ込み、当たった位置
がニードル全閉の位置です。決してプリセットハンドルを全閉の位置から締め込まないでください。さらに締め込みます
と、ノズルが破損します。
・HP-SBP 用カバーは調整しないでください。本体のカバーであり調整部ではありません。
・ノズルキャップ、ノズルの内径には、絶対キズを付けないでください。噴霧状態が悪くなる原因となります。
・種類の異なる色材(例:塗料と染料)を混ぜると色材の粘度が上がり、吹き付け不能となりますのでご注意ください。
1) 使用前にニードル止めネジをゆるめ、ニードルをノズルに当たるまで静かに押し込み、ニードル止めネジを再び締め
ておきます。洗浄液をカップに入れ、色材通路を洗浄してください。
2) 吹き始めは、①押しボタンを人差指または親指で下へ押し空気を出します。②空気を出しながら手前に引きますと色
材を噴出します。吹き終わりは、必ず押しボタンを前に戻してから指を離してください。押しボタンを下に押さない(空
気が出ない状態)で手前に引きますと色材がタレます。
エアーブラシを画面に近づけたり離したりすると図のようにパタン幅が変わります。
空気減圧弁
air regulator
空気圧縮機
air compressor
エアーフィルタ
air filter
別売り
option
エアーホース
air hose
①↓ ②→
2)
ニードル止めネジ
needle chucking
nut
ニードル
needle
1)
プリセットハンドル
preset handle

- 7 -
■3.How to operate
3-1 Connection
CAUTION
* Use clean compressed air which is filtered through air filter.
Dirty air can cause painting failure.
* When you use for the first time after unpacking, clean inside with cleaning liquid in order to remove
remaining anti-corrosive oil inside fluid passage. Remaining oil can cause painting failure such as fish
eye (dented finishing).
* Firmly fasten air hose and fluid cup to airbrush.
If not done, disconnected hose or falling cup can injure human body.
(1)Use slender and exclusive air hose for airbrush such as Ø4 x 6mm tube, etc.
(2)Use air pressure at around 0.10~0.29 MPa . Use air regulator to get stable air pressure.
Use air filter to remove moisture, oil and dust in air.
3-2 Spraying
* Filter color material with fine filter paper (cloth), or pigments may clog
nozzle.
* When spraying lacquer or varnish, add retarder to prevent whitening.
* Pre
set handle is to adjust fluid output while adjusting fluid needle.
Slightly screw the handle until it is fully closed, indicated by the touching
of the preset handle to the needle chucking nut. Never tighten preset
handle further. Further tightening can damage nozzle.
* Never adjust blanking screw which is not supposed to be adjusted.
* Never damage nozzle cap or nozzle. If done, it adversely affects
atomization.
* Do not mix different color material (example: paint and dyestuff).
If done, the viscosity will increase and cause malfunction.
(1) Before spraying, loosen needle chucking nut and gradually push needle inwards till needle touches nozzle,
and then retighten needle chucking nut. Pour cleaning liquid into cup and clean fluid passage.
(2) First push main lever with forefinger or thumb downwards in order to release air, and pull it toward you.
Then, color material will come out. Be sure to push main lever forward (original position) and detach finger
to stop spraying. If you do not push main lever (without air release), and just pull it forward, a big amount
of color material may jet out.

- 8 -
■4.保守・点検
4-1保守
警 告
・安全にご使用いただくための警告事項の機器誤用3項に従い、圧力を完全に逃がしてから作業してください。圧力が残
っていますと、誤作動、洗浄液の飛散により人体に危険があります。
・ニードルの先端がとがっているため、ご自身および他の人がケガをしないよう、取扱と保管には十分注意をして作業をし
てください。
保守方法 重 要
1.使用後は、カップ内に残った色材を捨て、水またはクリ
ーナーで充分に洗浄してください。 … 図①
・ノズル内部に異物があるような場合、ニードル止めネ
ジをゆるめニードルを2mm程度引きます。ノズルキャ
ップの先端を指で押さえ、水またはクリーナーをカップ
に入れ、押しボタンを押し空気をノズル内で逆流させ
ることでノズル内を洗浄します。(丁度うがいを行うよ
うな効果が得られます) … 図②
・ニードルを引き抜き、付着物を取り除きます。洗浄後
はニードルがノズルに当たるまで戻します。… 図③
1.洗浄不良は、パタン形状や粒子の不具合の原因となり
ます。
・ニードル先端およびノズルは、きわめて弱い部分です
から丁寧に扱ってください。
2.各部の洗浄は、洗浄液で浸したブラシで行い、ウエス
等で拭き取ります。 … 図④
2.エアーブラシ全体をシンナー等の液中に浸さないでくだ
さい。
・長時間浸漬した場合、Oリングおよびパッキン類の損
傷原因になります。
・洗浄時、ノズルキャップ、ノズルの各噴出穴およびニ
ードルは、絶対にキズをつけないでください。噴霧状
態が悪くなる原因となります。
3.分解する前は、色材通路内部を十分洗浄します。 3.ノズルを外す場合は、専用スパナを使用してください。
シート部保護のため押しボタンを引き、ニードルを引い
た状態で行ってください。
4-2点検
点 検 箇 所 部 品 交 換 基 準
1.キャップセットおよびノズルの各穴の通路 ・つぶれ、変形がある場合
2.パッキン、Oリング類 ・変形、摩耗の場合
3.ノズル、ニードル間のシート漏れ ・ノズル、ニードルの洗浄を十分行っても、漏れがある場合
交換
ノズル単品、ニードル単品で交換する場合、ニードル止め
ネジをゆるめ、ニードルがノズルに当たっている状態でニ
ードルを2~3回、回すこと(摺り合わせ)を実施し、漏れが
ないことを確認してください。
・ノズル交換の際、ノズル専用スパナを使い、加減しながら
適度に締め付けてください。他の工具の使用は、ネジ折
れや芯狂いの原因となります。
4.ニードルの先端 ・曲り折れがある場合
ニードルの曲がったものを元に直しても使用できません。
ニードル先端の曲り、折れは噴霧状態が悪くなるばかりで
なく、ノズル先端や内径にキズをつける原因となりますの
で、速やかに新品と交換してください。
図① 図② 図③
図④

- 9 -
■4.Maintenance after Painting
4-1 Maintenance
WARNING
* Always completely release pressure before maintenance in accordance with warning of safe operation
on page 2. If not done, remaining pressure can cause damage to human body by the splashing of
cleaning liquid or other misuse.
* The operator shall be fully conversant with the requirements in this manual and have enough
knowledge and experience.
* Pay full attention to the sharp tip of needle in order to avoid injury.
Maintenance procedure Important
1. After operation, be sure to empty fluid cup and
spray water or cleaning liquid for cleaning.
*When foreign matter is inside nozzle, loosen
needle chucking nut and pull needle 2mm.
Then close tip of nozzle cap with finger and pour
water or solvent into cup. Then if you push main
lever, air flows backward into nozzle which works
like gargling.
*Pull out needle and remove foreign matter.
*Clean needle and insert it till it touches nozzle.
1. Incomplete cleaning can cause adverse pattern
shape and particles.
*Be careful with handling of the tip of needle and
nozzle since they are very weak.
2. Clean other parts with attached brush soaked with
cleaning liquid and waste cloth.
2. Never immerse the whole airbrush into liquid such
as thinner.
*Immersion for a long time can damage O ring or
packing.
*Never damage holes of nozzle cap,
nozzle, or
needle. If done, it can influence atomization
adversely.
3. Fully clean fluid passage before disassembly. 3. Remove fluid nozzle while pulling needle with main
lever pulled (toward you), in order to protect seat
section.
4-2 Inspection
Where to inspect When to replace parts
1. Each hole passage of cap and nozzle *Replace if damaged or deformed.
2. Packing or o rings *Replace if damaged or worn out.
3. Seat section between nozzle and needle for leakage *Replace if there is still leakage even after you clean
nozzle and needle.
If you replace nozzle or needle
only, first match up nozzle and needle to see if there is
any leakage.
*When replacing nozzle, use exclusive tool and
gradually tighten. Use of other tools can cause
breakage of thread or incomplete centering.
4. Tip of needle *Replace if bent or broken.
You cannot repair a bent needle. Replace it with a new
one immediately. Incomplete needle can cause
adverse atomization and damage to tip of nozzle or
inner diameter.

- 10 -
■5.故障・対策
対 策状 況 発生箇所 チェック箇所 原 因
締
め
増
し
調
整
洗
浄
部
品
交
換
エアージョイント シート面のゴミ、キズ ○ ○
バルブバネ バルブバネのヘタリ ○
空気漏れ
(キャップ先端からの) エアーバルブセット部
Oリング 劣化・キズ・ゴミ ○ ○
ノズル~ニードル シート面のゴミ・キズ・
摩耗 ○ ○
ノズル締め付け不適 ○
ノズル~本体
シート面のゴミ・キズ ○ ○
ニードルバネのヘタリ ○
ニードルバネ~
スプリングケース ニードルパッキンネジ
のゆるみ ○
ニードル~
ニードルパッキンネジ
ニードルへの色材固
着によるニードル戻り
不良
○ ○
ニードル引代調整の
不適 ○
エアーブラシ先端部
ニードル~
ニードル止めネジ ニードル止めネジの
ゆるみ ○
ニードルパッキンネジ
のキズ、摩耗 ○
色材漏れ
押しボタン部
ニードルパッキンネジ ニードルパッキンネジ
のゆるみ ○
ノズル 穴の詰り、ゴミ、固着 ○
ニードル止めネジ ゆるみ ○
ニードルキャップ~
ノズルキャップ 内部の汚れ ○
色材出ず エアーブラシ先端
ニードル 先端色材固着 ○
■6.不完全パタン原因・対策
パタン 原 因 対 策
ニードル先端の色材が固着 ニードル先端の清掃
ノズルと本体との取り付けネジ部より空気が混入 ノズルを外し、ネジ部を清掃した上で再度取り
付ける
荒粒子
(スキッピング)
ノズル先端が、ノズルキャップより引っ込んでいる ノズルキャップを締め付ける
ノズル、ニードル、ニードルキャップ先端に
色材が固着 ノズル、ニードル、ニードルキャップの掃除
ニードル先端の曲り、ノズル先端の割れ、キズ 部品交換
ノズルの詰り 清掃
吹付空気圧力が低い 高くする
粗粒子
(スパッタリング)
色材が濃い 薄くする

- 11 -
■5.Problems and remedies
R1: retighten R2: adjust R3: clean R4: replace parts
Problems Place of Where to check Causes Remedies
problem R1 R2 R3 R4
Air leaks air valve air valve body dirt on or damage to seat ○ ○
(from tip of nozzle cap) air valve spring Wear on air valve spring ○
O ring wear, damage, dirt ○ ○
fluid nozzle~dirt, damage, wear on seatPaint leaks tip of brush
fluid needle
○ ○
insufficient nozzle tightening ○
fluid nozzle~body
Damaged nozzle thread ○ ○
needle spring~Wear on needle spring ○
needle spring case Loose needle packing screw ○
needle~fluid needle does not return due to
needle packing paint buildup on fluid needle.
○ ○
improper needle adjustment ○
needle~
needle chucking nut loose needle chucking nut ○
main lever needle packing damage to or wear on fluid needle
packing
○
needle packing screw loose needle packing screw ○
Paint does not come
out.
tip of air brush fluid nozzle clogged ○
needle chucking nut insufficient tightening ○
needle capnozzle cap dirty inside ○
needle clogged ○
■6.Causes and remedies of incomplete spray patterns
Pattern Causes Remedies
Skipping Paint sticks to tip of needle Clean tip of needle.
Air enters screw section between Remove nozzle, clean screw
nozzle and body. section and refit.
Tip of nozzle is set back from Tighten nozzle and cap.
tip of nozzle cap.
Spattering Paint sticks to tip of nozzle, Clean nozzle, needle or needle
needle or needle cap. cap.
Bent tip of needle, break or Replace parts.
damage to tip of nozzle
Nozzle is clogged. Clean it.
Atomizing air pressure is low. Increase it.
Paint viscosity is high. Reduce its viscosity.

- 12 -
■保証・修理サービス
・保証期間は、お買いあげの日から5年です。
・万一、故障の場合は、お買いあげの販売店または当社支店・営業所までご連絡くださ
い。保証期間中は、無償修理いたします。
・本製品の故障または不具合に伴う生産補償、営業補償など二次損失に対する補償は
致しませんのでご了承願います。
・次の場合は保証期間内でもお客様のご負担(有償)になります。
・取扱説明書の注意事項を守られなかったことによる故障および損傷
・お客様の取扱上の不注意による故障および損傷
・消耗品の交換・修理
・天災、地変、火災、地震、水害、塩害、落雷、公害などによる故障および損傷
・純正部品以外の部品が使用されている場合
・指定の修理店以外による修理がなされている場合
・保証は日本国内においてのみ有効です。This Warranty is valid only in japan.
【お問い合わせ窓口】
◆修理・保守に関するお問い合わせ
当社支店・営業所、もしくはご購入いただいた(お問い合わせ先は当社ホームページをご確認ください)
◆技術的なお問い合わせ、ご意見、ご希望など当社支店・営業所又はお客様相談室までご連絡下さい。
(支店・営業所のお問い合わせ先は当社ホームページをご確認ください)
※上記のお問い合わせ先は変更される場合がございますので、最新のお問い合わせ先につきましては当社ホームページをご覧ください。
お客様相談室
: 0800-100-1926
※携帯電話・PHS からもご利用いただけます。
(受付時間:月~金 9:00~12:00 / 13:00~17:00 土日・祝日・弊社指定休日を除く)
フリーダイヤル
No.1614-02
コードNo.08530510
〒223-8501 横浜市港北区新吉田町3176
ホームページ http://www.anest-iwata.co.jp/

クイックスタートガイド
詳細は下記のホームページからご確認いただけます
www.iwata-airbrush.com
TO AIR SOURCE
PAINT
AIR
AIR
USE INDEX
FINGER
PAINT
Turn your compressor on.
Using your index nger for
control, push down on the
main lever for air ow. With
main lever pushed down, pull
back to release paint ow. This
is called dual action.
For ner lines, turn the air
compressor pressure (psi)
down, get close to paint
surface then push down and
pull back on the main lever
just a little.
Clean your airbrush between
color changes and at the end
of your work session.
BEGIN
1
PAINT
START AIRBRUSHING
2
Quick Start Guide
3
For further in-depth instruction and information, please go to
www.iwata-airbrush.com
SIPHON FEED AIRBRUSH
TO AIR SOURCE
PAINT
BEGIN
1
PAINT
2
塗料
エアー
エアー
人差し指を使う
塗料
コンプレッサの電源を入れて
ください。人差し指でボタンを
下に押すと、空気が出ます。ボ
タンを下に押したまま後ろに
引くと、塗料がでます。これを
ダブルアクションと呼びます。
細い線を描くときはコンプレッ
サの圧力を下げて塗面にエア
ーブラシを近づけて、トリガー
の引き代は小さくしてください。
色を変える際、また作業を終了
する際はエアーブラシを洗浄
してください。
はじめに
1
塗料
塗装開始
2
3
付属のボトルに塗料を入れ、
エアーブラシに差し込んでく
ださい(ボトルはネジ式では
ありませ ん )
ホース(付属または別売り)にエ
アーブラシを取り付けてくださ
い。ホースのもう片方をコンプレ
ッサ(キットの付属または別売り
)に取り付けてください。
エアー源へ
吸上式エアーブラシ
QSG BF-IM-MCF
Begin by attaching the small
end of an Iwata airbrush hose
(included with some models or
sold separately) to your airbrush.
Attach the other end of your
airbrush hose to your air source.
(Compressor sold separately
or included with kits.)
Put paint into the included
siphon feed bottle and attach
the bottle to the bottom of
the airbrush by pushing it into
the airbrush. (Bottle does not
screw in.)

To clean your airbrush, ll a bottle with the appropriate cleaner for your
medium (such as airbrush cleaner) or use water (good for water-based
mediums) and attach it to the airbrush. Spray airbrush until it sprays clear.
NEVER soak your entire airbrush in any liquid. NEVER store your
airbrush with spray medium or cleaning agents in the uid cup.
CLEANING
PRESET AND/OR
CUTAWAY HANDLES
PRESET
NEEDLE
CHUCKING NUT
Some Iwata airbrushes are equipped with a
preset and/or cutaway handle. The knob on
the preset handle limits how far back you
can pull the main lever allowing you to set
a specic line width each time you spray.
The cutaway handle reveals the needle
chucking nut. Pull the needle chucking nut
back and push main lever down and back
when ushing cleaner through airbrush.
困ったときは?
プリセットキャップ
ニ ード ルトメ ネ ジ
エアーブラシの洗浄
Iwataエアーブラシにはプリセット或いは
カットアウェイハンドルが装備されている
ものがあります。プリセットハンドルにつ
いているツマミはトリガー(ボタン)の引
き代を固定でき、一定の塗料噴出量で作
業ができます。
カットアウェイハンドルは、ニードルトメ
ネジが見えます。洗浄液を捨て吹きする
際にはニードルトメネジを後ろに引っ張
り、トリガーを押してください。
プリセット・カットアウ
ェイハンドル
各地の支店・営業所、もしくはご購入された販売店までお問い合わせください。
洗浄の際はボトルに洗浄液(水性の塗料は水で洗浄可能です)を入れ、
何度か捨て吹きをして、液体が綺麗になるまで繰り返してください。
エアーブラシ全体を液体に浸さないで下さい。カップに塗料、洗浄液、
などを入れたままエアーブラシを保管しないで下さい。
ANEST IWATA-MEDEA, INC.
Portland, Oregon U.S.A.
+1-503-253-7308 (M-F)
info@iwata-medea.com
www.iwata-airbrush.com
ANEST IWATA AUSTRALIA PTY LTD.
Mt. Druitt, NSW
+61-(02)-9853-2000
www.anest-iwata.com.au
ANEST IWATA STRATEGIC CENTER
Cardano al Campo, Italy
+39-0331-733120
www.anest-iwataeu.com
ANEST IWATA SOUTH-EAST ASIA CO., LTD.
Bangkok, Thailand
+66-(0)-2643-2870
www.anest-iwatasoutheastasia.com
ANEST IWATA SHANGHAI
Shanghai, China
+86-(0)21-6407-9713 / 15 / 16
www.anest-iwata-sh.com
ANEST IWATA RUS LLC
Moscow, Russia
+7-495-938-77-28
www.anestiwata.ru
ANEST IWATA CORPORATION
Yokohama, Japan
+81-(0)45-591-1111
www.anest-iwata.co.jp
ANEST IWATA (U.K.) LTD.
Neots Cambs, England
+44-(0)1480-405419
www.anest-iwata.co.uk
ANEST IWATA MOTHERSON LTD.
Uttar Pradesh, India
+91-(0)120-4600500 / 14 / 17
www.aircompressors.com
ANEST IWATA SOUTH AFRICA (PTY) LTD.
Johannesburg, Republic of South Africa
+27-11-463-2169/2265/2223
www.anest-iwata.co.za
CENTURY TRADING CO., LTD.
Seoul, Korea
82-2-2163-0300
www.centrading.co.kr
If you have any issues or warranty service questions, contact your
before returning to your place of purchase.
NEED ASSISTANCE

クイックスタートガイド
詳細は下記のホームページからご確認いただけます
www.iwata-airbrush.com
コンプレッサの電源を入れて
ください。人差し指でボタンを
下に押すと、空気が出ます。ボ
タンを下に押したまま後ろに
引くと、塗料がでます。これを
ダブルアクションと呼びます。
細い線を描くときはコンプレッ
サの圧力を下げて塗面にエア
ーブラシを近づけて、トリガー
の引き代は小さくしてください。
色を変える際、また作業を終了
する際はエアーブラシを洗浄
してください。
はじめに
1
塗料
塗装開始
2
3
カップやボトルは左右どちら
でも接続できます。接続口の
反対側にはきちんとカバーを
付けてください。
カップやボトルをきちんとエ
アーブラシに差し込んでくだ
さい。カップのフタを外して
角度を調整し、塗料を少量ず
つ入れてください。ボトルタ
イプをご使用の方は塗料を
ボトルに入れてからエアーブ
ラシに差し込んでください。
ホース(付属または別売り)にエ
アーブラシを取り付けてくださ
い。ホースのもう片方をコンプレ
ッサ(キットの付属または別売り
)に取り付けてください。
エアー源へ
サイドカップタイプエアーブラシ
Cups and bottles can be used
on either side of airbrush by
interchanging blanking cover.
Blanking cover needs to be on
opposite side of cup or bottle
to spray.
Push color cup into airbrush.
Angle to position and add a
small amount of paint. If using
a bottle, ll the bottle with
paint and push into airbrush.
BEGIN
1
PAINT
START AIRBRUSHING
2
Quick Start Guide
3
SIDE FEED AIRBRUSH
TO AIR SOURCE
AIR
USE INDEX
FINGER
CUP
PAINT
BOTTLE
AIR
PAINT
BLANKING
COVER
Begin by attaching the small
end of an Iwata airbrush hose
(included with some models or
sold separately) to your airbrush.
Attach the other end of your
airbrush hose to your air source.
(Compressor sold separately
or included with kits.)
For further in-depth instruction and information, please go to
www.iwata-airbrush.com
Turn your compressor on.
Using your index nger for
control, push down on the main
lever for air ow. With the main
lever pushed down, pull back to
release paint ow. This is called
dual-action.
For ner lines, turn the air
compressor pressure (psi) down,
get close to paint surface then
push down and pull back on
tthe main lever just a little.
Clean your airbrush between
color changes and at the end
of your work session.
カップ
PAINT
ボトル
カバー
エアー
人差し指を使う
エアー
塗料
QSG SF-IM-MCF

To clean your airbrush, empty excess paint from cup. Flush out airbrush
with the appropriate cleaner for your medium (such as airbrush cleaner)
or use water (good for water-based mediums) and spray airbrush until it
sprays clear. Wipe out cup as necessary.
For bottles, replace with a bottle containing cleaning solution and spray
until the solution is clear and clean.
CLEANING
プリセットキャップ
ニ ード ルトメ ネ ジ
エアーブラシの洗浄
Iwataエアーブラシにはプリセット或いは
カットアウェイハンドルが装備されている
ものがあります。プリセットハンドルにつ
いているツマミはトリガー(ボタン)の引
き代を固定でき、一定の塗料噴出量で作
業ができます。
カットアウェイハンドルは、ニードルトメ
ネジが見えます。洗浄液を捨て吹きする
際にはニードルトメネジを後ろに引っ張
り、トリガーを押してください。
プリセット・カットアウ
ェイハンドル
困ったときは?
各地の支店・営業所、もしくは ご購入された販売店までお問い合わせください。
NEVER soak your entire airbrush in any liquid. NEVER store your
airbrush with spray medium or cleaning agents in the uid cup.
PRESET AND/OR
CUTAWAY HANDLES
PRESET
NEEDLE
CHUCKING NUT
Some Iwata airbrushes are equipped with a
preset and/or cutaway handle. The knob on
the preset handle limits how far back you
can pull the main lever allowing you to set
a specic line width each time you spray.
The cutaway handle reveals the needle
chucking nut. Pull the needle chucking nut
back and push main lever down and back
when ushing cleaner through airbrush.
ANEST IWATA-MEDEA, INC.
Portland, Oregon U.S.A.
+1-503-253-7308 (M-F)
info@iwata-medea.com
www.iwata-airbrush.com
ANEST IWATA AUSTRALIA PTY LTD.
Mt. Druitt, NSW
+61-(02)-9853-2000
www.anest-iwata.com.au
ANEST IWATA STRATEGIC CENTER
Cardano al Campo, Italy
+39-0331-733120
www.anest-iwataeu.com
ANEST IWATA SOUTH-EAST ASIA CO., LTD.
Bangkok, Thailand
+66-(0)-2643-2870
www.anest-iwatasoutheastasia.com
ANEST IWATA SHANGHAI
Shanghai, China
+86-(0)21-6407-9713 / 15 / 16
www.anest-iwata-sh.com
ANEST IWATA RUS LLC
Moscow, Russia
+7-495-938-77-28
www.anestiwata.ru
ANEST IWATA CORPORATION
Yokohama, Japan
+81-(0)45-591-1111
www.anest-iwata.co.jp
ANEST IWATA (U.K.) LTD.
Neots Cambs, England
+44-(0)1480-405419
www.anest-iwata.co.uk
ANEST IWATA MOTHERSON LTD.
Uttar Pradesh, India
+91-(0)120-4600500 / 14 / 17
www.aircompressors.com
ANEST IWATA SOUTH AFRICA (PTY) LTD.
Johannesburg, Republic of South Africa
+27-11-463-2169/2265/2223
www.anest-iwata.co.za
CENTURY TRADING CO., LTD.
Seoul, Korea
82-2-2163-0300
www.centrading.co.kr
If you have any issues or warranty service questions, contact your
before returning to your place of purchase.
NEED ASSISTANCE
洗浄の際はカップに残った塗料を出してから、洗浄液(水性の塗料は水
で洗浄可能です)を何度か捨て吹きをして、液体が綺麗になるまで繰り
返してください。
ボトルタイプをご使用の場合は、洗浄液の入ったボトルに付替えて同様
の作業を行ってください。
エアーブラシ全体を液体に浸さないで下さい。カップに塗料、洗浄液、
などを入れたままエアーブラシを保管しないで下さい。

Turn your compressor on.
Using your index nger for
control, push down on the
main lever for air ow. With
main lever pushed down,
pull back to release paint ow.
This is called dual action.
For ner lines, turn the air
compressor pressure (psi)
down, get close to paint
surface then push down and
pull back on the main lever
just a little.
Clean airbrush between color
changes and at the end of
your paint session.
BEGIN
1
PAINT
START AIRBRUSHING
2
Quick Start Guide
3
For further in-depth instruction and information, please go to
www.iwata-airbrush.com
GRAVITY FEED AIRBRUSH
TO AIR SOURCE
AIR
USE INDEX
FINGER
AIR
PAINT
FLUID
CAVITY
PAINT
PAINT
If your airbrush has a cup with a
lid, remove by pulling o. Put a
few drops of paint into the color
cup and push lid back on.
If your airbrush has no cup,
then put a drop or two of paint
directly into the uid cavity
found on top of airbrush.
Begin by attaching the small
end of an Iwata airbrush hose
(included with some models or
sold separately) to your airbrush.
Attach the other end of your
airbrush hose to your air source.
(Compressor sold separately
or included with kits.)
コンプレッサの電源を入れてく
ださい。人差し指でボタンを下
に押すと、空気が出ます。ボタン
を下に押したまま後ろに引くと、
塗料がでます。これをダブルア
クションと呼びます。
細い線を描くときはコンプレッ
サの圧力を下げて塗面にエア
ーブラシを近づけて、トリガー
の引き代は小さくしてください。
色を変える際、また作業を終了
する際はエアーブラシを洗浄し
てください。
はじめに
1
塗料
塗装開始
2
クイックスタートガイド
3
詳細は下記のホームページからご確認いただけます
www.iwata-airbrush.com
重力式エアーブラシ
エアー源へ
エアー
人差し指を使う
エアー
塗料
塗料受け
塗料
塗料
フタがついている場合は、フタ
を外してカップに少量塗料を入
れてください。入れたらフタを
閉めてください。
フタやカップが無いエアーブラ
シの場合は、カップ或いは本体
上部にあけられているスペース
に直接、数滴ずつ塗料を入れて
ください。
ホース(付属または別売り)に
エアーブラシを取り付けてく
ださい。ホースのもう片方を
コンプレッサ(キットの付属ま
たは別売り)に取り付けてく
ださい。
QSG GF-IM-MCF
LID
フタ

MAC VALVE
MAC VALVE
Some Iwata airbrushes are also equipped
with the MAC Valve (Micro-Air Control
Valve). Turning the knob adjusts the air
ow (psi) for ne control of paint spray.
NEVER soak your entire airbrush in any liquid. NEVER store your
airbrush with spray medium or cleaning agents in the uid cup.
To clean your airbrush, empty excess paint from cup or uid cavity and
wipe out as necessary. Flush out airbrush with the appropriate cleaner
for your medium (such as airbrush cleaner) or use water (good for
water-based mediums) and spray until airbrush sprays clear.
CLEANING
困ったときは?
プリセットキャップ
ニ ード ルトメ ネ ジ
MACバルブ
(空気調節ツマミ)
IwataエアーブラシにはMACバルブ(空気
調節ツマミ)が装備されているものがあり
ます。ツマミを回すことで空気量が調節で
き、より繊細なコントロールが可能となり
ます。
洗浄の際はカップに残った塗料を出してから、洗浄液(水性の塗料は水
で洗浄可能です)を何度か捨て吹きをして、液体が綺麗になるまで繰り
返してください。ボトルタイプをご使用の場合は、洗浄液の入ったボト
ルに付替えて同様の作業を行ってください。
エアーブラシの洗浄
Iwataエアーブラシにはプリセット或いは
カットアウェイハンドルが装備されている
ものがあります。プリセットハンドルにつ
いているツマミはトリガー(ボタン)の引
き代を固定でき、一定の塗料噴出量で作
業ができます。
カットアウェイハンドルは、ニードルトメ
ネジが見えます。洗浄液を捨て吹きする
際にはニードルトメネジを後ろに引っ張
り、トリガーを押してください。
プリセット・カットアウ
ェイハンドル
MACバルブ
(空気調節ツマミ)
各地の支店・営業所、もしくはご購入された販売店までお問い合わせください。
PRESET AND/OR
CUTAWAY HANDLES
PRESET
NEEDLE
CHUCKING NUT
Some Iwata airbrushes are equipped with a
preset and/or cutaway handle. The knob on
the preset handle limits how far back you
can pull the main lever allowing you to set
a specic line width each time you spray.
The cutaway handle reveals the needle
chucking nut. Pull the needle chucking nut
back and push main lever down and back
when ushing cleaner through airbrush.
ANEST IWATA-MEDEA, INC.
Portland, Oregon U.S.A.
+1-503-253-7308 (M-F)
info@iwata-medea.com
www.iwata-airbrush.com
ANEST IWATA AUSTRALIA PTY LTD.
Mt. Druitt, NSW
+61-(02)-9853-2000
www.anest-iwata.com.au
ANEST IWATA STRATEGIC CENTER
Cardano al Campo, Italy
+39-0331-733120
www.anest-iwataeu.com
ANEST IWATA SOUTH-EAST ASIA CO., LTD.
Bangkok, Thailand
+66-(0)-2643-2870
www.anest-iwatasoutheastasia.com
ANEST IWATA SHANGHAI
Shanghai, China
+86-(0)21-6407-9713 / 15 / 16
www.anest-iwata-sh.com
ANEST IWATA RUS LLC
Moscow, Russia
+7-495-938-77-28
www.anestiwata.ru
ANEST IWATA CORPORATION
Yokohama, Japan
+81-(0)45-591-1111
www.anest-iwata.co.jp
ANEST IWATA (U.K.) LTD.
Neots Cambs, England
+44-(0)1480-405419
www.anest-iwata.co.uk
ANEST IWATA MOTHERSON LTD.
Uttar Pradesh, India
+91-(0)120-4600500 / 14 / 17
www.aircompressors.com
ANEST IWATA SOUTH AFRICA (PTY) LTD.
Johannesburg, Republic of South Africa
+27-11-463-2169/2265/2223
www.anest-iwata.co.za
CENTURY TRADING CO., LTD.
Seoul, Korea
82-2-2163-0300
www.centrading.co.kr
If you have any issues or warranty service questions, contact your
before returning to your place of purchase.
NEED ASSISTANCE
エアーブラシ全体を液体に浸さないで下さい。カップに塗料、洗浄液、
などを入れたままエアーブラシを保管しないで下さい。
This manual suits for next models
8
Table of contents
Other Iwata Airbrush manuals

Iwata
Iwata High Performance Plus Series Operation manual

Iwata
Iwata Revolution HP-AR Manual

Iwata
Iwata Kustom Hi-Line TH Manual

Iwata
Iwata Revolution Series Instruction Manual

Iwata
Iwata Neo Airbrush Series Instruction Manual

Iwata
Iwata Eclipse HP-BCS User manual

Iwata
Iwata NEO FOR IWATA TRN1 Instruction Manual

Iwata
Iwata HP-BS User manual