Iwata Neo Airbrush Series Instruction Manual

1
CN | BCN
Operating Instruction Manual
Iwata Revolution Series and NEO For Iwata Series airbrushes deliver soft, eortless coverage at low air pressures.
Fine atomization is achieved with the smallest of air compressors, making these airbrushes a simple choice for medium
spray applications and for anyone wanting to start airbrushing for the rst time.

ANEST IWATA-MEDEA, INC.
Portland, Oregon U.S.A.
+1-503-253-7308 (M-F)
www.iwata-airbrush.com
ANEST IWATA AUSTRALIA PTY LTD.
Mt. Druitt, NSW
+61-(02)-9853-2000
www.anest-iwata.com.au
ANEST IWATA STRATEGIC CENTER
Cardano al Campo, Italy
+39-0331-733120
www.anest-iwataeu.com
ANEST IWATA SOUTH-EAST ASIA CO., LTD.
Bangkok, Thailand
+66-(0)-2643-2870
www.anest-iwatasoutheastasia.com
ANEST IWATA SHANGHAI
Shanghai, China
+86-(0)21-6407-9713 / 15 / 16
www.anest-iwata-sh.com
ANEST IWATA RUS LLC
Moscow, Russia
+7-495-938-77-28
www.anestiwata.ru
ANEST IWATA CORPORATION
Yokohama, Japan
+81-(0)45-591-1111
www.anest-iwata.co.jp
ANEST IWATA (U.K.) LTD.
Neots Cambs, England
+44-(0)1480-405419
www.anest-iwata.co.uk
ANEST IWATA MOTHERSON LTD.
Uttar Pradesh, India
+91-(0)120-4600500 / 14 / 17
www.aircompressors.com
ANEST IWATA SOUTH AFRICA (PTY) LTD.
Johannesburg, Republic of South Africa
+27-11-463-2169/2265/2223
www.anest-iwata.co.za
CENTURY TRADING CO., LTD.
Seoul, Korea
82-2-2163-0300
www.centrading.co.kr
If you have any issues or warranty service questions, contact your
local ANEST IWATA aliate before returning to your place of purchase.
NEED ASSISTANCE
ASSEMBLY
TO COMPRESSOR
TO AIRBRUSH
TO COMPRESSOR
TO AIRBRUSH
CN GRAVITY FEED
DUAL ACTION AIRBRUSH
BCN SIPHON FEED
DUAL ACTION AIRBRUSH
Needle chucking guide
needle
main lever
color cup
needle cap
nozzle cap
bottle
attachment
handle
main lever
needle cap
nozzle cap handle
air hoseair hose
Fine-Line Spray
1. Depress the main lever to start air flow.
2. Position the airbrush close to the surface, between 1/16 and 1/2 inch is common.
3. Pull the main lever back slightly to start the flow of paint.
Line thickness can be controlled by adjusting the distance between the airbrush
and the surface and also by varying the paint flow by manipulating the main
lever’s position.
Wide-Line and Background Spraying
1. Depress the main lever.
2. Position the airbrush further away from the surface, from 1 to 6 inches is common.
3. Pull the main lever back much farther releasing more paint to cover the bigger area.
Increase the distance between the airbrush and painted surface to control the line’s
width. Increasing the air pressure will also aect the spray width.
Air Pressure
For the NEO, working pressures generally vary between 10 and 60 psi, depending on
what type of work is being done and what textures are desired. A good working pres-
sure may average around 8-20 psi. The viscosity of the paint and your desired spray
characteristics will also aect your ideal pressure. As a general rule, larger amounts
of paint or thicker paints, will be sprayed with higher pressures.
WARNING: Do not exceed 100psi.
Paint Preparation
For non-airbrush-ready paints, proper preparation, including ltering the paint
through a nylon mesh, is recommended for best performance. Paint should be
thinned. It is best to prepare paint relatively thin and make repeated passes across
the work to achieve the desired shade. This will also improve the quality of your
work and decrease the cleaning time of your airbrush.
Safety Tips
• Always spray in a well-ventilated area.
• Use the appropriate respirator to safely lter out the paint vapors particular to the
kind of paint you are using.
• Wear eye protection to prevent paint contact with eyes.
• Never use air pressure that exceeds the airbrush’s limit (100 psi).
GENERAL OPERATION
2

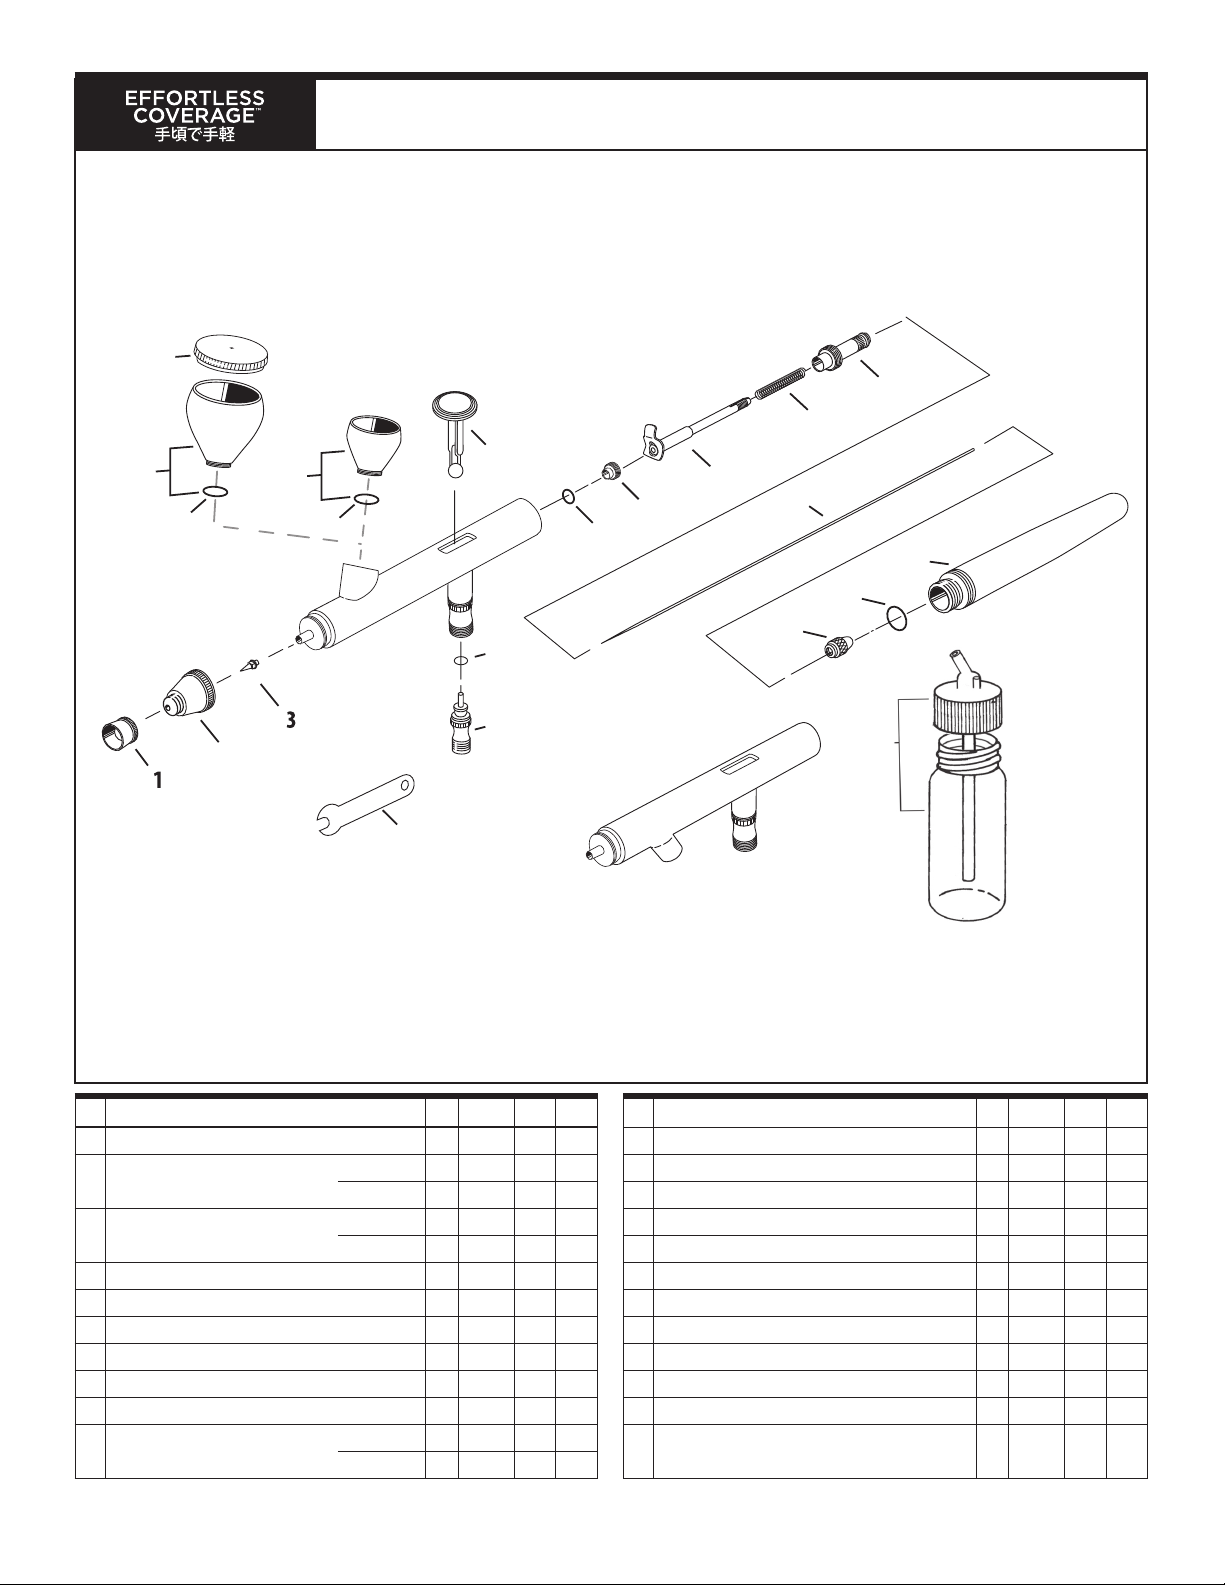
Cleaning the Airbrush (BCN)
1. Remove the paint bottle.
2. Attach a bottle containing the appropriate cleaning solution.
(Note: Medea Airbrush Cleaner works great for water-based media.)
3. Spray until the solution sprays clear.
4. Remove the bottle of cleaning solution.
5. Spray air until the airbrush sprays dry.
6. Attach a bottle containing the next color.
7. Repeat cleaning procedure when nished.
Cleaning the Airbrush (CN)
1. Dump out the color cup’s excess paint.
2. Rinse the cup with the appropriate cleaning solution.
(Note: Medea Airbrush Cleaner works great for water-based media.)
3. Use a paper towel to wipe out any left-over paint.
4. Fill the bottom of the cup with cleaner.
5. Spray cleaner until the spray is clear.
6. Add the next color to the color cup.
7. Repeat cleaning procedure when nished.
Cleaning the Needle (BCN, CN)
Before removing the needle, clean the airbrush as recommended.
1. Unscrew the handle from the airbrush body.
2. Loosen the needle chucking nut.
3. Gently pull the needle straight out.
4. Fold a soft cloth damp with cleaner over the needle.
5. Rotate the needle to gently wipe the residual paint o.
6. Carefully insert the needle into the airbrush until it seats fully against the nozzle.
CAUTION: The most probable time to damage the needle is when the needle
passes through the main lever. If the needle stops abruptly, retract and examine
the trigger mechanism for proper assembly and re-insert the needle.
7. Tighten the needle chucking nut nger tight.
• Pull the main lever back and forth to visually conrm the needle’s ability to move.
8. Screw the handle back onto the airbrush body.
Before Each Session
Spray water or the appropriate cleaning solution through the airbrush to make
sure the airbrush is working properly.
After Each Session
Or any time the airbrush becomes clogged:
1. Increase the air pressure.
2. Spray cleaning solution for a short time.
3. Clean the needle if necessary.
Cleaning the airbrush this way helps clean the paint passage, the nozzle
and the needle thoroughly. Note: Prolonged use of solvents may cause the
solvent-resistant o-ring to swell.
Periodically
To ensure smooth main lever action lubricate the needle and the main lever
mechanism when necessary.
1. Unscrew the handle.
2. Loosen the needle chucking nut.
3. Remove the needle.
4. Coat the needle lightly at the front where the taper starts with a high-quality
lubricant, like Iwata Lube.
5. Wipe the needle with a soft, clean cloth, leaving a light coat of lube behind.
6. Re-insert the needle gently into the airbrush.
7. Tighten the needle chucking nut.
8. Screw the handle onto the airbrush body.
Use a tiny drop of lube on the main lever’s piston. DO NOT over-lube the needle
or the main lever mechanism, since it is possible to transfer excess lube into the
nozzle causing severe paint ow problems. DO NOT use light machine oil or WD-40
for lubrication. These will cause the needle to stick as it moves through the needle
packing o-ring.
CAUTION: If it becomes absolutely necessary to dismantle the airbrush
remember that in most situations tools are not needed.
MAINTENANCE
3
NEVER soak your entire airbrush in any liquid. NEVER
store your airbrush with spray medium or cleaning
agents in the uid cup.
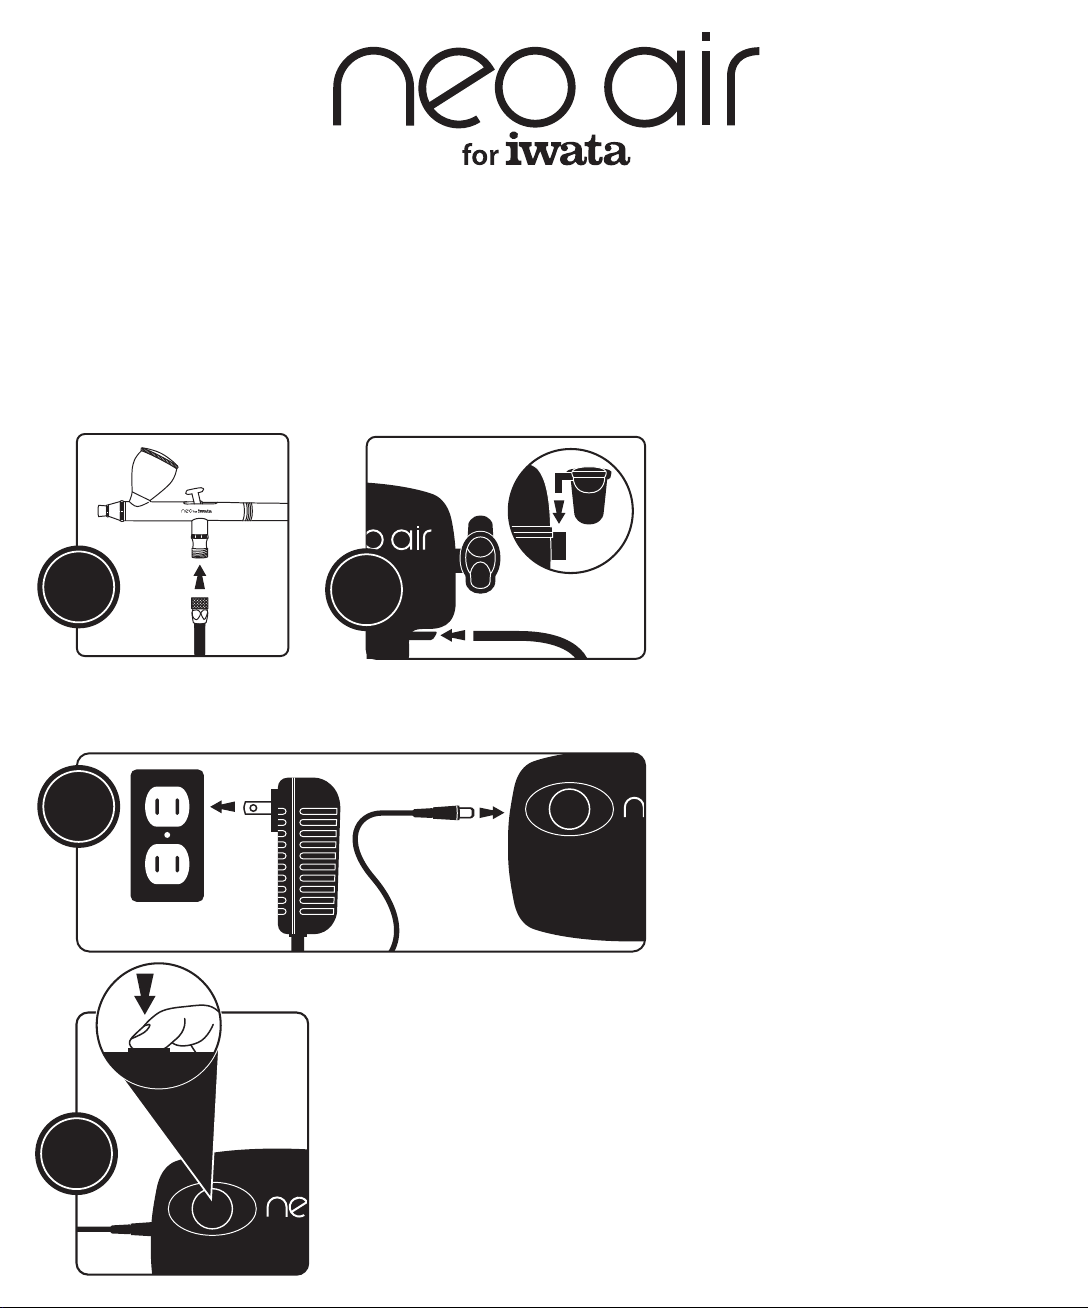
Begin by attaching the small end of an
Iwata air hose (sold separately) to your
airbrush.
Attach the other end of your airbrush
hose to an air source such as the NEO
AIR for Iwata Miniature Air Compressor
(sold separately).
Use airbrush-ready paint or be sure your paint is thinned to the
consistency of skim milk. Thicker paint may require spraying at a
higher psi.
BEGIN
1
PAINT
2
TO AIR SOURCE
Quick Start Guide
For further in-depth instruction and information, please go to
www.iwata-neo.com
For the gravity-feed NEO CN, remove lid by pulling o. Put a few drops of paint
into the color cup and push lid back on. (Note you have 2 choices of cup size).
For the siphon-feed NEO BCN, put paint into the Big Mouth Bottle (included)
and attach the bottle to the bottom of the airbrush by pushing it into the
airbrush. (Bottle does not screw in.)
IMPORTANT NOZZLE INFORMATION
SIPHON-FEED NEO
BIG MOUTH BOTTLE
GRAVITY-FEED NEO
PAINT
PAINT
LID
はじめに
塗料
吸上式NEO
付属ボトル
重力式NEO
塗料
塗料
フタ
Never remove the nozzle unless it is damaged or clogged.
Always keep your airbrush clean. Never leave paint in your airbrush as dried paint can
clog a nozzle. Although engineered from durable, high-quality materials, the nozzle is
small and delicate. Accidental damage caused by cross-threading, over-tightening,
dropping the airbrush, forcing a needle or tools into the nozzle and normal wear are
not covered under the warranty. Replacement parts and repair services are available
through your local aliate.
1
2
エアー源へ
ノズルについての大切なお知らせ
詰まりや 損 傷 が な い 限りはノズ ルを 取り外さないでください。
常にエアーブラシをきれいに保ってください。塗料が乾くとノズルが詰まってしまいま
すので、塗料がエアーブラシに残らないようにしてください。丈夫で高品質な材料か
ら作られていてもノズルは小さくデリケートな部品です。過度の締め付け、落下、ニー
ドルやツールの無理な挿入、ネジ山の損傷など不注意による損傷および消耗は保証
の対象外です。部品の交換や修理サービスなどについては現地のアネスト岩田グル
ープ各社までお問合せください。
クイックスタートガ イド
詳細は下記のホームページからご確認いただけます
www.iwata-airbrush.com/links-manuals.html
エアーブラシにエアーホース(別売り)
の片方を繋いでください。
エアーホースのもう片方を、エアーブ
ラシ用ミニコンプレッサ(別売り)など
のエアー源へ繋いでください。
塗料はエアーブラシ用塗料を使用するか、牛乳程度まで薄めてくだ
さい。粘度の高い塗料は吹付けに高めの圧力が必要となります。
重力式NEO CNは、フタを外してカップに数滴塗料を入れて、フタを戻してくだ
さい。(カップのサイズは2タイプ ありま す )
吸上式NEO BCNは、付属のボトルに塗料を入れて、ボトルをエアーブラシ下部
に差し入れてください。(ボトルはネジ式ではありません)

4
NEO FOR IWATA AIRBRUSH SERIES
BCN / CN
BCN
13
2
14
15
6
7
8
9
10
5
11
CN 12
18
17A
4
20
16A
17B 16B
19
# ITEM DESCRIPTION
PRICE
CODE ITEM # BCN CN
1Needle Cap AN1101 n n
2 Nozzle Cap N3 A N1401 xn
N5 A N1402 nx
3 Nozzle N3 C N0801 xn
N5 C N0802 nx
4 Main Lever A N1001 n n
5 Needle Packing (PTFE) A N1501 n n
6 Needle Packing Screw A N1251 n n
7 Needle Chucking Guide A N1151 n n
8 Needle Spring A N1351 n n
9 Spring Guide A N1701 n n
10 Needle N3 A N0751 xn
N5 A N0752 nx
# ITEM DESCRIPTION
PRICE
CODE ITEM # BCN CN
11 Needle Chucking Nut A N1201 n n
12 Handle O-ring A N1051 n n
13 Handle C N0901 n n
14 Air Valve O-ring A N1502 n n
15 Valve Set With Valve Spring A N 0201 n n
16A Cup (Gravity) 0.10 oz / 3 ml D N0701 xn
16B Cup (Gravity) O-ring 0.10 oz / 3 ml A N0712 xn
17A Cup (Gravity) 0.24 oz / 7 ml C N0702 xn
17B Cup (Gravity) O-ring 0.24 oz / 7 ml A N0713 xn
18 Cup (Gravity) Lid 0.24 oz / 7 ml A N0954 xn
19 Bottle 2 oz / 60 ml - A4702 nx
20 Spanner AN1651 n n
n= yes x= no OPT = optional

Nozzle
In time, the nozzle may wear or be damaged and may need to be replaced.
1. Unscrew the handle.
2. Loosen the needle chucking nut.
3. Gently pull the needle part way back. It doesn’t need to be fully pulled out.
4. Unscrew the needle cap and the nozzle cap.
5. Unscrew the nozzle counter-clockwise with the provided wrench.
6. Screw the new nozzle into the airbrush body with your ngers.
7. Slightly tighten the nozzle with the provided wrench.
• DO NOT OVER TIGHTEN!
8. Screw the needle cap and nozzle cap onto the airbrush body.
9. Push the needle all the way forward until it seats with the new nozzle.
10. Tighten the needle chucking nut.
11. Screw the handle onto the airbrush body.
TIP: Keep a spare nozzle on hand for unforeseen accidents.
Needle
Needles are subject to easy physical damage because of the long tapered, extremely
ne tip. If the needle point becomes severely bent, it must be straightened before
pulling it back through the nozzle. If not, the bent needle might damage the nozzle
as it’s pulled through.
TIP: Keep a spare needle on hand for unforeseen accidents.
REPLACEMENT PARTS AND ACCESSORIES REFER TO MASTER PARTS LIST ON PAGE 4
WARRANTY
All Iwata airbrushes are warranted against all manufacturing defects of material and manufacture or workmanship for a period of FIVE years
from date of purchase. This warranty does not cover needles, nozzles, o-rings and internal packings since these parts need to be replaced
occasionally due to normal wear. Any other parts or materials that are or become defective so as not to be usable within this period will be
repaired or replaced. This warranty does not cover damage caused by negligence or airbrushes which have been altered or abused in any way.
Copyright © 2018 ANEST Iwata-Medea, Inc. All rights reserved.
NEOCNBCN-IM-MIN

ON/OFF
ON/OFF
4
1
Be sure your paint is thinned to the consistency of
skim milk. Thick paint may clog your airbrush.
After 10 minutes of continuous use the motor will
automatically shut o. Turn back on to use.
塗料が脱脂粉乳程度の粘度まで薄まっていることを
確認してください。塗料が濃いとエアーブラシが
詰まります。
10分連続運転すると自動で止まります。再開するには
再びスイッチを入れてください。
Assicuratevi che la vernice sia accuratamente
diluita. Usate come termine di paragone il latte
scremato. Se la vernice ha una densità maggiore,
aumentate la diluizione.
Dopo 10 minuti di uso continuato, il motore si
spegnerà automaticamente. Riaccendetelo per
riprendere l'utilizzo.
Asegúrese de que su pintura sea adelgazada a la
consistencia de la leche descremada. La pintura de
viscosidad gruesa puede obstruir su aerógrafo.
Después de 10 minutos de uso continuo, el motor
se apagará automáticamente. Prendalo nuevamente
si desea continuar su uso.
Assurez vous que votre peinture soit susamment
liquide proche de la consistance du lait écrémé.
De la peinture trop épaisse pourrait obstruer
votre aérographe.
Après 10 minutes d'utilisation continue, le moteur
s'arrêtera automatiquement. Revenir sur "marche"
pour l'utiliser à nouveau.
Stellen Sie sicher, dass Ihre Farbe auf die Konsistenz
von Milch verdünnt wird. Dicke Farbe kann Ihre
Airbrushpistole verstopfen.
Nach 10 Minuten Dauerbetrieb wird der Motor
automatisch ausgeschaltet. Schalten Sie ihn zur
weiteren Nutzung wieder ein.
請確保你使用的顏料濃度適當. 太濃稠的顏料需要稀釋再
使用, 否則會阻塞噴筆
空壓機持續使用10分鐘后會自動停機. 重新啓動後即可再
開始使用
ON/OFF
2
3
If you have any issues with this product, call your local ANEST IWATA aliate BEFORE RETURNING TO YOUR PLACE OF PURCHASE.
不具合の際は販売店に返送する前に、各エリアのアネスト岩田までご連絡ください。•Per qualsiasi problema, contattare la liale
Anest Iwata di riferimento prima di rivolgersi al rivenditore.•Si tiene algún problema con este producto, llame a su proveedor
local ANEST IWATA ANTES DE DEVOLVERLO A SU LUGAR DE COMPRA.•Pour toutes questions sur ce produit, appelez la liale
Iwata la plus proche de chez vous avant de retourner le produit à votre revendeur.•Wenn Sie Probleme mit diesem Produkt haben,
benachrichtigen Sie Ihren lokalen ANEST IWATA Partner bevor Sie sich an Ihren Händler wenden.•如果你对产品有任何问题,
请在退回采购处前联系当地ANEST IWATA办事处。
Choose appropriate international plug • 付属品より適切なプラグを選択してください
•Spina con adattatore internazionale • Elija el enchufe internacional apropiado.
• Branchez vous sur un adaptateur international • Wählen Sie den entsprechenden
internationalen Stecker • 选择适当的国际插头
1 - On/Medium (Purple)
2 - High (Blue)
3 - Low (Red)
4 - OFF
1 - オン/中(紫)
2 - 高(青)
3 - 低(赤)
4 - オフ
1 - On/Medium (viola)
2 - Alto (Blu)
3 - Basso (Rosso)
4 - SPENTO
1 - On (Prendido)/
Mediano (Purpura)
2 - Alto (Azul)
3 - Bajo (Rojo)
4 - Apagado
www.iwata-airbrush.com
1 - ON - marche /
Moyen (violet)
2 - Haut (bleu)
3 - Bas (rouge)
4 - OFF - arrêt
1 - An / mittel (violett)
2 - hoch (blau)
3 - niedrig (rot)
4 - AUS
1 - 開/中段(紫色燈)
2 - 高段(藍色燈)
3 - 低段(紅色燈)
4 - 關
This manual suits for next models
25
Table of contents
Other Iwata Airbrush manuals

Iwata
Iwata Revolution HP-AR Manual

Iwata
Iwata Revolution Series Instruction Manual

Iwata
Iwata High Performance Plus Series Operation manual

Iwata
Iwata HP-BS User manual

Iwata
Iwata HP-AH User manual

Iwata
Iwata Eclipse HP-BCS User manual

Iwata
Iwata NEO FOR IWATA TRN1 Instruction Manual

Iwata
Iwata Kustom Hi-Line TH Manual