iwc GST AQUATIMER 3536 User manual

Ref. 3536
IWA04782/07.04/0.4
www.iwc.ch
GST AQUATIMER
REF. 3536
BEDIENUNGSANLEITUNG
OPERATING INSTRUCTIONS
MODE D’EMPLOI
ISTRUZIONI PER L’USO
INSTRUCCIONES DE MANEJO
Content_3536.qxd 01.11.2004 08:56 Page 1

Bedienungsanleitung
Deutsch
Operating instructions
English
Mode d’emploi
Français
Istruzioni per l’uso
Italiano
Instrucciones de manejo
Español
03
17
31
45
59
Content_3536.qxd 01.11.2004 08:56 Page 3

2 | 3
Willkommen im kleinen Kreis der Leute, die von
Ihrer Uhr genau genommen noch etwas mehr verlangen,
als dass sie ganz genau geht. Freude an der Uhr ist mehr
als Freude an der genauen Zeit. Es ist die Begeisterung
für eine verblüffende Idee. Für das Zusammenspiel von
Präzision und Phantasie. Von Zeit und Zeitlosigkeit. Von
Grenzen und Unendlichkeit. Von Gesetzen, an die sich
alle Welt zu halten hat, und von Geschmack, den man
niemandem vorschreiben kann. Wir nehmen uns deshalb
seit 1868 etwas mehr Zeit für die Uhr, die nicht nur ganz
genau gehen soll, sondern von der mit jedem Augenblick
auch die Faszination handwerklicher Meisterleistungen
ausgeht durch neue Erfindungen technischer, materiel-
ler oder formaler Natur, selbst wenn sie im kleinsten
Detail stecken, das vielleicht nicht einmal sichtbar ist.
Ein schönes neues Beispiel dieser IWC-Tradition ist hier-
mit in Ihrem Besitz: Wir möchten Ihnen hierzu von Herzen
gratulieren, verbunden mit den besten Wünschen für eine
Zeit mit Ihrer Uhr, die man vielleicht gar nicht genauer
beschreiben kann – als hier.
Die Direktion der IWC
Content_3536.qxd 01.11.2004 08:56 Page 5

2
4
1
6
3
4 | 5
Die Legende zur GST AquatimerDie technischen Feinheiten der GST Aquatimer
Ihre IWC-Uhr zeigt Ihnen die Zeit in Stunden, Minuten
und Sekunden und das Datum an. Die nachtleuch-
tende Markierung am Drehring weist zum Beispiel die
verbleibende Zeit bis zum Ende des Tauchganges.
Das mechanische Uhrwerk mit automatischem Aufzug
hat 21 Lagersteine (synthetische Rubine) und eine
Gangreserve nach dem Vollaufzug von mindestens
42 Stunden. Das Gehäuse und die Schliesse Ihrer Uhr
bestehen aus Edelstahl oder Titan. Ihre GST Aquatimer
ist stosssicher, antimagnetisch, wasserdicht bis
zu einem Druck von 200 bar, also einer Wassertiefe
von 2000 Meter und geschützt durch ein 3,7 mm
dickes, kratzfestes Saphirglas des Härtegrades 9.
Aus Sicherheitsgründen kann der Drehring nur im
Gegenuhrzeigersinn und durch gleichzeitiges
Herunterdrücken verstellt werden. Als Sonderzubehör
für den Einsatz mit dem Taucheranzug ist ein reiss-
festes Spezial-Nylonband mit Klettverschluss erhältlich.
Dieses lässt sich während des Tauchganges leicht
verstellen. Damit diese aussergewöhnliche Uhr ihre
zukünftigen Aufgaben erfüllen kann, müssen Sie die
wenigen, wichtigen Bedienungshinweise unbedingt
beachten.
1Stundenzeiger
2Minutenzeiger
3Sekundenzeiger
4Datumsanzeige
5verschraubte Krone
6Drehring mit Zeiteinteilung
5
Content_3536.qxd 01.11.2004 08:56 Page 7

6 | 7
Die Funktionen der Krone
XNormalstellung
(verschraubt)
0Aufzugsstellung
1Datumseinstellung
2Zeiteinstellung
Die Normalstellung
Diese Uhr besitzt eine verschraubte Krone. Die Ver-
schraubung (Normalstellung, Position X) verhindert ein
unbeabsichtigtes Verstellen der Uhrzeit oder des
Datums, und das Uhrgehäuse ist doppelt gegen ein-
dringendes Wasser geschützt. Zum Entsichern wird die
Krone durch Linksdrehen losgeschraubt und befindet
sich dann automatisch in Position 0, der Aufzugsstel-
lung. Durch Drücken der Krone in Position X und gleich-
zeitiges Rechtsdrehen wird sie wieder festgeschraubt
und gesichert.
Die Aufzugsstellung
In der Aufzugsstellung (Position 0) können Sie das auto-
matische Uhrwerk auch von Hand aufziehen. Zum In-
gangsetzen des Werkes genügen wenige Umdrehungen
der Krone. Besser ist es, durch ca. 30 Umdrehungen
der Krone den Vollaufzug zu erreichen, da dann die
maximale Ganggenauigkeit und eine Gangreserve, auch
nach dem Ablegen der Uhr, von ca. 42 Stunden ge-
währleistet ist.
Das Einstellen des Datums
Hat ein Monat weniger als 31 Tage, müssen Sie das
Datum von Hand auf den 1. Tag des Folgemonats
einstellen. Ziehen Sie die Krone in Position 1. Durch
Linksdrehen können Sie nun das Datum verstellen
(Schnellschaltung).
X01 2
Content_3536.qxd 01.11.2004 08:56 Page 9

8 | 9
Das Einstellen der Zeit
Ziehen Sie die Krone in Position 2. Dadurch stoppen Sie
das Uhrwerk. Für ein sekundengenaues Einstellen ist
es vorteilhaft, wenn das Uhrwerk beim Durchgang des
Sekundenzeigers über der 60 angehalten wird. Nun
können Sie den Minutenzeiger exakt zum Minutenstrich
positionieren. Zum Starten des Sekundenzeigers
drücken Sie die Krone wieder in Position 0. Bitte beach-
ten Sie beim Einstellen der Zeit die Datumsschaltung,
welche jeweils um Mitternacht (24 Uhr) erfolgt. Sollte
diese Schaltung schon um 12 Uhr mittags erfolgt sein,
müssen Sie die Zeiger um 12 Stunden vorwärts drehen.
Wichtig: In den Positionen 0, 1 und 2 ist die Uhr zwar
wasserdicht, die Krone muss aber für den normalen Ge-
brauch immer wieder verschraubt werden (Position X).
Das Zeitablesen bei Dunkelheit
Das Zifferblatt, der Stunden- und Minutenzeiger sowie
die Markierung auf dem Drehring Ihrer Uhr sind mit
Leuchtelementen versehen, die auch bei völliger
Dunkelheit ein einwandfreies Ablesen der Zeit er-
möglichen. Als Orientierungshilfe dient das Leucht-
element bei 12 Uhr.
Das Markieren des Beginns
oder des Endes einer Zeitspanne
Der Drehring ist gegen unbeabsichtigtes Verstellen
durch eine Kupplung gesichert. Nur durch gleichmässi-
ges Drücken an mindestens zwei gegenüberliegenden
Punkten wird der Drehring entkuppelt. Damit kann
nun der gewünschte Zeitpunkt (z. B. die Einstiegszeit
zu Beginn des Tauchganges) eingestellt werden, wobei
aus Sicherheitsgründen der Drehring nur im Gegen-
uhrzeigersinn – also linksherum – drehbar ist. Die hör-
und fühlbare Rastung erfolgt in Minutenschritten und
ist durch die nachtleuchtende Markierung auch im
Dunkeln sichtbar.
Die Verwendung der Uhr als Zeitmesser beim Tau-
chen setzt eine entsprechende Tauchsport-
ausbildung sowie eine regelmässige Prüfung der
Wasserdichtheit der Uhr voraus.
Content_3536.qxd 01.11.2004 08:56 Page 11

10 | 11
Die Reinigung der Uhr nach dem Tauchen
Nach dem Tauchen – speziell nach
dem Tauchen in Meerwasser –
sollte die Uhr unter fliessendem
Leitungswasser bei gleichzeitigem
Betätigen des Drehringes abge-
spült werden. Dadurch verhindern
Sie eine Salzverkrustung an Gehäuse, Band und Ver-
schluss, die vor allem den Rastmechanismus des
Drehringes und des Bandverschlusses beeinträchtigen
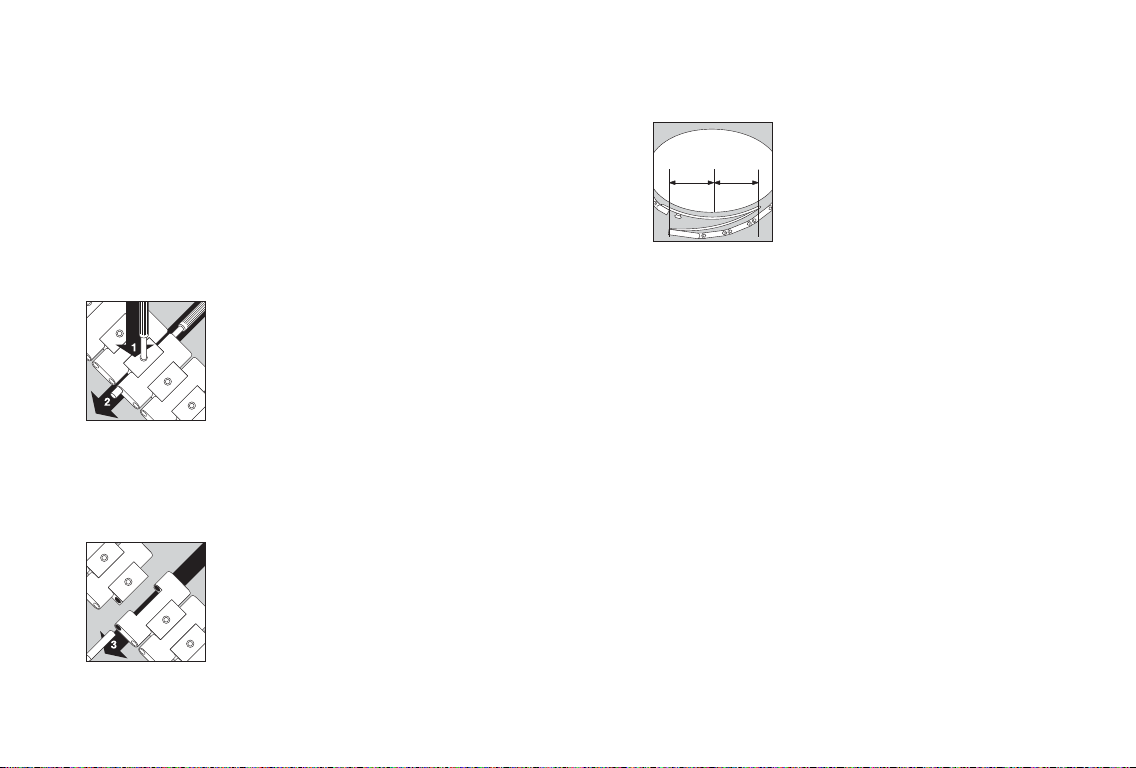
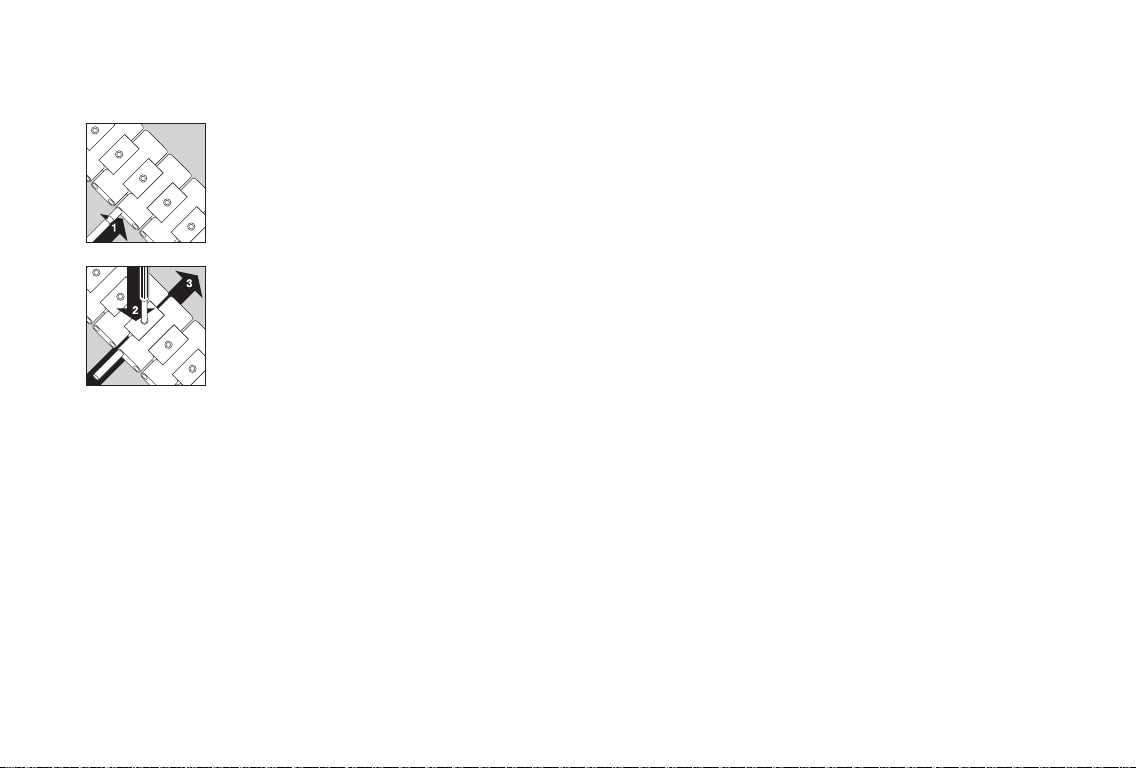
könnte. Bei Funktionsstörungen durch starke Ver-
schmutzung der Rastmechanik des Drehringes muss
dieser abgenommen werden. Dazu werden die vier
Schrauben im Drehring mit dem beiliegenden Schrau-
benzieher gelöst. Nun kann der Drehring nach oben
abgezogen und die freiliegende Rastmechanik ausge-
bürstet werden. Anschliessend den Drehring wieder
auf das Gehäuse aufsetzen und die vier Schrauben bis
zum Anschlag eindrehen.
Wichtig: Die Abnahme des Drehringes sollte nur bei
Funktionsstörungen erfolgen.
Die Wasserdichtheit
Um die einwandfreie Funktion sicherzustellen, muss
Ihre Uhr mindestens einmal jährlich durch eine IWC-
Servicestelle geprüft werden. Eine solche Prüfung muss
auch nach aussergewöhnlichen Belastungen (Stoss)
durchgeführt werden. Werden diese Prüfungen nicht
ordnungsgemäss durchgeführt, oder wird die Uhr von
nicht autorisierten Personen geöffnet, so lehnt IWC
jegliche Garantie- oder Haftungsansprüche ab.
Wichtig: Nach jedem Öffnen und Service Ihrer IWC-Uhr
muss Ihr autorisierter IWC-Fachhändler (Official Agent)
wieder eine Wasserdichtheitsprüfung durchführen.
Der Service an Ihrer GST Aquatimer
Alle Bestandteile dieser Uhr sind aus bestem Material
gefertigt. Trotzdem unterliegen einige Teile einem
natürlichen Verschleiss. Wichtig ist vor allem, dass die
Verschleissstellen immer optimal geölt sind und dass
die Verschmutzung des Öles durch metallischen Abrieb
rechtzeitig beseitigt wird. Wir empfehlen deshalb,
an Ihrer Uhr zirka alle 5 Jahre einen Unterhaltsservice
durchführen zu lassen. Wenden Sie sich dazu an einen
autorisierten IWC-Fachhändler oder direkt an den
IWC-Kundendienst in Schaffhausen.
Content_3536.qxd 01.11.2004 08:56 Page 13

12 | 13
Die Handhabung des Metallbandes
Das Metallband Ihrer IWC-Uhr kann problemlos Ihrem
Armumfang angepasst werden. Diese Anpassung
können Sie durch Herausnehmen oder Hinzufügen ein-
zelner Bandglieder selbst vornehmen.
Das Trennen des Bandes und
das Herausnehmen einzelner Bandglieder
Öffnen Sie den Tastenverschluss
durch Drücken der seitlichen Taste.
Legen Sie das Band mit der Ober-
seite auf eine feste Unterlage. Mit
den beiliegenden Hilfswerkzeugen
können Sie nun an der gewünsch-
ten Trennstelle den Fixierbolzen hinunterdrücken (1) und
dabei den Gelenkbolzen mit dem zweiten Hilfswerkzeug
seitlich etwa 3 mm hinausschieben (2).
Ziehen Sie den vorstehenden Ge-
lenkbolzen aus dem Armband (3).
Jetzt ist das Metallband getrennt,
und Sie können durch Wegnehmen
oder Hinzufügen einzelner Glieder
die Armbandlänge einstellen.
Das Ermitteln der Bandlänge
Legen Sie die Uhr mit geöffnetem
Band um Ihr Handgelenk und
schätzen Sie die überzähligen
Bandglieder ab, die Sie nun
aus dem Band (wie beschrieben)
herausnehmen können.
Müssen Sie um mehrere Glieder kürzen, nehmen Sie
von beiden Hälften des Bandes die möglichst gleiche
Anzahl Bandglieder heraus, damit der Verschlussbügel
ungefähr in der Mitte des Handgelenkes getragen
werden kann. Damit Sie das Band möglichst genau
Ihrem Armumfang anpassen können, haben wir beim
Verschluss ein Bandglied in Überlänge montiert. Durch
Weglassen dieses Bandgliedes wird Ihr Armband um
eine Zwischenstufe gekürzt und dadurch die Bandlänge
feiner eingestellt.
Bewahren Sie die überzähligen Bandglieder und die
Trennwerkzeuge für spätere Anpassungen gut auf.
Content_3536.qxd 01.11.2004 08:56 Page 15

14 | 15
Das Zusammenfügen des Bandes
Fügen Sie die Bandgliedteile an der
Verbindungsstelle zusammen und
schieben Sie den Gelenkbolzen
seitlich in das Armband ein (1).
Mit dem beiliegenden Hilfswerk-
zeug drücken Sie nun den Fixier-
bolzen (2) hinunter und schieben
gleichzeitig den Gelenkbolzen
wieder bündig ins Armband zurück
(3). Der Fixierbolzen muss wieder
bündig bis zur Oberkante des Sicherungsgliedes
hochgefahren sein. Bitte überprüfen Sie unbedingt den
richtigen Sitz des Gelenkbolzens.
Stand Oktober 1997.
Technische Änderungen vorbehalten.
Das Demontieren und
Montieren des Nylon-Klettbandes
Als Sonderzubehör liefern wir ein speziell entwickeltes,
reissfestes Nylon-Klettband. Dieses deckt, in Kombi-
nation mit dem Metallband, alle denkbaren Handgelenk-
durchmesser ab. Es ist so konzipiert, dass es auch
unter erschwerten Bedingungen jederzeit nachgezogen
oder gelockert werden kann. Dies ermöglicht eine
einfache und leichte Anpassung an den wechselnden
Handgelenkumfang beim Tauchen mit Anzug. Beim
Anbringen des Klettbandes muss auf einen sicheren
Sitz der Gelenkbolzen geachtet werden, damit ein
Verlieren der Uhr ausgeschlossen wird.
Content_3536.qxd 01.11.2004 08:56 Page 17

16 | 17
Welcome to the small group of people who de-
mand rather more from their watch than mere accuracy.
Enjoyment of your watch is more than just the enjoyment
of the precise time. It is enthusiasm for an amazing con-
cept. For the interplay between precision and imagin-
ation. Between time and timelessness. Between bound-
aries and infinity. Between laws that the whole world
must obey and taste, which cannot be dictated to
anyone. That is why, since 1868, we have been devoting
rather more of our time to the watch; not only must
a watch run accurately, but a fascination with great
achievements of craftsmanship must also emanate from
it at every instant through new inventions of a techni-
cal, material or design nature, even if they are concealed
in the smallest detail, which is perhaps not even visible.
You are now the owner of a beautiful new example of
this IWC tradition. We should like to congratulate you
most sincerely on your choice, and we send you our best
wishes for the time that you will spend with your watch,
which perhaps cannot be described with any greater
accuracy than it is here.
IWC Management
Content_3536.qxd 01.11.2004 08:56 Page 19

18 | 19
Technical refinements of the GST Aquatimer
Your IWC watch shows you the time in hours, minutes
and seconds and the date. The luminous marking on the
rotating ring shows the time remaining, for example,
to the end of the dive. The mechanical movement with
automatic winding has 21 jewels and a power reserve of
at least 42 hours when fully wound. The case and the
closure of your watch are made of stainless steel or
titanium. Your GST Aquatimer is shockproof, antimag-
netic, water-resistant to a pressure 200 bar, equivalent
to a water depth of 2000 metres, and is protected by
a 3.7 mm thick, scratch-resistant sapphire glass (hard-
ness grade 9). For safety reasons, the rotating ring can
only be adjusted in an anticlockwise direction and by
keeping it depressed at the same time. A tear-resistant
nylon strap with a Velcro closure is available as a spe-
cial accessory for use with a diving suit. This is easily
adjusted during a dive. To ensure that this exceptional
watch can continue to perform its tasks, you must
follow a few important operating instructions.
Key to the GST Aquatimer
1Hour hand
2Minute hand
3Seconds hand
4Date indicator
5Screw-in crown
6Rotating ring with time
graduation
2
4
1
6
3
5
Content_3536.qxd 01.11.2004 08:56 Page 21

20 | 21
Winding position
In the winding position (position 0), you can also wind
the automatic movement by hand. The movement will
start after only a few revolutions of the crown. However,
it is better to wind the movement fully with about
30 revolutions of the crown, as maximum accuracy and
a power reserve of about 42 hours will then be assured,
even after taking off the watch.
Setting the date
If a month has fewer than 31 days, you must set the date
by hand to the first day of the following month. Pull
the crown to position 1. You can now set the date by
rotating the crown to the left (quick setting).
Functions of the crown
XNormal position
(screwed in)
0Winding position
1Date setting
2Time setting
Normal position
This watch has a screw-in crown. The screw-in connec-
tion (normal position, position X) prevents unintentional
adjustment of the time or the date, and the watch case
has double protection against penetrating water.
To release the secure crown, unscrew it by rotating it to
the left, where it automatically assumes position 0, the
winding position. By depressing the crown in position X
and rotating it to the right at the same time, it is screwed
down firmly again and secured.
X01 2
Content_3536.qxd 01.11.2004 08:56 Page 23

22 | 23
Setting the time
Pull the crown to position 2. This will stop the move-
ment. To ensure that the set time is accurate to the
second, it is best to stop the movement as the seconds
hand reaches 60. You can now position the minute
hand exactly on the minute line. To start the seconds
hand, push the crown back to position 0. When setting
the time, please be aware that the date change always
takes place at midnight (24.00). If this change has al-
ready taken place at 12 noon, you must move the hands
forwards by 12 hours.
Important: Although the watch is water-resistant in
positions 0, 1 and 2, the crown must nevertheless always
be screwed down again for normal use (position X).
Reading the time in the dark
The dial and the hour and minute hands as well as the
marking on the rotating ring of your watch are provided
with luminous elements which permit the time to be read
without problem, even in total darkness. The luminous
point at 12.00 serves as a reference point.
Marking the start or the end of a period
The rotating ring is protected against unintentional
adjustment by a clutch coupling. The rotating ring
is released only by the application of even pressure in
at least two opposing points. The desired time (e.g. the
water entry time at the start of the dive) can now be
set and, for safety reasons, the rotating ring can only
be rotated in an anti-clockwise direction – i.e. to the
left. Indexing of the ring, which can be heard and felt,
takes place in steps of one minute and is also visible
in the dark because of the luminous marking.
The use of the watch as a time recorder when diving
calls for appropriate diving training and regular
testing of the water resistance of the watch.
Cleaning the watch after diving
After diving – especially after
diving in seawater – you should
rinse your watch under running
mains water, actuating the rotating
ring at the same time. This will
prevent salt encrustation on the
case, bracelet and clasp, which could particularly
affect the detent mechanism of the rotating ring and
the bracelet clasp. Malfunctions due to heavy conta-
mination of the detent mechanism of the rotating ring
Content_3536.qxd 01.11.2004 08:56 Page 25

24 | 25
will require its removal for cleaning. To do this, the four
screws in the rotating ring are removed with the screw-
driver provided. The rotating ring can now be lifted
off upwards, and the exposed detent mechanism can
be brushed clean. The rotating ring is then replaced on
the case, and the four screws are fully retightened.
Important: The rotating ring should only be removed in
the event of malfunctions.
Water-resistance
In order to ensure its perfect function, you must have
your watch inspected by an IWC service point at least
once a year. Testing must also be carried out after
exposure to exceptional stresses (e.g. extreme impact).
If these inspections are not carried out as stipulated,
or if the watch is opened by unauthorized persons, IWC
will decline any guarantee or liability claims.
Important: Your authorized IWC Official Agent must
perform a new water-resistance test every time your
IWC watch is opened and serviced.
Service for your GST Aquatimer
All the parts in this watch are manufactured from
top-quality materials. Nevertheless, a number of parts
are subject to natural wear and tear. It is particularly
important to ensure that points at which wear occurs
are always optimally lubricated and that contamination
of the oil caused by metal-to-metal abrasion is regularly
removed. This is why we recommend that you have a
maintenance service carried out on your watch about
every 5 years. Please contact an approved IWC Official
Agent or send your watch directly to the IWC Customer
Service Department in Schaffhausen.
Content_3536.qxd 01.11.2004 08:56 Page 27

26 | 27
Adjusting the metal bracelet
The metal bracelet of your IWC watch can be readily
adjusted to the size of your wrist. You can make this
adjustment yourself by removing or adding individual
bracelet links.
Taking the bracelet apart
and removing individual links
Open the push-button release
safety clasp by pressing the button
on the side. Lay the bracelet with
its top surface on a firm base.
Using the special tools provided,
you can now push down the secur-
ing pin (1) at the desired point of separation and, at
the same time, displace the pivot pin laterally by about
3 mm (2) with the second special tool.
Now pull the protruding pivot pin
from the bracelet (3). The metal
bracelet is now separated, and you
can adjust the length of the brace-
let by removing or adding indi-
vidual links.
Determining bracelet length
Place the watch with the bracelet
open around your wrist and esti-
mate the number of surplus brace-
let links that you can now remove
from the bracelet (as described
above).
If you need to shorten the bracelet by several links, you
should remove the same number of links from each half
of the bracelet, if possible, to ensure that the clasp can
be worn more or less at the centre of the wrist. To enable
you to adapt the bracelet as accurately as possible to
the size of your wrist, we have included an extra-long
bracelet link in the clasp. Your bracelet is shortened by
an intermediate amount by omitting this bracelet link,
and finer adjustment to the length of the bracelet can be
made in this way.
Keep the surplus links and the separating tools safely
for use in subsequent adjustments.
Content_3536.qxd 01.11.2004 08:56 Page 29

28 | 29
Status October 1997.
Technical specifications subject to change.
Attaching the bracelet
Attach the component parts of the
bracelet link to the connection
point, and push the pivot pin into
the bracelet from the side (1).
Using the special tool provided,
now press the securing pin down-
wards (2) and, at the same time,
slide the pivot pin back into
the bracelet until it lies flush (3).
The securing pin must be brought
up flush with the upper edge of the securing link. Please
be sure to check the correct seating of the pivot pin.
Removing and fitting the nylon Velcro strap
We can supply a specially developed, tear-resistant
nylon Velcro strap as a special accessory. This is suit-
able, when used in combination with the metal bracelet,
for all conceivable wrist diameters. It is designed so that
it can be tightened or loosened at any time, including
under arduous conditions. This allows simple and easy
adjustment to the variation in the circumference of the
wrist when diving in a suit. When fitting the Velcro strap,
care must be taken to ensure that the pivot pin is
securely seated to exclude the possibility of losing the
watch.
Content_3536.qxd 01.11.2004 08:56 Page 31

30 | 31
Bienvenue dans le cercle restreint de ceux qui,
à dire vrai, attendent un peu plus de leur montre que la
précision. Le plaisir qu’une montre peut procurer excède
sa simple fonction première de donner l’heure. C’est
l’admiration à l’égard d’une idée fascinante. De l’alliance
de la précision et de l’imagination. Du temps et de l’in-
temporalité. Des limites et de l’infini. Des lois auxquelles
le monde entier se réfère, et du goût, personnel par défi-
nition. Depuis 1868, nous consacrons un peu plus de
temps à des montres qui ne doivent pas seulement être
d’une précision absolue, mais aussi, à chaque regard
que vous porterez sur elles, exprimer la fascination de
prouesses artisanales d’exception, à travers des innova-
tions de nature technique, matérielle ou formelle, même
si celles-ci résident dans des détails infimes qui, peut-
être, ne sont même pas visibles. Vous possédez aujour-
d’hui un bel exemple de cette tradition d’IWC. Nous te-
nons à vous en féliciter cordialement tout en formant nos
meilleurs vœux pour ces nombreuses heures en compag-
nie de votre montre qu’il est peut-être impossible de dé-
crire avec davantage de précision – qu’ici.
La Direction d’IWC
Content_3536.qxd 01.11.2004 08:56 Page 33

32 | 33
Les raffinements techniques de la GST Aquatimer
Votre montre IWC vous indique l’heure en heures,
minutes et secondes ainsi que la date. Le marquage
lumineux sur la lunette tournante indique par exemple
le temps restant jusqu’à la fin d’un cycle de plongée.
Le mouvement mécanique à remontage automatique
possède 21 rubis et une réserve de marche d’au moins
42 heures lorsqu’il est complètement remonté. Le boî-
tier et le fermoir de votre montre sont en acier surfin
ou en titane. Votre GST Aquatimer est antichoc, anti-
magnétique, étanche jusqu’à une pression de 200 bars,
ce qui correspond à une profondeur de 2000 mètres,
et elle est protégée par un verre saphir inrayable, degré
de dureté 9, de 3,7 mm d’épaisseur. Pour des raisons
de sécurité, la lunette tournante ne peut être actionnée
que dans le sens inverse des aiguilles d’une montre
et en exerçant une pression simultanée. Comme
accessoire spécial pour utiliser votre montre avec la
combinaison de plongée, un bracelet en nylon indéchi-
rable avec fermeture velcro est disponible. Ce bracelet
est facile à ajuster en cours de plongée. Afin que cette
montre exceptionnelle remplisse à la perfection ses
offices, nous vous recommandons de respecter les
importantes instructions d’utilisation suivantes.
La légende de votre GST Aquatimer
1Aiguille des heures
2Aiguille des minutes
3Aiguille des secondes
4
Affichage de la date
5Couronne vissée
6Lunette tournante avec
répartition du temps
2
4
1
6
3
5
Content_3536.qxd 01.11.2004 08:56 Page 35

Les fonctions de la couronne
XPosition normale
(couronne vissée)
0Position de remontage
1Réglage de la date
2Réglage de l’heure
La position normale
Cette montre possède une couronne vissée. Ce disposi-
tif (position normale, position X) empêche de dérégler
involontairement l’heure ou la date et, de surcroît, il
assure une double protection de la boîte contre les infil-
trations d’eau. Pour libérer la couronne, il faut la tourner
vers la gauche, ce qui la ramène automatiquement en
position 0, la position de remontage. Vous revisserez la
couronne de remontoir en exerçant une pression pour
la ramener en position X tout en la tournant vers la
droite, ce qui la verrouille.
34 | 35
La position de remontage
Dans la position de remontage (position 0), vous pouvez
aussi remonter manuellement le mouvement auto-
matique. Quelques tours de la couronne de remontoir
suffisent à faire partir le mouvement. Toutefois, nous
recommandons d’effectuer env. 30 tours de la cou-
ronne afin d’obtenir un remontage complet assurant la
précision maximale et une réserve de marche d’env.
42 heures, même si vous ne portez pas votre montre.
Le réglage de la date
Si le mois compte moins de 31 jours, vous devez avancer
manuellement la date au 1er du mois suivant. Tirez la cou-
ronne de remontoir en position 1. En la tournant vers la
gauche, vous pouvez maintenant régler la date
(commutation rapide).
X01 2
Content_3536.qxd 01.11.2004 08:56 Page 37

36 | 37
Le réglage de l’heure
Tirez la couronne de remontoir en position 2, ce qui
arrête le mouvement. Pour un réglage à la seconde
près, nous recommandons d’arrêter le mouvement lors
que l’aiguille des secondes passe sur 60. Vous pouvez
maintenant positionner exactement l’aiguille des
minutes sur la barre des minutes. Pour faire repartir
l’aiguille des secondes, ramenez la couronne de
remontoir en position 0. Lorsque vous réglez l’heure,
n’oubliez pas d’être attentif à la commutation de la
date, laquelle s’effectue à minuit (24 heures). Si la
date change déjà à midi (12 heures), vous devez tourner
les aiguilles en avant de 12 heures.
Important: Votre montre reste étanche dans les posi-
tions 0, 1 et 2, mais la couronne de remontoir doit
toujours être revissée pour l’usage normal (position X).
Lire l’heure dans l’obscurité
Le cadran, les aiguilles des heures et des minutes ainsi
que le marquage sur la lunette tournante de votre mon-
tre sont munis d’éléments lumineux vous permettant de
lire parfaitement l’heure, même dans l’obscurité totale.
L’élément lumineux vers 12 heures sert de repère.
Le marquage du début ou
de la fin d’un temps sur la lunette
La lunette tournante est protégée contre les dérègle-
ments involontaires par une butée d’arrêt. Pour la
libérer, vous devez exercer simultanément une pression
sur au moins deux points opposés. Vous pouvez alors
régler le temps désiré (p. ex. le début d’un cycle de
plongée). Toutefois, pour des raisons de sécurité, la
lunette tournante ne peut être tournée que dans le sens
inverse des aiguilles d’une montre – c’est-à-dire vers la
gauche. Les crans, audibles et perceptibles, divisent les
indications en minutes et celles-ci peuvent également
être consultées dans l’obscurité grâce au marquage
lumineux.
L’utilisation de la montre comme instrument de
plongée implique une formation de plongée adé-
quate ainsi que le contrôle régulier de l’étanchéité
de la montre.
Content_3536.qxd 01.11.2004 08:56 Page 39
Table of contents
Languages:
Other iwc Watch manuals

iwc
iwc 3723 User manual

iwc
iwc 5022 User manual

iwc
iwc KLEINE DA VINCI User manual

iwc
iwc AQUATIMER CHRONOGRAPH User manual

iwc
iwc PORTUGUESE MINUTE REPEATER User manual

iwc
iwc IW3905 User manual

iwc
iwc 3789 User manual

iwc
iwc SPITFIRE MARK XVI User manual

iwc
iwc Reference 3785 User manual

iwc
iwc DA VINCI AUTOMATIC User manual

iwc
iwc AQUATIMER AUTOMATIC 2000 User manual

iwc
iwc 5023 User manual

iwc
iwc 3723 User manual

iwc
iwc Portugieser Chronograph Rattrapante User manual

iwc
iwc PILOT'S WATCH CHRONOGRAPH User manual

iwc
iwc IW3776 User manual

iwc
iwc PORTUGIESER YACHT CLUB CHRONOGRAPH User manual

iwc
iwc DA VINCI User manual

iwc
iwc IW3777 User manual

iwc
iwc IW3903 User manual