IXXAT CAN-IB Series User manual

PC CAN Interface
CAN-IB Series for PCI/PCIexpress
USER MANUAL
4.01.0230.20000 3.0 ENGLISH

Important User Information
Liability
Every care has been taken in the preparation of this document. Please inform HMS Industrial Networks of any inac-
curacies or omissions. The data and illustrations found in this document are not binding. We, HMS Industrial Net-
works, reserve the right to modify our products in line with our policy of continuous product development. The
information in this document is subject to change without notice and therefore should not be considered as a bind-
ing description of the range of functions (neither for future product versions). HMS Industrial Networks assumes no
responsibility for any errors that may appear in this document.
There are many applications of the described product. Those responsible for the use of this device must ensure that
all the necessary steps have been taken to verify that the applications meet all performance and safety require-
ments including any applicable laws, regulations, codes, and standards.
HMS Industrial Networks will under no circumstances assume liability or responsibility for any problems that may
arise as a result from improper use or use that is not in accordance with the documented features of this product.
The examples and illustrations in this document are included solely for illustrative purposes.
Intellectual Property Rights
HMS Industrial Networks has intellectual property rights relating to technology embodied in the product described
in this document. These intellectual property rights may include patents and pending patent applications in the USA
and other countries.
Trademark Acknowledgements
Ixxat®is a registered trademark of HMS Industrial Networks. All other trademarks are the property of their respec-
tive holders.
Copyright © 2016 HMS Technology Center Ravensburg GmbH. All rights reserved.
PC CAN Interface CAN-IB Series for PCI/PCIexpress User Manual
4.01.0230.20000 3.0

PC CAN Interface User Manual 4.01.0230.20000 3.0
Table of Contents Page
1 User Guide ........................................................................................................................ 3
1.1 Document History ..........................................................................................................3
1.2 Conventions ..................................................................................................................3
2 Safety and Dangers ........................................................................................................ 4
2.1 Information on EMC .......................................................................................................4
2.2 General Safety Notes .....................................................................................................4
3 Scope of Delivery ............................................................................................................ 4
4 Features............................................................................................................................. 5
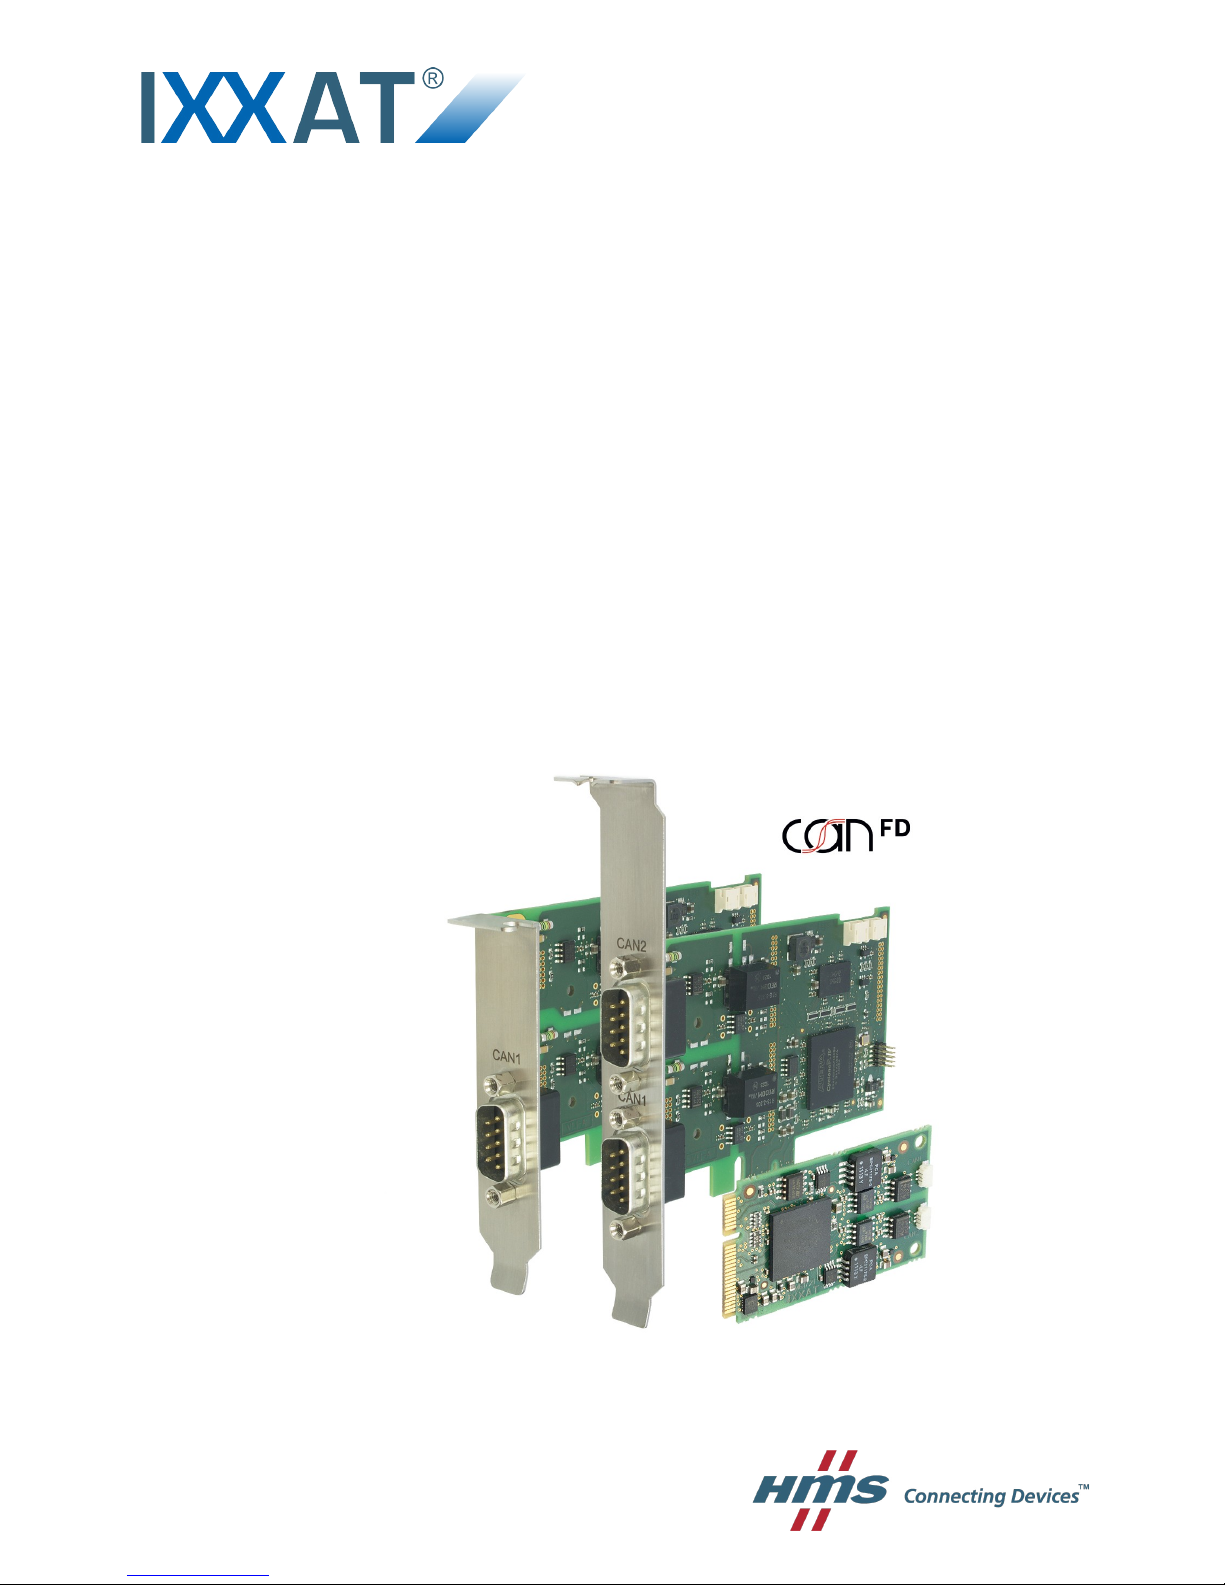
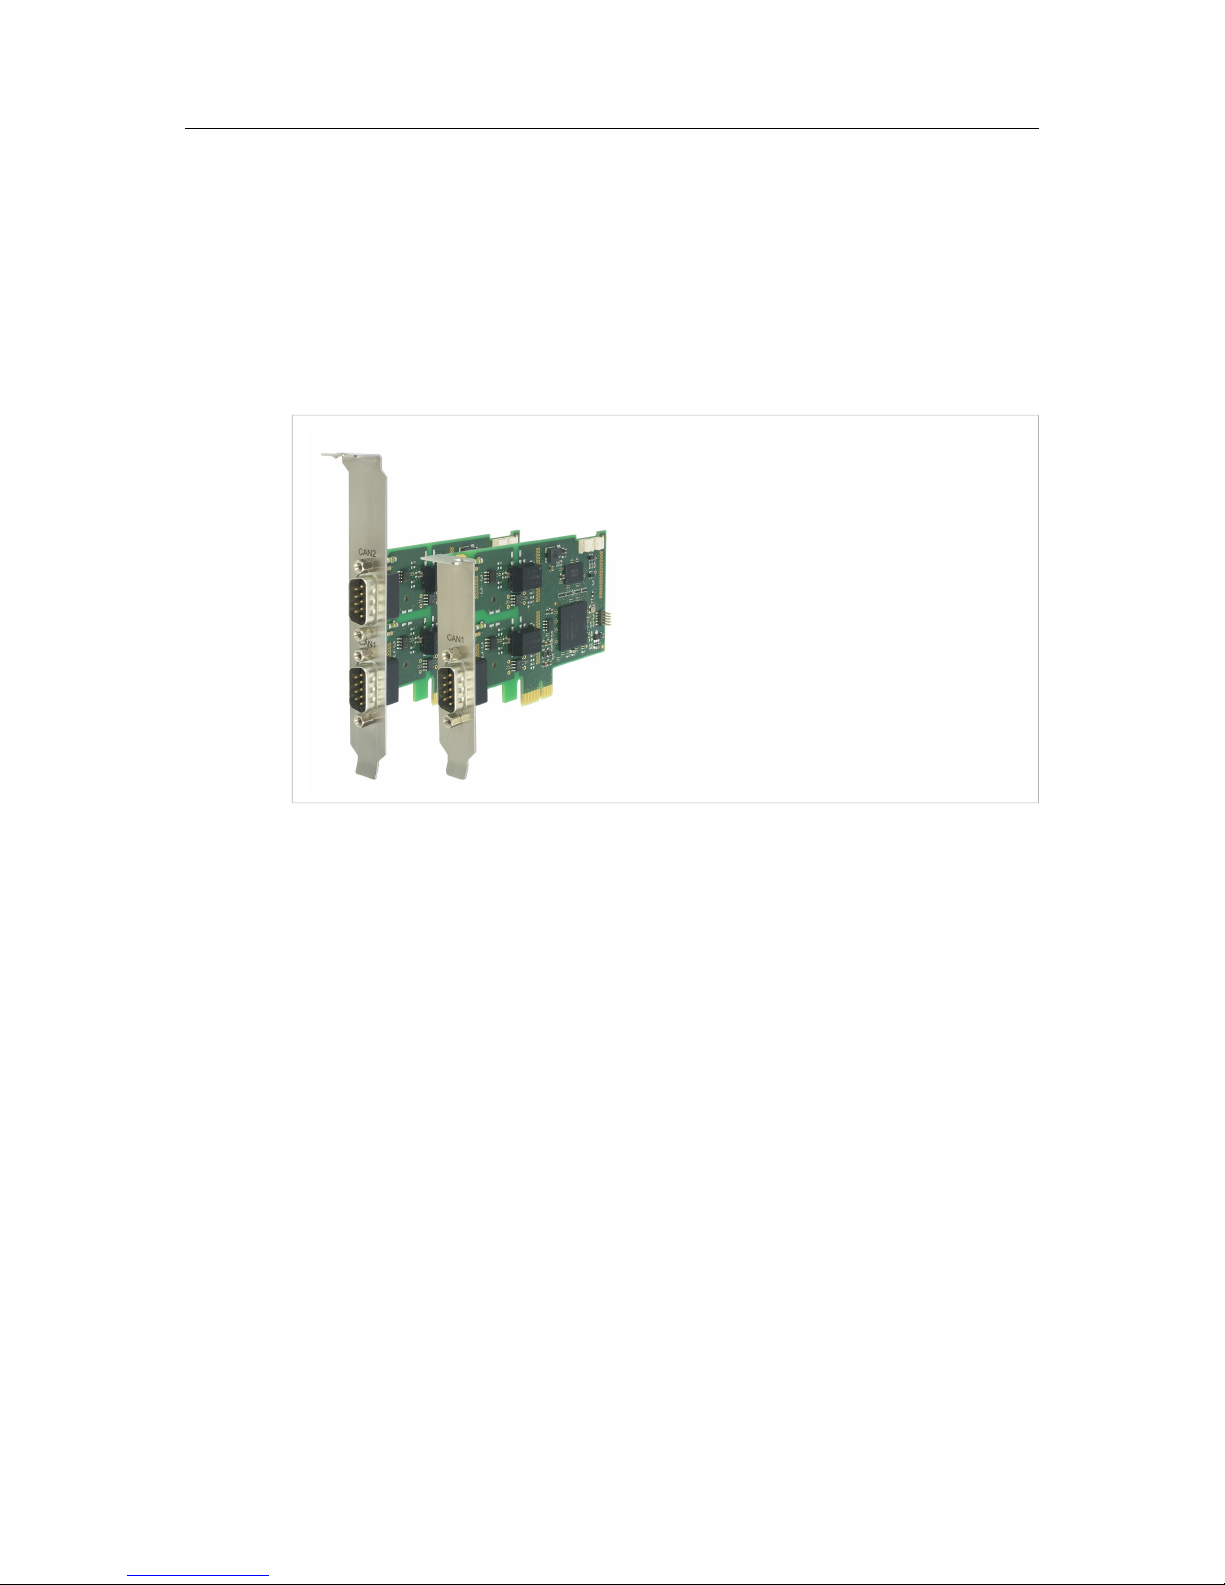
4.1 CAN-IB100/200/PCIe and CAN-IB300/400/PCI ................................................................5
4.2 CAN-IB500/600/PCIe and CAN-IB800/PCI ......................................................................6
4.3 CAN-IB120/PCIe Mini and CAN-IB520/PCIe Mini .............................................................7
5 Installation ........................................................................................................................ 8
5.1 Install Software..............................................................................................................8
5.2 Install Hardware.............................................................................................................8
6 Connections ..................................................................................................................... 9
6.1 Overview.......................................................................................................................9
6.2 CAN Bus .......................................................................................................................9
6.3 Expansions .................................................................................................................10
6.4 Synchronization Connector (Option)..............................................................................10
6.5 PCIe Mini .................................................................................................................... 11
7 Expansions ..................................................................................................................... 12
7.1 Fieldbus expansion ......................................................................................................12
7.2 CAN Expansion Board .................................................................................................14
7.3 MultiCAN expansion.....................................................................................................15
8 Technical Data................................................................................................................ 19
8.1 PCI/PCIe.....................................................................................................................19
8.2 Mini PCIe ....................................................................................................................19
9 Support/Return Hardware ........................................................................................... 20
9.1 Support.......................................................................................................................20
9.2 Return Hardware .........................................................................................................20
10 Disposal........................................................................................................................... 20

PC CAN Interface User Manual 4.01.0230.20000 3.0
Table of Contents
A Regulatory Compliance............................................................................................... 21
A.1 EMC Compliance (CE) .................................................................................................21
A.2 FCC Compliance Statement .........................................................................................21

User Guide 3 (22)
1 User Guide
Please read the manual carefully. Make sure you fully understand the manual before using the
product.
1.1 Document History
Version Date Author Description
3.0 April 2016 CoMi Revised and edited in new design
1.2 Conventions
Instructions and results are shown in the following way:
uinstruction 1
uinstruction 2
wresult 1
wresult 2
Lists are shown in the following way:
• item 1
• item 2
Bold typeface indicates interactive parts such as connectors and switches on the hardware, or
menus and buttons in a graphical user interface.
This font is used to indicate program code and other
kinds of data input/output such as configuration scripts.
This is a cross-reference within this document: Conventions, p. 3
This is an external link (URL): www.hms-networks.com
Safety advice is shown in the following way:
Cause of the hazard!
Consequences of not taking remediate action.
How to avoid the hazard.
Safety signs and signalwords are used dependent on the level of the hazard.
This is additional information which may facilitate installation and/or operation.
This instruction must be followed to avoid a risk of reduced functionality and/or
damage to the equipment, or to avoid a network security risk.
Caution
This instruction must be followed to avoid a risk of personal injury.
PC CAN Interface User Manual 4.01.0230.20000 3.0

Safety and Dangers 4 (22)
WARNING
This instruction must be followed to avoid a risk of death or serious injury.
2 Safety and Dangers
2.1 Information on EMC
Risk of interference to radio and television if used in office or home environment!
Use exclusively included accessories.
Make sure shield of interface is connected with device plug and plug on other side.
Use exclusively shielded cables.
2.2 General Safety Notes
uProtect product from moisture and humidity.
uProtect product from too high or too low temperature (see Technical Data, p. 19).
uProtect product from fire.
uDon’t throw, drop or try to bend the product.
uDon’t paint the product.
uDon’t modify or disassemble the product. Service must be carried out by HMS Industrial
Networks.
uDon’t use modified products.
uStore products in dry and dust-free place.
3 Scope of Delivery
Included in the scope of delivery of standard variant:
• PC CAN interface
• CD with VCI driver and example application
• Installation Guide VCI
• User Manual PC CAN Interface
PC CAN Interface User Manual 4.01.0230.20000 3.0

Features 5 (22)
4 Features
All interfaces (apart from PCIe Mini) are available as standard and low-profile version.
Standard version:
• 2 Sub-D9 connetors on one slot bracket.
Low-profile version:
• 1 Sub-D9 connector on one slot bracket
• expandable with Sub-D9 connector on second slot bracket
Fig. 1 Standard and low-profile version
4.1 CAN-IB100/200/PCIe and CAN-IB300/400/PCI
Common Features
• available with 1 or 2 CAN channels
• expandable up to 4 CAN channels
• ISO 11898-2 CAN bus coupling (high speed)
• optionally galvanically isolated
• expandable with ISO 11898-3 low-speed CAN
• expandable with LIN (CAN-IB200/PCIe, CAN-IB400/PCI)
CAN-IB100/200/PCIe
• single Lane (x1) PCI Express CAN-Interface
• CAN-IB100/PCIe, passive interface
• CAN-IB200/PCIe, active interface
• PCI Express connector compliant with the specification PCI Express Card
Electromechanical Specification version 1.1 , operation in any PCI Express slot (x1, x4,
x8, x16) possible
PC CAN Interface User Manual 4.01.0230.20000 3.0

Features 6 (22)
CAN-IB300/400/PCI
• PCI CAN-Interface
• 5 V and 3.3 V compatible
• CAN-IB300/PCI, passive interface
• CAN-IB400/PCI, active interface
• PCI interface compliant with PCI local bus specification Rev. 2.2
4.2 CAN-IB500/600/PCIe and CAN-IB800/PCI
Common Features
• available with 1 or 2 CAN channels
• supports CAN FD (ISO and NON ISO) and CAN 2.0A/B
• ISO 11898-2 CAN bus coupling (high speed)
• optionally galvanic isolated
• expandable with ISO 11898-3 low-speed CAN
• expandable with LIN (CAN-IB600/PCIe, CAN-IB800/PCI)
CAN-IB500/600/PCIe
• Single Lane (x1) PCI Express CAN-Interface
• CAN-IB500/PCIe, passive interface
• CAN-IB600/PCIe, active interface
• PCI Express connector compliant with the specification PCI Express Card
Electromechanical Specification version 1.1 , operation in any PCI Express slot (x1, x4,
x8, x16) possible
CAN-IB800/PCI
• PCI CAN-Interface
• 5 V and 3.3 V compatible
• active interface
• PCI interface compliant with PCI local bus specification Rev. 2.2
PC CAN Interface User Manual 4.01.0230.20000 3.0

Features 7 (22)
4.3 CAN-IB120/PCIe Mini and CAN-IB520/PCIe Mini
Common features
• Single lane (x1) PCI express card
• PC interface compliant with PCI express base specification, revision 1.1
• form factor F2: Full-mini with bottom-side keep outs
• dimensions according toPCI express Mini Card electromechanical specification,
revision 1.2
• ISO 11898-2 CAN bus coupling (high speed)
• optionally galvanic isolated
CAN-IB120/PCIe Mini
• available with 1 or 2 CAN channels
CAN-IB520/PCIe Mini
• 1 CAN FD channel, switchable ISO CAN FD, non-ISO CAN FD, CAN 2.0A/B
PC CAN Interface User Manual 4.01.0230.20000 3.0

Installation 8 (22)
5 Installation
5.1 Install Software
For the operation of the interface a driver is needed.
Windows
uInstall VCI driver (see Installation manual VCI).
Linux and Real-Time Operating Systems
uObserve information about supported operating systems and interfaces on
www.ixxat.com.
5.2 Install Hardware
Risk of ESD damages caused by improper handling!
Use ESD protective measures to avoid equipment damage.
uMake sure software driver is installed.
uTurn off computer.
uPull power cord.
uOpen computer case according to instructions of computer manufacturer.
uDetermine corresponding slot.
uPlug PC connector in corresponding slot, without using force.
uMake sure the interface is securely held in computer.
uClose computer case.
wHardware installation is complete.
PC CAN Interface User Manual 4.01.0230.20000 3.0

Connections 9 (22)
6 Connections
6.1 Overview
Fig. 2 Connections
1 CAN 1
2 CAN 2 (exclusively in standard version)
3 Fieldbus expansion connector channel 2 (option)
4 Fieldbus expansion connector channel 1 (option)
5PCI/PCIe connector
6 Expansion board connector (option)
7Synchronisation connector (option)
6.2 CAN Bus
The bus coupling can optionally be galvanically isolated. With galvanic isolation the shield of
the CAN connector is connected to CAN ground through a 1 MΩ resistor and a 10 nF capacitor.
The shields of the CAN connectors are connected directly together.
For a not galvanically isolated interface, the CAN ground and PC ground are at the same
potential.
For best noise immunity use shielded CAN cables.
Pin allocation of Sub-D9 Connector
Pin no. Signal Option
1 CAN-Low (Low-speed) Via fieldbus expansion
2 CAN-Low (High-speed)
3 GND
4 CAN-High (Low-speed) Via fieldbus expansion
5-
6-
7CAN-High (High-speed)
8 LIN Via fieldbus expansion
9 VBATLIN (8–18 V DC) Via fieldbus expansion
PC CAN Interface User Manual 4.01.0230.20000 3.0

Connections 10 (22)
Low-Profile Version
Fig. 3 Low-profile version
In the low-profile version, only the Sub-D9 connector of CAN 1 is implemented. It is possible to
output the signals of CAN 2 to a second slot bracket.
uTo connect second slot bracket to the interface plug ribbon cable in connector (1) on in-
terface and in connector on second slot bracket.
6.3 Expansions
The fieldbus expansion connectors can be used to extend each CAN circuit with fieldbus expan-
sions for additional fieldbuses (exclusively galvanically isolated interfaces). The signals of the
additional fieldbuses are applied to the corresponding CAN connector.
The CAN expansion board connector can be used to connect a CAN expansion board that can
provide up to two additional CAN interfaces and fieldbus expansions.
6.4 Synchronization Connector (Option)
The optional synchronization connector can be used to connect multiple CAN interfaces togeth-
er for synchronization (exclusively CAN-IB200/600/PCIe and CAN-IB400/800/PCI). For order
number of appropriate cable see www.ixxat.com.
PC CAN Interface User Manual 4.01.0230.20000 3.0

Connections 11 (22)
6.5 PCIe Mini
Fig. 4 Connections PCIe Mini
1 CAN 1, Pin 1
2 CAN 2, Pin 1
3 PCIe Mini card connector
Pin allocation of CAN connector
Pin no. Signal Color
1 CAN High Red
2 CAN Low Yellow
3 GND Black
The CAN connector type is SM03B-SURS-TF by JST. The counterpart is 03SUR-32S by JST. A
pre-assembled open-style cable for each CAN connector is included.
PC CAN Interface User Manual 4.01.0230.20000 3.0

Expansions 12 (22)
7 Expansions
7.1 Fieldbus expansion
Fig. 5 Fieldbus expansion
If there is a low-speed CAN transceiver on the fieldbus expansion, it is possible to switch via
software between the high-speed CAN transceiver on the interface and the low-speed CAN
transceiver on the fieldbus expansion. The signals of the fieldbus moduls are connected to the
appropriate Sub-D9 connector.
Simultaneous operation of low-speed CAN and LIN is also possible.
Use fieldbus expansions exclusively in conjunction with galvanically isolated CAN
channels.
7.1.1 Compatibility
Supported fieldbuses Compatible CAN interface (galvanically isolated)
CAN-Low-Speed CAN-IB100/200/PCIe
CAN-IB300/400/PCI
CAN-IB500/600/PCIe
CAN-IB800/PCI
CAN-Expansionboard
LIN CAN-IB200/600/PCIe
CAN-IB400/800/PCI
CAN-Low-Speed and LIN CAN-IB200/600/PCIe
CAN-IB400/800/PCI
PC CAN Interface User Manual 4.01.0230.20000 3.0

Expansions 13 (22)
7.1.2 Installation
Fig. 6 CAN interface with fieldbus expansions
1 Fieldbus expansion channel 2
2 Fieldbus expansion connector channel 2
3 Fieldbus expansion channel 1
4 Fieldbus expansion connector channel 1
uPlug expansion in corresponding expansion connector.
uMake sure expansion is properly inserted in socket.
wInterface detects installed expansions automatically.
uIf expansion is not detected automatically, check if expansion is properly inserted.
uObserve product description and further information on www.ixxat.com.
PC CAN Interface User Manual 4.01.0230.20000 3.0

Expansions 14 (22)
7.2 CAN Expansion Board
Fig. 7 Expansion board with fieldbus expansions
1 CAN 3
2 CAN 4
3 Fieldbus expansion channel 4
4 Fieldbus expansion connector channel 4
5 Fieldbus expansion channel 3
6 Fieldbus expansion connector channel 3
7 Expansion board connector
The CAN expansion board provides the following options:
• increase the number of available CAN channels up to four
• increase with additional fieldbus expansions
As an option bus coupling can be galvanically isolated.
The CAN expansion board is available as standard or low-profile version.
7.2.1 Compatibility
The CAN expansion board is compatible with the following, galvanically isolated two channel
CAN interface:
• CAN-IB100/PCIe
• CAN-IB200/PCIe
• CAN-IB300/PCI
• CAN-IB400/PCI
7.2.2 Installation
uConnect CAN expansion board to CAN interface with the provided ribbon cable.
uMake sure that ribbon cable is in right orientation.
uFor pin allocation of SUB-D9 connector see CAN Bus, p. 9.
PC CAN Interface User Manual 4.01.0230.20000 3.0

Expansions 15 (22)
7.2.3 Fieldbus expansions
The fieldbus expansion connectors can be used to extend each CAN circuit with fieldbus expan-
sions for additional fieldbuses. The signals of the additional fieldbuses are applied to the corre-
sponding CAN connector.
uObserve information about available fieldbus expansions and the compatibility with
CAN interfaces on www.ixxat.com.
uInstall expansion (see Installation, p. 13).
7.3 MultiCAN expansion
Fig. 8 MultiCAN expansion
Using a MultiCAN expansion the number of available CAN high speed channels on a Sub-D9
connector of specific CAN interface is doubled and the number of required computer slots is
halved.
MulitCAN-PB is used in conjunction with the standard version.
MulitCAN-PB/LP is used in conjunction with the low-profile version.
7.3.1 MultiCAN-PB
The expansion redirects the channel CAN 3 to the Sub-D9 connector of CAN 1 and channel
CAN 4 to Sub-D9 connector of CAN 2. Galvanic isolation of CAN channels will remain.
The use of the following expansions is not possible:
• CAN expansion board
• fieldbus expansion
Compatibility
The MultiCAN-PB expansion is compatible with the following, galvanically isolated two chan-
nel CAN interfaces (standard version):
• CAN-IB100/PCIe
• CAN-IB200/PCIe
• CAN-IB300/PCI
• CAN-IB400/PCI
PC CAN Interface User Manual 4.01.0230.20000 3.0

Expansions 16 (22)
Installation
Fig. 9 CAN interface with MultiCAN-PB expansion
1 CAN 1/3
2 CAN 2/4
3 MultiCAN-PB
4 Fieldbus expansion connectors
uInstall expansion (see Installation, p. 13).
uObserve different pin allocation of SUB-D9 connector.
Pin Allocation Using MultiCAN-PB
Pin No. Signal CAN 1/3 Signal CAN 2/4
1 CAN3–Low (High-Speed) CAN4–Low (High-Speed)
2 CAN1–Low (High-Speed) CAN2–Low (High-Speed)
3 GND1GND2
4 CAN3–High (High-Speed) CAN4–High (High-Speed)
5GND3GND4
6- -
7CAN1–High (High-Speed) CAN2–High (High-Speed)
8- -
9- -
PC CAN Interface User Manual 4.01.0230.20000 3.0

Expansions 17 (22)
7.3.2 MultiCAN-PB/LP
Fig. 10 CAN interface and CAN expansion board with MultiCAN-PB/LP expansion
1 CAN 1/2
2 CAN 3/4
3 MultiCAN-PB/LP
4 Fieldbus expansion connectors
If used in conjunction with low profile CAN interfaces the expansion redirects channel CAN 2 to
the CAN 1 connector.
If used in conjunction with CAN expansion board the expansion redirects channel CAN 4 to the
CAN 3 connector.
Galvanic isolation of CAN channels will remain.
The use of fieldbus expansions is not possible.
Compatibility
The MultiCAN-PB/LB expansion is compatible with the following, galvanically isolated CAN
interfaces (low-profile version):
• CAN-IB100/PCIe LP
• CAN-IB200/PCIe LP
• CAN-IB300/PCI LP
• CAN-IB400/PCI LP
• CAN-IB600/PCIe LP
• CAN-IB800/PCI LP
• CAN expansion board LP
Installation
uInstall expansion (see Installation, p. 13).
uObserve different pin allocation of SUB-D9 connector.
PC CAN Interface User Manual 4.01.0230.20000 3.0

Expansions 18 (22)
Pin Allocation Using MultiCAN-PB/LP
Pin No. Signal CAN 1/2 Signal CAN 3/4
1 CAN2–Low (High-Speed) CAN4–Low (High-Speed)
2 CAN1–Low (High-Speed) CAN3–Low (High-Speed)
3 GND1GND3
4 CAN2–High (High-Speed) CAN4–High (High-Speed)
5GND2GND4
6- -
7CAN1–High (High-Speed) CAN3–High (High-Speed)
8- -
9- -
PC CAN Interface User Manual 4.01.0230.20000 3.0
Table of contents
Other IXXAT Recording Equipment manuals

IXXAT
IXXAT iPC-I 165/PCI User manual

IXXAT
IXXAT CAN@net II User manual

IXXAT
IXXAT USB-to-CAN compact User manual

IXXAT
IXXAT USB-to-CAN II User manual

IXXAT
IXXAT CANblue User manual

IXXAT
IXXAT iPC-I XC16/PCI User manual

IXXAT
IXXAT FlexRay CCM/ FRC-EP150 User manual

IXXAT
IXXAT PC-I 03 User manual

IXXAT
IXXAT PC-I 04/104 User manual

IXXAT
IXXAT iPC-I XC16/PCI User manual
Popular Recording Equipment manuals by other brands

Cognex
Cognex MVS-8000 Series Hardware manual

Technisonic Industries Limited
Technisonic Industries Limited TAC-200A operating instructions

Digital Voice Systems
Digital Voice Systems AMBE-3000 HDK Specifications

Musicam
Musicam Liberty user guide

Tegeler
Tegeler Creme user manual

Maple Systems
Maple Systems HMI5000B Series installation guide