IXXAT VCI User manual

The expert for industrial and automotive communication
Manual
VCI - Virtual CAN Interface
VCI-V2 Installation Manual
Software Version 2.12

IXXAT
Headquarter US Sales Office
IXXAT Automation GmbH IXXAT Inc.
Leibnizstr. 15 64 Gothic Street
D-88250 Weingarten USA-Northampton, MA 01060
Tel.: +49 (0)7 51 / 5 61 46-0 Phone: +1-413-584-5650
Fax: +49 (0)7 51 / 5 61 46-29 Fax: +1-413-584-5647
Internet: www.ixxat.de Internet: www.ixxat.com
Support
In case of unsolvable problems with this product or other IXXAT products
please contact IXXAT in written form by:
Fax: +49 (0)7 51 / 5 61 46-29
Copyright
Duplication (copying, printing, microfilm or other forms) and the electronic
distribution of this document is only allowed with explicit permission of
IXXAT Automation GmbH. IXXAT Automation GmbH reserves the right to
change technical data without prior announcement. The general business
conditions and the regulations of the license agreement do apply. All rights
are reserved.
Document No. VCIV2_Installation Manual-E-V2.5

Copyright IXXAT Automation GmbH VCI-V2 Installation Manual V2.5
Contents
3
1 Overview....................................................................................5
2 Installation of the driver software VCI.......................................6
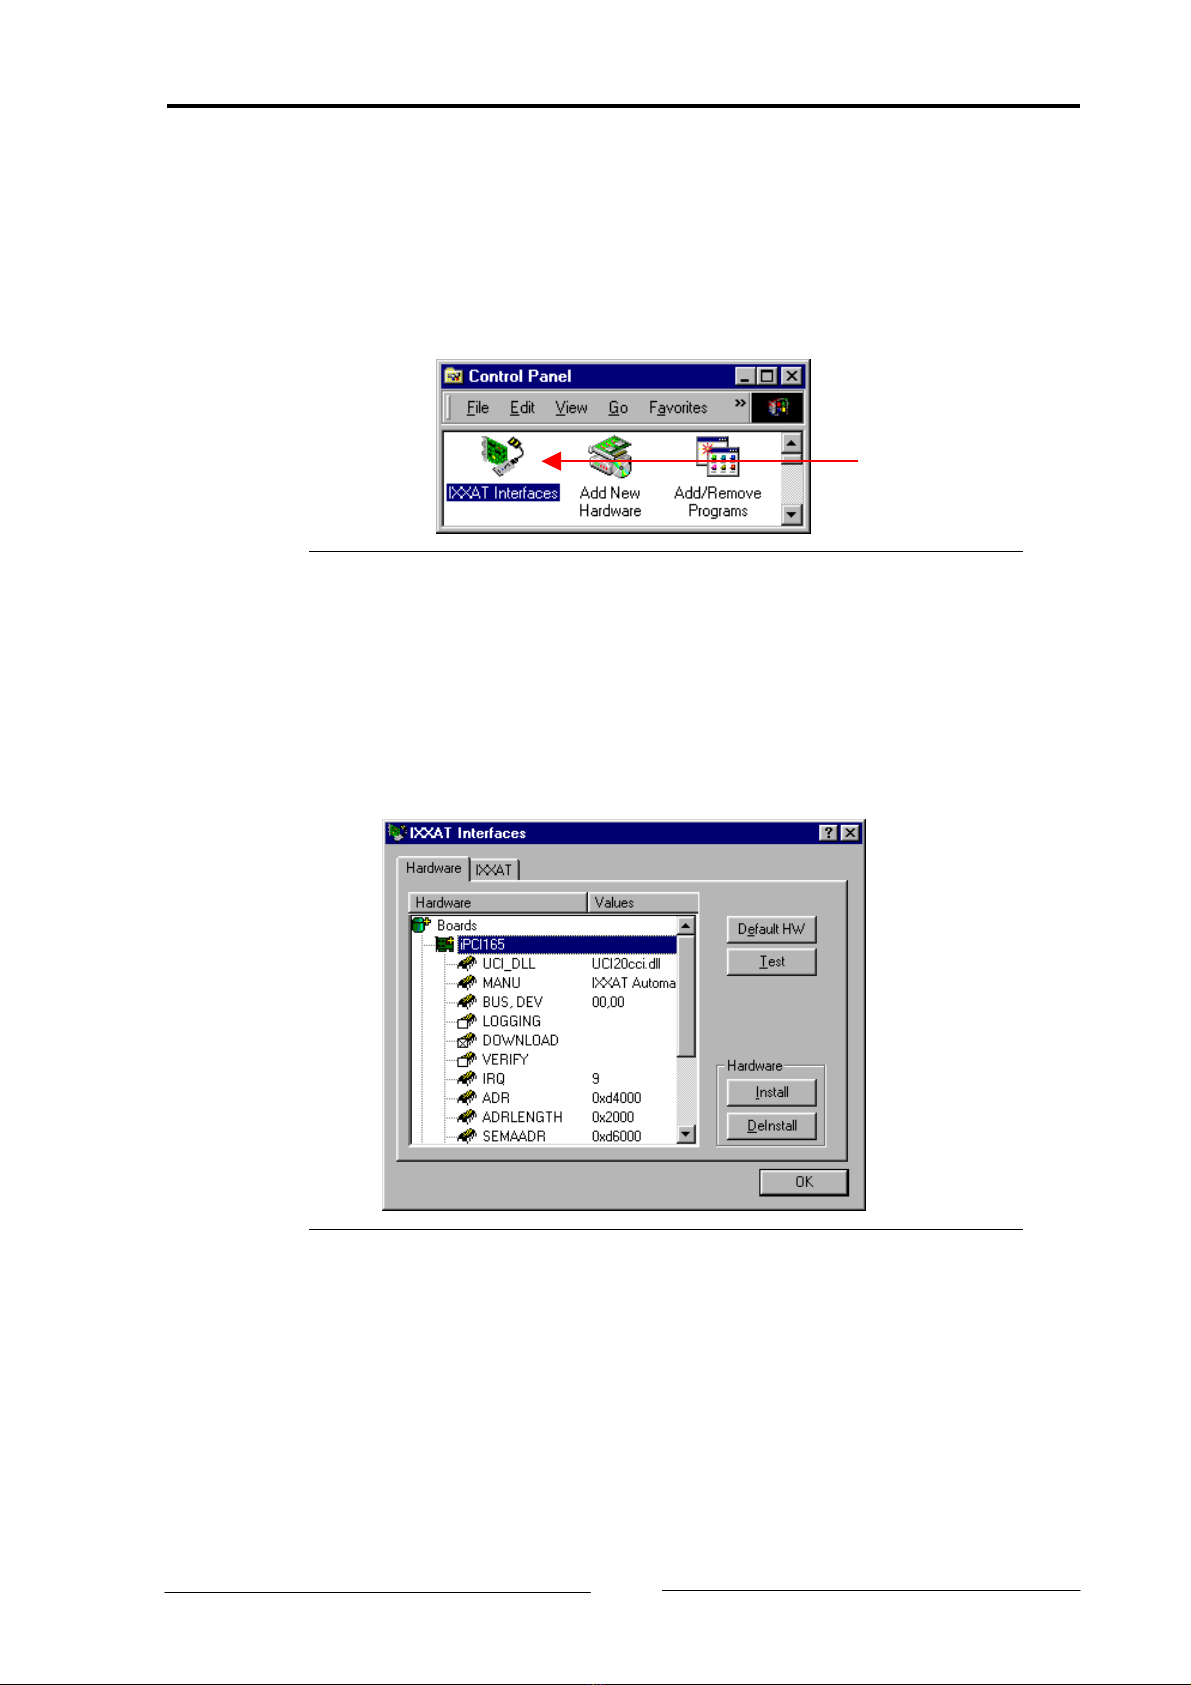
3 The IXXAT Interfaces Applet ......................................................7
3.1 Display function of the IXXAT Interfaces Applet................ 7
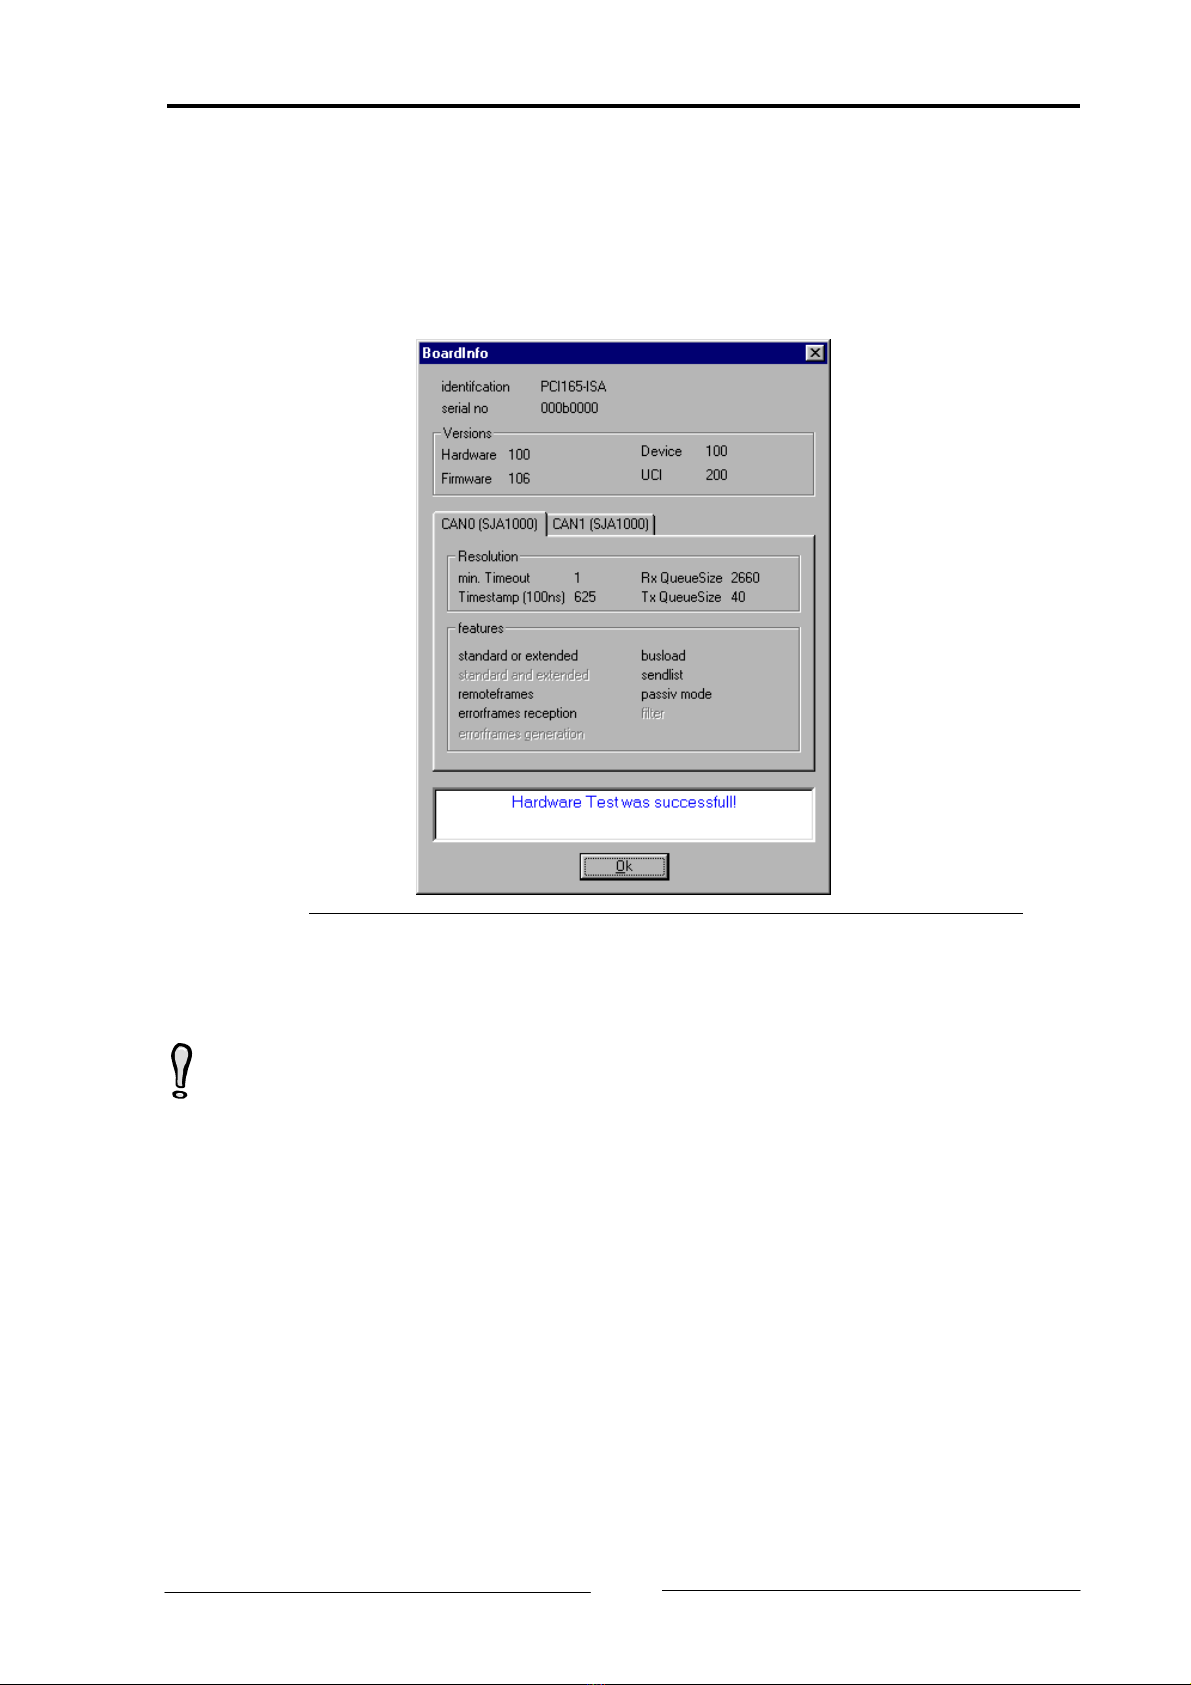
3.2 Access test to a PC/CAN-Interface ...................................... 9
4 Hardware installation Windows 95/98.....................................10
4.1 Installation of PCI-cards, USB-to-CAN or tinCAN.............. 10
4.2 Installation of ISA-cards ................................................... 14
4.2.1 Installation...............................................................................14
4.2.2 Changing the default settings ..................................................20
4.3 Installation of CANdy and CANdy lite .............................. 21
5 Hardware installation WindowsNT ..........................................24
5.1 Installation of PCMCIA-cards............................................ 24
5.1.1 Installation without Card Enabler .............................................25
5.1.2 Installation with Card Enabler ..................................................29
5.2 Installation of ISA-cards ................................................... 31
6 Hardware installation Windows2000.......................................34
6.1 Installation of PCI-cards, USB-to-CAN or tinCAN.............. 34
6.2 Installation of ISA-cards ................................................... 40
6.2.1 Changing the Default settings..................................................46
7 Important information ............................................................49
7.1 Updating to a new VCI version ........................................ 49
7.2 Plug&Play hardware installed prior to VCI-installation.... 49
7.3 Installation of INF file with right-hand mouse button..... 50
7.4 Missing COMCAT.DLL........................................................ 50


Copyright IXXAT Automation GmbH VCI-V2 Installation Manual V2.5
Overview
5
1 Overview
The VCI is a universal CAN-driver for all PC/CAN-cards from IXXAT and already
included in the scope of delivery of the CAN-cards. As DLL for Windows
95/98/NT/2000, it forms the interface between the user application and the vari-
ous CAN-cards offered by IXXAT. A special feature is its uniform programming
interface, which enables various card types to be interchanged without having to
adapt the user software.
Installation of the VCI consists of two steps:
(1) Installation of the software.
Please note the information in Section 7, if a VCI is already installed.
(2) Installation of the hardware
This manual gives instructions on carrying out these two steps.
Depending on the operating system and PC/CAN-interface, different procedures
are necessary for the installation. This manual therefore contains a separate sec-
tion for each operating system.
However, independently of the operating system and the PC/CAN-Interface used,
the following procedure should be followed:
(1) Install the CAN-driver software VCI.
(2) Select the relevant section in the manual according to the operating system
used.
(3) Select the relevant sub-section according to the CAN-hardware to be in-
stalled.
(4) If explicit installation is required, install the CAN-hardware as described in
this manual.
(5) Familiarize yourself with the meaning of the IXXAT Interfaces Applet with
the aid of Section 3.

Copyright IXXAT Automation GmbH VCI-V2 Installation Manual V2.5
Installation of the driver software VCI
6
2 Installation of the driver software VCI
The drivers for passive CAN hardware (PC-I 03, PC-I04/PCI,
PC-I04/104, CANdy lite) are not part of the driver software VCI
and must be installed as addon. After installing the driver pack-
age VCI Passive Addon the passive CAN hardware can also be
setup as described in this manual.
Installation from disk
Insert diskette 1 into disk drive.
Then start "A:\setup.exe" and follow the instructions.
Installation from CD
Insert the IXXAT installation CD into CD-drive.
Then start the file setup.exe from the correct directory for your operating
system (Win9x, WinNT, Win2000) on the installation-CD.
Follow the instructions in the installation program.

Copyright IXXAT Automation GmbH VCI-V2 Installation Manual V2.5
The IXXAT Interfaces Applet
7
3 The IXXAT Interfaces Applet
With the installation of the VCI-driver software, an "IXXAT Interfaces" Applet is
installed in the Windows Control Panel.
Figure 3-1: The IXXAT Interfaces Applet in the Control Panel
3.1 Display function of the IXXAT Interfaces Applet
The IXXAT Interfaces Applet supplies the user with information on installed IXXAT
PC/CAN-interfaces and their configuration (address, IRQ etc.).
Figure 3.1-1: Information on an installed iPC-I 165

Copyright IXXAT Automation GmbH VCI-V2 Installation Manual V2.5
The IXXAT Interfaces Applet
8
The entries LOGGING, DOWNLOAD and VERIFY differ from all others. They have a
special function:
•LOGGING: When Logging is activated, the log files “ccidpram.log” and
“ucidpram.log” are generated by the driver. All call-ups are protocolled to the
driver in these files.
Only activate Logging if there are problems during start-up of the
PC/CAN-interfaces. The log files become large very quickly and per-
formance is greatly restricted.
•DOWNLOAD: This entry only exists for active CAN-hardware. With this entry
you can determine whether the firmware is loaded onto the board when the
board is opened.
•VERIFY: This entry also exists only for active CAN-hardware. When VERIFY is
activated, the downloaded firmware is re-checked after the download phase.
Verification of the downloaded firmware may take some time, de-
pending on the type of PC/CAN-interface.

Copyright IXXAT Automation GmbH VCI-V2 Installation Manual V2.5
The IXXAT Interfaces Applet
9
3.2 Access test to a PC/CAN-Interface
Access to an installed PC/CAN-interface can be tested via the “Test“ button. The
dialog then opened provides detailed information on specific properties of the
board.
Figure 3.2-1: Specific properties of the installed board
This test is not implemented for CANdy and iPC-I 386.

Copyright IXXAT Automation GmbH VCI-V2 Installation Manual V2.5
Hardware installation Windows 95/98
10
4 Hardware installation Windows 95/98
Hardware
type
Installation method Section
PCI via automatically started hard-
ware wizard
0
PCMCIA via automatically started hard-
ware wizard
0
USB via automatically started hard-
ware wizard
(only Win98SE)
0
ISA via hardware wizard 4.2
LPT via IXXAT Interfaces Applet 4.3
4.1 Installation of PCI-cards, USB-to-CAN or tinCAN
Installing the new IXXAT hardware is made easier under Windows if
you install the VCI-Software before you install the IXXAT CAN-
Hardware. The driver is then found automatically and does not
have to be copied from an external data medium.
If no VCI-Software has been installed, you should make sure that you have the
relevant installation diskette or IXXAT installation-CD to hand.
Installation is carried out via the automatically started hardware wizard, which
detects the newly installed card.
(1) Install your PC/CAN-interface in the computer, or
plug the tinCAN into the PCMCIA slot, or
connect the USB-to-CAN adapter to your USB-port. For this, please also note
any instructions in the hardware manuals.
(2) When Windows 95/98 is first booted after the PCI-card has been installed or
after the tinCAN has been plugged in (or the USB-to-CAN), the Hardware
Wizard is started automatically. The following dialog appears, which you ac-
knowledge with "Next".

Copyright IXXAT Automation GmbH VCI-V2 Installation Manual V2.5
Hardware installation Windows 95/98
11
Figure 4.1-1: New PCI-component found
(3) A driver must be installed for the PC/CAN-Interface which has been found. If
the VCI or the driver has already been installed, Windows detects this and
skips points (4) and (5).
If the VCI has not yet been installed, Windows asks for the requested
method to search for it. Mark the search for the best driver for the device
and continue with "Next".
Figure 4.1-2: Procedure for driver search

Copyright IXXAT Automation GmbH VCI-V2 Installation Manual V2.5
Hardware installation Windows 95/98
12
(4) Insert the relevant installation diskette or IXXAT installation-CD.
If installing from diskette, enter the corresponding disk drive.
If installing the driver from the IXXAT installation-CD, enter the directory
Win9x on the installation CD as driver position (the driver cannot be found
by marking the “CD-ROM“-button!).
Start searching for the driver with "Next".
Figure 4.1-3: Entering the search directories
(5) Windows finds a driver for the new PC/CAN-interface and the following dia-
log appears (here for the iPC-I 320/PCI). Acknowledge the dialog with "Next".
Figure 4.1-4: driver found

Copyright IXXAT Automation GmbH VCI-V2 Installation Manual V2.5
Hardware installation Windows 95/98
13
(6) Windows now copies the driver found and signals success with a last dialog.
Close the installation by clicking on the "Finish" button.
Figure 4.1-5: Installation successful
After successful installation of the PCI-driver and provided the VCI-driver software
has already been installed, the card (here iPC-I 320/PCI) is visible in the Control
Panel Applet IXXAT Interfaces and ready for use.
Figure 4.1-6: iPC-I 320/PCI ready for use

Copyright IXXAT Automation GmbH VCI-V2 Installation Manual V2.5
Hardware installation Windows 95/98
14
4.2 Installation of ISA-cards
Before installing an ISA-card, it is absolutely essential to first find a free address
space in the working memory and a free IRQ. For this, open the Device Manager
(via applet “System“ in the Control Panel) and display the properties of the
“Computer“.
The free address and the IRQ found are then set on the card by means of jumpers
and dipswitches (see hardware manual). The IRQ has to be reserved in the BIOS
for ISA-cards.
Installing the new IXXAT hardware is made easier under Windows if
you install the VCI-Software before you install the IXXAT CAN-
Hardware. The driver is then found automatically and does not
have to be copied from an external data medium.
4.2.1 Installation
(1) Start the Hardware Wizard.
This is in the Start menu under "Control Panel"
Figure 4.2-1: Starting the Hardware Wizard

Copyright IXXAT Automation GmbH VCI-V2 Installation Manual V2.5
Hardware installation Windows 95/98
15
(2) The Hardware Wizard now asks you to close all other open applications. Do
this and acknowledge the dialog with the "Next" button.
Figure 4.2-2: The started hardware wizard
(3) Start the automatic identification of new Plug & Play devices with the "Next"
button.
This dialog only appears under Windows 98 !
Figure 4.2-3: Automatic identification of Plug & Play devices

Copyright IXXAT Automation GmbH VCI-V2 Installation Manual V2.5
Hardware installation Windows 95/98
16
(4) When the automatic identification is complete, the following dialog with a
list of found Plug & Play devices appears. Answer the question as to whether
the device to be installed is shown in the list with “No” and continue the in-
stallation with the "Next" button.
Note: The list may also be empty.
This dialog only appears under Windows 98 !
Figure 4.2-4: List of found Plug & Play devices
(5) The hardware wizard asks whether it should search for other hardware. This
is not the case.
Figure 4.2-5: Search for standard hardware

Copyright IXXAT Automation GmbH VCI-V2 Installation Manual V2.5
Hardware installation Windows 95/98
17
(6) If the VCI-software was already installed before the hardware installation,
you can select “IXXAT CAN-interfaces” in the list of known hardware types
and continue with point (9) via the “Next“ button.
If this is not the case, select "Other devices" and continue with the "Next"
button.
Figure 4.2-6: Selection of the hardware type
(7) The hardware wizard now offers you a list of hardware manufacturers and
their models. However, since you have a driver diskette or CD, click on the
"Have Disk" button without selecting a certain manufacturer.
Figure 4.2-7: List of hardware manufacturers

Copyright IXXAT Automation GmbH VCI-V2 Installation Manual V2.5
Hardware installation Windows 95/98
18
(8) Insert data medium with INF-file:
Insert the relevant installation diskette and enter the disk drive as source or
Insert the IXXAT installation CD and enter the CD-ROM drive as source. The
necessary .inf files are found in the directory Win9x.
Start copying with "OK".
Figure 4.2-8:Request for driver disk
(9) The hardware wizard now provides a selection of drivers. Select your
PC/CAN-interface and continue the installation with "Next".
Figure 4.2-9: Selection of the driver to be installed
The selected driver will now be installed. This may take some time!

Copyright IXXAT Automation GmbH VCI-V2 Installation Manual V2.5
Hardware installation Windows 95/98
19
(10) The following dialog shows you the settings of the newly installed PC/CAN-
interface recommended by Windows. If these do not match the address and
IRQ set by you on the hardware, you can adapt them later in the hardware
settings (see Section 4.2). However, you must first accept the recommended
settings and click on the "Next" button.
Figure 4.2-10: Default settings
(11) The installation of the new component is now complete and can be ended
with "Finish".
Figure 4.2-11: Installation finished
Windows now asks you to restart the computer. If the recom-
mended settings do not match the values set on the card, you
should alter them before restarting. For this, read Section 4.2.2.

Copyright IXXAT Automation GmbH VCI-V2 Installation Manual V2.5
Hardware installation Windows 95/98
20
4.2.2 Changing the default settings
An ISA-card is always installed by the Hardware Wizard with the default settings
(address and IRQ). If these do not correspond to the values set on the card via
jumpers and dipswitches, they must be altered as described in this section.
(1) Open the Control Panel.
Start the "System"-Applet in the Control Panel.
Figure 4.2-12: Starting the System Applet
(2) Select the installed PC/CAN-interface in the Device Manager.
In the System Applet, select the "Device Manager" tab and double-click on
the PC/CAN-interface whose settings you wish to change.
Figure 4.2-13: The Device Manager
Table of contents
Other IXXAT Recording Equipment manuals

IXXAT
IXXAT iPC-I 165/PCI User manual

IXXAT
IXXAT USB-to-CAN compact User manual

IXXAT
IXXAT CAN@net II User manual

IXXAT
IXXAT USB-to-CAN II User manual

IXXAT
IXXAT PC-I 03 User manual

IXXAT
IXXAT PC-I 04/104 User manual

IXXAT
IXXAT iPC-I 320/PCI II User manual

IXXAT
IXXAT CANblue User manual

IXXAT
IXXAT iPC-I XC16/PCI User manual

IXXAT
IXXAT FlexRay CCM/ FRC-EP150 User manual