manuals.online logo
Brands
  1. Home
  2. •
  3. Brands
  4. •
  5. Jamara
  6. •
  7. Batteries Charger
  8. •
  9. Jamara X-Peak 80 BAL V2 User manual

Jamara X-Peak 80 BAL V2 User manual

DE - Konformitätserklärung
Hiermit erklärt JAMARA e.K., dass das Produkt‚ „Ladegerät X-Peak 80 BAL V2,
No. 153059“ den Richtlinien 2014/30/EU, 2014/35/EU und 2011/65/EU entspricht.
Der vollständige Text der EU-Konformitätserklärung ist unter der folgenden
Internetadresse verfügbar: www.jamara-shop.com/Konformitaet
GB - Certicate of Conformity
Hereby JAMARA e.K. declares that the product „Ladegerät X-Peak 80 BAL V2, No. 153059“ com-
plies with Directive 2014/30/EU, 2014/35/EU and 2011/65/EU.
The full text of the EU Declaration of Conformity is available at the following Internet address:
www.jamara-shop.com/Conformity
FR - Déclaration de conformité
Par la présente, JAMARA e.K. déclare que le produit „Ladegerät X-Peak 80 BAL V2, No. 153059“
est conforme à la Directive 2014/30/UE, 2014/35/UE et 2011/65/UE.
Le texte intégral de la déclaration de conformité CE est disponible via l‘adresse Internet suivante:
www.jamara-shop.com/Conformity
IT - Dichiarazione di conformità
Con la presente JAMARA e.K. dichiara che il prodotto „Ladegerät X-Peak 80 BAL V2, No. 153059“
è conforme alla Direttiva 2014/30/UE, 2014/35/UE e 2011/65/UE.
Il testo integrale della dichiarazione di conformità UE è disponibile al seguente indirizzo Internet:
www.jamara-shop.com/Conformity
ES - Declaración de conformidad
Por la presente JAMARA e.K. declara que el producto „Ladegerät X-Peak 80 BAL V2, No. 153059“
cumplen con las Directivas 2014/30/UE, 2014/35/UE y 2011/65/UE.
El texto completo de la declaración de conformidad de la UE está disponible en la siguiente direcci-
ón de Internet: www.jamara-shop.com/Conformity
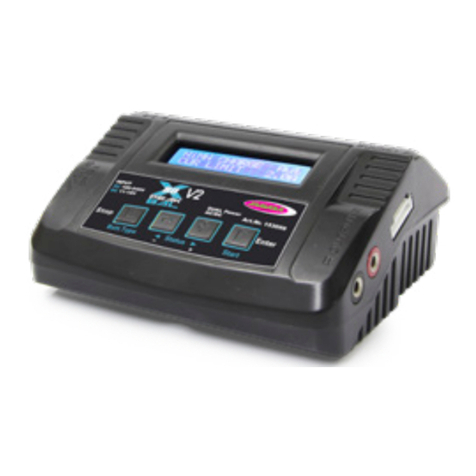
Ladegerät | Charger
X-Peak 80 BAL V2
No. 153059
DE - Gebrauchsanleitung
GB - Instruction
FR - Mode d‘emploi
IT - Istruzioni per l’uso
ES - Instrucción
DE - Allgemeine Hinweise
JAMARA e. K. übernimmt keine Haftung für Schäden, die an dem Produkt selbst oder durch dieses
entstehen, sofern diese auf falsche Bedienung oder Handhabungsfehler zurückzuführen sind. Der
Kunde allein trägt die volle Verantwortung für die richtige Bedienung und Handhabung; dies umfasst
insbesondere die Montage, den Ladevorgang, die Verwendung bis hin zur Wahl des Einsatzberei-
ches. Bitte beachten Sie hierzu die Bedienungs- und Gebrauchsanleitung, diese enthält wichtige
Informationen und Warnhinweise.
GB - General information
JAMARA e.K. is not liable for any damage caused to the product itself or through this, provided this
is due to improper operation or handling errors. The Customer alone bears the full responsibility for
the proper use and handling, including without limitation, the assembly, the charging process, the
use and choice of the operation area. Please refer to the operating and user instructions, it contains
important information and warnings.
FR - Remarques générales
La société JAMARA e. K. n’est pas responsable de dommages, que ce soit au niveau du modèle
ou causé par celui-ci, résultant d’une utilisation non appropriée. Seul le client est responsable con-
cernant la mise en oeuvre et l’utilisation conforme du matériel; cela va de l’assemblage, en passant
par la charge des accus et allant jusqu’au domaine d’utilisation. Pour cela, veillez lire attentivement
la notice d’assemblage et d’utilisation, celle-ci contient d’importantes informations ainsi que les con-
signes de sécurités.
IT - Informazioni generali
JAMARA e. K. non e´responsabile per danni, sostenute al prodotto stesso o attraverso questo,
dovuti ad una gestione non corretta del articolo. Solo il cliente si assume la piena responsabilità per
la manutenzione e l´utilizzo corretto dello stesso; questo include il montaggio, la ricarica, l´utilizzo,
no alla scelta della aerea di applicazione. Si prega di notare e rispettare le istruzioni d´uso, questi
contengono informazioni e avvertimenti molto importanti.
ES - Información general
JAMARA K. no se hace responsable de los daños causados al producto en sí o por medio de
esto, a menos que esto se debe al mal funcionamiento o errores de manejo. El cliente solo tiene la
responsabilidad completa para el uso y manejo adecuado, incluyendo, sin limitaciones, el montaje,
el proceso de carga, el uso de hasta la elección de la zona de aplicación. Por favor, consulte las
instrucciones de uso y funcionamiento, contiene información y avisos importantes.
DE - Bitte lesen Sie die komplette Bedienungsanleitung und Sicherheitshinweise sorg-
fältig durch bevor Sie das Modell in Betrieb nehmen.
Achtung! Warnhinweise / Sicherheitshinweise unbedingt komplett lesen.
Diese dienen Ihrer Sicherheit und können Unfälle / Verletzungen vermeiden.
GB - Read the complete instructions and security instructions carefully before using
the model.
Caution! Please fully and carefully read warnings/ safety instructions. These
are for our own security and can avoid accidents/injuries.
FR - Avant de mettre en marche toute l‘unité il faut lire attentivement le mode d‘emploi.
Attention! La mise en garde et les consignes de sécurités sont à lire
entièrement pour votre sécurité et éviter tout accidents et blessures.
IT - Prima di avviare il modello, leggere attentamente tutte le istruzioni per l’uso.
Attenzione! Leggere completamente le avvertenze / istruzioni di sicurezza,
questi sono per la vostra sicurezza può prevenire incidenti / infortuni.
ES - Lea atentamente la instruccion completa y seguridad antes de poner el modelo
en funcionamiento
Atención! Leer completamente las notas de advertencia / instrucciones de
seguridad estos son para su seguridad y puede evitar accidentes / lesiones
26/19
2
DE - Technische Daten:
Input AC 100 - 240 V; 50 Hz; 0,84 - 0,35 A; 84 W
DC 11 - 18,0 V; 5 - 7,2 - 4,55 A; 80 W
Output LiIon/LiPo/LiFePo: 1 - 6
NiCd/NiMH: 1 - 15
Pb 2V ~ 20 V
Ladestrom max. 80 W, 0,1 ~ 6,0 A
Entladestrom max. 10 W, 0,1 ~ 2,0 A
Balancerstrom 300 mAh/Zelle
Abmessungen 135 x 111 x 60 mm
Gewicht 402 g (Netto Gewicht)
GB - Technical data:
Input AC 100 - 240 V; 50 Hz; 0,84 - 0,35 A; 84 W
DC 11 - 18,0 V; 5 - 7,2 - 4,55 A; 80 W
Output LiIon/LiPo/LiFePo: 1 - 6
NiCd/NiMH: 1 - 15
Pb 2V ~ 20 V
Charging current max. 80 W, 0,1 ~ 6,0 A
Discharge current max. 10 W, 0,1 ~ 2,0 A
Balance current 300 mAh/cell
Dimensions 135 x 111 x 60 mm
Weight 402 g (Net Weight)
DE - Highlights
• Eingebauter Dual Power AC/DCAdapter 230 V und 11 - 18 V
• Interner unabhängiger Lithium Akku Balancer
• Individuell balancierte Batterie-Entladung
• Schneller Speichermodus für verschiedene Akkutypen
• Maximale Sicherheit
• Automat. Überspannungsschutz
• Eingangsstrom Überwachung
• Kapazitäts-Limit
• Prozesszeit Limit
• Ladekapazität Anzeige
• Unterstützt verschiedene Lithium Akku-Typen, NiMh, NiCD und Bleiakkus
• 5 Speicherplätze
GB - Highlights
• Dual Power Built-in AC Adapter 230 V and 11 - 18 V
• Internal independent lithium battery balancer
• Balancing individual cells battery discharging
• Fast and storage model for various type of battery
• Maximum safety
• Automatic charging current limit
• Input power monitoring
• Capacity limit
• Proscessing time limit
• Date store/load
• Supports various type of lithium battery, NiMh, NiCd and Lead battery packs
• 5 memory locations
DE - Lieferumfang:
• Ladegerät
• Ladekabel: BEC, Tamiya, Hochstromstecker LiPo, Krokodilklemmen, Balancer-Bord,
12 V Einspeißekabel für Netzteil, Netzkabel
• Anleitung
GB - Box content:
• Charger
• Charging lead: BEC, Tamiya, LiPo high-current plug, Crocodile clips,
Balancer board 12 V for power supply, Supply cable, Power cable
• Instructions
DE - Besonderheiten
Interner unabhängiger Lithium Akku Balancer
Das Ladegerät hat einen integrierten Balanceranschluß (bis zu 6 Lithium-Zellen). Der Ladevorgang
wird dadurch deutlich komfortabler und sicherer. Es ist nicht erforderlich einen separaten Balan-
cer zum Auaden anzuschließen.
Individuell balancierte Batterie-Ladung/-Entladung
Während des Entladevorgangs überwacht das Ladegerät jede Zelle einzeln. Fehler werden im
Display angezeigt und der Vorgang automatisch beendet wenn die Spannung einer Zelle nicht in
Ordnung ist.
Verschiedene Lithium Akku Typen
Mit dem Ladegerät können verschiedene Lithium-Akku-Typen wie Lithium-Ionen, LiPo und LiFe-
Zellen geladen werden.
Schneller Speichermodus
Alle Akkudaten können gespeichert und angezeigt werden. Das Verhalten der Zellen kann so über
mehrere Lade- / Entladezyklen verfolgt und analysiert werden.
Maximale Sicherheit
Delta-Peak-Empndlichkeit: Das Ladegerät überwacht den Spannungsverlauf am Akku während
des Ladens. Wenn die Ladespannung des Akkus erreicht oder überschritten wird, erfolgt die Ab-
schaltung automatisch.
Automat. Überspannungsschutz
Sie können die obere Grenze des Ladestroms beim Auaden Ihrer NiCd oder NiMh Akkus eingeben.
Dies ist nützlich bei NiMh Akkus mit niedriger Kapazität im automatischen Lademodus.
Kapazitäts-Limit
Zur Sicherheit wird die zu ladende Kapazität überwacht. Auch die Ladedauer wird ständig kontrol-
liert. Wenn die Ladekapazität den maximalen Wert überschreitet, wird der Prozess automatisch
beendet.
Temperatur-Überwachung m. programmierbarer Abschaltung*
An das Ladegerät kann ein Temperatursensor, angesteckt werden. Dieser kann die Akkutemperatur
im Bereich bis zu 80°C überwachen.
*Diese Funktion ist nur durch den Anschluss eines optionalen Temperaturfühlers (Art.-Nr. 153057)
möglich, dieser ist nicht im Lieferumfang enthalten.
Prozesszeit Limit
Um mögliche Fehler zu vermeiden, können Sie die Ladezeit auch manuell programmieren.
Eingangsstrom Überwachung
Damit es nicht zu einer Tiefentladung der Autobatterie kommt wird die Eingangsspannung des La-
degeräts ständig überwacht. Wenn der Grenzwert unterschritten wird, beendet das Ladegerät den
Prozess automatisch.
Datenspeicherung
Das Ladegerät ist mit einer Speichermöglichkeit für bis zu 5 Akkus ausgestattet. In jedem Speicher
können Sie die Daten eines Akkupacks hinterlegen. Dadurch können schnell auf Ihre wichtigsten
Akkus zugreifen, es entfällt weitestgehend eine Neuprogrammierung.
Zyklisches Laden / Entladen
Für die Akku-Zellen steht außerdem ein Zyklusprogramm zum Regenerieren der Zellen bereit.
GB - Special features
Internal independent lithium battery balancer
The Charger has an integrated balancer connection for the included Balander board (up to 6-cell
lithium). It isn‘t necessary to connect an external balancer for balance charging.
Balancing individual cells battery charging/discharging
During the process of discharging, the charger can monitor and balance each cell of the battery in-
dividually. Error message will be indicated and the process will be ended automatically if the voltage
of any single one cell is abnormal.
Adaptable to various type of lithium battery
Charger is adaptable to various types of Lithium batteries, such as Li-ion, LiPo and LiFe series of
batteries.
Fast and storage mode of lithium battery
Purposes to charge di󰀨erent battery types, „fast“ charge reduce the duration of charging, whereas
„store“ state can control the nal voltage of your battery, so as to store fo a long time and protect
useful time of the battery.
Maximum safety
Delta-peak sensitivity: the automatic charge termination program based on the principle of the Delta-
peak voltage detection. When the battery‘s voltage exceeds the threshold, the process will be ter-
minated automatically.
Automatic charging current limit
You can set up the upper limit of the charging current when charging your NiCd or NiMh battery. It is
useful for the NiMh battery of low impendance and capacity in the „Auto“ charging mode.
Capacity limit
The charging capacity is always calculated as the charging current multiplied by time. If the charging
capacity exceeds the limit, the process will be terminated automatically when you set the maximum
value.
Temperatur monitoring with programmable cut-o󰀨 *
The battery‘s internal chemical reaction will cause the temperature of the battery to rise. If the tem-
perature limit is reached, the process will be terminated.
*This function is available by connecting optional temperatur probe (Ord. No. 153057), which is not
included in our package.
Processing time limit
You can also limit the maximum process time to avoid any possible defect.
Input power monitoring
To portect the car battery used as DC input power from being damaged, its voltage keeps being
monitored. If it drops below the lower limit, the process will be ended automatically.
Data store/load
The maximum ve batteries‘ data can be stored for users‘ convenience. You can keep the data
pertaining to program setting of the battery of continuous charging or discharging. Users can call out
these data at any time without any special program setting.
Cyclic charging / discharging
1 to 5 cyclic and continuous process of charge>discharge or discharge>charge is operable for bat-
tery refreshing and Balancing to simulate the battery‘s activity.
3
DE - Anschlüsse und Bedienelemete
1 Eingang 230 V
2 Eingang 11 - 18 V
3 Anschluß Temperatursensor (Sensor nicht im Lieferumfang enthalten)
4 Ausgang Ladekabel - rot = plus (+) | schwarz = minus (-)
5 Balanceranschluss (1 - 6)
6 LED Display
7 Stop / Batt. Type-Taste = Dient zur Auswahl der Akkutypen
Stoppt den Ladevorgang
8 Status  - / +  = Moduswechsel
Veringerung bzw. Erhöhung eines Wertes.
9 Start / Enter Taste = Starten des Ladevorgangs
Zur Bestätigung der Menüpunkte
GB - Connections and Controls
1 230 V AC Input
2 11 - 18 V DC Input
3 Temperature sensor socket (sensor not included)
4 Output charge lead - red = plus (+) | black = minus (-)
5 Balancer lead sockets (1 - 6)
6 LED screen
7 Batt. Type = Scroll through the Main Menu
Stop any charge processes
8 Status  - / +  = After values
See the status of individual cells in balance charge mode
9 Start / Enter button = Resume or start charge processes.
Conrm an action.
3457
6 8 9
1 2
DE - Inbetriebnahme des Ladegeräts
Das X-Peak 80 BAL V2 kann alternativ mit zwei verschiedenen Spannungsquellen betrieben wer-
den. Es besteht die Möglichkeit die Energie über die Netzanschlussleitung aus einer normalen
Wechselstromsteckdose oder aus einer 12 V Autobatterie bzw. einem leistungsfähigen stabilisier-
tem Netzteil (11 - 18V) zu beziehen.
Verbinden Sie einen der Eingänge mit der Energiequelle Ihrer Wahl. Beim Anschluss an einer 12
V Spannungsquelle müssen Sie unbedingt auf die richtige Polarität achten. Verbinden Sie die rote
Krokodilklemme mit dem Pluspol (+) und die schwarze mit dem Minuspol (-) der Batterie bzw. des
Netzteils.
Bei der Inbetriebnahme wird „Charge Discharge“ angezeigt. In dieser Zeit überprüft der Prozessor
das Ladegerät und die Energiequelle. Liegt ein Fehler vor, weil z.B. die Eingangsspannung un-
terhalb 11 V oder über 15 V liegt, erfolgt eine entsprechende Meldung über das Display und der
Summer ertönt. Wenn das der Fall ist überprüfen Sie die Energieversorgung.
Wichtiger Hinweis:
Verwenden Sie niemals beide Energiequellen gleichzeitig, das Ladegerät nimmt dadurch un-
weigerlich Schaden.
Die Verbindung zum Akku der ge- oder entladen werden soll, erfolgt über zwei farbig gekennzeich-
nete 4 mm Anschlussbuchsen. Verbinden Sie den Akku mit diesen Buchsen. Dabei muss der Plus
pol des Akkus mit der roten (+) ,der Minuspol des Akkus mit der schwarzen (-) Buchse verbunden
werden. Setzen Sie nur hochwertige Ladekabel ein.
Beim Laden oder Entladen eines Lithium-Akkus sollten Sie aus Sicherheitsgründen unbedingt die
Balancer-Funktion des Ladegerätes nutzen. Nur so sind die Lithium-Zellen optimal vor einer Fehl-
behandlung geschützt.
Dazu müssen Sie außer den beiden Hauptanschlüssen auch den Balancerstecker des Akkus mit
dem Ladegerät verbinden. Wenn der Balancer-Port nicht benutzt wird, erfolgt eine Lade- bzw. Entla-
devorgang ohne die Überwachung der Einzelzellenspannung. Außerdem können die Spannungen
der einzelnen Zellen auch nicht im Display angezeigt werden.
GB - Using your charger for the rst time
The X-Peak 80 BAL V2 is tted with 2 power inputs which gives you the choice of powering the unit
from the household mains supply (220 V AC) or via 12 V DC. The 12 V DC can be either a vehicle
battery or a stabilised transformer (11 - 18V).
Connect the charger to an input of your choice, if using 12 V pay particular attention to the polarity.
The red crocodile clip must be connected to the plus pole (+) and the black clip to the minus pole (-).
After connection the charger will display „Charge Discharge“ whilst a self test is conducted. If an
error is encountered, for example if the input voltage is outside the allowed range of 11-15 V, a mes-
sage will be displayed and the buzzer will sound. Disconnect the power supply and rectify the fault.
WARNING!
Never connect both power inputs simultaneously as this will destroy the charger!
Battery packs to be charged or discharged are attached to the charger via 2 colour coded banana
sockets using a good quality charging cable. Make sure that the plus (+) pole of the battery is con-
nected to the red socket on the charger and that the minus (-) pole of the battery is connected to the
black socket of the charger.
When charging or discharging Lithium packs, always use the balancer function of the charger. This
will not only provide protection for your cells, but also ensure maximum e󰀩ciency and long life.
To do so, you must connect both the charging cable and the balancer plug/socket. Not doing this
will result in the individual cells not being protected and you will not be able to monitor the individual
cell voltage in the display.
DE - Menüstruktur des Ladegerätes
Nach dem Anschließen des Ladegeräts an eine der Stromquelle sind die zuletzt benutzen Einstel-
lungen aktiv. Soll der gleiche Akku wieder ge- oder entladen werden, brauchen keine Änderungen
vorgenommen zu werden. Der zuletzt genutzte Lademodus wird angezeigt.
Für eine Änderung der Einstellungen muss zunächst vorgegeben werden welcher Akkutyp ge- oder
entladen werden soll. Dazu muss die ‘Batt.Typ/Stop’-Taste so oft betätigt werden, bis im Display
der gewünschte Akkutyp angezeigt wird. Die Akkutypen sind in einer Schleife hintereinander an-
geordnet.
Der angezeigte Akkutyp wird bestätigt durch drücken der ‚Start/Enter‘-Taste. Jede Tastenbetätigung
wird, wenn Sie es wünschen, durch ein kurzes akustisches Signal bestätigt.
Wenn die ’Start/Enter’-Taste betätigt wird, beginnt der einstellbare Parameter, z.B. der Ladestrozu
blinken. Durch Betätigung der ’Status  - / + ’-Tasten kann dieser Wert wunschgemäß verändert
werden.
Wenn ein Akku angeschlossen ist, kann der programmierte Vorgang durch eine längere Betätigung
der ’Start/Enter’-Taste gestartet werden. Wenn alles ordnungsgemäß abgeschlossen ist und kein
defekter Akku vorliegt, beginnt der Vorgang. Im Fehlerfall wird, begleitet von einem akustischen
Warnsignal, eine entsprechende Fehlermeldung angezeigt. Während eines laufenden Lade- oder
Entladevorganges werden die wichtigsten Daten im Display dargestellt.
Die nachfolgende Grak stellt die komplette Menüstruktur des X-Peak 80 BAL V2 dar:
GB - Menu Structures
Having connected the charger to a power supply, the last settings used will be displayed. If you are
going to charge/discharge the same pack, no settings need to be changed. The last used mode will
be displayed.
If a di󰀨erent pack is to be charged/discharged the setting must be changed, starting with the battery
type. To do this, press the ‘Batt.Typ/Stop’ button until the correct battery type ashes in the display.
This menu option is an endless loop.
The displayed battery type is conrmed by pressing the ‚Start/Enter‘ button. If you wish, each key
press is conrmed by a brief acoustic signal.
Pressing the ’Start/Enter’ button allows the user to access the various parameters which can be
changed, for example the charging current. The ’Status  - / + ’ buttons are used to change
the values.
Once a battery pack has been connected, the selected operation can be started by pressing the
’Start/Enter’ button for 3 seconds. Providing that the battery is not damaged and correctly connec-
ted, the selected operation will begin. If a problem is encountered, a warning bleep will sound and
a warning message displayed. When operationing the charger will display the relevant information.
The following program ow chart shows the complete menu structure of the X-Peak 80 BAL V2:
4
DE - Menüstruktur GB - Menu Structures
Programm - Lithium Akkus
Program select - Lithium battery
Programm - NiMH Akkus
Program select - NiMH battery
Programm - NiCd Akkus
Program select - NiCd battery
Programm - Blei-Akku
Program select - Pb battery
Programm - Speichern
Program select - Save Data
Gespeichertes Programm wählen
Program select - Load Data
Programm benutzerdeniert
User Set Program
Einstellungen speichern
Save Data
Gespeichertes Programm laden
Load Data
Lixx laden
Lixx charge
NiMH laden - Auto. / Manuell
NiMH charge - Auto. / Man.
NiCd laden - Auto. / Manuell
NiCd charge - Auto. / Man.
Sicherheitstimer
Safety Timer
Lade-/Entladepause
CHg>Dchg Waste Time
Lixx Art
Lixx V. Type
Blei-Akku laden
Pb battery charge
Lixx - balanciert laden
Lixx - Balance
NiMH - entladen - Auto. / Manuell
NiMH - discharge - Auto. / Man.
NiCd - entladen - Auto. / Manuell
NiCd - discharge - Auto. / Man.
Kapazitätsabschaltung
Capacity Cut-o󰀨
Temperaturabschaltung -
USB aktivieren
Temp Cut-o󰀨 - USB Enable
LiPo/Lilo/LiFe Erkennungszeit
LiPo/Lilo/LiFe CHk Time
Blei-Akku - entladen
Pb battery - discharge
Lixx - entladen
Lixx - Discharge
Lixx - schnellladen
Lixx - Fast charge
NiMH - Zyklisch
NiMH - cycle
NiCd - Zyklisch
NiCd - cycle
Eingangsspannungswarnung
Input Power Low Cut-o󰀨
Tasten- und Warntöne
Key Beep Buzzer
NiCd-Höhe Ladeeinheit
NiCd D. Peak Sensitivity
NiCd-Höhe Ladeeinheit
NiCd D. Peak Sensitivity
Lixx - speichern
Lixx - Storage
Start / Enter
Start / Enter
Start / Enter
Start / Enter
Start / Enter
Start / Enter
Start / Enter
Status -
Status + 
Status -
Status + 
Status -
Status + 
Status -
Status + 
Status -
Status + 
Status -
Status + 
Status -
Status + 
Stop / Bat.Type
Stop / Bat.Type
Stop / Bat.Type
Stop / Bat.Type
Stop / Bat.Type
Stop / Bat.Type
Status -
Status + 
Status - Status + 
Status -
Status + 
Status -
Status + 
Status -
Status + 
Status -
Status + 
Status -
Status + 
Status -
Status + 
DE - Achtung!
Standardmäßig ist das Ladegerät auf Benutzereinstellungen vorprogrammiert. Wenn zum ers-
ten Mal an ein 12-V Akku angeschlossen wird, werden Auf dem Bildschirm nacheinander die
folgenden Informationen angezeigt, und der Benutzer kann die Parameter auf ändern.
Wenn Sie den Parameterwert im Programm ändern müssen, drücken Sie die Taste „Start /
Enter“, damit er blinkt, und ändern Sie dann den Wert mit der Taste „Status -“ oder „Status +
“. Der gewünschte Wert wird durch einmaliges Drücken der Taste „Start / Enter“ gespeichert
GB - Warning
As default this charger will be set to typical user settings when it is connected to a 12 V battery
for the rst time. The screen displays the following information in sequence and the user can
change the parameter on each screen.
If you need to alter the parameter value in the program, press „Start/Enter“ key to make it
blink then change the value with „ Status -“ or „Status + “ key. The value will be stored by
pressing „Start/Enter“ key once
5
DE - Vorgabe der Parameter
Menü zur Auswahl der Lithium-Akku Typen:
LiFe = 3,3 V; LiIo = 3,6 V; LiPo = 3,7 V
Es ist unbedingt notwendig den richtigen Akkutyp vorzugeben, die Zellen
werden sonst beschädigt.
Um fehlerhafte Einstellungen zu vermeiden, ist der X-Peak 80 BAL V2 mit
einer automatischen Erkennung der Zellenzahl von Li-Akkus ausgestattet. Bei
zu tief entladenen Zellen kann das Messergebnis falsch werden. In diesem
Menü kann daher eine Zeit vorgegeben werden, in der ständig die Anzahl der
in Reihe geschalteten Li-Zellen überprüft, und wenn notwendig korrigiert wird.
Normalerweise reicht eine Vorgabe von 15 min. aus. Für besonders hochkapa-
zitive Akkus sollte die Zeit höher angesetzt werden.
In diesen beiden Menüs wird die die Abschaltempndlichkeit für NiMH und
NiCd-Akkus programmiert. Der Bereich liegt zwischen 5 und 20 mV. Je höher
der Wert eingestellt wird, umso voller werden die Akkus, aber durch mögliche
Überladungen sinkt die Lebensdauer. Die Voreinstellungen betragen 12 mV
bei NiCd und 7 mV bei NiMH.
Auf der linken Seite des Ladegeräts bendet sich ein 3-po-
liger Anschluss, der als Anschluss für einen Temperatur-
sensor (nicht im Lieferumfang enthalten) verwendet wird.
Wenn auf dem Bildschirm die Temperatur angezeigt wird,
können Sie den optionalen Temperaturfühler verwenden,
um eine Verbindung mit der Oberäche der Batterie her-
zustellen. Eine USB-Funktion ist bei diesem Ladegerät
nicht verfügbar.
Die maximale Temperatur des Akkus kann während des
Ladevorgangs eingestellt werden. Der Vorgang wird au-
tomatisch beendet, um die Batterie zu schützen, sobald
die Batterietemperatur diese Werte erreicht. Diese Funktion wird durch einen
Temperaturfühler (optional, nicht im Lieferumfang enthalten) erreicht.
Achtung!
Stecken Sie das Temperatursensorkabel nicht verpolt ein. Ihr Ladegerät oder
der Temperatursensor könnten dabei beschädigt werden.
Während es Lade-/Entladevorgangs erwärmt sich der Akku. In diesem Menü
lässt sich eine Zeitverzögerung zwischen Entladung und Ladung einfügen,
damit der Akku genügend Zeig zum Abkühlen bekommt. Je größer die Zeit, je
besser kann der Akku abkühlen, aber umso länger dauert der komplette
Zyklus. Der Einstellbereich liegt zwischen 1 und 60 Minuten.
Wenn der Ladevorgang startet, startet zeitgleich der integrierte Sicherheits-
timer. Wird ein Fehler oder die Abschlussschaltung nicht erkannt, ist dieses
Gerät so programmiert, dass ein Überladen verhindert wird. Beziehen Sie sich
bitte auf die Anweisungen in Abschnitt „Berechnung der Safety Timer Vorga-
ben“, um den von Ihnen eingestellten Timer zu berechnen.
In dieser Einstellung kann die max. Kapazität für einen Vorgang programmiert
werden. Diese Möglichkeit erhöht die Sicherheit eines Lade- bzw.
Entladevorganges, damit es nicht dazu kommt, dass die Zellen beschädigt
werden. Sobald die Schwelle erreicht, wird der Ladevorgang abgebrochen.
In diesem Untermenü kann eingestellt werden, dass bei jeder Betätigung
einer der Tasten ein akustisches Signal ertönt und das Ende eines Vorganges
akustisch angezeigt werden soll.
Die Stromquelle (Autobatterie, Netzteile ect.) wird von der Software überwacht,
um eine Tiefentladung zu vermeiden. Wenn die Spannung unter dem vom Be-
nutzer eingestellten Wert liegt, wird das Programm um den Akku zu schützen
automatisch abschalten.
GB - Specication of the parameters
The screen shows the nominal voltage of Lithium battery.There are three
kinds of Lithium battery:
LiFe = 3,3 V; LiIo = 3,6 V; LiPo = 3,7 V
This is very important so you have to check the battery carefully and set
it up correctly. If it is di󰀨erent from correct value the battery can explode
during charge process.
To avoid from erroneous setting by users. The X-Peak 80 BAL V2 detects the
cell count of Lithium battery automatically at the beginning of charge or di-
scharge process. But deeply discharged battery can be perceived incorrectly.
To avoid this error, the time can bye set to verify the cell count by the processor.
Normally, 15 seconds are enough to detect the cell count correctly. You need
to extend the time term limit for the battery of large capacity. But the charge or
discharge process can may come to an end within the time term because of
the time limit decided by the wrong count if you set too long time limit for the
battery of small capacity. This may cause fatal error. You have to extend the
time term if the processor detect the cell count incorrctly at the beginning of
charge or discharge process. Otherwise, default value is recommended to use.
This shows the trigger voltage for automatic charge termination of NiMH and
NiCd battery. The valid value ranges from 5 to 20 mV per cell. Setting the
trigger voltage higher brings a danger of overcharging; whereas setting it lower
brings a possibility of premature termination. Please refer to the techincal spe-
cication of the battery. (NiCd default: 12 mV, NiMH default: 7 mV).
On the left side of the charger is a 3-pin port used as a
connection for a temperature sensor (not included).
If the screen displays temperature, you can use the
optional temperature probe to connect to the surface of
the battery. The USB function is not available for this
charger.
The maximum temperature of the battery can be set du-
ring the charge process. The process will be terminated
automatically to protect battery once the temperature of
battery reaches this values. This feature is accomplished
through temperature probe (optional, not supplied).
Attention!
Plug the temperature sensor cable (not supplied) only as shown. Plug the cable
not reverse polarity. Your charger or the temperature sensor can be damaged.
The battery become warm after cyclec of charge/discharge process. The
program will insert a time delay after each charge/discharge process to allow
the battery enough time to cool down before beginning next cyle of charge/
discharge process. The valid value ranges from 1 to 60 minutes.
When the charge process starts, the integral safety timer starts to run simulta-
neously. If error detected or the termination circuit can not detect whether the
battery is fully charged or not, this unit is programmed to prevent overcharging.
Please refer to the below statement to calculate the timer you set.
This program provides maximum capacity protection function. If the Delta peak
voltage can not be detected or the saftey timer times out, the charge process
will stopp automatically, when the battery reaches the user-set maximum char-
ge capacity.
The beep to conrm userts operation sounds every time a button is pressed.
The beep or melody sounds at various times during operation to conrm di󰀨e-
rent mode change. These functions can be switched on or o󰀨.
This funktion monitors the voltage of the input battery used to power this char-
ger. If the voltage is lower than user-set value, the program will end forcibly to
protect the input battery.
- +
 Status 
- +
Status 
- +
Status 
- +
Status 
- +
Status 
- +
Status 
- +
Status 
- +
Status 
- +
Status 
- +
Status 
- +
Status 
Status 
Status 
Status 
Status 
Status 
Status 
Status 
Status 
••
- +
Status 
- +
Status 
Status 
Status 
6
DE - Lithium Zellen laden
Nach der Aktivierung mit der ’Batt-Type/Stop’-Taste des Li-Programms erfolgt
der Einstieg in die Programmierphase, durch eine Betätigung der ’Start/ Enter’-
Taste. Das Display sieht dann, für einen LiPo-Akku, wie abgebildet aus. Links
in der ersten Zeile wird der aktivierte Zellentyp angezeigt. In der zweiten Zeile
kann der Ladestrom im Bereich von 0,1 bis 5,0 A und die Zellenspannung bzw.
Zellenzahl (1 bis 6) mit der ’Status ’-Taste programmiert werden.
Wenn alle Vorgaben richtig eingestellt sind, oder der gleiche Akku wie zuvor
wieder geladen werden soll, muss der Start durch eine Betätigung der ’Start/
Enter’-Taste für mind. 3 Sek. vorbereitet werden. Das Display stellt sich dann
wie nebenstehend abgebildet dar.
Nach dem Start wird das Arbeitsdisplay dargestellt. Es werden alle wichtigen
Informationen zur Verfügung gestellt. Dabei handelt es sich um, Zellentyp und
Zellenzahl (1), Ladezeit (2), Ladestrom (3), aktuelle Akkuspannung (4) und ge-
ladene Kapazität (5).
Um einen Ladevorgang zu beenden, betätigen Sie die ’Batt-Type/Stop’-Taste.
Allerdings ist der Akku dann nicht ganz aufgeladen.
GB - Charging of lithium battery
The left side of the rst line shows the type of battery you choose. The value
on the left of the second line of the charger is current user set. After setting the
current and voltage, press START/ENTER key for more than 3 seconds to start
the process.(charge current: 0.1-5.0A,voltage:1-5V).
This displays the number of cells you set up and the processsor detects. „R“
shows the number of cells detected by the charger and “S“ is the number of
cells set by you at the previous screen. If both numbers are identical you can
start charging by press START/ENTER button. If not,press BATT TYPE/STOP
button to go back to previous screen to carefully check the number of cells of
the battery pack before going ahead.
This screen shows the real-time status during charge process.
Press BATT TYPE/STOP key once to stop the charge process.
1 Number of cell
2Charging time
3 Charging current
4 Battery voltage
5Charged capacity
DE - Berechung der Safety Timer Vorgaben:
Beim Laden von NiCd- oder NiMH-Akkus teilen Sie den Kapazitätswert durch den Ladestrom,
das Ergebnis teilen Sie dann durch den Faktor 11,9. Als Endergebnis erhalten Sie die Lade-
zeit in Minuten, die Sie als Limit angeben können
Beispiel
• 1.000 mAh Kapazität / 1,2 A Ladestrom / Faktor 11,9 ergibt 70 Min. als Einstellwert
• 2.000 mAh Kapazität / 2,0 A Ladestrom / Faktor 11,9 ergibt 84 Min. als Einstellwert
• 3.300 mAh Kapazität / 3,3 A Ladestrom / Faktor 11,9 ergibt 92 Min. als Einstellwert
GB - Safety Timer Calculations
When charging NiCd or NiMH batteries, divide the battery‘s rated capacity (mAh) by the
charge current (A). And divide the result by 11.9.
For example:
• 1.000 mAh Capacity / 1,2 A Current / Safety timer setting, divided by 11,9 = 70 minutes
• 2.000 mAh Capacity / 2,0 A Current / Safety timer setting, divided by 11,9 = 84 minutes
• 3.300 mAh Capacity / 3,3 A Current / Safety timer setting, divided by 11,9 = 92 minutes
- +
Status 
- +
Status 
Stop /
Bat.Type Start/
Enter> 3 sec.
Start/
Enter
12
3
4
5
DE - Lithium Zellen mit Balancer laden
Beim Laden und Entladen von Lithiumzellen sollte unbedingt ein Balancer ver-
wendet werden. Beim X-Peak 80 BAL V2 sind die Balancer integriert, es muss
aber unbedingt der Balancer-Port mit dem Akku verbunden werden.
Das Display stellt sich wie abgebildet dar. Der Programmiervorgang ist iden-
tisch mit dem zuvor beschriebenem. Mit der ’Status ’-Taste werden Lade-
strom und Zellenzahl eingestellt.
Wenn alle Vorgaben richtig eingestellt sind, oder der gleiche Akku wie zuvor
wieder geladen werden soll, muss der Start durch eine Betätigung der ’Start/
Enter’-Taste für mind. 3 Sek. vorbereitet werden. Das Display stellt sich dann
wie nebenstehend abgebildet dar.
Nach dem Start wird das Arbeitsdisplay dargestellt. Es werden alle wichtigen
Informationen zur Verfügung gestellt. Dabei handelt es sich um, Zellentyp und
Zellenzahl (1), Ladezeit (2), Ladestrom (3), aktuelle Akkuspannung (4) und ge-
ladene Kapazität (5).
Um einen Ladevorgang zu beenden, betätigen Sie die ’Batt-Type/Stop’-Taste.
Allerdings ist der Akku dann nicht ganz aufgeladen.
GB - Charging Lithium battery in the Balance mode
This function is for balancing the voltage of Lithium-polymer battery cells while
charging. In the balance mode, the battery needs to have a balance lead to
connect to the individual port at the right side of the charger. And you need to
connect the battery‘s output plug to the output of charger.
Charging in this mode is di󰀨erent from the normal modes, because the built-in
processor monitors voltage of individual cell and control input current fed into
each cell to normalize the voltage.
The value on the left side of the second lines sets the charge current. The
value on the right side of the second lines sets the battery pack‘s voltage.After
setting current and voltage, press START/ENTER for more than 3 seconds to
start the process.
This displays the number of cells you set up and the processor detects. “R“
shows the number of cells detected by the charger and “S“ is the number of
cells set by you at the previous screen. If both numbers are identical you can
start charging by press START/ENTER button. If not, press BATT TYPE/STOP
button to go back to previous screen to carefully
check the number of cells of the battery pack before going ahead.
This screen shows the real-time status during charge process. Press BATT
TYPE/STOP key once to stop the charge process.
1 Number of cell
2Charging time
3 Charging current
4 Supplied capacity
5Current voltage battery
DE - Anschlussdiagramm
Die neben stehende Abbildung zeigt die Konguration
des Balancer Anschlusses. Das X-Peak 80 BAL V2 ist
mit einem Balancer-Port nach dem Jamara Stecksystem
(XH) ausgerüstet. Sollte Ihr Akku mit einer anderen Norm
ausgerüstet sein, benutzen Sie entsprechende Adapter
aus unserem Sortiment.
GB - Individual cell connection diagram
The illustration opposite shows the conguration of the
balancer connector. The charger is provided with a balan-
cer port after Jamara connector system (XH). Your battery
should be provided with a di󰀨erent norm, use suitable ad-
apters from our range.
12
3
4
5
- +
Status 
- +
Status 
Start/
Enter
Stop / Bat.Type Start/ Enter > 3 sec.
7
- +
Status 
- +
Status 
Stop /
Bat.Type
Stop /
Bat.Type
Start/
Enter
Start/
Enter
> 3 sec.
> 3 sec.
- +
Status 
- +
Status 
- +
Status 
DE - Schnelllademodus
Dieser Lademodus für Lithium-Akkus wird angewandt um nicht unnötig lange
auf das Ladeende zu warten. Beim normalen Ladeverfahren nimmt der zwei-
te Lade Ladeabschnitt, die Konstantspannungs-Ladung viel Zeit in Anspruch,
bringt aber nur wenig an Kapazitätszuwachs. Im Schnelllademodus wird der
letzte Abschnitt verkürzt, der Ladevorgang endet dadurch schneller, aber der
Akku ist nicht total voll aufgeladen.
Nachdem dieses Untermenü der Lithiumladeprogramme mit der ’Status ein-
gestellt wurde, wird das nebenstehende Display angezeigt. In diesem Menü
kann auf die schon beschriebene Art und Weise der Ladestrom und die Zellen-
zahl programmiert werden.
Im Arbeitsdisplay werden die gleichen Ladewerte Zellentyp und Zellenzahl (1),
Ladezeit (2), Ladestrom (3), aktuelle Akkuspannung (4) und geladene Kapazi-
tät (5) wie bei den anderen Lithiumladevorgängen dargestellt.
Mit der ’Start/Enter’-Taste wird der Ladevorgang gestartet. Mit der ’Batt-Type/
Stop’-Taste kann die Auadung jederzeit unterbrochen werden.
GB - Fast charging of Lithium battery
Charging current will become lower when it progress to the end of charging.A
specic CV process will be reduced to end the charging process earlier.In
fact,the charging current will goes to 1/5 when the charging process comes to
1/10.Charging capacity will be a little smaller than normal charging,but char-
ging time will be shortened accordingly.
You can set up the charging current and voltage of the battery pack Press
START/ENTER key to display voltage conrmation.Then press START/ENTER
key again to conrm and begin to charge.
This screen shows the real-time status of“fast charging“.Press BATT TYPE/
STOP key once to stop the charge process
1Number of cell
2 Elapsed time
3Charge current
4 Supplied capacity
5Current voltage battery
DE - Storage Lade Modus
Diese Ladeart für Lithium-Akkus wird angewandt um sie vor einer längeren
Lagerung, z.B. für die Winterpause, optimal zu laden. Für diesen Zweck emp-
ehlt es sich den Akku auf eine Zellenspannung von 3,75 V bei LiIo, 3,85 V bei
LiPo und 3,30 V bei LiFe aufzuladen, um ihn optimal für eine Überwinterung
vor zubereiten.
Nachdem dieses Untermenü der Lithiumladeprogramme mit der ’Status ’-
Taste eingestellt wurde, wird das nebenstehende Display angezeigt. In diesem
Menü kann auf die schon beschriebene Art und Weise der Ladestrom und die
Zellenzahl programmiert werden.
Im Arbeitsdisplay werden die Ladewerte alle wie bei den anderen Lithium-
ladevorgängen dargestellt. Mit der ’Start/Enter’-Taste wird der Ladevorgang
gestartet.
Mit der ’Batt-Type/Stop’-Taste kann die Storage-Auadung jederzeit unterbro-
chen werden.
1 Zellentyp und -zahl
2 Ladezeit
3 Lade- oder Entladestrom
4 Aktuelle Akkuspannung
5 Geladenen Kapazität
GB - Storage control of Lithium battery
This function is for charging/discharging batteries which are not used at once.
This program is designed for charging or discharging of batteries of specic
original state.They are classied by types: 3.75 V LiIo, 3.85 V LiPo and 3.3
V LiFe. The program will begin to discharge if the original state of the battery
exceeds the voltage level of storage.
At this screen,you can set up the current and voltage of the battery pack.
Charging and discharging will make the batteries come to the voltage level
of“storage“state.
This screen shows the real-time status charging.Press BATT TYPE/STOP key
once to stop the charge process.
1 Number of cell
2 Elapsed time
3 Charge or discharge current
4 Supplied capacity
5 Current voltage battery
1
1
1
2
2
2
3
3
3
4
4
4
5
5
5
DE - Lithium Zellen entladen
Mit dem X-Peak 80 BAL V2 können auch Lithiumakkus entladen werden, um
z.B. die Restkapazität nach einem Einsatz festzustellen.
Nachdem das entsprechende Menü aktiviert wurde, kann auf die bereits mehr-
fach beschriebene Art und Weise der Entladestrom, die Zellenzahl vorgegeben
werden. Mit der ’Start/Enter’-Taste wird der Entladevorgang gestartet. Mit der
’Batt-Type/Stop’-Taste kann die Auadung jederzeit unterbrochen werden.
Im Arbeitsdisplay werden die aktuellen Entladewerte (Zellenzahl; Ladestrom;
aktuelle Akkuspannung, Entlademodus; verstrichene Entladezeit und bislang
entladene Kapazität) genau wie bei den anderen Lithium Vorgängen darge-
stellt.
1 Zellentyp und -zahl
2 Ladezeit
3 Entladestrom
4 Aktuelle Akkuspannung
5 Geladenen Kapazität
GB - Discharging of Lithium battery
The value of discharge current on the left can not exceed 1C,and the value
on the right can not be under the voltage recommended by the manufacturer
to avoid deep discharging.Press START/ ENTER for more than 3 seconds to
start charging.
This shows the real-time status of discharging,you can press BATT TYPE/
STOP key to stop discharging.
1 Number of cell
2 Elapsed time
3 Discharging current
4 Battery voltage
5 Discharged capacity
- +
Status 
Stop /
Bat.Type
Start/
Enter > 3 sec.
DE - Überwachtes Be- und Entladung mit der Balancer-Funktion
Sowohl beim Laden, als auch beim Entladen von Lithium-Akkus sollten Sie
die Balancer-Funktion des X-Peak 80 BAL V2 benutzen. Voraussetzung
dafür ist eine Verbindung des Akkus mit dem Balancer-Port des Laders.
Dann überwacht der Prozessor die einzelnen Zellen, er versucht die Span-
nungslagen anzugleichen. Wenn sich die Spannung einer oder mehrerer
Zellen unnormal während eines Vorgangs verändert, bricht das Ladegerät
den laufenden Prozess mit einer Fehlermeldung ab. Die Ursache dafür ist
meist in einer defekten Zelle oder einer unsachgemäßen Lötstelle bzw. Ver-
bindung zu suchen.
Dieses Display wird angezeigt, wenn die Software eine Zelle mit zu niedri-
ger Spannung erkannt hat. Mit der ’Status ’-Taste kann man ein weiteres
Display aktivieren, in dem die Einzelzellenspannungen angezeigt werden.
Im Beispiel hat die 4. Zelle eine viel zu geringe Spannungslage
GB - Voltage balancing and monitoring in the discharge
process
The processor monitors voltage of each cell when the battery packs are
during its “storage“ and „discharging“ process. To achieve this feature,plug
each battery to the charger individually. If voltage of any cell is abnormal,B6
will show error message and terminate the program forcibly. So if there
is battery damage or disconnection, you can see the error message and
press Status to know which cell is damaged.
The processor detects voltage of one cell is too low. The 4th cell was dama-
ged. The value of voltage may be zero if disconnection occurs.
Status 
8
DE - Nickel Zellen laden
Diese Funktion dient zum Laden von NiMH- bzw. NiCd-Akkus. Dabei stehen
ein automatischer und ein manueller Modus zur Verfügung. Im ’Aut’-Modus
muss aus Sicherheitsgründen, nur die Obergrenze des Ladestroms vorgeben
werden. Der Prozessor ermittelt, unter Berücksichtigung dieses Wertes, den
optimalen Ladestrom. Stellen Sie den Grenzwert so ein, dass die Zellen nicht
beschädigt werden können, weil es dazu kommen könnte, dass bei niederoh-
migen Zellen mit geringer Kapazität, der Prozessor einen zu hohen Strom be-
rechnen könnte.
Im manuellen Modus (’Man’) ießt der Ladestrom, der mit Hilfe der ’Status
’-Taste programmiert worden ist.
Sämtliche Programmiervorgänge und die Anzeige der Ladewerte im Arbeits-
display entsprechen genau denen im Lithium-Modus. Wichtig zu wissen ist:
Der Moduswechsel (’Aut’ nach ’Man’ bzw. umgekehrt) erfolgt durch gleichzeiti-
ge Betätigung der ’Status ’- Taste während die Anzeige blinkt. Der jeweils
aktive Modus wird in der oberen Zeile angezeigt.
Mit der ’Batt-Type/Stop’-Taste kann die Auadung jederzeit unterbrochen wer-
den. Bedenken Sie, dass der Akku dann nicht voll aufgeladen ist. Das Ladeen-
de wird im Display und durch ein akustisches Signal gemeldet.
1 Zellentyp
2Ladezeit
3Ladestrom,
4aktuelle Akkuspannung
5geladene Kapazität.
GB - Charging of NiCd/NiMH battery
This program is for charging and discharging of NiCd/NiMH batteries associa-
ted with R/C models applications.You can press START/ENTER key to make
it blink and then Status to change the parameter value.Press START/
ENTER key to store the value.
This program charge the battery using the current you set up.In the
„auto“state,you should set up the upper limit of the charge current to avoid
damage by excessive feeding current.Some batteries of low resistance
and capacity can lead to higher current in the“auto“charging mode. But in
the manual mode,it will charge with the current you set. You can make it blink
in the current eld and press Status at the same time to switch mode.
The screen shows the real-time status. Press BATT TYPE/STOP key to end the
program.The sound will emitted to indicates the end of program.
1 Battery type
2 Elapsed time
3 Charge current
4 Battery voltage
5 Charged capacity
DE - Nickel Zellen entladen
Diese Funktion dient zum direkten Entladen von NiMH- bzw. NiCd-Akkus. Die
Programmierung umfasst die Einstellung des Entladestromes im Bereich von
0,1 bis 1,0 A, sowie die Vorgabe der Ladeschlussspannung für den Akkupack
(Einstellbereich von 0,1 bis 25,0 V).
Nach der Aktivierung dieser Funktion wird das abgebildete Display angezeigt.
Sind der korrekte Entladestrom und die Entladeschlussspannung mit der ’
Status ’-Taste eingestellt, kann der Entladevorgang mit der ’Start/Enter’-
Taste (3 Sek. lang) ausgelöst werden.
Im Arbeitsdisplay werden sämtliche Werte des laufenden Entladevorganges
angezeigt. Mit der ’Batt-Type/Stop’-Taste kann die Entladung jederzeit unter-
brochen werden. Bedenken Sie, dass der Akku dann nicht voll entladen ist.
Das Vorgangsende wird im Display und durch ein akustisches Signal gemeldet.
1 Zellentyp
2Ladezeit
3Ladestrom,
4aktuelle Akkuspannung
5entladene Kapazität.
GB - Discharge of NiCd/NiMH battery
Set charge current on the left and the nal voltage on the right. Range of the
charge current is 0.1-1.0A;range of nal voltage is 0.1-25.0V. Press START/
ENTER key for more than 3 seconds to start the program.
The screen indicates the discharging state.You can press START/ENTER key
to alter discharge current.Press START/ENTER again to store the value. Press
BATT TYPE/STOP key to stop discharging. The emitted sound alerts the end
of discharging
1 Battery type
2 Elapsed time
3 Discharge current
4 Battery voltage
5 Discharged capacity
12
3
45
1
2
3
4
5
- +
Status 
- +
Status 
- +
Status 
Stop /
Bat.Type
Stop /
Bat.Type
Stop /
Bat.Type
Start/
Enter
Start/
Enter
Start/
Enter
> 3 sec.
> 3 sec.
> 3 sec.
- +
Status 
- +
Status 
DE - Zyklische Vorgänge
Diese Funktion dient dazu ganz neue NiMH- bzw. NiCd-Akkus zu formieren,
aber auch Akkus nach längerem Gebrauch oder der Winterpause wieder auf
volle Leistungsfähigkeit zu bringen. In diesem Menü kann die Reihenfolge der
Abläufe (DCHG > CHG oder CHG > DCHG) vorgegeben werden. Es kann
bestimmt werden, ob ein Zyklus mit einer Entladung oder Auadung beginnen
soll. Damit wird auch festgelegt, ob nach Ablauf der Zyklen ein ge- oder ent-
ladener Akku vorhanden ist. Außerdem kann die Zyklenzahl im Bereich von 1
bis 5 vorgegeben werden. Bei den grundsätzlichen Einstellungen besteht die
Möglichkeit zwischen den einzelnen Phasen eine Pause vorzugeben.
Nach der Aktivierung dieser Funktion wird das abgebildete Display angezeigt.
Sind die gewünschte Reihenfolge und die Zyklenzahl, sowie der Strom mit der
’Status ’-Taste eingestellt, kann der Zyklus mit Hilfe der ’Start/Enter’-Taste
(3 Sek. lang) gestartet werden.
Im Arbeitsdisplay werden alle aktuellen Werte des gerade laufenden zykli-
schen Vorganges dargestellt. In der Abbildung ist gerade ein Entladevorgang
aktiv (D>C).
1 Zellentyp
2 Ladezeit
3 Ladestrom
4 aktuelle Akkuspannung
5 geladene Kapazität.
Der Prozess kann durch eine Betätigung der ’Batt-Type/Stop’-Taste jederzeit
abgebrochen werden. Das Zyklusende wird durch ein akustisches Signal an-
gezeigt.
Nach dem Ablauf des gesamten Vorgangs werden die entladene und die gela-
dene Kapazität angezeigt. Durch Betätigung der ’Status ’-Taste kann das
Resultat der einzelnen Zyklen angezeigt werden.
GB - Charge/discharge and discharge/charge cycle of NiCd/NiMH battery
You can set up sequence on the left and the number of cycles on the right.
You can balance,refresh and bread-in the battery with this function.You can
set a temporary cool-o󰀨 procedure in the use‘s setting. Range of the cycle
number is 1-5.
Press BATT TYPE/STOP key to stop program,you can press START/ ENTER
key to alter charge current.The sound indicates the end of program.
When it approaches to the end,you can see the capacity of the battery being
charged or discharged.You can press Status key to display result of each
cycle.
1 Number of cell
2 Elapsed time
3 Charge or discharge current
4 Battery voltage
5 Charge or discharge capacity
1
23
4
5
- +
Status 
9
- +
Status 
- +
Status 
Stop /
Bat.Type
Stop /
Bat.Type
Start/
Enter
Start/Enter
Start/
Enter
> 3 sec.
> 3 sec.
- +
Status 
- +
Status 
DE - Blei Zellen laden
Mit diesem Programmpunkt lassen sich Bleiakkus behandeln. Dabei können
Akkus mit einer Spannung von 2 bis 20 V (1 – 10 Zellen) sich sowohl laden,
als auch entladen. Bleiakkus werden am besten mit einem Strom geladen,
der 1/10 der Kapazität des Akkus entspricht, sie sollten nicht schnell geladen
werden.
Nach der Aktivierung dieser Funktion muss die Stromstärke und die Zellenzahl
vorgegeben werden. Der Ladevorgang wird auf die bekannte Art mit der ’Start/
Enter’-Taste (3 Sek. lang) gestartet.
Im zugehörigen Arbeitsdisplay werden alle üblichen Parameter des Vorganges
angezeigt. Mit der ’Batt-Type/Stop’-Taste kann die Auadung jederzeit unter-
brochen werden. Bedenken Sie, dass der Akku dann nicht voll auaden ist.
Das Vorgangsende wird im Display und durch ein akustisches Signal gemeldet.
1 Zellentyp
2 Ladezeit
3 Ladestrom
4 aktuelle Akkuspannung
5 geladene Kapazität.
GB - Charging of the Pb battery
This program is only suitable for charging Pb (lead-acid) battery with nominal
voltage from 2 to 20 V. Pb (lead-acid) battery is completely di󰀨erent from NiCd/
NiMh battery. These batteries can only deliver current lower in comparison to
their capacity. The same restriction applies to the charging process. Conse-
quently, the optimum charge current can only be 1/10 of the capacity. Pb batte-
ry can not be used for fast-charging, please follow
the instructions provided by the battery manufacturer.
You can press START/ENTER key to make it blink and alter the value of para-
meters using Status , press START/ENTER key to store the value.
Set up the charge current on the left and nominal voltage on the right Range
of current is 0.1 - 5.0 A, the voltage should match the battery being charged.
Press START/ENTER key for more than 3 seconds to start charging.
The screen displays the real-time discharging status.Press START/ ENTER
key to alter discharge current.Press START/ENTER key again to store the pa-
rameter value you set.Press BATT TYPE/STOP key to end the program.
1 Battery type
2 Elapsed time
3 Charge current
4 Battery voltage
5 Charged capacity
DE - Blei Zellen entladen
Um Bleiakkus zu entladen muss dieses Menü aktiviert werden. Nach dem
Aufruf dieser Funktion wird das abgebildete Display angezeigt. Es muss die
Stromstärke, im Bereich von 0,1 A bis 1,0 A und die Zellenzahl programmiert
werden.
Sind der Entladestrom und die Zellenzahl mit der ’Status ’-Taste richtig
eingestellt, kann der Entladevorgang mit der ’Start/Enter’-Taste (3 Sek. lang)
gestartet werden. Im Arbeitsdisplay werden alle üblichen Parameter das Ent-
ladevorganges angezeigt. Mit der ’Batt-Type/Stop’-Taste kann die Entladung
jederzeit unterbrochen werden. Bedenken Sie, dass der Akku dann nicht voll
entladen ist. Das Vorgangsende wird im Display und durch ein akustisches
Signal gemeldet.
Da Bleiakkus keinen Memory E󰀨ekt haben, müssen keine Formierungsvor-
gänge durch Lade- / Entladezyklen durchgeführt werden. Dieser Modus steht
daher im Pb-Modus nicht zur Verfügung.
1 Zellentyp
2 Ladezeit
3 Ladestrom
4 aktuelle Akkuspannung
5 entladene Kapazität.
GB - Discharging of the Pb battery
Set up the charge current on the left and nominal voltage on the right. Range
of discharge current is 0.1-5.0A,the voltage should match the battery being
charged. Press START/ENTER key for more than 3 seconds to start charging.
The screen displays the real-time discharging status.Press START/ ENTER
key to alter discharge current.Press START/ENTER key again to store the pa-
rameter value you set.Press BATT TYPE/STOP key to end the program.
1 Battery type
2 Elapsed time
3 Discharge current
4 Battery voltage
5 Discharged capacity
1
2
3
4
5
1
2
3
4
5
DE - Speicherplätze verwalten
Das Ladegerät X-Peak 80 BAL V2 stellt 5 Datenspeicher bereit, in denen, unter
jeweils einer fortlaufenden einer Speicherplatznummer (01 bis 05) die Daten
eines Akkus, den Sie oft einsetzen abgespeichert werden kann. Sehr komfor-
tabel können diese Daten aktiviert werden, die Parameter für den Vorgang ste-
hen sofort bereit, eine Programmierung entfällt. Die Speicherverwaltung hält
zwei Funktionen bereit. Es lassen sich sowohl Datensätze abspeichern (SAVE
DATA) aber auch Daten laden (LOAD DATA).
Akkudaten speichern
Nach der Aktivierung dieser Funktion wird das abgebildete Display angezeigt.
Durch eine Betätigung der ’Start/Enter’- Taste gelangt man zu den Einstellun-
gen.
In der ersten Ebene können, nach den bekannten Verfahren, die abgebildeten
Parameter des Akkus eingestellt werden.
1 Spannung 2 Programmplatz
3 Ladekapazität 4 Zellentyp
In der zweiten Ebene werden der Ladestrom für einen manuellen Vorgang,
bzw. die Ladestrom Obergrenze für einen automatischen Vorgang eingestellt.
Im nächsten Display werden die gleichen Vorgaben für einen Entladevorgang
programmiert.
Eine Ebene weiter werden die Einstellungen für die zyklischen Vorgänge pro-
grammiert.
Nachdem sämtliche Parameter für den Akku eingegeben sind, muss die ’Start/
Enter’-Taste für mind. 3 Sek. betätigt werden. Dadurch wird der Speichervor-
gang ausgelöst. Im Display wird dabei der Schriftzug ‚’Save’ dargestellt. Mit der
’Status’-Taste kommt man innerhalb der Menüschleife jeweils zur vorherigen
Ebene zurück.
GB - Data storage program
For your convenience, X-Peak 80 BAL V2 has a data storage and load pro-
gram. It can store ve battery data representing the respective specications
of batteries. You can call back the data when charging or discharging without
setting up the program again.Press START/ENTER key to make it blink, and
use Status to set up the parameter.
Data storage
Setting of the parameter in the screen will not a󰀨ect the charge and dischar-
ge process. They just present the specication of the battery. The example is
NiMH battery pack,including 12 cells,the capacity is 3000mAh.
Set up the charge current in the manual mode,or current limit in the auto mode.
Press INC and DEC key simultaneously to make the current eld blink to switch
the charge mode.
1 Voltage 2 Data number
3 Capacity 4 Type of battery
Set up the discharge current and nal Voltage.
Set up the charge/discharge sequence and cycle number.
Saving the data
12 3 4
- +
Status 
- +
Status 
- +
Status
- +
Status 
Start/Enter > 3 sec.
- +
Status 
Stop/Bat.Type Start/Enter > 3 sec.
Status Status 
Status 
10
DE - Akkudaten laden
Mit dieser Option können die Daten eines Akkus aus einem der Speicher ge-
laden werden.
Nach der Aktivierung dieser Funktion wird das abgebildete Display angezeigt.
Durch eine Betätigung der ’Start/Enter’-Taste gelangt man zur Auswahlebene.
Im nächsten Menü kann der gewünschte Speicherplatz bestimmt werden.
Nach erfolgter Auswahl muss die ’Start/ Enter’-Taste für 3 s betätigt werden.
Dadurch werden die Daten geladen.
Die Displays stellen sich dabei wie abgebildet dar.
GB - Load data program
This program is to load the data stored at the“save data“program.Press
START/ENTER key to make the data eld blink and press INC or DEC for
more than 3 seconds to load the data.
Choose the data number you want to call back.The data you want to call back
will be displayed.
Loading the data.
Start/Enter
Start/
Enter
> 3 sec.
DE - Anzeige weiterer Werte
Sie können während des Lade-/Entladevorgangs verschiedene Informationen
auf dem LCD-Bildschirm abfragen. Drücken Sie die Taste ’Status’, das La-
degerät zeigt die Einstellung des Benutzers an. Sie können die ’Status ’ Taste
drücken um die Spannung jeder Zelle zu überwachen während die Batterie mit
jedem Anschluss des Ladegeräts verbunden ist:
Anzeige der Spannungslage eines Akkus am Ende eines Vorgangs.
Anzeige der bei den Voreinstellungen vorgegebenen max. Kapazität.
Anzeige der bei den Voreinstellungen vorgegebenen max. Vorgangszeit.
Belegung des USB- / Temperatur Ports
Die USB-Funktion ist bei diesem Ladegerät nicht verfügbar.
Anzeige der Akkutemperatur, nur bei Verwendung des Temperatur-
sensors
Anzeige der Eingangsspannung
Anzeige der Einzelzellenspannungen eines Lithiumakkus.
Der Akku ist mit jedem Port über ein Kabel verbunden; Sie können die Span-
nung jeder Zelle im Akkupack überprüfen. Wenn das Kabel mit den Anschlüs-
sen rechts vom Ladegerät verbunden ist, zeigt das Programm die Spannung
von bis zu 6 Batterien an. Der Akkupack benötigt einen Ausgangsstecker, der
mit jeder Zelle verbunden ist.
GB - Various information in the program
You can inquire variors information on the LCD screen during the charging and
discharging process. Press DEC key, the charger will display user‘s setting.
You can press INC key to monitor voltage of each cell while the battery is
connected with each port of the charger:
It comes to the nal voltage when the program ended.
Indication of the max. capacity preset in the presettings.
Display of the max. process time specied in the presettings
3-pin connector is selected to be the USB port.
For this charger the USB function is not available.
The external temperature is displayed when the temperature probe is used.
Present input voltage
Display of the single cell voltages of a lithium battery.
The battery is connected with each port through cable; you can check voltage
of each cell in the battery pack. When the cable is connected with the ports on
the right of the charger, the program will display voltage of up to 6 batteries.
The battery pack needs an output connector connected with each cell.
Status
Status
Status
Status
Status
11
DE - Fehlermeldungen
Das Ladegerät X-Peak 80 BAL V2 stellt eine Reihe von Fehlermeldungen be-
reit. Alle Fehlermeldungen werden durch ein akustisches Signal begleitet. Die
optische und akustische Meldung kann durch Betätigung einer Taste abgestellt
werden, nachdem der Fehler behoben worden ist, oder der Akku abgeklemmt
worden ist.
Der Akku ist verpolt angeschlossen worden.
Im Ladestromkreis liegt eine Unterbrechung vor.
Kurzschluss
Die Eingangsspannung liegt außerhalb der zulässigen Grenzen.
Falsche Zellenzahl eines Li-Akkus eingestellt.
Unbekannter Fehler, Gerät sofort von der Energiequelle abklemmen.
Zellenzahl bei einem Lithium-Akku zu gering
Zellenzahl bei einem Lithium-Akku zu hoch
Eine Zelle eines Lithium-Akkus hat eine zu geringe Spannungslage.
Eine Zelle eines Lithium-Akkus hat eine zu hohe Spannungslage.
Schlechte, hochohmige Verbindung im Ladestromkreis
Ladegerät ist zu heiß geworden, abkühlen lassen.
Es ist ein schwerer Fehler aufgetreten, das Ladegerät muss repariert werden.
GB - Warning and orror information
X-Peak 80 BAL V2 incorporates a variety of functions for the systems to verify
processes and the state of the electronics. In case of an error the screen will
display the cause of error and emit an audible sound.
Incorrect polarity connected.
Battery connection is interrupted.
Short-circuit of the output termination.
Erroneous selection of voltage of Lithium pack, please check the voltage of
the battery pack.
The voltage of the battery pack has been selected incorrectly!
The charger has malfunctioned for some reason. Seek professional
advice.
The voltage is lower than which is set. Please check the nubmer of cells in
the battery pack.
The voltage is higher than which is set. Please check the number of cells in
the battery pack.
Voltage of one cell in the battery pack is too low, please check the voltage of
each cell.
Voltage of one cell in the battery pack is too high, please check the
voltage of each cell.
Wrong connection of the connector detected; please check the connector and
cable.
The internal temperature is too high, please cool down.
The processor cannot control the feeding current, please repair it.
Irrtum und technische Änderungen vorbehalten. Copyright JAMARA e.K. 2019
Kopie und Nachdruck, auch auszugsweise, nur mit Genehmigung von JAMARA e. K.
All rights reserved. Copyright JAMARA e.K. 2019
Copying or reproduction in whole or part, only with the expressed permission of JAMARA e.K.
JAMARA e.K.
Inh. Manuel Natterer
Am Lauerbühl 5 - DE-88317 Aichstetten
Tel. +49 (0) 75 65/94 12-0 - Fax +49 (0) 75 65/94 12-23
[email protected] ●www.jamara.com
Service - Tel. +49 (0) 75 65/94 12-777
kundenservice@ jamara.com
DE - Entsorgungshinweise
Elektrogeräte dürfen nicht im Hausmüll entsorgt werden, sondern müssen getrennt
entsorgt werden. Sie sind verpichtet, die Batterien – wenn möglich – herauszuneh-
men und das Elektroaltgerät bei den kommunalen Sammelstellen abzugeben. Sollten
sich personenbezogene Daten auf dem Elektroaltgerät benden, müssen diese von
Ihnen selbst entfernt werden.
GB - Disposal restrictions
Electrical appliances must not be disposed of in domestic waste and must be disposed of separately.
You are obliged to take out the batteries, if possible, and to dispose of the electrical equipment at
the communal collection points. Should personal data be stored on the electrical appliance you must
remove them by yourself.
DE - Sicherheitshinweise
• Beim Betrieb des Ladegeräts sind einige Sicherheitshinweise zu beachten, die Sie
unbedingt berücksichtigen müssen.
• Dieses Gerät ist nicht dafür bestimmt, durch Personen (einschließlich Kinder) mit eingeschrän-
kten physischen, sensorischen oder geistigen Fähigkeiten oder mangels Erfahrung und / oder
mangels Wissen benutzt zu werden, es sei denn, sie werden durch eine für ihre Sicherheit zu-
ständige Person beaufsichtigt.
• Kinder sollten beaufsichtigt werden, um sicherzustellen, dass sie nicht mit dem Gerät spielen.
• Nur für den Gebrauch in Innenräumen.
• Das Ladegerät kann sich während des Betriebs erwärmen, stellen Sie es so auf, dass die Wärme
optimal abgeführt werden kann.
• Schützen Sie das Ladegerät unbedingt vor Staub, Schmutz, Feuchtigkeit und direkter Sonnen-
einstrahlung.
• Nach dem Gebrauch das Ladegerät von der Stromquelle trennen und angeschlossene Akkus
abnehmen.
• Der Lader und die Akkus dürfen nicht auf brennbaren Unterlagen und unbeaufsichtigt betrieben
werden.
• Vermeiden Sie unbedingt Kurzschlüsse und achten Sie auf richtige Polung der Eingangsspan-
nung und der zu behandelnden Akkus.
• Laden oder entladen Sie keine heißen Akkus, lassen Sie Akkus nach Gebrauch erst abkühlen.
• Laden Sie jeweils nur einen Akkupack pro Anschluss. Es dürfen nur Zellen vom gleichen
Hersteller und gleicher Kapazität zusammen geladen werden.
• Schalten Sie unter keinen Umständen Akkupacks zum Laden bzw. Entladen parallel
• Laden- bzw. entladen Sie niemals Akkus die direkt mit einer elektronischen Schaltung verbunden
sind, trennen Sie die Akkus, wenn kein Schalter vorhanden ist.
• Beim Anschließen der Akkus immer zuerst das Ladekabel am Gerät einstecken und danach mit
dem Akku verbinden
• Laden Sie niemals defekte oder beschädigte Akkus.
• Beachten Sie unbedingt die Angaben der Akkuhersteller.
• Das Ladegerät ist nur zum Laden bzw. Entladen au adbarer Akkus der genannten Typen ge-
eignet (siehe technische Daten).
• Ö󰀨nen Sie das Ladegerät nicht, um es zu reparieren. Es ist gefährlich und Sie verlieren jeglichen
Gewährleistungsanspruch. Zur Reparatur senden Sie den Lader an unseren Service.
GB - Safety Information
• Whenever you operate your charger the following safety instructions must be followed.
• This device is not intended for use by individuals (including children) with reduced physical
sensory, mental abilities, lack of experience and / or knowledge, unless they are supervised in
how the device is to be used.
• Children should be supervised to ensure that they do not play with the appliance.
• Only for indoor use.
• The charger may get hot in use, position the unit so that the heat can dissipate.
• Never expose the charger to moisture or direct sun light.
• After use always disconnect the unit from the mains and unplug any batteries.
• Never leave the charger unattended when in use, and always operate it on a re proof surface.
• Avoid short circuits at all costs. Always observe the correct polarity.
• Batteries should always be allowed to cool down before you charge or discharge them.
• Only charge or discharge packs containing cells from the same manufacturer and of the same
capacity.
• Do not connect packs in parallel to charge or discharge them.
• Always disconnect the pack from any electronic system (ESC etc.) before attempting to charge
it.
• Connect the charging cable to the charger rst and then to the battery.
• Never try to charge/discharge damaged packs or cells.
• Follow the directions given by the battery manufacturer.
• The charger may only be used to charge / discharge the types of cells listed in the technical
specications.
• Do not open the unit. This will void the guarantee and may be dangerous. If the charger is
damaged or faulty, return it our service department for repair.
DE - Empfohlenes Zubehör
GB - Accessories
No. 332057 MPX
Ladekabel Deluxe
Charging lead Deluxe
No. 332058 LiPo
Deans Ladekabel Deluxe
Deans Charging lead Deluxe
No. 091114
BEC-Ladekabel mit Bananenstecker
BEC charging lead with banana plug
No. 332059
Ladekabel XT60
Charging lead XT60
No. 332051
Tamiya-Ladekabel mit Bananenstecker
Tam charging lead with lead gold

Other manuals for X-Peak 80 BAL V2

3

This manual suits for next models

1

Other Jamara Batteries Charger manuals

Jamara X-Peak 80 BAL Pult Edition User manual

Jamara

Jamara X-Peak 80 BAL Pult Edition User manual

Jamara Lipo 20 Charger 2S/3S User manual

Jamara

Jamara Lipo 20 Charger 2S/3S User manual

Jamara Lipo 20 413117 User manual

Jamara

Jamara Lipo 20 413117 User manual

Jamara X-Peak Touch USB 2L User manual

Jamara

Jamara X-Peak Touch USB 2L User manual

Jamara Lipo 20 Charger 2S User manual

Jamara

Jamara Lipo 20 Charger 2S User manual

Jamara X-Peak Touch USB 2L User manual

Jamara

Jamara X-Peak Touch USB 2L User manual

Jamara Lipo 20 User manual

Jamara

Jamara Lipo 20 User manual

Jamara Ride-on Strong Bull User manual

Jamara

Jamara Ride-on Strong Bull User manual

Jamara Lipo 20 User manual

Jamara

Jamara Lipo 20 User manual

Jamara LiPo 2S User manual

Jamara

Jamara LiPo 2S User manual

Jamara X-Peak 80 BAL V2 User manual

Jamara

Jamara X-Peak 80 BAL V2 User manual

Jamara Ecological Wind User manual

Jamara

Jamara Ecological Wind User manual

Jamara Lipo 20 User manual

Jamara

Jamara Lipo 20 User manual

Jamara Lipo 20 User manual

Jamara

Jamara Lipo 20 User manual

Jamara Lipo 20 User manual

Jamara

Jamara Lipo 20 User manual

Jamara Lipo 20 User manual

Jamara

Jamara Lipo 20 User manual

Jamara Lipo 20 User manual

Jamara

Jamara Lipo 20 User manual

Jamara X-Peak 80 BAL Pult Edition User manual

Jamara

Jamara X-Peak 80 BAL Pult Edition User manual

Jamara X-Peak 90 Touch User manual

Jamara

Jamara X-Peak 90 Touch User manual

Jamara X-Peak Touch USB 2L User manual

Jamara

Jamara X-Peak Touch USB 2L User manual

Jamara Lipo 20 User manual

Jamara

Jamara Lipo 20 User manual

Jamara X-Peak 100 Touch Dual USB User manual

Jamara

Jamara X-Peak 100 Touch Dual USB User manual

Jamara X-Peak 80 BAL V2 User manual

Jamara

Jamara X-Peak 80 BAL V2 User manual

Jamara X-Peak 100 Touch Dual USB User manual

Jamara

Jamara X-Peak 100 Touch Dual USB User manual

Popular Batteries Charger manuals by other brands

Sigineer Power PSW71512NC user manual

Sigineer Power

Sigineer Power PSW71512NC user manual

Onyx 245 instruction manual

Onyx

Onyx 245 instruction manual

Ericsson Monogram MHCH3W installation manual

Ericsson

Ericsson Monogram MHCH3W installation manual

Tronic TLG 1000 A1 operating instructions

Tronic

Tronic TLG 1000 A1 operating instructions

MINN KOTA MK230D owner's manual

MINN KOTA

MINN KOTA MK230D owner's manual

Shell SBC100 user guide

Shell

Shell SBC100 user guide

Schumacher Electric SE-2352 owner's manual

Schumacher Electric

Schumacher Electric SE-2352 owner's manual

XD XCLUSIVE P436.17 Series manual

XD XCLUSIVE

XD XCLUSIVE P436.17 Series manual

Pablo PIXO Assembly/installation instructions

Pablo

Pablo PIXO Assembly/installation instructions

Alpina BT 48 Li 2.0 Operator's manual

Alpina

Alpina BT 48 Li 2.0 Operator's manual

RC-Plus PLUS POWER 60 instruction manual

RC-Plus

RC-Plus PLUS POWER 60 instruction manual

SMART Wallbox Home installation manual

SMART

SMART Wallbox Home installation manual

alfen Eve Double Pro-line FR manual

alfen

alfen Eve Double Pro-line FR manual

Invacare PF2405SL user manual

Invacare

Invacare PF2405SL user manual

Kompernass TRONIC KH 980 instruction manual

Kompernass

Kompernass TRONIC KH 980 instruction manual

Roland DWX-50 Operation guide

Roland

Roland DWX-50 Operation guide

GRAUPNER ULTRAMAT 15 operating manual

GRAUPNER

GRAUPNER ULTRAMAT 15 operating manual

KUSSMAUL 091-11HO-PIM instruction manual

KUSSMAUL

KUSSMAUL 091-11HO-PIM instruction manual

manuals.online logo
manuals.online logoBrands
  • About & Mission
  • Contact us
  • Privacy Policy
  • Terms and Conditions

Copyright 2025 Manuals.Online. All Rights Reserved.