manuals.online logo
Brands
  1. Home
  2. •
  3. Brands
  4. •
  5. Jamara
  6. •
  7. Batteries Charger
  8. •
  9. Jamara X-Peak Touch USB 2L User manual

Jamara X-Peak Touch USB 2L User manual

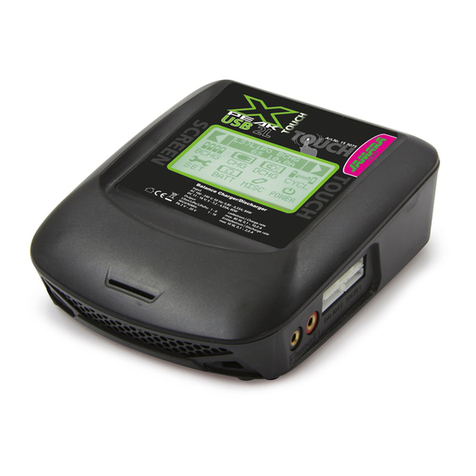
X-Peak Touch USB 2L
Caricatore / Charger
No. 15 3075
IT - Istruzioni di montaggio
GB - Instruction
IT - Informazioni generali
Jamara e. K. non e´responsabile per dan-
ni, sostenute al prodotto stesso o attraverso
questo, dovuti ad una gestione non corretta del
articolo. Solo il cliente si assume la piena res-
ponsabilità per la manutenzione e l´utilizzo cor-
retto dello stesso; questo include il montaggio,
la ricarica, l´utilizzo,  no alla scelta della aerea
di applicazione. Si prega di notare e rispettare
le istruzioni d´uso, questi contengono informa-
zioni e avvertimenti molto importanti.
GB - General information
Jamara e.K. is not liable for any damage
caused to the product itself or by it, if this is
due to improper operation or handling errors.
The customer alone bears the full responsibility
for the proper use and handling, including in
particular, assembling, charging and using the
model, and selecting the area in which to use
it. Please refer to the operating and user ins-
tructions, which contain important information
and warnings.
IT - Dichiarazione di conformita’
Jamara e. K. dichiara qui di seguito che il modello “Caricatore X-Peak Touch USB 2L, No. 153075“
in è in linea con le norme ed altre rilevanti disposizioni comunitarie 2014/30/EU, 2011/65/EU e
2014/35/EU.
Piu informazioni: www.jamara-shop.com/Conformity
GB - Certifi cate of Conformity
JAMARA e.K. hereby declares that “Charger X-Peak Touch USB 2L, No. 153075“ follow the regu-
lations and requirements as well as any ther relivant directives of the EEC directive 2014/30/EU,
2011/65/EU and 2014/35/EU.
Further information can also be found at: www.jamara-shop.com/Conformity
Istruzioni per lo smaltimento
Importante per pezzi elettronici Smaltire i pezzi elettronici secondo le norme di legge.
Gettari questi articoli solo negli contenitori appositi.
Disposal Instructions
All parts of this model should be disposed of correctly, in particular electronic components may be
subject to local restrictions. Your dealer will advise you.
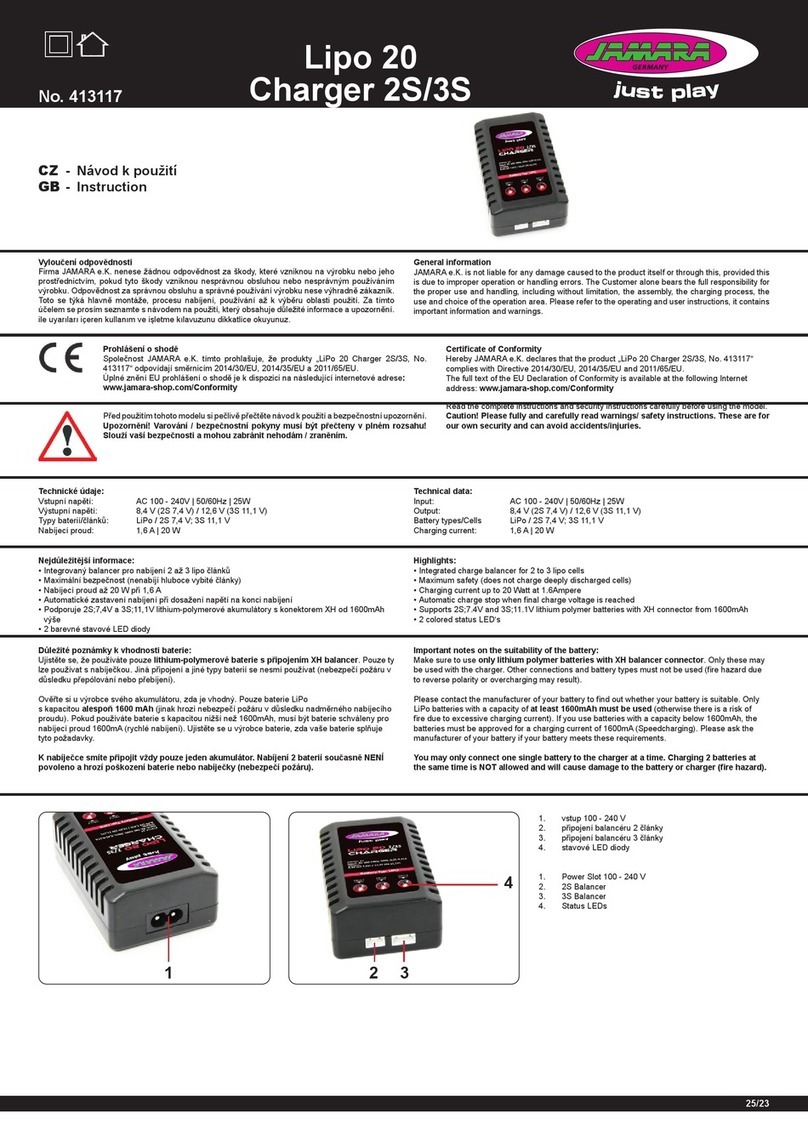
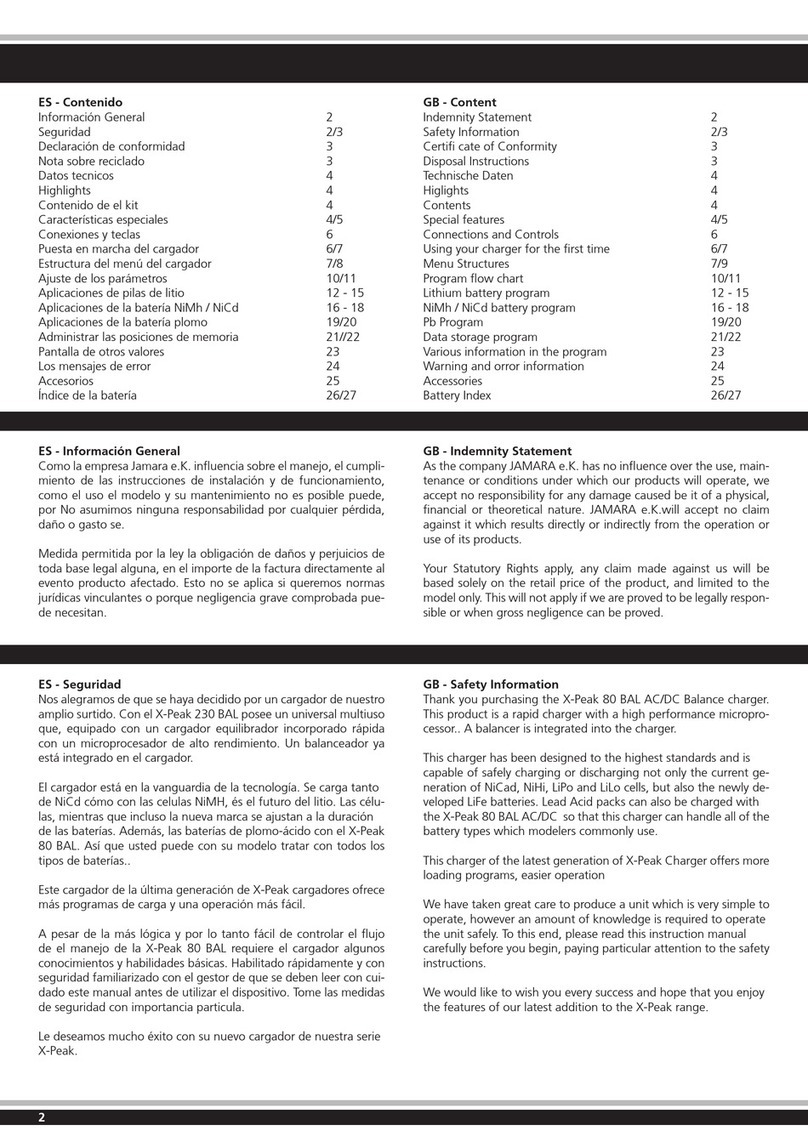
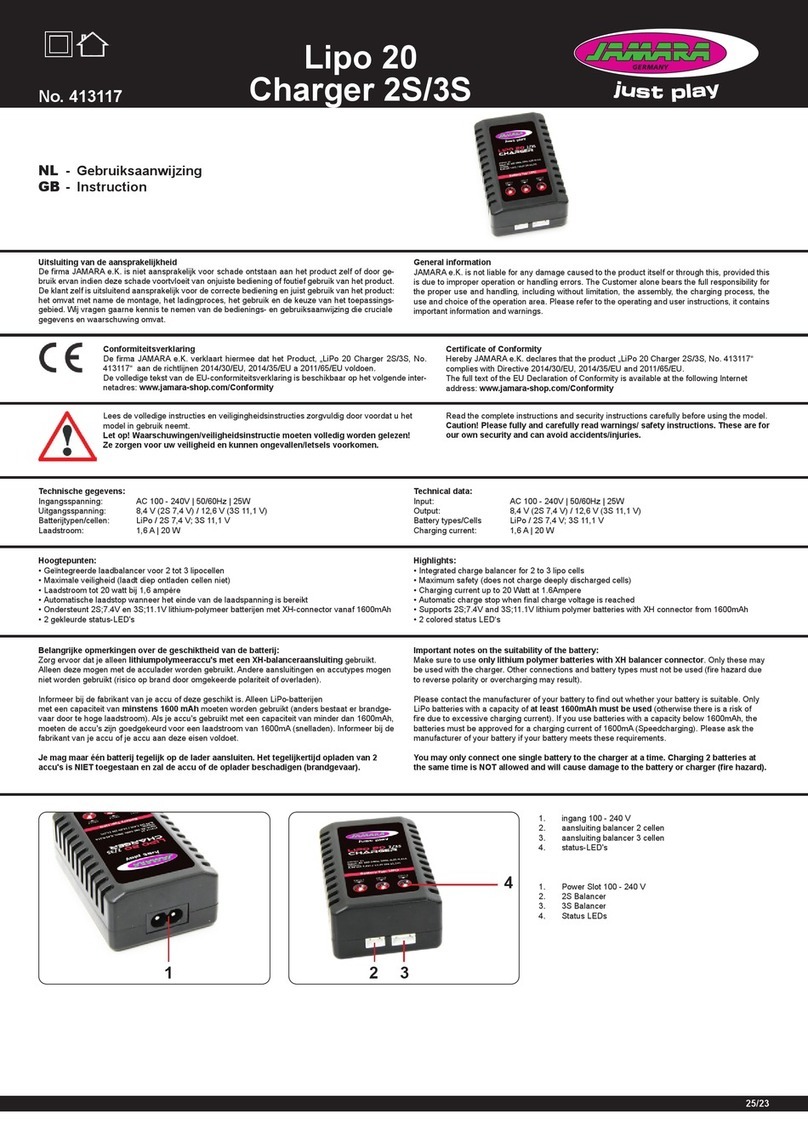
Dati tecnici:
Input AC 100 - 240 V; 50 Hz; 0,80 - 0,33 A; 84 W
DC 11 - 18 V; 7,2 - 4,55 A; 80 W
Output LiIon/LiPo/LiFePo: 1 - 6
NiCd/NiMH: 1 - 16
Pb 2 V ~ 20 V
Corrente di carica mass. 80 W, 0,1 ~ 10,0 A
Corrente di scarica mass 10 W, 0,1 ~ 2,0 A
Corrente bilanciatore mass. 450 mAh/Celle
Scarica 2,0 - 4,2 V/Celle Li-Ion, LiPo, LiFePo
Dimensioni 180 x 145 x 57 mm
Peso 605 g
Technical data:
Input AC 100 - 240 V; 50 Hz; 0,80 - 0,33 A; 84 W
DC 11 - 18 V; 7,2 - 4,55 A; 80 W
Output LiIon/LiPo/LiFePo: 1 - 6
NiCd/NiMH: 1 - 16
Pb 2 V ~ 20 V
Charging current max. 80 W, 0,1 ~ 10,0 A
Discharge current max. 10 W, 0,1 ~ 2,0 A
Balance current 450 mAh/cell
Discharge 2,0 - 4,2 V/Cells Li-Ion, LiPo, LiFePo
Dimensions 180 x 145 x 57 mm
Weight 605 g
Highlights
• Facile utilizzo tramite touch-screen
• Adattatore Dual Power AC/DC 230 V e 12 V
• Balancer al Litio incorporato
• Equilibratore individuale per la scarica della batteria
• Adatto per vari tipi di pacco batterie al Litio
• Sicurezza di carica
• Funzionalità Overload
• Controllo Input
• Limite di capacità
• Controllo della temperatura con disinnesto automatico
• Limite tempo di carica
• Monitoraggio della ricarica
• Supporta Litio, NiMh, NiCD e PB
Nuove funzioni speciali:
• Stato di carica tramite visualizzazione gra ca per ogni cella singola
• Controllo della resistenza interna di ogni singola cella al litio
• Servo-tester
• 18 Memorie, individualmente con gurabili
• Slot di carica per prese USB. Per esempio per macchine fotogra che, cellulari etc.
• Ricarica simultanea, per USB e ricarica e principale
• Output alimentazione regolabile 1 - 28 V
Highlights
• Touch Screen
• Dual Power Built-in AC Adapter 230 V and 12 V
• Internal independent lithium battery balancer
• Individually balanced battery charge/discharge
• Adaptable for various type of lithium battery
• Maximum safety
• Automatic charging current limit
• Input power monitoring
• Capacity limit
• Temperature monitoring with programmable switch-off
• Proscessing time limit
• Date store/load
• Supports Lithium, NiMh, NiCd and Lead battery packs
New special functions:
• Graphical display of each individual cell level
• Internal resistance measurement of each individual Lithium Battery cell
• Servo Tester
• 18 individual con gurable presets
• Monitored USB charging port. For example, for charging cameras, smart phones, toys, etc
• Simultaneous charging on USB charging port and main
• Adjustable power supply function output 1 - 28 V
Contenuto del kit:
• Caricatore
• Cavo di collegamento: cavo di alimentazione 230 V e 12 V (per batteria dell‘auto)
• Cavo di carica: LiPo Deluxe
• Istruzioni
Box content:
• Charger
• Extension lead: Electric cable 230 V and 12 V (for car battery)
• Charging lead: LiPo Deluxe
• Instructions
Accessori:
Balancer Adapterboard Universal No. 15 3043
Cavo adattatore Balancer Universal No. 15 3044
Sensore di temperatura No. 15 3056
GB - Accessories:
Balancer Adapterboard Universal No. 15 3043
Adapter cable Balancer Universal No. 15 3044
Temperature sensor No. 15 3056
IT - Istruzioni di montaggio
14/16
2
IT - Particolarità
Indipendente bilanciatore al litio all’interno
L’ caricatore ha un bilanciatore integrato per max. 6 Litio - celle (Balancer Adapterboard Univer-
sal, No. 153043, Cavo adattatore Balancer Universal, No. 153044). Il processo di carica diventa in
questo modo molto più sicuro e confortevole. Non è necessario collegare un bilanciatore separato
durante il processo di carica.
Scarico di batteria singolarmente equilibrata
Durante il processo di scarico il caricatore controlla ogni cella singolarmente. Errori sono visualizzati
sul display e il processo termina automaticamente se la tensione di una cella non è regolare.
Vari tipi di batterie al litio
Con questo caricatore possano essere caricato varie batterie al litio. Per esempio: batterie agli ioni
di litio, LiPo e le nuove celle LiFe.
Massima sicurezza
Delta-Peak-Sensibilità: Il caricabatterie controlla la tensione della batteria durante la carica. Appena
raggiunto o superato la tensione di carica della batteria, il dispositivo si spegne automaticamente.
Protezione automatica contro le sovratensioni
È possibile impostare il limite superiore della corrente di carica durante la ricarica del tuo NiCd o
NiMH. Questo è utile per batterie NiMH con bassa capacità in modalità di caricamento automatico.
Monitoraggio della corrente d´ingresso
Per evitare una scarica profonda della batteria, la tensione d’ingresso del caricatore è costante-
mente monitorata. Se il valore massimo sarà superato, il caricabatterie termina il processo auto-
maticamente.
Monitoraggio della temperatura con spegnimento programmabile*
Al caricatore po’ essere collegato un sensore di temperatura. Il quale po’ controllare la temperatura
della batteria  no a 80°C.
* Questa funzione è solo ottenibile con il collegamento di un sensore di temperatura (No. 153056).
Quest’articolo non è incluso nel kit di consegna.
Limite di capacità
Per sicurezza è monitorata la capacità di carica. Inoltre è costantemente monitorato anche il tempo
di ricarica. Se la capacità di carica supera il valore massimo, il processo sarà terminato automati-
camente.
Limite di tempo delle operazioni
Per evitare errori, è anche possibile impostare manualmente il tempo di caricamento.
Funzionamento a cicli di carica / scarica
Le celle delle batterie possano anche usufruire di un programma per la rigenerazione delle celle
stesse. Per i dettagli esatti si prega di consultare i dati tecnici.
GB - Special features
Internal independent lithium battery balancer
The Charger has an integrated balancer connection for the included Balander board (up to 6-cell
lithium) (Optional Universal Balancer Board, No.153043, balancer adapter cable, No. 153044). It
isn‘t necessary to connect an external balancer for balance charging.
Balancing individual cells battery charging/discharging
During the process of discharging, the charger can monitor and balance each cell of the battery in-
dividually. Error message will be indicated and the process will be ended automatically if the voltage
of any single one cell is abnormal.
Adaptable to various type of lithium battery
Charger is adaptable to various types of Lithium batteries, such as Li-ion, LiPo and the new LiFe
series of batteries.
Maximum safety
Delta-peak sensitivity: the automatic charge termination program based on the principle of the Delta-
peak voltage detection. When the battery‘s voltage exceeds the threshold, the process will be ter-
minated automatically.
Automatic charging current limit
You can set up the upper limit of the charging current when charging your NiCd or NiMh battery. It is
useful for the NiMh battery of low impendance and capacity in the „Auto“ charging mode.
Input power monitoring
To portect the car battery used as DC input power from being damaged, its voltage keeps being
monitored. If it drops below the lower limit, the process will be ended automatically.
Temperatur monitoring with programmable cut-off
The battery‘s internal chemical reaction will cause the temperature of the battery to rise. If the tem-
perature limit is reached, the process will be terminated.
*This function is available by connecting optional temperatur probe (Ord. No. 153056), which is not
included in our package.
Capacity limit
The charging capacity is always calculated as the charging current multiplied by time. If the charging
capacity exceeds the limit, the process will be terminated automatically when you set the maximum
value.
Processing time limit
You can also limit the maximum process time to avoid any possible defect.
Cyclic charging/discharging
1 to 5 cyclic and continuous process of charge>discharge or discharge>charge is operable for bat-
tery refreshing and Balancing to simulate the battery‘s activity.
Messa in servizio del caricabatterie
Lo caricatore in alternativa può essere utilizzato con due fonti di tensione differenti. È possibile usare
l‘energia del cavo di alimentazione di una normale presa CA o di una batteria a 12 V o anche di un
potente alimentatore stabilizzato.
Collegare uno degli ingressi alla rete di Vostra scelta. Quando è collegato a una fonte di alimentazio-
ne a 12 V, accertarsi di rispettare la corretta polarità. Collegare il morsetto rosso al polo positivo (+) e
il nero al polo negativo (-) alimentazione a batteria o alimentazione.
Durante l´accensione viene segnalato „Charge Discharge“. In quell´istante il processore controlla
la caricabatteria e la fonte di alimentazione. Se trova un errore, per esempio la tensione d’ingresso
è inferiore a 11 V o 15 V, lo segnala con un messaggio sul display e con un segnale acustico. Se
questo è il caso, controllare l‘alimentazione
Avviso importante:
Mai usare entrambe le fonti energetiche allo stesso tempo, il caricabatterie così va inevita-
bilmente danneggiato
Il collegamento con la batteria da caricare o scaricare è compiuto da prese di 4mm di 2 colori diversi.
Collegate la batteria con queste prese. Il (+) della batteria deve essere collegato con la presa rossa
e il (–) con la presa nera. Usate solo cavi di ricarica di alta qualità.
Durante la carica o la scarica di una batteria al litio, è necessario utilizzare per ragioni di sicurezza
la funzione di bilanciamento del caricatore. Solo in questo modo, le celle al litio sono perfettamente
protette.
Per fare ciò, oltre alle due porte principali dovete collegare anche il sistema di bilanciamento della
batteria con il caricabatterie. Se il bilanciatore non è usato, la modalità di carica o scarica viene
effettuata senza controllo della tensione delle singole celle. Inoltre, le tensioni delle singole celle non
possono essere visualizzati sul display.
Using your charger for the fi rst time
The Charger is  tted with 2 power inputs which gives you the choice of powering the unit from the
household mains supply (220 V AC) or via 12 V DC. The 12 V DC can be either a vehicle battery or
a stabilised transformer.
Connect the charger to an input of your choice, if using 12 V pay particular attention to the polarity.
The red crocodile clip must be connected to the plus pole (+) and the black clip to the minus pole (-).
After connection Info menu and then the set-up menu is appears  rst. If an error is encountered, for
example if the input voltage is outside the allowed range of 10-15 V, a message will be displayed and
the buzzer will sound. Disconnect the power supply and rectify the fault.
WARNING!
Never connect both power inputs simultaneously as this will destroy the charger!
Battery packs to be charged or discharged are attached to the charger via 2 colour coded banana
sockets using a good quality charging cable. Make sure that the plus (+) pole of the battery is con-
nected to the red socket on the charger and that the minus (-) pole of the battery is connected to the
black socket of the charger.
When charging or discharging Lithium packs, always use the balancer function of the charger. This
will not only provide protection for your cells, but also ensure maximum ef ciency and long life.
To do so, you must connect both the charging cable and the balancer plug/socket (balancerboard
included). Not doing this will result in the individual cells not being protected and you will not be able
to monitor the individual cell voltage in the display.
Connessioni e Modi di controllo
1 Ingresso 230 V
2 Ori cio di carico USB
3 Ingresso 10 - 18 V
4 Collegamento per il sensore di temperatura
Connettore USB JR (Software / PC)
Connessione di servo
5 Ventilatore
6 Porta di ricarica rosso = più (+)
Nero = meno (-)
7 Attacchi di bilanciatore (1 - 6)
8 LED Display con Touchscreen, illuminato.
Connections and Controls
1 230 V AC Input
2 USB charging socket
3 10 - 18 V DC Input
4 Temperature sensor socket
USB-JR socket
Servo socket
5 Cooler
6 Charge cabel sockets red = plus (+)
black = minus (-)
7 Balancer sockets (1 - 6)
8 LED screen with Touch screen and light
1 2 3 54 7
6
8
3
IT - Menu principale
1. Dopo che è stato collegato il caricabatterie, si apre il menu principale. Dopo premendo le
frecce ( o ) si può scegliere tra i singoli punti del menu. Per scegliere un menu, premere il
tasto corrispondente.
2. Tasto freccia per spostarsi tra le voci del menu
3. Visualizzare il programma di ricarica selezionato.
4. Selezionare il menu Balancer-Carica.
5. Scegliere menu di carica.
6. Scegliere menu di scarica
7. Scegliere Cycle-Menu
8. Scegliere Setup-Menu
9. Selezionare il menu Riparazione della batteria.
10. Selezionare il collegamento di carica USB/collegamento servo.
11. Selezionare il menu Digital Power.
*LS > Ulitma modalità di lavoro
GB - Main Screen
1. After power on the charger, you can see the main menu, press the symbols to select a menu.
2. Arrow buttons to change the stored charging programs
3. Enter the memory into the charging/balancing charging/discharging/cycle.
4. Enter into the balancing charging mode.
5. Enter into the charging mode.
6. Enter into the discharging mode.
7. Enter into the cycle mode.
8. Enter into the setup mode.
9. Enter into the batteries doctor mode.
10. Enter into the extern function mode.
11. Enter into digital power mode.
*LS > Last working mode.
1 2 3
4
8
5
9
6
10
7
11
IT - Impostazione dei parametri
Premendo il tasto „SET“ unirsi nel menu di impostazione.
Consiglio:
Prima del 1. utilizzo, dovete impostare alcuni parametri.
1Illuminazione 20 % ~ 80 %
2Contrasto 30 ~ 60
3Tono Tasto on/off
4Tono d`allarme on/off
5Max. Output 50 - 80 W
ASave / indietro
Bdiminuire / in giù
Caumentare / in su
6Sottotensione 10,0 V ~ 18,0 V
7Timer 10 ~ 600 min.
8Sconnessione della temperatura interna
50 ~ 80°C
9Sconnessione della temperatura esterna
50 ~ 80°C
10 Capacità massima di carico 500 mAh ~ 50 Ah
11 Modalità di ciclo (Nixx) C->D/D->C
12 Ripetere ciclo 1 ~ 5T
13 Ciclo di pausa 5 ~ 60 min.
14 Delta-Peak NiMh 5 ~ 25 mV
15 Delta-Peak NiCd 5 ~ 20 mV
16 LiPo-Celle caricare 4.00 ~ 4.25 V
17 LiPo-Celle scaricare 3.00 ~ 4.00 V
18 LiFe-Celle caricare 3.50 ~ 3.70 V
19 LiFe-Celle scaricare 1.80 ~ 3.30 V
20 Batteria al piombo- Celle caricare
2.00 ~ 2.50 V
21 Batteria al piombo-Celle scaricare
1.20 ~ 2.00 V
22 NiMh-Celle scaricare 0.80 ~ 1.50 V
23 NiCd-Celle scaricare 0.50 ~ 1.50 V
24 Lilo-Celle caricare 4.00 ~ 4.15 V
25 Lilo-Celle scaricare 3.00 ~ 3.90 V
Initial parameter set up
Pressing the „SET“ button to enter the setup menu
Tips:
Please set up correctly in the „user set“ menu before into the job for
the  rst time you use it.
1Back Light 20 % ~ 80 %
2LCD Contrast 30 ~ 60
3Button Sound on/off
4Buzzer Sound on/off
5Max. Out Watt 50 - 80 W
ASave / Back
BINC / Down
CDEC / Up
6Input cut 10,0 V ~ 18,0 V
7Safety timer 10 ~ 600 min.
8 Int. Cut-Off 50 ~ 80°C
9 Temp. Cut-Off 50 ~ 80°C
10 Max. Out CAPA 500 mAh ~ 50 Ah
‚
11 Nixx Cycle Mode C->D/D->C
12 Nixx Cydle Cnt. 1 ~ 5 T
13 Cycle Waste time 5 ~ 60 min.
14 NiMh Delta-Peak 5 ~ 25 mV
15 NiCd Delta-Peak 5 ~ 20 mV
16 LiPo CHG Cut 4.00 ~ 4.25 V
17 LiPo DCHG Cut 3.00 ~ 4.00 V
18 LiFe CHG Cut 3.50 ~ 3.70 V
19 LiFe DCHG Cut 1.80 ~ 3.30 V
20 PB CHG Cut 2.00 ~ 2.50 V
21 PB DCHG Cut 1.20 ~ 2.00 V
22 NiMh DCHG Cut 0.80 ~ 1.50 V
23 NiCd DCHG Cut 0.50 ~ 1.50 V
24 Lilo CHG Cut 4.00 ~ 4.15 V
25 Lilo DCHG Cut 3.00 ~ 3.90 V
A B C
1
2
3
4
5
6
7
8
9
10
11
12
13
14
15
16
17
18
19
20
21
22
23
24
25
4
IT - Primi passi per iniziare la carica/scarica é ciclo
1. Tipo di batteria
Selezionare il tipo di batteria. E importante speci care il tipo
corretto di batteria, le cellule si posono danneggiare. La
selezione può essere impostato utilizzando i tasti di freccia
(su/giù).
2. Impostare il numero di cellule
Selezionare il numero di cellule. La selezione può essere
impostato utilizzando i tasti di freccia (su/giù).
3. Impostare la corrente di carica/scarica
La selezione può essere impostato utilizzando i tasti di freccia
(su/giù). Premere il tasto „Save“ per salvare i parametri
impostati. Per iniziare la ricarica premere „Start“.t“.
4. Save = Inserire spazio di memoria
(Posto 1 - 10 sono pre-programmati)
5. Tensione di entrata / Test della batteria
Start = Iniziare il processo
6. Tensione di entrata / Test della batteria
Start = Iniziare il processo
GB - Getting started to balancing charging/charging/discharging
and cycle
1. Battery type
Set the battery type.
You have to check the battery carefully and set it up correctly, or
it will cause a explode.
The selection can be set using the arrow keys (up / down).
2. Number of cells.
Set the numbers of cells.
The selection can be set using the arrow keys (up / down)
3. Charge/Discharge current
The selection can be set using the arrow keys (up / down)
Press „Save“ to the set presented to store parameters.
To start the charging process press „Start“
4. Save = Enter Memory location
(Place 1 - 10 are pre-programmed)
5. Input Voltage / Battery check.
Start = Start Operation
6. The charging process is started.
5
IT - Primi passi per iniziare la carica/scarica é ciclo
1. Primi passi per iniziare la carica/scarica é ciclo.
2. Impostare i dati di carica/scarica
Qualora siano necessarie eventuali modi che,
selezionare i dati richiesti.
3. Per visualizzare il corso di corrente, si deve premere il
tasto „Graph“.
4. Per controllare le singole celle, premere il tasto „Cell“.
5. NiMH / NiCd-Ciclo
GB - Getting started to balancing charging/charging/
discharging and cycle
1. Charging/Discharging data
In the digital bower menu, charger will shows the
parameters which user setted in the last time
2. Charging/Discharging set data
Should any changes be necessary, select the required
data.
3. Press „Graph“ key to view the current curve.
4. Press „Cell“ key to view the Cells
5. NiMh / NiCD Cycle
1. Lipo
Selezionare il tipo di batteria (LiPo/LiFe/Lilo)
2. VOL
Selezionare la tensione/resistenza interna
Selezionare la tensione/Volt
3. BALA
Avviare il processo balancer
Controllo del processo balancer con „Stop“ si può concludere il processo balancer
prematuramente.
1. Lipo
can select LiPo/LiFe/Lilo
2. VOL
can select Voltage/Internal resistance
Can select Voltage/Volt
3. BALA
Start the balancer operation
Balancer control operation, with „Stop“ you can stop the Valancer operation prematurely.
Menù-Riparazione della batteria GB -Battery‘s Doctor Progam
6
IT - Programmi di funzioni esterne
1. Si può scegliere tra USB y Servotester
2. USB Monitor
3. Servotester
GB - Extern function program
1.oCan select USB Monitor /
Servotester
2. USB Monitor
3. Servo Tester
Menu Digital Power
Il carica-batteria può essere utilizzato anche come alimentatore rego-
labile per dispositivi elettrici con una tensione di uscita da 3,0 V - 24 V.
1. Regolare i singoli valori per tensione, corrente, watt e durata
massima.
2. Potenza di elaborazione digitale.
Digital power program
In this mode, charger can provide a output power of DC 3,0 V - 24 V
for the other electronic equipment.
1. Set voltage / current / watt / run time
2. Digital power working.
Segnalazioni d´errore
Il caricatore fornisce una serie di messaggi di errore. Tutte le segnalazioni di errore vengano ac-
compagnato da un segnale acustico. L‘allarme visivo e acustico può essere disattivato premendo
qualsiasi tasto dopo che l‘errore è stato corretto o la batteria è stata scollegata.
Warning and orror information
The charger is protected agains faults and operator errors by the Multi-Protections-System. Faults/
Errors are displayed on the LCD screen and they interrup the active process to protect the unit and
the battery.
1. La batteria è collegata con polarità invertita.
2. Nel circuito di carica esiste un’interruzione.
3. Cortocircuito della tensione di uscita.
4. La tensione d´entrata supera i limiti consentiti (1 - 18 V).
1. The output ist connected to a battery with incorrect polarity.
2. Not connected or connection interruption.
3. Output short circuits.
4. Input voltage error, below or over the limit of 10 - 18 V.
5. Errore sconosciuto, scollegare immediatamente l´apparecchio dalla fonte di alimentazione.
6. La tensione di una batteria Litio è troppo bassa.
7. La tensione di una batteria Litio è troppo alta.
8. Una cella di una batteria al litio ha una tensione troppo bassa.
5. Charger fault.
6. Total voltage too low.
7. Total voltage too high.
8. Unit cell voltage too low.
9. Una cella di una batteria al litio ha una tensione troppo alta.
10. Connessione della corrente di carica scadente e ad alta impedenza.
11. Il carica batterie è troppo calda, fatelo raffreddare.
12. Il carica batterie ha superato la potenza di uscita.
9. Unit cell votage too high
10. Balance port connection error.
11. Charge overheating
12. Power exceed the limit in the digital power mode.
1234
5678
9 10 11 12
7
IT - Segnalazioni d´errore GB - Warning and error information
13. Il massimo della corrente consentita è stato superato.
14. Il tempo massimo di carica è stato superato.
15. La capacità massima è stata superata.
16. La temperatura massima della batteria è stata superata.
13. Current exceed the limit in the digital power mode.
14. Exceed the maximum safe time limit.
15. Exceed the maximum capacity limit.
16. External temperature too high.
13 14 15 16
Ulteriori informazioni
Il caricabatterie è dotato di un potente alimentatore da 80 Watt interna ed una presa per il collega-
mento ad un alimentatore esterno. Quando si opera su una normale presa di corrente a 230 V é
necessario assicurarsi che il caricatore é impostato per operare all’interno della potenza massima
di 80 Watt. È necessario impostare la max. corrente in Ampere secondo la rispettiva batteria, nella
gamma del tasso di carico massimo consentito della batteria e la massima
uscita dell‘alimentatore interna! Se si sceglie di ricarica correnti che superano i 80 Watt di alimenta-
zione si attiva l´interruttore di sicurezza del sistema é si riavvia il caricabatterie. Durante la connes-
sione a un alimentatore esterno con una potenza appropriata, il caricabatterie permette un maggiore
caricamento entro i dati tecniche.
Nella tabella si possono vedere le correnti di carica di varie batterie al litio. La base di calcolo di Watt
è Volt moltiplicato per Ampere.
Additional information
Your charger is equipped with a powerful internal 80 watt power supply and a socket to connect to an
external power supply . When operating on a normal 230V AC power outlet you should making sure
the charger ist set to operate within the maximum power of 80 watts . You should set the max. Amp
current according to the respective battery , into the range of the allowed maximum Charging rate of
the battery and the maximum output of the internal power supply! If you choose charging currents
exceeding the 80 watts of the power supply the safety shutdown of the power supply will restart the
charger. When connecting to an external power supply to the appropriate power the charger allows
higher Loading rates within the technical performance.
In the table you can see the charging currents of various lithium batteries. The basis for calculation
of Watts is Volts multiplied by amps.
Sommario Caricabatterie in Watt/Ampere LiPo
Table of current in Watt/Ampere LiPo
V-máx Cella singola
V-max p.cell
Cellule
cells
V-máx Pacco batteria
V-max battery
Ampere Corrente di carica
max. Amp current
Watt
Watt
4,2 1 4,2 10 42
4,2 2 8,4 10 84
4,2 3 12,6 7 88,2
4,2 4 16,8 5,2 87,36
4,2 5 21 4,2 88,2
4,2 6 25,2 3,5 88,2
Sommario Caricabatterie in Watt/Ampere LiIon
Table of current in Watt/Ampere LiIon
V-máx Cella singola
V-max p.cell
Cellule
cells
V-máx Pacco batteria
V-max battery
Ampere Corrente di carica
max. Amp current
Watt
Watt
4,1 1 4,1 10 41
4,1 2 8,2 10 82
4,1 3 12,3 7,2 88,56
4,1 4 16,4 5,4 88,56
4,1 5 20,5 4,3 88,15
4,1 6 24,6 3,6 88,56
Istruzioni per la sicurezza
• Vi preghiamo di leggere attentamente le istruzioni e Istruzioni per la
sicurezza prima di usare il modello.
• Questo prodotto non è destinato ad essere utilizzato da persone (bambini
compresi) con capacità  siche limitate, con limitazioni sensoriale o mentali oppure
mancanza di esperienza e/o di conoscenza. A meno che siano sorvegliate da una
persona responsabile della loro sicurezza o ricevano istruzioni su come usare il
prodotto in modo corretto. Bambini devono essere supervisionati per assicurare
che non giocano con l’apparecchio.
• I bambini devono essere sorvegliati per assicurarsi che non giochino con
l‘apparecchio.
• Solo per uso interno.
• Il caricabatteria si può scaldare durante l´utilizzo e va posizionato in modo che il
calore può essere scaricato in modo adeguato.
• Proteggere il caricatore da polvere, sporcizia, umidità e raggi di sole diretti.
• Dopo l‘uso, prima scollegare il caricabatteria dalla presa di corrente e poi
scollegate le batterie.
• Non appoggiate mai il caricabatterie e le batterie su super ci in ammabili. Inoltre
il caricabatterie va sempre sorvegliato durante l’uso.
• Evitate assolutamente sopracarichi e cortocircuiti e fate attenzione alla polarità.
• Non caricate o scaricate mai batterie ancora calde subito dopo il primo uso. Fatele
sempre raffreddare prima.
• Caricate o scaricate sempre solo una confezione di batterie a volta. Si possano
usare insieme solo prodotti dello stesso fornitore e della stessa potenza.
• Girare in nessun caso, batterie per la ricarica e la scarica in parallelo.
• Non caricate o scaricate mai batterie che sono direttamente collegate a un circuito
elettronico, scollegare la batteria quando non è disponibile un interruttore.
• Quando si collega la batteria, sempre collegare prima il cavo di ricarica al
dispositivo e poi collegare la batteria.
• Non caricate mai batterie rotte o danneggiate.
• Si prega di rispettare sempre le informazioni fornite dal produttore della batteria.
• Il caricabatterie ´solo adatto per la carica e scarica delle batterie ricaricabili indicati
(vedi dati tecnici)
• Non aprite il caricabatterie per nessun motivo per ripararlo. E` pericoloso e inoltre
decade qualsiasi diritto di garanzia. Per riparazione mandate l´articolo
direttamente al nostro servizio di assistenza.
GB - Safety Information
• Whenever you operate your charger the following safety instructions must
be followed.
• This device is not intended for use by individuals (including children) with reduced
physical sensory, mental abilities, lack of experience and / or knowledge, unless
they are supervised in how the device is to be used.
• Children should be supervised to ensure that they do not play with the appliance.
• Only for indoor use.
• The charger may get hot in use, position the unit so that the heat can dissipate.
• Never expose the charger to moisture or direct sun light.
• After use always disconnect the unit from the mains and unplug any batteries.
• Never leave the charger unattended when in use, and always operate it on a  re
proof surface.
• Avoid short circuits at all costs. Always observe the correct polarity.
• Batteries should always be allowed to cool down before you charge or discharge
them.
• Only charge or discharge packs containing cells from the same manufacturer and
of the same capacity.
• Do not connect packs in parallel to charge or discharge them.
• Always disconnect the pack from any electronic system (ESC etc.) before
attempting to charge it.
• Connect the charging cable to the charger  rst and then to the battery.
• Never try to charge/discharge damaged packs or cells.
• Follow the directions given by the battery manufacturer.
• The charger may only be used to charge/discharge the types of cells listed in the
technical speci cations.
• Do not open the unit. This will void the guarantee and may be dangerous. If the
charger is damaged or faulty, return it our service department for repair.
JAMARA e.K.
Inh. Manuel Natterer
Am Lauerbühl 5 - DE-88317 Aichstetten
Tel. +49 (0) 75 65/94 12-0 - Fax +49 (0) 75 65/94 12-23
[email protected] ●www.jamara.com
Service - Tel. +49 (0) 75 65/94 12-66
kundenservice@ jamara.com
Reitter Modellbau Versand
Patricia Reitter
Degerfeldstrasse 11
72461 Albstadt
Tel 07432 9802700
Fax 07432 2009594
Mail [email protected]
Web www.modellbauversand.de
Extra Trade
Rudolf Müller & Gerrit Müller GdbR
Lindenstraße 82
66787 Wadgassen
Tel 06834 9604952
Fax 06834 9604963
Mail [email protected]
Web www.extra-trade.de
Sigi‘s Modellbau Shop
Siegfried Costa
Bundesstr. 30
AT -6923 Lauterach
Tel +43 557483657
Fax +43 557483657
Mail [email protected]
Web www.playland-modellbau.at
Modellbau Zentral
Peter Hofer
Bresteneggstrasse 2
CH -6460 Altdorf
Tel +41 794296225
Fax +41 418700213
Mail [email protected]
Web www.modellbau-zentral.ch
Bay-Tec Modelltechnik
Martin Schaaf
Am Bahndamm 6
86650 Wemding
Tel 07151 5002192
Fax 07151 5002193
Mail [email protected]
Web www.bay-tec.de
DE DE
DE
Aigner Modellbau
Edmund Aigner
Graben 2
AT -3300 Amstetten
Tel +43 747224655
Fax +43 747223358
Mail of[email protected]
Web www.modellbau-amstetten.at
CH
AT AT
S.E. & O. Copyright JAMARA e.K. 2016
Copia e la riproduzione totale o in parte, solo con il permesso di JAMARA e. K.
All rights reserved. Copyright JAMARA e.K. 2016
Copying or reproduction in whole or part, only with the expressed permission of JAMARA e.K.
IT - Centro assistenza GB - Service centre

This manual suits for next models

1

Other Jamara Batteries Charger manuals

Jamara Lipo 20 User manual

Jamara

Jamara Lipo 20 User manual

Jamara Lipo 20 Charger 2S User manual

Jamara

Jamara Lipo 20 Charger 2S User manual

Jamara LiPo 2S User manual

Jamara

Jamara LiPo 2S User manual

Jamara X-Peak 80 BAL Pult Edition User manual

Jamara

Jamara X-Peak 80 BAL Pult Edition User manual

Jamara Lipo 20 User manual

Jamara

Jamara Lipo 20 User manual

Jamara Lipo 20 User manual

Jamara

Jamara Lipo 20 User manual

Jamara X-Peak 100 Touch Dual USB User manual

Jamara

Jamara X-Peak 100 Touch Dual USB User manual

Jamara Lipo 20 User manual

Jamara

Jamara Lipo 20 User manual

Jamara Lipo 20 User manual

Jamara

Jamara Lipo 20 User manual

Jamara LiPo 2S User manual

Jamara

Jamara LiPo 2S User manual

Jamara Lipo 20 User manual

Jamara

Jamara Lipo 20 User manual

Jamara Lipo 20 Charger 2S/3S User manual

Jamara

Jamara Lipo 20 Charger 2S/3S User manual

Jamara X-Peak 80 BAL V2 User manual

Jamara

Jamara X-Peak 80 BAL V2 User manual

Jamara X-Peak Touch USB 2L User manual

Jamara

Jamara X-Peak Touch USB 2L User manual

Jamara Lipo 20 User manual

Jamara

Jamara Lipo 20 User manual

Jamara X-Peak 80 BAL Pult Edition User manual

Jamara

Jamara X-Peak 80 BAL Pult Edition User manual

Jamara X-Peak 80 BAL V2 User manual

Jamara

Jamara X-Peak 80 BAL V2 User manual

Jamara Lipo 20 User manual

Jamara

Jamara Lipo 20 User manual

Jamara X-Peak Touch USB 2L User manual

Jamara

Jamara X-Peak Touch USB 2L User manual

Jamara X-Peak 90 Touch User manual

Jamara

Jamara X-Peak 90 Touch User manual

Jamara X-Peak 80 BAL V2 User manual

Jamara

Jamara X-Peak 80 BAL V2 User manual

Jamara X-Peak 100 Touch Dual USB User manual

Jamara

Jamara X-Peak 100 Touch Dual USB User manual

Jamara X-Peak 80 BAL V2 User manual

Jamara

Jamara X-Peak 80 BAL V2 User manual

Jamara Ecological Wind User manual

Jamara

Jamara Ecological Wind User manual

Popular Batteries Charger manuals by other brands

Insignia NS-Q2CS Quick setup guide

Insignia

Insignia NS-Q2CS Quick setup guide

Kärcher BC 18 V 2,5 A manual

Kärcher

Kärcher BC 18 V 2,5 A manual

La Crosse Technology Battery Charger instruction manual

La Crosse Technology

La Crosse Technology Battery Charger instruction manual

SUNER POWER BC-12W-Pro user manual

SUNER POWER

SUNER POWER BC-12W-Pro user manual

Ryobi 1400677 Operator's manual

Ryobi

Ryobi 1400677 Operator's manual

Classic Exhibits InCharg MOD-1454 Setup instructions

Classic Exhibits

Classic Exhibits InCharg MOD-1454 Setup instructions

Chargetek RTIC-2307 installation manual

Chargetek

Chargetek RTIC-2307 installation manual

Sony WCH20 manual

Sony

Sony WCH20 manual

Energizer PowerKeep 12 user guide

Energizer

Energizer PowerKeep 12 user guide

Studer MBC 12-08 user manual

Studer

Studer MBC 12-08 user manual

GYS DIAG-STARTIUM 60-12 manual

GYS

GYS DIAG-STARTIUM 60-12 manual

Renogy DCC-1212 Series manual

Renogy

Renogy DCC-1212 Series manual

Signature Solar EG4 user manual

Signature Solar

Signature Solar EG4 user manual

PowerCell PCA-4U user manual

PowerCell

PowerCell PCA-4U user manual

Sanyo NS-MQH01U operating instructions

Sanyo

Sanyo NS-MQH01U operating instructions

Anton/Bauer Interactive 2000 PowerCharger owner's manual

Anton/Bauer

Anton/Bauer Interactive 2000 PowerCharger owner's manual

Powerex MH-C401U instructions

Powerex

Powerex MH-C401U instructions

Atec 3075? manual

Atec

Atec 3075? manual

manuals.online logo
manuals.online logoBrands
  • About & Mission
  • Contact us
  • Privacy Policy
  • Terms and Conditions

Copyright 2025 Manuals.Online. All Rights Reserved.