manuals.online logo
Brands
  1. Home
  2. •
  3. Brands
  4. •
  5. Jamara
  6. •
  7. Batteries Charger
  8. •
  9. Jamara X-Peak 80 BAL Pult Edition User manual

Jamara X-Peak 80 BAL Pult Edition User manual

2
ES - Contenido
Información General 2
Seguridad 2/3
Declaración de conformidad 3
Nota sobre reciclado 3
Datos tecnicos 4
Highlights 4
Contenido de el kit 4
Características especiales 4/5
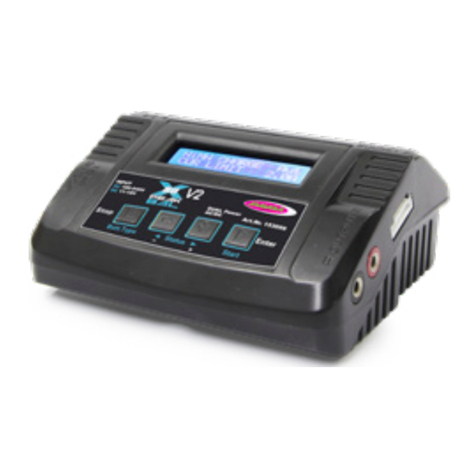
Conexiones y teclas 6
Puesta en marcha del cargador 6/7
Estructura del menú del cargador 7/8
Ajuste de los parámetros 10/11
Aplicaciones de pilas de litio 12 - 15
Aplicaciones de la batería NiMh / NiCd 16 - 18
Aplicaciones de la batería plomo 19/20
Administrar las posiciones de memoria 21//22
Pantalla de otros valores 23
Los mensajes de error 24
Accesorios 25
Índice de la batería 26/27
GB - Content
Indemnity Statement 2
Safety Information 2/3
Certifi cate of Conformity 3
Disposal Instructions 3
Technische Daten 4
Higlights 4
Contents 4
Special features 4/5
Connections and Controls 6
Using your charger for the first time 6/7
Menu Structures 7/9
Program flow chart 10/11
Lithium battery program 12 - 15
NiMh / NiCd battery program 16 - 18
Pb Program 19/20
Data storage program 21/22
Various information in the program 23
Warning and orror information 24
Accessories 25
Battery Index 26/27
ES - Seguridad
Nos alegramos de que se haya decidido por un cargador de nuestro
amplio surtido. Con el X-Peak 230 BAL posee un universal multiuso
que, equipado con un cargador equilibrador incorporado rápida
con un microprocesador de alto rendimiento. Un balanceador ya
está integrado en el cargador.
El cargador está en la vanguardia de la tecnología. Se carga tanto
de NiCd cómo con las celulas NiMH, és el futuro del litio. Las célu-
las, mientras que incluso la nueva marca se ajustan a la duración
de las baterías. Además, las baterías de plomo-ácido con el X-Peak
80 BAL. Así que usted puede con su modelo tratar con todos los
tipos de baterías..
Este cargador de la última generación de X-Peak cargadores ofrece
más programas de carga y una operación más fácil.
A pesar de la más lógica y por lo tanto fácil de controlar el flujo
de el manejo de la X-Peak 80 BAL requiere el cargador algunos
conocimientos y habilidades básicas. Habilitado rápidamente y con
seguridad familiarizado con el gestor de que se deben leer con cui-
dado este manual antes de utilizar el dispositivo. Tome las medidas
de seguridad con importancia particula.
Le deseamos mucho éxito con su nuevo cargador de nuestra serie
X-Peak.
GB - Safety Information
Thank you purchasing the X-Peak 80 BAL AC/DC Balance charger.
This product is a rapid charger with a high performance micropro-
cessor.. A balancer is integrated into the charger.
This charger has been designed to the highest standards and is
capable of safely charging or discharging not only the current ge-
neration of NiCad, NiHi, LiPo and LiLo cells, but also the newly de-
veloped LiFe batteries. Lead Acid packs can also be charged with
the X-Peak 80 BAL AC/DC so that this charger can handle all of the
battery types which modelers commonly use.
This charger of the latest generation of X-Peak Charger offers more
loading programs, easier operation
We have taken great care to produce a unit which is very simple to
operate, however an amount of knowledge is required to operate
the unit safely. To this end, please read this instruction manual
carefully before you begin, paying particular attention to the safety
instructions.
We would like to wish you every success and hope that you enjoy
the features of our latest addition to the X-Peak range.
ES - Información General
Como la empresa Jamara e.K. influencia sobre el manejo, el cumpli-
miento de las instrucciones de instalación y de funcionamiento,
como el uso el modelo y su mantenimiento no es posible puede,
por No asumimos ninguna responsabilidad por cualquier pérdida,
daño o gasto se.
Medida permitida por la ley la obligación de daños y perjuicios de
toda base legal alguna, en el importe de la factura directamente al
evento producto afectado. Esto no se aplica si queremos normas
jurídicas vinculantes o porque negligencia grave comprobada pue-
de necesitan.
GB - Indemnity Statement
As the company JAMARA e.K. has no influence over the use, main-
tenance or conditions under which our products will operate, we
accept no responsibility for any damage caused be it of a physical,
financial or theoretical nature. JAMARA e.K.will accept no claim
against it which results directly or indirectly from the operation or
use of its products.
Your Statutory Rights apply, any claim made against us will be
based solely on the retail price of the product, and limited to the
model only. This will not apply if we are proved to be legally respon-
sible or when gross negligence can be proved.
4
ES - Características especiales
Balancador encorporado en Lithium
Especialmente útil es el balanceador incorporado activos que pue-
den trabajar con hasta seis elementos de litio. La carga de estas
baterías es cómodo y seguro.No es necesario conectar un equi-
librador separado para la carga.
Bilancador individual
Durante el proceso de descarga, X-Peak 80 BAL puede controlar y
equilibrar cada celda de la batería de forma individual. Mensaje de
error se indicará y el proceso será terminado automáticamente si la
tensión de que exista sólo una célula es anormal.
Utilizable para varios tipos de bateías de litio
Como ya le hemos comentado trabaja a la perfección con los más
novedosos elementos de Litio, tales como los elementos de Iones
de Litio-hierro-fosfato (LiFePO4).
El modo de memoria rápida
Propósitos para cargar diferentes tipos de baterías, „rápida“ carga
reducir la duración de la carga, mientras que „almacén“ estado
puede controlar el voltaje final de la batería, así como para alma-
cenar FO un largo tiempo y proteger el tiempo útil de la batería.
GB - Special features
Internal independent lithium battery balancer
X-Peak 80 BAL employs an individual-cell-voltage balancer. It isn‘t
necessary to connect an external balancer for balance char-
ging.
Balancing individual cells battery discharging
During the process of discharging, X-Peak 80 BAL can monitor and
balance each cell of the battery individually. Error message will be
indicated and the process will be ended automatically if the voltage
of any single one cell is abnormal.
Adaptable to various type of lithium battery
Charger is adaptable to various types of Lithium batteries, such as
Li-ion, LiPo and the new LiFe series of batteries.
Fast and storage model of different battery types
Purposes to charge different battery types, „fast“ charge reduce
the duration of charging, whereas „store“ state can control the fi-
nal voltage of your battery, so as to store fo a long time and protect
useful time of the battery
ES - Datos tecnicos
Entrada de voltaje DC 11,0 - 18,0 V
AC IN ~ 240 V 50/60 Hz
AC zu DC Adaptador
(DC11,0 ~ 18,0 V/5 A)
Tipos de batería y elementos 1 - 15 NiCd, NiMH
1 - 6 Li-Ion, LiPo
Corriente de carga max. 80 W, 0,1 ~ 6,0 A
Corriente de descarga max. 10 W, 0,1 ~ 1,0 A
Corriente de balancador 300 mAh/Célula
Pb Batería corriente: 2 V ~ 20 V
Dimension 135 x 145 x 35 mm
Peso 550 g (Neto Peso)
GB - Technical data:
Input Voltage DC 11,0 - 18,0 V
AC to ~ 100 - 24 V
50/60 Hz
AC to DC Adapter
(DC11,0 ~ 18,0 V/5
A)
Battery types/cells 1 - 15 NiCd, NiMH
1 - 6 Li-Ion, LiPo
Charging current max. 80 W, 0,1 ~ 6,0 A
Discharge Current max. 10 W, 0,1 ~ 1,0 A
Balance Current 300 mAh/cells
Pb battery current 2V ~ 20 V
Dimensions 135 x 145 x 35 mm
Weight 550 g (Net weight)
ES - Highlights
• Adaptador Dual Power AC/DC 230 V y 12 V
• Balancador encorporado en Lithium
• Bilancador individual
• Utilizable para varios tipos de bateías de litio
• El modo de memoria más rápida para varios tipos de bateías
• Máxima seguridad
• Automática protección sobretensiones
• Corriente de entrada de supervisión
• Capacidad de Limite
• Control de la temperatura con programación de corte
• Limitador de temperatura
• Proceso de límite de tiempo
• Visulización de carga de la capacidad
• Compatible con litio, NiMh, NiCD y baterías de plombo
GB - Highlights
• Dual Power Built-in AC Adapter 230 V and 12 V
• Internal independent lithium battery balancer
• Balancing individual cells battery discharging
• Adaptable to various type of lithium battery
• Fast and storage model of different battery types
• Maximum safety
• Automatic charging current limit
• Input power monitoring
• Temperatur monitoring with programmable cut-off optional
• Capacty limit
• Proscessing time limit
• Date store/load
• Supported by Lithium,NiMH,NiCD and Pb batteries
ES - Contenido de el kit:
• Cargador
• Cable de carga:
BEC, JR, LiPo, Bujía,
Enchufe, Cable de carga,
Pinzas de cocodrilo
• Instrucciones
GB - Contents:
• Charger
• AC power cable
• Charging lead:
BEC, JR, LiPo, glow plugs,
plug, Charging lead,
Crocodile clips
• Instruction
5
Máxima seguridad
Delta-Peak sensibilidad: El cargador controlar el voltaje en la batería
durante la carga. Cuando el voltaje de carga de la batería se alcan-
za o supera, el dispositivo se apaga automáticamente.
Automática protección sobretensiones
Se puede establecer el límite superior de la corriente de carga para
recargar su batería de NiCd o NiMH tipo de batería. Esto es útil para
NiMh con menor capacidad en el modo de carga automática.
Corriente de entrada de supervisión
Por lo tanto, no llega a una descarga profunda, la batería del coche
de la tensión de entrada del cargador es monitoreada continua-
mente. Si se alcanza el límite, el cargador pasa automáticamente
detiene el proceso.
Control de la temperatura con programación de corte*
En el cargador hay un sensor de temperatura que puede infectarse.
Entonces, la temperatura de la batería puede variar hasta 80° C ,
tener cuidado.
*Esta función no es sólo a través de la conexión de un sensor de
temperatura opcional (Ref. 15 3056) es posible, se incluye.
Capacidad de Limit
Por razones de seguridad, la capacidad de carga se controla. El
tiempo de carga („Safety‘-temporizador) se controla constante-
mente. Si la capacidad de carga excede el valor máximo, el proceso
se termina automáticamente.
Proceso de límite de tiempo
Para evitar posibles errores, también se puede cargar manualmente
programieren tiempo.
Visulización de carga de la capacidad
El cargador está conectado a una instalación de almacenamiento
equipado de hasta 5 baterías. En cada memoria, está los datos de
un paquete de baterías. Depósito este, que es rápidamente clave
en su acceso a la batería, elimina una gran medida de programa-
ción.
Cíclica de carga / descarga
1 a 5 cíclico y continuo proceso de carga> descarga o carga y de-
scarga> es operable para la batería refrescante y equilibrado para
simular la actividad de la batería. Por favor, consulte los datos téc-
nicos (página 5).
Maximum safety
Delta-peak sensitivity: the automatic charge termination program
based on the principle of the Delta-peak voltage detection. When
the battery‘s voltage exceeds the threshold, the process will be ter-
minated automatically.
Automatic charging current limit
You can set up the upper limit of the charging current when char-
ging your NiCd or NiMh battery. It is useful for the NiMh battery of
low impendance and capacity in the „Auto“ charging mode.
Input power monitoring
To portect the car battery used as DC input power from being da-
maged, its voltage keeps being monitored. If it drops below the
lower limit, the process will be ended automatically.
Temperatur monitoring with programmable cut-off
The battery‘s internal chemical reaction will cause the temperature
of the battery to rise. If the temperature limit is reached, the pro-
cess will be terminated.
*This function is available by connecting optional temperatur probe
(Ord. No. 153056), which is not included in our package.
Capacity limit
The charging capacity is always calculated as the charging current
multiplied by time. If the charging capacity exceeds the limit, the
process will be terminated automatically when you set teh maxi-
mum value.
Processing time limit
You can also limit the maximum process time to avoid any possible
defect.
Data store/load
The maximum five batteries‘ data can be stored for users‘ conveni-
ence. You can keep the data pertaining to program setting of the
battery of continuous charging or discharging. Users can call out
these data at any time without any special program setting.
Cyclic charging/discharging
1 to 5 cyclic and continuous process of charge>discharge or
discharge>charge is operable for battery refreshing and Balancing
to simulate the battery‘s activity. Please see the technical data
(Page 5).
6
ES - Puesta en marcha del cargador
El X-Peak 80 BAL puede ser alimentado de dos maneras distintas,
pero no simultáneamente. Dispone de la posibilidad de obtener la
energía de una toma de corriente casera, un enchufe, o bien de
una batería de automóvil o de una fuente de alimentación estabi-
lizada de 12 V.
Conecte el cargador a la toma de alimentación seleccionada. Si lo
conecta a una toma de alimentación de 12 V y corriente continua
debe comprobar que la polaridad sea la correcta. Conecte la pinza
de cocodrilo roja con el polo positivo (+), y la negra con el negativo
(-), de la batería o fuente de alimentación.
Cuando la puesta en marcha, aparece „Charge Discharge“ Duran-
te este tiempo, el procesador comprueba el cargador de batería y
fuente de alimentación. Si se produce un fallo, por ejemplo, porque
la tensión de entrada está por debajo de 10 V o 18 V, un mensaje
correspondiente aparecerá en la pantalla y un zumbido. Si ese es el
caso debe verificar la fuente de alimentación.
Nota importante:
Nunca mezclar las dos fuentes de energía, el cargador se
puede dañar.
La conexión a la batería de GE cargada o descargada aparece por
dos códigos de colores hembrillas de 4 mm. Conecte la batería
con estas tomas. Cuando conectada – en continuación, la terminal
positiva de la batería que corresponde a la roja (+) y la terminal
negativa de la batería con el negro (-). Utilice sólo el cargador de
alta calidad.
GB - Using your charger for the first time
The X-Peak 230 BAL is fitted with 2 power inputs which gives you
the choice of powering the unit from the household mains supply
(220 V AC) or via 12 V DC. The 12 V DC can be either a vehicle
battery or a stabilised transformer.
Connect the charger to an input of your choice, if using 12 V pay
particular attention to the polarity. The red crocodile clip must be
connected to the plus pole (+) and the black clip to the minus pole
(-).
After connection the charger will display „Charge Discharge“
whilst a self test is conducted. If an error is encountered, for ex-
ample if the input voltage is outside the allowed range of 11-15 V,
a message will be displayed and the buzzer will sound. Disconnect
the power supply and rectify the fault.
WARNING!
Never connect both power inputs simultaneously as this will
destroy the charger!
Battery packs to be charged or discharged are attached to the
charger via 2 colour coded banana sockets using a good quality
charging cable. Make sure that the plus (+) pole of the battery is
connected to the red socket on the charger and that the minus (-)
pole of the battery is connected to the black socket of the charger.
ES -
Conexiones y teclas
1 Entrada 230V
2 Entrada 12 V
3 Conexión para el sensor
de temperatura
4 Salidas para carga
rojo = positiv (+)
negro = negativ (-)
5 Conectors equilibrado (1 - 6)
6 Seguidores
7 Indicador LED
8 Clave Batt-tipo/Stop =
Selecciona diferentes tipos de
pilas y detene el proceso,
detiene la carga
9 DEC botón =
Modo de cambio y
la reducción de los valores
10 INC botón =
Modo de cambiar o
aumentar los valores
11 Entrar botón START =
Para confirmar el tipo de
la batería, iniciar la carga.
GB -
Connections and Controls
1 230 V AC Input
2 12 V DC Input
3 Temperature sensor socket
4 Charge cabel sockets
red = plus (+)
black = minus (-)
5 Balancer sockets (1 - 6)
6 Cooler
7 LED screen
8 Batt. Type/Stop button =
The BATT TYPE button is
used to select the battery
type and to stop the process
9 DEC button =
The DEC button is used to
change the mode or to
decrease the value
10 INC button =
The INC button is used to
change the mode or to
increase the value
11 Start/Enter button =
The ENTER - START/STOP
button is used to confirm the
battery type, confirm the set
value or to start/stop an
operation.
1 2 3
5 6
8 10 119
4
7
7
Cuando se carga o descarga una batería de litio, debes usar para la
seguridad necesariamente la función de balanceador de los X-Peak
EVO 3 Plus. Es la única forma que las células de litio queden bien
protegidas contra una falta de tratamiento.
Cuidado con los terminales y el equilibrador de la batería con el car-
gador. Si el puerto balanceador no se utiliza, una carga o descarga
se lleva a cabo sin el control de la tensión de celda individual.
Además, el voltaje de las células individuales no se pueden mostrar.
When charging or discharging Lithium packs, always use the ba-
lancer function of the charger. This will not only provide protection
for your cells, but also ensure maximum efficiency and long life.
To do so, you must connect both the charging cable and the balan-
cer plug/socket. Not doing this will result in the individual cells not
being protected and you will not be able to monitor the individual
cell voltage in the display.
ES - Estructura del menú del cargador
Después de conectar el cargador a la fuente de alimentación los
últimos ajustes se queda en la última memoria utilizada, haciendo
que se convierta en activa. La misma batería puede ser reutilizada
dando dados de alta, a penas deberás realizar el cambio de lo que
deseas. El último modo de carga se muestra.
Por un cambio de la configuración debe ser establecido primero a
que tipo de batería de GE será cargada o descargada. Utilizarás, la
tecla „BATT TYP/STOP“‚se puede usar repetidamente hasta que la
pantalla aparezca el tipo de batería deseado, empiezará a parpa-
dear. Los tipos de pilas se encuentran en una secuencia de LiPo,
NiMH, NiCd, Pb detrás de la otra.
El tipo de batería se puede dañar atravez de pulsar el botón Start/
Enter. Cada pulsación de tecla se confirma por una señal acústica
breve.
Si el botón „Start/ENTER“ se pulsa, inicia el ajuste de parámetros,
por ejemplo la corriente de carga empieza a parpadear. Al pulsar el
‚INC‘ o el botón de ‚DEC‘, este valor puede ser cambiado si lo de-
sea.
Cuando la batería está conectada, la operación programada puede
ser iniciada presionando la tecla ‚Enter‘. Cuando todo se haya com-
pletado correctamente y no hay presente una batería defectuosa, el
proceso comienza. En caso de fallo, se acompaña de una señal au-
ditiva, recibirá un mensaje de error. Durante una carga o descarga
de los datos más importantes se muestran en la pantalla.
El siguiente cuadro muestra la estructura del menú completo del
X-Peak 80 BAL:
GB - Menu Structures
Having connected the charger to a power supply, the last settings
used will be displayed. If you are going to charge/discharge the
same pack, no settings need to be changed. The last used mode
will be displayed.
If a different pack is to be charged/discharged the setting must be
changed, starting with the battery type. To do this, press the ‘Batt.
Typ/Stop’ button until the correct battery type flashes in the dis-
play.. This menu option is an endless loop and the battery types are
presented in the following order: LiPo, NiMH, NiCd, Pb.
The displayed battery type is conrmed by pressing the ‚Start/Enter‘
button. If you wish, each key press is confirmed by a brief acoustic
signal.
Pressing the ’Start/Enter’ button allows the user to access the vari-
ous parameters which can be changed, for example the charging
current. The ’INC’ and ’DEC’ buttons are used to change the values.
Once a battery pack has been connected, the selected operation
can be started by pressing the ’Start/Enter’ button for 3 seconds.
Providing that the battery is not damaged and correctly connected,
the selected operation will begin. If a problem is encountered, a
warning bleep will sound and a warning message displayed. When
operationing the charger will display the relevant information.
The following program flow chart shows the complete menu struc-
ture of the X-peak for 80 BAL:
8
Programa de las
baterías litio
Programa de las
baterías NiMH
Programa de las
baterías NiCd
Programa de las
baterías de plomo
Programa de la
Memoria
Seleccione el
programa almacenado
Definido por el
usuario del programa
Lixx
de carga rápida
Lixx
MEMORIZAR
NiMh
cíclica
NiCd
cíclica
Lixx carga
Auto./Manual
NiMh carga
NiCd carga
El plomo carga
Guardar
configuración
Programa almacena-
do de carga
Lixx tipo LiPo/Lilo/LiFe
tiempo de detección
Timer seguridad
Carga/descargada
alto
Capacidad de corte
Temperatura
de cierre
Input advertencia
de tensión
Botones y pitidos
NiCd unidad
de carga de altura
NiMh-Höhe
unidad de carga
Lixx
balanceo de carga
Lixx
descargar
NiMh descargar
Manual
NiCd descargar
Auto./Manual
El plomo
descargada
ES
10
ES - Ajuste de los parámetros
Menú para seleccionar los tipos de ba-
terías de litio:
LiFe = 3,3 V; LiIo = 3,6 V; LiPo = 3,7 V
Es fundamental, que el tipo de batería sea
colocada correctamente antes de empie-
zar el proceso, las células se pueden dañar.
El X-Peak 80 BAL está equipado con una
detección automática del número de cé-
lulas de Li-pilas. Con demasiadas descar-
gadas de las células, el resultado de la
medición puede ser erróneo. Este menú,
por lo tanto puede establecer un tiempo
de constante revisión, en el número de se-
rie de Li-células, y corregir si es necesario.
Normalmente, un valor predeterminado
de 15 segundos. Sobre todo la batería de
alta capacidad dura un buen tiempo.
En estos dos menús para las baterías de
NiMH y NiCd está programado. El rango
es entre 5 y 20 mV. Cuanto más alto sea el
valor se establece, al máximo, las baterías,
pero por la sobrecarga de posibles, se re-
duce el tiempo de vida. La configuración
predeterminada es 12 mV para NiCd y 7
mV con NiMH.
En este submenú, una vez que presione
el botón, podrá controlar la temperatura
con la ‚INC‘ / ‚DEC‘. Además, el cierre pue-
de ser especificado. Esta función requiere
un sensor de temperatura. Se tiene que
insertar en el lugar indicado. El conector
de 3 pines en el lado izquierdo del carga-
dor, pero se puede utilizar como un puerto
USB para el PC. El segundo menú se pue-
de determinar si el control de la tempera-
tura o el puerto USB se activa. La pantalla
muestra un puerto USB con discapacidad.
GB - Program flow chart
The screen shows the nominal voltage of
Lithium battery.There are three kinds of Li-
thium battery:
LiFe = 3,3 V; LiIo = 3,6 V; LiPo = 3,7 V
This is very important so you have to check
the battery carefully and set it up correctly.
If it is different from correct value the bat-
tery can explode during charge process.
The X-Peak 80 BAL recognise the cell
count of Lithium battery automatically
at the beginning of charge or discharge
process to avoid from erroneoussetting by
user. But deeply discharged battery can
be perceived incorrectly. To prevent the
error, you can set the time term to verify
the cell count by the processor. Normally,
15 seconds are enough to perceive the cell
count correctly. For the battery of larger
capacity, you may extend the time term.
But if you set the rime term too long for
the battery of smaller capacity, the char-
ge or discharge process can be finished
within the time term with the erroneous
cell count. This may cause the fatal result.
If the processor recognises the cell count
incorrectly at the beginning of charge or
discharge process, you may extend the
time. Otherwise, you had better use with
the default value.
This shows the trigger voltage for automa-
tic charge termination of NiMH and NiCd
battery. The effective value ranges from 5
to 20 mV per cell. If the trigger voltage is
set higher, there is a danger of overchar-
ging the battery; if it is set lower, there is
a possibility of premature termatination.
Please refer the techincal specification of
the battery. (NiCd default: 12 mV, NiMH
default: 7 mV).
In this submenu, the temperature monitor
with the ‚INC‘ /‘ DEC‘ key one, or be swit-
ched off. In addition, the shutdown tem-
perature will be given. For this function
must be inserted, a temperature sensor at
the marked position. The USB function is
not available for this charger.
11
ES - Cálculo de los requisitos de seguridad del
temporizador:
Al cargar las baterías de NiCd o NiMH, dividir la capacidad de
la corriente de carga, el resultado que luego se divide por el
factor 11.9. El resultado final se obtiene el tiempo de carga en
cuestión de minutos.
Ejemplo
• 1.000 mAh / 1,2 A de corriente de carga / factor es 11,9
70 minutos como escenario
• 2.000 mAh / 2,0 A de corriente de carga / factor es 11,9
84 minutos como escenario
• 3.300 mAh / 3,3 A de corriente de carga / factor es 11,9
92 minutos como escenario
GB - Safety Timer Calculations
When charging NiCd or NiMH batteries, divide the battery‘s
rated capacity (mAh) by the charge current (A). And divide the
result by 11.9. Set this number ov minutes in the safety timer
setting. If the charger stops charging at this time limit by any
reason, approx. 140 % if the battery‘s capacity woll have been
delivered to the battery.
For example:
• 1.000 mAh Capacity / 1,2 A Current /
Safety timer setting, divided by 11,9 = 70 minutes
• 2.000 mAh Capacity / 2,0 A Current /
Safety timer setting, divided by 11,9 = 84 minutes
• 3.300 mAh Capacity / 3,3 A Current /
Safety timer setting, divided by 11,9 = 92 minutes
DE
Este menú puede ser un período de espera
entre una decisión y una carga al final de
un ciclo. Marca cuanto el tiempo se enfría
la batería. El rango de ajuste es entre 1 y
60 minutos.
En este ámbito, el máximo de tiempo se
puede configurar para una tarea. Una vez
alcanzado el límite de tiempo, el proceso
se detiene automáticamente.
En ese marco posue la màxima capacidad
para programar. Esta posibilidad aumenta
la seguridad de la carga o descarga, por lo
que no significa que las células se dañan.
Una vez que se alcanza el umbral, el pro-
ceso de carga se finaliza.
Este submenú se puede configurar para
que cada vez que uno de los botones,
emita al final de una operación una señal
acústica.
La batería del coche se controla por el
software para evitar una descarga profun-
da. El punto de corte puede oscilar entre
10,0 V y 11,0 V, y puede ser especificado.
GB
The battery is on the cyclic process of
charge and discharge can often become
warm after charge or discharge period.
The program can insert a time delay to oc-
cur after each charge and discharge pro-
cess to allow the battery adequate time to
cool down before being subjected to the
next procress. The value ranges from 1 to
60 minutes.
When you start a charge procress, the
integral safety timer automatically starts
running at the same time. This is program-
mes to prevent overcharge the battery if it
proves to be faulty, or if the termination
circuit cannot detect the battery full. Ple-
ase refer the statement in below to calcu-
late the time setting.
This program sets the maximum charge
capacity that will be supplied to the batte-
ry during charge. If the deltapeak voltage
is not detected nor the safety timer expi-
red by any reason, this feature will auto-
matically stop the process at the selected
capacity value.
The beep sounds at every time pressing
the buttons to confirm your action. The
beep or melody sounded at various times
during operation to alert different mode
changes. These audible sounds can bo on
or off.
This program monitors the voltage of in-
put DC battery. If the voltage drops below
the value you set the operation forcibly
teriminated to protect the input battery.
12
ES - Almacenan las células de litio
Atención! Con este método de carga,
las células no vienen equilibrado.
Después de Activación con el botón ’Batt-
Type/Stop’‚en el Li-programa de la entrada
en la fase de programación, pulse el botón
‚Start / Enter‘. La pantalla pondrá batería
LiPo, como se ha dicho. Izquierda en la
primera línea muestra el tipo de células
activadas. En la segunda línea, la corriente
de carga que puede variar desde 0,1 a 5,0
A y el voltaje de la celda o el recuento de
células (1-6) a la ‚INC‘ o se programado la
tecla ‚DEC‘ .
Si todos los valores predeterminados es-
tán bien ajustados, o la misma batería se
debe cargar de nuevo como antes, debe
iniciar pulsando el botón Start / Enter „por
lo menos 3 segundos”. La pantalla mu-
estrará para dar continuedad.
Después se muestreará la salida de la pan-
talla de trabajo. Mostrando toda la infor-
mación importante disponible que usted
hizo. El tipo celular y el número (1), tipo
de carga de corriente (2), voltaje de la ba-
tería de tareas (3), tiempo de carga (4) y
la capacidad de carga (5).
Para finalizar el proceso de carga, pulse el
botón „Batt-Type/Stop ‚botón. Sin embar-
go, la batería está totalmente cargada.
GB - Charging of lithium battery
Attention! For this of charging type
the cells are not balanced.
The left side of the first line shows the
type of battery you choose. The value on
the left of the second line of the charger is
current user set. After setting the current
and voltage,press START/ENTER key for
more than 3 seconds to start the process.
(charge current: 0.1-5.0A,voltage:1-5V)
This displays the number of cells you set
up and the processsor detects. „R“shows
the number of cells detected by the char-
ger and“S“is the number of cells set by
you at the previous screen. If both num-
bers are identical you can start charging
by press START/ENTER button.If not,press
BATT TYPE/STOP button to go back to pre-
vious screen to carefully check the number
of cells of the battery pack before going
ahead.
This screen shows the real-time status
during charge process. Press BATT TYPE/
STOP key once to stop the charge process.
1 Number of cell
2 Charging time
3 Charging current
4 Battery voltage
5 Charged capacity
1
2
3
4
5
Lithium
13
ES - Las células de litio con
balanceador de carga
Con las células de lítio es necesario el uso
de balanceadores para la carga y descar-
ga de las células. El X-Peak 80 BAL posue
un equilibrador integrado y no necesita
un equilibrador de puerto conectado a la
batería.
Es como se muestra en la pantalla. El pro-
ceso de programación es el mismo que se
describió anteriormente. Con el ‚INC‘ o la
carga de la ‚clave DEC‘ cuenta actual y se
puede establecer la celda.
Si todos los valores predeterminados es-
tán bien ajustados, o la misma batería se
debe cargar de nuevo como antes, debe
iniciar pulsando el botón Start / Enter „por
lo menos 3 segundos”. La pantalla mu-
estrará para dar continuedad.
Después se muestreará la salida de la pan-
talla de trabajo. Mostrando toda la infor-
mación importante disponible que usted
hizo. El tipo celular y el número (1), tipo
de carga de corriente (2), voltaje de la ba-
tería de tareas (3), tiempo de carga (4) y
la capacidad de carga (5).
Para detener una carga, pulsar el botón
‚Batt-Type/Stop‘. Sin embargo, la batería
está totalmente cargada.
GB - Charging Lithium battery in the
balance mode
This function is for balancing the volta-
ge of Lithium-polymer battery cells while
charging.In the balance mode,the battery
needs to have a balance lead to connect
to the individual port at the right side of
the charger.And you need to connect the
battery‘s output plug to the output of
charger. Charging in this mode is different
from the normal modes,because the built-
in processor monitors voltage of individu-
al cell and control input current fed into
each cell to normalize the voltage.
The value on the left side of the second
lines sets the charge current.The value on
the right side of the second lines sets the
battery pack‘s voltage.After setting cur-
rent and voltage,press START/ENTER for
more than 3 seconds to start the process.
This displays the number of cells you set
up and the processsor detects.“R“shows
the number of cells detected by the char-
ger and“S“is the number of cells set by
you at the previous screen. If both num-
bers are identical you can start charging
by press START/ENTER button.If not,press
BATT TYPE/STOP button to go back to pre-
vious screen to carefully check the number
of cells of the battery pack before going
ahead.
This screen shows the real-time status
during charge process. Press BATT TYPE/
STOP key once to stop the charge process.
1 Number of cell
2 Charging time
3 Charging current
4 Supplied capacity
5 Current voltage battery
1
2
3
4
5
ES - Diagrama de conexión
La ilustración muestra la configuración el puerto equilibrador. El
X-Peak EVO 3 Plus, viene con un puerto equilibrador equipado,
el sistema de conector Graupner . Si, la batería está equipada con
un estándar diferente, usar uno adaptador adecuado de nuestra
gama.
GB - Individual cell connection diagram
The illustration opposite shows the configuration of the balan-
cer connector. The charger is provided with a balancer port after
Graupner connector system. Your battery should be provided with
a different norm, use suitable adapters from our range.
Lithium
14
ES - El modo de carga rápida
Este modo de carga rápida para las ba-
terías de litio se usa para evitar innecesa-
riamente larga espera para el final de la
carga. Durante el procedimiento de car-
ga normal, se toma el segundo cargo a
la sección de carga, la constante tensión
de carga tarda mucho tiempo, y no hace
nada para aumentar la capacidad. En el
modo de carga rápida de la última sección
se reduce, el proceso de carga y termina
más rápidamente, pero la batería no está
del todo completa.
Una vez que este menú se ha estableci-
do los programas de carga de litio con la
‚INC‘-clave, aparecerá en la pantalla. En
este menú en la forma ya descrita, apare-
cerá la corriente de carga y el número de
células para ser programado.
Se muestran los valores de la misma carga
(número de células (1), la tensión de carga
actual (2), corriente de la batería (3), el
modo de carga (4); transcurrido el tiem-
po de carga y hasta ahora la capacidad de
carga (5)) como las operaciones de car-
ga de litio y otros representados. Con el
botón Start / Enter ‚en el proceso de carga
se ha iniciado. Con el botón „Batt-Type/
Stop, la carga puede ser interrumpida en
cualquier momento.
GB - Fast charging of Lithium battery
Charging current will become lower when
it progress to the end of charging.A speci-
fic CV process will be reduced to end the
charging process earlier.In fact,the char-
ging current will goes to 1/5 when the
charging process comes to 1/10.Charging
capacity will be a little smaller than normal
charging,but charging time will be shor-
tened accordingly.
You can set up the charging current and
voltage of the battery pack Press START/
ENTER key to display voltage confirmati-
on.Then press START/ENTER key again to
confirm and begin to charge.
This screen shows the real-time status
of“fast charging“.Press BATT TYPE/STOP
key once to stop the charge process
1 Number of cell
2 Elapsed time
3 Charge current
4 Supplied capacity
5 Current voltage battery
12
3
4
5
Lithium
ES - Modo de almacenamiento
de carga
Este modo de carga para las baterías de
litio se usa para protegerse de un alma-
cenamiento prolongado, por ejemplo
para las vacaciones de invierno para car-
gar de forma óptima. Por eso, se recomi-
enda este propósito que la batería use un
voltaje de la célula de 3,75 V a Lilo, 3.85V
para LiPo y 3.30 V, para la vida de la carga,
le sugerimos estés voltajes para el periodo
de invierno.
Una vez que este menú se ha estableci-
do los programas de carga de litio con
la ‚INC‘-clave, aparecerá en la pantalla.
n este menú, la forma ya descrita, el nú-
mero corriente de carga y el de las células
será programado.
En la pantalla de carga de trabajo se pre-
sentan todos los valores para la carga de
litio y otros procesos. Con el botón Start /
Enter el proceso de carga se ha iniciado.
Con el botón „Batt-Type/Stop, el alma-
cenaje de la carga se puede interrumpir
en cualquier momento.
GB - Storage control of
Lithium battery
This function is for charging/discharging
batteries which are not used at once.This
program is designed for charging or di-
scharging of batteries of specific original
state.They are classified by types:3.75V
LiIo,3.85V LiPo and 3.3V LiFe.The pro-
gram will begin to discharge if the original
state of the battery exceeds the voltage
level of storage
At this screen,you can set up the cur-
rent and voltage of the battery pack.
Charging and discharging will make
the batteries come to the voltage level
of“storage“state.
This screen shows the real-time status
charging.Press BATT TYPE/STOP key once
to stop the charge process.
1 Number of cell
2 Elapsed time
3 Charge or discharge current
4 Supplied capacity
5 Current voltage battery
1
2
3
4
5
15
LithiumLithium
ES - Lithium Zellen entladen
Con el X-Peak 3 Plus EVO también pue-
de baterías de litio son dados de alta, por
ejemplo determinar la capacidad residual
después de la operación.
Una vez que el menú correspondiente se
ha activado en varias ocasiones se descri-
be la forma de descarga, y también se
pueden especificar el número de células.
Con el botón „Batt-Type/Stop, la carga se
interrumpe en cualquier momento Con el
botón Start / Enter, el proceso de descarga
se inicia.
El trabajo muestra la tasa de aprobación
de la gestión actual (número de células
(1), el modo de carga de corriente (2),
voltaje de la batería actual de descarga
(3); el tiempo de descarga transcurrido
(4) y capacidad de descarga hasta el mo-
mento (5)) al igual que se muestra otras
operaciones de lítio.
GB - Discharging of Lithium battery
The value of discharge current on the left
can not exceed 1C,and the value on the
right can not be under the voltage recom-
mended by the manufacturer to avoid
deep discharging.Press START/ENTER for
more than 3 seconds to start charging.
This shows the real-time status of
discharging,you can press BATT TYPE/
STOP key to stop discharging.
1 Number of cell
2 Elapsed time
3 Discharging current
4 Battery voltage
5 Discharged capacity
ES - Encuadramiento de carga y
descarga con la función de
equilibrador
Tanto durante la carga y descarga de la
batería de litio, el X-Peak 80 BAL cubre
el uso de balance en la función. Esto
requiere una conexión de la batería al
puerto equilibrador del cargador. Lue-
go, el procesador controla las células
individuales, que trata de aproximar
los niveles de tensión. Si la tensión de
una o más células anormales se cam-
bia durante una operación, el cargador
interrumpe el proceso actual con un
mensaje de error. La causa general es
que una célula puede estar defectuosa
o para buscar una unión de soldadura
o conexión impropia.
Esta pantalla aparece cu-
ando se detecta el soft-
ware a una celda con la
baja tensión . El botón
„INC“ puede activar otra
pantalla en la que se mu-
estran las tensiones de las
células individuales.
En el ejemplo, 4. La célula
tiene un nivel de tensión
demasiado baja
GB - Voltage balancing and
monitoring in the
discharge process
The processor monitors voltage of each
cell when the battery packs are during
its“storage“and „discharging“process.
To achieve this feature,plug each bat-
tery to the charger individually.If volta-
ge of any cell is abnormal,B6 will show
error message and terminate the pro-
gram forcibly. So if there is battery da-
mage or disconnection,you can see the
error message and press INC to know
which cell is damaged.
The processor detects vol-
tage of one cell is too low.
The 4th cell was damaged.
The value of voltage may
be zero if disconnection
occurs.
1
2
3
4
5
16
1
2
3
4
5
ES - Níquel células de carga
Esta función se utiliza para cargar las
baterías de NiMH o NiCd. Aquí hay un
modo automático y un modo manual. En
el modo ‚Aut‘, por razones de seguridad,
sólo se pretende el límite superior a la cor-
riente de carga. El procesador determina
teniendo en cuenta este valor, la corriente
de carga óptimizada. Establecer el límite
para que no se dañen las células, porque
podría suceder que en una célula baja de
capacidad del procesador, no aguentara la
corriente de carga.
En el modo manual („Man“), los flujos de
corriente de carga, el programa se puede
programar con las teclas ‚INC‘ o la tecla
‚DEC‘.
Todas las operaciones de programación y
la visualización de los valores de carga se
muestreará en la pantalla de trabajo cor-
respondente exactamente con los en el
modo de litio. Es importante saber: el
cambio de modo („Aut“ a „Man“ o vice-
versa) se realiza pulsando simultáneamen-
te las teclas „INC“ y el botón de ‚DEC‘,
que aparecen en el modo activo actual,
que se encuentra en la línea superior.
Con el botón „Batt-Type/Stop, la carga se
puede interrumpir en cualquier momento.
Recuerde que la batería no está comple-
tamente cargada. El final de la carga se
detecta en la pantalla y una señal acústica.
1Tipo de batería
2Tiempo transcurrido
3Corriente de carga
4Voltaje de la batería
5Capacidad de carga
GB - Charging of NiCd/NiMH battery
This program is for charging and dischar-
ging of NiCd/NiMH batteries associated
with R/C models applications.You can
press START/ENTER key to make it blink
and then INC or DEC to change the pa-
rameter value.Press START/ENTER key to
store the value.
This program charge the battery using the
current you set up.In the „auto“state,you
should set up the upper limit of the char-
ge current to avoid damage by excessive
feeding current.Some batteries of low re-
sistance and capacity can lead to higher
current in the“auto“charging mode.But in
the manual mode,it will charge with the
current you set. You can make it blink in
the current field and press INC and DEC at
the same time to switch mode.
The screen shows the real-time status.
Press BATT TYPE/STOP key to end the pro-
gram.The sound will emitted to indicates
the end of program.
1 Battery type
2 Elapsed time
3 Charge current
4 Battery voltage
5 Charged capacity
NiMH/NiCd
17
NiMH/NiCd
1
2
3
4
5
ES - Níquel células de alta
Está función se utiliza para la descarga di-
recta de las baterías de NiMH o NiCd. La
programación incluye el establecimiento
de la corriente de descarga en el rango de
0,1 a 1,0 A, y la especificación de voltaje
de carga del circuito de la batería (ajustab-
le de 0,1 a 25,0 V).
Después de activar esta función, se mu-
estra en la pantalla. Si, hay un buen des-
empeño se ajusta al voltaje de la descarga
con la ‚INC‘ o el botón de ‚DEC‘, la de-
scarga con el „Inicio / Enter ‚se activará (3
segundos).
La pantalla de trabajo se muestra todos
los valores del proceso de aprobación de
la gestión actual. Con la tecla ‚Batt-Type/
Stop‘ , la descarga puede ser interrumpida
en cualquier momento. Recuerde que la
batería no se descarga completamente. El
proceso final se informa en la pantalla y
con una señal acústica.
1Tipo de batería
2Tiempo transcurrido
3Corriente de carga
4Voltaje de la batería
5Capacidad de carga
GB - Discharge of NiCd/NiMH battery
Set charge current on the left and the final
voltage on the right. Range of the charge
current is 0.1-1.0A;range of final voltage
is 0.1-25.0V. Press START/ENTER key for
more than 3 seconds to start the program.
The screen indicates the discharging sta-
te.You can press START/ENTER key to al-
ter discharge current.Press START/ENTER
again to store the value.Press BATT TYPE/
STOP key to stop discharging.The emitted
sound alerts the end of discharging
1 Battery type
2 Elapsed time
3 Discharge current
4 Battery voltage
5 Discharged capacity
18
1
2
3
4
5
ES - Procesos cíclicos
Esta función se utiliza para NiMH total-
mente nuevo o pilas NiCd „para cargar,
sino también las baterías para un uso pro-
longado o en el periodo de invierno para
traer de vuelta hasta su máxima capaci-
dad. En este menú, se dan el orden de las
secuencias (DCHG> CHG o CHG> DCHG).
Es posible determinar si un ciclo debe co-
menzar con una descarga o carga. Esto
también determinará si hay después de los
ciclos una descarga la batería. Además, el
número de ciclos se dan en 1 a 5 en la
configuración básica. Es posible que la
persona que utilize el aparato pueda es-
pecificar una fase de pausa.
Después de activar esta función, se mues-
tra en la pantalla. Puede ser establecido el
orden deseado y el número de ciclos, y el
poder con el ‚INC‘ o el botón de ‚DEC‘, el
ciclo de uso debe ser „Inicio / Enter para
empezar (3 segundos).
La pantalla se presenta todos los valores
actuales del proceso cíclico. En la imagen
de arriba es solamente una
descarga activa (D> C).
1Tipo de batería
2Tiempo transcurrido
3Corriente de carga
4Voltaje de la batería
5Capacidad de carga
El proceso puede parar pulsando la tecla
‚Batt-Type/Stop‘ en cualquier momento. El
final del ciclo se indica mediante una señal
acústica.
Tras el final de todo el proceso, los egresa-
dos y su capacidad de carga se muestra.
Por Presione la tecla ‚INC‘ o la tecla ‚DEC‘,
el resultado de los ciclos individuales se
muestran.
GB - Charge/discharge and discharge/
charge cycle of NiCd/NiMH
battery
You can set up sequence on the left and
the number of cycles on the right.You can
balance,refresh and bread-in the battery
with this function.You can set a tempora-
ry cool-off procedure in the use‘s setting.
Range of the cycle number is 1-5.
Press BATT TYPE/STOP key to stop
program,you can press START/ ENTER key
to alter charge current.The sound indica-
tes the end of program.
When it approaches to the end,you can
see the capacity of the battery being char-
ged or discharged.You can press INC or
DEC key to display result of each cycle.
1 Number of cell
2 Elapsed time
3 Charge or discharge current
4 Battery voltage
5 Charge or discharge capacity
NiMH/NiCd
19
Pb
1
2
3
4
5
ES - Células de carga de plomo
Con este punto del programa se pueden
tratar las baterías de plomo ácido. Esta ba-
tería puede con una tensión de 2 a 20 V
(1 a 10 células) tanto de carga y descarga.
Las baterías de plomo ácido son los mejo-
res carga con una corriente de 1 / 10 de
la capacidad de la batería, se carga rápi-
damente.
Después de habilitar esta característica se
pueden especificar, la intensidad de la cor-
riente y el número de células. El proceso
de carga se inicia con el ‚Start / Enter‘ (3
segundos).
En la pantalla de trabajo se muestran to-
dos los parámetros habituales correspon-
dientes del proceso. Con el tipo „Batt /
STOP „, el cargo será interrumpido en cu-
alquier momento. Recuerde que la batería
puede no estar ser plenamente cargada.
El proceso final se informa en la pantalla y
una señal acústica.
1Tipo de batería
2Tiempo transcurrido
3Corriente de carga
4Voltaje de la batería
5Capacidad de carga.
GB - Charging of the Pb battery
This program is only suitable for charging
Pb(lead-acid)battery with nominal voltage
from 2to 20V.Pb(lead-acid)battery is com-
pletely different from NiCd/NiMh battery.
These batteries can only deliver current
lower in comparison to their capacity.The
same restriction applies to the charging
process.Consequently,the optimum char-
ge current can only be 1/10 of the capa-
city. Pb battery can not be used for fast-
charging,please follow the instructions
provided by the battery manufacturer.
You can press START/ENTER key to make
it blink and alter the value of parameters
using INC or DEC key,press START/ENTER
key to store the value.
Set up the charge current on the left and
nominal voltage on the right Range of cur-
rent is 0.1-5.0A,the voltage should match
the battery being charged.Press START/
ENTER key for more than 3 seconds to
start charging.
The screen displays the real-time dischar-
ging status.Press START/ ENTER key to al-
ter discharge current.Press START/ENTER
key again to store the parameter value
you set.Press BATT TYPE/STOP key to end
the program.
1 Battery type
2 Elapsed time
3 Charge current
4 Battery voltage
5 Charge capacity
20
1
2
3
4
5
ES - Células de alta de plomo
Este menú está habilitado para usar las ba-
terías de plomo-ácido. Después de poner
esta función, se muestreará en la pantalla.
La intensidad de la corriente debe de te-
ner el rango de 0,1 A a 1,0 A y el número
de células a ser programado.
Para la corriente de descarga y el número
de células con el ‚INC‘ o juego de llaves
‚DEC‘, comenza con el botón Start / Enter
‚(3 segundos). La pantalla de trabajo se
muestran todos los parámetros habitua-
les de descarga. Con el botón „Batt-Type/
Stop ‚, la descarga puede ser interrumpida
en cualquier momento. Recuerde que la
batería no se descarga completamente. El
proceso final se informa en la pantalla y
una señal acústica.
Las baterías de plomo no tienen efecto
memoria, no tienen procesos de forma-
ción por ciclos de carga / descarga. Este
modo, PB-Modo, no está disponible.
1Tipo de batería
2Tiempo transcurrido
3Corriente de carga
4Voltaje de la batería
5Capacidad de carga.
GB - Discharging of the Pb battery
Set up the charge current on the left and
nominal voltage on the right. Range of
discharge current is 0.1-5.0A,the voltage
should match the battery being charged.
Press START/ENTER key for more than 3
seconds to start charging.
The screen displays the real-time dischar-
ging status.Press START/ ENTER key to al-
ter discharge current.Press START/ENTER
key again to store the parameter value
you set.Press BATT TYPE/STOP key to end
the program.
1Battery type
2Elapsed time
3Discharge current
4Battery voltage
5Discharged capacity
Pb
21
ES - Administrar las posiciones
de memoria
El cargador X-Peak 80 BAL 5 representa los
almacenes de datos, en los que, cada uno
bajo una constante un número de ubicaci-
ón (01 a 05) los datos de una batería que
es utilizada a menudo, se almacena en
la memoria del programa. Muy cómodo,
estos datos pueden ser seleccionados, los
parámetros para el proceso están dispo-
nibles de inmediato, un programa. La ge-
stión de la memoria tiene dos funciones.
Se pueden almacenar ambos conjuntos de
datos SAVE DATA(GUARDAR DATOS)
Asimismo, los datos de carga LOAD
DATA(carga de datos).
Ahorro de batería de datos
Después de activar esta función, la pantal-
la se muestra la función activada.
Manteniendo el botón Start / Enter se
puede acceder a la configuración.
En el primer nivel, por el método conoci-
do, los parámetros de la batería.
En el segundo nivel de la corriente de
carga para una operación manual, ni a la
percepción actual límite superior para un
proceso de configuración automática.
La siguiente pantalla muestra el mismo ar-
gumento puede ser programado para una
descarga.
Un nivel seguirá el programa de la confi-
guración de los procesos cíclicos.
Después de todos los parámetros estén
incluidos en la batería, presionar la tecla
‚Start / Enter „ durante al menos 3 se-
gundos. Por lo tanto, el proceso de alma-
cenamiento se dispara. En la pantalla, las
letras, en SAVE „Guardar“ se muestra.
Con la tecla ‚DEC‘ vuelve entrar en el
menú en la función anterior.
GB - Data storage program
For your convenience, X-Peak 80 BAL has
a data storage and load program.It can
store five battery data representing the
respective specifications of batteries.You
can call back the data when charging or
discharging without setting up the pro-
gram again.Press START/ENTER key to
make it blink, and use INC or DEC to set
up the parameter.
Data storage
Setting of the parameter in the screen
will not affect the charge and discharge
process.They just present the specification
of the battery. The example is NiMH bat-
tery pack,including 12 cells,the capacity is
3000mAh.
Set up the charge current in the manual
mode,or current limit in the auto mode.
Press INC and DEC key simultaneously to
make the current field blink to switch the
charge mode.
Set up the discharge current and final vol-
tage.
Set up the charge/discharge sequence and
cycle number.
Saving the data
22
ES - Batería de datos de carga
Con esta opción, usted puede guardar los
datos de una batería en una carga de me-
moria.
Después de activar esta función, aparece
en la pantalla. Pulsando el botón Start ‚/
Enter ‚para alcanzar el nivel de selección.
En el instante siguiente, el espacio de-
seado se puede determinar. Después de
la selección, el Inicio / Intro „durante 3
segundos son operados. Estos datos son
cargados.
En la pantalla aparecerá el cambio.
GB - Load data program
This program is to load the data stored at
the“save data“program.Press START/EN-
TER key to make the data field blink and
press INC or DEC for more than 3 seconds
to load the data.
Choose the data number you want to call
back.The data you want to call back will
be displayed.
Loading the data.
23
ES - Pantalla de otros valores
Con esta opción, los datos de la batería se
pueden caragar desde una memoria.
Muestra el voltaje de una batería al final
de una tarea.
Visualización de las preferencias concedi-
das por el máximo. Capacidad.
Visualización de las preferencias concedi-
das por el máximo. El tiempo de proce-
samiento..
Asignación de la USB / Puertos temperatu-
ra. La función USB no està disponible
para este cargador.
Mostrar la temperatura de la batería, sólo
cuando se utiliza el sensor de temperatura
De tensión de entrada de visualización
Visualización de tensiones de los elemen-
tos individuales de una batería de litio
GB - Various information in
the program
You can inquire variors information on
the LCD screen during the charging and
discharging process. Press DEC key, the
charger will display user‘s setting. You can
press INC key to monitor voltage of each
cell while the battery is connected with
each port of the charger
It comes to the final voltage when the pro-
gram ended.
3-pin connector is selected to be the USB
port.
For this charger the USB function is
not available.
The external temperature is displayed
when the temperature probe is used.
Present input voltage
The battery is connected with each port
through cable; you can check voltage of
each cell in the battery pack. When the
cable is connected with the ports on the
right of the charger, the program will
display voltage of up to 6 batteries. The
battery pack needs an output connector
connected with each cell.

Other manuals for X-Peak 80 BAL Pult Edition

1

Other Jamara Batteries Charger manuals

Jamara Lipo 20 User manual

Jamara

Jamara Lipo 20 User manual

Jamara X-Peak Touch USB 2L User manual

Jamara

Jamara X-Peak Touch USB 2L User manual

Jamara Ride-on Strong Bull User manual

Jamara

Jamara Ride-on Strong Bull User manual

Jamara Lipo 20 User manual

Jamara

Jamara Lipo 20 User manual

Jamara X-Peak Touch USB 2L User manual

Jamara

Jamara X-Peak Touch USB 2L User manual

Jamara X-Peak 100 Touch Dual USB User manual

Jamara

Jamara X-Peak 100 Touch Dual USB User manual

Jamara LiPo 2S User manual

Jamara

Jamara LiPo 2S User manual

Jamara Lipo 20 Charger 2S User manual

Jamara

Jamara Lipo 20 Charger 2S User manual

Jamara X-Peak 80 BAL Pult Edition User manual

Jamara

Jamara X-Peak 80 BAL Pult Edition User manual

Jamara Lipo 20 User manual

Jamara

Jamara Lipo 20 User manual

Jamara LiPo 2S User manual

Jamara

Jamara LiPo 2S User manual

Jamara X-Peak Touch USB 2L User manual

Jamara

Jamara X-Peak Touch USB 2L User manual

Jamara Lipo 20 User manual

Jamara

Jamara Lipo 20 User manual

Jamara X-Peak 80 BAL V2 User manual

Jamara

Jamara X-Peak 80 BAL V2 User manual

Jamara Lipo 20 User manual

Jamara

Jamara Lipo 20 User manual

Jamara Lipo 20 User manual

Jamara

Jamara Lipo 20 User manual

Jamara Lipo 20 413117 User manual

Jamara

Jamara Lipo 20 413117 User manual

Jamara X-Peak 80 BAL V2 User manual

Jamara

Jamara X-Peak 80 BAL V2 User manual

Jamara X-Peak 100 Touch Dual USB User manual

Jamara

Jamara X-Peak 100 Touch Dual USB User manual

Jamara Lipo 20 Charger 2S/3S User manual

Jamara

Jamara Lipo 20 Charger 2S/3S User manual

Jamara Ecological Wind User manual

Jamara

Jamara Ecological Wind User manual

Jamara Lipo 20 User manual

Jamara

Jamara Lipo 20 User manual

Jamara X-Peak 80 BAL V2 User manual

Jamara

Jamara X-Peak 80 BAL V2 User manual

Jamara X-Peak 90 Touch User manual

Jamara

Jamara X-Peak 90 Touch User manual

Popular Batteries Charger manuals by other brands

Schumacher SP1356 owner's manual

Schumacher

Schumacher SP1356 owner's manual

Ryobi AM00180 user manual

Ryobi

Ryobi AM00180 user manual

Grin Technologies Cycle Satiator Universal charger

Grin Technologies

Grin Technologies Cycle Satiator Universal charger

Synthes Universal Battery Charger II user manual

Synthes

Synthes Universal Battery Charger II user manual

AMETEK/PRESTOLITE POWER AC1000 Control owner's manual

AMETEK/PRESTOLITE POWER

AMETEK/PRESTOLITE POWER AC1000 Control owner's manual

Expion360 EX-85ASC user manual

Expion360

Expion360 EX-85ASC user manual

Horizon Hobby SPEKTRUM S1400 G2 instruction manual

Horizon Hobby

Horizon Hobby SPEKTRUM S1400 G2 instruction manual

ISDT FD-200 user guide

ISDT

ISDT FD-200 user guide

Cotek BP-1205 user manual

Cotek

Cotek BP-1205 user manual

Xenteq Profline TBC 600 user manual

Xenteq

Xenteq Profline TBC 600 user manual

Nokia Fatboy DT-901 user guide

Nokia

Nokia Fatboy DT-901 user guide

LEGRAND 0 570 10 user guide

LEGRAND

LEGRAND 0 570 10 user guide

Draper C18UB instruction manual

Draper

Draper C18UB instruction manual

Schumacher 520A-PE owner's manual

Schumacher

Schumacher 520A-PE owner's manual

Siegen tools S0547 instruction manual

Siegen tools

Siegen tools S0547 instruction manual

Nokia DT-903 user guide

Nokia

Nokia DT-903 user guide

Scosche BASE3 3IN1 manual

Scosche

Scosche BASE3 3IN1 manual

Draper BCD18A Original instructions

Draper

Draper BCD18A Original instructions

manuals.online logo
manuals.online logoBrands
  • About & Mission
  • Contact us
  • Privacy Policy
  • Terms and Conditions

Copyright 2025 Manuals.Online. All Rights Reserved.