manuals.online logo
Brands
  1. Home
  2. •
  3. Brands
  4. •
  5. Jamara
  6. •
  7. Motorized Toy Car
  8. •
  9. Jamara Rupter User manual

Jamara Rupter User manual

No. 41 0009, Rupter
No. 41 0010, Cubic
Rupter | Cubic
2,4 GHz
DE - Gebrauchsanleitung
GB - Instruction
FR - Notice
IT - Istruzione
ES - Instrucciones
44/16
DE - Allgemeine Hinweise
Jamara e. K. übernimmt keine Haftung für Schäden, die an dem Produkt selbst oder durch dieses
entstehen, sofern diese auf falsche Bedienung oder Handhabungsfehler zurückzuführen sind. Der
Kunde allein trägt die volle Verantwortung für die richtige Bedienung und Handhabung; dies umfasst
insbesondere die Montage, den Ladevorgang, die Verwendung bis hin zur Wahl des Einsatzberei-
ches. Bitte beachten Sie hierzu die Bedienungs- und Gebrauchsanleitung, diese enthält wichtige
Informationen und Warnhinweise.
GB - General information
Jamara e.K. is not liable for any damage caused to the product itself or by it, if this is due to impro-
per operation or handling errors. The customer alone bears the full responsibility for the proper use
and handling, including in particular, assembling, charging and using the model, and selecting the
area in which to use it. Please refer to the operating and user instructions, which contain important
information and warnings.
FR - Remarques générales
résultant d’une utilisation non appropriée. Seul le client est responsable concernant la mise en
oeuvre et l’utilisation conforme du matériel; cela va de l’assemblage, en passant par la charge des
accus et allant jusqu’au choix du lieu d’utilisation. Pour cela, veillez à lire attentivement la notice
d’utilisation, elle contient d’importantes informations ainsi que les consignes de sécurité.
IT - Informazioni generali
Jamara e. K. non e´responsabile per danni, sostenute al prodotto stesso o attraverso questo, dovuti
ad una gestione non corretta del articolo. Solo il cliente si assume la piena responsabilità per la
manutenzione e l´utilizzo corretto dello stesso; questo include il montaggio, la ricarica, l´utilizzo, 
no alla scelta della aerea di applicazione. Si prega di notare e rispettare le istruzioni d´uso, questi
contengono informazioni e avvertimenti molto importanti.
ES - Información general
Jamara K. no se hace responsable de los daños causados al producto en sí o por medio de esto,
a menos que esto se debe al mal funcionamiento o errores de manejo. El cliente solo tiene la re-
sponsabilidad completa para el uso y manejo adecuado, incluyendo, sin limitaciones, el montaje,
el proceso de carga, el uso de hasta la elección de la zona de aplicación. Por favor, consulte las
instrucciones de uso y funcionamiento, contiene información y avisos importantes.
DE - Konformitätserklärung
Hiermit erklärt JAMARA e.K., dass sich das Modell‚ “Rupter, No. 410009, Cubic, No. 410010“ in
Übereinstimmung mit den grundlegenden Anforderungen und den anderen relevanten Vorschriften
der Richtlinien 2014/53/EU, 2011/65/EU und 2009/48/EG bendet.
Weitere Informationen nden Sie auch unter: www.jamara-shop.com/Konformitaet
GB - Certicate of Conformity
JAMARA e.K. hereby declares that the model “Rupter, No. 410009, Cubic, No. 410010“ follow the
regulations and requirements as well as any ther relivant directives of the EEC directive 2014/53/EU,
2011/65/EU and 2009/48/EC.
Further information can also be found at: www.jamara-shop.com/Conformity
FR - Déclaration de conformité
Par la présente, la société Jamara e.K. déclare que ce modèle “Rupter, No. 410009, Cubic, No.
410010“ est conforme en tous points avec les textes de la directive de l’union européenne sous les
directives 2014/53/EU, 2011/65/EU et 2009/48/CE.
Vos pourrez également trouver des informations sur notre site Internet:
www.jamara-shop.com/Conformity
IT - Dichiarazione di conformita’
Jamara e. K. dichiara qui di seguito che il modello “Rupter, No. 410009, Cubic, No. 410010“ è in li-
nea con le norme ed altre rilevanti disposizioni comunitarie 2014/53/EU, 2011/65/EU e 2009/48/CE.
Piu informazioni: www.jamara-shop.com/Conformity
ES - Declaración de conformidad
Por medio de la presente, la empresa Jamara e. K. declara que el modelo “Rupter, No. 410009,
Cubic, No. 410010“ de conformidad con los requisitos esenciales y otras disposiciones pertinentes
de la Directiva 2014/53/EU, 2011/65/EU y 2009/48/CE se encuentra.
Encontrará más información en: www.jamara-shop.com/Conformity
DE - Entsorgungshinweise
Bitte sorgen Sie für eine fachgerechte, den gesetzlichen Vorschriften entsprechende
Entsorgung der Batterien und/oder der Akkus. Bitte werfen Sie nur entladene Akkus in
die Sammelboxen beim Handel oder den Kommunen.
GB - Disposal instructions
Please ensure that you dispose of the batteries and/or battery pack in an environmen-
tally correct and legal way. Only dispose of  at battery packs in the collection boxes in
your local shops or authorities.
FR - Consignes de recyclage
Veuillez respecter les consignes de recyclage des accus et/ou piles. Veuillez ne jeter que des piles/
accus vides dans les bacs de collecte que vous trouverez dans différents commerces ou au centre
de recyclage de votre commune.
IT - Istruzioni per lo smaltimento
Si prega di assicurarsi che le batterie (ricaricabili e non) siano smaltite a regola d‘arte, conforme-
mente alla normativa vigente. Gettare soltanto batterie scariche negli appositi contenitori presso i ri-
venditori o gli enti comunali (in genere le batterie sono scariche quando il modello non funziona più).
ES - Notas sobre el reciclado
Respete la normativa vigente sobre la eliminación de residuos, especialmente sobre baterías y
pilas. Lleve a reciclar las baterías solo si están descargadas
DE
Geeignet für Kinder ab 8 Jahren.
Achtung: Für Kinder unter 36 Monaten nicht geeignet. ERSTICKUNGSGEFAHR.
Enthält verschluckbare Kleinteile. Von Kleinkindern unbedingt fernhalten.
GB
Suitable for children over 8 years.
Warning: Not suitable for children under 36 months. RISK OF SUFFOCATION!
Contains small parts which can be swallowed. Keep away necessarily from children.
FR
Adapté pour des enfants à partir de 8 ans.
Attention: Ne convient pas aux enfants de moins de 36 mois. DANGER D‘ETOUFFEMENT!
Contient de petites pièces facilement avalables. Garder lion nécessairement enfants.
IT
Consigliato per bambini superiori ai 8 anni!
Attenzione: Non adattato ai bambini inferioti ai 36 mesi. PERICOLO DI SOFFOCAMENTO!
Contiene pezzi piccoli. Tenere lontano assolutamente dei bambini.
ES
Apto para niños mayores de 8 años.
Atención: No es recomendable para los niños menores de 36 meses. ASFIXIA!
Contiene piezas pequeñas. Mantenga necesariamente lejosde los niños.
2
DE - Achtung!
Vor dem Betrieb:
Erst das Modell und dann den Sender einschalten.
Bei Beendigung:
Erst das Modell und dann den Sender ausschalten.
●Betreiben Sie Ihr Modell niemals in Distanzen die außer-
halb Ihrer Sichtweite liegen. Sowohl die max. Sichtweite
als auch die max. Reichweite Ihres Modells hängen von
vielen Faktoren wie Witterung, Einsatzort und vorhande-
nen Störfrequenzen ab. Führen Sie deshalb vor jedem Ein-
satz mit einer zweiten Person, die das Modell während des
Tests sicher xiert hält, einen Reichweitentest durch und
prüfen Sie auch wie sich das Modell während des Betriebs
bei einem Signalausfall wie z.B. bei leeren Senderbatteri-
en oder ausgeschaltetem bzw. ausgefallenem Sender ver-
hält.
GB - Attention!
Before operating:
Switch the model on rst then the transmitter.
When nished:
First switch off the model then the transmitter.
● Never operate your model beyond sight. Both the
maximum visibility as well as the max. range of your
model will depend on many factors such as weather,
location and interfering frequencies. Therefore, before
each use perform a range test with a second person
securely holding the model and also check how the
model reacts if there is a signal failure e.g. when empty
transmitter batteries are installed.
FR - Attention!
Avant l’utilisation:
Allumez en premier modèle puis seulement votre l’émetteur.
Après utilisation:
Arrêtez le modèle en premier puis votre radiocommande.
●N’utilisez jamais le modèle à une distance hors de votre
visibilité. La visibilité maximale ainsi que la portée maxi-
male dépendent de plusieurs facteurs tels que le temps, le
lieu d’utilisation et les présentes fréquences pertur-
batrices. Pour cela, avant chaque usage, veuillez effectuer
un test de visibilité et de portée avec une deuxième
personne qui tient le modèle xé et vériez les réactions
du modèle en usage en cas de pertes de signal due par
exemple à des piles usées ou à un émetteur éteint.
IT - Attenzione!
Prima dell‘uso:
Accendete prima il modello e poi la trasmittente.
Dopo l‘uso:
Spegnere prima il modello e poi la trasmittente.
●Non utilizzare il suo modello fuori della distanzia di vista.
Sia la visibilità come la portata massima del vostro
modello dipendono da molti fattori, come il tempo,
disturbo di frequenza e il luogo di utilizzo. Eseguire un
test prima di ogni utilizzo del modello con una seconda
persona che tiene ssato il modello. Con questa
procedura potete testare come reagisce il modello
durante la perdita del segnale causato per esempio da una
batterie scarica oppure la radio spenta.
ES - ¡Atención!
Antes del uso:
Encender primero el modelo, y después la emisora.
Después del uso:
Apagar primero el modelo, y después la emisora.
●No utilizar su modelo fuera de la distancias de visibilidad.
Tanto la visibilidad como la capacidad máxima de su
modelo depende de muchos factores, tales como el
tiempo, frecuencia de interferencia y el lugar de
utilización. Realice una prueba antes de cada uso del
modelo con una segunda persona que fija el modelo.
Con este procedimiento se puede comprobar cómo el
modelo reacciona durante la pérdida de señal causada
por ejemplo por una batería descargada o la emisora
apagada.
2
1
5
Q
Q
ab
3
4
a
b6
A B C
DE
Bezeichnung der Komponenten
Fernsteuerung:
1. Antenne
2. Lenkrad
a) rechts
b) links,
3. Power LED
4. Gashebel
a) rückwärts
b) vorwärts
5. Ein/Aus Schalter
6. Batteriefach
Auto:
A Ausrichtungshebel
Sollte das Modell nach rechts
bzw. links ziehen, können Sie
dies mit dem Regler an der
Unterseite des Modells fein-
justieren.
B EIN/AUS Schalter
C Batteriefach
GB - Component Description
Transmitter:
1. Antenna
2. Steering wheel
a) right
b) left
3. Indicator light
4. Throttle Lever
a) reverse
b) forward
5. On/Off Switch
6 Batterie box
Car:
A Trim Lever
The directional guide on the
bottom of the model can be used
to adjust the models straight-
linerunning performance.
B On/Off Switch
C Battery cover
FR - Désignations des diff. pièces
Radiocommande:
1. Antenne
2. Volant directionnel
a) droite
b) gauche
3. Power LED
4. Commande des gaz
a) avant
b) arrière
5. Interrupteur On/Off
6. Support de batterie
Voiture:
A Levier directionnel:
Si votre modéle devait tourner à
droite ou à gauche d‘elle-même,
vous pouvez compenser cela
grâce au bouton de réglage sous
la modéle.
B Interrupteur On/Off
C Compartiment pour piles
IT
Denominazione dei componenti
Telecomando:
1. Antenna
2. Volante
a) destra
b) sinistra
3. Power LED
4. Leva del gas
a) indietro
b) avanti
5. Interruttore ON/OFF,
6. Compartimento batteria
Macchina:
A Leva:
Se il modello con lo sterzo al
centro non va diritto potrete
regolare la sua traiettoria con il
regolatore ubicato sotto il
modello.
B Interruttore ON/OFF
C Compartimento batteria
ES
Descripción de las difer. partes
Emisora:
1. Antena:
2. Volante
a) derecha
b) izquierda
3. Power LED
4. Pedal Pulso
a) marcha atrás
b) delante
5. On/Off interruptor
6. Compartimento de la batería
Coche:
A Alineado:
Si el modelo va en derecha o
izquierda, puedes ajustar el
modelo,
B Interruptor On/Off
C Compartimento de la batería
12 3
1x 9V
DE - Einlegen der Batterie in den Sender
1. Lösen Sie die Schraube am Batteriefach. Nehmen Sie den
Batteriefachdeckel ab.
2. Legen Sie einen 9 V Batterieblock ein, achten Sie auf die
richtige Polung.
3. Setzen Sie den Batteriefachdeckel wieder ein und verschrau-
ben ihn sorgfältig.ein.
GB - Placing the battery in the transmitter
1. Undo the screws on the battery hatch and remove it.
2. Fit the 9 V battery, observe the correct polarity.
3. Replace the battery hatch and carefully replace the screws.
FR - Mise en place des pile
1. Desserrer la vis du compartiment de box de piles. Retirez le
couvercle de la batterie.
2. Mettez en place respectivement une pile 9 V, respectez la
polarité.
3. Remplacer le couvercle du compartiment et vissez
soigneusement.
IT - Montaggio delle pile
1. Svitate la vita del scomparto batterie. Togliere il coperchio del
scomparto batterie.
2. Inserire la batteria 9 V nella giusta posizione, facendo
attenzione ai poli.
3. Rimettere il coperchio del scomparto batterie ed avvitarlo con
attenzione.
ES - Colocar pilas a la emisora
1. Aoje el tornillo del compartimiento de la batería. Retire la
tapa del compartimiento de la batería.
2. Coloque una pila 9 V, respetando la polaridad.
3. Coloque la batería en el compartimiento y tornillos con
cuidado.
3
1
1
2
A
C
B
2 3
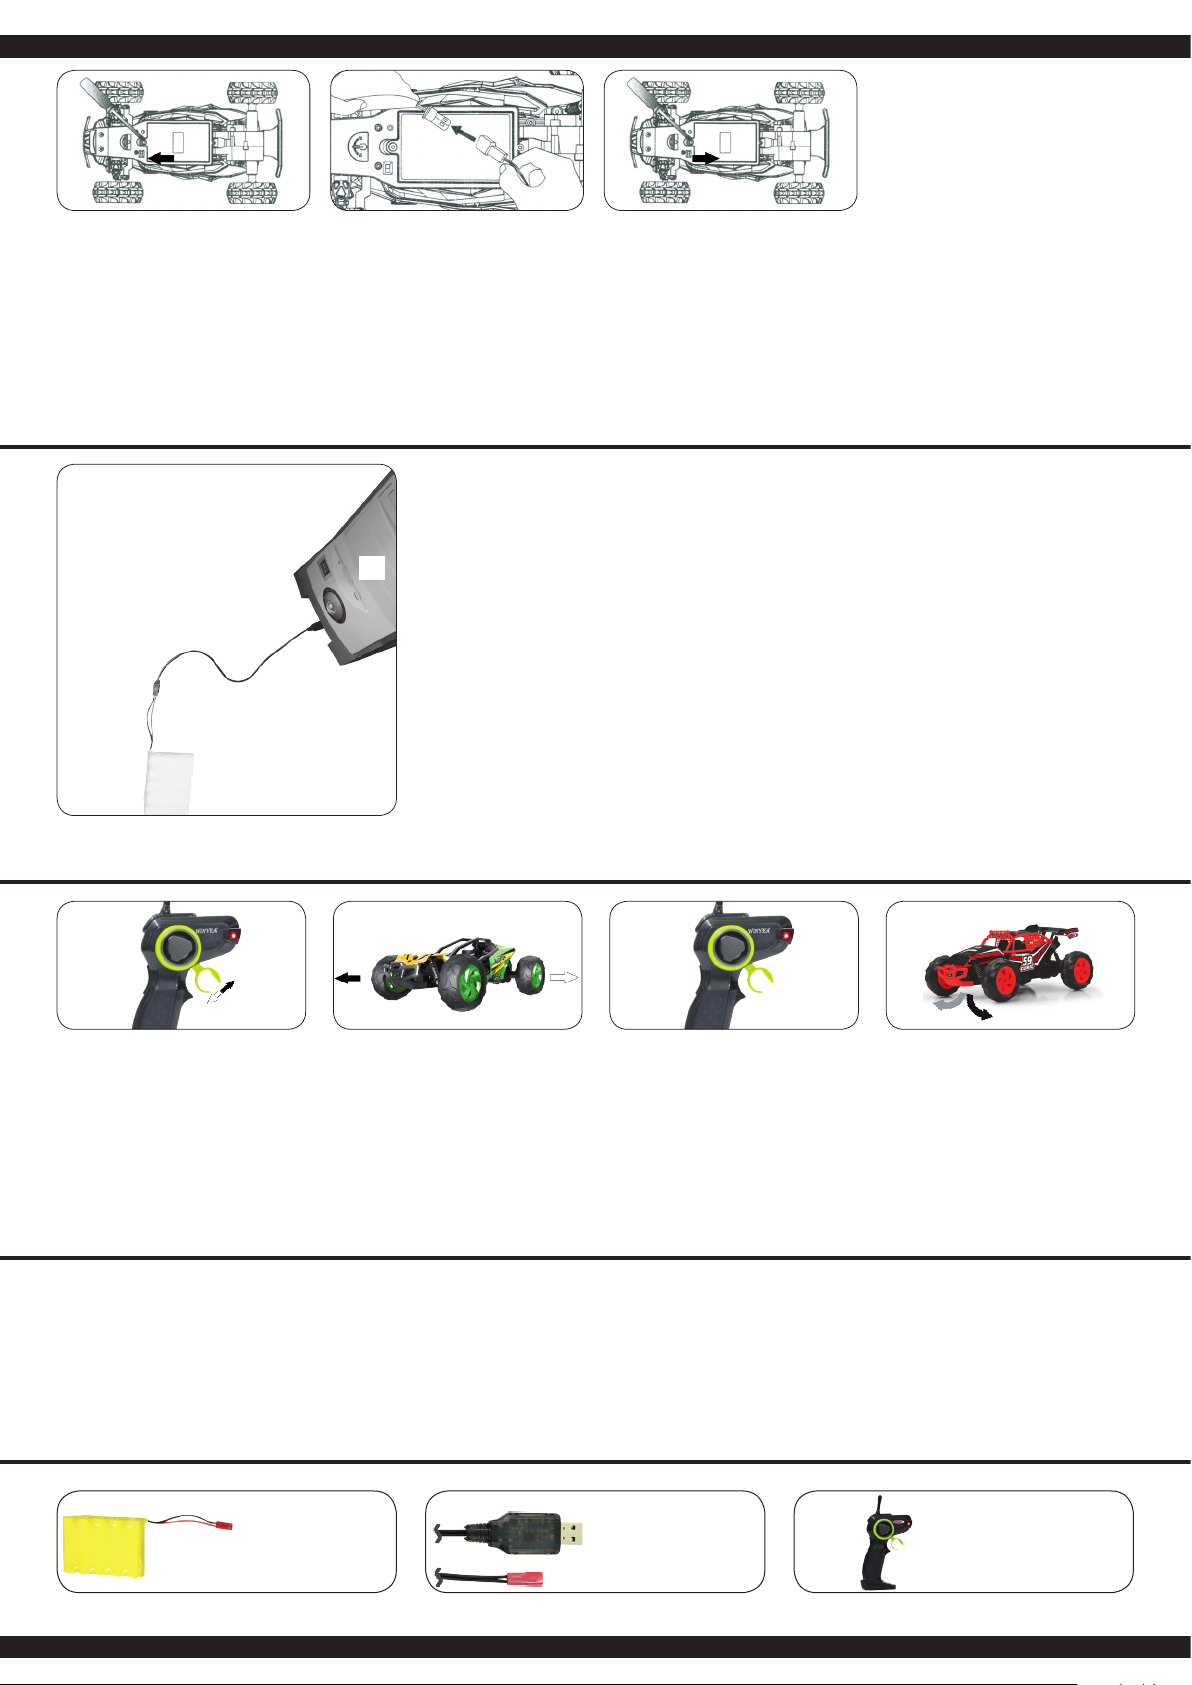
DE - Einsetzen des Fahrakkus
1. Lösen Sie die Schraube am Akkufach. Nehmen Sie den
Akkufachdeckel ab.
2. Legen Sie den 6 V Akkupack in das Akkufach ein (achten Sie
auf die richtige Polung).
3. Setzen Sie den Akkufachdeckel wieder ein und ver-
schrauben ihn sorgfältig.
GB - Install the battery pack
1. Undo the screws on the battery hatch and remove it.
2. Fit 1 x 6 V battery back as shown (observe the correct
polarity).
3. Replace the battery hatch and carefully replace the screws.
FR - Mise en place de l‘accu
1. Desserrer la vis du compartiment de box de piles. Retirez le
couvercle de la batterie.
2. Placez le accu 6 V dans le compartiment en respectant la
polarité.
3. Remplacer le couvercle du compartiment et vissez
soigneusement.
IT - Montaggio della batteria
1. Svitate la vita del scomparto batterie. Togliere il coperchio del
scomparto batterie.
2. Installate la batteria 6 V nello scomparto ris pettando la
polarità.
3. Rimettere il coperchio del scomparto batterie ed avvitarlo con
attenzione.
ES - Instalación de la batería
1. Aije el tornillo del compartimiento del la batería. Retire la
tapa del compartimiento de la batería.
2. Instale el compartimiento de la batería 6 V con la polaridad
correcta.
3. Coloque la batería en el compartimiento y tornillos con
cuidado.
DE - Laden des Fahrakkus
A Akkupack
B Computer
C USB-Ladekabel
Nehmen Sie den Akku aus dem Modell. Stecken Sie den
USB-Stecker des Ladekabels in die USB-Buchse ihres PC‘s.
Verbinden Sie den Akku mit dem USB-Ladekabel.
Die Ladezeit beträgt bei entladenem Akku ca. 3 - 4 Stunden.
GB - Charging the battery pack
A Batterypack
B Computer
C USB charging lead
Take out the battery from the model. Insert the USB charging
cable into the USB charging port of the your computer. Connect
the battery with the USB charging cable.
The charging time by completely discharged battery pack about
3 - 4 hours.
FR - Charge de l‘accu de propulsion
A Pack d‘accu
B Ordinateur
C Câble de recharge USB
Retirez la batterie du modèle.Insérez la che USB du câble de
chargement dans le port USB de votre PC. Connecter la batterie
avec le câble de recharge USB.
Pour un accu complètement déchargé, le temps de charge est
entre 3 - 4 heures.
IT - Carica delle batterie
A Batteria
B Computer
C Cavo di ricarica USB
Togliere la batteria dal modello.Inserire il cavo di ricarica USB
nella porta USB di ricarica del vostro computer. Collegare la bat-
teria con il cavo di ricarica USB.
Il tempo medio di ricarica della batteria (se completamente sca-
rica) è di 3 - 4 ore.
ES - Carga de la batería
A Battería
B Ordenador
C Cable de carga USB
Retire la batería del modelo. Inserte el cable de carga USB
en el puerto de carga USB en su computadora. Conectar la ba-
tería con el cable de la carga del USB.
El tiempo de carga, para una battería totalmente descargada,
oscilará entre 3 - 4 horas.
DE
1. Vorwärts/rückwärts
Drücken Sie den Gashebel
nach vorne oder zurück, wird
das Modell vorwärts bzw. rück-
wärts fahren
2. Links bzw. Rechts abbiegen
Mit dem Lenkrad wird die Fahrt-
richtung gesteuert. Durch
drehen des Lenkrads nach links
oder rechts, fährt Ihr Modell
nach links oder rechts.
GB
1. Forward / Reverse
Push the throttle stick forward
or backward, the model will
drive forward or backward.
2. Left or right turn
When the throttle control car,
and turned the steering wheel,
can control the car left/right turn.
FR
1. Marche avant/arriére
Poussez le levier du gaz vers
l‘avant ou vers l’arrière et le
modèle fera une marche avant
ou une marche arriére.
2. Tourner à droite ou à gauche
A l’aide du volant vous
déterminez la direction que
votre modèle va prendre. En
tournant le volant de direction
vers à gauche ou à droite,
votre modèle ira à gauche ou à
droite.
IT
1. Avanti/indietro
Spingere l‘acceleratore in avanti
o indietro e il modello andrà
avanti o indietro.
2. Girare a sinistra o destra
Con il volante si controlla la
direzione. Se si gira il volante a
sinistra o a destra, il modello
gira a sinistra o a destra.
ES
1. Adelante/Atás
Primer la palanca de gas hacia
adelante o hacia atrás, el
modelo seguirá adelante o
hacia atrás.
2. Giro a la izquierda o derecha
Con el volante se controla la
dirección. Cuando gira usted el
volante a la izquierda o a la
derecha, el modelo conduce a
la izquierda o a la derecha.
Q
Q
DE - Allgemeine Hinweise
Schalten Sie zu erst das Fahrzeug
an und dann den Sender. Wenn das
Fahrzeug anhält, beginnt langsamer
zu werden oder träger zu reagieren
ist der Akku leer. Fahren Sie in die-
sem Fall nicht weiter und schalten
Sie das Fahrzeug aus da der Akku
sonst tiefen entladen wird und Scha-
den nimmt. Stecken Sie den Akku
auch bei abgeschaltetem Modell
immer aus.
GB - General information
First, turn the vehicle on and then
the transmitter. When the vehicle
stops, starts to get slower or res-
ponds are slow, the battery will be
nearly empty. In this case do not
continue driving and switch off the
vehicle as otherwise there is dan-
ger of deep discharging the battery,
which leads to damages. Also dis-
connect the battery from the vehicle
if not in use.
FR - Indications générales
D’abord mettez la véhicule en mar-
che et après commutez l’émetteur.
L’accu est vide quand le véhicule
s’arrête, commence à rouler plus
lentement ou s’alanguit. Dans ce
cas arrêtez le véhicule et l’éteignez ;
autrement l’accu sera déchargé pro-
fondément et il subit des dégâts. En-
levez l’accu toujours même quand le
modèle est éteint.
IT - Note generali
Accendere primail il veicolo e poi la
radio. Quando il veicolo si ferma,
inizia a rallentare o risponde lenta-
mente ai comandi, e neccessario di
ricaricare la batteria. In questo caso
consigliamo di spegnere il veico-
lo, perche evitare che la batteria si
sottoscarica, questo causa un dann-
eggiamento alla batteria. Importante
di staccare la batteria dopo l’utilizzo
della vettura.
ES - Notas generales
Encender primero el vehículo y lue-
go la emisora. Cuando el vehículo
se detiene, empieza a disminuir la
velocidad o responde lento a los co-
mandos, quiere decir que la betería
esta vacía. En este caso no continu-
ar y apagar el vehículo, porque la
batería se sobredescarga y se pue-
de dañar. Desconectar siempre la
batería, tambien cuando el modelo
esta apagado.
No. 41 2049
Akku
Battery
Accu
Batteria
Batería
41 2050
Ladegerät USB
Charger USB
Chargeur USB
Caricatore USB
Cargador USB
No. 41 2051
Fernsteuerung
Transmitter
Radiocommande
Trasmittente
Emisora
DE - Ersatzteile | GB - Spare parts | FR - Pièces détachées | IT - Pezzi di ricambio - ES - Lista de repuestos
JAMARA e.K.
Inh. Manuel Natterer
Am Lauerbühl 5 - DE-88317 Aichstetten
Tel. +49 (0) 75 65/94 12-0 - Fax +49 (0) 75 65/94 12-23
[email protected] ●www.jamara.com
Service - Tel. +49 (0) 75 65/94 12-66
kundenservice@ jamara.com
DE - Gebrauchsanweisung sorgfäl-
tig lesen!
GB - Read the instructions carefully.
FR - Se il vous plaît lire attentive-
ment les instructions!
IT - Vi preghiamo di leggere attenta-
mente le istruzioni.
ES - Lea atentamente las instruc-
ciones.
DE - Benutzung nur unter unmittel-
barer Aufsicht von Erwachsenen.
GB - Use only under direct supervisi-
on of an adult!
FR - Utiliser uniquement sous la sur-
veillance d’un adulte!
IT - Utilizzare solo sotto la diretta
sorveglianza di un adulto!
ES - Usado bajo la supervisión di-
recta de un adulto!
DE - Von Kindern fernhalten. Enthält
verschluckbare Kleinteile.
GB - Keep away from Children.
Contains small parts which can be
swallowed.
FR - Tenez les enfants éloignés.
Contient de petites pièces facile-
ment avalables.
IT - Tenere i bambini lontano. Conti-
ene pezzi piccoli.
ES - Mantenga el lejos de los niños.
Contiene piezas pequeñas.
DE - Sind die Batterien leer, wech-
seln Sie sie aus.
GB - The batteries are nearly, repla-
ce the batteries.
FR - Si ce les piles sont vides, chan-
gez ceux-ci.
IT - Controllare il stato delle batterie,
potrebbero essere scariche.
ES - Las pilas estarán agotadas,
sustituya las pilas por otras nuevas.
DE - Auf Polarität achten!
GB - Pay attention to the polarity!
FR - Prêter attention aux la polarité!
IT - Prestare attenzione alla polarità!
ES - Preste atención a la polaridad!
DE - Auf die Frequenzen in Ihrem
Umfeld achten!
GB - Pay attention to the frequenci-
es in your environment!
FR - Faites attention aux fréquences
dans votre environnement!
IT - Prestare attenzione alle frequen-
ze nel proprio ambiente!
ES - Preste atención a las frecuenci-
as en su entorno!
DE - Betreiben Sie das Modell nicht
bei Regen, Schnee, Nässe oder
Sand.
GB - Do not drive in rain, snow, wet-
ness or sand.
FR - Ne pas conduire sous la pluie,
la neige, humidité ou sable.
IT - Non guidare sotto la pioggia,
neve, umidità o sabbia.
ES - No conduzca bajo la lluvia, la
nieve, humedad o arena.
DE - Nicht auf befahrenen Straßen
und Plätzen fahren.
GB - Never drive on roads or areas
used by real vehicles.
FR - Ne roulez jamais sur la voie
publique ou des endroits fréquentés.
IT - Non giocare sulle strade comuni.
ES - No utilice en calles o plazas
transitadas.
DE - Fahren Sie nie außerhalb der
Reichweite Ihrer Fernsteuerung.
GB - Never run out of the reach of
your remote control.
FR - Laissez jamais celle-ci sortir de
la portée de votre émetteur.
IT - Non utilizzare il modello fuori la
portata della trasmittente.
ES - No conduzca más allá del al-
cance de su emisora.
DE - Nicht direkter Sonnenbestrah-
lung oder Wärme aussetzen.
GB - Do not leave in very strong
sunlight.
FR - N‘exposez jamais votre modèle
directement aux rayons du soleil.
IT - Non disporre il modello sotto il
sole oppure nel caldo.
ES - No exonga el modelo a los
rayos solares directos o fuentes de
calor.
DE - Verschmutzungen mit einem
feuchten Tuch entfernen.
GB - Clean by using a damp cloth.
FR - Essuyez la boue avec un tissu
humide.
IT - l‘inquinamento possono essere
rimossi con un panno umido
ES - Polución se puede eliminar con
un paño húmedo.
DE - Batterien/Akku niemals im Mo-
dell lagern.
GB - Store batteries/battery packs
separately when not in use.
FR - La piles/accu ne doit jamais
être stockée dans la modèle.
IT - Conservare le batterie/accumu-
latore separatamente quando non
sono in uso.
ES - Sacar siempre las batería/acu-
mulador y guárdarlo por separado.
DE - Sicherheitsmaßnahmen | GB - Safety Notes | FR - Consignes de sécurités | IT - Precauzioni | ES - Recomendaciones de seguridad
X
X X X X X
X

DE - Achtung!
Dieses Modell ist nicht dafür bestimmt, durch Personen
(einschließlich Kinder) mit eingeschränkten physischen,
sensorischen oder geistigen Fähigkeiten oder mangels
Erfahrung und/oder mangels Wissen benutzt zu werden,
es sei denn, sie werden durch eine für ihre Sicherheit zu-
ständige Person beaufsichtigt, wie das Gerät zu benutzen
ist.
GB - Warning!
This device is not intended for use by individuals (Inclu-
ding children) with reduced physical sensory, mental abi-
lities, lack of experience and / or knowledge, unless they
are supervised in how the device is to be used.
FR - Attention!
Cet appareil n’a pas été conçu pour être utilisé par des
personnes (également des enfants) présentant des défail-
lances physiques, sensitives ou mentales, cela s’applique
aussi aux personnes n’ayant pas ou peu d’expériences
hormis si celle-ci est accompagnée par une personne re-
sponsable et concernant la manipulation de cet appareil.
IT - Attenzione!
Questo prodotto non è destinato a essere utilizzato da
persone (bambini compresi) con capacità siche limitate,
con limitazioni sensoriali o mentali oppure mancanza di
esperienza e/o di conoscenza. A meno che, siano sorveg-
liate da una persona responsabile della loro sicurezza su
come usare il prodotto in modo corretto.
ES - Atención!
Este dispositivo no debe ser utilizado por
personas(incluidos niños) con discapacidad física, habi-
lidades sensoriales o mentales o la falta de experiencia y
/ o conocimientos, porque son responsables de su propia
seguridad persona de supervisión sobre cómo se utiliza
el dispositivo. O la persona que son supervisados en
cómo usar.
DE - Servicehändler | GB - Service centre | FR - Revendeur de service | IT - Centro assistenza | ES - Servicio asistencia
DE - Reitter Modellbau Versand, Patricia Reitter, Degerfeldstrasse 11, 72461 Albstadt, Tel. 07432 9802700, Fax 07432 2009594, [email protected], www.modellbauversand.de
DE - Bay-Tec Modelltechnik, Martin Schaaf, Am Bahndamm 6, 86650 Wemding, Tel. 07151 5002192, Fax 07151 5002193, [email protected], www.bay-tec.de
DE - Extra Trade, Rudolf Müller & Gerrit Müller GdbR, Lindenstraße 82, 66787 Wadgassen, Tel. 06834 9604952, Fax 06834 9604963, [email protected], www.extra-trade.de
CH - Modellbau Zentral, Peter Hofer, Bresteneggstrasse 2, CH -6460 Altdorf, Tel. +41 794296225, Fax +41 418700213, [email protected], www.modellbau-zentral.ch
AT - Sigi‘s Modellbau Shop, Siegfried Costa, Bundesstr. 30, AT -6923 Lauterach, Tel. +43 557483657, Fax +43 557483657, [email protected], www.playland-modellbau.at
AT - Aigner Modellbau, Edmund Aigner, Graben 2, AT -3300 Amstetten, Tel. +43 747224655, Fax +43 747223358, of[email protected], www.modellbau-amstetten.at
Irrtum und technische Änderungen vorbehalten. Copyright JAMARA e.K. 2016
Kopie und Nachdruck, auch auszugsweise, nur mit Genehmigung von JAMARA e. K.
All rights reserved. Copyright JAMARA e.K. 2016
Copying or reproduction in whole or part, only with the expressed permission of JAMARA e.K.

This manual suits for next models

3

Other Jamara Motorized Toy Car manuals

Jamara Lindner Geotrac User manual

Jamara

Jamara Lindner Geotrac User manual

Jamara Audi R8 Spyder V10 performance quattro User manual

Jamara

Jamara Audi R8 Spyder V10 performance quattro User manual

Jamara Ferrari F40 User manual

Jamara

Jamara Ferrari F40 User manual

Jamara Mercedes-Benz E 350 Coupe User manual

Jamara

Jamara Mercedes-Benz E 350 Coupe User manual

Jamara 460447 User manual

Jamara

Jamara 460447 User manual

Jamara BMW Z4 User manual

Jamara

Jamara BMW Z4 User manual

Jamara 405300 User manual

Jamara

Jamara 405300 User manual

Jamara MAN User manual

Jamara

Jamara MAN User manual

Jamara Jeep Wrangler JL 2,4GHz User manual

Jamara

Jamara Jeep Wrangler JL 2,4GHz User manual

Jamara Akron BL RTR 2,4 GHz User manual

Jamara

Jamara Akron BL RTR 2,4 GHz User manual

Jamara Porsche 911 GT3 Cup 2,4GHz User manual

Jamara

Jamara Porsche 911 GT3 Cup 2,4GHz User manual

Jamara 404515 User manual

Jamara

Jamara 404515 User manual

Jamara Mercedes-AMG SL 65 User manual

Jamara

Jamara Mercedes-AMG SL 65 User manual

Jamara Lindner Geotrac with front loader User manual

Jamara

Jamara Lindner Geotrac with front loader User manual

Jamara Dakar 2,4 GHz User manual

Jamara

Jamara Dakar 2,4 GHz User manual

Jamara 405093 User manual

Jamara

Jamara 405093 User manual

Jamara Ford GT 2,4GHz User manual

Jamara

Jamara Ford GT 2,4GHz User manual

Jamara 404980 User manual

Jamara

Jamara 404980 User manual

Jamara Mercedes-AMG GT3 User manual

Jamara

Jamara Mercedes-AMG GT3 User manual

Jamara Lextron EP User manual

Jamara

Jamara Lextron EP User manual

Jamara Ride on Mercedes-Benz SLC User manual

Jamara

Jamara Ride on Mercedes-Benz SLC User manual

Jamara BMW M4 Coupe 2,4GHz User manual

Jamara

Jamara BMW M4 Coupe 2,4GHz User manual

Jamara Ice Tiger EP 2,4 GHz User manual

Jamara

Jamara Ice Tiger EP 2,4 GHz User manual

Jamara BMW i8 User manual

Jamara

Jamara BMW i8 User manual

Popular Motorized Toy Car manuals by other brands

Hobbytech BX8SL Runner instruction manual

Hobbytech

Hobbytech BX8SL Runner instruction manual

THUNDER TIGER MTA4 instruction manual

THUNDER TIGER

THUNDER TIGER MTA4 instruction manual

Pilsan ACTIVE TRACTOR manual

Pilsan

Pilsan ACTIVE TRACTOR manual

Caretero toyz RAPTOR user manual

Caretero

Caretero toyz RAPTOR user manual

AE Factory Team 12R5 user guide

AE

AE Factory Team 12R5 user guide

Fisher-Price POWER WHEELS CBG65 owner's manual

Fisher-Price

Fisher-Price POWER WHEELS CBG65 owner's manual

Associated Electrics SC18 manual

Associated Electrics

Associated Electrics SC18 manual

Serpent Viper 989 40th anniversary instruction manual

Serpent

Serpent Viper 989 40th anniversary instruction manual

REVELL KIT 1555 Assembly manual

REVELL

REVELL KIT 1555 Assembly manual

Associated Electrics Monster MGT8.0 instruction manual

Associated Electrics

Associated Electrics Monster MGT8.0 instruction manual

REVELL KIT 2046 Assembly manual

REVELL

REVELL KIT 2046 Assembly manual

Tamiya MERCEDES-BENZ SLS AMG GT3 instructions

Tamiya

Tamiya MERCEDES-BENZ SLS AMG GT3 instructions

Kyosho Mini-Z Racer MR-02 MM Type instruction manual

Kyosho

Kyosho Mini-Z Racer MR-02 MM Type instruction manual

DICKIE SPIELZEUG RC Soft Car operating instructions

DICKIE SPIELZEUG

DICKIE SPIELZEUG RC Soft Car operating instructions

Tractor Supply Savage GV-6128 instruction manual

Tractor Supply

Tractor Supply Savage GV-6128 instruction manual

Yokomo B-MAX 2 MR manual

Yokomo

Yokomo B-MAX 2 MR manual

Horizon Hobby Axial RYFT RBX10 manual

Horizon Hobby

Horizon Hobby Axial RYFT RBX10 manual

Traxxas Pro Scale Mercedes-Benz G 500 installation instructions

Traxxas

Traxxas Pro Scale Mercedes-Benz G 500 installation instructions

manuals.online logo
manuals.online logoBrands
  • About & Mission
  • Contact us
  • Privacy Policy
  • Terms and Conditions

Copyright 2025 Manuals.Online. All Rights Reserved.