Jedmed api OS1 Service manual
Operating / Service
Manual
IMPORTANT: Read all instructions before assembling or using this device.
Instructions for Use
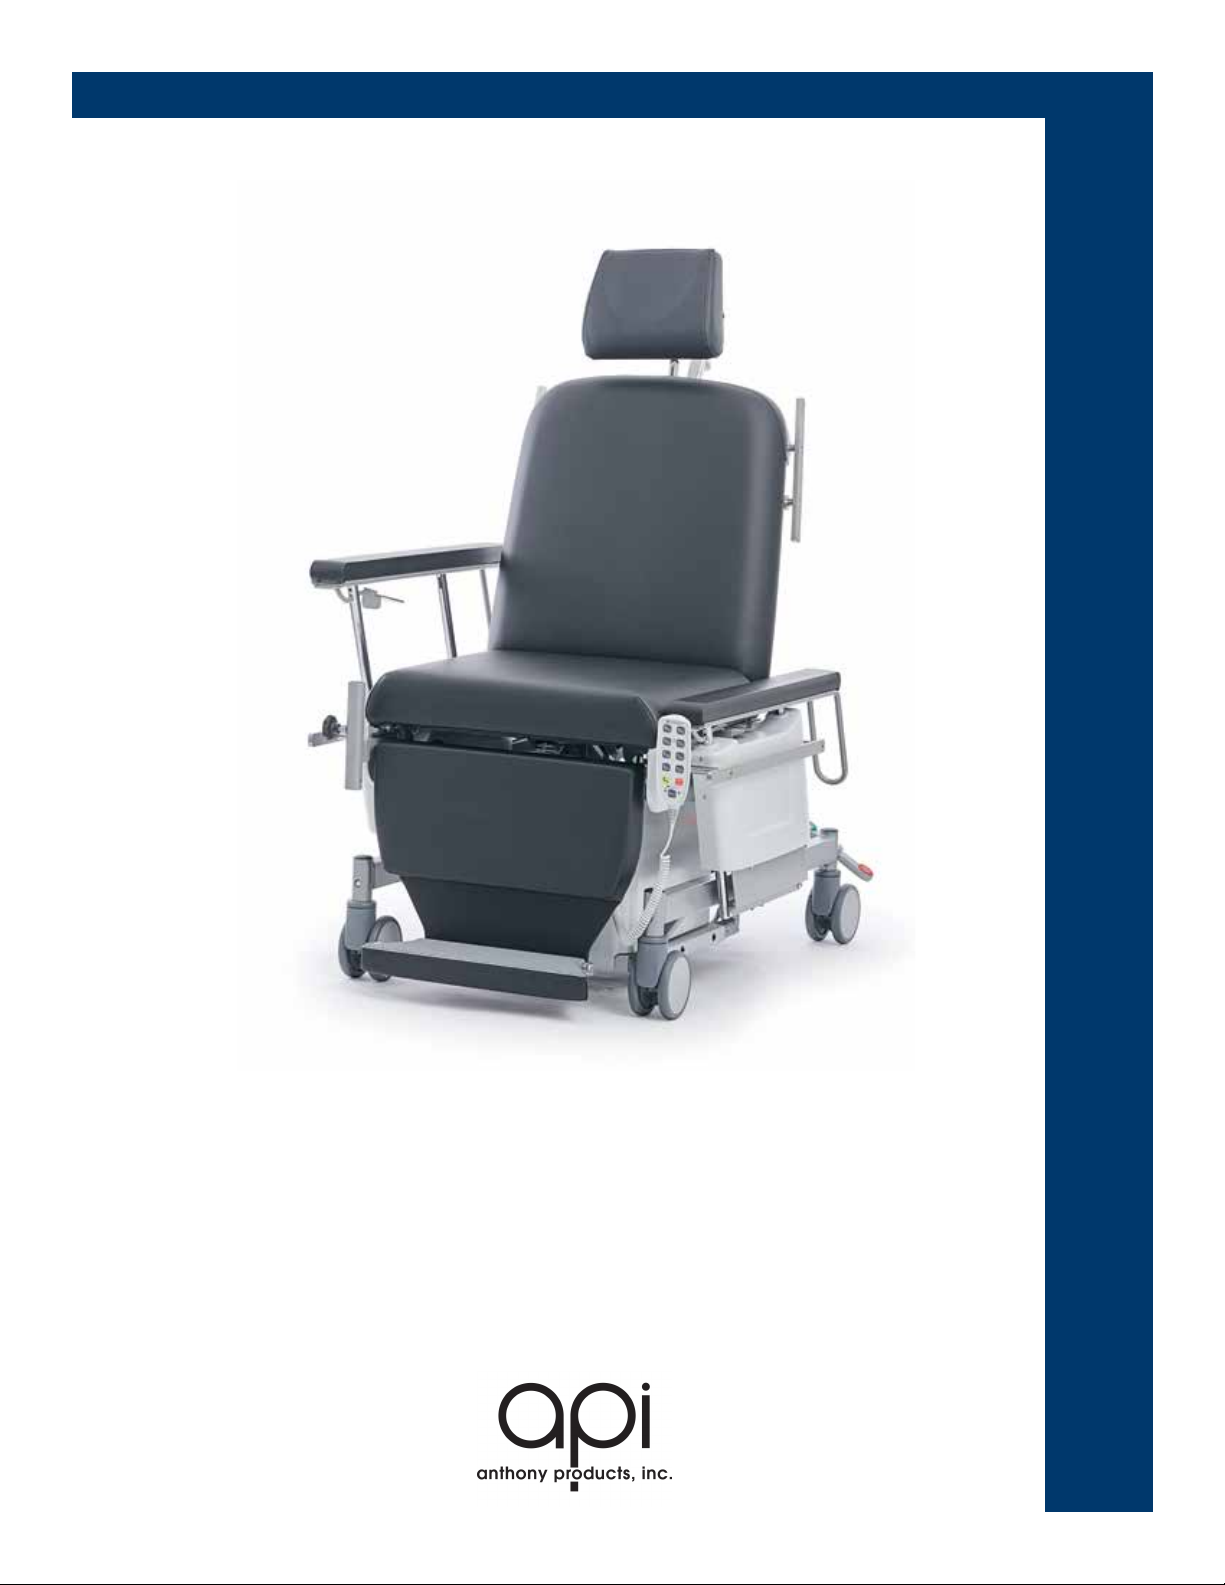
OS1 Mobile Operating Chair

COPYRIGHT © 2023 JEDMED Instrument Company
All rights reserved.
pmnl174
Rev. 4
04-2023
For decades, JEDMED has built its reputation on principles of quality, integrity,
innovation and value. Continuous research and development coupled with
exceptional customer service and a world-class quality system has placed
JEDMED as an industry leader.
As always, our focus remains on you, our valued customer. Building rewarding
and lasting relationships is the cornerstone of JEDMED's business philosophy.
JEDMED is committed to delivering reliable and cost-eective solutions to
medical professionals everywhere.
The employee-owners of JEDMED would like to take this opportunity to thank
you for all your support. We are pleased and proud to serve the ever-changing
medical community.
Sincerely,

3
OS1 Mobile Operating Chair Operating / Service Manual
Introduction.....................................................4
Safety..............................................................5-7
Commissioning...............................................8-11
Operation.......................................................12-32
Accessories....................................................33-35
Cleaning / Disinfection....................................36-37
Troubleshooting..............................................38-42
Section Page
OPERATION
OPERATING
Note: Specications subject to change without notice.
CONTENTS

OS1 Mobile Operating Chair Operating / Service Manual
4
1. Introduction
With this instruction manual (hereinafter also referred to as the “manual”) we would like to provide the user and
operator with useful information for safe and proper operation of the OS1 Mobile Operating Chair (hereinafter also
referred to as the “chair”). This manual also describes functions or features that may not be included in your chair.
This manual contains information on the safe use of the chair according to its intended use (see 2.4 Intended use).
Observance of the instructions helps to:
• avoid risks
• reduce downtime
• reduce ongoing operating costs
• increase the reliability and service life of the chair
We reserve the right to make technical changes without notice within the scope of further development of the chair
described in this manual.
1.1 Validity
This manual applies only to the chair and accessories supplied by JEDMED
1.2 Manufacturer
JEDMED
5416 JEDMED Court
St. Louis, MO 63129-2221
Phone: (314) 845-3770
Fax: (314) 845-3771
www.jedmed.com
1.3 Note on Pictoral Representations
The photos/illustrations are general illustrations and may dier from the actual conditions or from the components
actually used.
1.4 Warranty and Liability
Our General Terms and Conditions (GTC) apply in the currently valid version at www.jedmed.com. In the event of
a complaint (damage, defects, or other reasons for complaint), your authorized specialist distributor is the appro-
priate contact person. Please provide the data of the type plate (and possibly a photo). The more accurate and
better the data, the better and more targeted the remedy can be provided.
INTRODUCTION

5
OS1 Mobile Operating Chair Operating / Service Manual
SAFETY
2. Safety
The main objective of the safety instructions is to prevent injury to persons. In addition, observation of the
safety instructions helps to avoid material damage. As the operator you have purchased an OS1 Mobile Op-
erating Chair from JEDMED. As a result, you are also responsible for its proper and intended operation.
2.1 Signal Words
In order to point out dangers, prohibitions and important information, the following signal words and symbols
are used in this manual. These must be read and strictly observed.
DANGER This signal word indicates an imminent danger resulting in serious injuries, and in some cases
death.
WARNING This signal word indicates a potential imminent danger, which can result in serious injuries, and in
some cases death.
CAUTION This signal word indicates a potential imminent danger, which can result in light to serious injuries.
NOTE This signal word indicates a potential imminent danger, which can result in damage to property and
the environment.
TIP Indicates tips for use or other particularly important information when handling the chair.
2.2 Device Safety
JEDMED Chairs were built in accordance with the applicable national and international standards and reg-
ulations according to the current state of the art and tested by an independent body. This chair meets the
requirements for safety and functionality.
The validity of the declaration of conformity expires if changes are made to the chair by the customer or third
parties, e.g. modications of any kind, use of external accessories, changes to the software, removal of warn-
ing and information signs (no claim to completeness).
Due to the chosen robust, interference-proof design of the electrical adjustment devices, the chair is largely
tolerant to EMC interference from other electrical equipment operated in the vicinity.
Despite comprehensive EMC testing, it is possible that other devices may be disturbed by the chair. In such
cases, either switch o the chair completely by removing the battery or unplugging the mains plug or dis-
connect it from the mains, or, if necessary, keep a larger distance from the disturbed device and change the
orientation to each other. If possible, do not use the same outlet.
This applies in particular to the simultaneous use of highly sensitive measuring instruments. Their measure-
ment reseults may be inuenced under certain circumstances.
The chair can be equipped with accessories on delivery (See Accessories).
If necessary, observe the instruction manual for the accessories. For further information, please contact your
authorized specialist distributor.
All prohibition, warning, and message symbols or instructions on the chair must be observed. The symbols
and notes must always be legible and complete. Damaged or lost symbols or notes must be replaced true to
the original.
The chair is made mainly of steel tubes or steel proles. The surfaces are either powder-coated with zinc or
chrome.
All surfaces are harmless against skin contact.

OS1 Mobile Operating Chair Operating / Service Manual
6
SAFETY CONTINUED
2.3 Personal Safety
To avoid errors and to ensure trouble-free operation of the chair, the safety instructions in this instruction manual
must be read and understood completely and must always be made available to the user at all times (in printed
or electronic form).
Basic instructions for the user can be given by JEDMED or its authorized specialist distributor at the request of
the operator.
Patients must be instructed in the use of the chair before activating the hand control.
Operation allowed only by qualied personnel.
Notes to the operator
• Do not leave device(s) in operating state while unattended
• Always use “Universal Precautions” when handling potentially infectious material(s)
• Always clean, disinfect and sterilize equipment between patients
• Use care when introducing pressurized medications to patients
• When using beroptic light sources, keep ammables away from light port, beroptic cable ends,
and endoscope tip
• Disconnect cable ends and endoscope tip
• Do not allow liquid to enter any parts of this device
• Specula and other instruments may pose choking hazard for small children
• Always replace fuse(s) with same type and rating
2.4 Intended Use
The OS1 Operating Chair from JEDMED is a medical chair for use by patients in health facilities such as hospitals,
clinics, and medical practices. It is intended exclusively for use inside buildings and under normal environmental
conditions. The OS1 chair was specially developed for use in outpatient surgery. The chair allows the convenient
and comfortable positioning of the patient before, during, and after treatment or examination. The use is supported
in his or her work with regard to the ergonomics and quality.
• The maximum patient weight of the chair is 485 lbs.
• The chair is mainly used to prepare the patient for surgery and postoperative treatment of the patient,
e.g. in the recovery room. Absolute prerequisite is the compliance with the hygiene standards
regarding disinfection of the chair before and after the procedure
• As a treatment chair for sitting and lying treaments or examinations
• The chair can be used for patient transport under certain conditions within buldings
• The intended users are trained and instructed medical personnel of the relevant department
(e.g.: nurses, carers, doctors, assistants, etc.)
• Installation and commissioning by technical personnel of the operator or authorized specialist
distributors, if necessary

7
OS1 Mobile Operating Chair Operating / Service Manual
SAFETY CONTINUED
2.4.1 Reasonably Forseeable Misuse
Reasonably forseeable misuse can lead to hazards. Some examples of “reasonably forseeable misuse” are given
below. (no claim to completeness)
• Use in the vicinity of high-frequency surgical units, MRI units, or debrillators
• Use in an environment where ammable or explosive gases or vapors (e.g. anesthetic) are
to be expected
• Overloading of the chair above the specied maximum patient weight
• Use in the operating theater
• Use as a work chair
• Use as a spare hospital bed or spare bed
• Operation of the chair by patients without prior instruction
• Improper operation of electrical functions and uncontrolled positioning
• Outdoor use
• Use in wet areas, e.g. bathing establishments
• Use as a climbing aid (ladder)
• Use as a children’s toy, e.g. gymnastics or sports equipment
• Use as a vehicle or for the transport of goods
• Try to move the chair although the casters are in the braked position
• Pull on cables to move the chair
• Disconnect electrical connectors by pulling on the cables
• Cleaning in washing facility
• Cleaning with a spray hose of a high-pressure cleaner or water jet

OS1 Mobile Operating Chair Operating / Service Manual
8
COMMISSIONING
3 Commissioning
The chapter commissioning describes the preparation of the chair for use including a nal check of the functional
safety.
The use of specially trained and instructed service personnel during commissioning is neither necessary
or intended
3.1 Safety Instructions for Commissioning
Before commissioning the chair, the user must be instructed in the handling of the chair using the instruction man-
ual, having previously read it in detail. In addition, the potential dangers that may occur despite proper operation
of the chair must be pointed out in detail.
Operator’s obligation - instruction
• The operator must observe the respective valid national specications and legal regulations
• The operator must ensure that the users are instructed before using the chair
• The instruction can be given either by an authorized person of an authorized specialist distributor or
directly by the manufacturer
TIP If the delegated person or the operator, e.g. the person responsible for medical devices, has been
instructed by an authorized person of an authorized specialist distributor or by the manufacturer,
we would like to point out that we authorize the person responsible for medical devices of the
operation within the scope of the purpose for the instruction of the chair on the basis of training,
experience and knowledge.
• The operator must ensure that the instruction manual has been read and understood completely
by the users. The operator must disclose the place where the instruction manual is stored and make
it accessible at all times.
• The operator must ensure that representative personnel also receive adequate instruction in the
operation of the chair
• The operator must ensure that the chair is operated exclusively by trained users
• The operator must inform the users that the patients may only operate the chair after their
instruction, if necesary only under supervision
TIP Electrical testing before commissioning
A further electrical inspection of the chair before the rst commissioning is not necessary, as the
chair has been tested for electrical safety in accordance with EN 60601 (test report in instruction
manual) and has left our factory in perfect condition. In other countries, the applicable national
regulations and laws must be observed. Additional commissioning specications of the operator
must always be observed.
Danger of suocation from packaging material
Packaging material is not a toy and must be kept away from babies and small children.
In particular, do not pull the plastic bags or sacks over your head or crawl into them.
DANGER

9
OS1 Mobile Operating Chair Operating / Service Manual
COMMISSIONING CONTINUED
3.2 Installation Requirements
The chair is only approved for use in buildings and under normal ambient conditions, or for use in dry rooms
(see Technical Data)
The following environmental conditions must be observed on site.
Operating temperature [C]:
+5°C
+40°C
Air humidity [rH] (non-condensing):
20%
90%
Air pressure [hPa]:
700 hPa
1060 hPa
Operation at estimated altitude [m]:
≤2000m
3.3 Disposal of the Packaging Material
The packaging material must be separated according to substance groups and disposed of properly in accordance
with national regulations. If you have any questions, please contact your operator, your local municipalities, or
waste disposal companies.
3.4.3 Electrical Commissioning
Personnel Requirements
• 1 User
Required Tools and aids
• None
Operating Statuses
• When the chair is equipped with a quick-change battery [BATTERY] and the hand control is
disabled, the yellow operation control LED (1) lights up.
• When the chair is equipped with a battery and the hand control is enabled with the magnetic key,
the green operation LED (2) lights up to indicate that the chair is ready for operation
OS1 Mobile Operating Chair Operating / Service Manual
10
COMMISSIONING CONTINUED
Way of Proceeding
A
B
5
1
3
4
2
1. Insert the mains plug into a socket
Unlocking the Hand Control
2. To unlock the hand control (3), swipe the magnetic key (4) over the key symbol (5) (see gure above)
3. Carry out a functional check

11
OS1 Mobile Operating Chair Operating / Service Manual
COMMISSIONING CONTINUED
3.5 Requirements on the Place of Operation
For the operation of the chair, an appropriate mains supply and, if applicable, an equipotential bonding connection
is required at the place of use. If this is available and the building’s wiring permits it, the chair must always be
connected to the equipotential bonding system.
Battery
TIP Charge the battery for at least 24 hours before rst use. The battery is then available for
normal operation without restriction.
3.6 Check Before Commissioning and Reassignment
After the commissioning work has been completed, and before any occupation by a new patient, the chair must
be cleaned and disinfected (See Cleaning and Disinfection).
CAUTION Risk of infection from contaminated chair
The chair must be cleaned and then disinfected before the rst use. This also applies before
each use (occupation by a new patient).
WARNING Risk of injury for patient, user, and third parties
The chair must be checked for functional safety after rst commissioning and every occupation
by a new patient. It must be ensured that the chair can be used as intended without endangering
the patient, the user, or third parties.
If the chair is put into operation for the rst time or before any occupation by a new patient, the same functional
check must be carried out as for recommissioning after storage.
• General check of the overall condition of the chair for soiling, condition and damage, completeness and
legibility of stickers, symbols, and instructions, clean if necessary in accordance with the manufacturer’s
specications or those of the operator and repair if necessary.
• Visually inspect the mains cable and plug, hand control, as well as all other electrical cables and
connectors for breakage, proper installation (e.g. strain relief), clamping or friction points etc. and
repair if necessary.
• Functional check of the electrical adjustment devices and the control system. All electric actuators must
be operated once up to their end positons. Pay particular attention to changed operation behavior,
unusual noises, speed, smooth running, odors and increased temperature and repair if necessary.
• Carry out a functional check according to the installed brake system for the casters (locking, freewheel)
and repair if necessary.
• Any defects or damage found must be remedied immediately. The chair must not be used before the
defects or damage have been remedied.
WARNING Risk of injury due to defective chair
The chair must not be operated in a defective or faulty condition in which the chair could endanger
patients, users, or third parties. A defective or faulty chair must be clearly marked “DEFECT”.
The marking must be done in such a way that the defective condition is clearly identiable
for everyone. Inform the operator for intensive inspection during repair.

OS1 Mobile Operating Chair Operating / Service Manual
12
OPERATION
4 Operation
The chapter operation describes the functions of the chair and its performance features.
Prerequisites for operation
The chair may only be operated and used in accordance with its intended use, the generally recognized rules of
technology and the national occupational safety and accident prevention regulations valid at the place of use (see
Intended Use).
To ensure safe operation, the following points must be strictly observed.
• Before using the chair, the user must familiarize him or herself with the contents of this manual and
observe the safety instructions for the individual points of danger.
• The chair must be cleaned rst and then disinfected (see Cleaning and Disinfecting) before
commissioning and before any further use (occupation by a new patient). A functional check
must be then carried out afterwards.
• The chair does not have an EMERGENCY STOP command device. Access to the mains plug must
therefore be guaranteed at all times in order to allow the deactivation of the chair in an emergency
situation by disconnecting the mains plug.
• Avoid mechanical stress on the mains cable or plug. Do not crush or trap the mains cable anywhere.
Carry out an immediate visual check after each mechanical load on the mains cable or plug.
• Tighten all handwheels, clamping levers and clamping screws etc., including those on accessories
before use.
4.1 Safety Instructions for Operation
When adjusting the chair, ensure that there are no limbs of the patient, user, or other persons,
especially children playing between the lower and upper sections, as well as between the back
or armrest(s) or the leg section and the oor, which could cause entrapment or inhyrt. Pets
should generally be kept away from the chair and no other objects should be stored under the chair.
Ensure that the chair does not get caught on walls or furniture.
DANGER Risk of injury due to unintentional movements of the chair
The chair is not intended for unsupervised use by children or handicapped persons. In such
situations, always ensure that the electrical adjustment functions are disabled as long as there
is no trained user on site. Keep the magnetic key separate from the hand control at all times.
(see Unlocking and locking the hand control).
The chair may only be occupied by one person at a time. The maximum patient weight must not be exceeded and
must be evenly distributed on the lying surface. Do not sit or rest on the backrest upholstery, the legrest upholstery,
the arm support or the foot support.
CAUTION Risk of falling or injury if lying position is set too high
In order to avoid or reduce injuries caused by falling, we recommend (except when carrying out
care measures on the patient) moving the chair to the lowest position. This generally applies
when moving the chair (see Driving) and in particular when transporting and sitting down and
standing up of the patients (see Patient transportation and Sitting down and standing up of the
patients).
When operating other devices on or near the chair, that are equipped with cables, air hoses, or similar, make sure
that these lines cannot get trapped in the moving parts of the chair or be damaged in any other way.
WARNING Risk of injury due to the use of unsuitable accessories
Only original accessories from JEDMED may be used. The attachment of accessories from other
manufacturers (e.g. xing belts etc.) lies within the responsibility and duty of care of the operator.

13
OS1 Mobile Operating Chair Operating / Service Manual
OPERATION CONTINUED
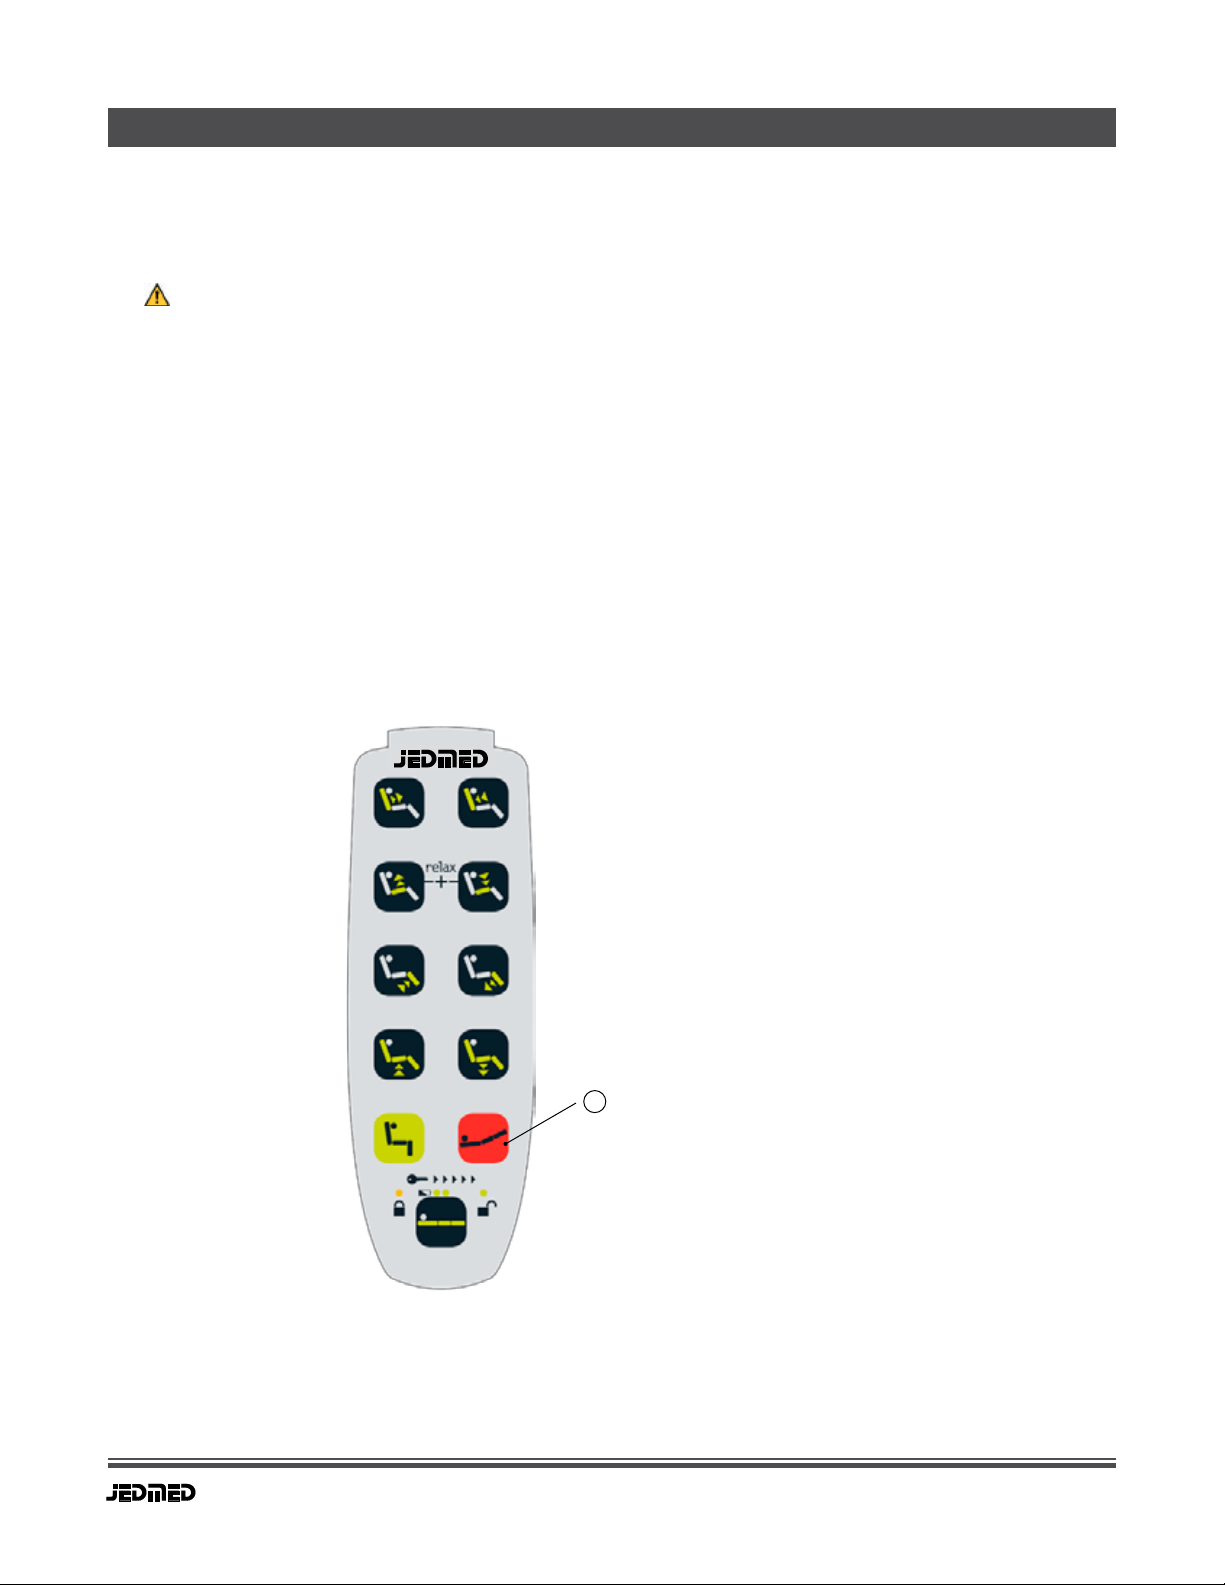
4.2 Hand Control
The hand control enables the user or patient to make continuous adjustments using electric drives. Patients must
be instructed in the functions of the hand control in any case. When adjusting the chair, the patient’s forearms must
be in the normal position on the arm supports.
General information on operating the hand control
• The drives run as long as the buttons are pressed.
• Each adjustment stops if more than one button is pressed simultaneously, except for the button
combination for Relax position (see Relax position).
• Always hang the hand control on the brackets at the front end of the arm supports. In this way, the patient
cannot accidentally sit or lie down on the hand control and thus trigger unwanted movements of the chair.
The spiral cable provides plenty of freedom for movement.
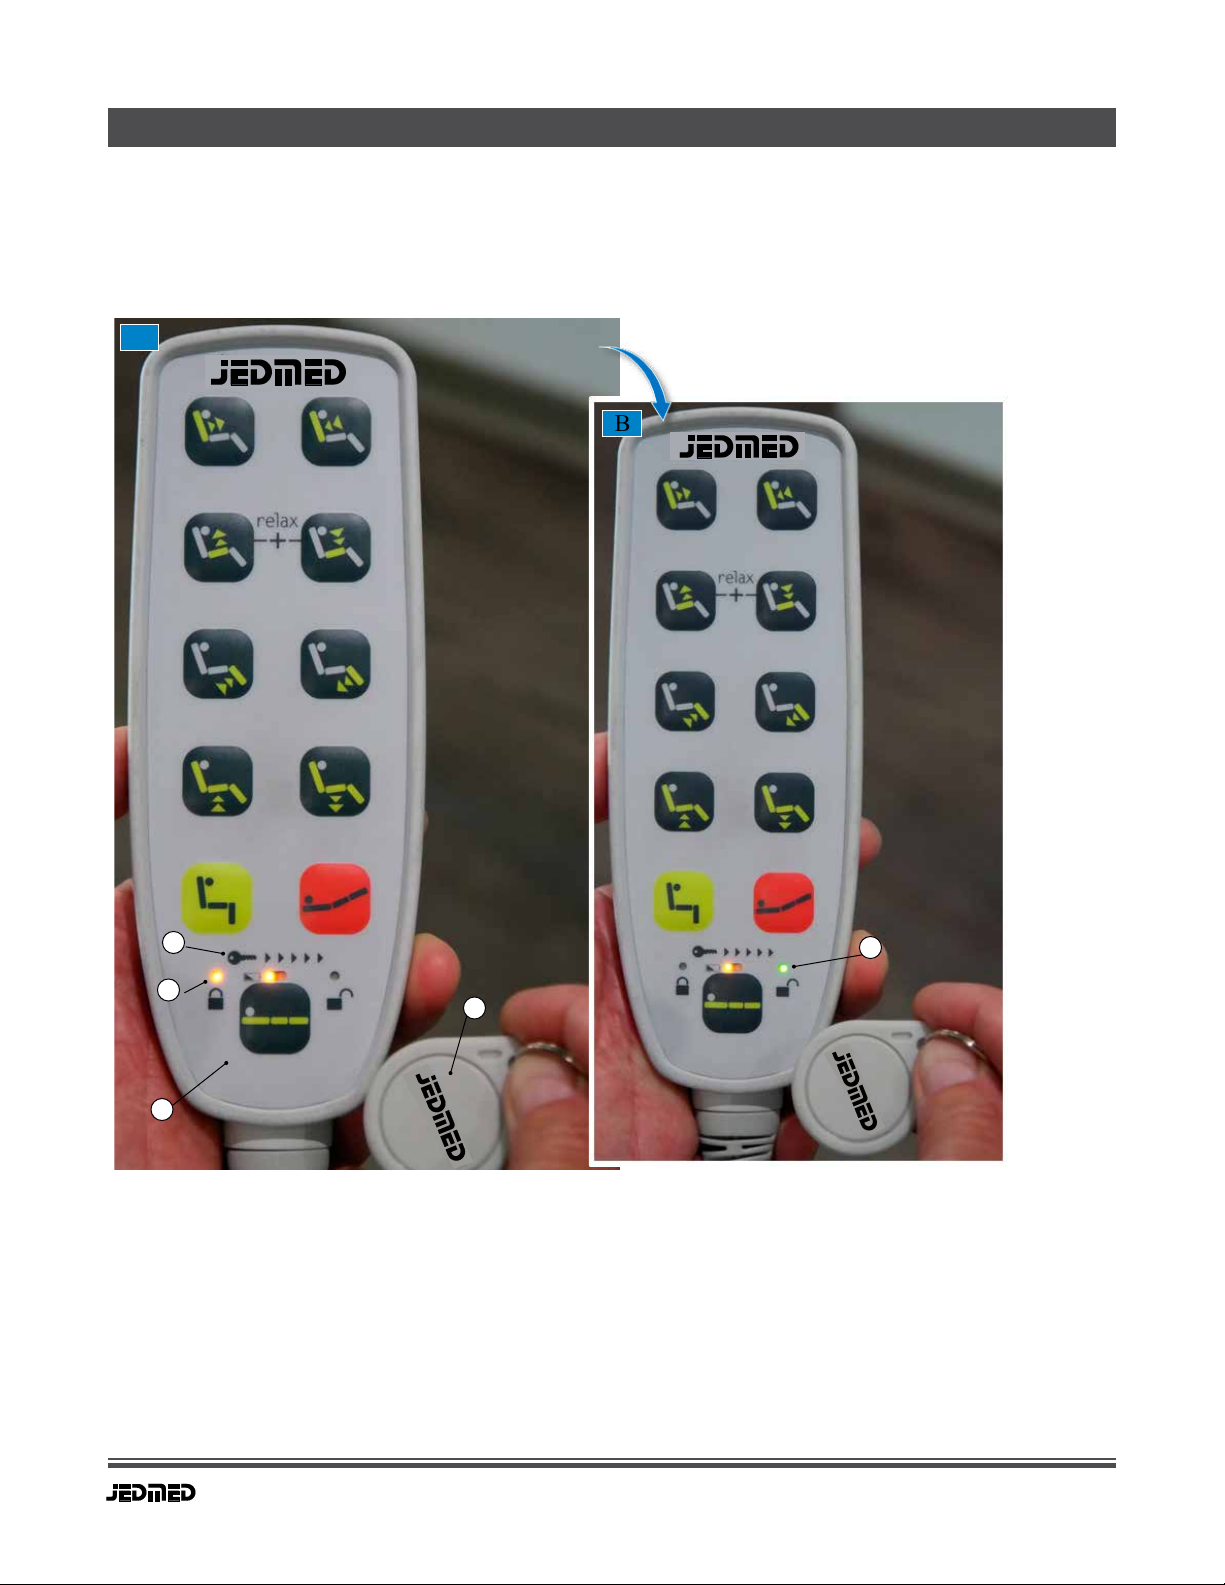
The yellow (1) and the green LEDs (2) indicate the actual operating status (see Unlocking and locking the hand control).
Operation
• Backrest up (3) - down (4)
• Seat inclination up (5) - down (6)
• Leg section up (7) - down (8)
• Seat height up (9) - down (10)
• Basic position (11)
• Shock position (Trendelenburg position) (12)
• Bed (at position) (13)
• Relax (5 + 6)
Both the yellow and red buttons (11) + (12) for basic position and shock position (Trendelenburg position) and the
button for bed position (13) as well as the button combination for relax position are described separately (see Basic
position, Shock position, Bed position (at position), and Relax position). The battery indicator (14) is described in
more detail in a separate section (Battery indicator).
1. Yellow operation control LED (hand control locked)
2. Green operation control LED (hand control unlocked)
3. Backrest - up
4. Backrest - down
5. Seat inclination - up
6. Seat inclination - down
7. Leg section - up
8. Leg section - down
9. Seat height - up
10. Seat height - down
11. Basic position
12. Shock position (Trendelenburg position)
13. Bed position (at position)
14. Battery indicator
4
6
8
10
12
2
14
13
1
11
9
7
5
3

OS1 Mobile Operating Chair Operating / Service Manual
14
OPERATION CONTINUED
4.3.1 Unlocking and Locking the Hand Control
The unlocking and locking of the hand control of an OS1 Mobile Operating Chair is shown here. Locking the hand
control prevents the chair from moving accidentally or unintentionally.
TIP After removing the quick-change battery [BATTERY] and then reinserting it, the chair remains in
the previous operating status. This means, for example, that the hand control was locked before
disconnecting the battery supply, so the hand control remains locked even after the battery supply
has been restored. The control unit remembers the current operating status even without a
quick-change battery. Depending on the charging status of the quick-change battery,
the control unit changes to stand-by either after 120 minutes (charging status > 40%)
or 10 minutes (charging status < 40%). The corresponding operation control LED and the battery
indicator on the hand control switch (see Battery indicator) turns o. A chair in stand-by mode cannot
be activated by the magnetic key. Press any button on the hand control to activate. Now the chair
can be unlocked or locked.
Operating statuses
• When the chair is equipped with a quick-change battery and the hand control is disabled,
the yellow operation control LED (1) lights up.
• When the chair is equipped with a battery and the hand control is enabled with the magnetic key, the
green operation control LED (2) lights up to indicate that the chair is ready for operation.
5
2
3
4
1
1. Yellow operating control LED (hand control locked)
2. Green operating control LED (hand control unlocked)
3. Hand control
4. Magnetic key
5. Key symbol
Unlocking the hand control
To unlock the hand control (3), swipe the magnetic key (4) over the key symbol (5)
Locking the hand control
To lock the hand control, swipe the magnetic key over the key symbol again
TIP When the hand control is locked, the foot switch for moving to the shock position (Trendelenburg position)
is also locked (see Foot switch).
15
OS1 Mobile Operating Chair Operating / Service Manual
OPERATION CONTINUED
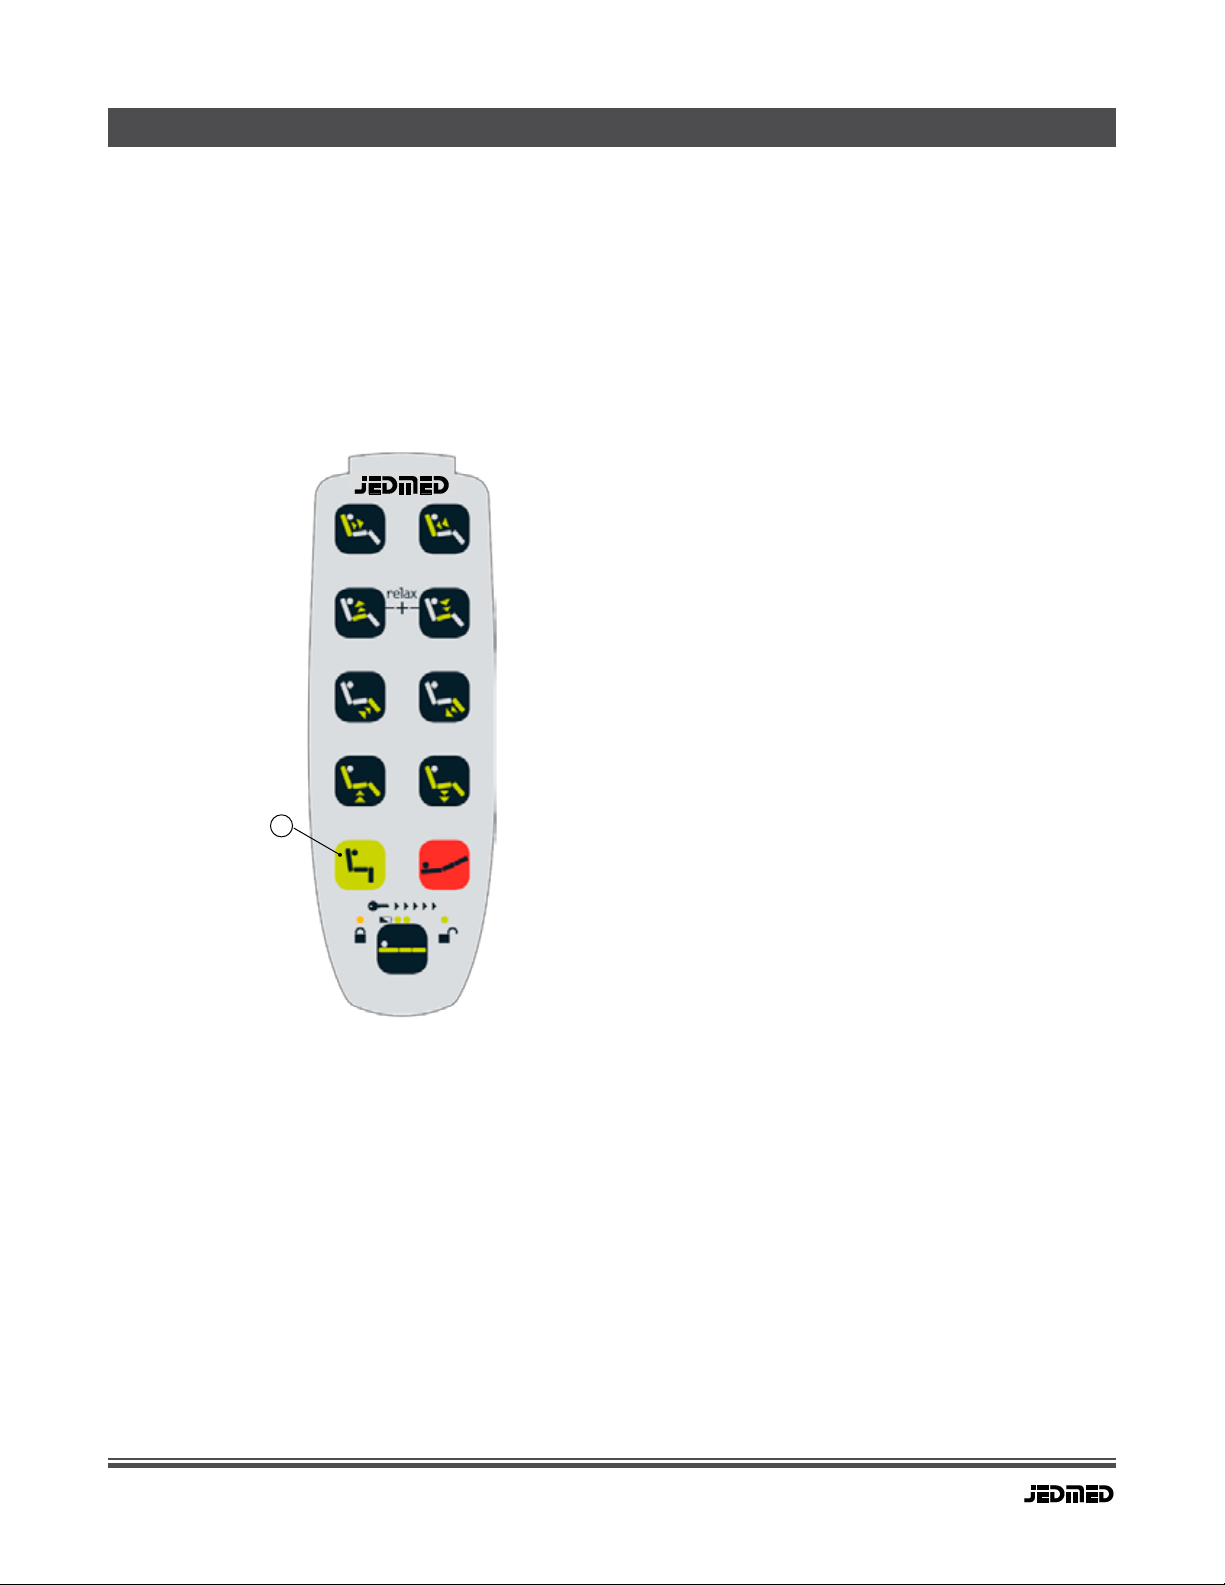
4.3.2 Basic position
If patients want to sit down or get up from the chair, as well as before driving, the chair must be brought into the basic
position by pressing the yellow button (11). Pressing the button for basic position requires increased attention from the
user, as dierent actuators are activated simultaneously. All lying surfaces (backrest, seat surface, and leg section)
move simultaneously to the basic position at maximum speed. In addition, the seat height is lowered completely.
• The backrest is fully upright
• The seat surface is placed horizontally
• The leg section is swivelled all the way down
• The seat height may be lowered completely
11
11. Basic position
OS1 Mobile Operating Chair Operating / Service Manual
16
OPERATION CONTINUED
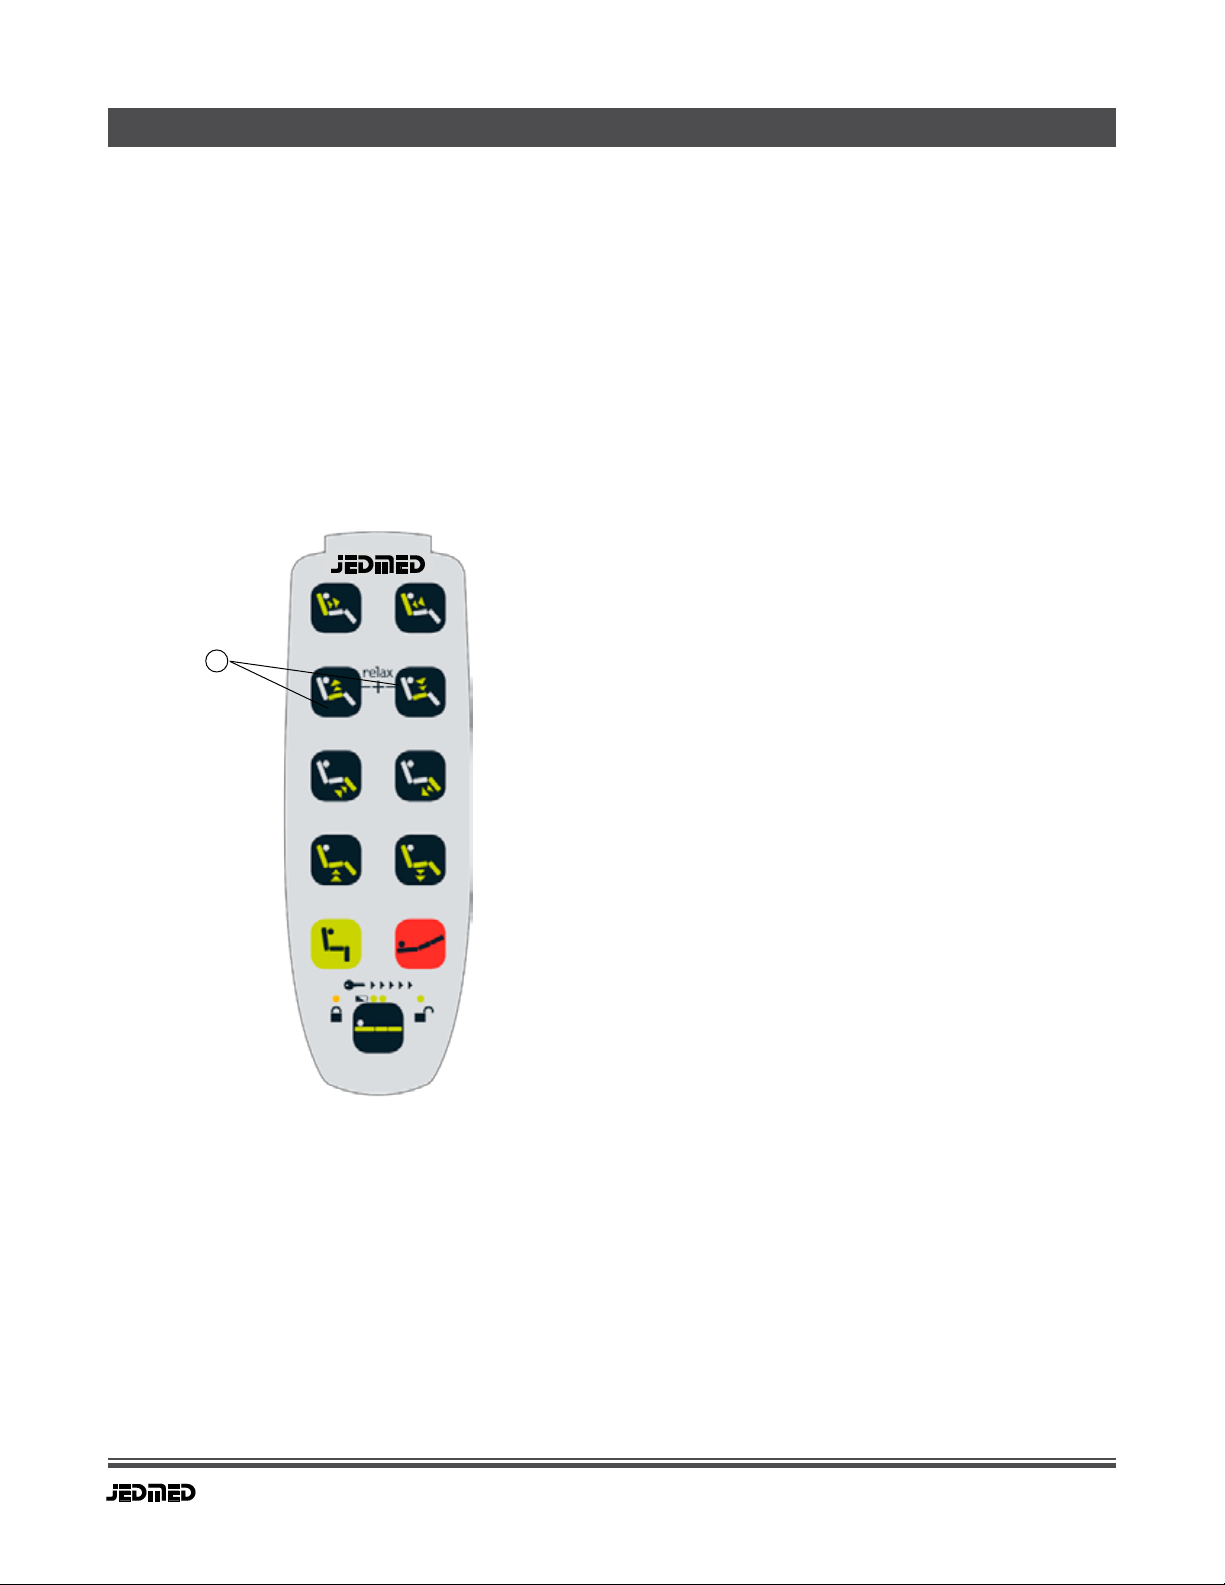
4.3.3 Relax position
Pressing the two seat inclination adjustment buttons (15) simultaneously brings the chair to a comfortable reclining
position for the patient. Pressing the button for the relax position requires increased attention from the user, as
dierent actuators are activated simultaneously. All lying surfaces (backrest, seat surface, and leg section) move
simultaneously to the xed position at maximum speed.
• The backrest lowers slightly
• The seat surface is slightly raised
• The leg section swivels upwards by a predetermined amount
• Careless handling can endanger the patient and third parties or lead to damage to objects or the chair
TIP The seat height remains in the exisiting position
The position is permanently stored in the control unit and cannot be changed
15
15. Relax position: seat inclination - up+down

17
OS1 Mobile Operating Chair Operating / Service Manual
OPERATION CONTINUED
4.3.4 Bed position (at position)
Pressing the button (13) brings the chair into the bed position (at position).
Pressing the button for the bed position requires increased attention from the user, as dierent actuators are acti-
vated simultaneously. All lying surfaces (backrest, seat surface, and leg section) move simultaneously to the xed
position at maximum speed.
• The backrest is brought into a at position
• The seat surface is placed horizontally
• The leg section is swivelled all the way up
• Careless handling can endanger the patient and third parties or lead to damage to objects or the chair
TIP The seat height remains in the existing position.
The position is permanently stored in the control unit and cannot be changed.
13
13. Bed position (at position)
OS1 Mobile Operating Chair Operating / Service Manual
18
OPERATION CONTINUED
4.3.5 Shock position
WARNING Risk of injury due to patient slipping o the chair
This function is intended for medical emergencies only and not for daily use. The patient
position known as the shock position (Trendelenburg position), is also referred to by others
as the low head position. Pressing the button (12) for shock position or the foot switch requires
maximum attention from the user, as dierent actuators are activated simultaneously. All lying
surfaces (backrest, seat surface, and leg section) move simultaneously, at maximum speed,
in shock position.
• The backrest lowers to the head-down position
• The seat surface and the leg section are swivelled all the way up
• When pressing the button or the foot switch (Trendelenburg position), make sure that the
patient does not slip o the chair
• Careless handling can endanger the patient and third parties or lead to damage to objects
or the chair.
TIP The seat height remains in the existing position.
12. Shock position (Trendelenburg position)
12
19
OS1 Mobile Operating Chair Operating / Service Manual
OPERATION CONTINUED
4.3.6 Battery indicator
The regular indicator (14) on the hand control shows the current charge level of the quick-change battery.
The indicator turns o when the chair is in stand-by mode.
TIP Depending on the charging status of the quick-change battery, the control unit changes to stand-by either
after 120 minutes (charging status > 40%) or 10 minutes (charging status < 40%). The corresponding
operation control LED and the battery indicator on the hand control switch turns o. A chair in stand-by
mode cannot be activated by the magnetic key (see Unlocking and locking the hand control). Press any
button on the hand control to activate. The current charge level is now displayed.
A green LED (left) and a yellow LED (right) in combination indicate the current charging level. If the charge level
is below 30%, a short beep will also sound when a button is pressed. During charging, the two LEDs are ashing
alternately. The fully charged battery is indicated by the permanent lighting of the two LEDs.
The control unit distinguishes between the following charging levels:
Charge level Yellow LED (left) Green LED (right) Sound signal
100 - 50% on on none
49 - 30% on o none
< 30% ashes o short
During charging alternate ashing none
Charging completed on on none
NOTE If the battery falls below the 30% limit (yellow LED (left) ashes), the battery should be charged immediately
or replaced with a fully charged battery in order to achieve the best possible service life (see Charging the
battery). When the charge level reaches the critical level, the control unit immediately deactivates all
movements. There is a danger that the initiated movement cannot be nished or that the processor in the
control unit can no longer detect the position of the drives.
14. Battery indicator
14
OS1 Mobile Operating Chair Operating / Service Manual
20
OPERATION CONTINUED
4.4 Charging the battery
Notes on handling the battery
TIP Charge the battery for at least 24 hours before rst use. The battery is then available for normal operation
without restriction. It is not possible to overcharge the battery. The chair can be adjusted during the charging
process.
NOTE Proper handling increases the service life of the battery. Avoid deep discharge of the battery. Deeply
discharged batteries can be damaged to such an extent that premature replacement is necessary. In
order to guarantee the electrical functionality at all times or the longest battery life, the battery should be
charged < 30% or replaced with a fully charged battery (see Battery indicator). Fully charged batteries
should not be stored for longer than 3 months without recharging. The battery must be fully charged or
replaced with a fully charged battery every 3 months at the latest, otherwise it will be damaged due to
self-discharge. The battery is a wearing part and must be replaced after 4 years at the latest, or even
earlier, depending on the intensity of use.
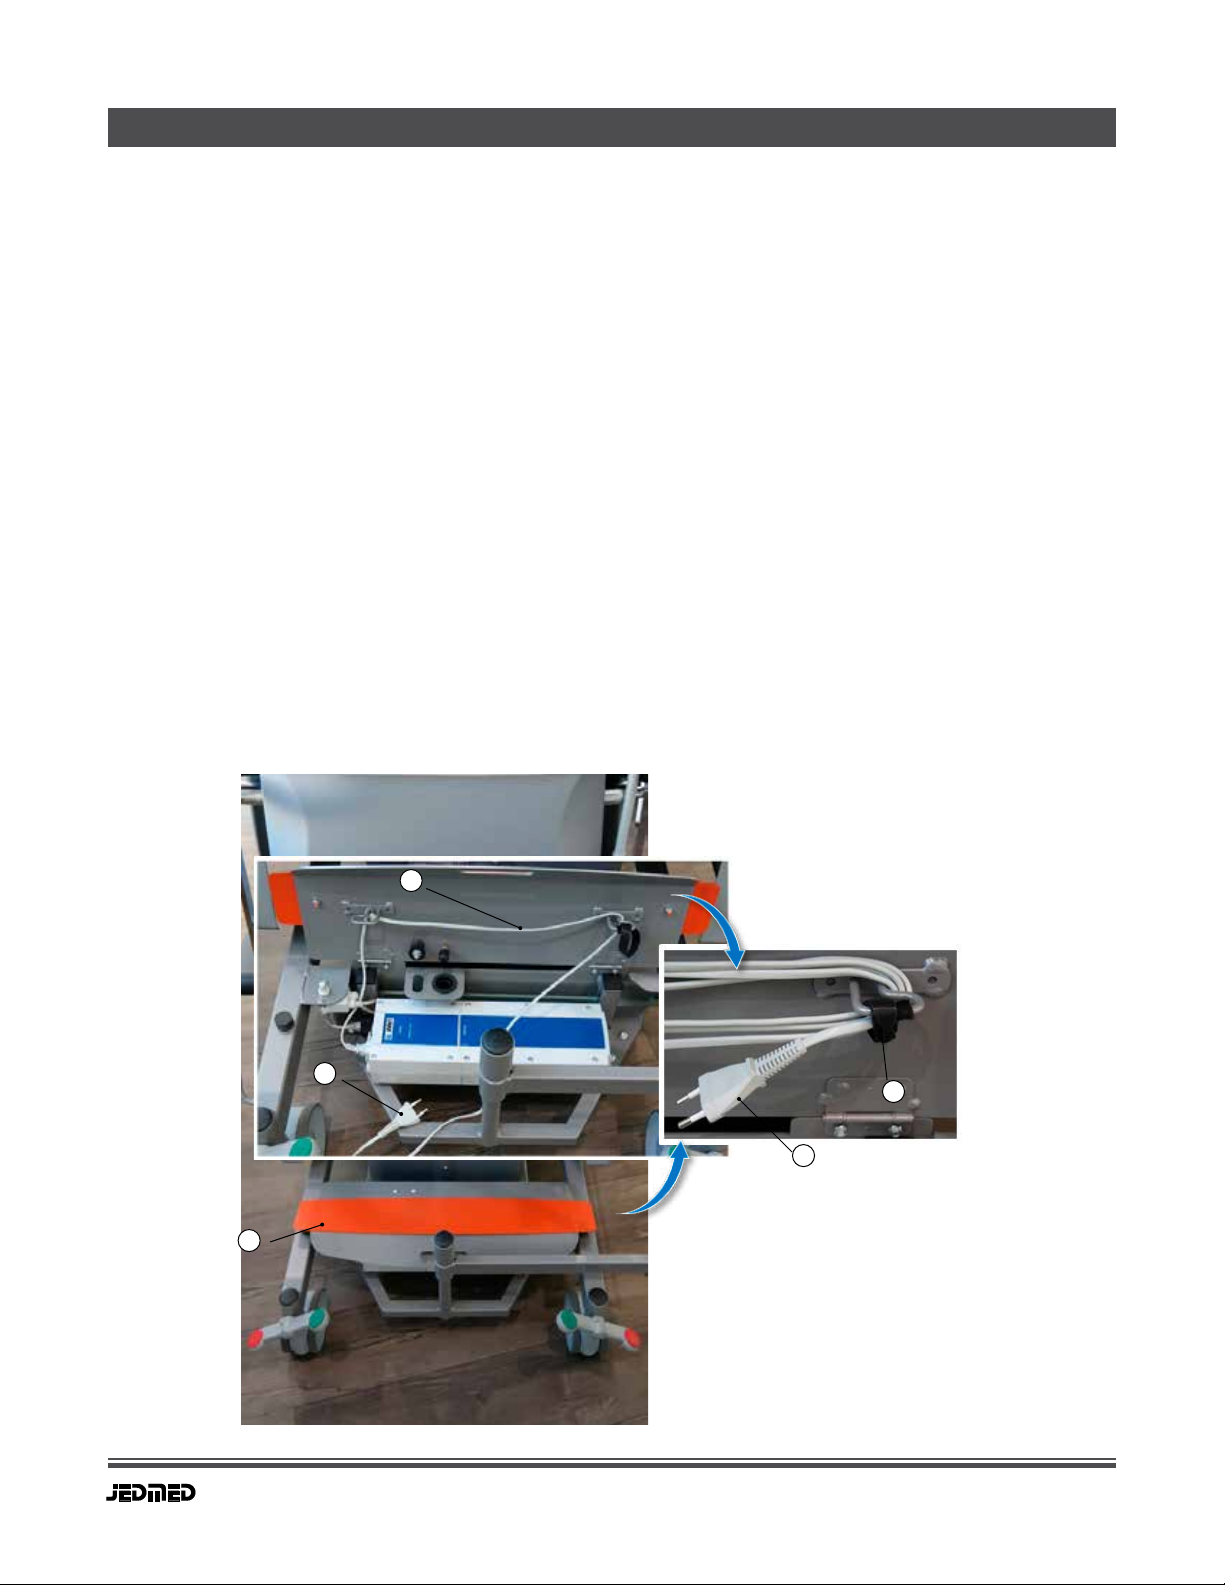
Insert the mains plug
Fold up the cover (1). Uncoil the mains cable (2) to the required length. If necessary, loosen the Velcro® strap (3)
beforehand. Insert the mains plug (4) into a socket.
2
4
1
4
3
1. Cover
2. Mains cable
3. Velcro strap
4. Mains plug
Table of contents
Other Jedmed Medical Equipment manuals

Jedmed
Jedmed Omni-Steth User manual

Jedmed
Jedmed S-II Plus Instruction and safety manual

Jedmed
Jedmed Combo 50 User manual

Jedmed
Jedmed Ergo-Flex User manual

Jedmed
Jedmed PHOENIX III User manual

Jedmed
Jedmed MACHIDA User manual

Jedmed
Jedmed Horus Scope 3 Series User manual

Jedmed
Jedmed Classic CSC ENT Instruction and safety manual

Jedmed
Jedmed Horus Scope User manual


