Jedmed Classic CSC ENT Instruction and safety manual

Operating / Service
Manual
Employee-Owned
IMPORTANT: Read all instructions before assembling or using this device.
Instructions for Use
Classic CSC ENT Cabinet

3
Classic CSC Operating / Service Manual
COPYRIGHT © 2011 JEDMED Instrument Company
All rights reserved.
pmnl127
Rev. 1
06-2020
For decades, JEDMED Instrument Company has built its reputation on principles
of quality, integrity, innovation and value. Continuous research and development
coupled with exceptional customer service and a world-class quality system has
placed JEDMED as an industry leader.
As always, our focus remains on you, our valued customer. Building rewarding
and lasting relationships is the cornerstone of JEDMED's business philosophy.
JEDMED is committed to delivering reliable and cost-effective solutions to
medical professionals everywhere.
The employee-owners of JEDMED would like to take this opportunity to thank
you for all your support. We are pleased and proud to serve the ever-changing
medical community.
Sincerely,

3
Classic CSC Operating / Service Manual
Precautions.....................................................4
Description......................................................5
Unpacking ......................................................5
Parts Identification.......................................6-9
Options.....................................................10-11
Assembly.......................................................12
Operation..................................................13-15
Cleaning / Disinfection..............................16-17
Maintenance..................................................16
Reorder Information..................................18-19
Specifications............................................20-22
Section Page
OPERATION
SERVICE
OPERATING
Information .....................................................24
Troubleshooting...............................................25
Diagrams.....................................................26-27
Note: Specifications subject to change without notice.
CONTENTS

Classic CSC Operating / Service Manual
4
5
Classic CSC Operating / Service Manual
The following conventions are used throughout this manual:
PRECAUTIONS
- Allow operation only by qualified personnel.
- Do not leave device(s) operating while unattended.
- Always use "Universal Precautions" when handling potentially infectious material.
- Always clean, disinfect and sterilize equipment between patients
- Use care when introducing pressurized medications to patients.
- When using fiberoptic light sources, keep flammables away from light port,
fiberoptic cable ends and endoscope tip.
- Trap canister and suction tubing are single-use, disposable items. Do not reuse.
Reuse may result in canister rupture and release of potentially
infectious material.
- Disconnect from power before cleaning, servicing or storing.
- Do not allow liquid to enter any parts of this device.
- Specula and other instruments may pose choking hazard for smalll children.
- Always replace fuse(s) with same type and rating.
Safety Precautions
Alerts user to the possibility of PERSONAL INJURY.
WARNING
!
Alerts user to the possibility of DAMAGE to the EQUIPMENT.
v
Alerts user to PERTINENT FACTS or CONDITIONS.
Ø
CAUTION
NOTE
Photos throughout this manual depict the standard Classic CSC
Cabinet for simplicity. The stainless steel version of the cabinet
is equivalent except as indicated.
ØNOTE

Classic CSC Operating / Service Manual
4
5
Classic CSC Operating / Service Manual
DESCRIPTION
UNPACKING
The JEDMED Classic CSC ENT Cabinet is a cost-effective workstation for the otolaryngic
specialist. Its proven design has remained the industry standard for decades.
The contemporary look of the Classic CSC will enhance the appearance of any exam room.
Several versatile color choices are available making it easy to coordinate with most any
decor.
Standard configuration comes complete with all pumps, tubing, canisters, and spray bottles
necessary for a basic ENT set-up. A variety of options are available allowing the cabinet to be
customized to the user’s specific work-style. Fully updated, the Classic CSC incorporates all
user-friendly, low-voltage controls.
A stainless steel version of the cabinet is also available for users who prefer this timeless material.
It is equivalent in form and overall dimensions to the standard Classic CSC.
The Classic CSC ENT Cabinet is a quality-designed and manufactured medical device. Given
reasonable care, this product will provide many years of trouble-free service.
SHIPPED IN CARTON:
Cut bands holding carton together.
Remove top end cap.
Remove main carton tube.
Carefully lift cabinet off of bottom end cap (skid) and place on desired floor location
(2 people required).
Carefully cut stretch-wrap away from cabinet.
SHIPPED VIA MOVING VAN:
Carefully cut stretch-wrap away from cabinet.
1.
1.
2.
3.
4.
5.
Any shipping damage should be documented and
reported immediately to the carrier or JEDMED.
ØNOTE
Classic CSC Operating / Service Manual
6
7
Classic CSC Operating / Service Manual
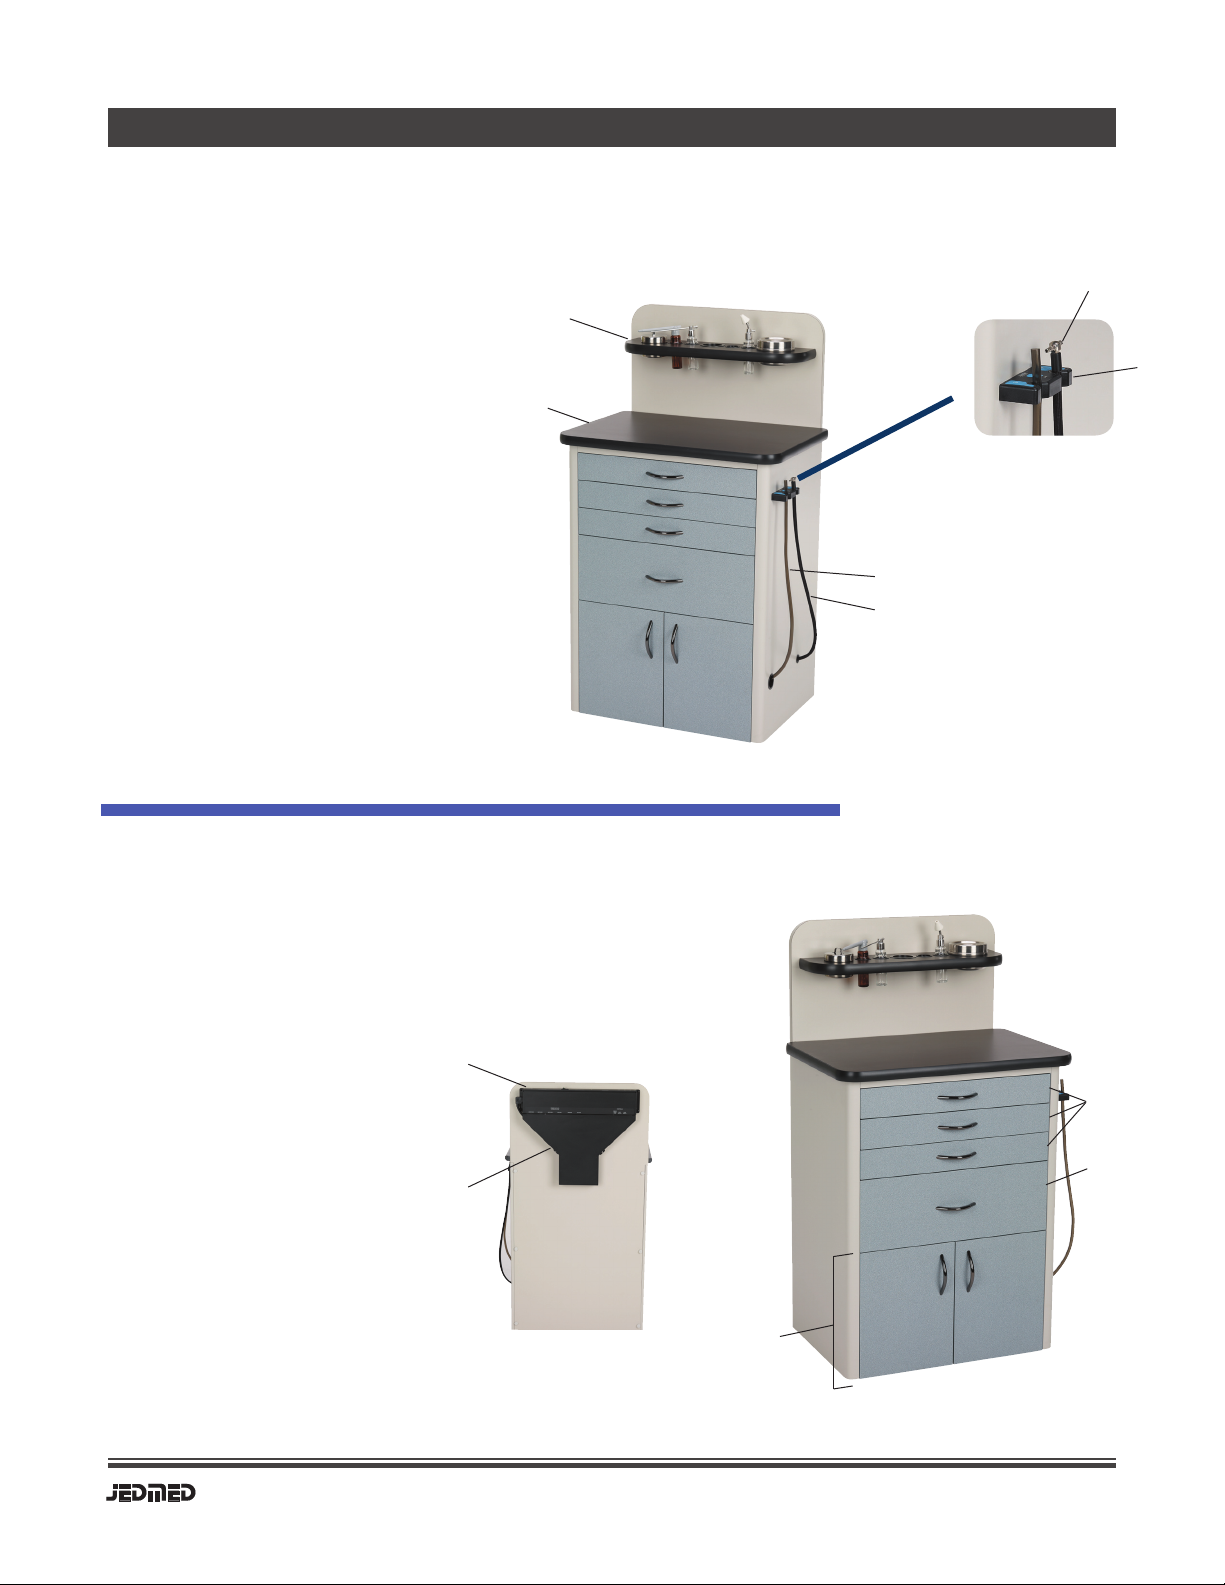
PARTS IDENTIFICATION
Bottle shelf
Work surface
Tubing hanger
Pressure connection
Suction tubing
Pressure tubing
1.
2.
3.
4.
5.
6.
(right side)
Main Cabinet
Instrument drawer
Storage drawer
Pump compartment
& trap canister
Control unit
Cord cover
1.
2.
3.
4.
5.
(left side)
Main Cabinet
Rear View
1
2
5
6
4
1
3
2
5
Tubing hanger
4
3
Classic CSC Operating / Service Manual
6
7
Classic CSC Operating / Service Manual
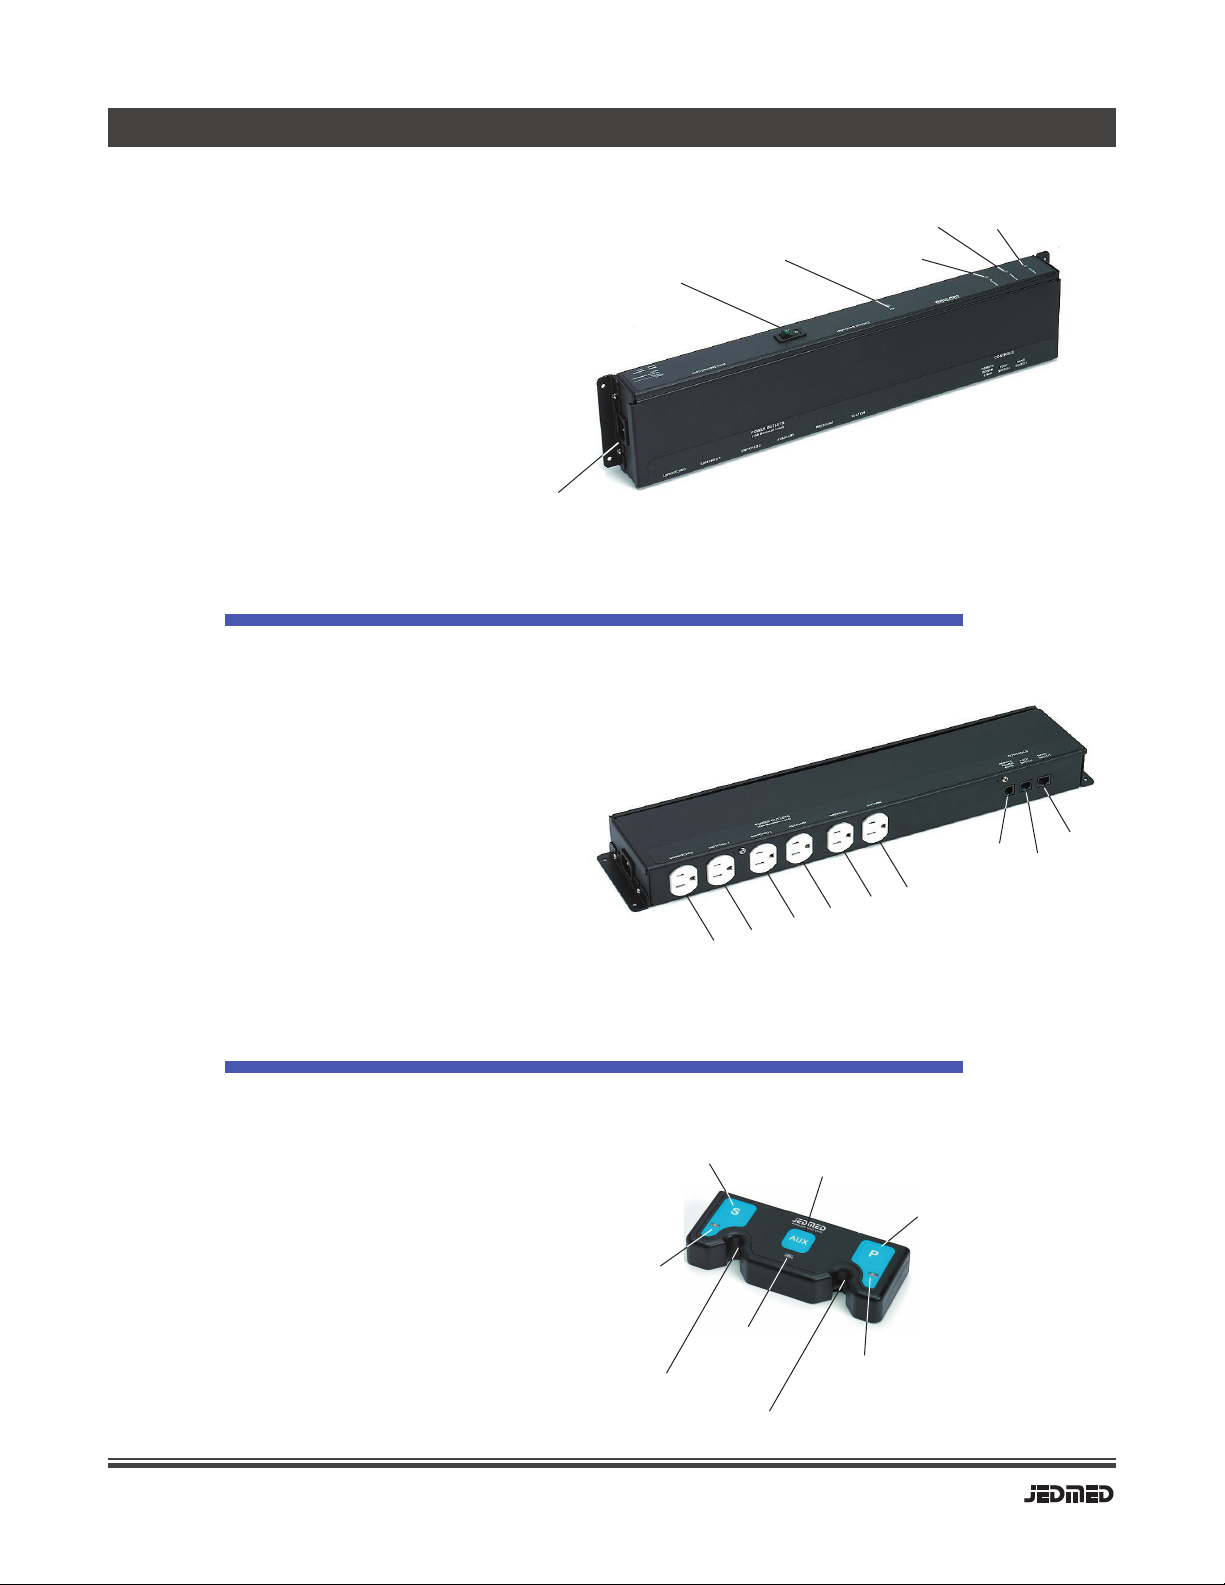
Control Unit
Power input
Main power switch
Power indicator
Auxiliary indicator
Pressure indicator
Suction indicator
1.
2.
3.
4.
5.
6.
PARTS IDENTIFICATION
1
Control Unit
Unswitched outlet
Switched 1 outlet
Switched 2 outlet
Auxiliary outlet
Pressure outlet
Suction outlet
Remote power strip connection
Footswitch connection
Tubing hanger (hand switch) connection
1.
2.
3.
4.
5.
6.
7.
8.
9.
Tubing Hanger (hand switch) Controls
Suction switch
Suction indicator
Auxiliary switch
Auxiliary indicator
Pressure switch
Pressure indicator
Internal switches (automatic version only)
1.
2.
3.
4.
5.
6.
7.
2
34
56
1
78
9
23456
1
2
4
6
3
5
7
7
(top view)
(bottom view)
Classic CSC Operating / Service Manual
8
9
Classic CSC Operating / Service Manual
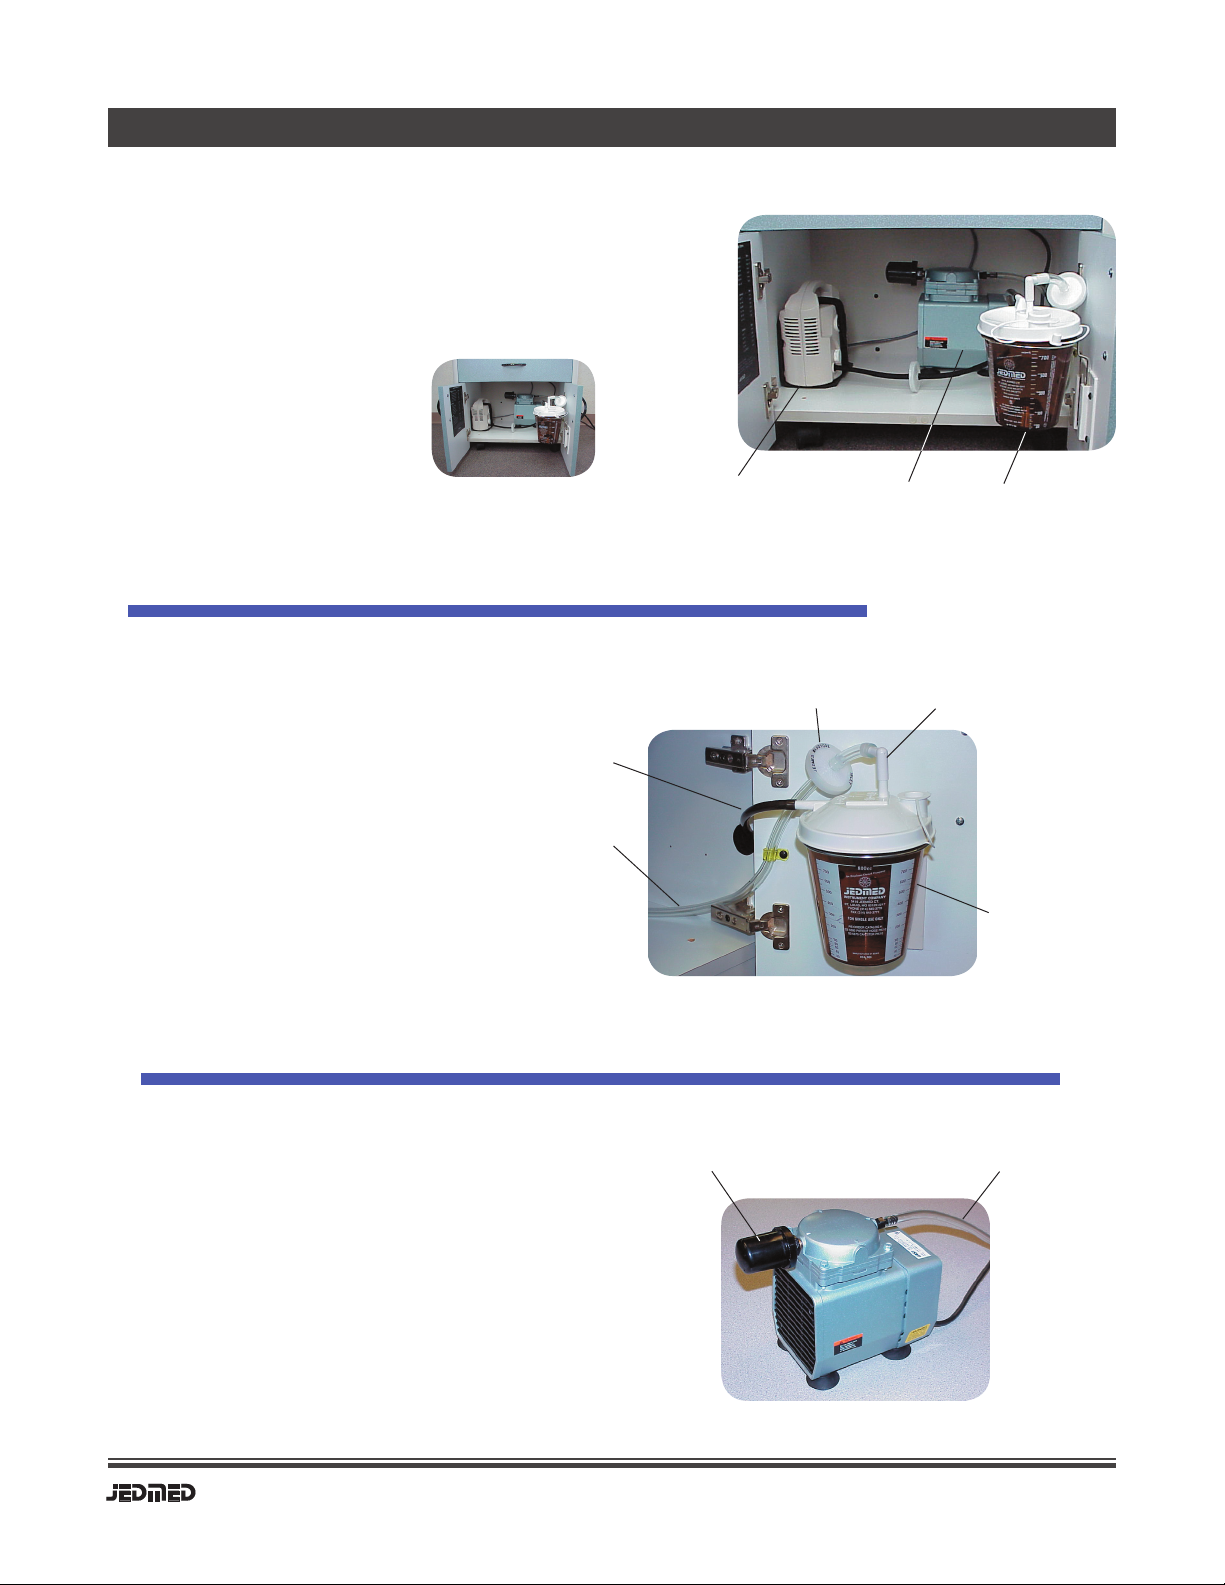
PARTS IDENTIFICATION
Trap canister configuration
1.
2.
3.
Trap canister & lid
Patient tubing
Suction tubing (to pump)
Hydrophobic filter
Elbow fitting
1.
2.
3.
4.
5.
Suction Trap System
Pump Compartment Components
Pump compartment
located in base of cabinet
1
1
2
3
45
2
Pressure pump
Suction pump
Trap canister
3
1.
2.
Suction Pump Detail
21
Suction tubing
Muffler
Suction pump
Classic CSC Operating / Service Manual
8
9
Classic CSC Operating / Service Manual
PARTS IDENTIFICATION
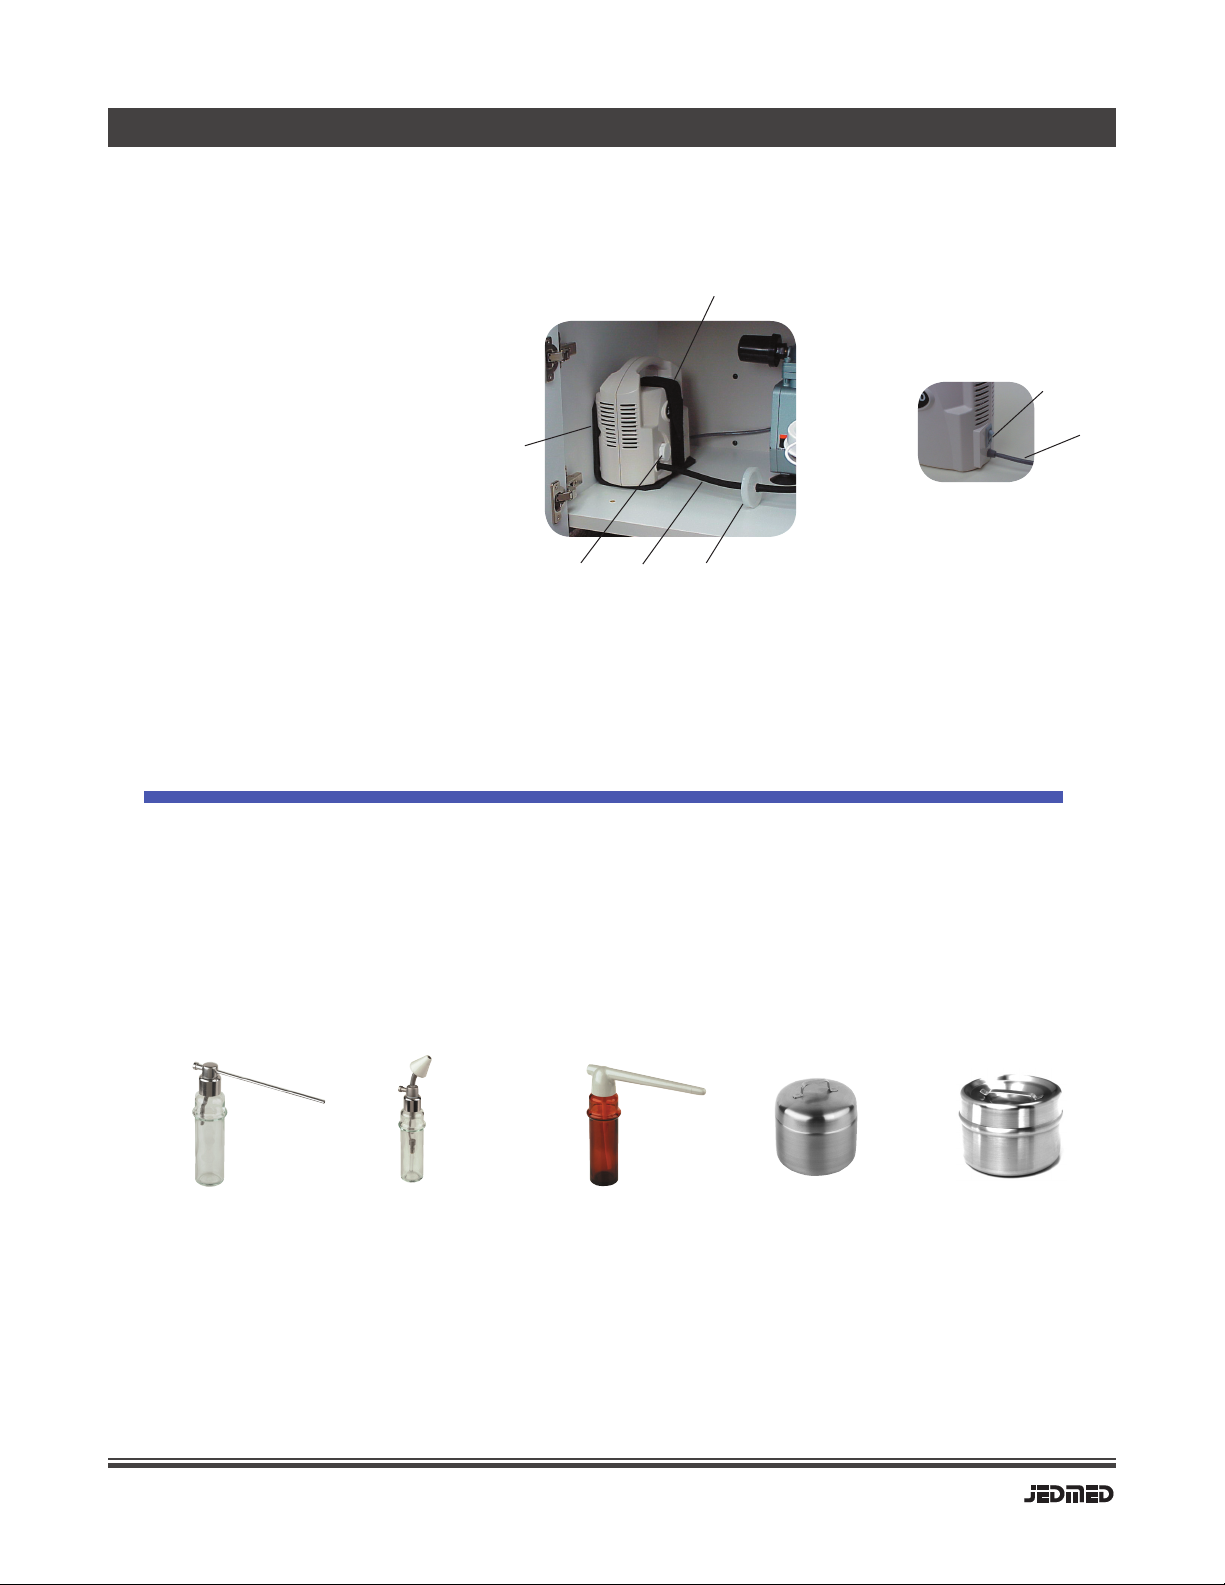
Accessories
Powder Blower
#175
Nebulizer
#180 Atomizer
#286
3” Cotton
Container
4” Gauze
Container
Power switch
Power cord
Intake filter
Pressure tubing
Hydrophobic filter (pressure)
Securing strap
Foam pad
1.
2.
3.
4.
5.
6.
7.
Pressure Pump Detail
1
2
35
4
6
7
Pressure pump
(right side)

Classic CSC Operating / Service Manual
10
11
Classic CSC Operating / Service Manual
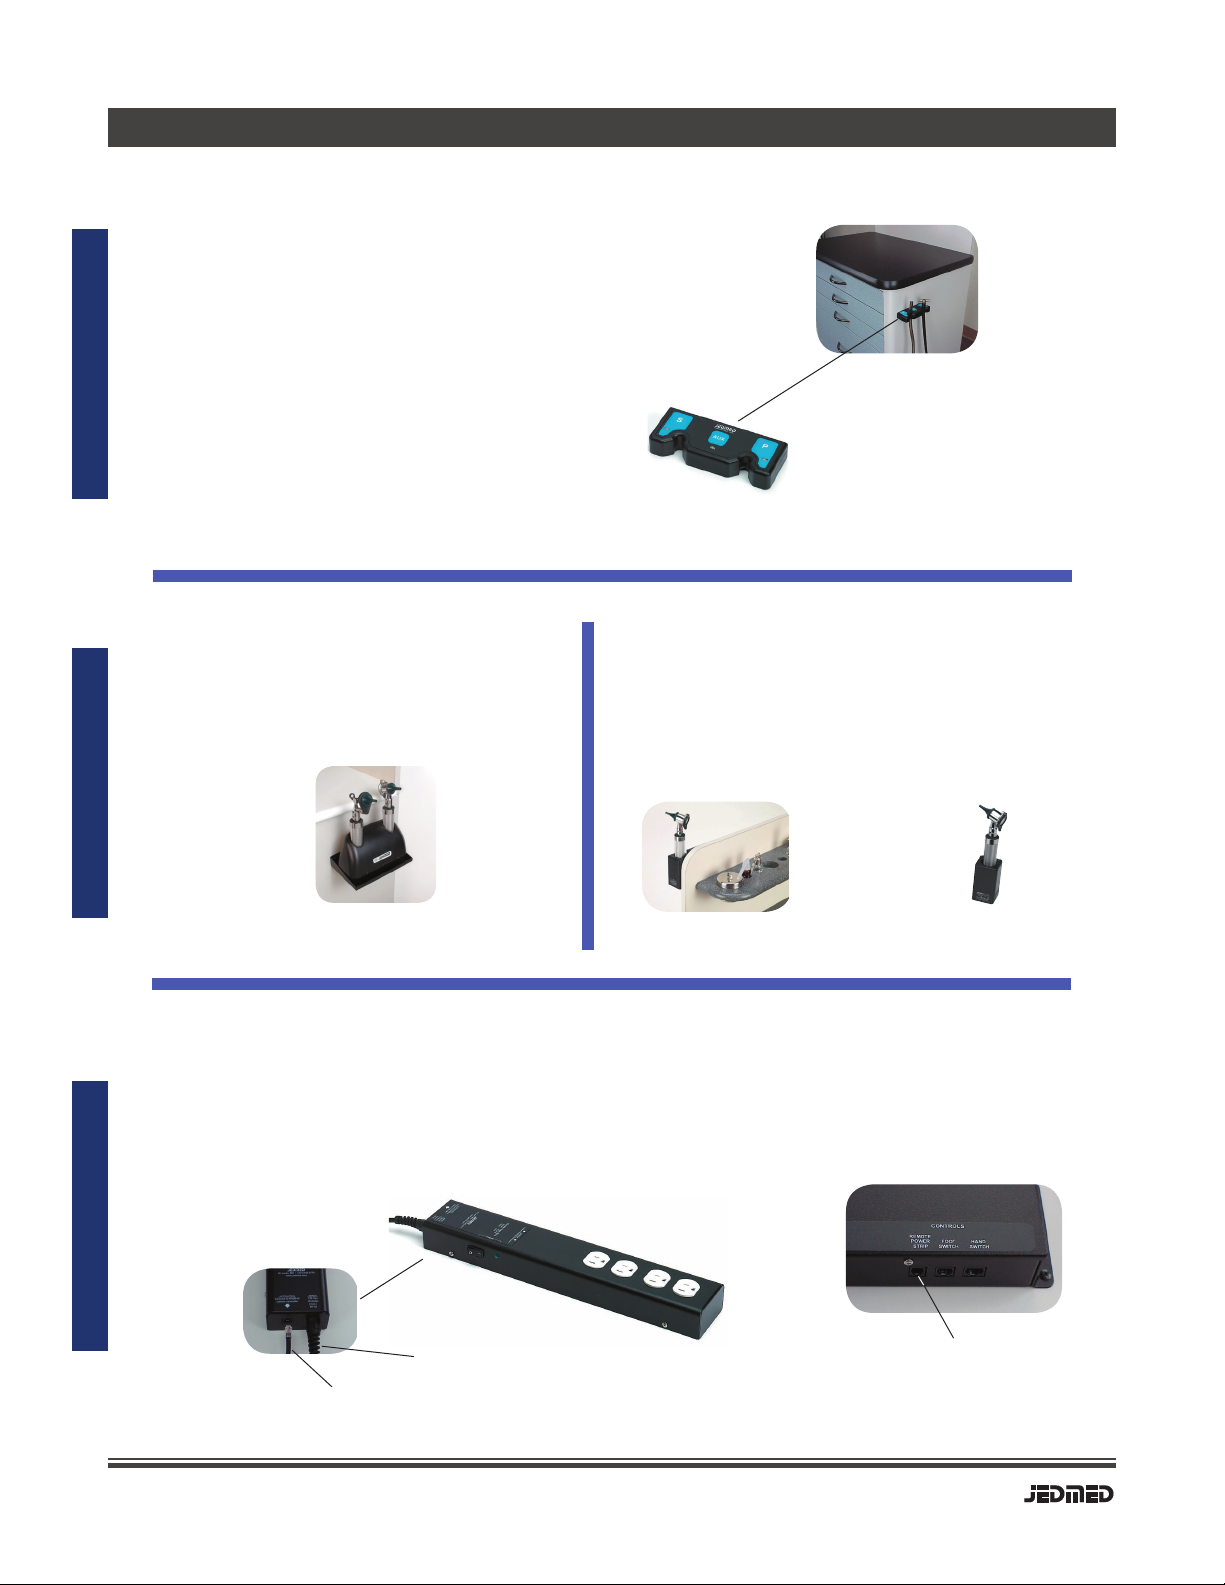
PARTS IDENTIFICATION - Options
Not available on stainless steel version.
ØNOTE
Cabinet on Riser
Standing Riser (10”)
with drawer
Riser Drawer
Flip-Up Shelf
Extended
Retracted
Not available on stainless steel version.
ØNOTE
Footswitch Option
Remote Footswitch
Plugs into rear of
control box
OptionOptionOption
Classic CSC Operating / Service Manual
10
11
Classic CSC Operating / Service Manual
Automatic Switching Tubing Hanger
(pressure & suction)
Otoscope Recharger Unit (Welch Allyn®)
Automatic
switching option
Otoscope Option
Remote-Controlled Power Strip
Control cable plugs into rear
of control box
Pressure or suction pumps start automatically
when tubing is lifted out of hanger bracket.
Rechargeable handle unit for
otoscopes.
Remote power strip is controlled by cabinet power. When cabinet control
box is switched off, power to remote outlet is also shut off. Plug microscope
and/or power chair into remote power strip to keep children from tampering
with sensitive equipment while physician is out of the room.
control
cable
power
cord
PARTS IDENTIFICATION - Options
OptionOptionOption
Welch Allyn® is a registered trademark of Welch Allyn Corporation
JEDMED K2 Recharger
Works with traditional Welch Allyn® 2.5V
or 3.5V rechargeable handles.
Integrated Stand-Alone
OR

Classic CSC Operating / Service Manual
12
13
Classic CSC Operating / Service Manual
HOSE BARB
(FITTING)
MUFFLER
SUCTION PUMP
Pressure pump comes pre-installed in cabinet.
ØNOTE
1. Attach fittings to pumps (if required).
2. Place pump in cabinet.
3. Connect suction tubing (clear) to suction pump inlet.
4. Plug pump into "suction" receptacle
located on bottom of control box.
INSTALL SUCTION PUMP
ASSEMBLY INSTRUCTIONS
1. Place lid on canister and press to seal securely.
2. Slip canister with lid into metal support ring.
3. Attach tapered elbow fitting (on end of pump tubing) to top
of canister.
4. Attach dark gray patient tubing to “Patient” inlet on canister.
INSTALL TRAP CANISTER
Options are normally supplied fully assembled and installed at the factory. If options are
ordered after initial cabinet purchase, follow instructions received with each option.
INSTALL OPTIONS
Tubing Connection
Assembly
Pump placement
Trap canister

Classic CSC Operating / Service Manual
12
13
Classic CSC Operating / Service Manual
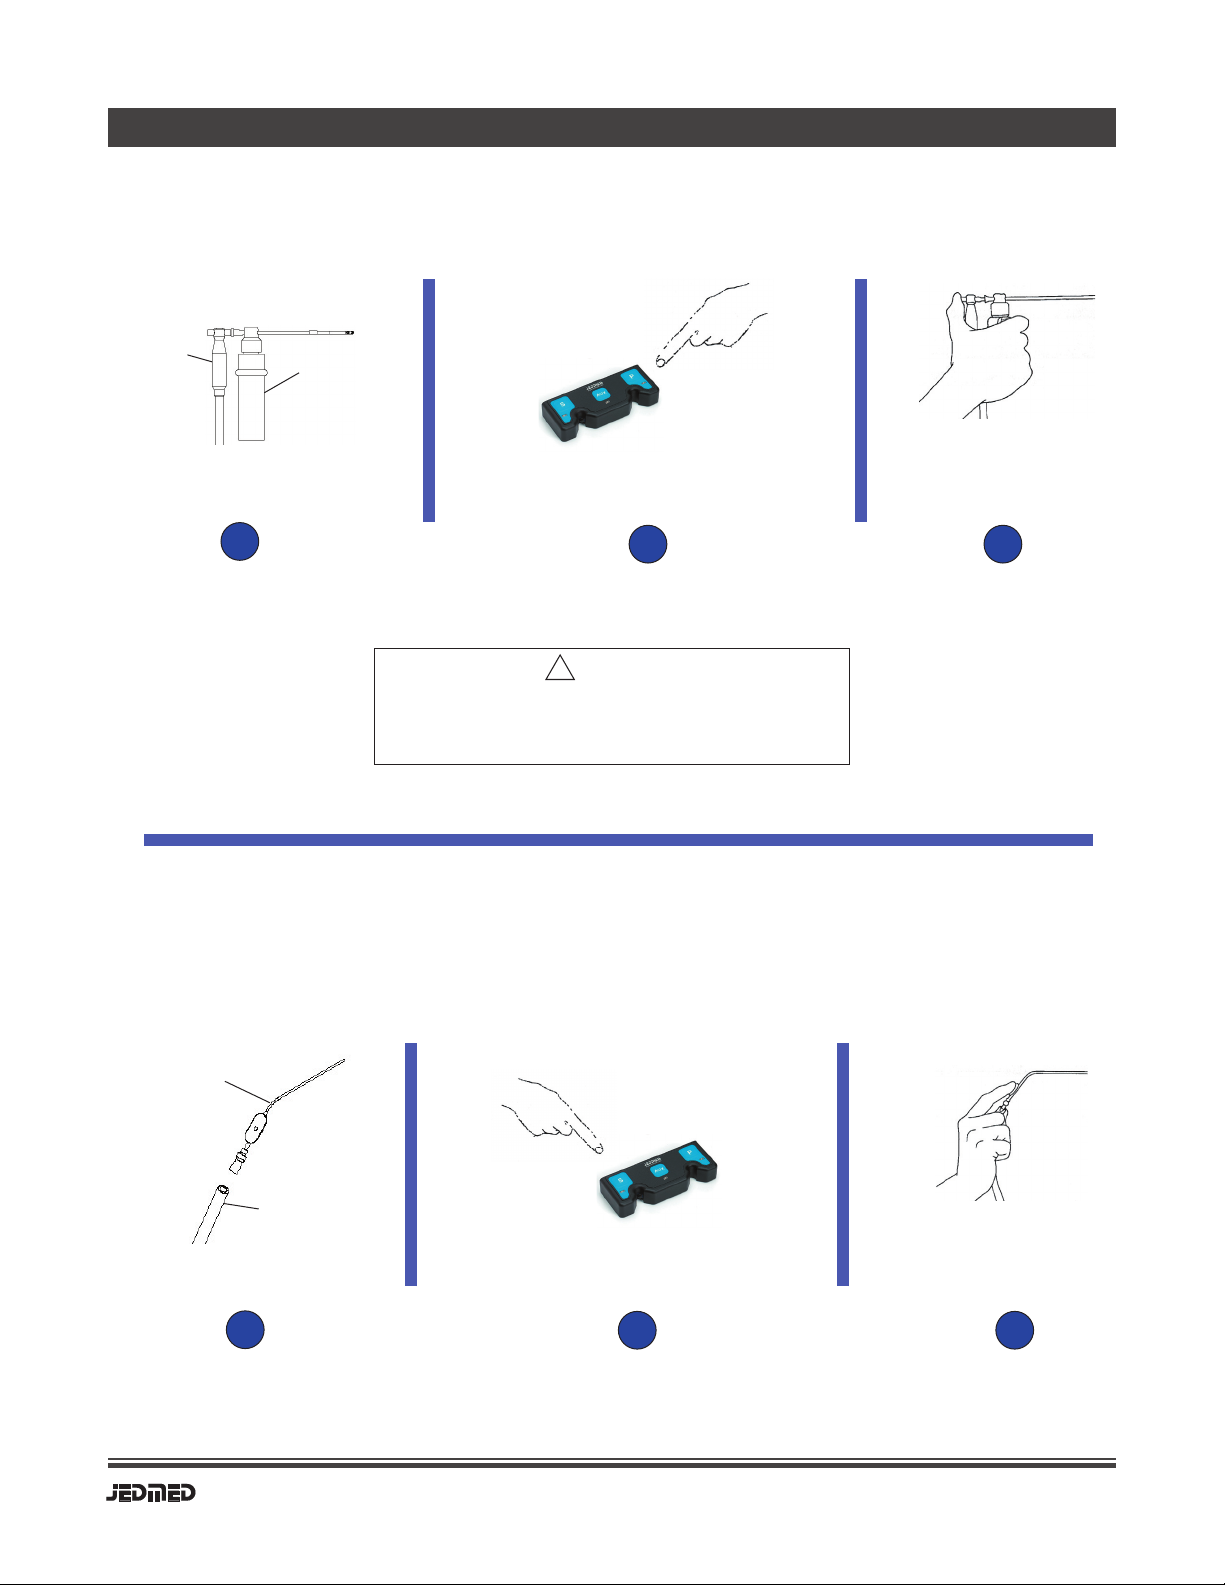
DEVICE OPERATION
Controls
1
3
Possible explosion hazard if used in the presence
of flammable anesthetics.
Warning
!
4 5 2
1. Power Switch (main)
2. Power Indicator
3. Suction Indicator
4. Pressure Indicator
5. Auxiliary Indicator
Shuts off all AC power to the cabinet except “unswitched”
receptacle on bottom of control box. "Unswitched" receptacle
may be used for rechargeable otoscope unit or other device
which requires power even if control box is shut off.
Indicates when power to cabinet is switched "ON"
Indicates when suction pump is energized.
Indicates when pressure pump is energized.
Indicates when auxiliary device is energized. "AUX" receptacle
is located on bottom of control box.
- Depress "P" on hand switch to start pressure pump.
Pressure illuminator lights and pump runs.
- Press "P" again to stop pump.
- Pump may be optionally controlled using footswitch or
automatic tubing hanger. Regardless which switch
turns pump on, indicators on all devices will light.
Likewise, pump may be turned off by using any control
(hand switch, footswitch or automatic tubing hanger).
- Suction pump and Auxiliary outlet operate similarly.
- Various options may be plugged into Auxiliary outlet
and be controlled via "AUX" switch (power limit: 2 amps).
Top view
Typical Use
Footswitch
Hand Switch
Classic CSC Operating / Service Manual
14
15
Classic CSC Operating / Service Manual
DEVICE OPERATION
Always exercise care when introducing pressurized medications
onto the site. Use only enough pressure to accomplish the
task.
Warning
!
SPRAYING (Pressure)
Connect bottle Turn on pressure
Begin spraying
(Partially cover bleeder
hole with thumb)
(Tapered Luer fitting)
Install cannula
Begin aspirating
Turn on suction
ASPIRATING (Suction)
pressure
handle spray
bottle
patient
tubing
suction
cannula
(Cover bleeder hole with index finger
to draw vacuum)
123
123
Classic CSC Operating / Service Manual
14
15
Classic CSC Operating / Service Manual
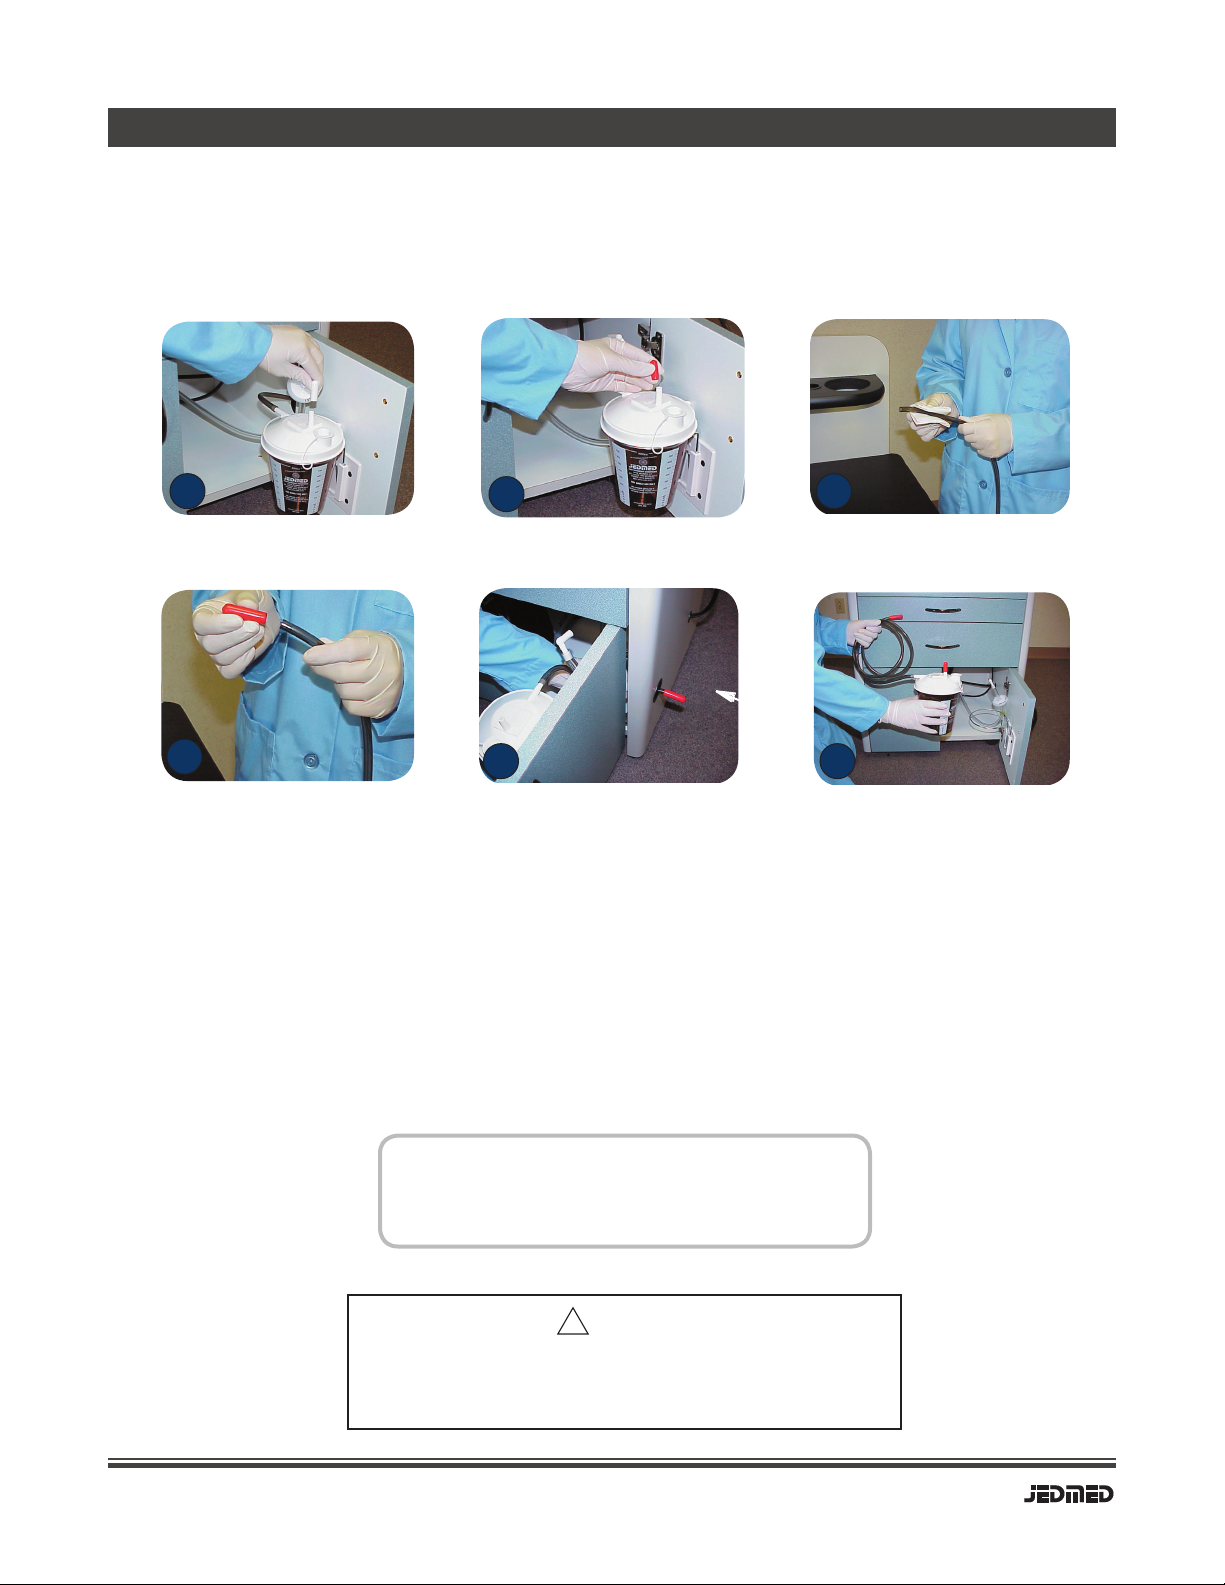
DEVICE OPERATION
Securely Cap Patient Tubing Carefully Pass Tubing
Through Cabinet
Remove & Discard Properly
REPLACEMENT OF TRAP CANISTER & PATIENT TUBING
Disconnect Pump Tubing Securely Cap Pump Port
on Canister
Disinfect Patient Tubing
Trap canister and suction tubing are single-use, disposable items.
Do not reuse. Reuse may result in canister rupture and release of
potentially infectious material.
1
Aspirated bodily fluids are considered a BIO-HAZARD. ALWAYS use
“Universal Precautions” when handling any such potentially infectious
material. Dispose of properly in accordance with federal, state, and local
regulations.
Warning
!
23
45 6
ØNOTE
To avoid contaminating cabinet, do not contact opening or
cabinet wall with tubing or gloves as tubing is passed through.
If contacted, disinfect area immediately.
Classic CSC Operating / Service Manual
16
17
Classic CSC Operating / Service Manual
CLEANING - DISINFECTION - MAINTENANCE
Always unplug unit from main power outlet before
cleaning, disinfecting, maintenance or service.
WARNING
!
System may be wiped clean using a soft cloth moistened with water and a mild detergent.
Do not use excessive liquids or allow liquids to enter control box, pumps, cable connections
or other components. Check that system is thorougly dry before reconnecting power.
Cleaning
System should be wiped down with a cold disinfecting solution and a disposable cloth. Do
not allow disinfectant solution to remain on product any longer then necessary to ensure
proper disinfecting. Before using, test new disinfectants in an inconspicuous surface and
check for adverse results. Follow disinfectant manufacturer's instructions for use.
Disinfection
Pressure intake filter should be changed out at a minimum of every
two (2) months, or as needed.
Hydrophobic filters should be changed out at a mimimun of every
three (3) months, or as needed.
All filters simply press into place.
Scheduled Maintenance
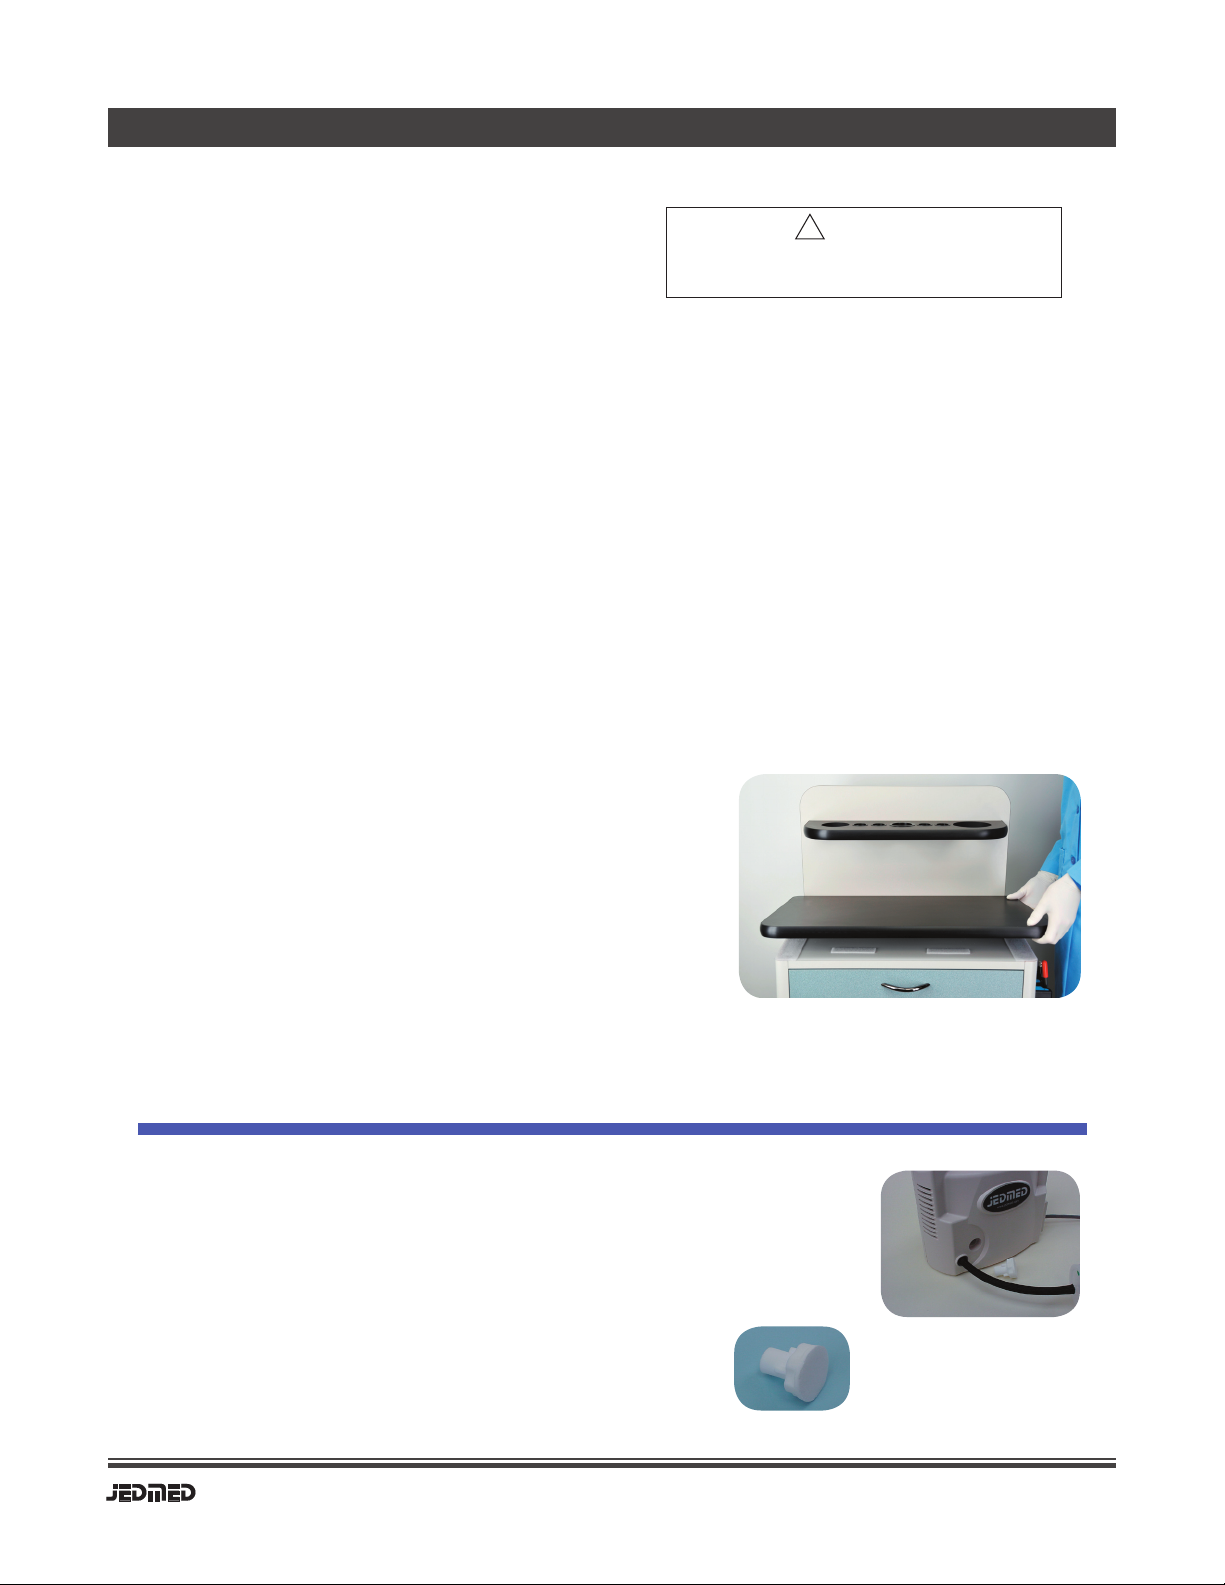
Intake filter removed
Removal of Work Surface
Lift up slowly and firmly along front edge
of work surface
(secured with hook & loop material)
As a convenience, work surface is held securely in
place with hook & loop material. If needed, removal is
accomplished by simply lifting up slowly.
Intake filter
Classic CSC Operating / Service Manual
16
17
Classic CSC Operating / Service Manual
FILTERS
Filter Wetting - A filter can become “wetted” if the filter
membrane comes in contact with alcohol or any other
solvent. “Wetting” causes the filter to lose its hydrophobic
(water-shedding) characteristics. This causes the filter to
allow liquids to pass which would normally be blocked.
Hydrophobic filters are incorporated to trap bacteria and
help protect pumps from liquids. It is important to replace
filters regularly as well as any time they may have become
wetted.
Air Flow Direction
Pump Side
Pressure Filter Spray Bottle
Side
Air Flow Direction
Suction Filter
Trap bottle
side
Pump Side
About Hydrophobic Filters
Both the pressure and suction pumps are fitted with in-line
hydrophobic filters. A “hydrophobic” filter allows air to pass
through but blocks aqueous (water-based) fluids. The pore size
of these filters also traps most common forms of bacteria.
If any aqueous solutions (including bodily fluids) contact the
membrane of the hydrophobic filter, the pores will close-down
and lock out both liquids and air from passing. This will result in
loss of suction and may cause the pump to have difficulty starting.
Filters may be fully blocked or only partially blocked depending
on how much liquid has entered.
Filter life may vary due to several factors. Filters should be checked
weekly for the following:
1. Darkening of color (accumulation of particles)
2. Variation in flow rate (decreased flow)
3. Liquid ingress (suction overflow)
If any conditions noted above are observed, replace filters.
At a minimum, filters should be changed at least once per month.
Replace Pump Filters
1. Pull tubing loose from hose barbs on filter.
2. Install new filter by pushing firmly onto filter hose barbs.
Orientation is important: Refer to diagrams.
Always observe Universal Precautions when handling
and disposing of hydrophobic filters.
WARNING
!
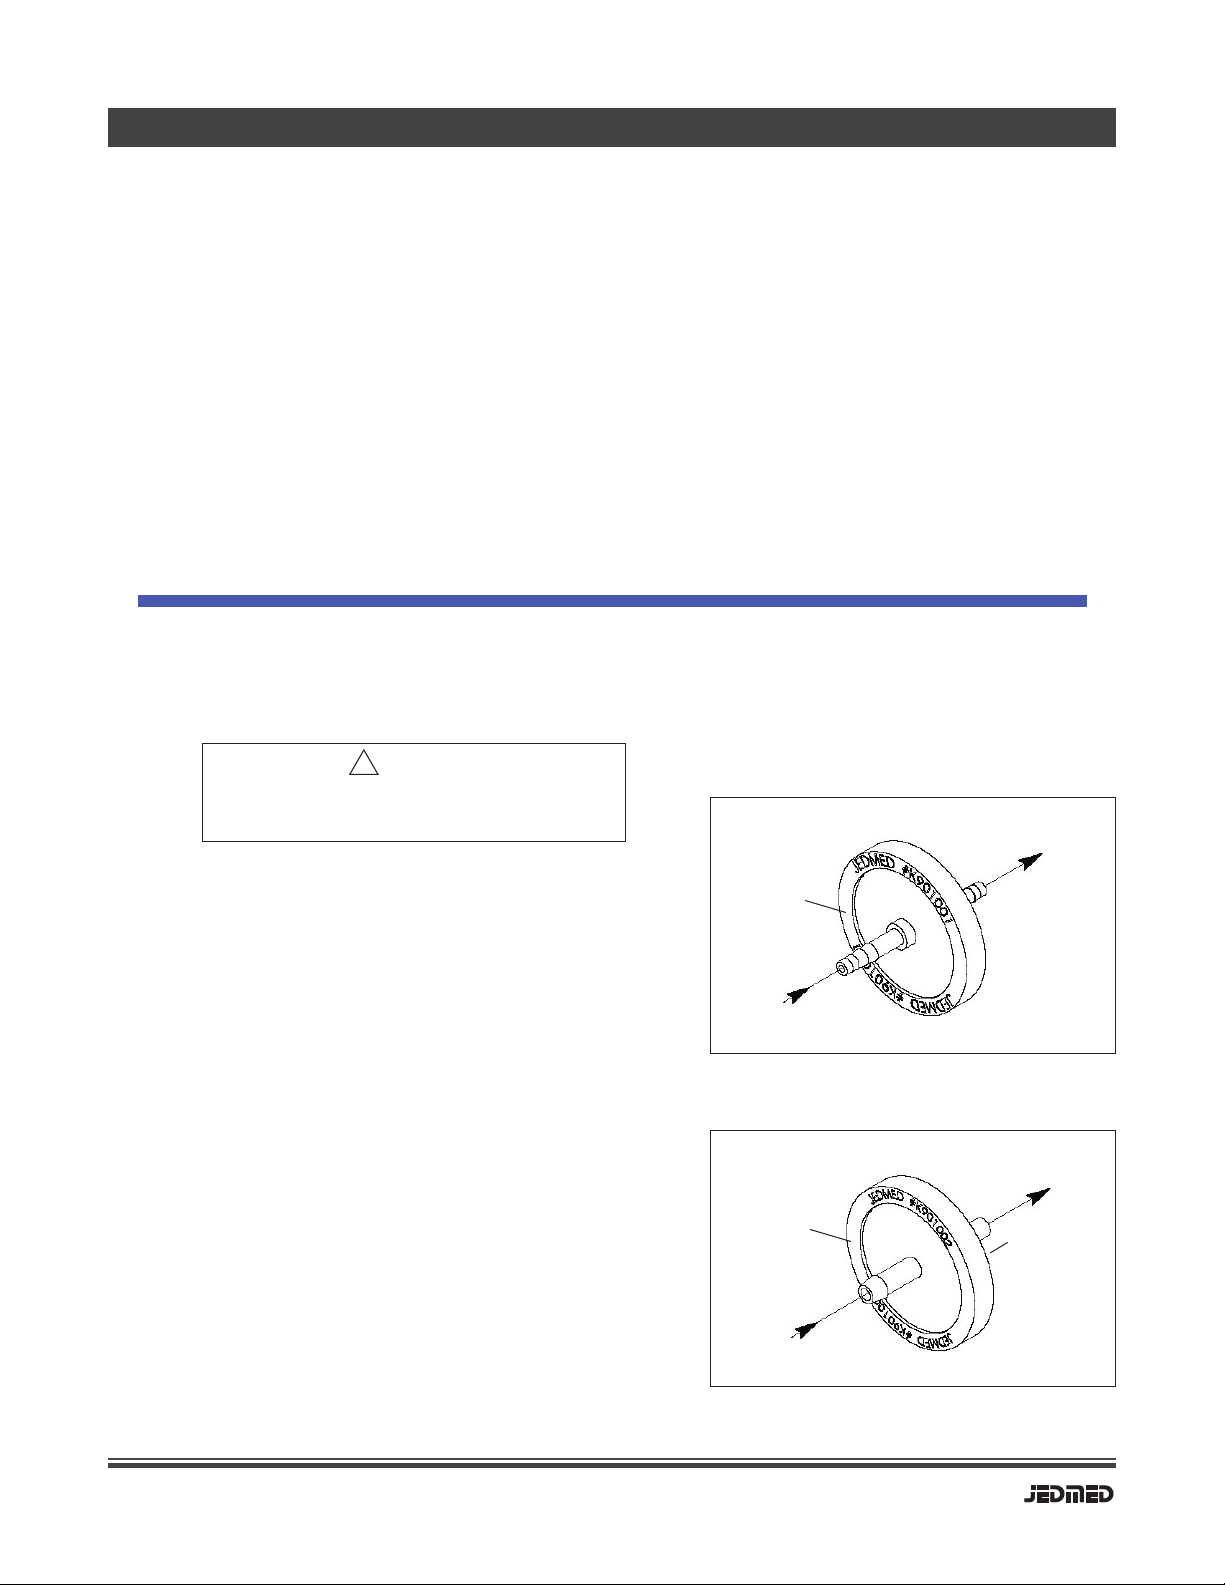
Inlet side marked
on plastic rim
as “IN” or “Inlet”
or “This Side to
Pump”
May be marked
on plastic rim
"This side to
pump".
Inlet side marked
on plastic rim
as “IN” or “Inlet”
or “This Side to
Trap Canister”

Classic CSC Operating / Service Manual
18
19
Classic CSC Operating / Service Manual
REORDER INFORMATION
Consumables
For additional information or to order replacement parts contact your Regional Sales
Representative or JEDMED Technical Service. Refer to inside of back cover.
Contact Information
Order # Description
03-5575 Disposable trap canister & lid (pack of 10)
03-5580 Disposable suction tubing (6 ft.)
K901002 Hydrophobic filter (suction)
K903020 Intake filter (pressure)
K901001 Hydrophobic filter (pressure)
Fuses (120V version)
K011022 T10A Main Power (Bussman #MDA-10, slow) 1-1/4 x 1/4"
K011056 T6.3A Suction / Pressure / Auxiliary (Littelfuse #021506.3HXP, slow) 5 x 20mm
Fuses (240V version)
Contact JEDMED
Refer to the assembly drawings located at the back of this
manual for replacement parts.
ØNOTE
Replacement Parts
Order # Description
K409018 Control Box (120V)
K409019 Control Box (240V)
03-6111 Automatic Pressure/Suction Tubing Hanger
03-6113 Footswitch
03-6115 Remote-Controlled Power Strip
03-6135 K2 handle recharger (otoscope) - on control box
03-6120 K2 handle recharger (otoscope) - free standing

Classic CSC Operating / Service Manual
18
19
Classic CSC Operating / Service Manual
Blank

Classic CSC Operating / Service Manual
20
21
Classic CSC Operating / Service Manual
SPECIFICATIONS
Overall Cabinet
Dimensions See below
Weight In use Shipping
Laminate version 175 lbs. (80 kg) 200 lbs. (91 kg)
Stainless steel version 190 lbs. (87 kg) 215 lbs. (98 kg)
Control Box
Input 115Vac, 60Hz
Output 115Vac (Controls up to 10 Amps)
Power 1150W maximum
Class Class 1 (3 prong, grounded)
Dimensions 1.875 x 4.250 x 19.250 inches (48 x 108 x 489 mm)
Suction Pump
Electrical Input 115Vac 4.2amps 60Hz
Vacuum 25.5 in. Hg (max.)
Flowrate 1.1cfm @ 0 in. Hg
Dimensions (W x D x H) 7.500 x 5.000 x 8.000 inches (191 x 127 x 203 mm)
Weight 14 lbs. (6.4 kg)
Pressure Pump
Electrical Input 115Vac 2.5amps 60Hz
Pressure 35psi
Flowrate 8 lpm
Dimensions (W x D x H) 8.000 x 4.000 x 7.000 inches (203 x 102 x 178 mm)
Weight 5.0 lbs. (2.3 kg)
Trap Canister
Dimensions (diameter x H) 5.000 x 6.000 inches (127 x 152 mm)
Capacity 800cc
Hydrophobic Filters
Type 0.3um pore size, PTFE membrane/media
Size 50mm diameter
Riser with Drawer
Dimensions (W x D x H) 24.000 x 17.000 x 10.000 inches (610 x 432 x 254 mm)
Weight 55 lbs. (25 kg)
Remote Power Strip
Dimensions (W x D x H) 1.625 x 2.750 x 15.500 inches (42 x 70 x 394 mm)
Weight 1.75 lbs. (0.8 kg)
Current Rating 10 amps (maximum)
Flip-Up Writing Shelf
Dimensions (W x D x H) 14.000 x 14.000 x 0.750 inches (356 x 356 x 19 mm)
Weight 4.5 lbs. (2.0 kg)
Weight Limit 15 lbs. (6.8 kg)
Footswitch
Dimensions (W x D x H) 8.000 x 6.000 x 1.500 inches (203 x 152 x 38 mm)
Weight 1.2 lbs. (0.5 kg)
Options
Table of contents
Other Jedmed Medical Equipment manuals

Jedmed
Jedmed Ergo-Flex User manual

Jedmed
Jedmed Combo 50 User manual

Jedmed
Jedmed MACHIDA User manual

Jedmed
Jedmed PHOENIX III User manual

Jedmed
Jedmed Omni-Steth User manual

Jedmed
Jedmed api OS1 Service manual

Jedmed
Jedmed Horus Scope 3 Series User manual

Jedmed
Jedmed Horus Scope User manual

Jedmed
Jedmed S-II Plus Instruction and safety manual
Popular Medical Equipment manuals by other brands


Nasco
Nasco Life/form LF01044U instruction manual

Otto Bock
Otto Bock DynamicArm Plus Instructions for use

Aqua Creek
Aqua Creek Tidal Wave manual

Invacare
Invacare Propad Revolve V user manual

ZOLL
ZOLL M Series CCT Configuration guide

MIETHKE
MIETHKE SENSOR RESERVOIR Instructions for use and Technical description


