JF JF 40P User manual

Rev. 00
MÁQUINAS AGRÍCOLAS
JF 40P
FORAGE CHOPPER - ENSILADORA
OPERATION TECHNICAL MANUAL
MANUAL TÉCNICO DE OPERACIÓN


1 - Introduction
Congratulations! You have just purchased an excellent forage chopper, easy to operate and
maintainandidealtoassistyourssilageneeds.
We thank you for choice of a machine really suitable to your needs, which is made by a
companythatcontinuouslysearchesfortheimprovementofitsproducts.
This manual supplies the instructions for correct operation, preventive maintenance and
information on how contact the Technical Service if necessary. Before operate the forage
chopperforthefirsttime,readthesafetyinstructionsandallotherinstructionsinthismanual.
In case of any doubt, please contact with any of ourAuthorized Dealers or with our Post Sale
Department.Wearegoingtobeverygladinhelpingyouonwhateveryouneed.
PostSaleDepartment
Phone ..................................................................................................... (0xx19) 3863-9658
(0xx19) 3863-9642
e-mail.......................................................................................[email protected]
Website .............................................................................................. .www.jfmaquinas.com
The images displayed in this manual are only for illustrative purposes. Thus to facilitate your
viewing, the images show cutaway or the safety shielding removed for displaying it more
clearly. Do not operate the machine under any circumstances without these respective
protectiveshields.
3
OPERATION TECHNICAL MANUAL - FORAGE CHOPPER JF 40P
English

Content
4
Note:
1- JFMáquinasAgrícolasLtdaaimsitsproductstobeconstantly
getting upgraded and improved in addition to having its own right to introduce
changesinitscomponentsandaccessorieswithoutpriornotice.
2- IllustrationsinthisManualaremerelyillustrative.
3- JF offers one free operation training at the factory. Contact JF Training
Departmentandaskforfurtherinformation.
1-Introduction 03
2-Safetyrecommendations 05
2.1-Whilereadingthemanual 05
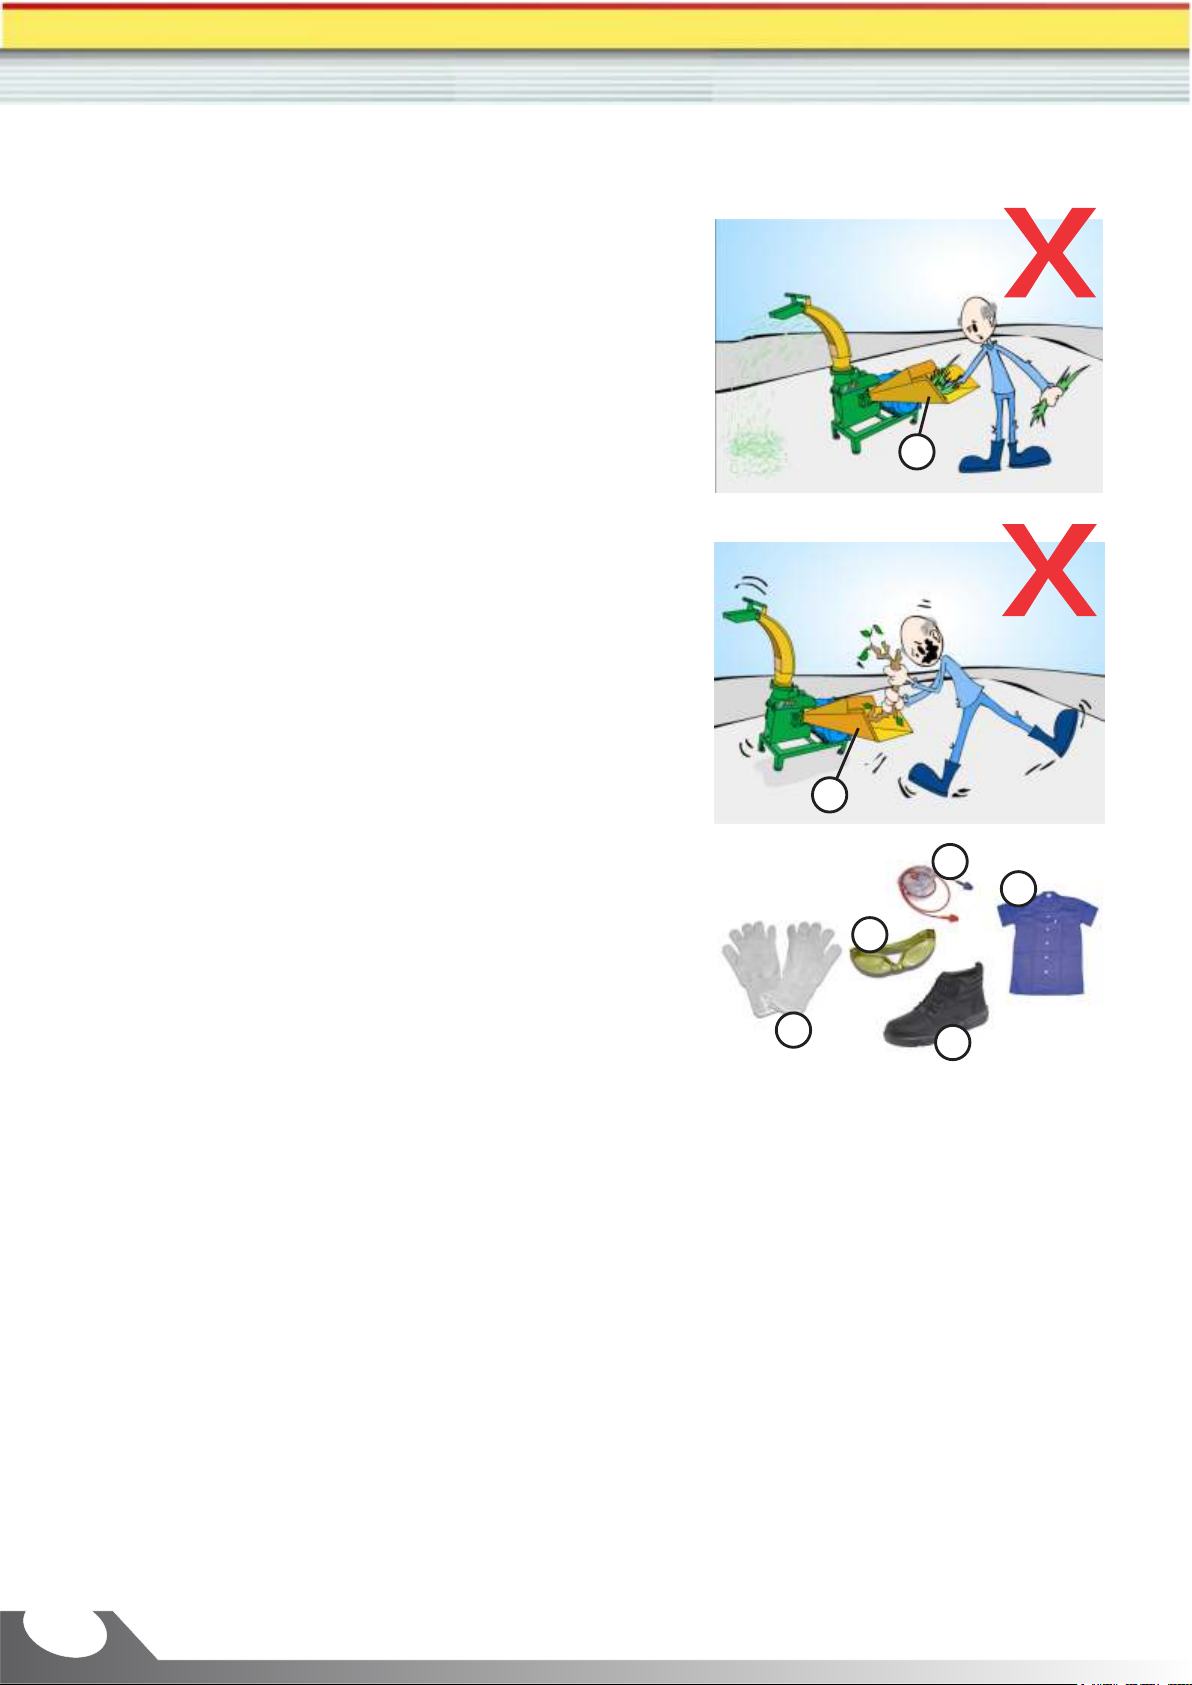
2.2-WhenoperatingtheForageChopper 06
2.3-Whenmakingmaintenanceinthemachine 06
2.4-Transportontruck 06
3-Machinepresentation 07
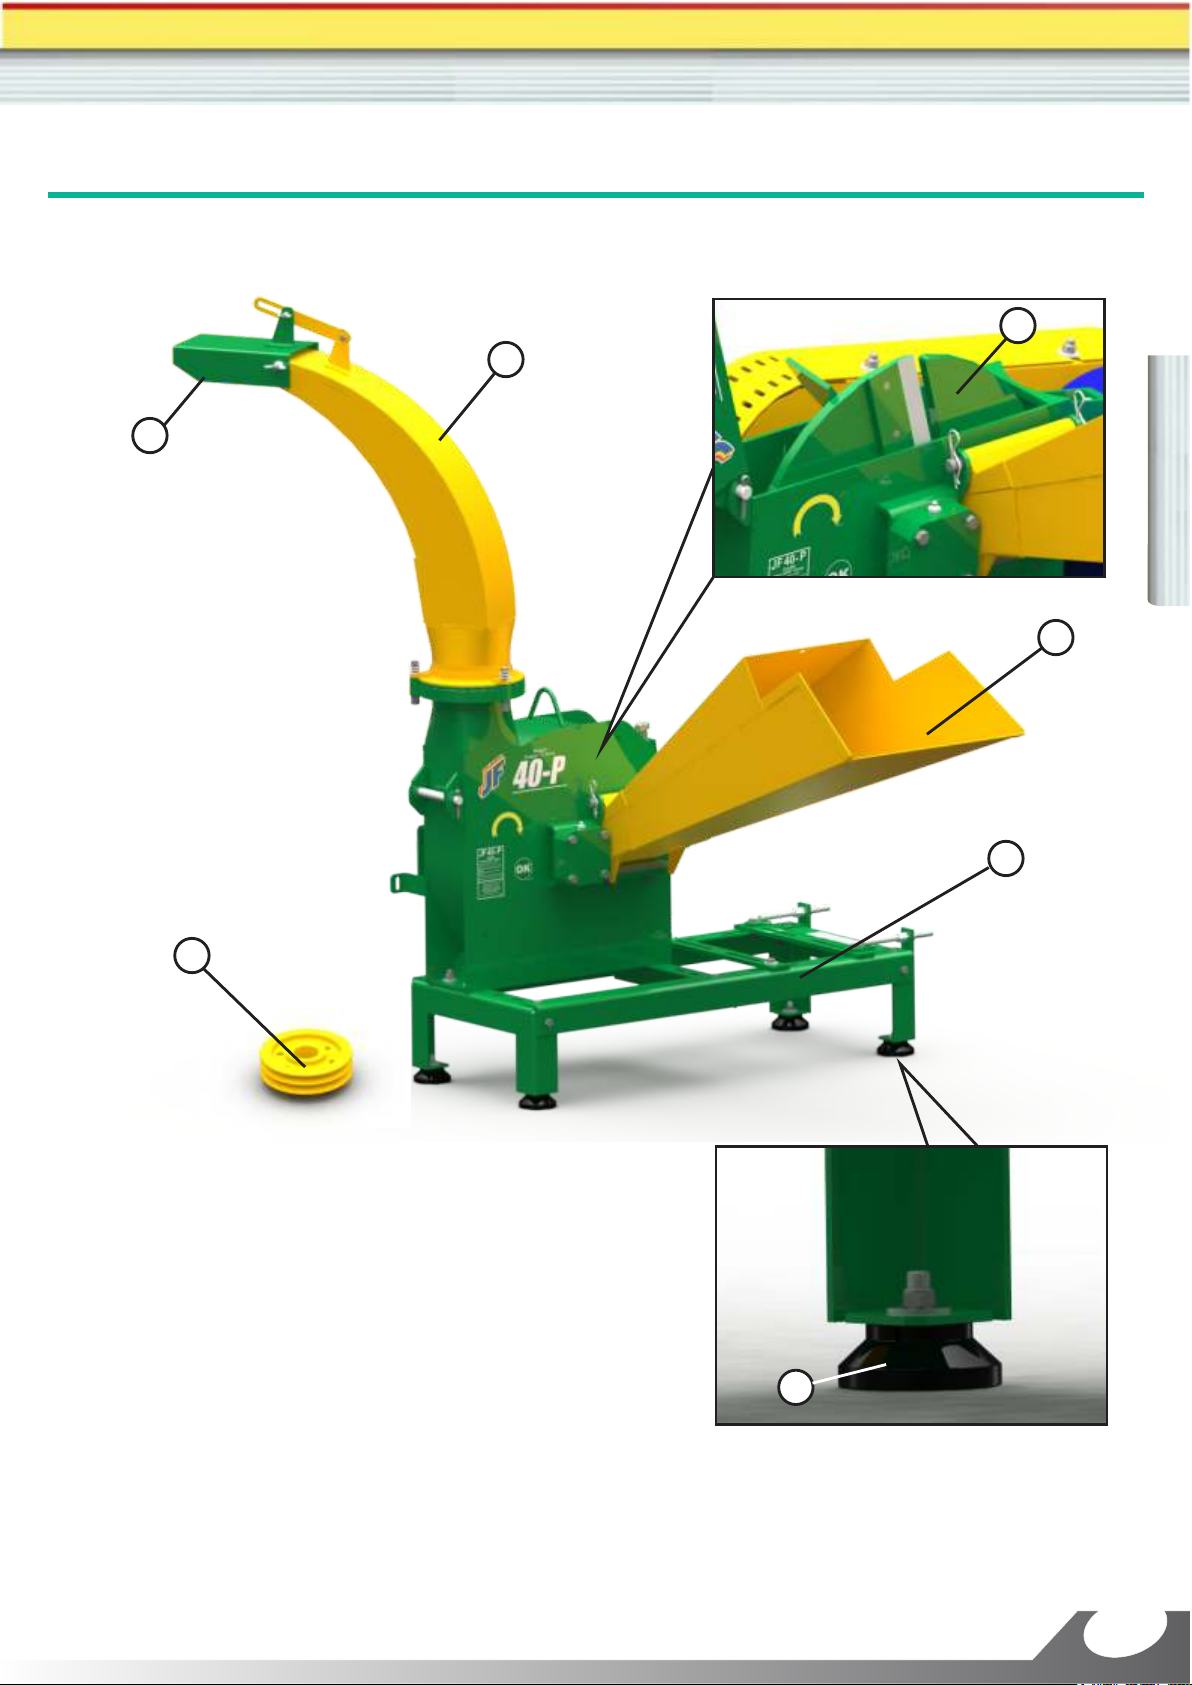
3.1-Partsidentification 07
3.2-Operation 08
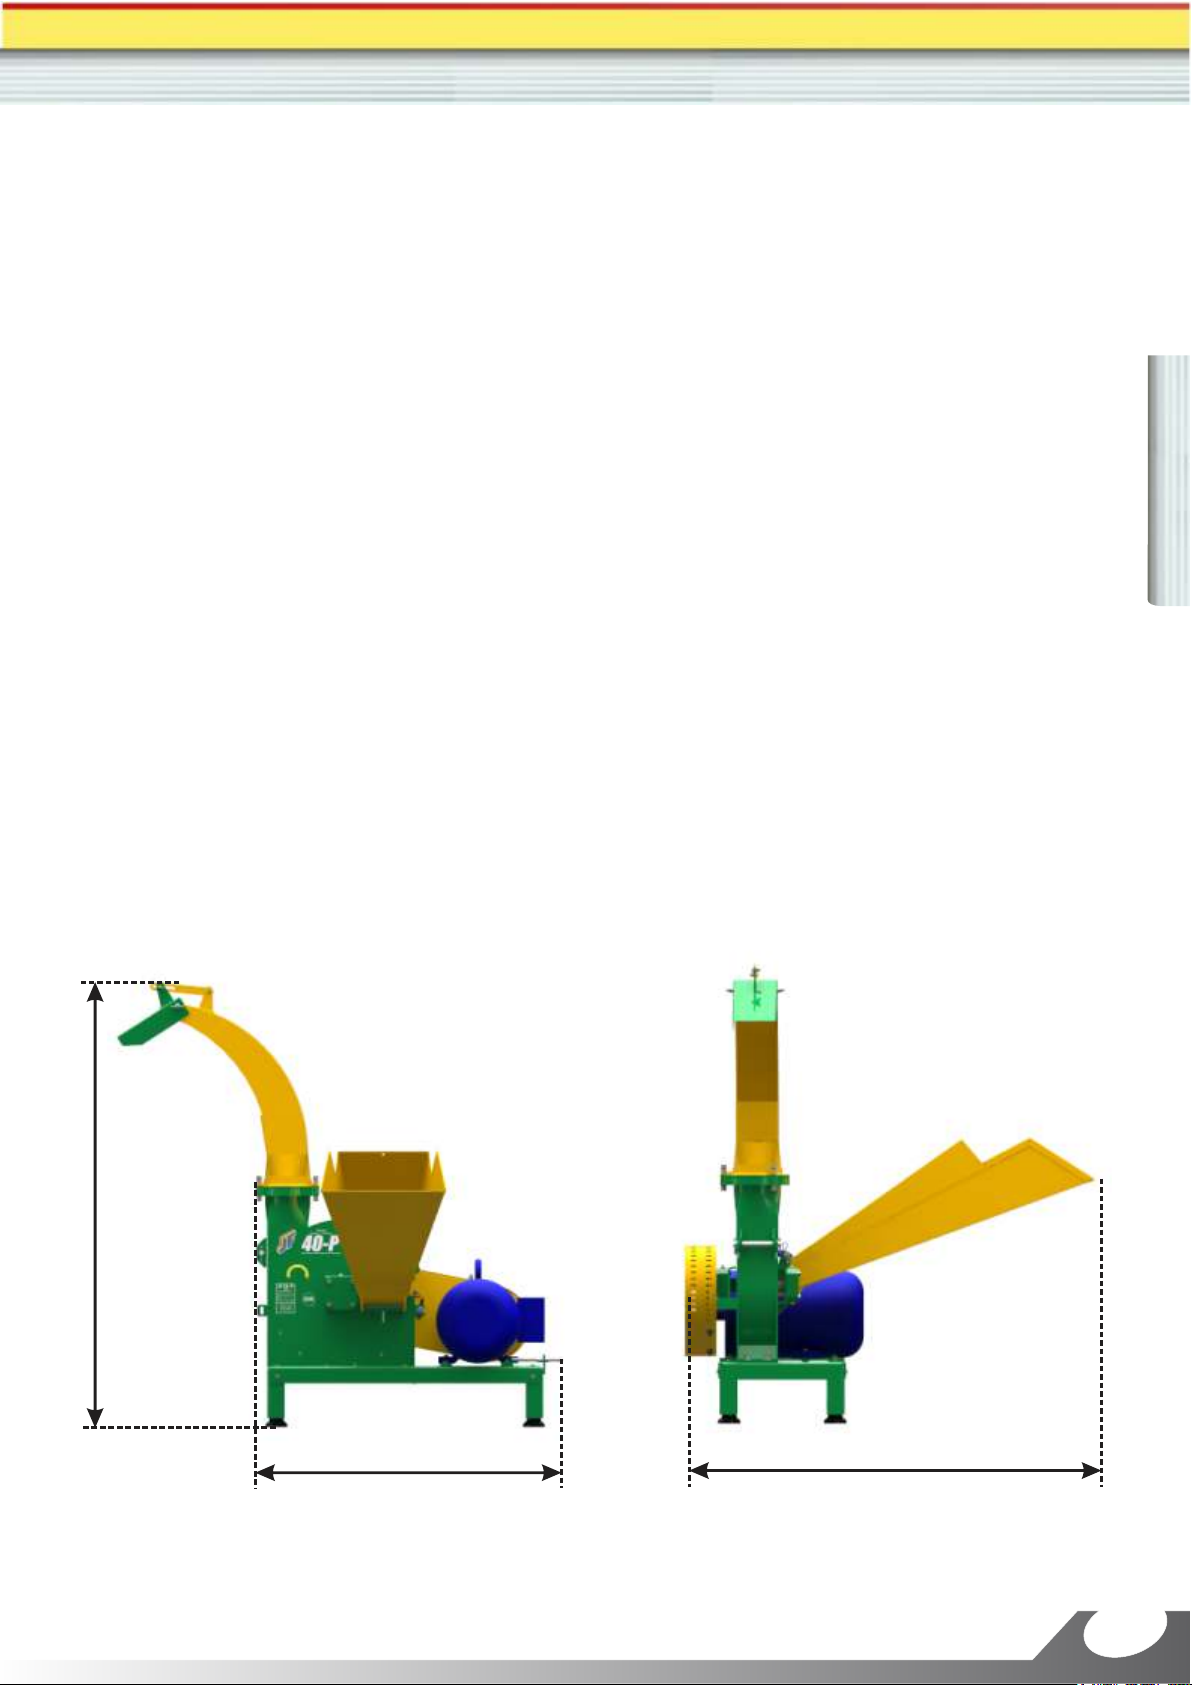
3.3-Technicalspecifications 09
4-Assemblyandadjustmentsbeforeoperating 10
4.1-Assemblyofthedetachedparts 10
4.2-Foragechopperadjustments 15
5-Stepbystepoperation 16
6-Maintenanceinstructions 17
6.1-Greaselubricatingpoints 17
6.2-Chopperknivessharpening 18
6.3-Gapadjustmentsbetweenknifeandcounterknife 19
6.4-Counterknife 20
6.5-Beltstensionadjustmentandreplacements 21
6.6-Foragechopperpreservation 22
7-Machineworkspeedadjustment 23
8-StickersfoundontheForageChopper 24
9-DetacheditemsthatcomealongwiththeForageChopper 25
10-Troubleshooting 26
11-Technicalassistance 27
11.1-Machineserialnumber 27
11.2-Warrantyterm 28
11.3-Technicaldeliveryreceipt 29

5
2- Safety Recommendations
2.1- While Reading the Manual
Warning Labels
Seating and Torques
Protectors, Closures and Fairings
ObservetherecommendationsofyourTractor'sManual,forasafeandefficientoperation.
Obs.: You must obey and never discard these labels. In case of repainting, you ought to
replacethemwithoriginalitemsasstatedinItem8.
Note:
Itmeansthatadetailwillbepresentedanditmayconcernsoperationorsecurity.
Note:
The machine features several labels containing warnings and/or technical
guidancethatconcernsecurity.
Note:
When seating the screws presented in this manual, use torques and keys present
inthetableofItem12-AdditionalInformation.
Attention:
It means that your life or parts of your body may be in danger. You must pay
attentiontothissign!
Attention:
You must never operate the Harvester without Protectors, Closures and
Fairings.
OPERATION TECHNICAL MANUAL - FORAGE CHOPPER JF 40P
English

6
2.2- When operating the Forage Chopper
1- The Forage Chopper JF 40P has been developed
exclusivelytochopforagestoanimalfood.
2- When supply the machine, never introduct the hands
intothefeedingchute(1).
3- In order to obtain the maximum efficiency and quality
of chopped material, maintain a constant and uniform
feeding.
4- To more security fasten the machine on a even and
rigidsurface.
5- Never use the machine to chop tree branchs or
anotherrigidmaterial.
6-Neverattempttoadjustorrepaircomponentswiththe
machineinmovement.
7- Do not leave the Forage Chopper in a place that can
beoperatedbychildrenornotqualifypeople.
8- You must always use proper PPE in order to operate
ormaintainthemachine.
1-ProtectiveGloves
2-EarProtection
3-SafetyGlasses
4-Safetyfootwear
5-ProperClothing
1
1
1
2
3
4
5
2.3- When making maintenance in the machine
1-ForageChoppermustbeturnedoffforanytypeofmaintenance.
2-Observethespecificationandamountoflubricanttobeusedonthemachine.
2.4- Transport on truck
Whenever you have to transport the machine for longer distances, when there is need for
usingpublicroads,thetransportmustbedoneontruckortrailer.
Tomoresafety,theForageChoppermustbefixedwithropeonthetruck.

7
3- Machine presentation
3.1- Parts identification
1-Feedingnozzle.
2-Rotarydischargetube.
3-Deflector.
4-Chopper(2knifes).
5-Rack(tomachineanddrivingmotor).
6-Rubbercushions(4units).
7-Pulleywithtwochannel(1unit).
1
5
3
24
6
7
OPERATION TECHNICAL MANUAL - FORAGE CHOPPER JF 40P
English

8
3.2- Operation
The Forage Chopper JF 40P has simple and efficient running. It is designed to chop corn,
sugarcane,sorghum,elephantgrassetc.,asmuchtomakesilageastodailyration.
Theproductisinsertedthroughthefeedingnozzle(1).Inthemachinehousingtheimpeller(2)
choptheproductandthrowouttheparticlesfromthechute(3).Thechuteis rotative,allowing
throw out the product to any direction. The deflector (4), is adjustable to set particles throw
height.
2
1
4
3

9
3.3- Technical specifications
Drive ............................................................................................................... Electric motor
Power of the motor ............................................................... 7,5 hp to 10 hp (5,5 to 7,5 kw)
Work speed ............................................................................................ 2.400 to 2.600 rpm
Cutting knives ............................................................................................................ 3 units
Driving belt ..................................................................................................................... A55
Pulley diameter which follow the machine:
- To 60 Hz motor ..................................................................................... 140 mm (2 groves)
- To 50 Hz motor ..................................................................................... 160 mm (2 groves)
Impeller pulley diameter ......................................................................... 195 mm (2 groves)
Machine approximate weight (without motor) ............................................................ 118 kg
Note: The motor, depending on the power, can weight up to 72 Kg.
Dimensions (see picture below)
A (height) .............................................................................................................. 1.418 mm
C (lenght) .............................................................................................................. 1.400 mm
L (width) ................................................................................................................ 1.238 mm
Front view RH side
A
LC
OPERATION TECHNICAL MANUAL - FORAGE CHOPPER JF 40P
English

10
4- Assembly and adjustments before operating
4.1- Assembly of the detached parts
The parts described below are delivered disassembled
tofacilitatethemachinetransport.Assembleitaccording
nextsteps:
Feedingnozzle(1)
Installthefeedingnozzle(1)accordingpictureasideand
fasten it through pin (1a) and cotterpin (2b), which are
together with the detached items that follow the
machine.
Rotarydischargetube(2)
Install the discharge tube (2) on the nozzle (2a)
according picture below, fastening it with tree bolts (2b),
treesprings(2c)andsixnuts(2d).
Note:
Observe the correct assemble position of the
elementsbyside.
Fasten the nuts (2d) to press the spring (2c),
so that it is possible to rotate the chute (2)
manuallywithoutdoingalotofeffort.
1
1a
2a
1b
1c
1b
2
1d

11
Rack(3)
If the rack (3) is disassembled, assemble it according
nextsteps.
a) Assemble the rubber cushion (3a) according detail
below, using the bolts (3b) + plain washer + spring
washer+nut.
b) Assemble the rails (3c) on illustrated position aside,
using a bolt on each side (3d) + two plain washers + one
nut.
c) Install the spindles (3e) according the picture, using
threenots(3f)onrearpart.
NOTE: All the bolts, nuts and washers used in that
assemblywhichfollowthemachine.
3
3a
3c 3f
3d 3e
3b
1 outher nuts
OPERATION TECHNICAL MANUAL - FORAGE CHOPPER JF 40P
English

12
InstallingtheForageChopperandmotorontherack
ForageChopper
Install the Forage Chopper on the rack (3) and fasten it
withfourbolts(4a)+plainwhashersandthenuts.
Electricmotor
IMPORTANT:Seerequiredmotorpoweronpage9.
Install the motor on the rails (3c) and fasten it with the
bolts(4b)+plainwashersandnuts.
3
4a
3c
4b
4b

13
Assemblethebeltsandthemotorpulleys
Pulley(5)
a) Remove front cover (5a) releasing four nuts (5b - two
upperandtwounder).
b)Installthepulley(5)onmotoraxlewithonekey.
NOTE: In case it is necessary to move the motor
transversely(seearrowsaside)todotheassemblyofthe
pulley(5),loosenthescrews(4b).
c)Makethe aligmentbetweenthemotor’spulleyandthe
machine’s pulley (5), moving the motor according
necessary.
Seethesituationsonpictureaside:
1º-Properalignment.
2º-Incorrectalignment:pulleysout-of-line.
3º-Incorrectalignment:oneoftheaxlesismoved.
d)Ifyougetthealignment,re-tightenthenuts(4b).
1º
2º
3º
5b
5d
5a
5
4b
OPERATION TECHNICAL MANUAL - FORAGE CHOPPER JF 40P
English

14
Belts(6)
IMPORTANT:UseapairofbeltsA55.
a)Installthebelts(6)asilustratedaside.
NOTE: If necessary displace the motor lenghwise (see
arrows aside) to assemble the belts, see instructions in
thismanual.
b)Adjustthebelttighteningaccordinginstructionsinthis
manual.
c)Installtheshield(5a)andfastenitwithfournuts(5b).
6
5b
5a

15
4.2- Forage Chopper adjustments
When you operate the Forage Chopper, adjust the
chute position (1) and the deflector (2) according next
steps:
Chute(1)
Turn the chute manually according desired position. If
necessary,releasethenuts(1a)toturnthechuteeasily.
Then,re-tightenthenuts(1a)alittlebit.
Deflector(2)
Loosen the wing nuts (2a) and position the deflector as
desired.
The more lifted up is the deflector, higher and far away
theproductwillbethrownandvice-versa.
Then,re-tightenthenut(2a).
2a
1a
OPERATION TECHNICAL MANUAL - FORAGE CHOPPER JF 40P
English

16
a)Turnthechute(1)tothedesireddirection,accordinginstructionsonpreviouspage.
b)Adjustthedeflectorposition(2)accordinginstructionsonpreviouspage.
c)Turnthemachineon.
d) Put the product on feeding nozzle (3) on continuously way as possible and in quantity
compatiblewiththemachineandfeedingnozzlecapacity.
NOTE:Thenewbundlemustbeplacedoverthepreviousone,sothemachinehasbeenmore
uniformamountofproductcomingin.Thatitwillalwaysdoauniformandonselectedsizecut.
e)Theforagejetwillbethrownbytheoutputchute(1).
5- Step by step operation
1
2
3

17
Lubricate each 8 work hours or daily the rear and frontal bearings chopper (see pictures
below),usingagreasepump.
Recommendedgrease
LithiumsoapbasegreaseGrade2.
Note:
Lubricateafteraworkperiod,becausethegreaseflowsbetterwhenthemachineis
stillwarm.
Usethecommonsenseregardingtheamountofgreasetobeapplied.
Avoidoverstatement!
6- Maintenance instructions
6.1- Grease lubricating points
OPERATION TECHNICAL MANUAL - FORAGE CHOPPER JF 40P
English

18
6.2- Chopper knives sharpening
This operation is more important on machine
maintenance, because aim at good performance and
durabilityoftheknives(1).
The sharpeness should be made in such a way to
preserve the characteristics of the knives and the
temperingofthesteel.
Sharpen the knives when you see that the quality of
theparticlesisdecreasing.
Procedure:
a) Loosen the latch (2) and open cover (3) from the
motorcompartment.
b) Lock the impeller (4) with a wood shim to avoid that it
turnduringboltremoval(5).
c)Removeboltsandnuts(5)andremovetheknives(1).
IMPORTANT:Sharpenalwaysalltheknifes!
d) Sharpen each knife with an appropriate emery,
avoiding overheting and variation on wire color. See
tablebelow.
IMPORTANT:
-Don’tcoolhotknifeswithwater.Itcancauselashing.
- Do not sharpen the knife chamfered surface, but the
cuttingedgeonly.Maintainthecuttingangle.
Notes:
1- Hold the knifes (1) on correct position
(inclination), according picture aside, to
maintainthecuttingangle.
2-Itsnecessarytouseglassesandgloovesto
makethesharpening.
3- If the knives don’t make possible more
sharpeningorturning,replacethekit.
Neverreplaceonlyoneoftheknifes.
23
15
4
1

19
e) Let the impeller (4) locked with a wood shim and
reinstall the knifes (1), observing the correct fastening
position: the face with the chamfer should be
returned for the rear of the Forage Chopper,
accordingtopictureaside.
f) VERY IMPORTANT: After to assemble and to tighten
all knives, check the gap between knifes and the
counterknife,accordinginstructionsonnextitem.
Chanfer
6.3- Gap adjustments between knife and counterknife
This adjustments must be done after the sharpen or
newknifesinstallation.
a)Removethefeedingchute(1)loosingthepin(2).
b)Loosen(butdon’t remove)the impellerfastening bolts
(3).
c) Displace the impeller (4) manually forward,
approximating the knifes (5) nearest as possible against
thecounterknife(6).
IMPORTANT: It cannot have interference between the
knivesand counterknife duringthe operation.Therefore,
JFrecommendsaminimumgap0,05to0,15mm.
d) Check the gap through feeding nozzle (7), turning the
impeller(4)manuallyandslowly.
e)After the adjustment, tighten the bolts (3) to fasten the
impeller(4)oncorrectposition.
f) Reinstall the chute (1) and close the impeller
compartmentcover.
1
4
2
3
7
6
4
5
8
1
OPERATION TECHNICAL MANUAL - FORAGE CHOPPER JF 40P
English

20
6.4- Counterknife
Whenallsidesareworn(rounded),replaceit.
NOTE: Counterknife with rounded edge cause unlevel
cut,productshreddingandwastedrivingpower.
Todisassemblethecounterknife,removethenuts(2).
Thereafter the counterknife assembly check the
play between the knives and impeller, according
describedonpreviousitem.
If the counterknife (1) is worn, with the edge rounded,
invertittousetheotherside.
IMPORTANT: The counterknife has four operation
edges (positions) (A, B, C and D), according ilustrated
below:
AB
C
Transversal section of the counterknife (1)
D
1
2
Table of contents
Languages:
Other JF Farm Equipment manuals
Popular Farm Equipment manuals by other brands

Altec
Altec PC20 manual

SCHABEN
SCHABEN LA9000 Operation & maintenance manual

KIFCO
KIFCO WATER-REEL T 210L Operator's manual

Ritchie
Ritchie Thrifty King for Swine HG 2 installation instructions

Johnny's Selected Seeds
Johnny's Selected Seeds Connecta Tool System Assembly, use and maintenance

breviglieri
breviglieri mekfarmer 180 K Operating and maintenance manual

AGRI-COVER
AGRI-COVER SRT-2 Special instructions

RCI
RCI AG-BAG T7170 Operator and parts manual

Kongskilde
Kongskilde GMT FLEX Series Operator's manual

BROWN
BROWN 2000 Series Owner's/operator's manual

DIGITAL YACHT
DIGITAL YACHT AIT1500N2K Installation and instruction manual

Tufline
Tufline TW6 Series Operator's manual