manuals.online logo
Brands
  1. Home
  2. •
  3. Brands
  4. •
  5. Johnson
  6. •
  7. Measuring Instrument
  8. •
  9. Johnson 40-6676 User manual

Johnson 40-6676 User manual

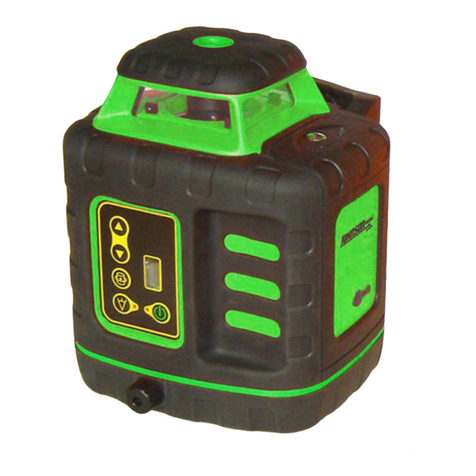
40-6676 Self-Leveling 360° Laser with
Plumb Line Operator’s Manual
Download this manual at
www.johnsonlevel.com/manuals
40-6676
Thank you for purchasing this Johnson Self-
Leveling 360° Laser with Plumb Line featuring
GreenBrite® technology. This laser includes a 360°
plane of laser light as well as a vertical beam for
plumb work.
This tool comes with a Li-Ion battery and charger, or
the option to use 4 AA Alkaline batteries.
To use the Li-Ion battery: Make sure the battery is
charged (see CHARGING THE LI-ION BATTERY). Lift
the latch on the battery door (1) and insert the battery
pack (2). Press the battery door closed until the latch
engages.
To use 4 x AA Alkaline batteries: Insert the batteries
into the battery holder according to the indicated
polarity, lift the latch on the battery door and insert
the battery holder into the laser. Press the battery
door closed until the latch engages.
To charge the Li-Ion battery, remove it from the
tool by lifting the battery door latch and sliding out
the battery (reverse the steps above in INSERTING
BATTERIES).
Plug the charger into the battery and into 120V power
until the light on the charger turns green (about
4-6 hours). While the battery is charging, the laser
can be operated using the included akaline battery
compartment.
ATTENTION:
• Read all instructions before operating this tool.
• Do not remove any labels from the tool.
• Do not project the laser into the eyes of others.
• Do not set up the laser tool at eye level or
operate the tool near reflective surfaces, as the
beam can be projected into your eyes or the
eyes of others.
• Do not place the laser tool in a manner that may
cause someone to unintentionally look into the
laser beam. Serious eye injury may result.
• Do not operate the tool in explosive
environments, (i.e., in the presence of gases or
flammable liquids).
• Keep the laser tool out of the reach of children
and other untrained persons.
• Do not attempt to view the laser beam through
optical tools such as telescopes. Serious eye
injury may result.
SAFETY INFORMATION
SAFETY LABEL LOCATION
COMPONENT OVERVIEW
KEYPAD OPERATION
INSERTING BATTERIES
CHARGING THE LI-ION BATTERY
This Class II laser tool complies with CRF
21 parts 1040.10 and 1040.11 as well as
international safety rule IEC 285.
THIS TOOL EMITS LASER RADIATION.
DO NOT STARE INTO BEAM. AVOID
DIRECT EYE EXPOSURE.
PENDULUM LOCK
BATTERY DOOR
1/4"-20 TRIPOD MOUNT
LASER APERTURE (H) KEYPAD
LASER APERTURE (V)
• Always turn o the laser tool when not in use
or when left unattended for any period of
time.
• Disassembly or repair by unqualified persons
will void the warranty.
Enables/disables the
horizontal (360°) beam
Enables/disables the
vertical beam
Enables/disables PULSE
and MANUAL modes
12
Download this manual at
www.johnsonlevel.com/manuals
40-6676
40-6676 Self-Leveling 360° Laser with
Plumb Line Operator’s Manual
Johnson Level & Tool oers a three-year limited
warranty on this product. You can obtain a copy
of this warranty on our website. The limited
warranty contains various limitations and
exclusions.
Note: The user is responsible for verifying proper
calibration of this instrument before each use.
If you experience problems with this product,
please contact us.
In the USA:
service@johnsonlevel.com
888-953-8357
In Canada:
800-346-6682
On the Web:
www.johnsonlevel.com
Please register your product within 30 days.
Registration ensures you can obtain warranty
service even if you lose your receipt, or so we
can contact you if there is ever a product recall.
We will never share your information!
Scan or click:
www.johnsonlevel.com/register
Laser
Class II, <1mW, 515nm
Accuracy +/- 3/16" @ 50’
Operating Range Up to 200’
Self-Leveling
Range +/- 2.5°
Operating
Temperature 14°F to 113°F
Batteries Li-Ion (included) or
4 AA (not included)
Battery Life 7 hours
Dimensions 4.25" x 2.25" x 4.8"
Weight (laser) 1lb 5oz (with batteries)
IP Rating IP54 (rainproof)
Tool does not power on or remain on
• Check battery polarity.
• Replace batteries.
• Ensure battery door is tight.
• Turn pendulum lock o, then on.
• Ensure the tool is within its self-leveling
range.
Laser light is dim
• Ensure fresh batteries are being used or the
Li-Ion battery pack is fully charged.
• Ensure laser is within operating temperature
range.
• Ensure battery door is secure.
• Ensure laser is within self-leveling range.
Laser appears out of calibration
• Ensure pendulum is in the unlocked position.
• Has the laser been dropped or subjected to
impact? It may need calibration.
• Contact Johnson Level & Tool for calibration
service. The laser does not contain any user-
serviceable parts.
Note: Do not disassemble; removal of any labels
will void your warranty.
•Read all operating instructions prior to use.
•Power on the laser by unlocking the pendulum
lock.
•Activate/disable the horizontal beam by pressing
. Activate/disable the vertical beam by
pressing .
•To use a detector (not included), activate pulse
mode by pressing . The PULSE LED will
illuminate.
•To operate the laser in manual mode (non self-
leveling), keep the pendulum locked and press
to enter manual mode, then use and to
power on the desired beams. The MANUAL LED
will blink to indicate manual mode is engaged.
• If the laser is in self-leveling mode and is not
able to self-level, both laser beams will flash and
the unit will beep to alert you that it is out of
level.
•If the battery is running low, the low battery
indicator LED will flash. A solid red battery
indicator indicates there is adequate battery life
remaining.
•Store the tool in its case with the pendulum
locked. For extended storage (>3 months),
remove the batteries to prevent corrosion.
•Set the laser on a tripod 10’ from all walls.
•Make a horizontal mark on the wall anywhere
along the 360° line to indicate the height of
the beam. Label this as Point A.
•Turn the laser 90° and mark Point B on the
same spot on the wall as Point A where the
beam intersects. This mark should either be
directly above, below or on top of Point A.
•Repeat Step 3 twice more, labeling the marks
as Point C and Point D, respectively.
•Measure the greatest vertical distance (H)
between any two of the points A, B, C & D.
•If ‘H’ < 1/16” for walls 10’ away from the tool,
the accuracy of the instrument is within its
specifications and no calibration is necessary. If
calibration is required, please contact Johnson
Level & Tool to obtain service at the address to
the bottom right.
•Place the laser on the floor 10’ from a doorway.
Project the plumb beam through the doorway.
•Mark the beam on the floor near the tool as
Point 1. Mark a spot 20’ away as Point 2.
•Mark the beam directly under the doorway as
Point C. Mark the beam on the doorway as D.
•Move the laser to Point 2, and aim the plumb
beam directly through Point 1 and Point C.
•Mark on the doorway Point E.
•Measure the distance
between Point D and
Point E.
•If this distance is less
than 1/16” for a 7’ high
doorway, then the tool
is properly calibrated.
REGISTRATION
TROUBLESHOOTING
CHECKING VERTICAL ACCURACY
CHECKING HORIZONTAL ACCURACY
BASIC OPERATION
WARRANTY
SPECIFICATIONS
Other Johnson Measuring Instrument manuals

Johnson LDM195 User manual

Johnson

Johnson LDM195 User manual

Johnson 40-6526 User manual

Johnson

Johnson 40-6526 User manual

Johnson 40-6535 User manual

Johnson

Johnson 40-6535 User manual

Johnson 40-6624 User manual

Johnson

Johnson 40-6624 User manual

Johnson 40-6688 User manual

Johnson

Johnson 40-6688 User manual

Johnson 40-6590 User manual

Johnson

Johnson 40-6590 User manual

Johnson 40-6064 User manual

Johnson

Johnson 40-6064 User manual

Johnson 40-6705 User manual

Johnson

Johnson 40-6705 User manual

Johnson 40-6618 User manual

Johnson

Johnson 40-6618 User manual

Johnson 40-6502 User manual

Johnson

Johnson 40-6502 User manual

Johnson 1888-1900 User manual

Johnson

Johnson 1888-1900 User manual

Johnson 40-6690 User manual

Johnson

Johnson 40-6690 User manual

Johnson LDM85 User manual

Johnson

Johnson LDM85 User manual

Johnson 1456-0000 User manual

Johnson

Johnson 1456-0000 User manual

Johnson 40-6557 User manual

Johnson

Johnson 40-6557 User manual

Johnson 40-6625 User manual

Johnson

Johnson 40-6625 User manual

Johnson 40-6582 User manual

Johnson

Johnson 40-6582 User manual

Johnson JRT300-RDHV-S User manual

Johnson

Johnson JRT300-RDHV-S User manual

Johnson 1888-1100 User manual

Johnson

Johnson 1888-1100 User manual

Johnson 40-6648 User manual

Johnson

Johnson 40-6648 User manual

Johnson 40-6515 User manual

Johnson

Johnson 40-6515 User manual

Johnson Old Town Sportsman iPilot User manual

Johnson

Johnson Old Town Sportsman iPilot User manual

Johnson 40-6519 User manual

Johnson

Johnson 40-6519 User manual

Johnson 1888-0700 User manual

Johnson

Johnson 1888-0700 User manual

Popular Measuring Instrument manuals by other brands

JUMO LOGOSCREEN 500 operating instructions

JUMO

JUMO LOGOSCREEN 500 operating instructions

UPRtek MK350S PREMIUM user manual

UPRtek

UPRtek MK350S PREMIUM user manual

TSI Instruments Sizer 3310A instruction manual

TSI Instruments

TSI Instruments Sizer 3310A instruction manual

Setra Systems SS-SPM quick start guide

Setra Systems

Setra Systems SS-SPM quick start guide

SiteLab SL1188P instruction manual

SiteLab

SiteLab SL1188P instruction manual

Offel 07-875 MM RCA ALIM user manual

Offel

Offel 07-875 MM RCA ALIM user manual

Bender ISOMETER isoRW425 manual

Bender

Bender ISOMETER isoRW425 manual

Kroeplin K Series user manual

Kroeplin

Kroeplin K Series user manual

Olympus WS 100 - 64 MB Digital Voice Recorder instructions

Olympus

Olympus WS 100 - 64 MB Digital Voice Recorder instructions

TURNER DESIGN AQUAFLUOR user manual

TURNER DESIGN

TURNER DESIGN AQUAFLUOR user manual

Teledyne Everywhereyoulook T3PM1100 user manual

Teledyne

Teledyne Everywhereyoulook T3PM1100 user manual

Water Specialties TR15 Operation and maintenance manual

Water Specialties

Water Specialties TR15 Operation and maintenance manual

Carel iaq+ user manual

Carel

Carel iaq+ user manual

Eurotron PTB 150 instruction manual

Eurotron

Eurotron PTB 150 instruction manual

Campbell CM 21 instruction manual

Campbell

Campbell CM 21 instruction manual

Martini Instruments MI 415 user manual

Martini Instruments

Martini Instruments MI 415 user manual

Ametek VersaSTAT LC Series Hardware manual

Ametek

Ametek VersaSTAT LC Series Hardware manual

REED SD-4214 Instruction manual and users guide

REED

REED SD-4214 Instruction manual and users guide

manuals.online logo
manuals.online logoBrands
  • About & Mission
  • Contact us
  • Privacy Policy
  • Terms and Conditions

Copyright 2025 Manuals.Online. All Rights Reserved.