Joie stages isofix User manual

stages isofix
child restraint
ECE R44.04: A,C,D
ECE R44.04: ISOFIX
ECE R44.04: Group 0+/1 /2 (0–25kg)

2
GB Welcome to Joie™
Congratulations on becoming part of the Joie family! We are so excited
to be part of your journey with your little one. While traveling with the
Joie stages™ isofix you are using a high quality, fully certified safety
Group 0+/1/2 child restraint. Please carefully read this manual and fol-
low each step to ensure a comfortable ride and best protection for your
child.
To use this Joie stages™ isofix with a 3-point adult seat belt and the
ISOFIX connections according to the ECE R44.04 Regulation, the child
should weight 0-25kg (approximately 0-7 years old). This stages™ isofix
can be installed using a 3 point retractable adult seat belt approved to
ECE R16 or similar standard systems provided.
Base
These instructions show the use of the stages™ isofix seat and the base.
This base can also be used with other certain Joie infant child restraints.
Please read all the instructions in this manual before installing and using
the product.
! IMPORTANT: KEEP FOR FUTURE REFERENCE.
PLEASE READ CAREFULLY.
Please keep the instruction manual in the
storage compartment at the bottom of
the base as right figure.
1
2
3
4
5
10
6
8
9
12
11
13
14
18
16
15
17
19
Parts List
1 Head Support
2 Seat Pad
3 Buckle
4 Adjustment Webbing
5 Child Restraint Latched
Indicator
6 Load Leg Indicator
7 Load Leg
8 Load Leg Adjustment
Button
9 Child Restraint Release
Button
10 Recline Adjustment
Button
11 ISOFIX Releasing Button
12 Crotch Strap
13 Shoulder Strap
14 Infant Insert
15 Rebound Bar
16 ISOFIX Connector
17 ISOFIX Guides
18 Head Support
Adjustment Lever
19 Side Impact Shield
Please make sure there are no missing parts. Please contact the
retailer if anything is missing.
7

1 2
WARNING
!NO child restraint can guarantee full protection from
injury in an accident. However﹐ proper use of this child
restraint will reduce the risk of serious injury or death
to your child.
!Make sure that the straps holding the restraint to the
vehicle should be tight and any straps restraining the
child should be adjusted to the child's body. Check to
make sure that the straps are not twisted.
!DO NOT install or use this child restraint without
following the instructions and warnings in this manual
or you may put your child at serious risk of injury or
death.
!NEVER use ropes or any other substitutes in place of
seat belts in case of injuries from restraint.
!DO NOT make any modifications to this child restraint
or use it along with component parts from other
manufacturers.
!DO NOT use this child restraint if it is damaged or has
missing parts.
!DO NOT use forward facing mode before the child’s
weight exceeds 9kg. Keep your child rearward facing
as long as possible as rearward facing is the safest
position.
WARNING
!DO NOT have your child in swaddled clothes when
using this child restraint in baby or toddler mode﹐
because this may prevent your child from being
properly and securely fastened by the shoulder
harnesses and the harnesses between thighs.
!When using this child restraint in baby or toddler or
Junior mode﹐ the harness must be used correctly﹐
and make sure the lap belt is not above the child’s
pelvis portion.
!DO NOT leave this child restraint unsecured in your
vehicle because an unsecured child restraint can be
thrown around and may injure occupants in a sharp
turn﹐ sudden stop﹐ or collision. Remove it if not in
regular use.
!NEVER leave your child unattended with this child
restraint.
!Don’t use it on front seat with active airbag when
installed in rearfacing mode.
!NEVER use a second-hand child restraint or a child
restraint whose history you do not know because
they may have structural damage that endangers
your child’s safety.

3 4
WARNING
!Please keep this child restraint away from sunlight﹐
otherwise it may be too hot for the child’s skin.
!DO NOT use this child restraint as a regular chair as it
tends to fall down and could injure the child.
!DO NOT use this child restraint without the soft
goods.
!The soft goods should not be replaced with any
besides the ones recommended by the manufacturer﹐
because the soft goods constitute an integral part of
the child restraint performance.
!DO NOT put anything other than the recommended
soft goods in this child restraint.
!DO NOT put unsecured items in the vehicle because
they can be thrown around and may injure occupants
in a sharp turn﹐ sudden stop﹐ or collision.
!Do not place other items on top of the child restraint
if it is in the car boot to prevent damage.
!Do not allow the car restraint harness or buckles to
become trapped or caught in the vehicle seat or
door.
!DO NOT continue to use this child restraint after it
has suffered any crash. Replace immediately as there
may be invisible structural damage from the crash.
WARNING
!Remove this child restraint from the vehicle seat
when it is not in use for a long period of time.
!To avoid suffocation﹐ remove plastic bag and
packaging materials before using this product. The
plastic bag and packaging materials should then be
kept away from babies and children.
!Consult the retailer for issues concerning mainte-
nance﹐ repair and part replacement.
!Do not place any objects in the load leg area in front
of your base.
!Frequently check the ISOFIX guides for dirt and clean
them if necessary. Reliability can be effected by
ingress of dirt﹐ dust﹐ food particles etc.
!DO NOT use any load bearing contact points other
than those described in the instructions and marked
on the child restraint.
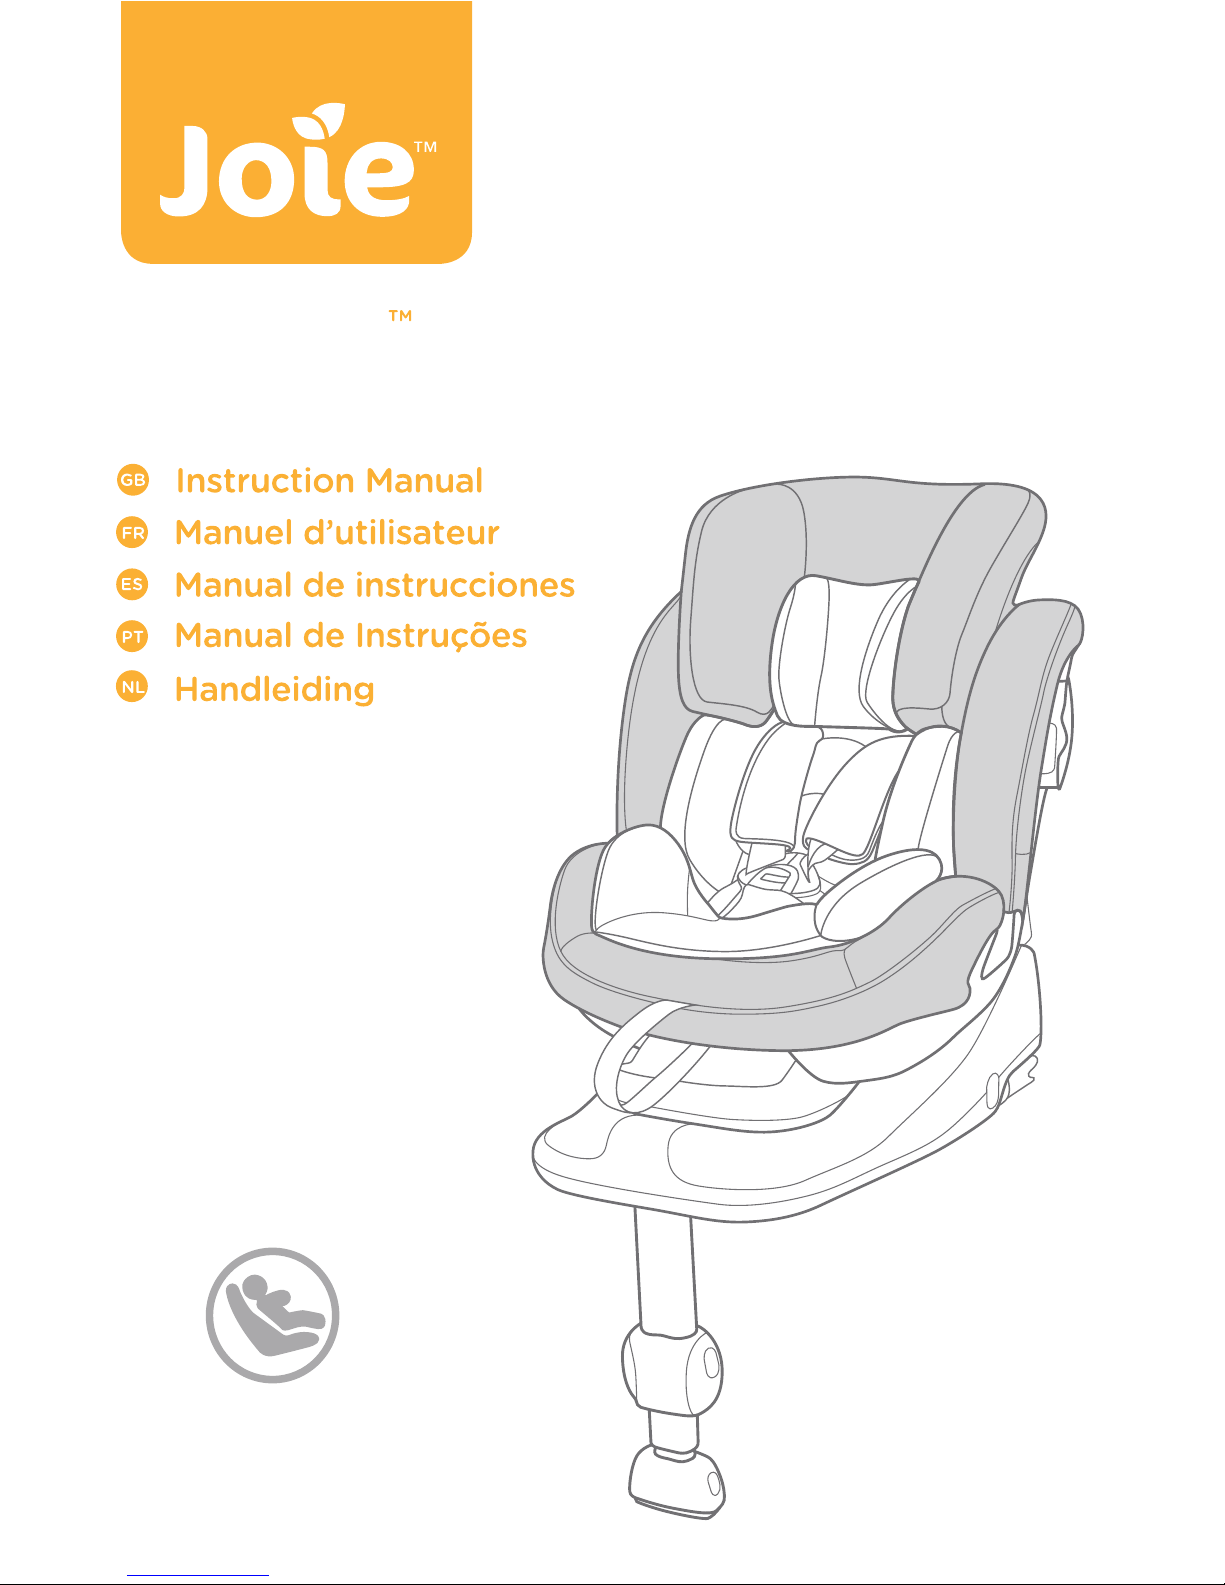
!Correct Installation is only permitted by use of the
ISOFIX connectors.
!Must use the rebound bar.

5 6
Emergency
In case of emergency or accidents, it is most important to have your
child taken care of with first aid and medical treatment immediately.
Product Information
1. This Joie child restraint with base is classified for “Semi-Universal”
use and is suitable for fixing into the seat positions of the following
cars. This child restraint can be installed using a 3 point retractable
adult seat belt approved to UN ECE R16 or similar standard (Using
a 3 point retractable adult seat belt and ISOFIX at the same
time while using the child restraint in Group 2 mode).
2. Seat positions in other cars may also be suitable to accept the child
restraint. If in doubt, consult either the child restraint manufacturer
or the retailer.
3. Please refer to our vehicle fitting list (on-product as well as online at
our website).
This is an ISOFIX CHILD RESTRAINT SYSTEM. It is approved to
UN ECE regulation 44, 04 series of amendments for general use in
vehicles fitted with ISOFIX anchorages systems.
It will fit vehicles with positions approved as ISOFIX positions (Please
refer to our vehicle fitting list either), depending on the category of the
child restraint and of the fixture. If in doubt, consult either the child
restraint manufacturer or vehicle manufacturer.
The ISOFIX size class for which this device is intended is A ,C, D.
Suitable for Child weighing under 25kg
Mass Group Group 0+/1 /2
Materials Plastics, metal, fabrics
Patent No. Patents pending
Concerns on Installation
1
24
3
57
6
1
24
3
57
6
12
3
A
I
R
B
A
G
3
1
see images 1- 3
Check provided car
fitting list for
approved seats for
child seat
attachment.
2

7 8
Installation
Mode InstallationReference
Age
Recline
Position
<4 years
1 year
to
4 years
Position
Position
1 -7
Approx
Approx
1 -7
Baby
mode
Toddler
mode
0-18kg
Child's
Weight
Position
1 -7
ECE
R44.04
15-25kg Junior
Mode
Approx
3-7 years
Reference
Images
1
1
2
9-18kg
Choose the Installation Mode
Detach the snaps on
the head support to
remove the head
portion of the insert.
We recommend using the full
infant insert while the baby
is 0-6 months or until they
outgrow the insert. The infant
insert increases side impact
protection.
Remove the head support
portion of the infant
insert when the child’s
head no longer fits
comfortably.
Remove the body
portion of the infant
insert when the infant’s
shoulders no longer fit
comfortably.
Remove the infant insert
cushion by detaching the
snaps to allow more space
when the infant does not
fit comfortably. The cushion
can be used separately
without being attached to
the insert to bolster the
infant's back for more
comfort.
1
2
Use Infant Insert

910
Installing the Base for use with
the stages™ isofix seat
Installation of ISOFIX Base System
see images 4- 13
4
1
Unfold the load leg from storage
compartment. 4
!Insert the rebound bar downwards
until you hear a “click” which
means that the assembly is
complete. 4-1
If required attach the plastic guides
onto the vehicle ISOFIX bars 5-1
Extend the ISOFIX connectors by
depressing on the release button 6-1
whilst pulling on the connector 6-2
! Press the ISOFIX adjuster button
6-1 and push to adjust 7untill
rebound bar tight against the
vehicle seat.
51
6
1
2
! Make sure that both ISOFIX
connectors are securely attached to
their ISOFIX anchor points. The
colors of the indicators on both
ISOFIX connectors should be
completely green. 7-1
! There are 9 adjustable positions
for ISOFIX. Press the ISOFIX
release button and push the base
back against the vehicle seat until
tight.
After placing the base on the vehicle
seat, extend the load leg to floor 8-1
, when the load leg indicator shows
green means it is installed correctly.
Red means it is installed incorrectly.
9
!When the load leg indicator shows
red this means the load leg is in the
wrong position.
!Make sure the load leg is in full
contact with the vehicle floor pan.
!Squeeze the load leg releasing
button, then shorten the load leg
upwards. 8
9
1
7
8
1

11 12
10
1
2
12
12
13
1
2
!The ISOFIX connectors must be
attached and locked onto the
ISOFIX anchor points. 10 -1
!The load leg must be installed
correctly with green indicator. 10 -2
Please refer to baby mode and
toddler mode and junior mode in
section to use the stages™ isofix.
Removing the base
To remove base from the vehicle
press the release button 11 -1 and
pull the base back from the seat.
11 -2
Then press 12 -1 and pull back on
the ISOFIX connector 12 -2
!For transporting base, press
ISOFIX release button 13 -1 and
move back ISOFIX connector so it
is folded completely 13 -2
.
11
1
2
Installing the stages™ isofix seat
in the Base
see images 14 - 38
Baby Mode (Rearward Facing Mode)
Rearward Facing Newborn - 4 years old
Recline position Position 1-7
!Please install the base on the vehicle seat (with rebound bar
attached), then install the shell, and then put the child in the stages™
isofix.
!Ensure rebound bar is fitted to base.
!The most convenient way to install the shell is when the base is in
the 7th position.
14
12
!Pull up on the stages™ isofix seat
to be sure it is securely latched into
the base.
!Please ensure that there is no gap
between the vehicle seat upper
surface and the bottom of the
base.
!Make sure to open the side impact
protection shield for more side
impact safety. 14 -1The side impact
shield opposite the vehicle door can
be closed to allow more seating
space. 14 -2

13 14
Securing your Child in the stages™ isofix
Rearward Facing
15
1
If the stages™ isofix is secure, the
stages™ isofix latched indicator
shows green. If the stages™ isofix is
not secure, the stages™ isofix shows
red. 15 -1
16
1. Infant insert is for children's
protection. Child 0-6 months must
use the full insert.
2. Infant insert includes head support
and body portion and wedge.
3. Please install the base on
the vehicle seat, then install
the shell, and then put the child in
the stages™ isofix.
4. After the child is placed into the
seat, check whether the shoulder
harnesses are at correct from
proper height.
5. Please make sure the infant insert
has the wedge assembled before
using it for infant. 16
6. Detach the snaps on the head
support, and then remove the infant
insert. Please refer to (Use Infant
Insert). To assemble head support
in reverse steps. 17
7. After removing the wedge from
the infant insert, please store it in
a place where the child can not
access it.
18
1
19
1. Press the webbing adjustment
button, while pulling out the
shoulder harnesses to the proper
length. 18
18 -1 Adjustment webbing
2. Press the red button to disengage
the buckle. 19
3. Fix the buckles on the both sides
of seat to make placing the baby
more convenient. 20
20
17

15 16
4. Place the child into the stages™
isofix and pass both arms through
the harnesses. 21
! When used rear facing, the
shoulder harness height must be
even with the child’s shoulders. 22
! After the child is seated, re-check
whether the shoulder harnesses
are at the proper height.
5. Engage the buckle. 23
22
23
24
6. Pull down the adjustment webbing
and adjust it to the proper length
to make sure your child is snugly
secured. 24
! Make sure the space between the
child and the shoulder harness is
about the thickness of one hand
lay flat on children's chest.
!To release the stages™ isofix
seat, taking the child out of the
stages™ isofix seat, lift the
stages™ isofix seat up 25 -2 while
squeezing the child restraint
release button. 25 -1
25
2
1
21

17 18
Toddler Mode (Forward Facing Mode)
Forward Facing 1-4 years old
Recline position Position 1-7
! Please install the base on the vehicle seat (with rebound bar
attached), then install the shell, and then put the child in the stages™
isofix.
! Ensure rebound bar is fitted to base.
! The most convenient way to install the shell is when the base is in
the 7th position.
26
27 1
If the stages™ isofix is secure, the
child restraint latched indicator shows
green. If the stages™ isofix is not
secure, the latched indicator shows
red. 27 -1
!Pull up on the stages™ isofix seat
to make sure it is securely latched
into the base.
!Please ensure that there is no gap
between the vehicle seat and the
bottom of the base.
Securing your Child in the stages™ isofix
Forward Facing
1. When installing the stages™ isofix in the forwards facing mode,
do not use the infant insert.
2. Please install the Base on the vehicle seat, then install the seat,
and then put the child in the stages™ isofix.
3. After the child is placed into the stages™ isofix seat, check
whether the shoulder harnesses are at proper height.
Note
1. Press the webbing adjustment
button, while pulling out the
shoulder harnesses to the proper
length.
2. Press the red button to disengage
the buckle.
3. Fix the buckles on the both sides
of seat to make placing the baby
more convenient. 28
4. Place the child into the stages™
isofix and engage the buckle. 29 29
28

19 20
30
! When used forward facing, the
shoulder harness height must be
even with the child’s shoulders. 30
!After the child is seated, re-check
whether the shoulder harnesses
are at the proper height.
5. Engage the buckle.
6. Pull down the adjustment webbing
and adjust it to the proper length
to make sure your child is snugly
secured. 29
! Make sure the space between the
child and the shoulder harness
is about the thickness of one hand
lay flat on children's chest.
! To release the stages™ isofix
seat, taking the child out of the
stages™ isofix seat, lift the
stages™ isofix seat up while
squeezing the child restraint
release button.
Junior Mode (Forward Facing Mode)
Forward Facing 3-7 years old
Recline position Position 1-7
! Just use the vehicle seat belt when installing the child restraint in the
junior mode, do not use the Infant Insert, shoulder straps, please
store the shoulder straps, buckle in respective storage
compartments. 32 33 34 35 36
31
! Please install the base on the
vehicle seat (with rebound bar
attached), then install the shell, and
then put the child in the stages™
isofix.
! Ensure rebound bar is fitted to base
! The most convenient way to install
the shell is when the base is in the
7th position. 31
32 33

21 22
36
! Please adjust the shoulder
harnesses to proper length before
store the shoulder straps and
buckle in their storage
compartments.
! Position shoulder belt through
shoulder belt guide, pass waist
belt through seat slots. Fasten
buckle and pull the vehicle belt to
tighten.
37
Securing your Child in the stages™ isofix
Forward Facing
34 35 37
1
3
2
4
! When used in junior mode, the
shoulder belt guides must be
even with or just above the child’s
shoulders.
38
! The child restraint can not be
used if the vehicle safety belt
buckle (female buckle end) is too
long to anchor the child restraint
securely.
37 -1
! Shoulder belt must pass through
shoulder belt guide. 37 -2
38
! The vehicle waist belt must cross through the middle of the crotch
strap cover and then attach the loop and hook fasteners over it.
37 -3
! Make sure that both ISOFIX connectors are securely attached to
their ISOFIX anchor points. The colors of the indicators on both
ISOFIX connectors should be completely green. 37 -4
!Do not use shoulder belt loose or positioned under arm.
! Do not use shoulder belt behind child’s back.

23 24
1
40
1
41
39
1
2
Recline Adjustment
see images 39 - 41
!
Please re-check the load leg position
after reclining.
There are 7 recline angles with baby mode and 7 positions for toddler
mode and 7 positions for junior mode. 40 41
1
42
Height Adjustment
see images 42
1. Please adjust the head support
and check if the shoulder
harnesses are at the correct height
according to 22 30 .
2. Squeeze the head support
adjustment lever 42 -1, meanwhile
pull up or push down the head
support until it snaps into one of
the 6 positions. The head support
positions are shown as 42 .
!
When the head support is adjusted to
the 4th position or higher, side wings
will extend for more shoulder space.
see images 43 - 50
Press the red button to disengage the
buckle. 43
!
Crotch strap cover attached to the
crotch hole inside with fasteners loop
and hook.
To re-attach the soft goods please
repeat the above steps in the reverse
order.
Detach Soft Goods
goods
43

25 26
44 45
50
46
!After removing the foam of infant insert, please store it
somewhere that the child can not access it.
!Please wash the soft goods with cold water under 30°C.
!Do not iron the soft goods.
!Do not bleach or dry clean the soft goods.
!Do not use undiluted neutral detergent, gasoline or other
organic solvent to wash the child restraint. It may cause
damage to the child restraint.
!Do not twist the soft goods to dry with great force. It may
leave the soft goods with wrinkles.
!Please hang dry the soft goods in the shade.
!Please remove the child restraint from the vehicle seat if not
in use for a long period of time. Put the child restraint in the
shade and somewhere your child can not access it.
Care and Maintenance
49
48
47

27
FR
Joie™ vous souhaite la bienvenue
Nous vous félicitons d’avoir rejoint la famille Joie ! Nous sommes très
heureux de pouvoir faire partie de votre voyage avec votre petit. En
voyageant avec le Joie stages™ isofix, vous utilisez un dispositif de
retenue pour enfants de haute qualité , à sécurité entièrement certifiée.
Veuillez lire ce manuel et suivre chaque étape pour assurer le confort et
la meilleure protection possible pour votre enfant.
Pour utiliser ce siège Joie stages™ isofix avec une ceinture pour adulte à
trois points et les connexions ISOFIX conformément à la réglementation
ECE R44.04, l’enfant doit peser entre 0 et 25 kg (environ 0 à 7 ans).
Ce siège stages™ isofix peut être installé en utilisant une ceinture de
sécurité pour adulte rétractable à 3 points conforme à la norme ECE R16
ou systèmes à norme similaire.
Base
Ces instructions présentent l’utilisation du siège stages™ isofix et de
l’Base. Base peut également être utilisée avec d’autres dispositifs de
retenue pour enfants Joie. Veuillez lire toutes les instructions de ce
manuel avant d’installer et d’utiliser le produit.
! IMPORTANT : À CONSERVER POUR TOUTE CONSULTATION ULTÉRI-
EURE. À LIRE ATTENTIVEMENT.
Veuillez conserver ce manuel d’utilisation dans le compartiment de
rangement en bas de l’Base, comme illustré dans la figure de droite.
1
2
3
4
5
10
6
8
9
12
11
13
14
18
16
15
17
19
Liste des pièces
1 Appui-tête
2 Assise de siège
3 Boucle
4 Sangle de réglage
5 Indicateur de verrouillage du
dispositif de retenue
6 Indicateur de piètement de
charge
7 Piètement de charge
8 Bouton de réglage du
piètement de charge
9 Bouton de déverrouillage du
dispositif de retenue
10 Bouton de réglage de
l'inclinaison
11 Bouton d'éjection ISOFIX
12 Sangle d’entrejambes
13 Sangle pour épaules
14 Support pour bébé
15 Barre de rebond
16 Connecteur ISOFIX
17 Guides ISOFIX
18 Levier d'ajustement de
l'appui-tête
19 Protecteur d'impact latéral
Veuillez vous assurer qu'aucune pièce ne manque. Veuillez
contacter le revendeur si des pièces manquent.
7

29 30
AVERTISSEMENT
!AUCUN dispositif de retenue pour enfants ne peut
garantir une protection complète contre les blessures
en cas d’accident. Cependant﹐ une bonne utilisation
de ce dispositif de retenue pour enfants réduit les
risques de blessures graves ou de mort pour votre
enfant.
!Ne laissez PAS les sangles du dispositif de retenue
pour enfants se tordre﹐ elles doivent rester plates.
!N'installez et n'utilisez PAS ce siège de bébé sans
avoir suivi les instructions et avertissements de ce
manuel﹐ ou vous pourriez mettre votre enfant en
danger de blessures ou de mort.
!N’utilisez JAMAIS de cordes ou autres substituts au
lieu des ceintures au risque de provoquer des bles-
sures lors de la retenue.
!Ne faites AUCUNE modification sur ce dispositif de
retenue pour enfants et ne l’utilisez pas avec des
pièces d’autres fabricants.
!N’utilisez PAS ce dispositif de retenue pour enfants s’il
est endommagé ou si des pièces manquent.
!N’utilisez PAS le mode face à la route si le poids de
l’enfant ne dépasse pas 9 kg. Laissez votre enfant
orienté vers l’arrière aussi longtemps que possible﹐
car l’orientation vers l’arrière est l’orientation la plus
sûre.
AVERTISSEMENT
!Ne mettez PAS de vêtements trop serrés à votre
enfant lors de l’utilisation de ce dispositif de retenue
pour enfants en mode bébé ou bambin﹐ car cela
pourrait empêcher votre enfant d’être correctement
attaché par le harnais pour épaules et le harnais au
niveau des cuisses.
!Lorsque vous utilisez ce dispositif de retenue pour
enfants en mode bébé ou bambin﹐ le harnais doit
être utilisé correctement﹐ et vous devez vérifier que
la ceinture abdominale n’est pas au-dessus de la
région du pelvis de l’enfant.
!Ne laissez PAS ce dispositif de retenue pour enfants
détaché dans votre véhicule﹐ car il peut basculer et
blesser les passagers lors de virages serrés﹐ d’arrêts
soudains ou de collisions. Enlevez-le si vous ne
l’utilisez pas.
!Ne laissez JAMAIS votre enfant sans surveillance
avec ce dispositif de retenue pour enfants.
!Ne l’utilisez pas sur le siège avant avec un airbag
actif lorsqu’il est installé en mode dos à la route.
!N’utilisez JAMAIS un dispositif de retenue pour
enfants d’occasion ou dont vous ne connaissez pas
l’historique﹐ car il peut présenter des dommages
structurels mettant la sécurité de votre enfant en
péril.

31 32
AVERTISSEMENT
!Ne laissez pas ce dispositif de retenue pour enfants
exposé au soleil﹐ car il pourrait devenir trop chaud
pour la peau de l’enfant.
!N’utilisez PAS ce dispositif de retenue pour enfants
comme chaise ordinaire﹐ car il pourrait tomber et
blesser l’enfant.
!N’utilisez PAS ce dispositif de retenue pour enfants
sans les parties souples.
!Les parties souples ne doivent pas être remplacées
par d’autres non recommandées par le fabricant﹐ car
elles font intégralement partie de ses performances
du dispositif de retenue pour enfants.
!Ne placez RIEN d’autre que les parties souples
recommandées dans ce dispositif de retenue pour
enfants.
!Ne placez PAS d’objets non attachés dans le véhi-
cule car ils pourraient basculer et blesser les passag-
ers lors de virages serrés﹐ d’arrêts soudains ou de
collisions.
!Ne placez PAS d’autres objets au dessus du disposi-
tif de retenue pour enfants lorsqu’il est dans le coffre
du véhicule pour éviter des dommages.
!Ne laissez pas le harnais ou les boucles du dispositif
de retenue pour enfants se coincer ou se bloquer
dans un siège ou une porte du véhicule.
AVERTISSEMENT
!Cessez d’utiliser ce dispositif de retenue pour en-
fants après un accident. Remplacez-le immédiate-
ment car des dommages structurels invisibles
pourraient avoir été causés par l’accident.
!Retirez ce dispositif de retenue pour enfants du siège
du véhicule si vous ne prévoyez pas de l’utiliser
pendant une longue période.
!Pour éviter tout risque de suffocation﹐ enlevez le sac
en plastique et les éléments d’emballage avant
d’utiliser ce produit. Le sac en plastique et les
éléments d’emballage doivent être conservés à l’abri
des bébés et des enfants.
!Consultez le revendeur pour tout problème concer-
nant l’entretien﹐ les réparations et le remplacement
des pièces.
!Ne placez aucun objet dans la zone de piètement de
charge en face de la base.
!Vérifiez régulièrement la présence de poussière sur
les guides ISOFIX et nettoyez-les si nécessaire. La
fiabilité peut être affectée par l’infiltration de pous-
sière﹐ saletés﹐ particules de nourriture﹐ etc.
!N’utilisez PAS de points de contact porteurs autres
que ceux décrits dans les instructions et indiqués sur
le dispositif de retenue pour enfants.
!Une bonne installation n’est permise qu’avec des
connecteurs ISOFIX.
!Doit utiliser la barre de rebond.

33 34
Urgence
En cas d'urgence ou d'accident, il est très important que votre enfant
soit immédiatement pris en charge par les premiers secours et des
soins médicaux.
Informations sur le produit
1.
Ce dispositif de retenue pour enfants Joie avec base est classifié
pour un usage ""Semi-Universel"" et adapté à une installation aux
places assises des véhicules suivants. Ce dispositif de retenue pour
enfants peut être installé à l'aide d'une ceinture de sécurité pour
adultes rétractable 3 points homologuée selon la norme UN ECE R16
ou une norme similaire (Utiliser une ceinture de sécurité pour adultes
rétractable 3 points et ISOFIX en même temps en cas d'utilisation du
dispositif de retenue pour enfants en mode Groupe 2).
2. Les positions des sièges dans d'autres voitures peuvent également
être adaptées au dispositif de retenue pour enfants. En cas de
doute, consultez le fabricant du dispositif de retenue pour enfants ou
le revendeur.
3. En cas de doute, veuillez consulter le fabricant ou le revendeur du
dispositif de retenue pour enfants.
Il s'agit d'un SYSTÈME DE RETENUE POUR ENFANTS ISOFIX. Il est
approuvé par la série d'amendements 44, 04 de la réglementation
UN ECE pour une utilisation générale dans des véhicules équipés de
systèmes d'ancrage ISOFIX.
Il convient aux véhicules avec des positions approuvées en tant
que positions ISOFIX (reportez-vous plutôt à notre liste de véhicules
compatibles), selon la catégorie du dispositif de retenue pour enfants
et de la fixation. En cas de doute, veuillez consulter le fabricant du
siège enfant ou le constructeur du véhicule.
La classe de taille ISOFIX pour laquelle ce dispositif est prévu est A, C, D.
Convient aux Enfants pesant moins de 25 kg
Groupe de masse Groupe 0+/1/2
Matériaux Plastique, métaux, tissus
N° brevet Brevets en attente
Remarques au sujet de l'installation
1
24
3
57
6
1
24
3
57
6
12
3
A
I
R
B
A
G
3
1
voir images 1- 3
Vérifiez la liste de
véhicules compatibles
fournie pour les sièges
homologués pour la
fixation du siège enfant.
2

35 36
Position
Position
1 -7
1 -7
ECE
R129/00
Position
1 -7
ECE
R44.04 15-25kg
1
1
2
Taille de
l'enfant
Mode
d'installation
Installation Âge
référence
Position
inclinée
Images de
référence
Mode
bébé
Mode
bambin
Mode
Junior
Environ
< 4 ans
Environ 1
à
4 ans
Environ
3 - 7 ans
0-18kg
9-18kg
ECE
R44.04
Choix du mode d'installation
Nous conseillons d'utiliser le
support pour enfant intégral
lorsque le bébé fait moins de
0-6 mois ou jusqu'à ce qu'il
dépasse du support. Le
support pour nourrisson
augmente la protection contre
les impacts latéraux.
Détachez les attaches
du support pour tête
afin d'enlever la
portion haute du
support pour
nourrisson.
Retirez la portion de tête du
support pour nourrisson
lorsque la tête de l'enfant ne
se place plus de façon
confortable.
Retirez la portion du corps
du support pour nourrisson
lorsque les épaules de
l'enfant ne se placent plus de
façon confortable.
Enlevez le coussin de
support pour nourrissons
en débloquant les fermoirs
pour faire plus de place
quand l'enfant grandit. Le
coussin peut être utilisé
séparément sans être fixé
au support afin de soutenir
le dos de l'enfant pour plus
de confort.
1
2
Utilisation du support pour bébé
Table of contents
Languages:
Other Joie Car Seat manuals

Joie
Joie transcend User manual

Joie
Joie signature i-Spin XL User manual

Joie
Joie spin 360 signature User manual

Joie
Joie bold R User manual

Joie
Joie Signature i-Spin Grow User manual

Joie
Joie steadi User manual

Joie
Joie Every Stage FX User manual

Joie
Joie signature i-Prodigi User manual

Joie
Joie duallo User manual

Joie
Joie Curve C 0925 User manual